
Orova Timekeeping is your company's attendance tool. Employees click Start and End on the web, and Orova works out credited days, late arrivals and overtime, then builds the monthly timesheet.
This guide is written for someone who has never used attendance software. Every section starts by explaining the new words, then walks through what to click, what to fill in and what you should see.
Orova only provides the tool. Attendance data belongs to your company and is managed by your company. To view, edit or delete your own data, contact your company.
01 · Getting started
What Timekeeping is and who sets up what
Learn the five words below first and the rest of the guide reads quickly.
Clocking in
Recording the time you start and finish work each day. In Orova you do this with the Start and End buttons on the Today page.
Session
One Start followed by one End. A day can have several sessions, for example one in the morning and one in the afternoon. Session times add up.
Credit
The unit for one working day. A full shift earns 1 credit. Arriving late, leaving early or taking half a day off lowers the day's credit accordingly.
Shift
The standard working hours and working days of the week, for example 08:30–17:30, Monday to Friday. Anyone without an assigned shift follows the default shift.
Orova Timekeeping desktop app
An app installed on your work computer. It only measures after you click Start, and it only counts numbers: active time, idle time, key presses and mouse clicks.
Timekeeping has two roles. The manager sets things up first in Settings: shifts, employees, attendance rules, days off and leave types. Employees then only need to clock in every day.
Open Timekeeping
- 1
Click the
Orova Timekeepingcard. Go to your workspace page. Find theOrova Timekeepingcard and click it. Orova opens theTodaypage directly.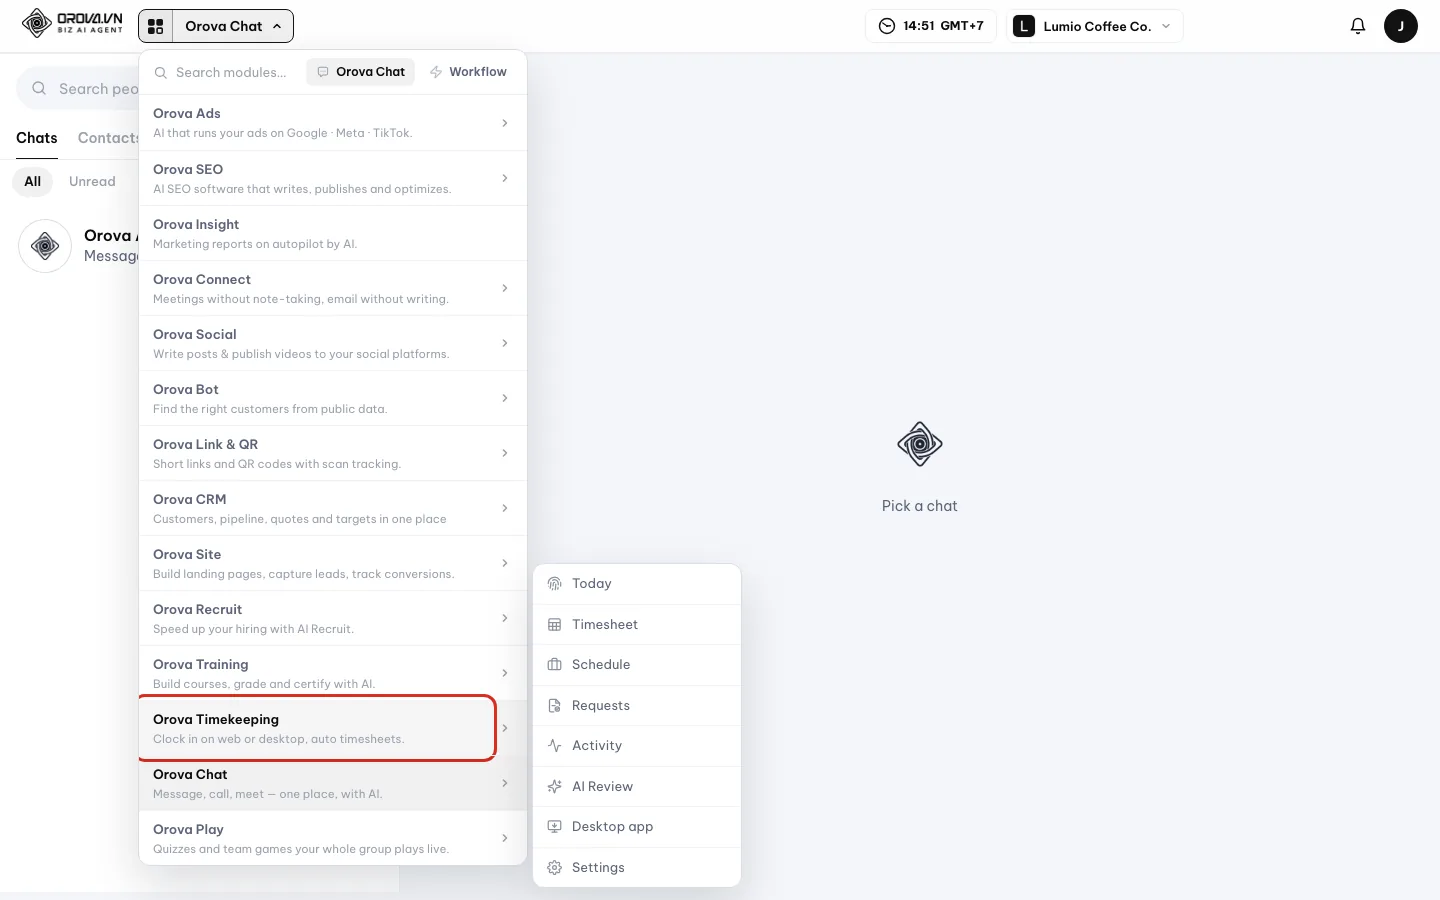
The Orova Timekeeping card on the workspace page. - 2
Get to know the menu bar. The menu bar at the top has 8 items:
Today,Timesheet,Schedule,Requests,Activity,AI Review,Desktop app,Settings. You only see the items you have permission for.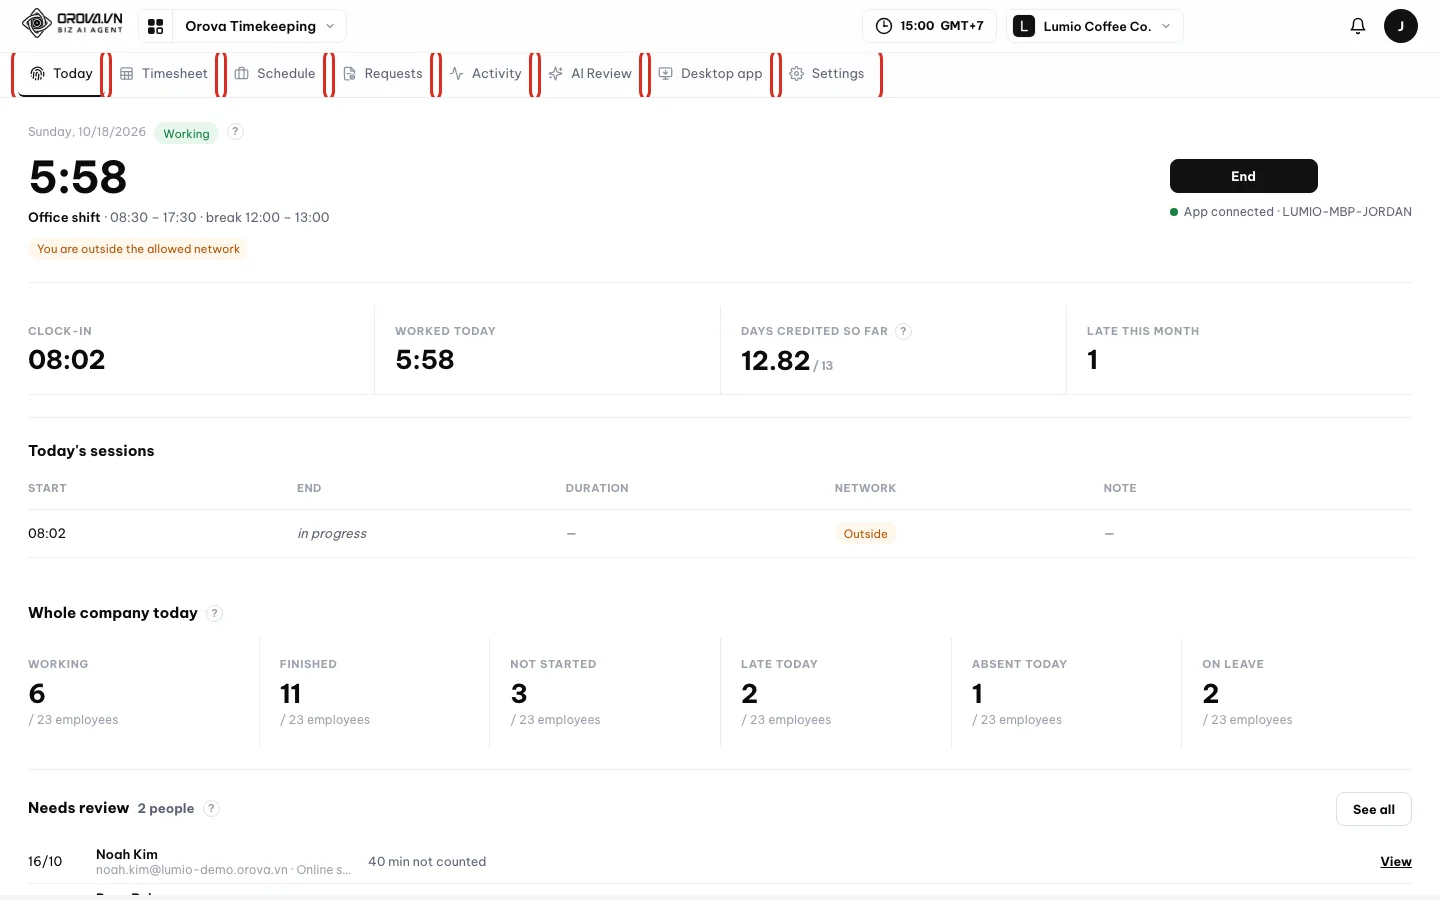
The eight items on the Timekeeping menu bar.
First-time setup (for managers)
- 1
Open
Settings. ClickSettingson the menu bar. The left menu has 8 items:Employees,Shifts,Attendance rules,Requests,Positions,Departments,Benchmarks & weights,Automation.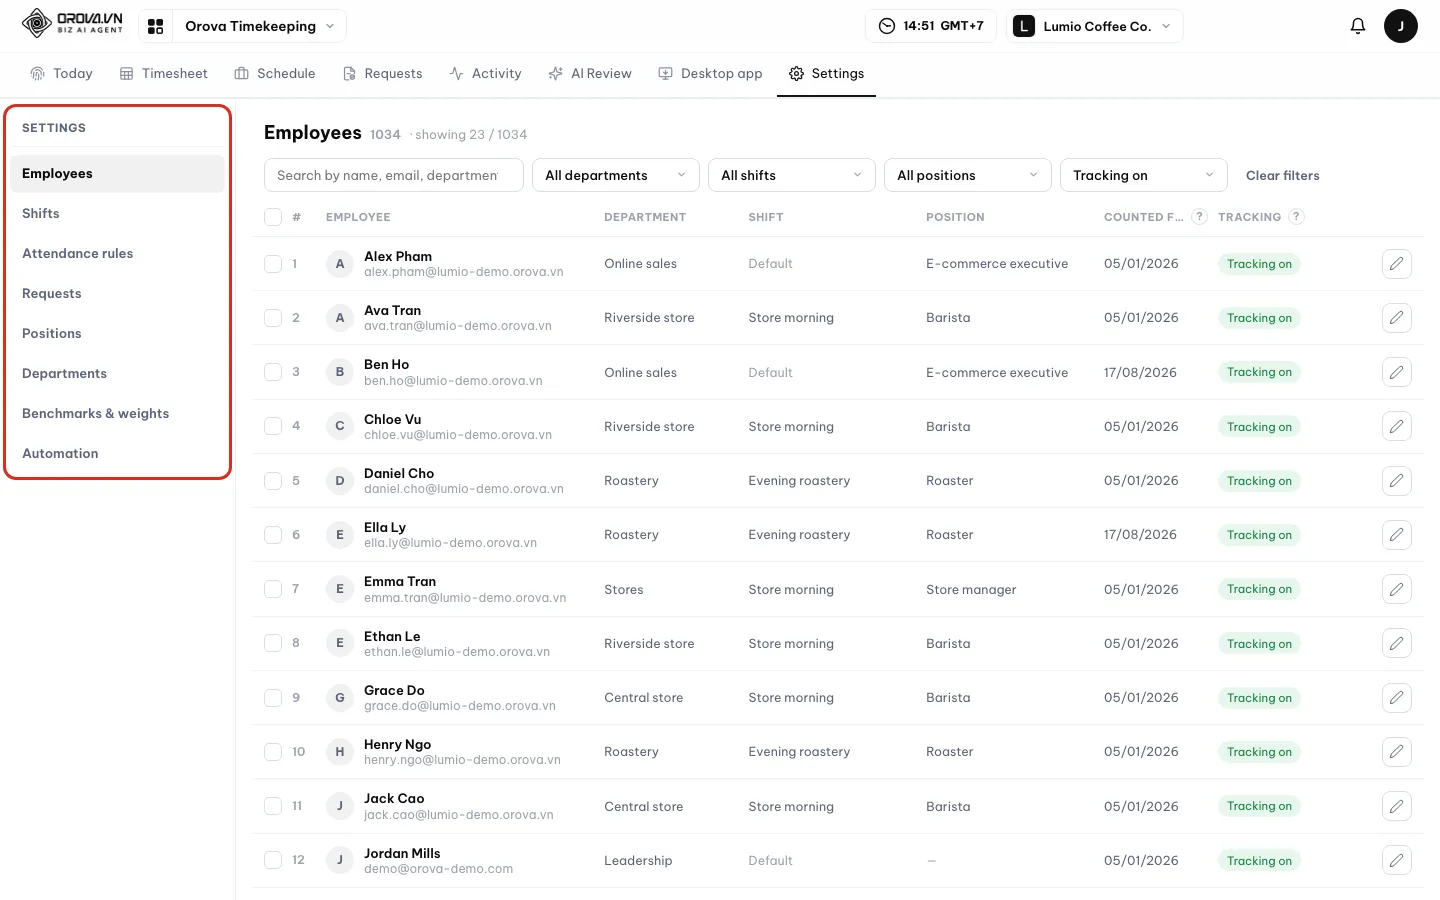
The Settings left menu. First-time setup goes through it in order. - 2
Create a shift. Go to
Shiftsand clickAdd shift. Set the working hours and working days, and make one shift theDefault shift. Details are in the Create a shift section. - 3
Turn on timekeeping for employees. Go to
Employees, assign a shift and a position, and turn onTrackingfor each person. Employees are the members of your workspace. Details are in the Turn on timekeeping for employees section. - 4
Set the attendance rules. Go to
Attendance rulesto choose the allowed network, how overtime is counted, make-up time and auto-closing days with no clock-out. Details are in the Attendance rules section. - 5
Enter days off and public holidays. Open
Scheduleon the menu bar and clickAdd day off. See section 06 of this guide. - 6
Turn on leave types, then ask employees to install the app. Go to
Requestsin Settings to turn on leave types and the approval flow. Then ask employees to openDesktop appto install the app and pair their computer (section 03).
| Permission | What it means | Opens |
|---|---|---|
| Use timekeeping | Clock in and see your own timesheet | Today, Timesheet, Schedule, Requests, Activity, Desktop app |
| See everyone's timesheet | See the numbers of every employee | Without it, department managers only see their own department |
| Manage timekeeping | Set up shifts, attendance rules, days off, review standards and edit timesheets | Settings, Edit day, Add day off, the All company computers block |
| AI Review | Run AI Review on attendance data based on department and position descriptions | The AI Review page |
Note
Who has which permission
| Action | Uses quota? | Notes |
|---|---|---|
AI Review (Run, Run again) | Yes | The estimated quota shows before you click Run |
The Monthly AI Review rule in Automation | Yes, every month | Charged by the number of people reviewed |
AI write for a position or department description | Yes | No number is shown before it runs |
AI write all | Yes | Shows the number of items and AI runs before it starts |
| Emailing an AI Review report, Automation emails | No AI quota | These are real emails sent to the recipients |
| Clocking in, timesheet, Excel export, requests, desktop app, activity | No | Use as much as you need |
Tip
Every plan has every feature
Note
Your data belongs to your company
02 · Clocking in
Clock in every day
An employee's daily job comes down to two buttons: Start when you begin, End when you are done.
Start again
After you click End, the button changes to Start again. Use it when you step out and come back to keep working. Session times add up.
Auto-closed
If you forget to click End and your company has auto-close turned on, the system closes the session at the shift's end time. That session is labeled Auto-closed.
Allowed network
The office network address your company has registered. Clocking in from another network can be flagged or blocked outright, depending on the rule your company picks.
The Today page is where you clock in for yourself. It shows today's shift, how long you have worked and when each session started and ended.
Clock in for a day
- 1
Open
Todayand read your status. ClickTodayon the menu bar. You see the date, the statusWorking,FinishedorNot started, a timer of the time worked and today's shift, for example “Office shift”. On a day with no shift it shows “No shift today”.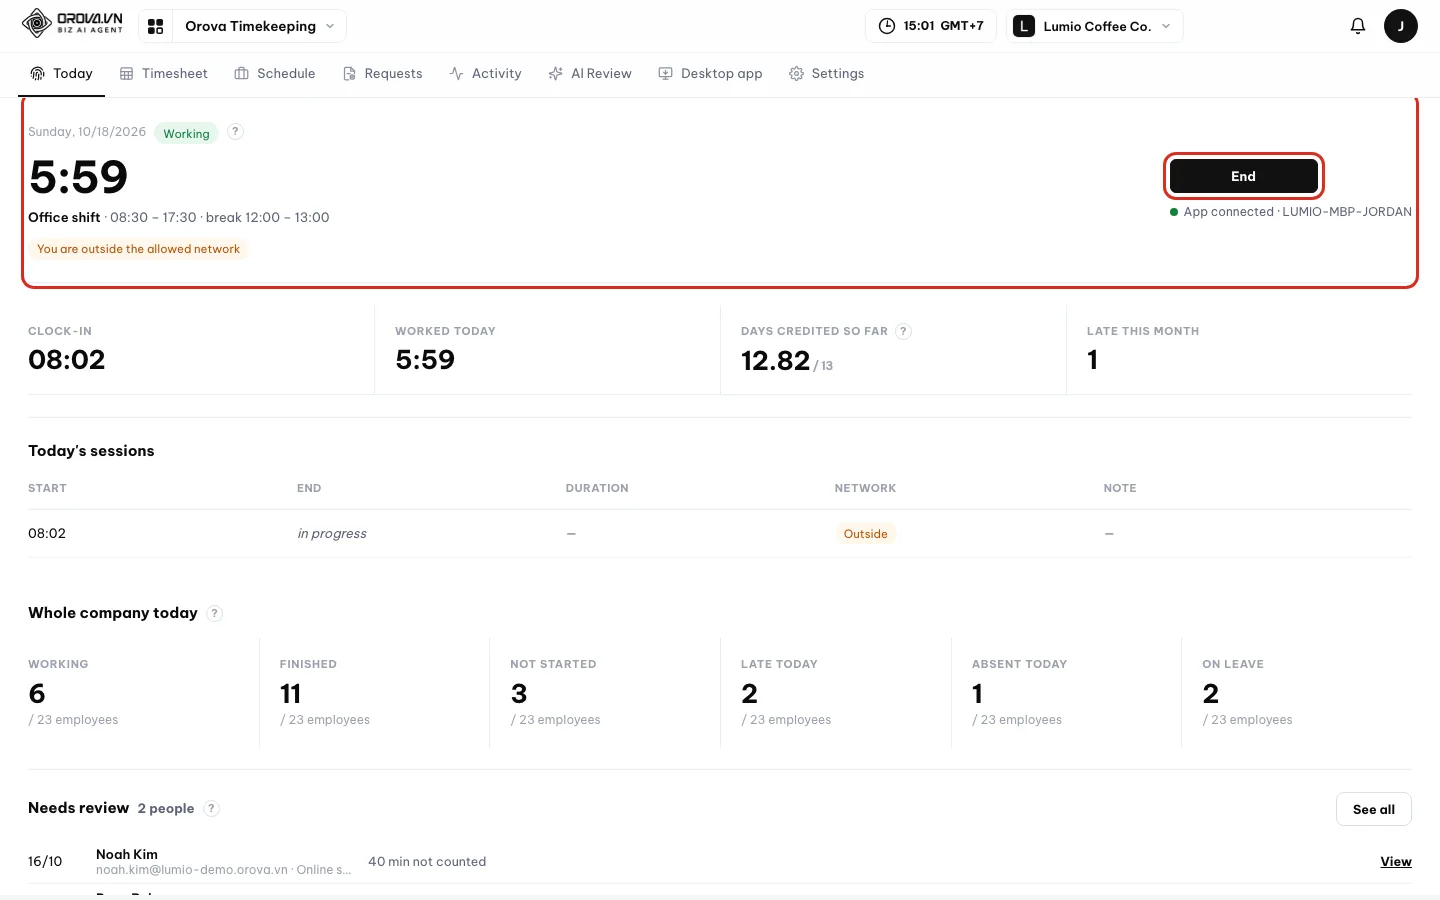
The clock-in block: status, timer, today's shift and the main button. - 2
Click
Start. ClickStartwhen you begin work. The timer starts and the button changes toEnd. If you see “Open Orova Timekeeping on your computer, then start.” and the button is locked, your company requires the desktop app to be open first. Open the app, wait for the app strip to say “App connected”, then click again. - 3
Read your four numbers. Below the clock-in block are 4 tiles:
Clock-in,Worked today,Days credited so far,Late this month.Days credited so faris the credit you have earned against the standard days up to today.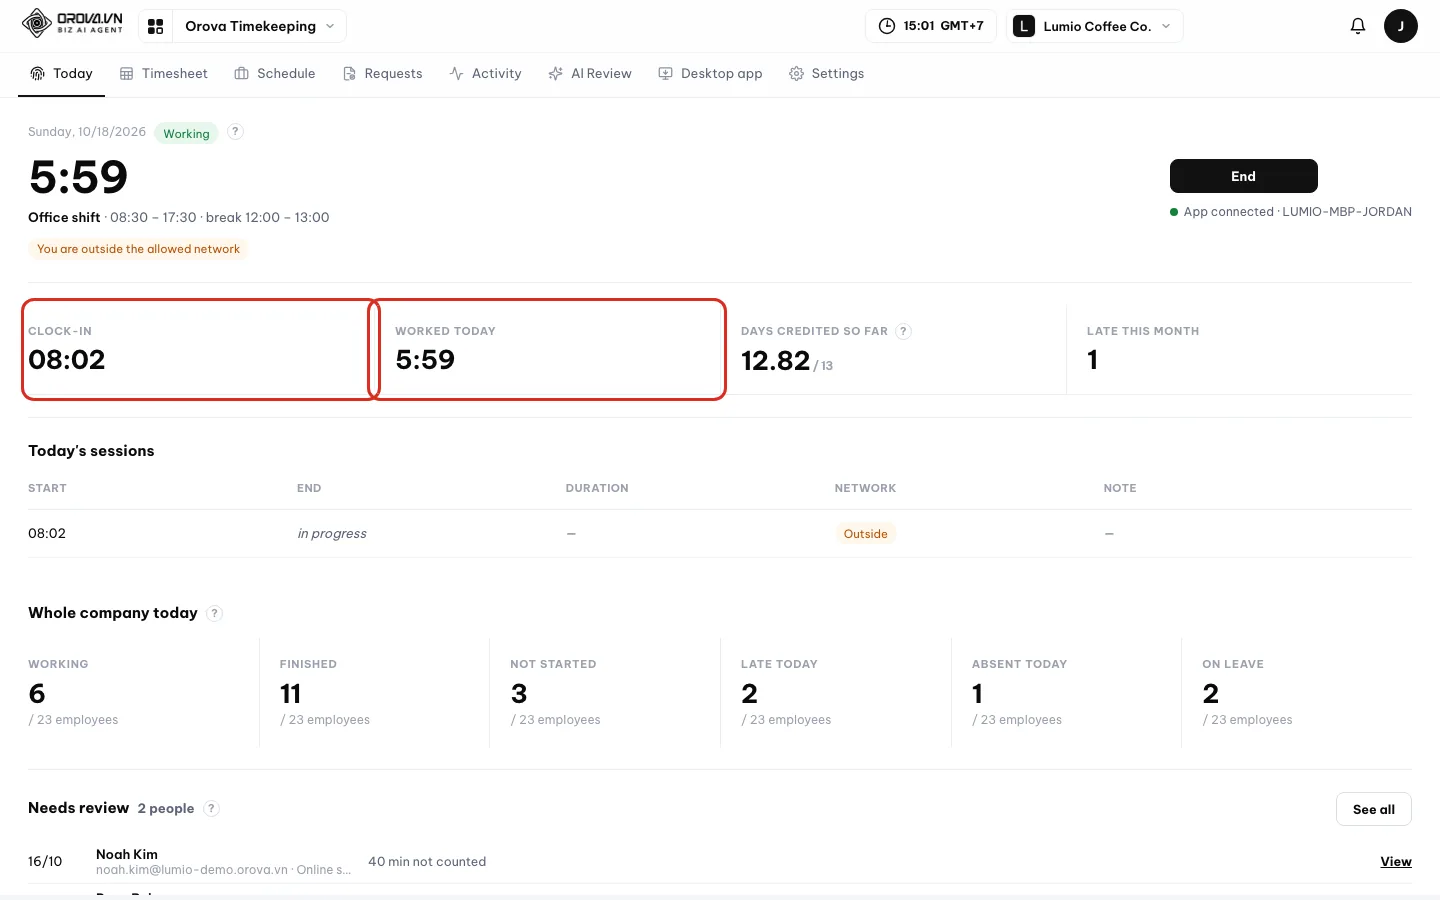
The four tiles only count for you. - 4
Check
Today's sessions. The table lists each session with the columnsStart,End,Duration,Network,Note. An open session shows “in progress”. TheNetworkcolumn showsAllowedorOutside.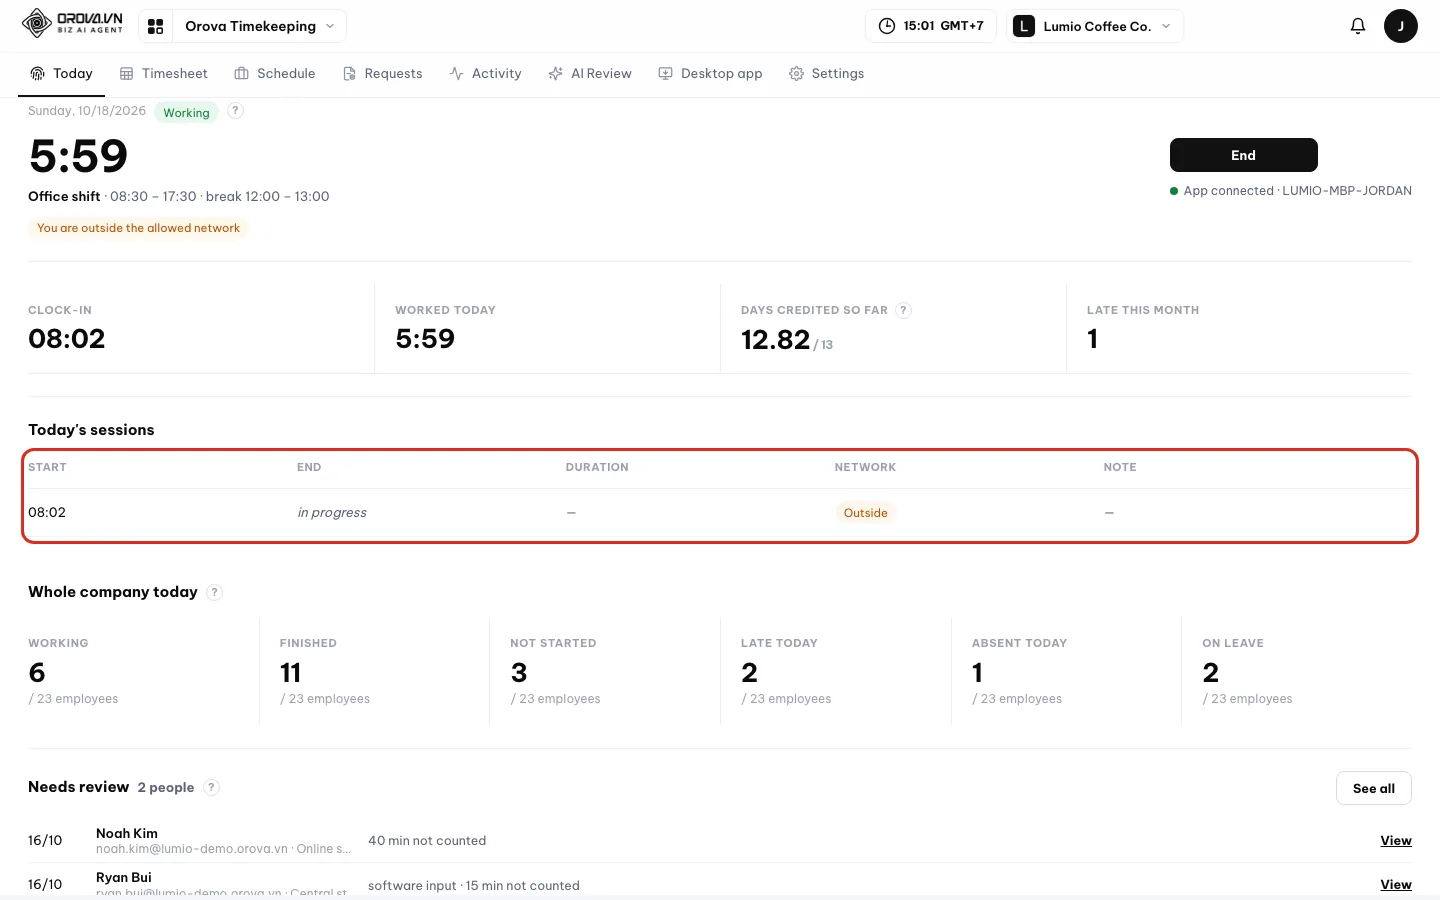
Each Start and End pair is one row in the table. - 5
Click
Endwhen you are done. ClickEnd. The “End workday” box asks “End your work session now?”. Confirm in the box, your clock-out time is recorded right away and the status changes toFinished.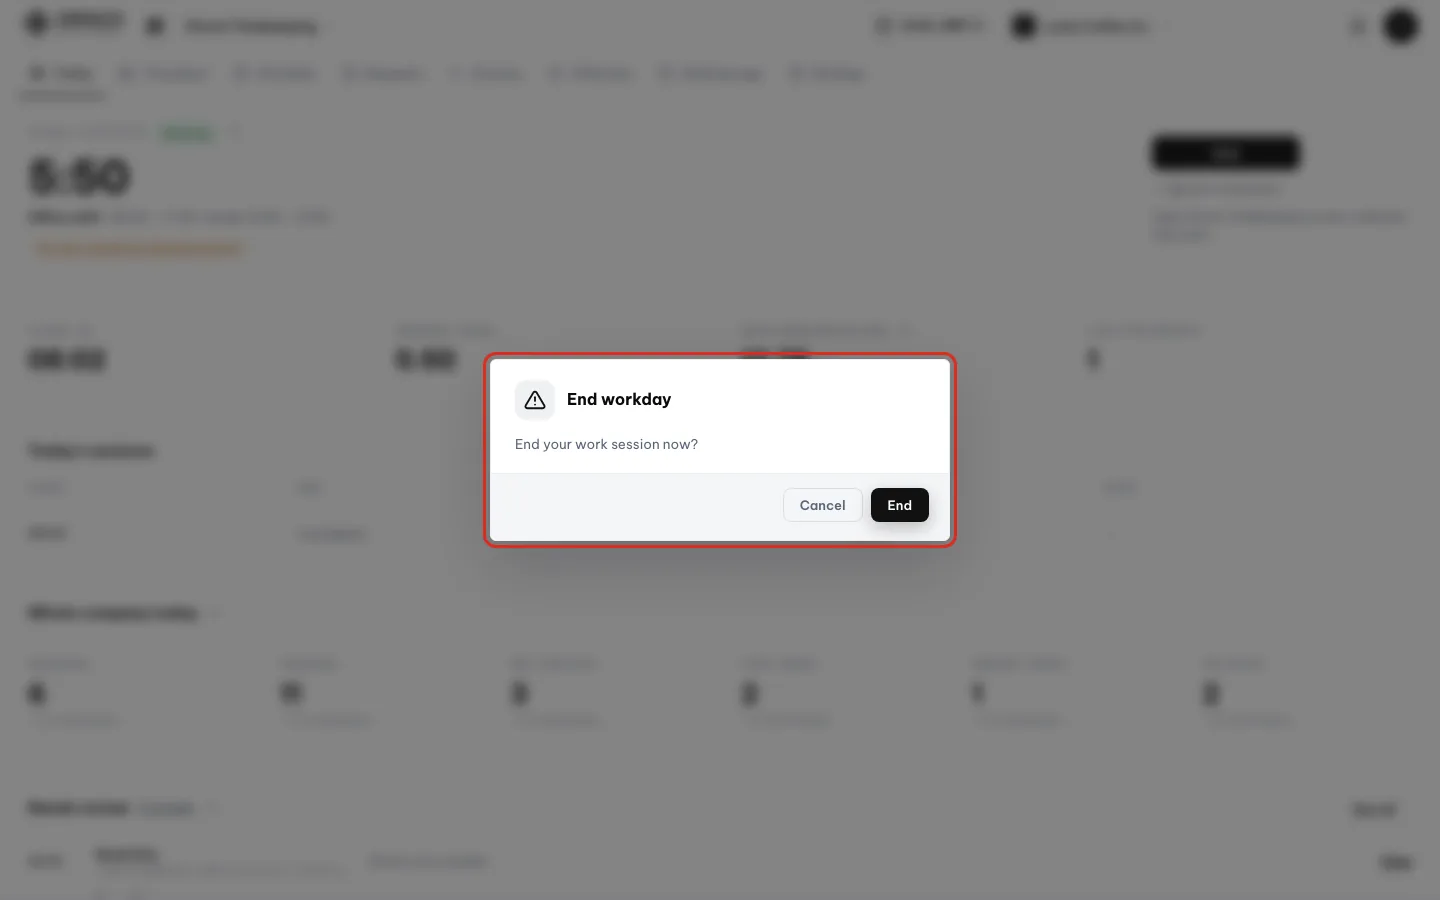
Orova asks once more before recording your clock-out time. - 6
Keep working with
Start again. To come back to work after ending, clickStart again. TheToday's sessionstable gets a new row and the time is added to the day.
| Button / field | What it means | Notes |
|---|---|---|
Start / Start again | Opens a new work session | Locked if your company requires the desktop app and the app is not connected |
End | Closes the open session and records your clock-out time | Asks once more before recording |
| Status | Working, Finished or Not started | Only your own status |
| Timer | Hours and minutes worked today | Ticks every second while you work |
| Today's shift | “{name} shift” with the shift hours | “No shift today” on a shift day off |
| Late and outside-network labels | “{n} late” or “You are outside the allowed network” | Your flags for the day |
| App strip | “App connected · {computer}”, “App not connected” or “No computer paired · Install app” | Click to go to the Desktop app page |
Clock-in · Worked today · Days credited so far · Late this month | Your four tiles | Not counted for anyone else |
Today's sessions | Table of the day's sessions | No sessions yet: “You have no sessions today.” |
Warning
Forgot to click End
End records your clock-out time right away. If you forget and your company has auto-close turned on, the system closes the session at the shift's end time and labels it Auto-closed. If your real time was different, send a Time correction request in section 07.Note
No Start button
Settings ▸ Employees.Company dashboard (managers, department heads)
Needs review
A list of people with minutes where input was generated by another program, not by a person. It is a hint for you to review, not a conclusion.
If you can see other people's numbers, an extra Whole company today block appears below your own clock-in block. On a company day off, the block says “Today is a day off”.
Follow the whole company through the day
- 1
Read the six cards and click to filter. The six cards are
Working,Finished,Not started,Late today,Absent today,On leave. Click a card (exceptFinished) to filter the employee table below. Click it again to clear the filter.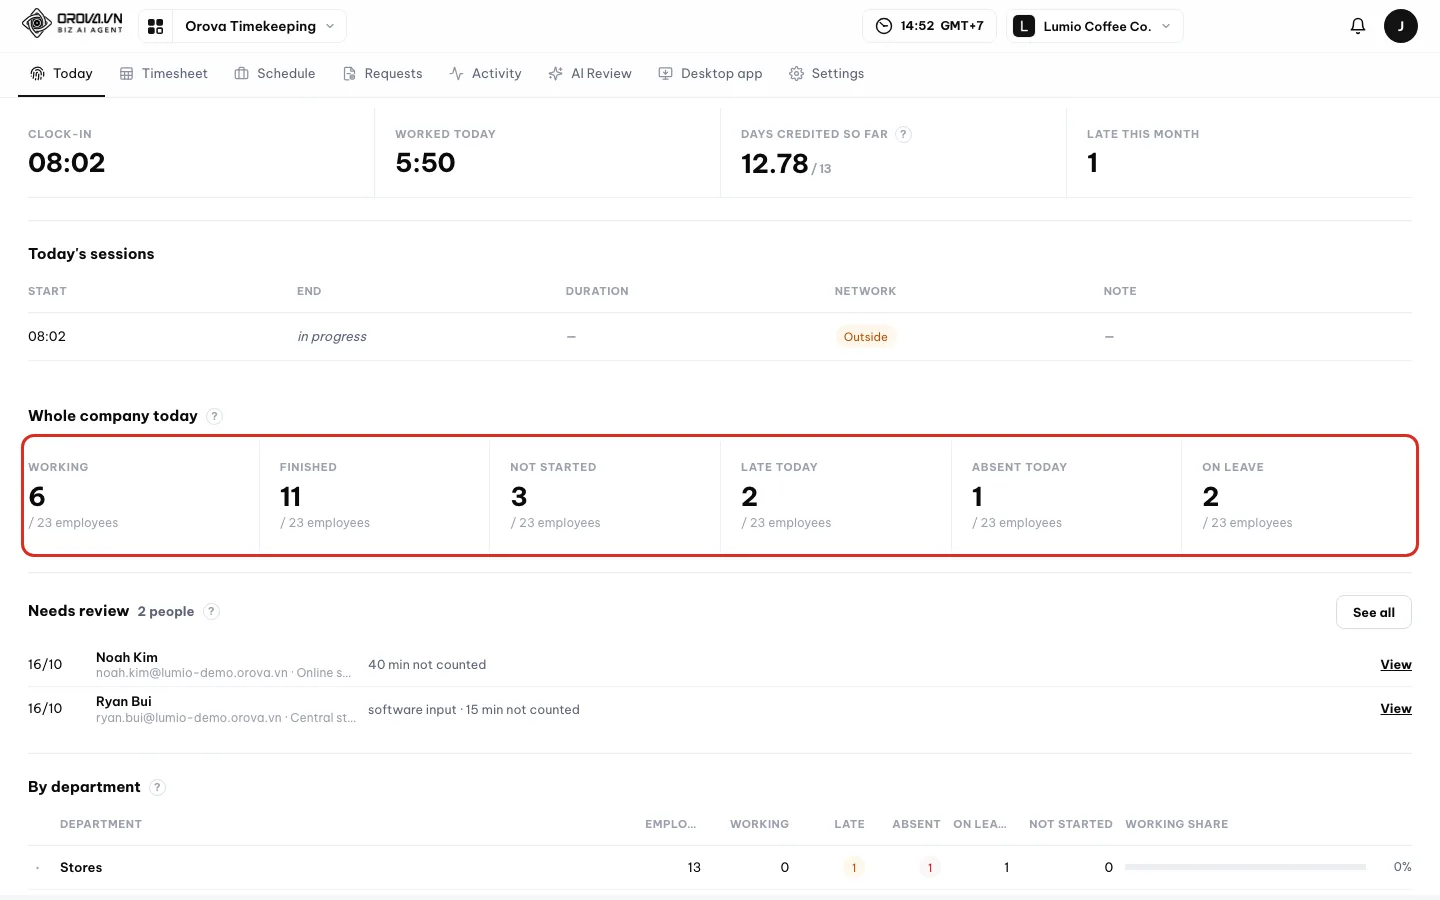
Six cards show how the whole company is doing. Click a card to filter. - 2
Find people in the
Who is doing whattable. Type in the “Search by name or email” box, chooseAll departmentsor one department, then click a filter button:All,Working,Not started,Late,Absent,On leave. Click theScorecolumn header to sort. TheBy departmenttable above can also be clicked to filter.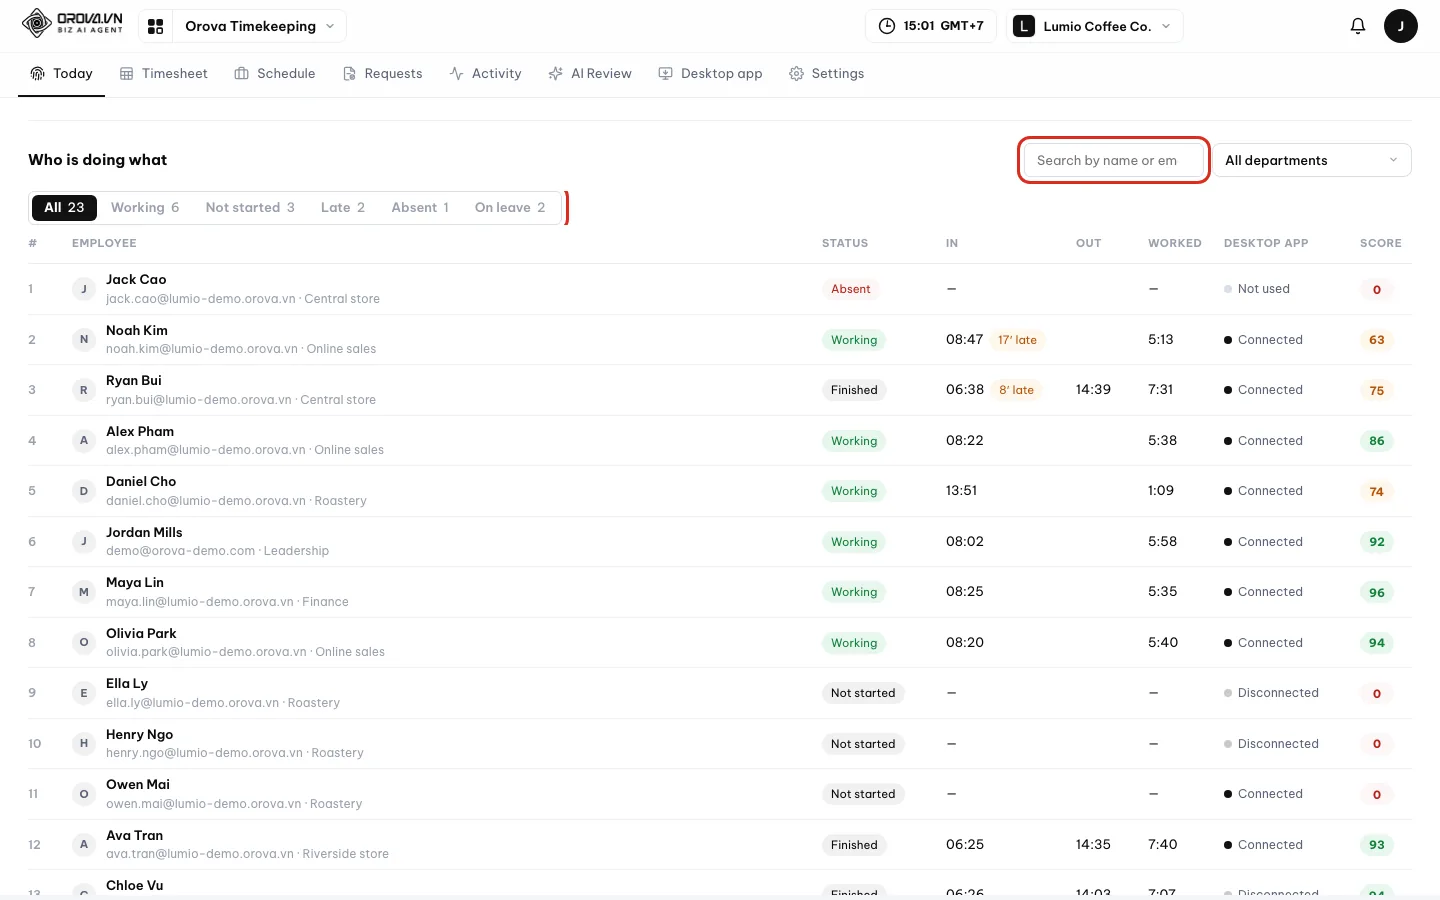
The employee table: clock-in, clock-out, time worked, desktop app and score. - 3
Check trends and rankings. Scroll down to
Trendsand pick 7, 30 or 90 days. The four charts areClock-in times,Late arrivals by day,Hours worked by dayandLate arrivals by weekday.Rankings in periodhas three tabs:Most late,Most overtime,Most short hours.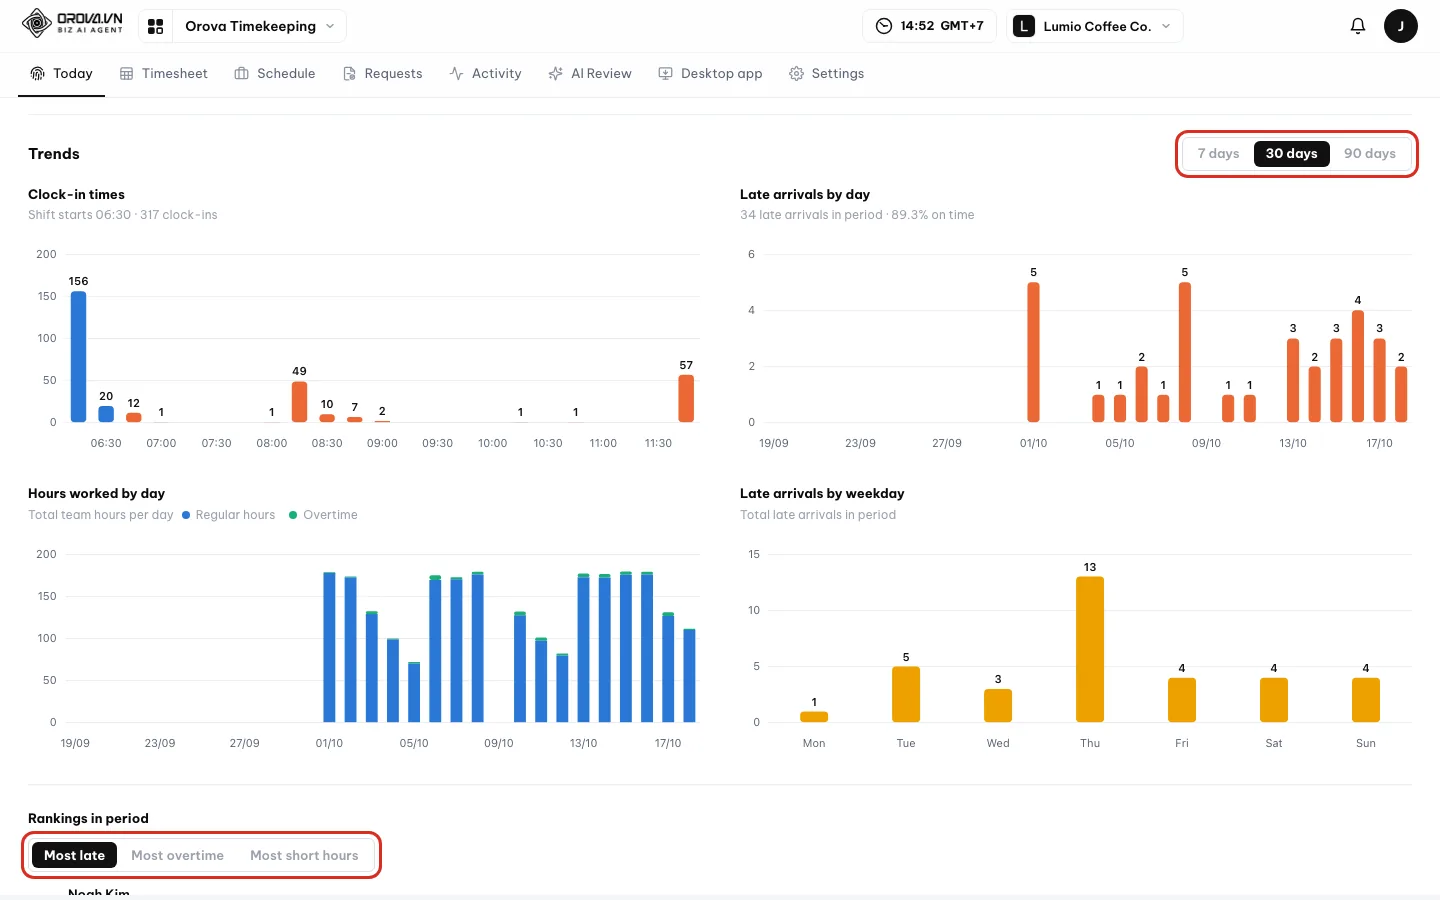
Trends and rankings. The charts load after a few seconds.
03 · Desktop app
Install and pair the desktop app
The desktop app lets your company see whether working hours had real activity on the computer. Install it once, pair it once and you are done.
What the app collects and what it does not
The app only counts numbers: active seconds, idle seconds, key presses and mouse clicks. It does not record what you type and does not take screenshots.
Pairing and the pairing code
Pairing links the app on your computer to your Orova account. You use an 8-character code that works only once and expires after 10 minutes.
Permission to count keys and clicks
On macOS you need to allow the app under Input Monitoring before it can count keys and clicks. Linux on a Wayland session does not allow counting. Without the permission, the app still measures active time and idle time.
The Desktop app page is where you download, install and pair the app. The app only measures after you click Start on the web, and stops when you click End.
Download and install
- 1
Open
Desktop appand read the status. ClickDesktop appon the menu bar. TheApp statusblock shows “No computer paired”, “Connected” or “Not connected”, with the computer name andLast seen.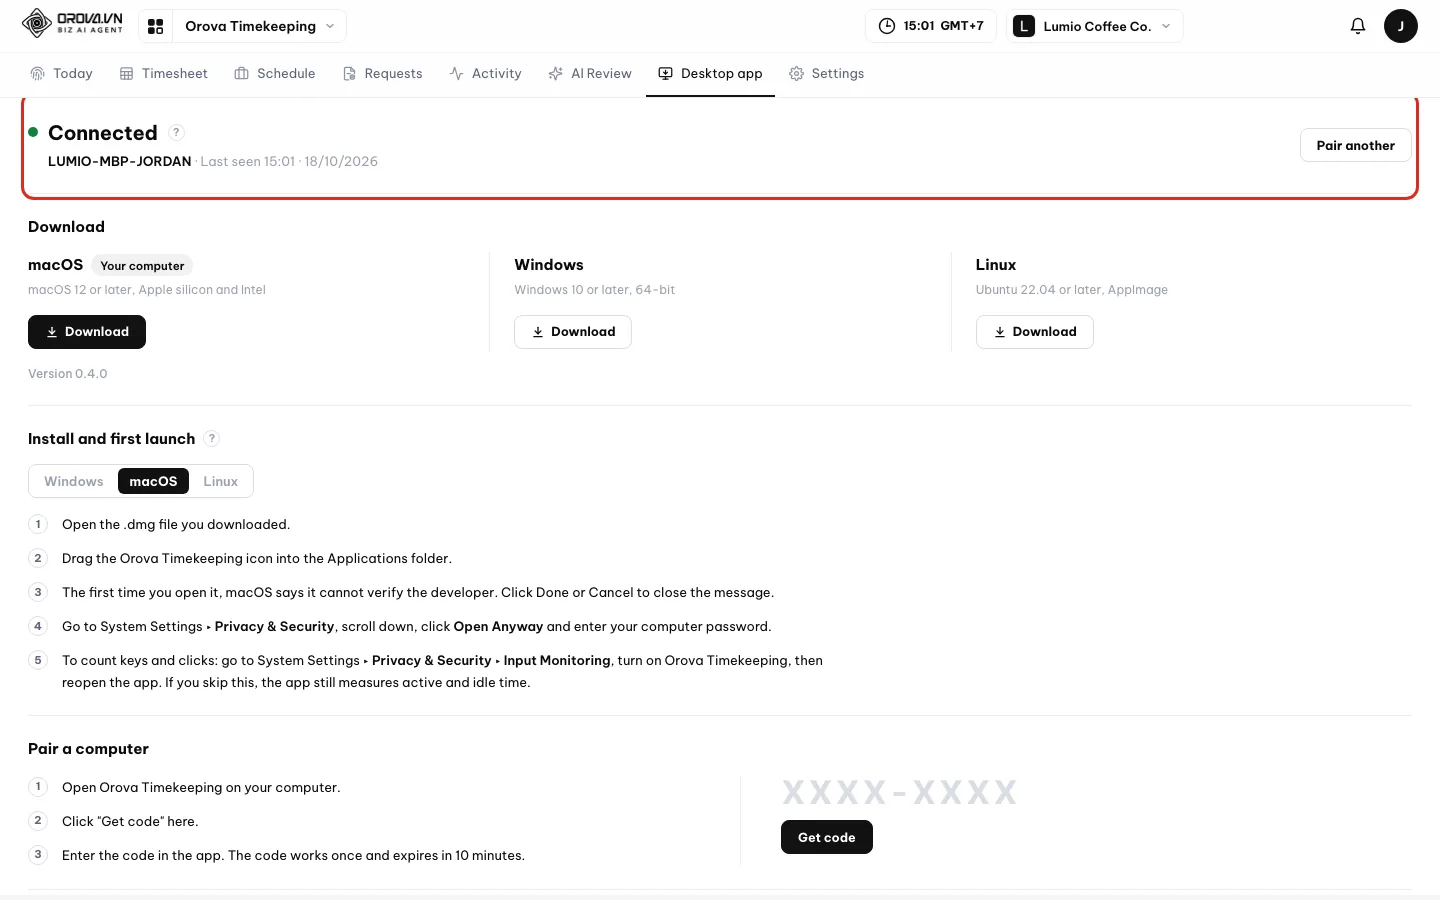
Your own desktop app status. - 2
Click
Downloadfor your operating system. There are three cards: Windows, macOS, Linux. The card that matches the computer you are using says “Your computer”. ClickDownloadon that card and wait for the file to finish downloading.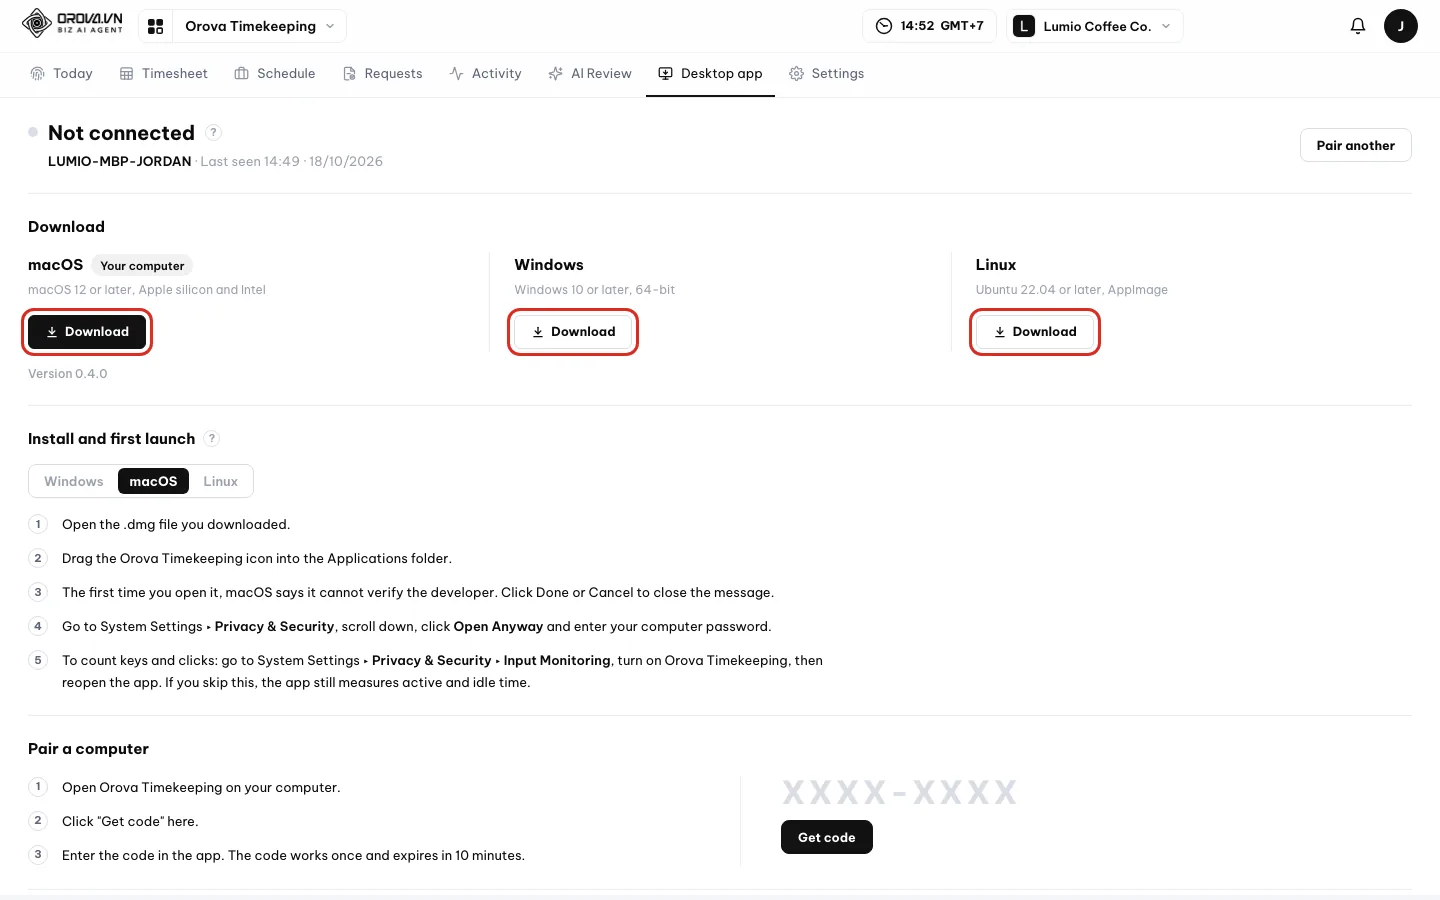
Pick the card that says Your computer, then click Download. - 3
Install on Windows. Open the file you downloaded (Orova-Timekeeping-windows-x64.exe). If Windows shows a blue “Windows protected your PC” screen, click “More info”, then click “Run anyway”. When the install finishes, the app opens by itself and sits in the system tray at the bottom right, next to the clock.
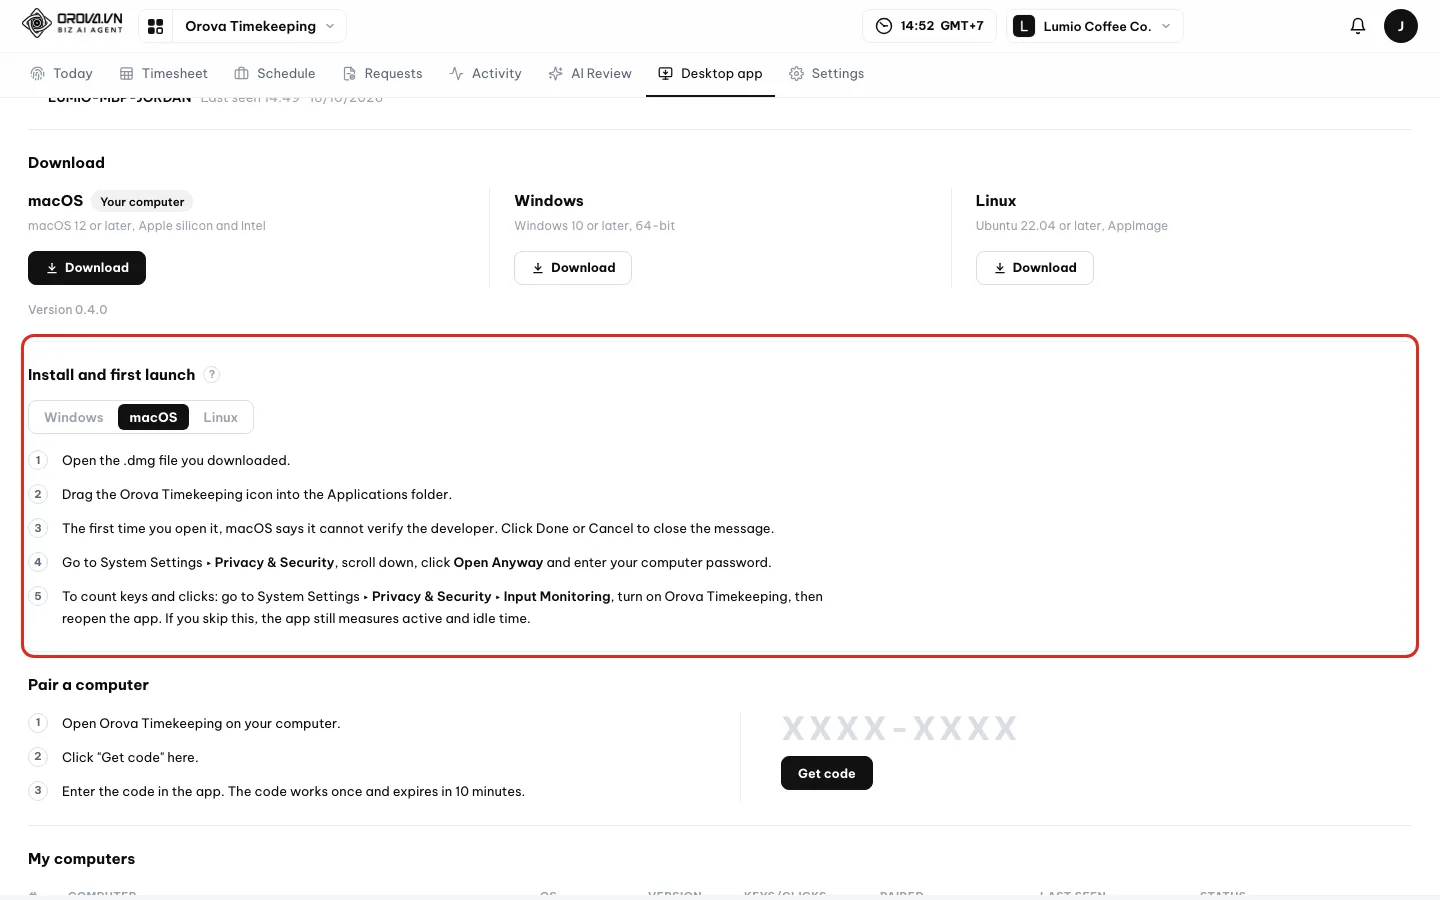
The Install and first launch tabs list each step for every operating system. - 4
Install on macOS. Open the .dmg file you downloaded. Drag the Orova Timekeeping icon into the Applications folder. Open the app from Applications. To count keys and clicks, grant Input Monitoring as in the last step of Pair a computer.
- 5
Install on Linux. Allow the file to run: open Terminal in the folder that holds the file and type
chmod +x Orova-Timekeeping-linux-x86_64.AppImage. Or right-click the file ▸ Properties ▸ Permissions and tick the option that allows it to run. Then double-click the file to open it.
Pair a computer
- 1
Open the app and see the connect screen. The first time you open it, the app shows the “Connect to your Orova account” screen with three steps and a
Pairing codefield. The EN/VI button in the corner changes the app language.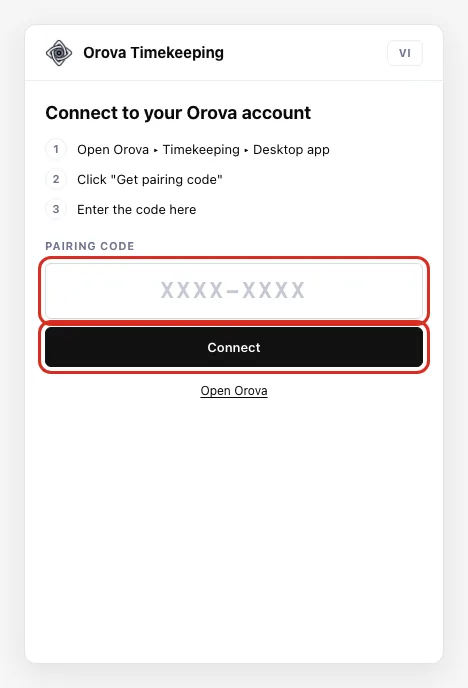
The app's pairing screen. - 2
Get a code on the web. On the
Desktop apppage, in thePair a computerblock, clickGet code. A code in the XXXX-XXXX format appears with anExpires incountdown. ClickCopy. If the code expires, clickNew code.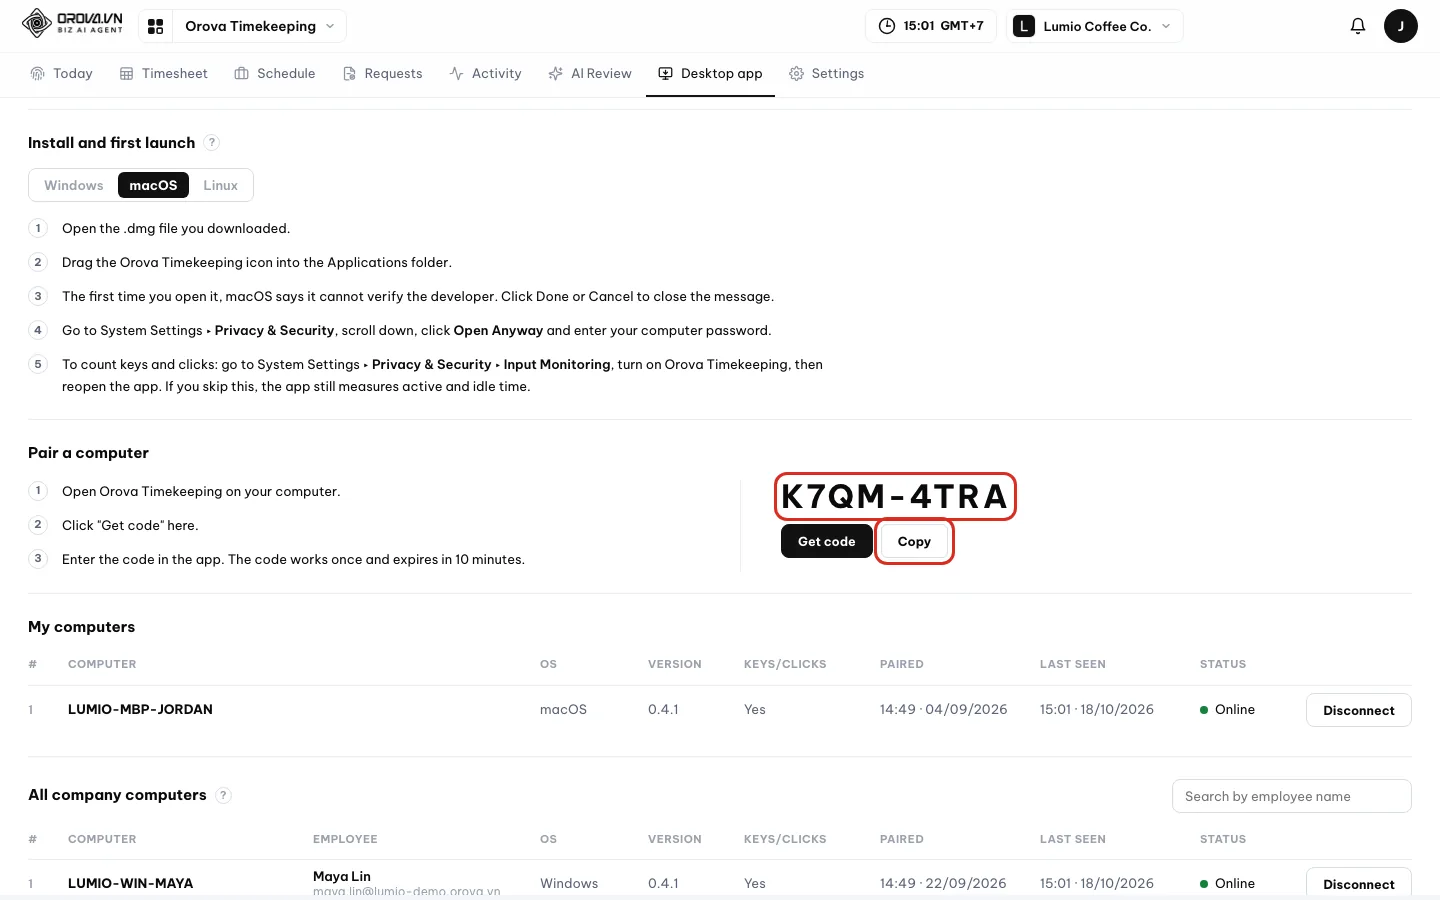
A pairing code works once and lasts 10 minutes. - 3
Paste the code and click
Connect. Paste the code into thePairing codefield in the app and clickConnect. The app switches to “Waiting for you to click Start on Orova”. ClickStarton theTodaypage and the app changes to “Tracking”.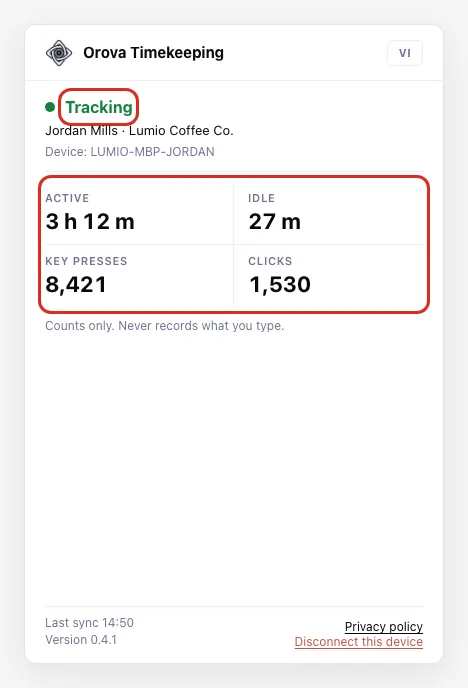
Tracking: the app only counts how many times, never what you type. - 4
macOS: click
Grant accessto count keys and clicks. If the app shows a permission card, clickGrant access. Go to System Settings ▸ Privacy & Security ▸ Input Monitoring, turn on Orova Timekeeping, then reopen the app. If you leave it off, the app still measures active time and idle time.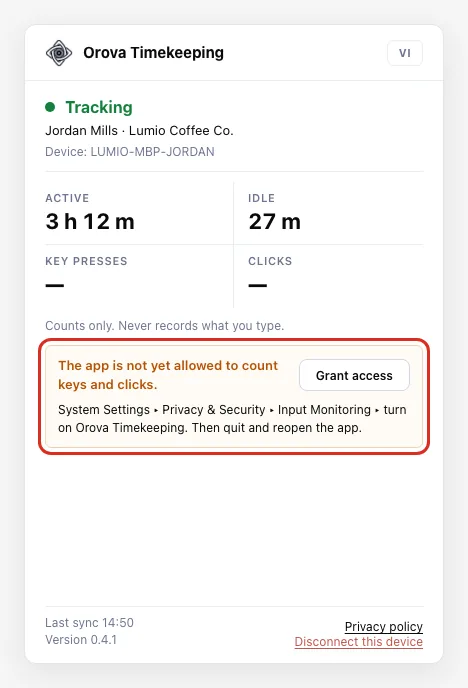
The macOS permission card when the computer does not yet allow counting keys and clicks.
Manage paired computers
- 1
Check
My computersand clickDisconnectwhen needed. TheMy computerstable hasComputer,OS,Version,Keys/clicks,Paired,Last seen,Status. ClickDisconnectand confirm “Disconnect this computer?” when you switch computers or stop using one.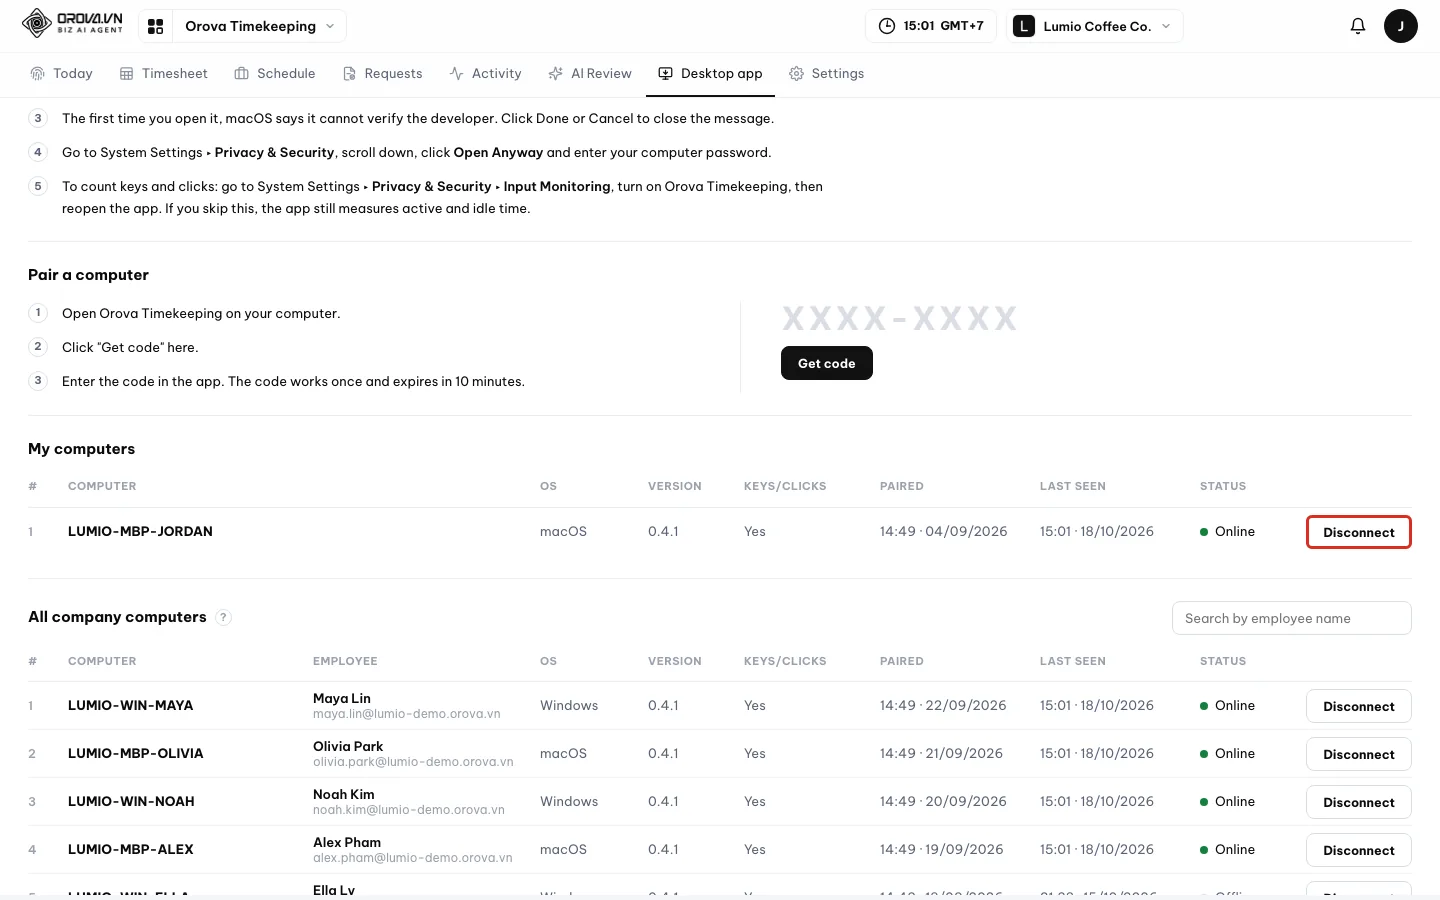
My computers: each row is one paired computer. - 2
Managers: check
All company computers. People with the Manage timekeeping permission also see theAll company computerstable, with anEmployeecolumn. Type in the “Search by employee name” box to search. Managers can also disconnect other people's computers.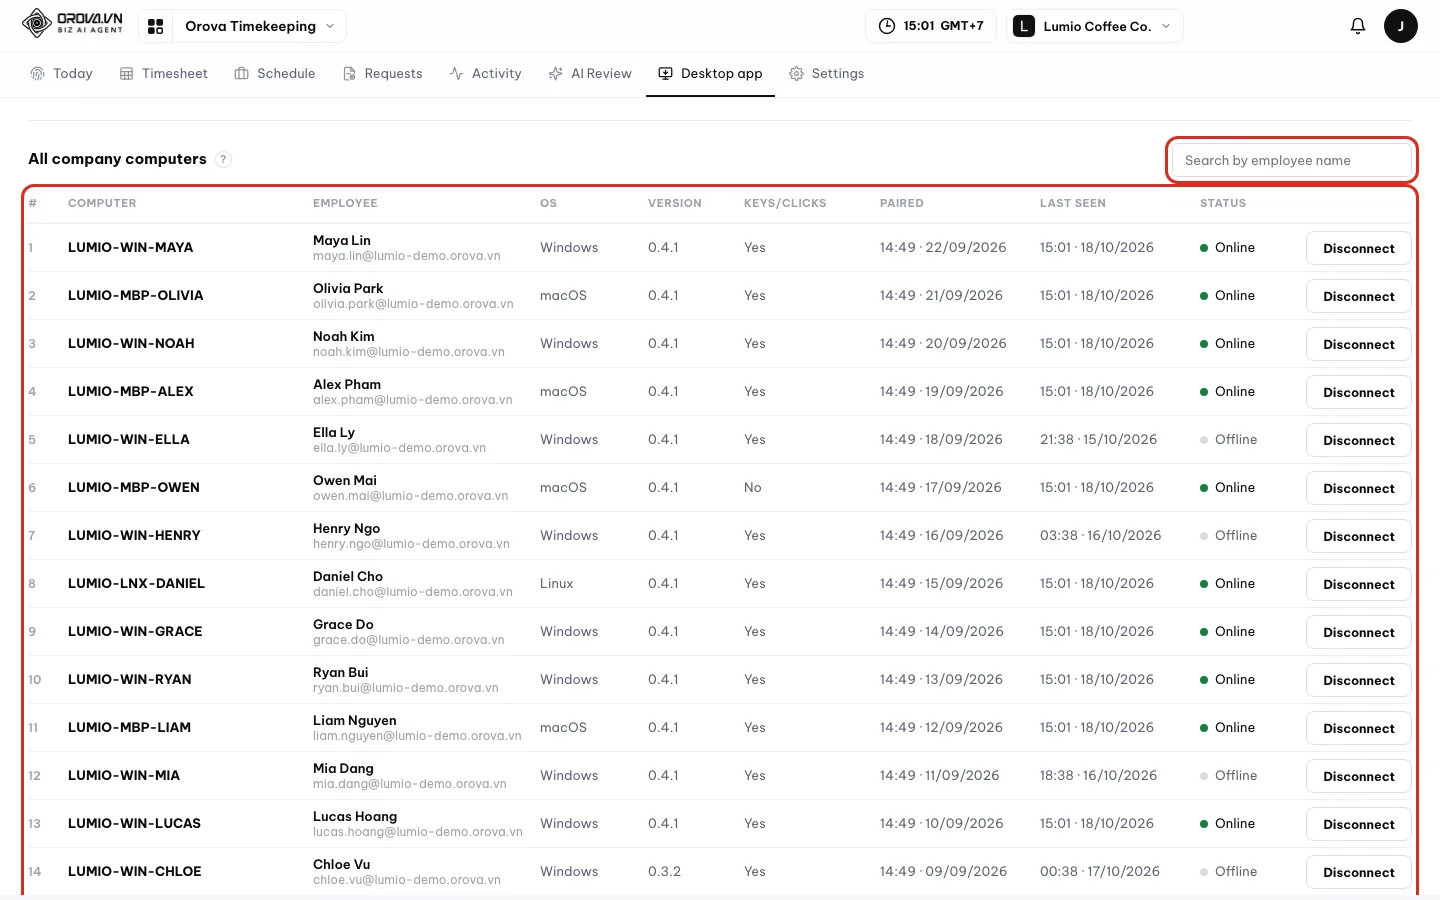
All company computers, visible to managers only.
| Operating system | Requirement | Notes |
|---|---|---|
| Windows | Windows 10 or later, 64-bit | SmartScreen may ask the first time: “More info”, then “Run anyway” |
| macOS | macOS 12 or later, Apple silicon and Intel | Needs Input Monitoring permission to count keys and clicks |
| Linux | Ubuntu 22.04 or later, AppImage | Wayland sessions do not count keys and clicks; pick an X11 (Xorg) session if you want full counts |
| Button / field | What it means | Notes |
|---|---|---|
Pairing code · Connect | Enter the code from the web to pair the computer | The code needs all 8 characters |
Open Orova | Opens Orova in your browser | To get a pairing code |
| Status | “Tracking”, “Waiting for you to click Start on Orova” or “Lost connection to server” | Only measures after you click Start on the web |
| Four tiles | Active · Idle · Key presses · Clicks | Counts only, never records what you type |
Grant access | Opens the macOS setting that allows counting keys and clicks | Only shows when the computer does not allow counting yet |
Privacy policy | Opens the privacy policy | At the bottom of the window |
Disconnect this device | Stops measuring and unlinks the computer from your account | To use it again, pair it with a new code |
Note
Up to 3 computers per person
Disconnect on an old computer, then pair again with a new code.Note
When your company records apps
Warning
Old versions must be updated
Download new version and install the file you downloaded. Until you update, the app cannot send data.Note
Computer data belongs to your company
04 · Timesheet
Read the monthly timesheet
The timesheet is calculated from real clock times. You only need to know how to read each cell.
Standard days
The credit a person should earn in the month: the working days by shift, minus days off, plus extra workdays, with multipliers applied. For example, a month with 22 working days has 22 standard days.
The Days column and the rate
The Days column shows the credit earned against the standard days for the whole month, for example 15/22. The line below is the percentage up to today.
Score and Perfect attendance
Score runs from 0 to 100 and combines credited days, punctuality, full hours and computer activity. Perfect attendance means full credit with no late arrivals and no early leaves for the whole month. It is closed once the month is over.
The Timesheet page shows one row per person and one column per day. People with the See everyone's timesheet permission, or department heads, also see other people. Regular employees only see their own row.
Read the timesheet
- 1
Open
Timesheetand pick a month. ClickTimesheeton the menu bar. Use the ‹ › arrows to move back and forward a month. Click the month label to pick a month and year, or clickThis month. The tiles at the top are totals for the table you are viewing, for exampleEmployees,Late arrivals,Overtime hours.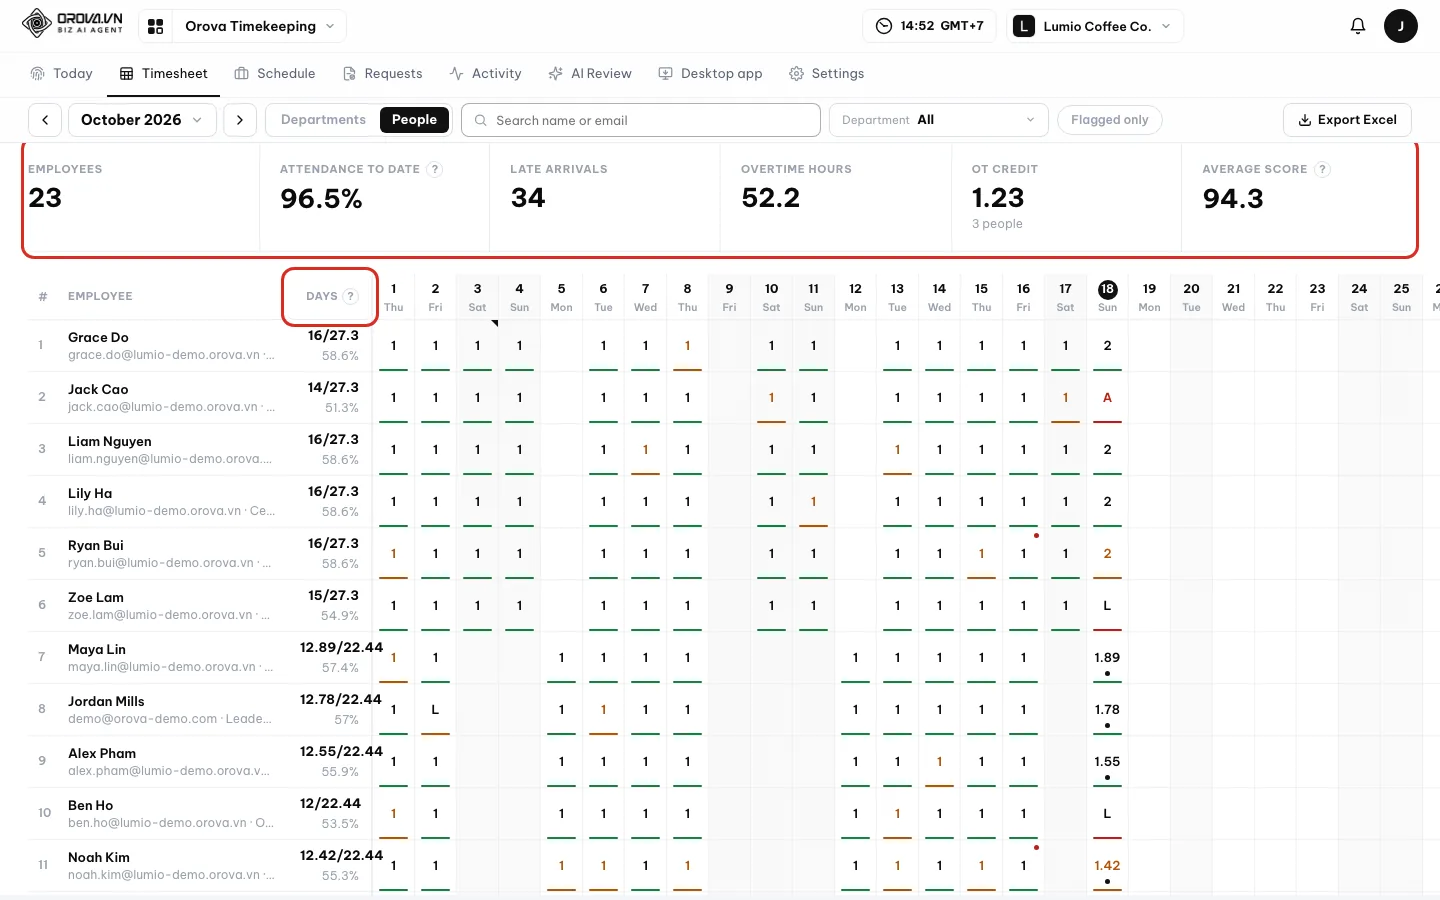
One row per person, one column per day. - 2
Read the cell legend. The legend sits below the table.
1means full credit for the day. A colored number means a late arrival.Ameans absent. A symbol such asLmeans a day off with an approved request. “L 8–10” means leave by the hour.+hmeans hours worked on a day off. A cell with a border was edited by hand.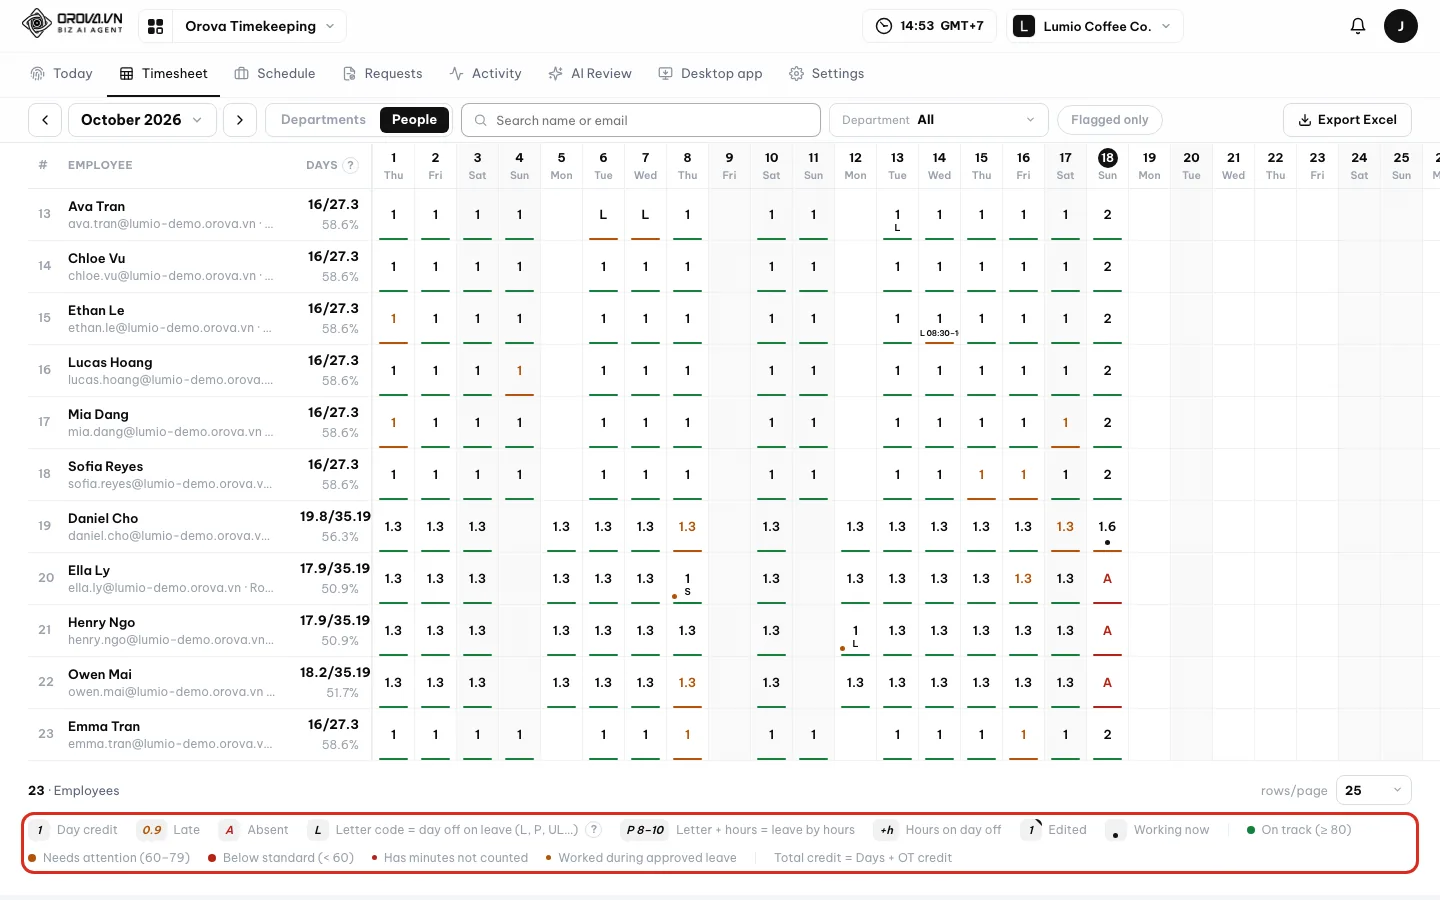
The legend explains every symbol you see in a cell. - 3
Search, filter and export to Excel. Type in the “Search name or email” box. Pick a department in the
Departmentfield. ClickFlagged onlyto keep only people with flags. ClickExport Excelto download the file; the button shows “Exporting…” while you wait.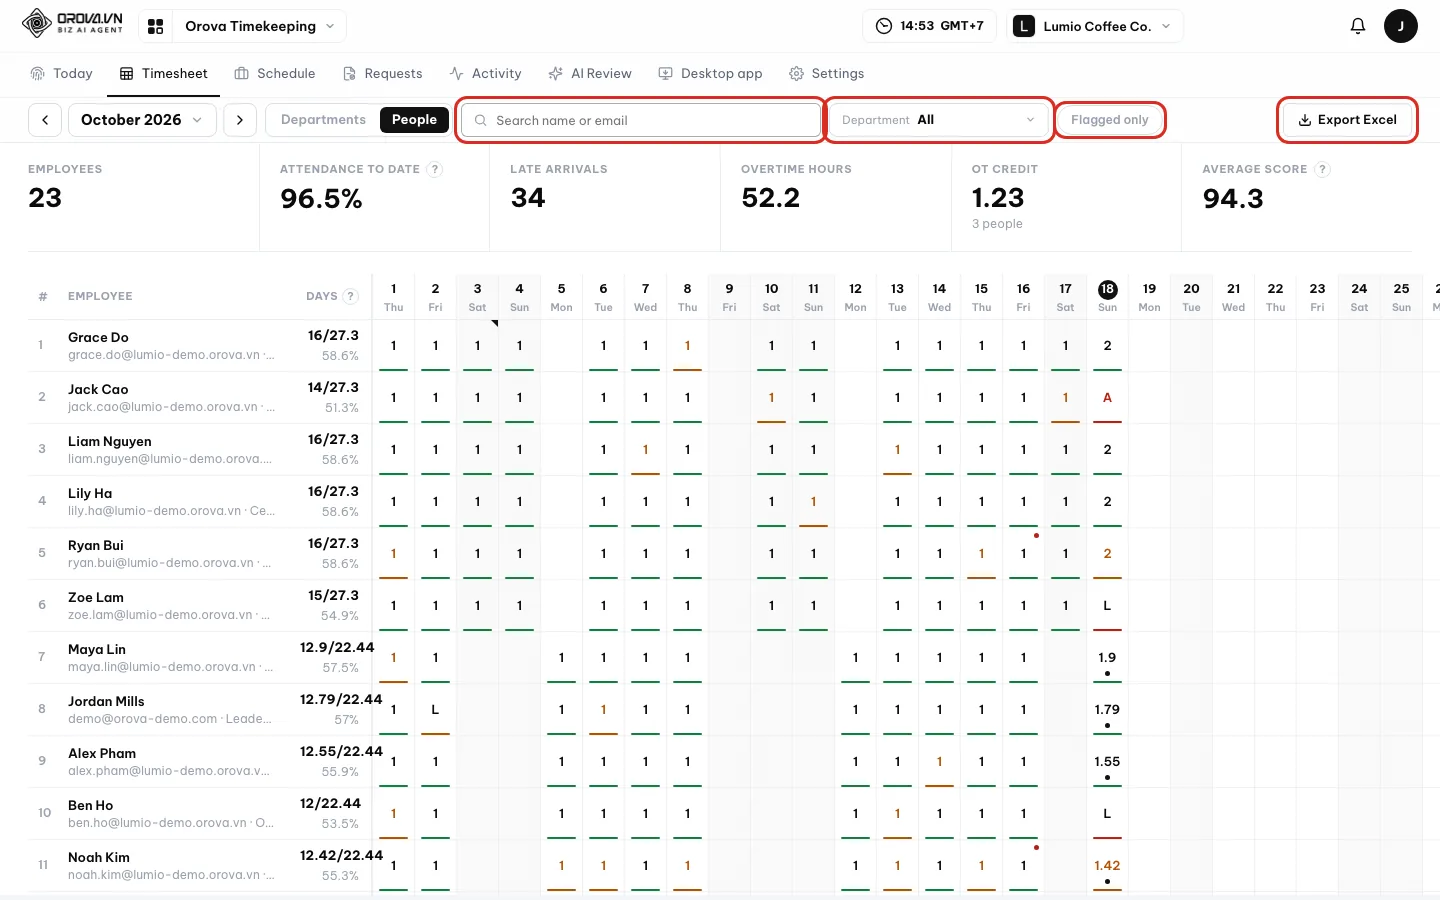
The filter bar and the Export Excel button. - 4
View by
Departments. Click theDepartmentstoggle to see one row per department: average credit per person, rate, late, absent, on leave, overtime and average score. Click a row to see the employees of that department.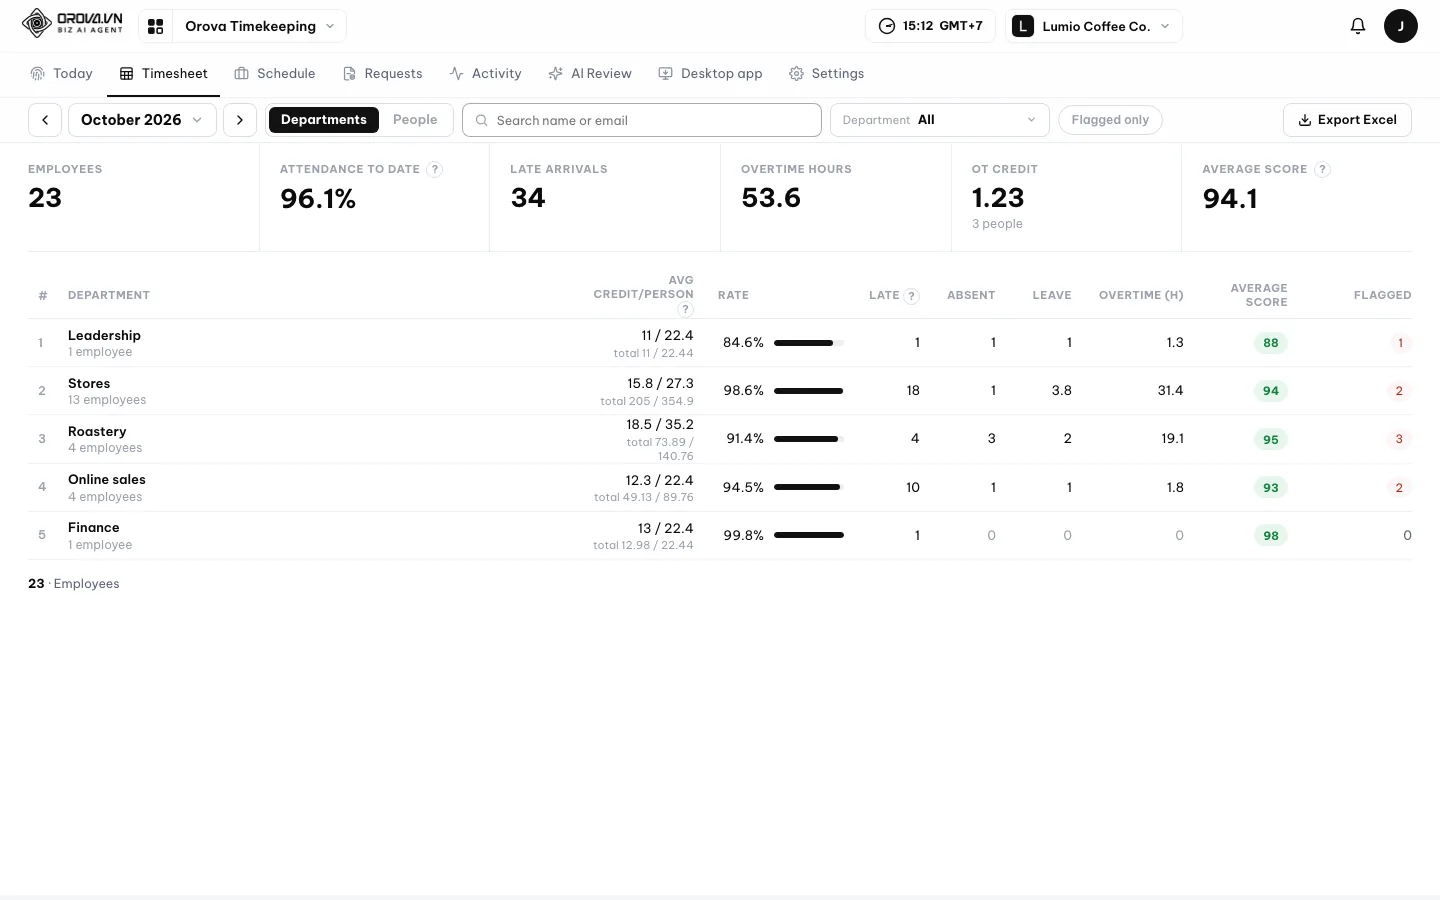
View by department to compare departments at a glance.
| Column | What it means | Notes |
|---|---|---|
Employee | The person's name | — |
Days | Credit earned / standard days for the whole month | The line below is the rate in % |
| Day columns | The credit or symbol for that day | Days off are grayed out; click a cell for details |
Score | Average score for the month | Colored by the thresholds your company sets |
In-shift hrs | Hours worked inside the shift | — |
Paid leave · Unpaid leave | Days off with a request, by type | Only shown when there are numbers |
Late · Early | Number of late arrivals and early leaves | Grace minutes already deducted |
Make-up · Overtime | Hours worked outside the shift | See section 05 |
OT credit · Total credit | Credit from overtime; Total credit = Days + OT credit | Only shown when your company converts overtime to credit |
Comp (h) | Comp time hours earned from overtime | Only shown when your company converts overtime to comp time |
Days off · Short · Perfect | Days off, hours still short, and whether perfect attendance was reached | Perfect attendance is closed once the month is over |
| Symbol | What it means | Notes |
|---|---|---|
1 | Full credit for the day | A number below 1 means partial credit |
| Colored number | Late arrival | — |
A | Absent | — |
Leave type symbol, for example L | Day off with an approved request | Symbols are set by your company in Settings ▸ Requests |
| “L 8–10” | Leave by the hour | — |
+h | Hours worked on a day off | — |
| Bordered cell | Edited by hand | Has an edit history |
| Dot | Working | Score dot colors: On track, Needs attention, Below standard |
| Flag | “Has minutes not counted” or “Worked during approved leave” | A hint to review |
Note
Empty timesheet
Create shift button when your company has no shift yet or has not turned on tracking for anyone.View one day in detail and edit it
Open a day and edit it when needed
- 1
Click a day cell. The detail box shows the name, email and date. The number grid has
Shift,Clock in,Clock out,In shift,Make-up,Overtime,Day-off work,Late,Early,Credit. Below it is the list ofSessionsfor that day.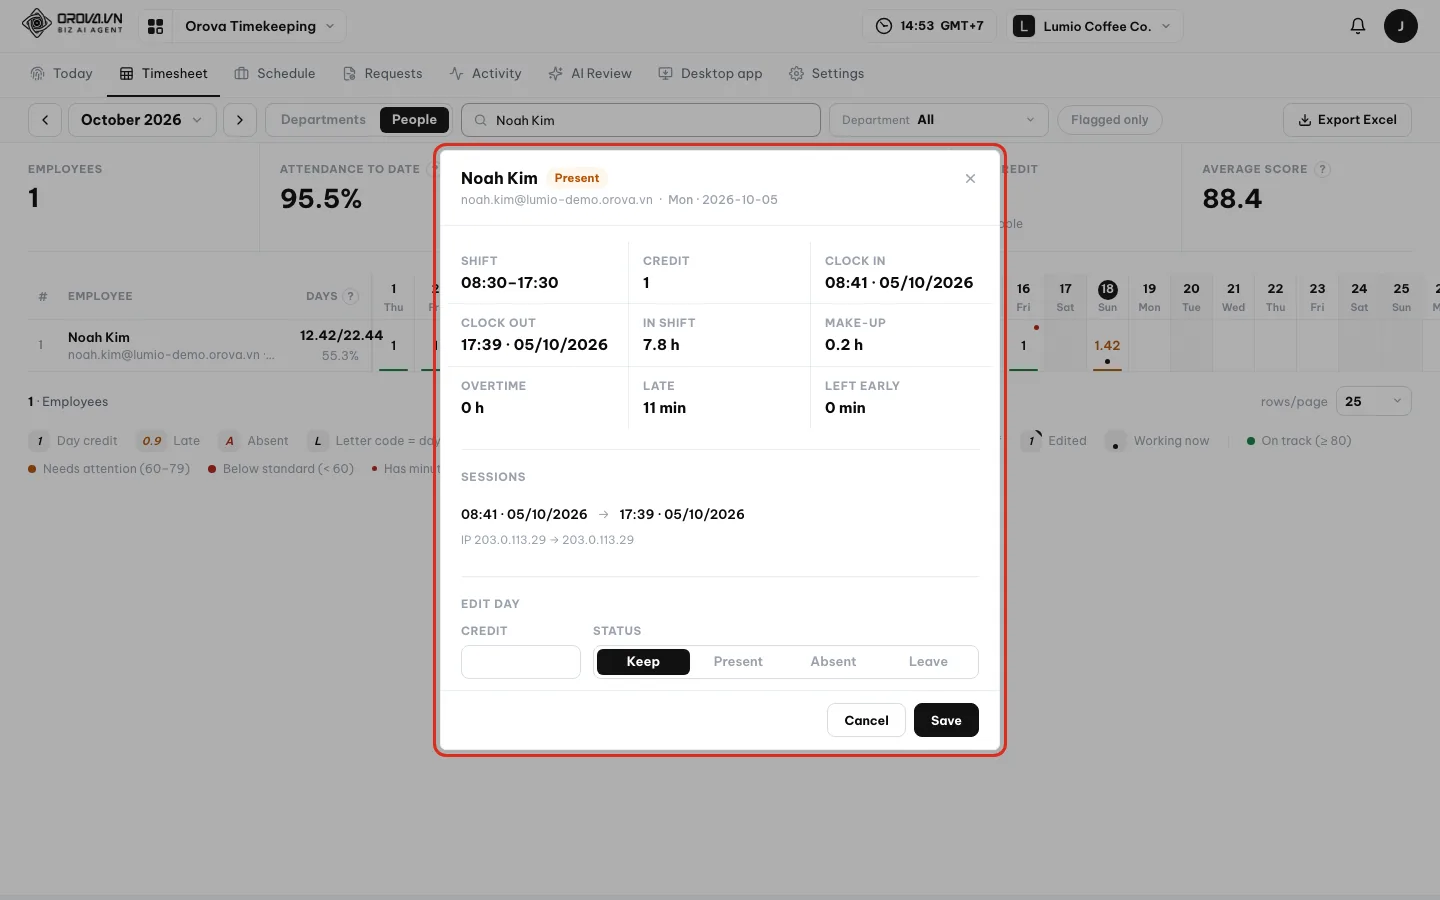
One day in detail: clock-in, clock-out, minutes late, credit. - 2
Managers: edit in the
Edit dayblock. EnterCredit(0 to 10); this is the final number for the day. Choose aStatus: Keep, Present, Absent or On leave. Write the reason inNote, for example “forgot to clock out”, then clickSave. Every edit is recorded inEdit history.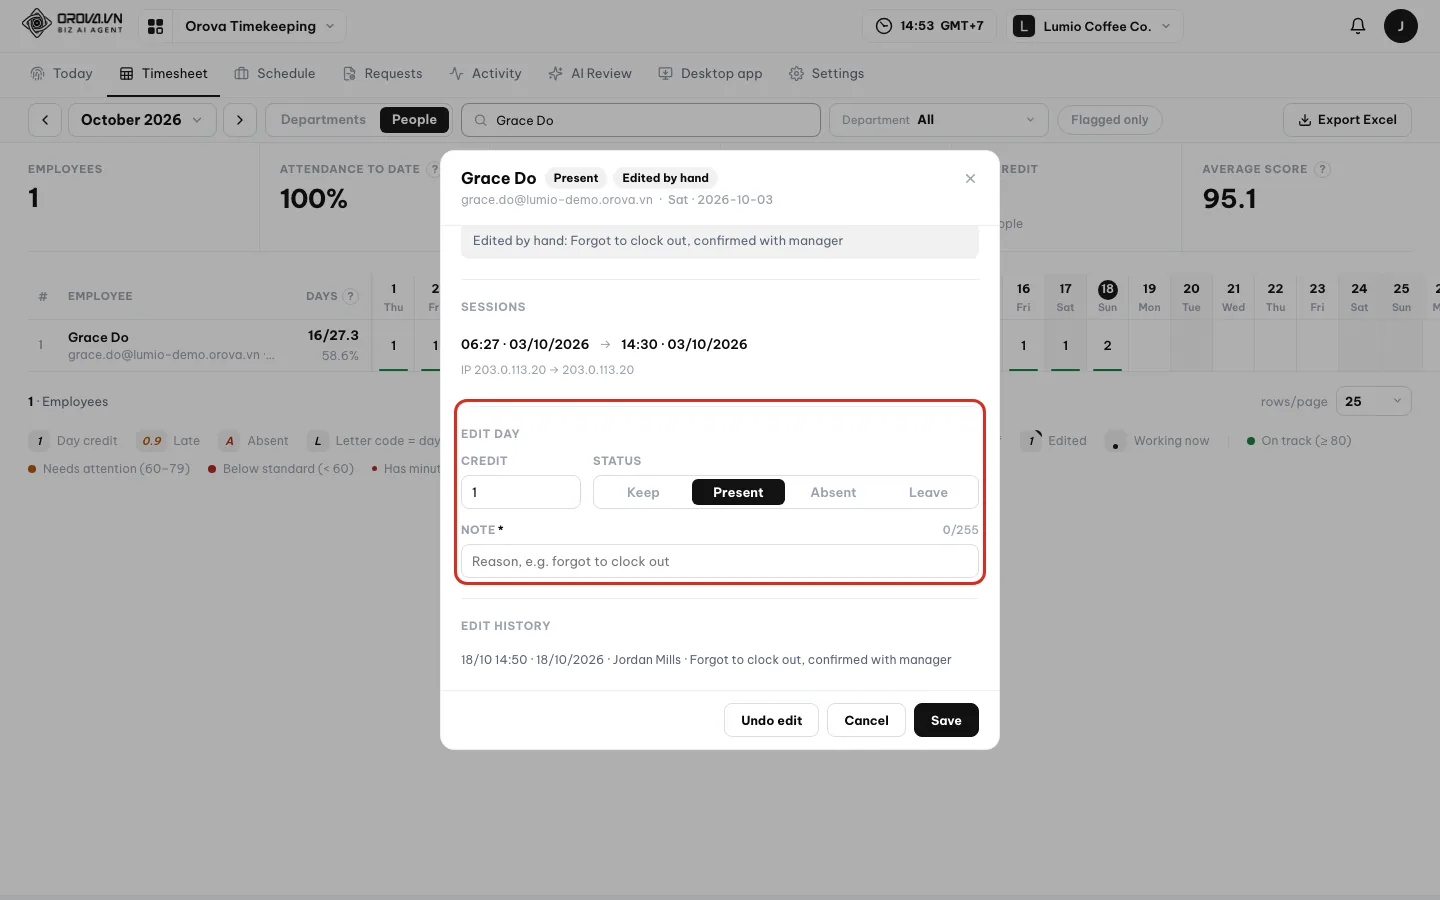
Editing a day requires a reason, and every edit is kept in the history. - 3
Go back to the real times with
Undo edit. To remove the manual edit, clickUndo edit. Orova asks “Remove the manual edit for this day? Numbers go back to the real clock times.”. Agree and the day is recalculated from the real clock times.
Warning
You can't edit your own timesheet
Note empty, Orova says “Please enter a reason for the edit.”.05 · Credit multiplier
Credit multipliers, overtime and make-up time
Evening shifts, working on a Sunday or overtime hours can all earn more credit. This section explains how it is calculated.
Shift credit multiplier
The credit for each full day on that shift. For example, an evening shift with a multiplier of 1.3 earns 1.3 credit for a full shift. The monthly standard days of people on this shift are multiplied too.
Extra workday multiplier
An extra workday turns a shift day off, such as a Sunday, into a working day. That day has its own multiplier. For example, set it to 2 and a full day earns 2 credit, and the standard days also go up by 2.
Overtime, Make-up, Short
Overtime is time worked outside the shift. Short is time still missing against the shift. If your company turns on Make-up time, time outside the shift first makes up the short hours, and only the rest counts as overtime.
The multiplier only applies to time worked. A paid day off still counts as 1 credit, with no multiplier. The examples below use an evening shift with a multiplier of 1.3:
- A full shift for one day: 1.3 credit.
- A month with 22 working days by shift: standard days are 22 × 1.3 = 28.6 credit.
- A full paid day off: 1 credit.
- Half a day of paid leave, half a day of work: 0.5 + 0.5 × 1.3 = 1.15 credit.
- A Sunday set as an extra workday with a multiplier of 2, fully worked: 2 credit, and the monthly standard days go up by 2.
Set multipliers and how overtime is counted
- 1
Set the shift's
Credit multiplier. Go toSettings▸Shiftsand click the edit icon on the shift's row. Fill inCredit multiplier, for example 1.3, then clickSave. Regular shifts stay at 1.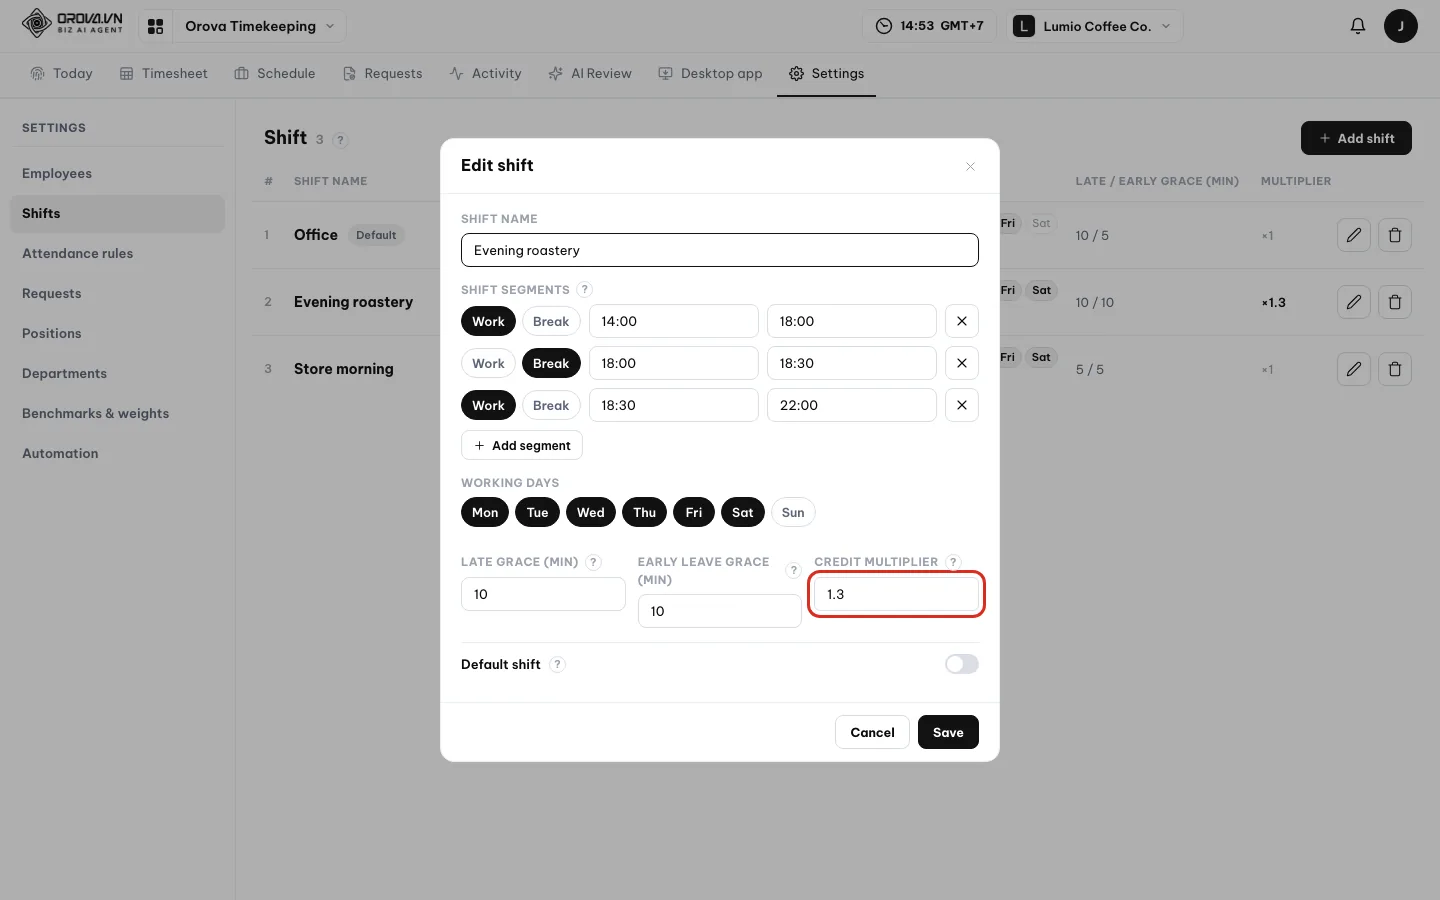
The credit multiplier is in the shift edit box. - 2
Check the result on the
Timesheet. OpenTimesheetand find someone on that shift. A fully worked day cell shows 1.3 instead of 1. TheDayscolumn shows the credit earned against standard days with the multiplier applied.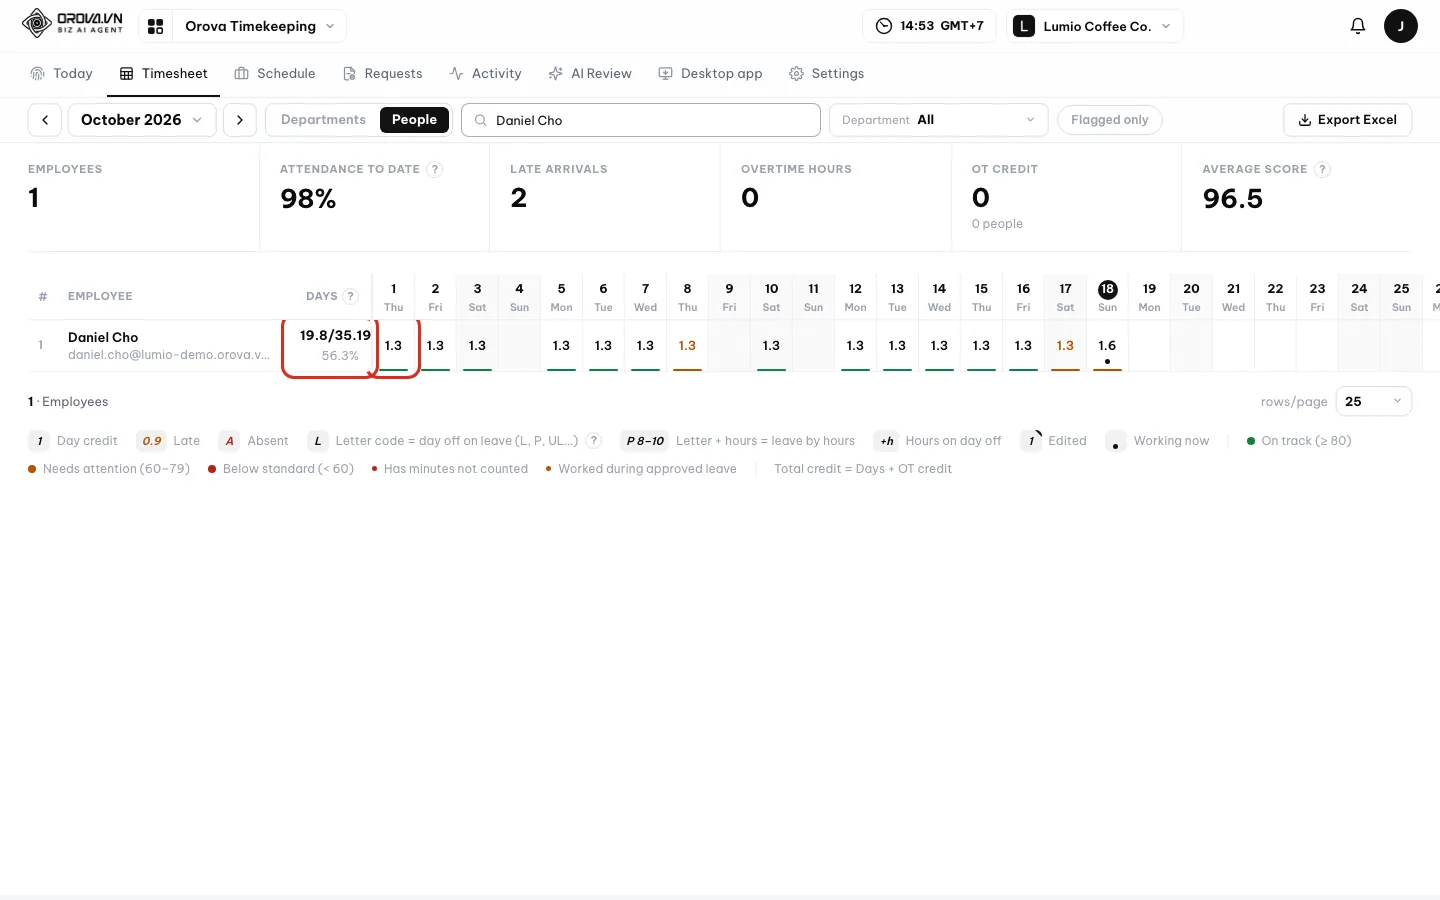
Day cells for a shift with a 1.3 multiplier. - 3
Set an
Extra workdaywith a multiplier. OpenScheduleand clickAdd day off. In theTypefield, chooseExtra workday. TheCredit multiplierfield appears, set to 1 by default. Enter 2 for a Sunday at work, set aName, then clickSave.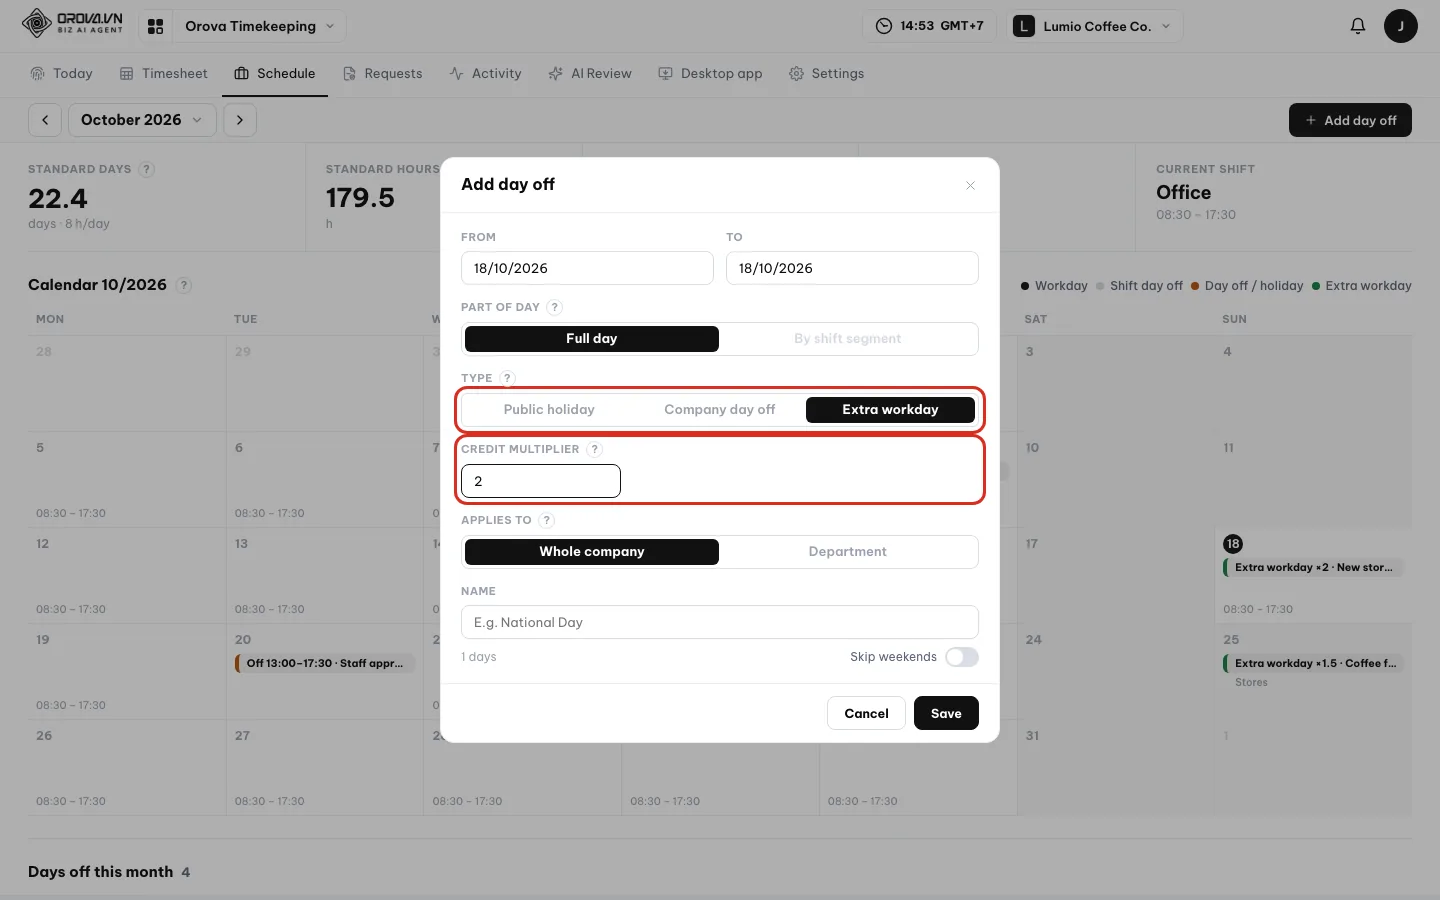
Each extra workday has its own multiplier. - 4
Choose how overtime and make-up time are counted. Go to
Settings▸Attendance rules. UnderOvertime, chooseTrack only,Convert to creditorConvert to comp time. Fill in theRatesfor Weekday, Weekend and Holiday. Turn onMake-up timeand pick the make-up scope. ClickSave.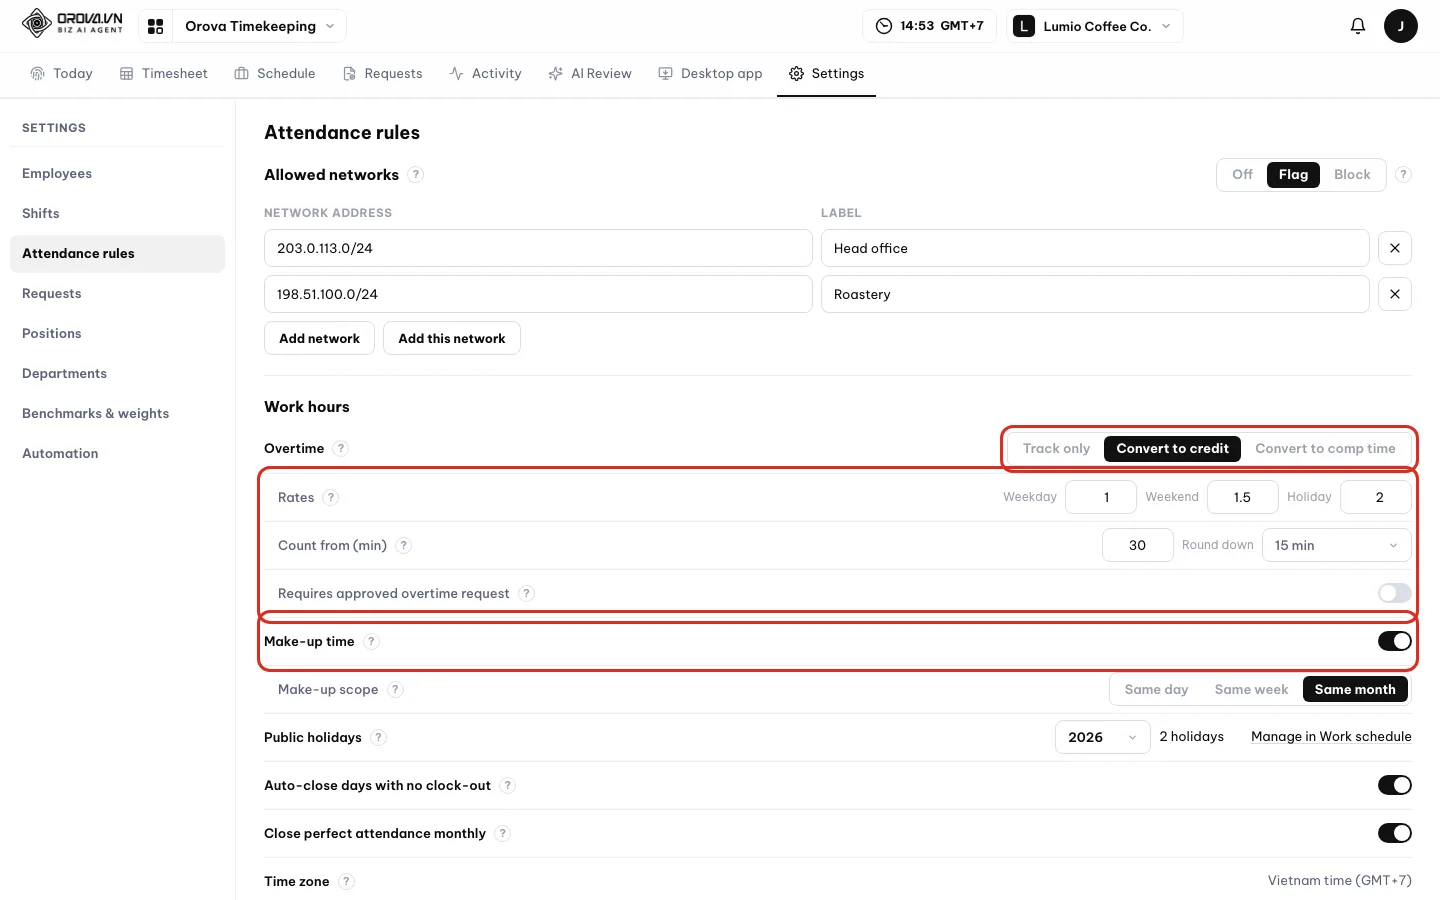
Three ways to count overtime and the Make-up time switch.
| Field | What it means | Notes |
|---|---|---|
Track only | Only counts overtime hours for reporting | Adds no credit and no comp time |
Convert to credit | Turns overtime hours into credit | Shows the OT credit and Total credit columns on the Timesheet |
Convert to comp time | Turns overtime hours into comp time hours | Shows the Comp (h) column |
Rates Weekday / Weekend / Holiday | Multiplier for overtime hours by type of day | 0 to 10, default 1 / 1.5 / 2 |
Count from (min) | How many minutes of overtime before it counts | Anything below this is not counted |
Round down | Rounds overtime hours down to a number of minutes | Or No rounding |
Requires approved overtime request | Only counts overtime when there is an approved Overtime request | Switch |
Make-up time + make-up scope | Uses time outside the shift to make up short hours | Scope: Same day, Same week or Same month |
Warning
Changing a multiplier only applies from today
Credit multiplier only applies from today onward. Earlier days keep the credit already calculated. The multiplier accepts values from 0.1 to 10.06 · Schedule
Schedule, days off and public holidays
The schedule decides the month's standard days. Public holidays, company days off and extra workdays are all entered here.
Public holiday and Company day off
Both are days off; only the display name differs. For example, choose Public holiday for National Day and Company day off for the company trip.
By shift segment
Taking part of the shift off instead of the whole day. For example, if the shift has a morning and an afternoon segment, you choose to take only the afternoon off.
Applies to and Skip weekends
Applies to sets whether the day off is for the whole company or for one department. Skip weekends removes Saturdays and Sundays from the date range you pick.
Everyone can see the Schedule. Only people with the Manage timekeeping permission see the Add day off button and can edit or delete days off.
View the schedule and add a day off
- 1
Open
Scheduleand read the tiles and calendar. ClickScheduleon the menu bar. The tiles at the top showStandard days,Standard hours,Days off / holidays,Extra workdays,Current shift. The month calendar is colored by the legend: Workday, Shift day off, Day off / holiday, Extra workday.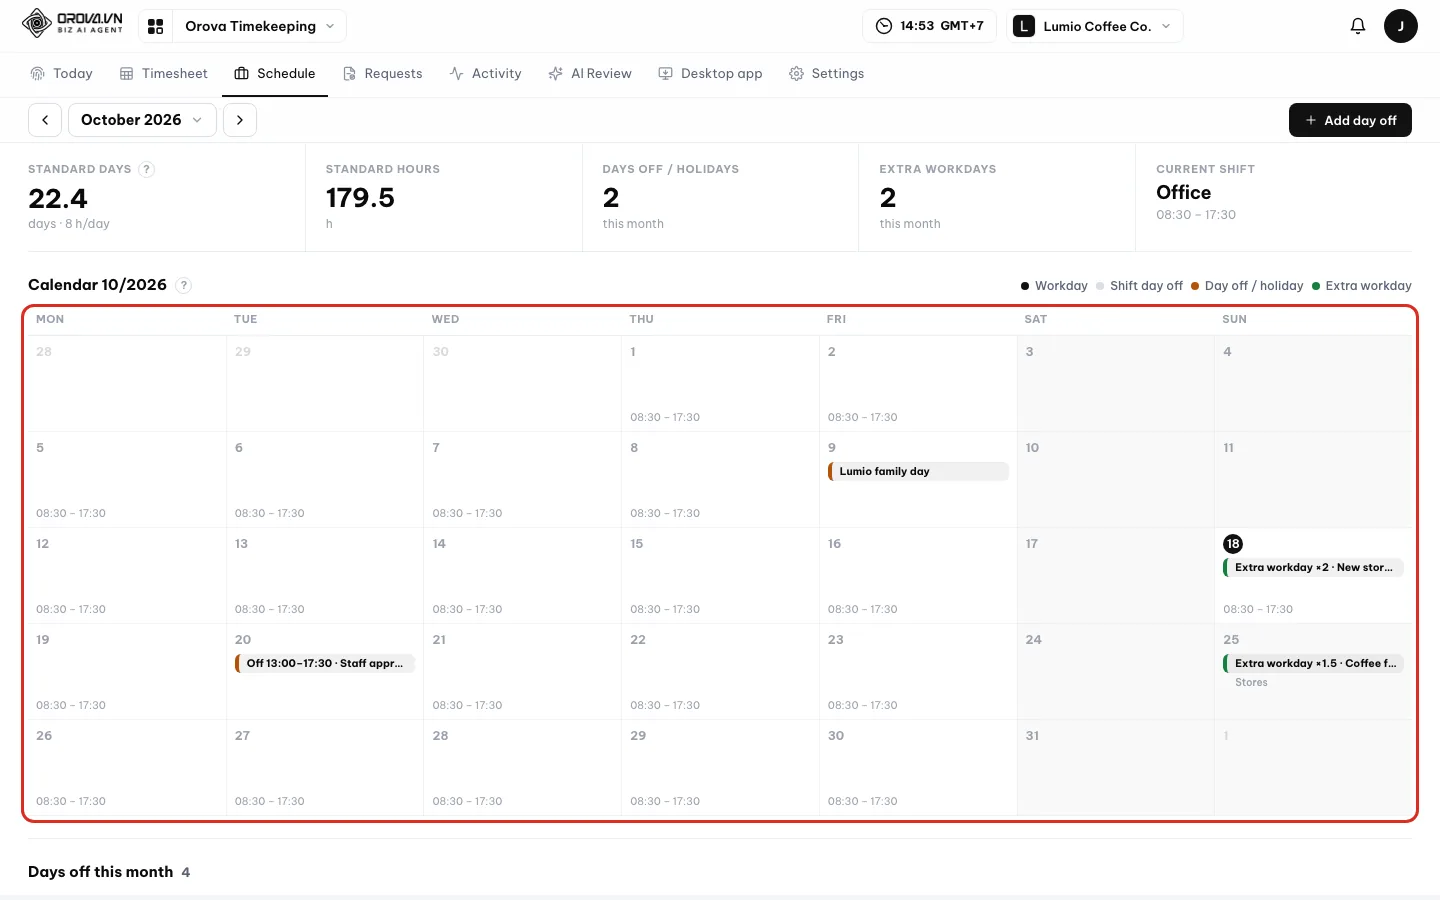
The month calendar and the standard days tiles. - 2
Click
Add day offand fill in the box. ChooseFromandTo. Choose aPart of day:Full dayorBy shift segment. Choose aType:Public holiday,Company day offorExtra workday. ChooseApplies to:Whole companyorDepartment. Type aName, for example “National Day”, then clickSave.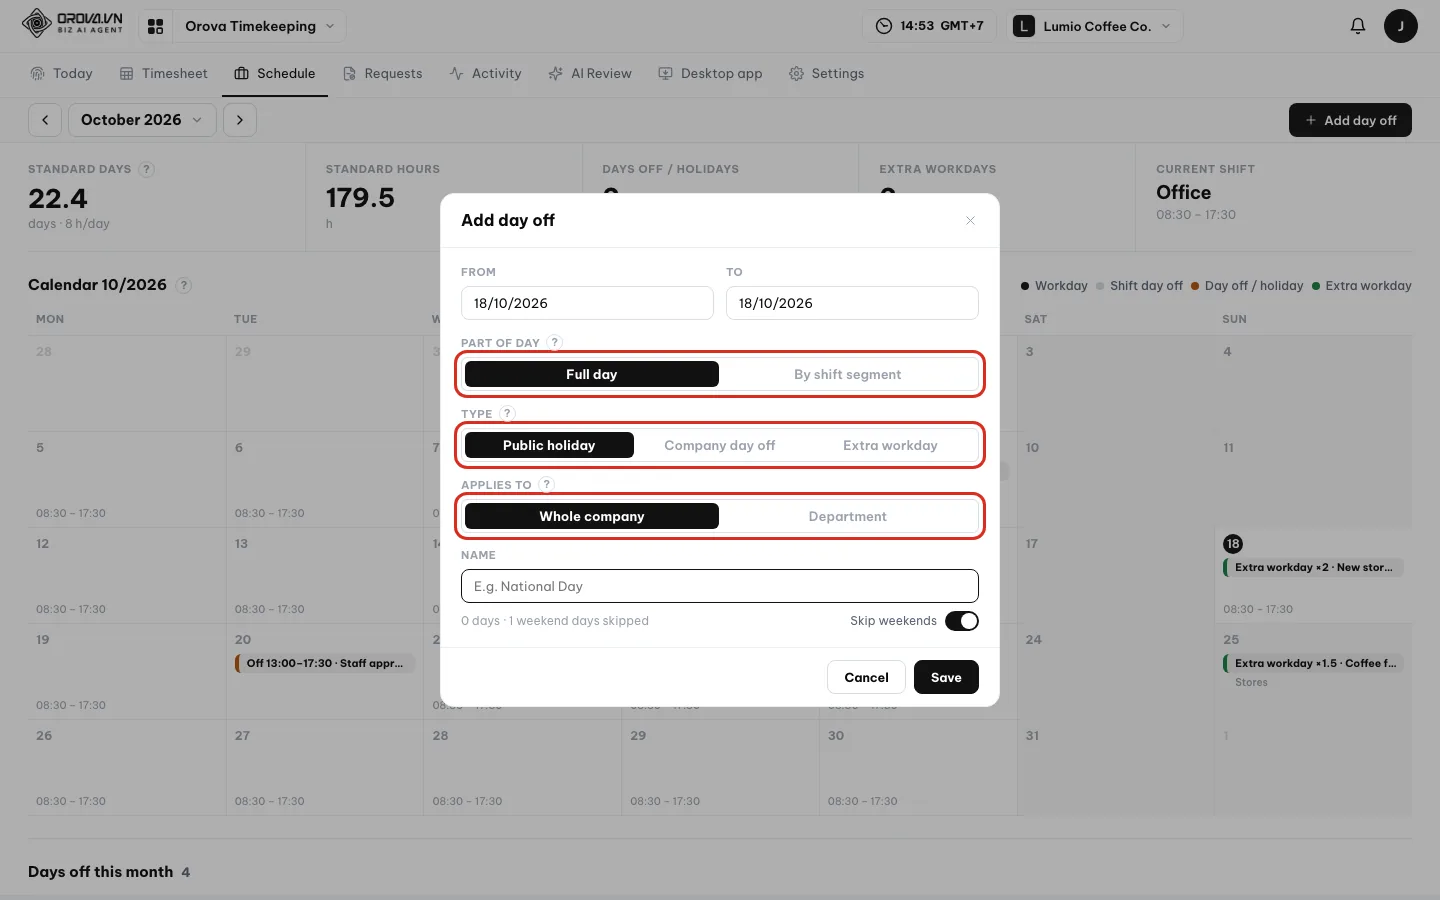
The Add day off box. - 3
Part of a shift off: choose
By shift segment. ClickBy shift segment. The “Pick the segments off” area lists the shift's segments. Tick the segments that are off, for example the afternoon. If none are ticked, Orova says “Pick at least one segment”. This option is disabled when your company has no shift yet.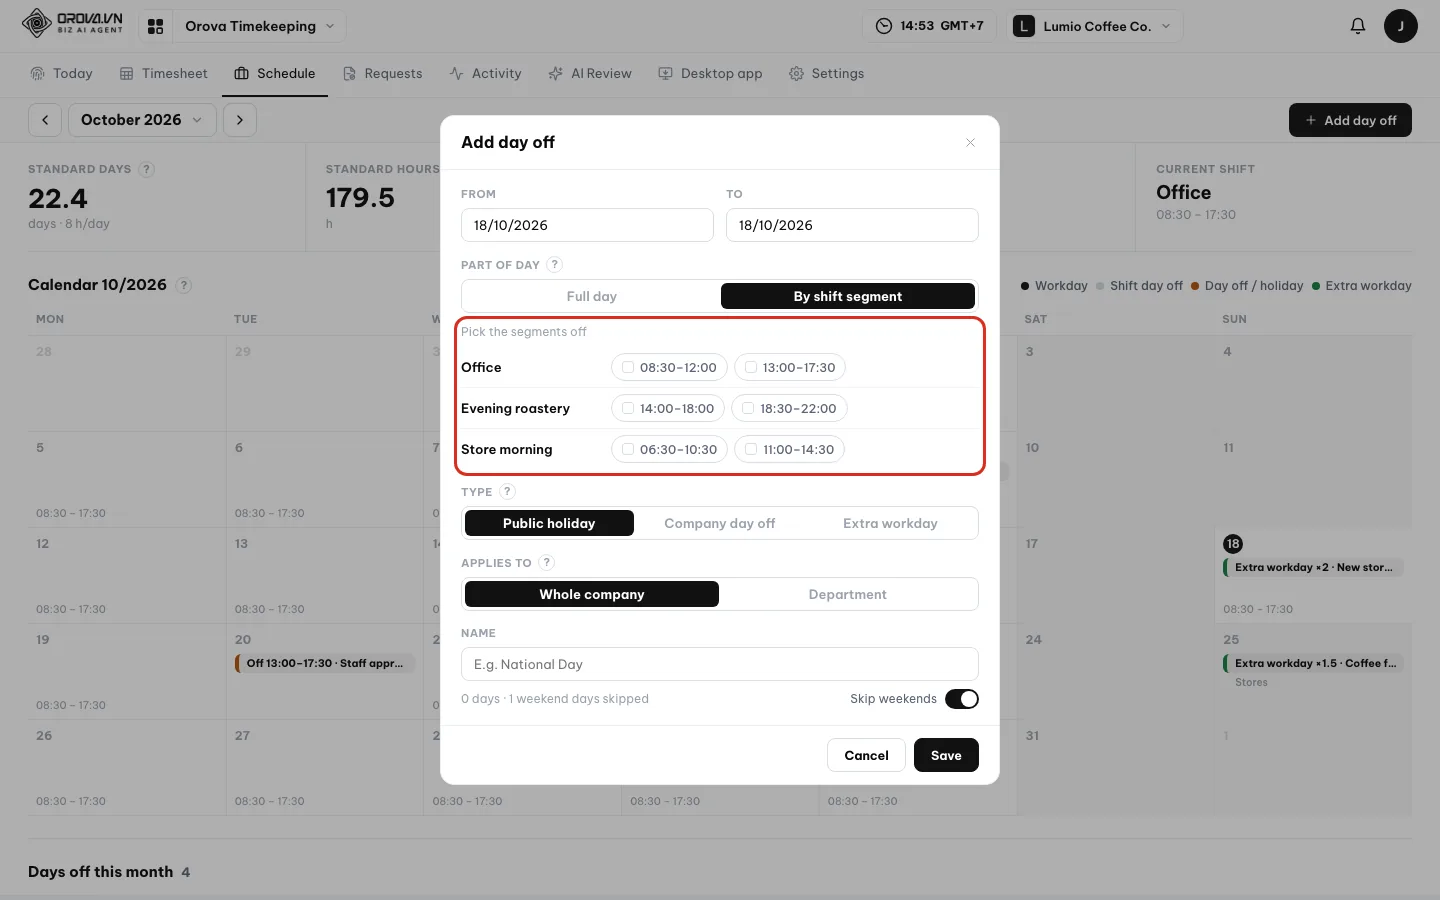
By shift segment: only the ticked segments are off. - 4
Check the list, edit or delete. The
Days off this monthtable lists each day with its name, type, multiplier and department. Click the trash icon to delete it; Orova asks “Delete day off {date}?”. To edit, click that day's cell on the calendar and choose edit.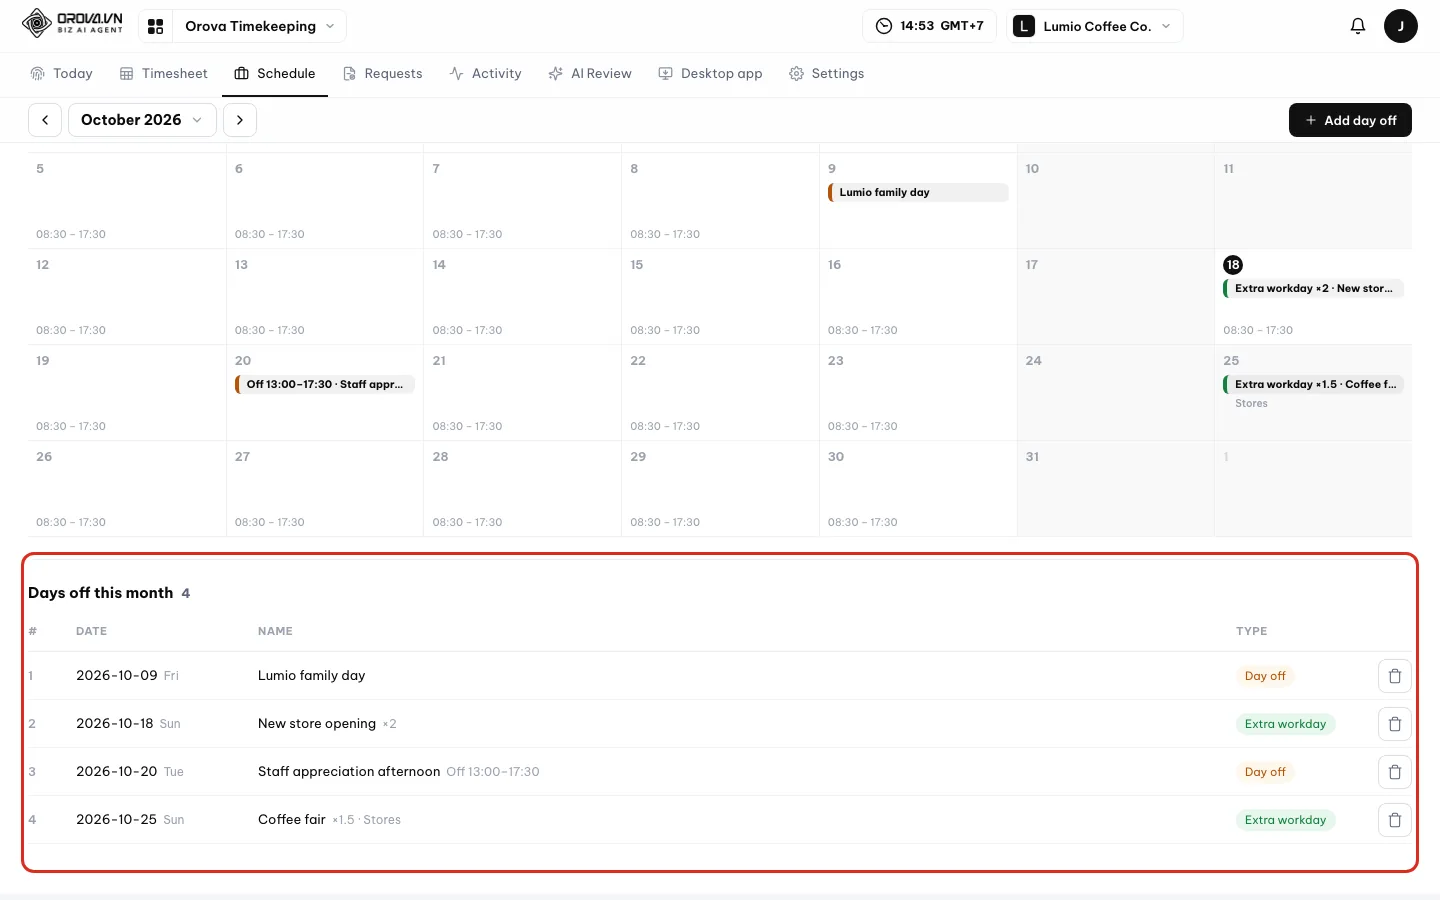
The month's days off and extra workdays.
| Field | What it means | Notes |
|---|---|---|
From · To | The date range of the day off | The box counts “{n} days” |
Part of day | Full day or By shift segment | By shift segment needs your company to have a shift |
Type | Public holiday, Company day off or Extra workday | An extra workday turns a shift day off into a working day |
Credit multiplier | Credit for each extra workday | Only shown for Extra workday, default 1 |
Applies to | Whole company or Department | If you pick Department, choose the department before saving |
Name | The name shown on the calendar | For example “National Day” |
Skip weekends | Removes Saturdays and Sundays from the date range | The box shows how many days were skipped |
Note
Public holidays are entered here
Schedule. The Public holidays block in Attendance rules only counts the year's holidays and has a Manage in Work schedule button that brings you back here.Warning
Deleting a day off changes standard days right away
Save or delete.07 · Requests
Time off, time corrections, overtime and approvals
Anything that needs someone else's approval — time off, fixing a missed clock-in, overtime — goes through Requests.
Leave types and symbols
Your company creates its own leave types, such as Annual leave or Sick leave. Each type has a symbol, for example L, shown in Timesheet cells, and is either paid or unpaid.
Leave balance
The number of days of a leave type you still have in the year. Remaining equals your entitlement, minus days used, minus days pending approval.
Approval flow and Delegate
A request can go through several approval steps, for example the department head first, then the director. Delegate hands your approvals to someone else while you are away.
The Requests page has three tabs. My requests are the requests you sent. To approve are the requests waiting for your approval. All only shows for people who can see everyone.
Send a request
- 1
Open
Requests▸My requestsand read your balance. ClickRequestson the menu bar and choose theMy requeststab. Each type with a yearly number of days shows a card: the days remaining, with “of {n} days · {n} used · {n} pending”. Below is the table of your requests.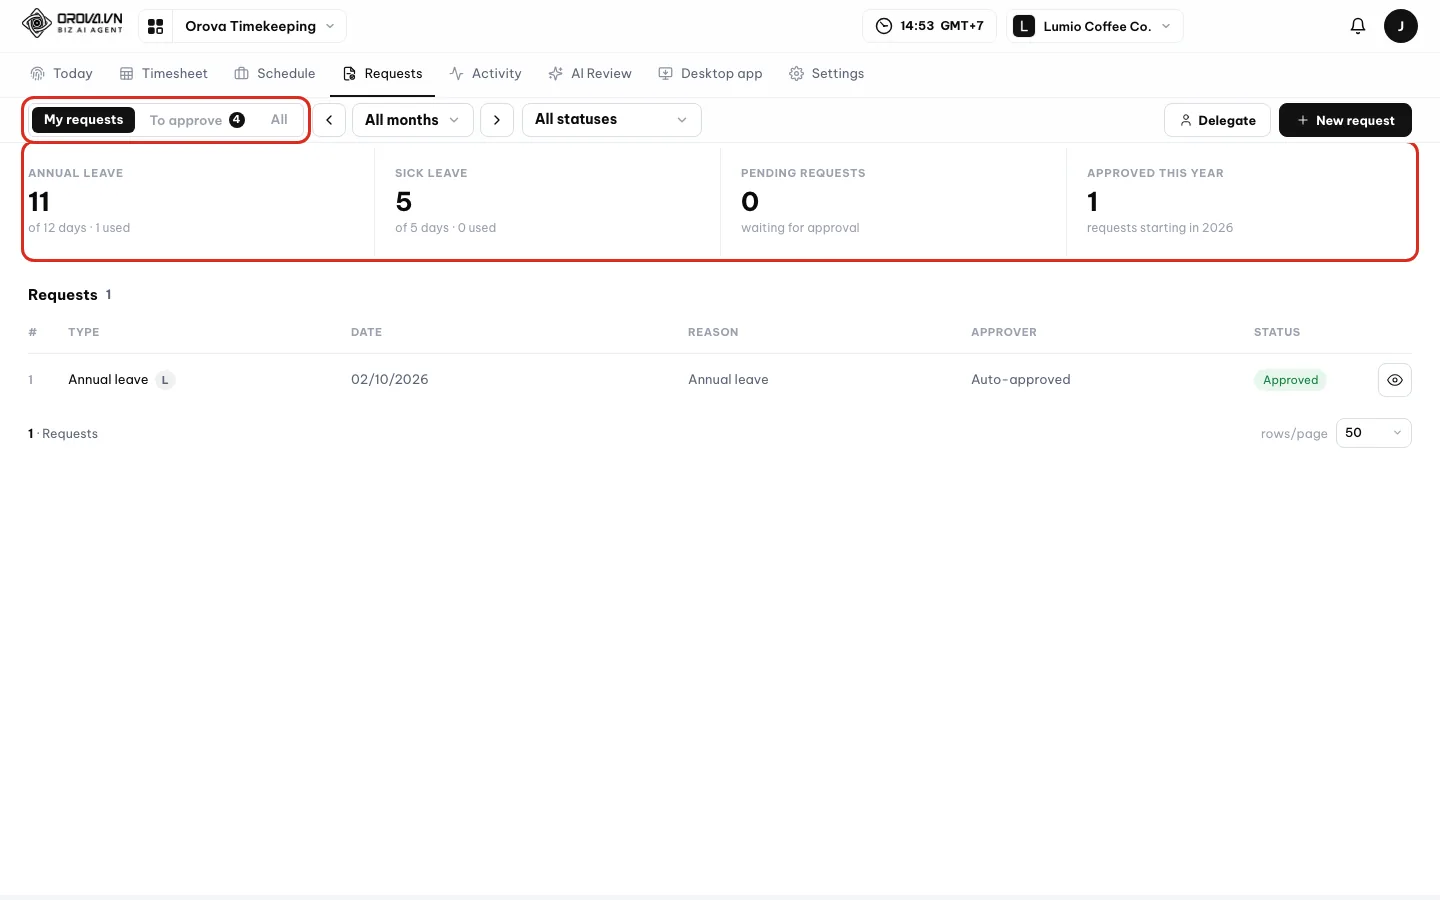
My requests: leave balances and the requests you sent. - 2
Click
New request▸Time off. Choose aLeave type; your balance shows right below. ChooseFromandTo. Choose aPart of day:Full day,By shift segmentorHours. Write aReason, attach an image or PDF withChoose filesif needed, then clickSend.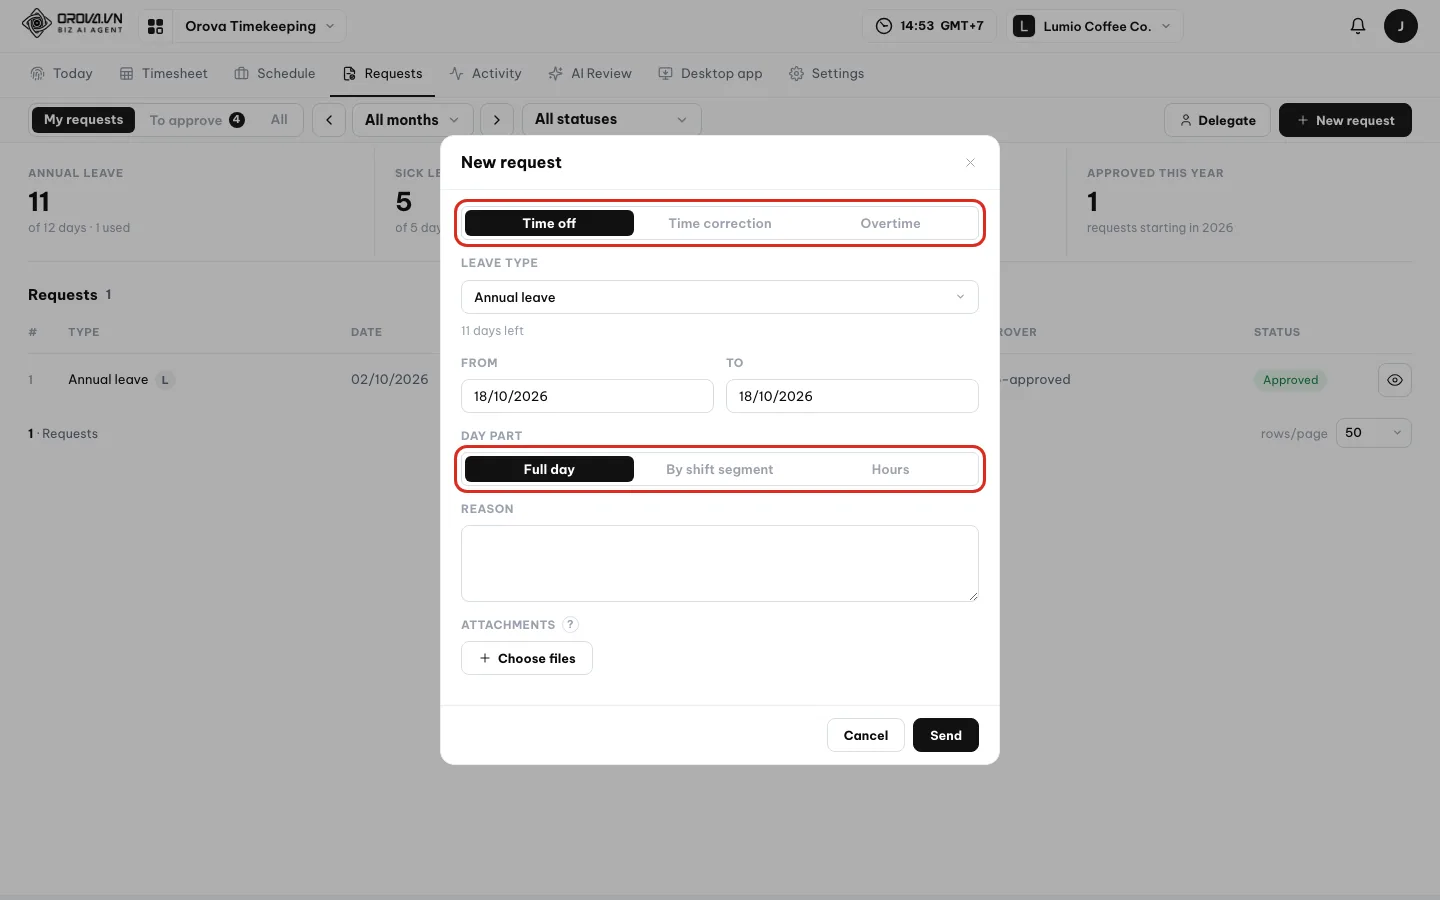
A Time off request: pick the type, dates, part of day and reason. - 3
Forgot to clock in? Send a
Time correction. Worked overtime? SendOvertime. In theNew requestbox, chooseTime correctionand fill inDate,Clock in,Clock out. You can only send it within the number of days your company allows. ChooseOvertimeand fill inDate,From,To. Write aReason, then clickSend.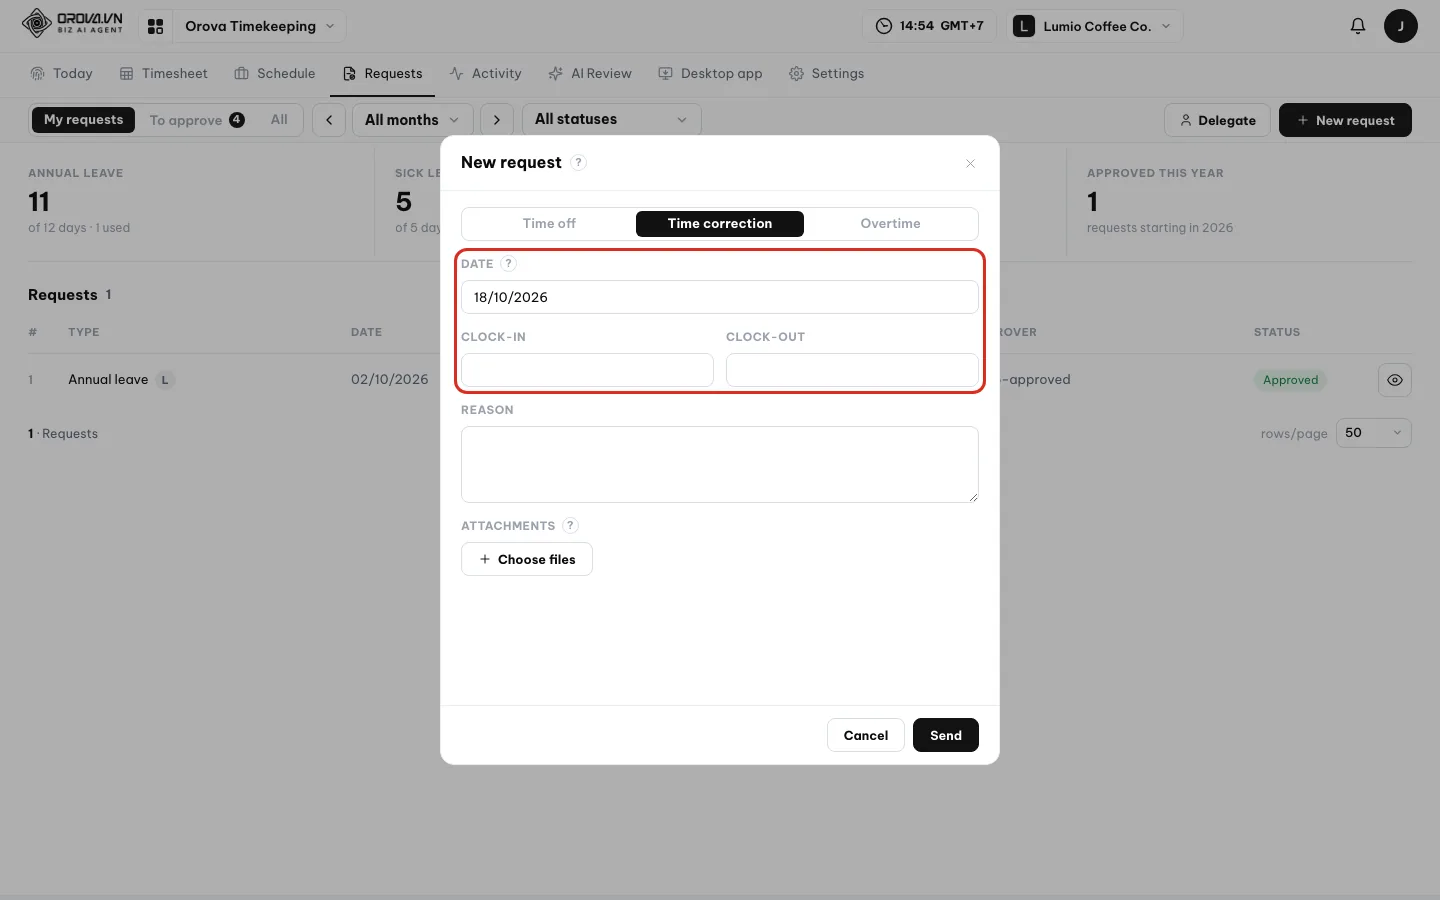
Use a Time correction request when you forgot to click Start or End. - 4
Withdraw a pending request. Click the view icon at the end of the row to open
Request details. If the request is still pending, clickCancel request. This button only shows for the sender while the request is pending.
| Option | What it means | When it shows |
|---|---|---|
Full day | Off for the whole of the chosen days | Always |
By shift segment | Off only for the ticked segments | When your shift has 2 or more working segments |
First half · Second half | Off for the first or second half of the shift | When your shift has only one working segment |
Hours | Off by the hour; fill in From and To | Only when the start and end dates are the same; the hours must be inside the shift |
Approve requests
- 1
Open the
To approvetab. TheTo approvetab shows the number of pending requests. It only lists requests waiting for you to approve, or for someone who delegated their approvals to you. In that case the page says “You are approving on behalf of {list}.”.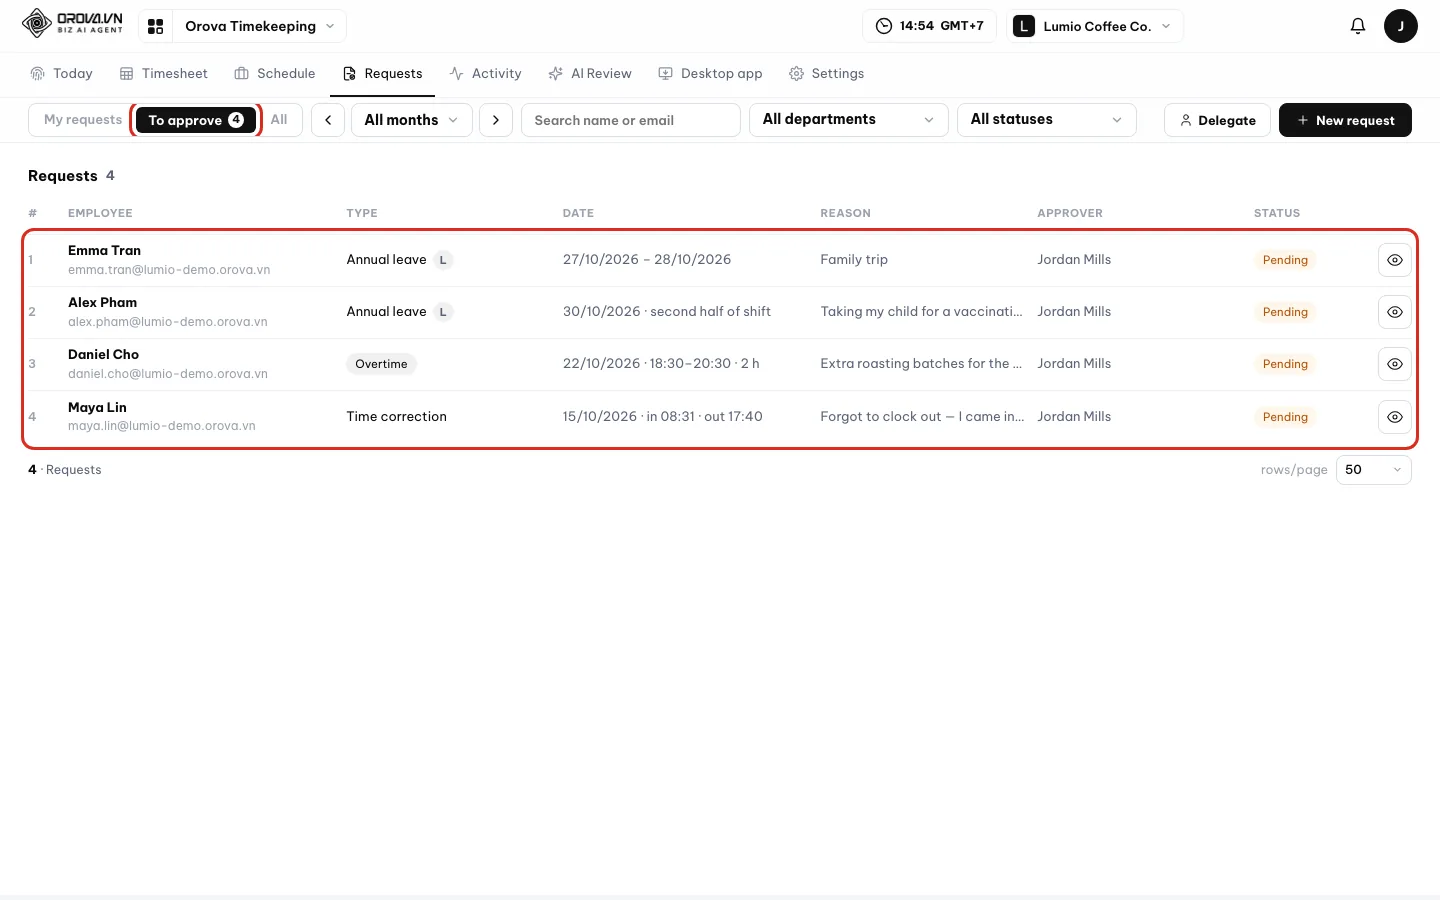
To approve: only the requests waiting for you. - 2
Open the request, then
ApproveorReject. Click the view icon at the end of the row. TheRequest detailsbox shows the details, attachments andApproval steps. ClickApproveif you agree. To reject, write inNote (required to reject), then clickReject.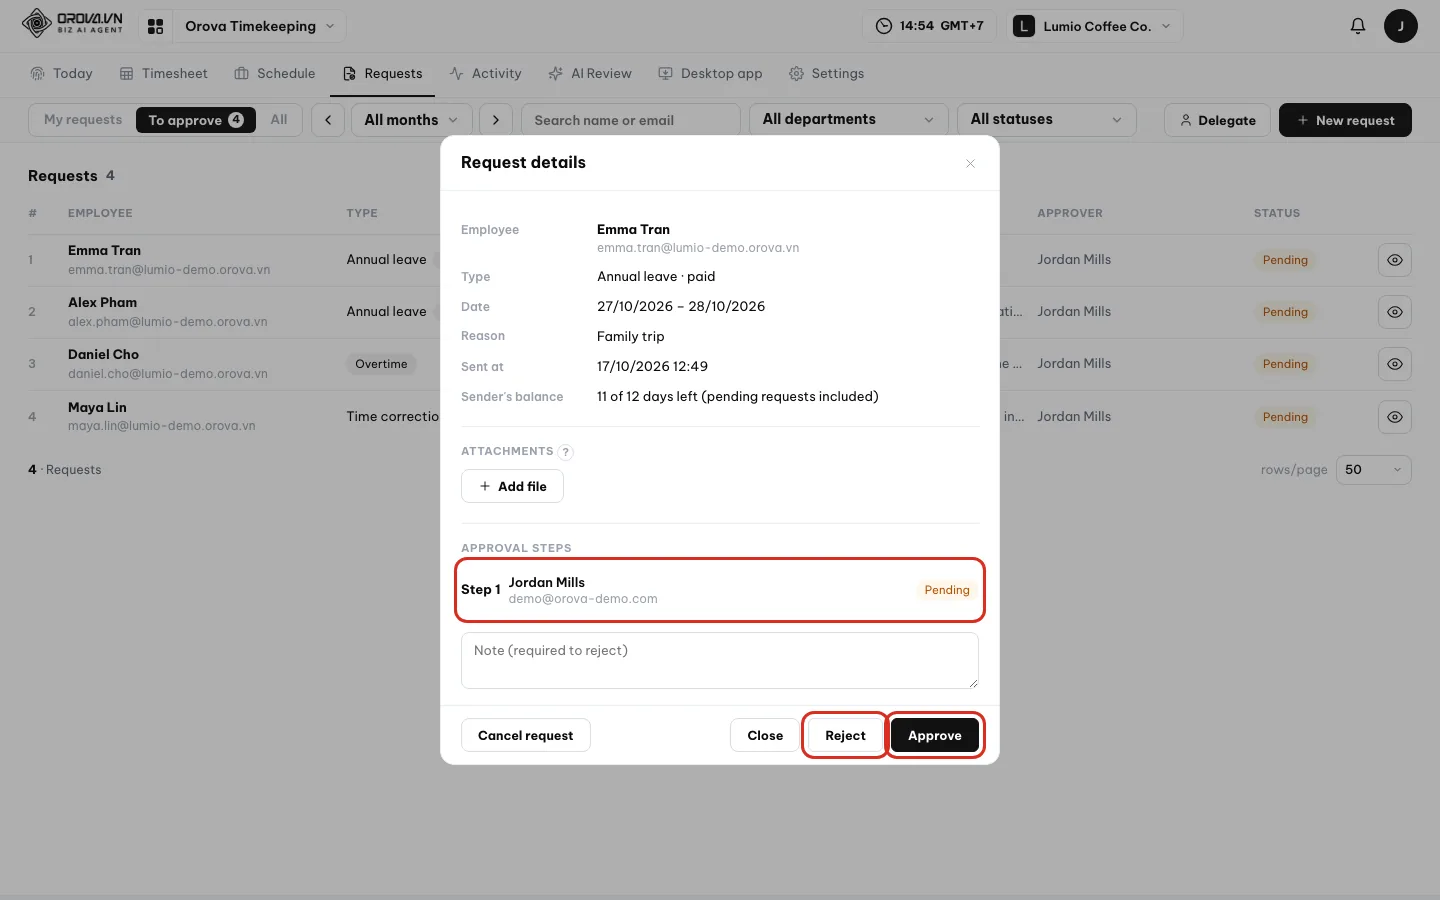
Approval steps show which step the request is at and who approves it. - 3
Away? Set a
Delegate. ClickDelegate. Under “Set a delegate”, choose one or more people, pickFromandToor turn onNo end date, then clickSave. Your current delegates are listed at the top of the box and can be cancelled.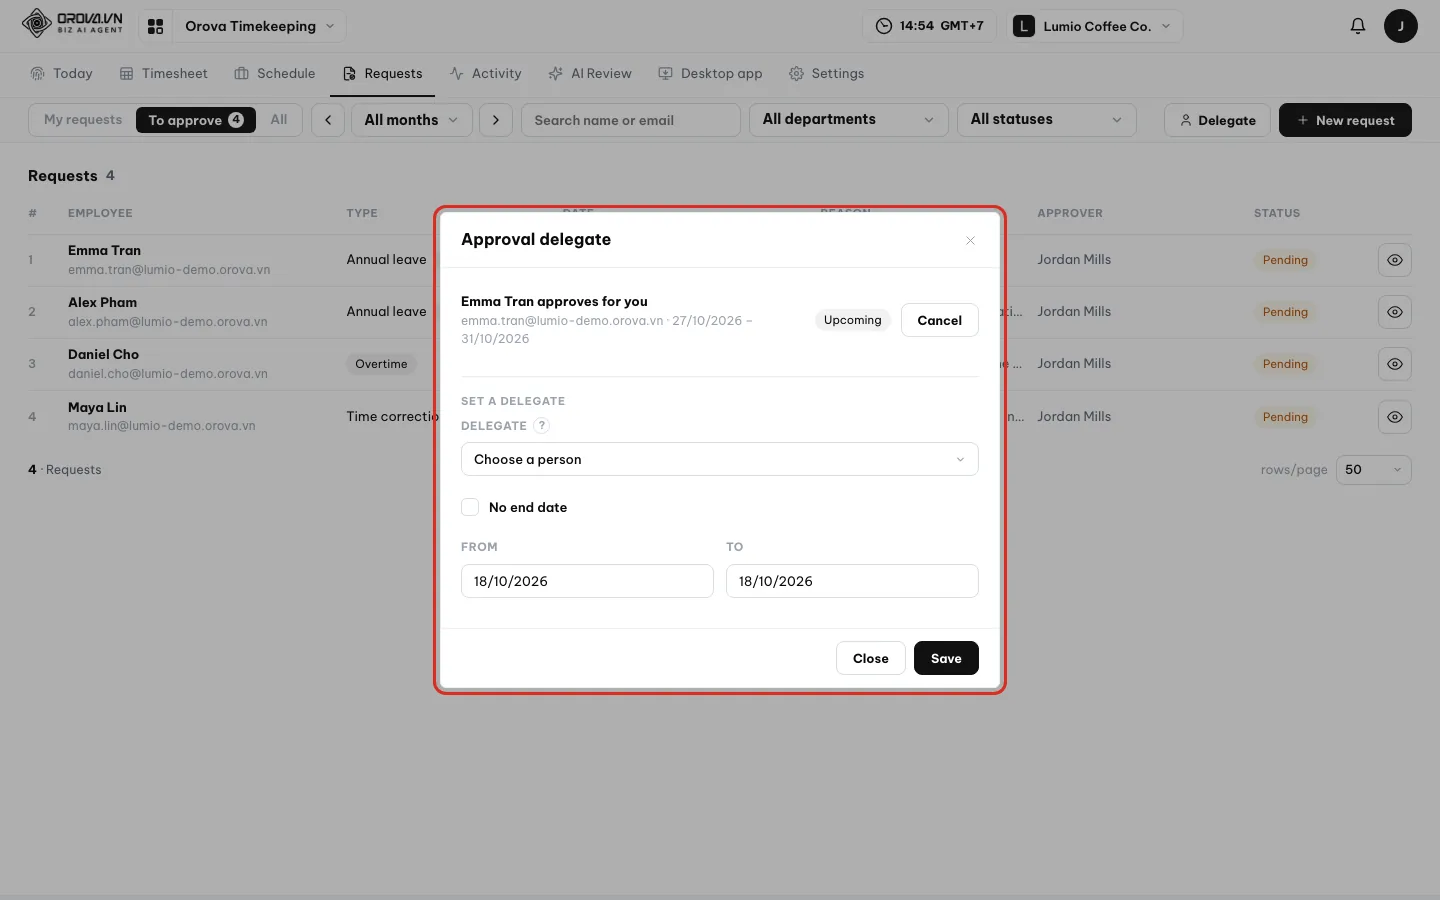
Delegate so requests don't get stuck while you are away. - 4
See every request in the company. The
To approvetab does not show requests other people approve. To see every request, open theAlltab and filter by status:Pending,Approved,Rejected,Cancelled. This tab needs the permission to see everyone.
| Message | Cause | How to fix it |
|---|---|---|
| “You already have a request for these dates.” | Another request already covers the same day | Open the old request, cancel it if it is wrong, then send again |
| “You do not have enough days left for this request.” | Your balance is used up and your company blocks requests when out of days | Pick another leave type or ask your manager |
| “The dates you picked have no working days.” | All the chosen days are days off | Pick a different date range |
| “It is too late to request a correction for this day.” | Past the number of days your company allows | Ask your manager to edit the day on the Timesheet |
| “The requested times do not fit that day's clock records.” | The clock-in and clock-out times conflict with existing sessions | Open the day's details on the Timesheet to see the real sessions |
| “Please add a reason.” | The Reason field is empty | Fill in a reason and send again |
| “Your company has no leave types turned on yet.” | No leave type has been turned on | A manager turns them on in Settings ▸ Requests |
Warning
Approving changes real data
08 · Activity
Computer activity by day
Activity shows, day by day, whether clocked hours had real input on the computer.
Activity coverage
The share of 10-minute blocks in the shift that had real activity. For example, an 8-hour shift has 48 blocks; if 36 had activity, coverage is 75%.
Keys/min and Clicks/min
The average number of key presses and mouse clicks per active minute. The app only counts how many times, it never knows what you type.
Minutes not counted and Needs review
Minutes not counted are minutes with signs that a person was not at the controls: only mouse movement, typing too fast, a machine-like rhythm, or input generated by software. These are signs to review, not conclusions.
The Activity page needs the desktop app. On a day with no data, the page says “No computer data for this day yet. Employees install the app from the App section.”
Read one day of activity
- 1
Open
Activityand pick a day. ClickActivityon the menu bar and use ‹ › to change the day. The tiles at the top:Employees,With computer data,App connected,Average score,Needs review. The table below has one row per person.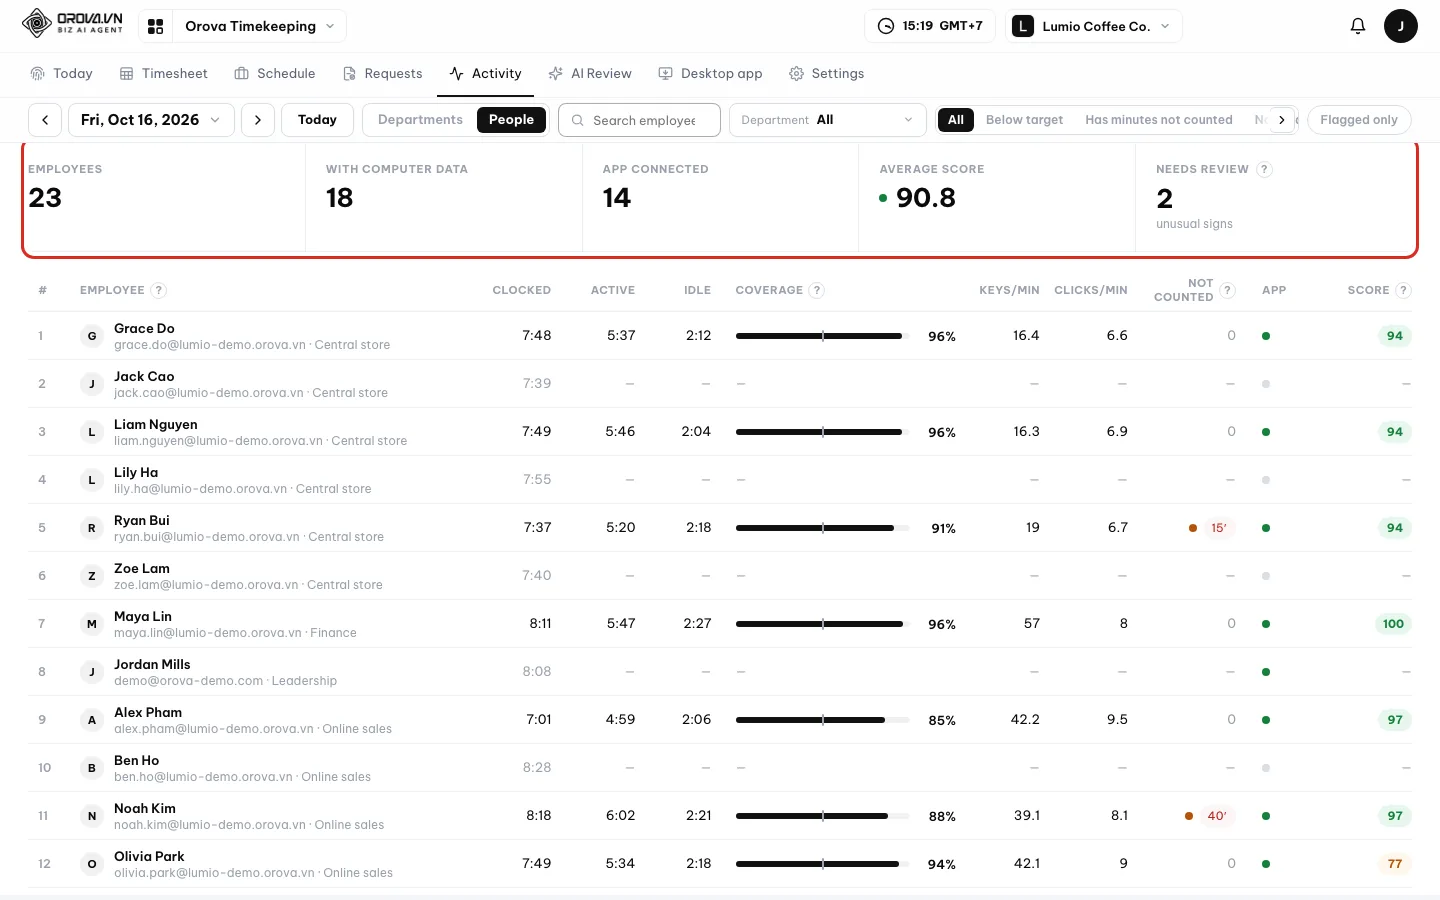
Activity by day: tiles at the top, table below. - 2
Quick filters. Click
All,Below target,Has minutes not countedorNo data yetto filter right on the page. ClickFlagged onlyto keep only people with flags. TheDepartmentfield and the employee search work the same as on the Timesheet.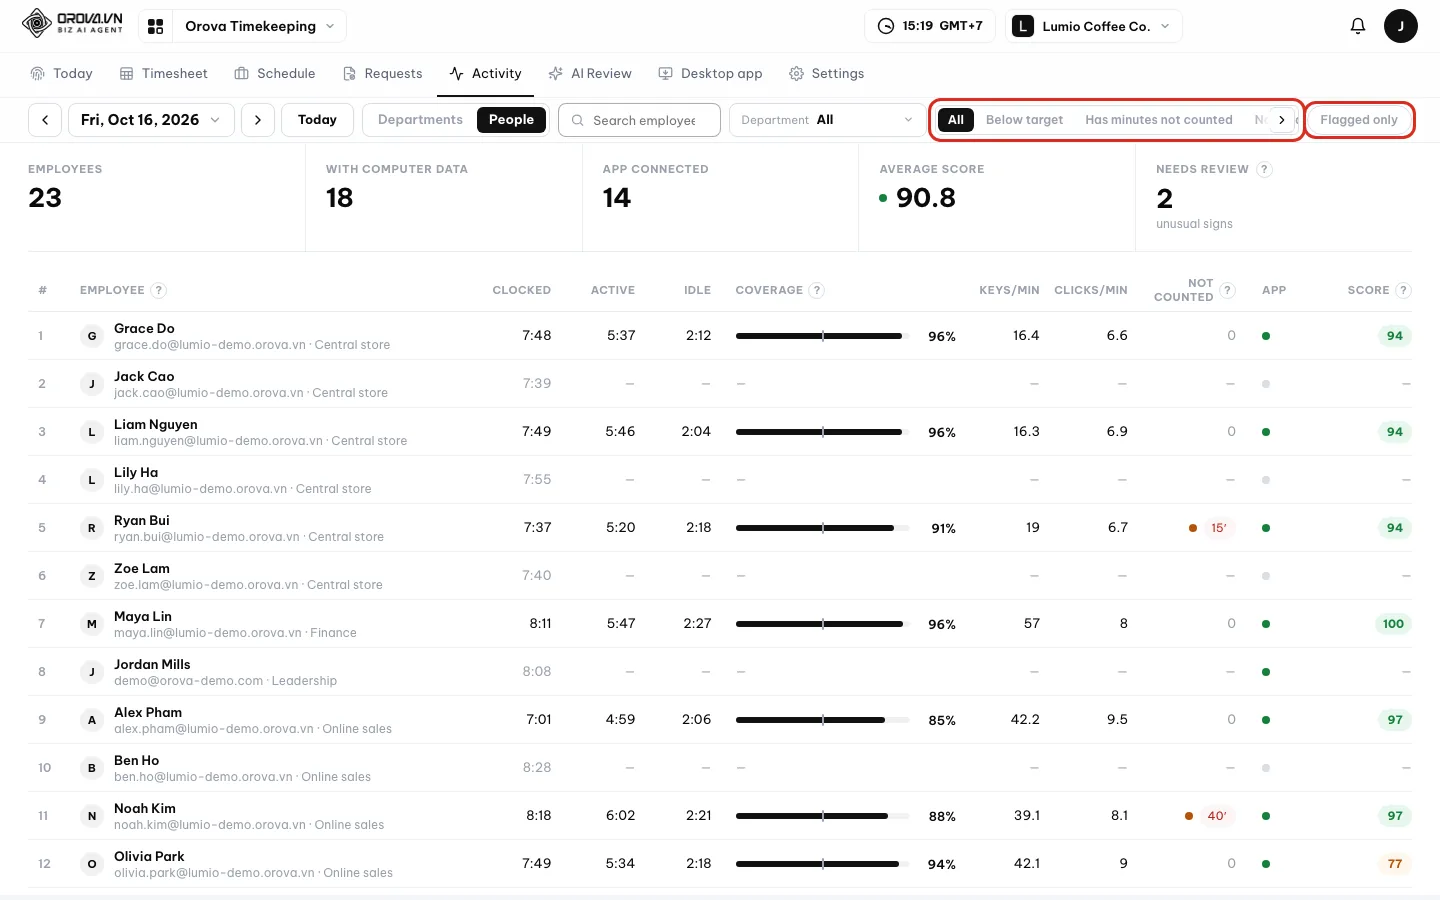
Quick filters to find the people to look at. - 3
Click a row to open the detail panel. The panel on the right shows
Active,Idle,Coverage,Keys/min,Clicks/min,Minutes not counted. In theTimeline, each cell is a 10-minute block. Cells with a dashed border are outside the shift; cells with a red border have minutes not counted.Score breakdownshows where the score comes from.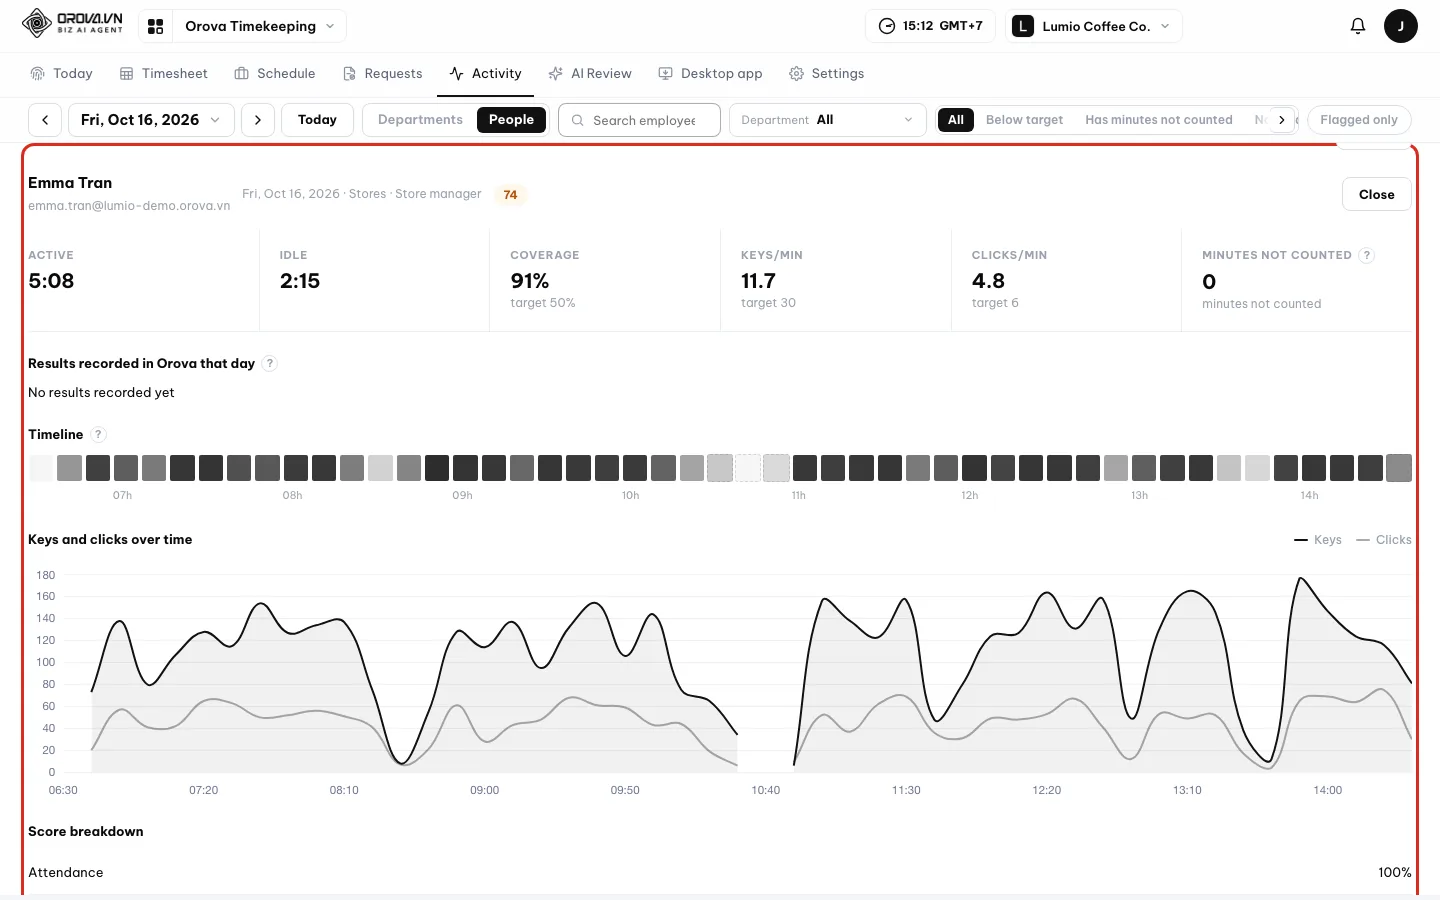
The detail panel: 10-minute timeline and score breakdown. - 4
Check apps and results in Orova. Scroll down to
Apps & websites used: only app names, domains and time, no titles. TheResults recorded in Orova that dayblock counts emails sent, customer updates, meetings and other tasks.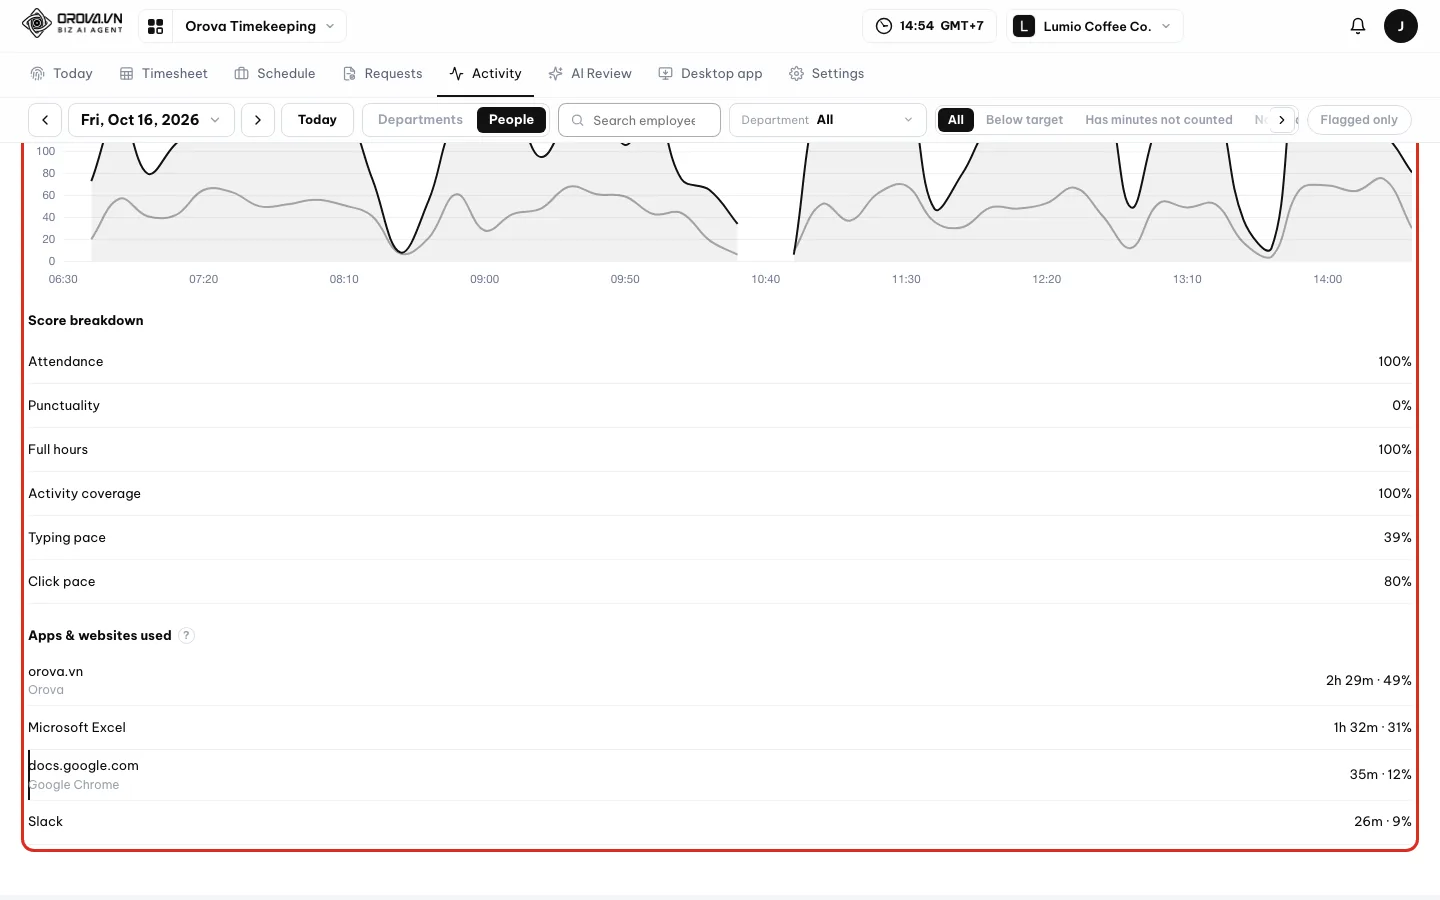
App names, domains and work results in Orova. - 5
Read
Needs review. The end of the panel lists the signs, for example working nonstop for more than 2.5 hours, an unusually even rhythm, input generated by software, or several computers at once. Use them to talk with the employee, not as a conclusion.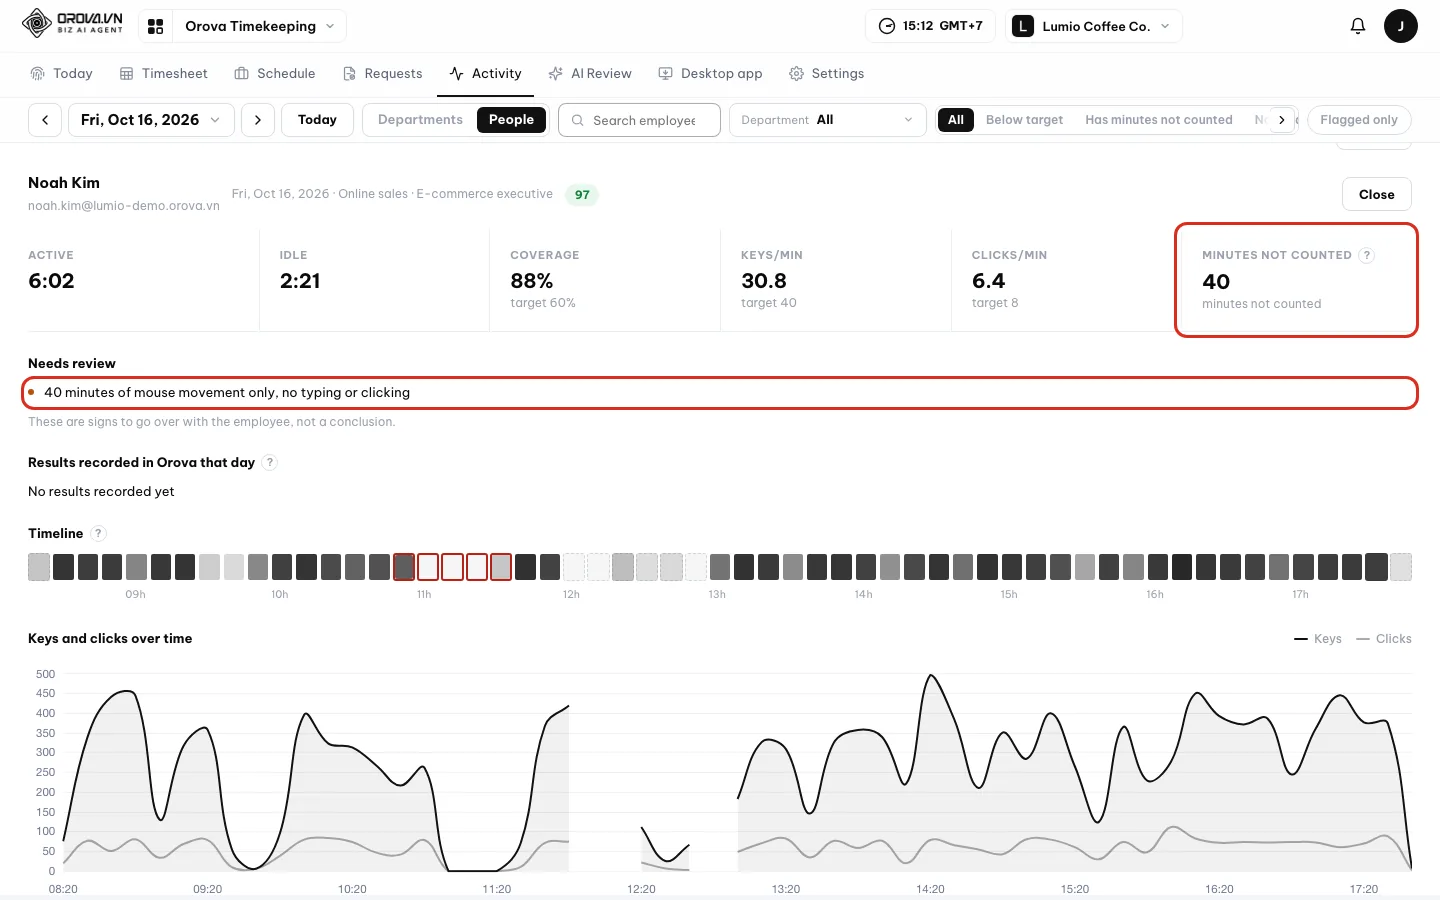
Needs review signs are hints, not conclusions.
| Column | What it means | Notes |
|---|---|---|
Clocked | Time clocked in during the day | From the Start and End buttons |
Active · Idle | Time with input and time without input | Measured by the desktop app |
Coverage | Share of 10-minute blocks with activity | Compared with the standard your company sets |
Keys/min · Clicks/min | Typing and clicking pace | Empty when the computer does not allow counting |
Not counted | Number of minutes not counted | Reasons are in the detail panel |
App | Whether the desktop app is connected | — |
Score | The day's score | Click the header to sort |
Note
App recording must be turned on by your company
Record apps & websites in use in Settings ▸ Attendance rules. Until then, the block says “Your company has not turned on app & website tracking”.Tip
Computers that don't count keys and clicks
09 · AI Review
Monthly AI Review
The AI reads a whole month of attendance and activity data, then writes a review based on your company's rubric.
Rubric
The set of criteria the AI scores against, each with a weight. Your company sets it in Settings ▸ Benchmarks & weights ▸ AI Review rubric.
Grade and Evidence
Each review has a score and a grade of A, B, C or D. Each criterion comes with evidence: real numbers taken from attendance and activity.
Position and department descriptions
The job descriptions the AI reads to understand the context. For example, a coffee roaster types less than an online sales rep. Without descriptions, the review is less accurate.
The AI Review page needs the AI Review permission. The AI only reads department descriptions, position descriptions and attendance and activity data. Every run uses your workspace's quota.
Run a review
- 1
Open
AI Reviewand check the descriptions. ClickAI Reviewon the menu bar. The tiles showReviews this month,Employees reviewed,Missing descriptions. If theMissing descriptionstile has the “Needs adding” label, clickAdd descriptionsto write them first.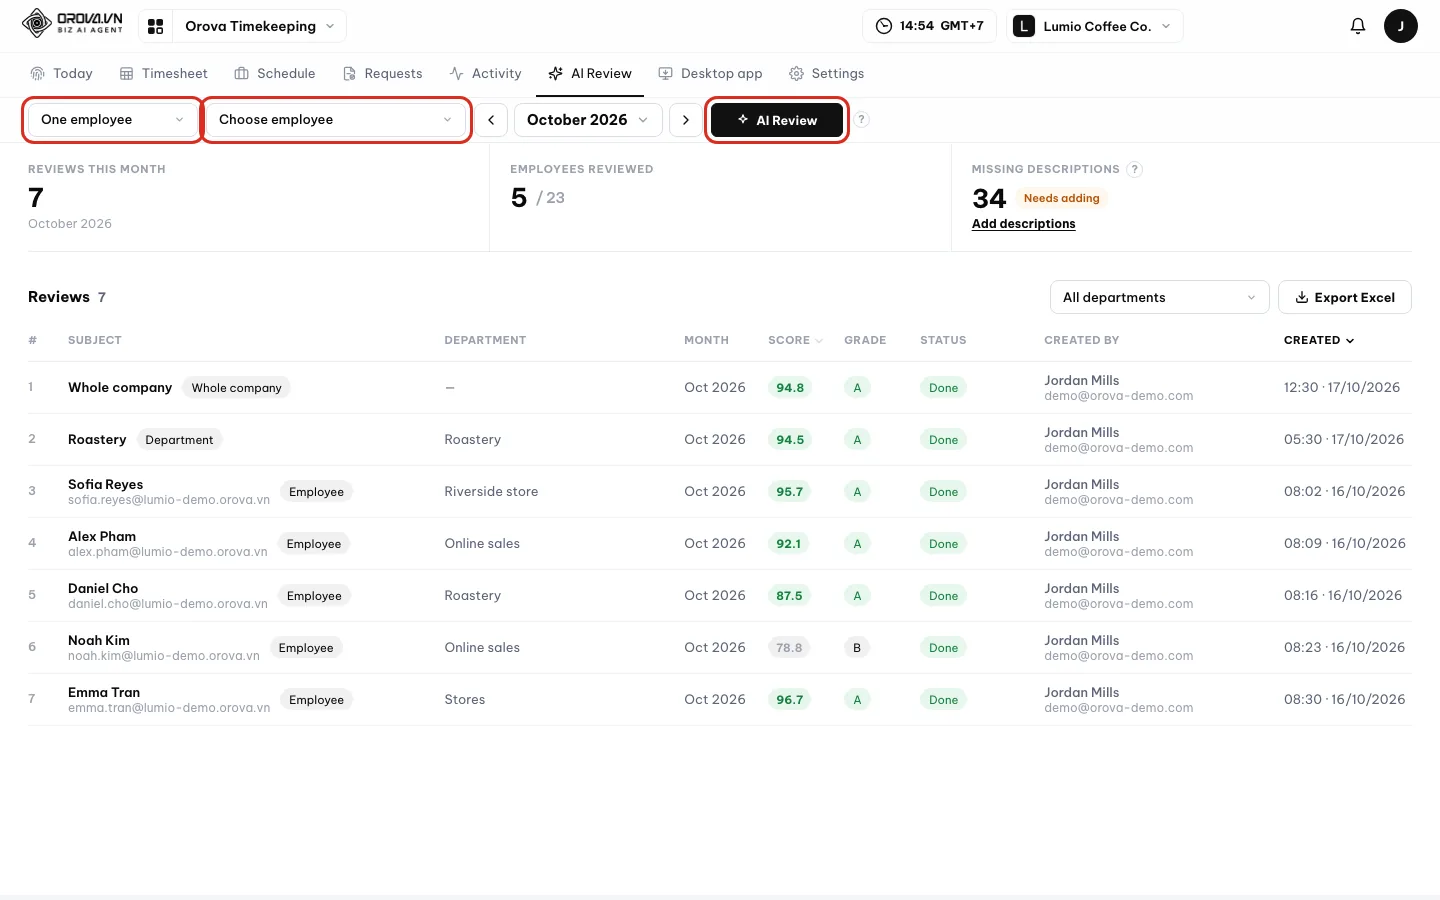
AI Review: tiles at the top, review table below. - 2
Pick a scope, click
AI Reviewand read the quota. UnderScope, chooseOne employee,Whole departmentorWhole company, then pick the person or department and the month. ClickAI Review. The estimate box shows the number of people, the number of runs and the estimated quota. If you agree, clickRun.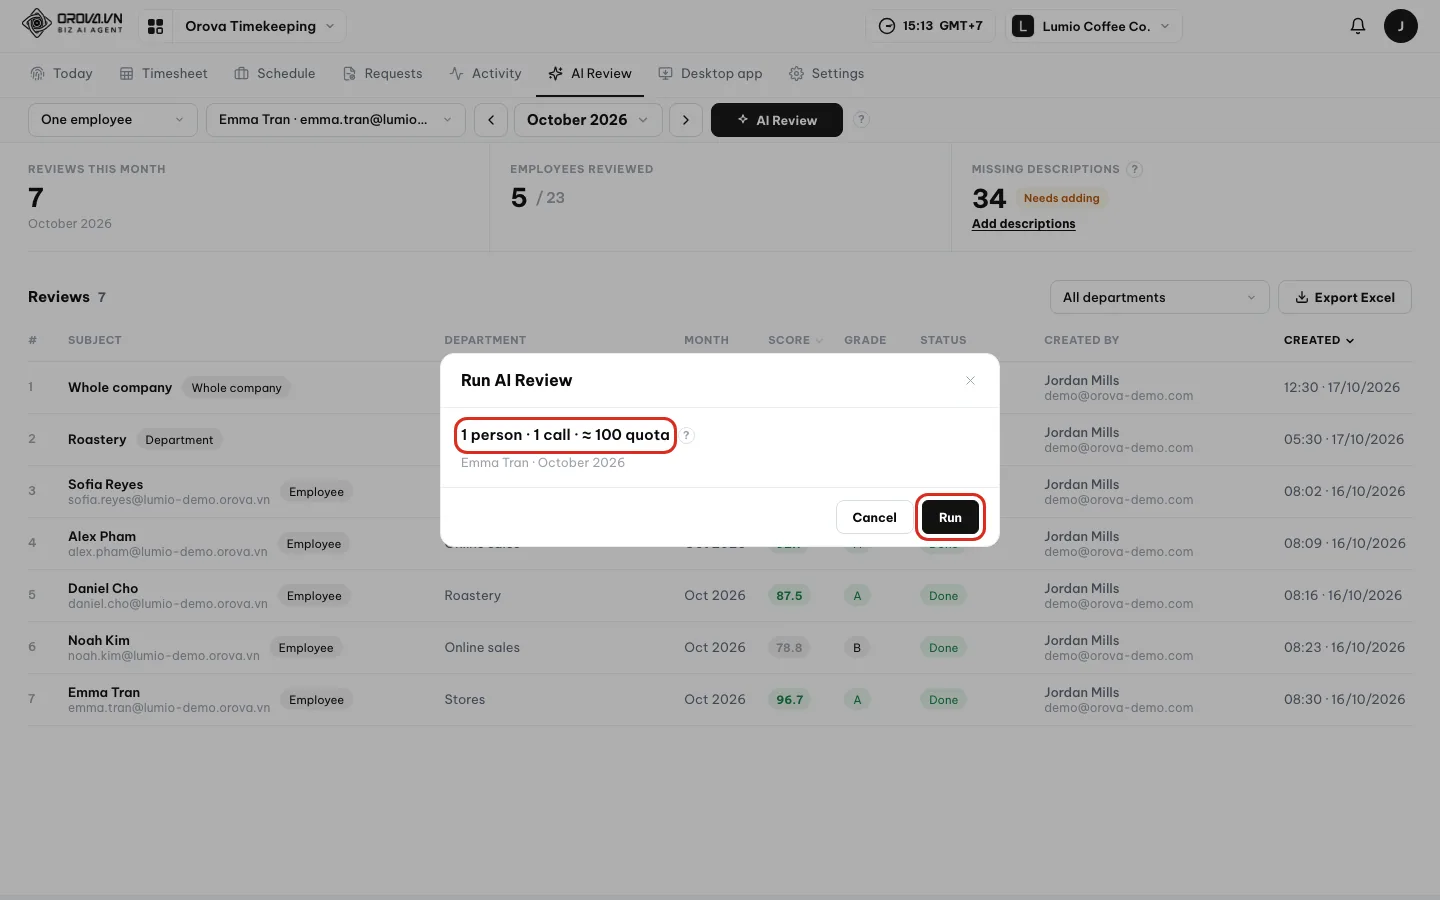
The estimated quota shows before you click Run. - 3
Wait until it is done, then open the review. The review runs in the background. The
Statuscolumn goes from Queued and Writing… to Done. Click the row to open it. You see the score, the grade, theCriteriatable with weights and evidence,Strengths,Watch out,SuggestionsandNumbers given to the AI.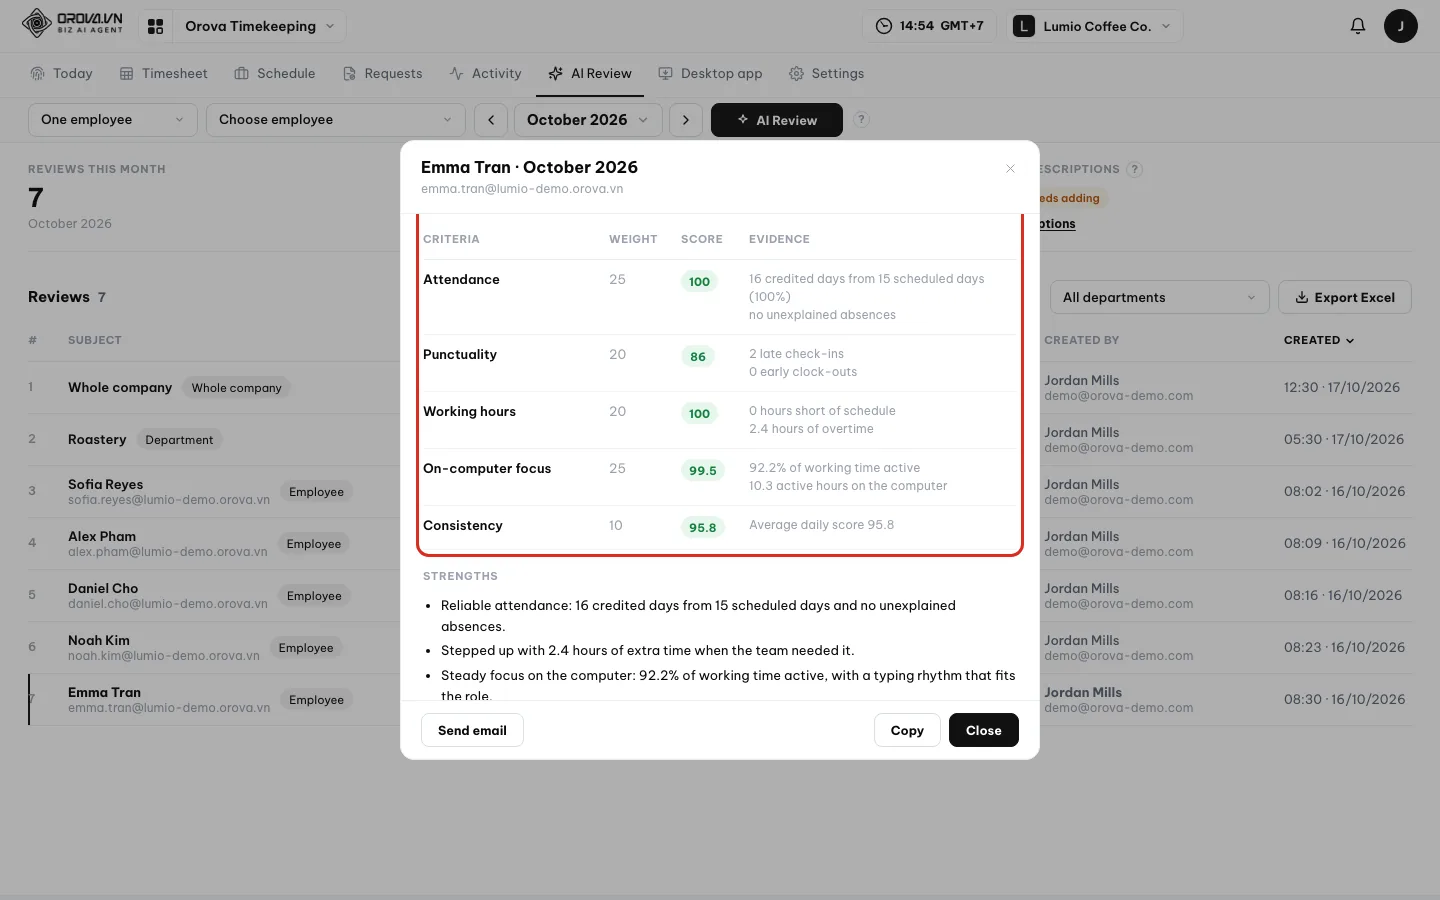
A review: score, grade, criteria and evidence. - 4
Email, copy or export to Excel. At the bottom of the box, click
Send emailand choose to send it to the Employee, the Manager or Both. Orova says “Queued for sending”. ClickCopyto copy the content. On the main page, clickExport Excelto download the review table.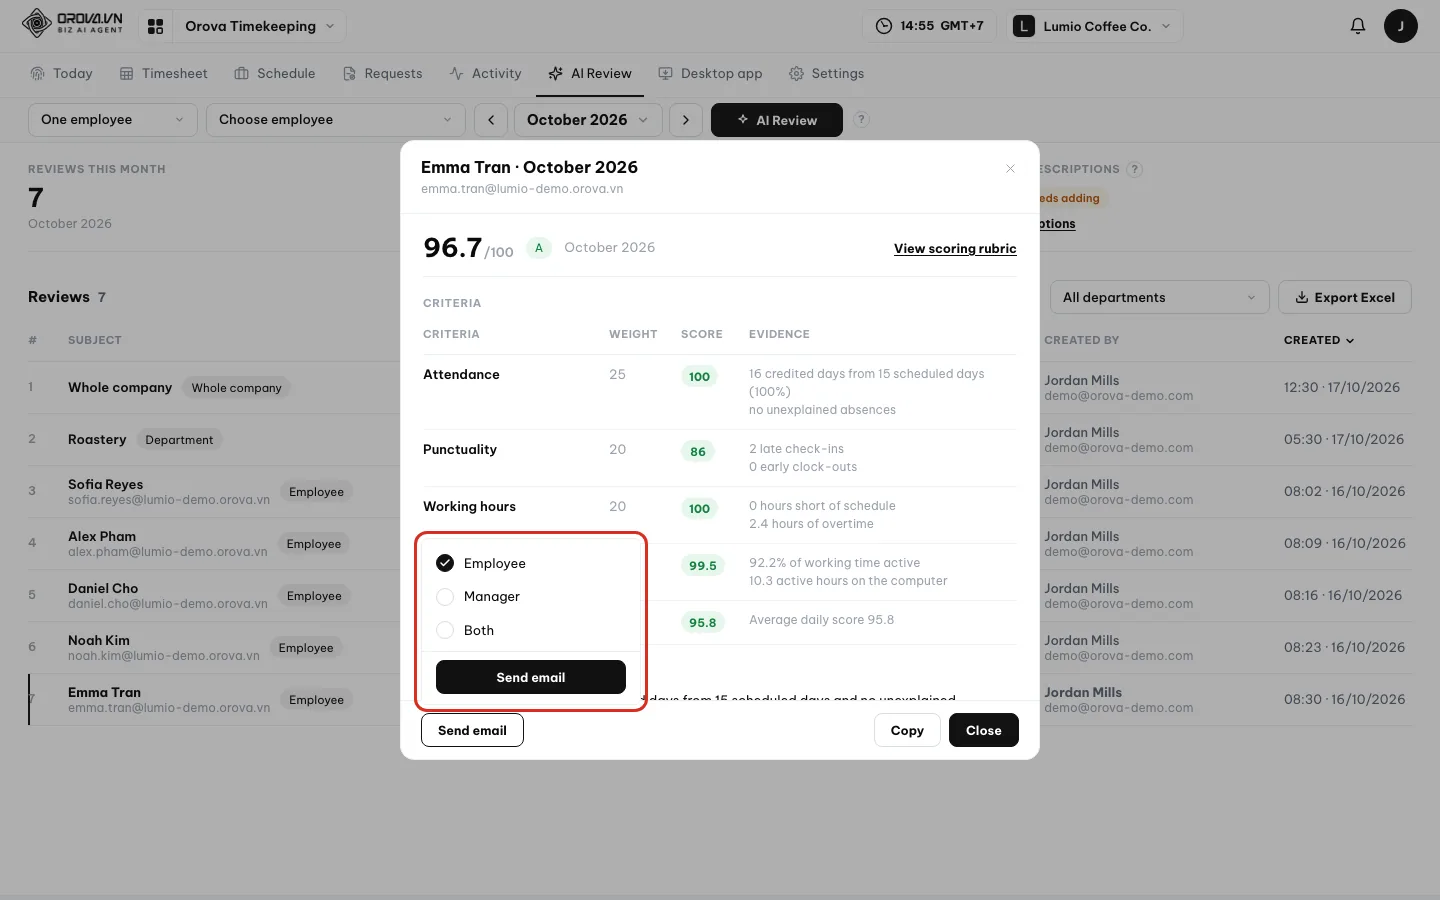
Email the review to the employee, the manager or both. - 5
Whole company reviews: see the top and bottom groups. A
Whole companyreview also hasGrade distribution,Top 10,Bottom 10andAverage per criterion. AWhole departmentreview has aMemberslist.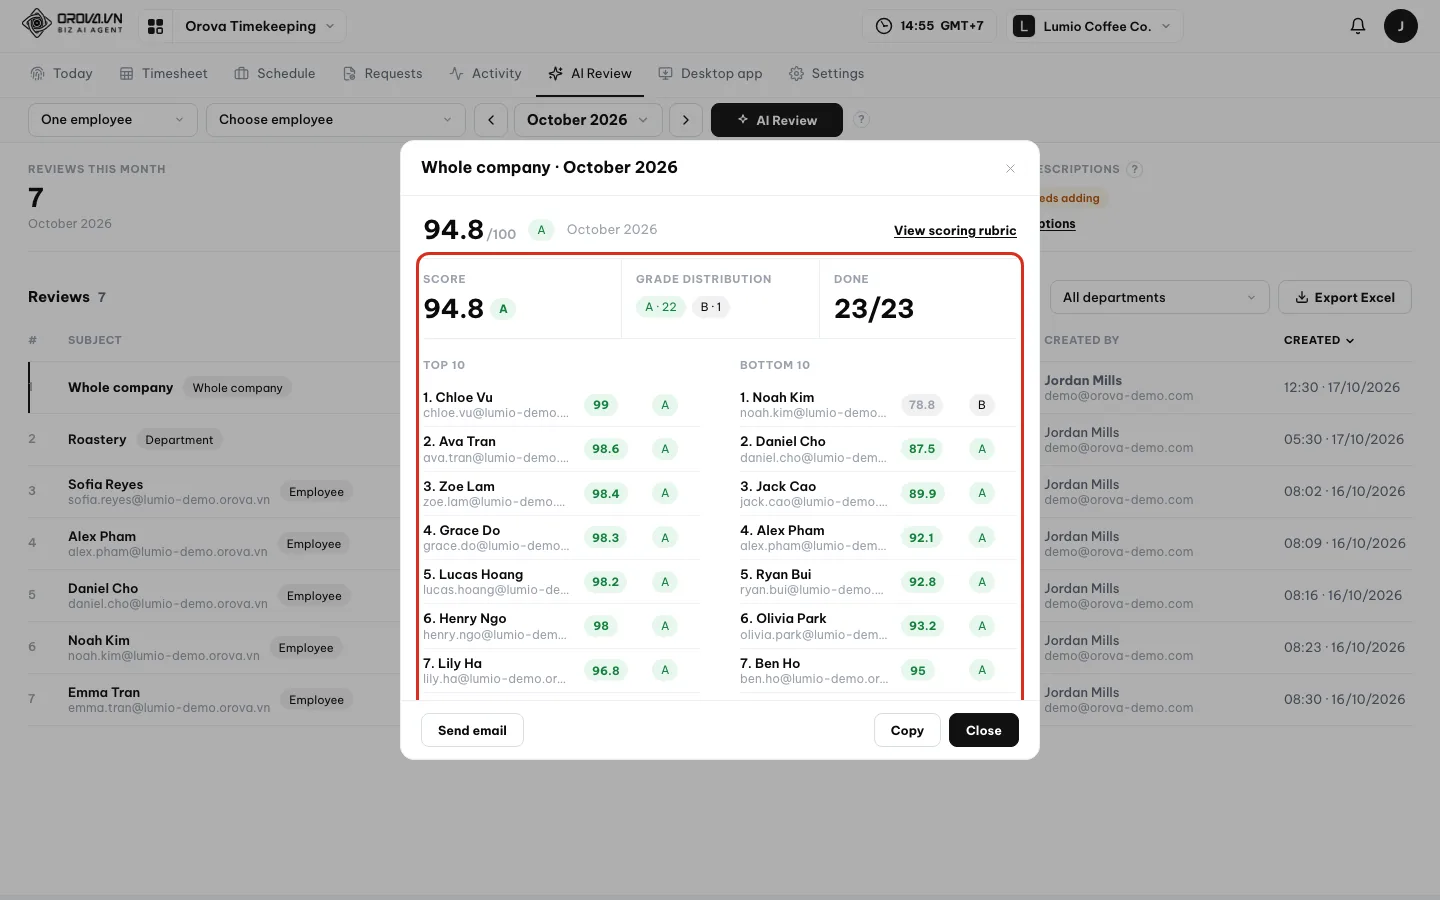
The whole company review shows who leads and who needs support.
| Button / field | What it means | Notes |
|---|---|---|
Scope | One employee, Whole department or Whole company | Changes the person or department picker next to it |
AI Review | Opens the quota estimate box | No AI call yet, no quota used |
Run | Starts writing the review | Uses quota; the number shows before you click |
Run again · View | Shown when that month already has a review | Run again uses quota |
View scoring rubric | Shows the criteria and weights in use | Edit them in Settings ▸ Benchmarks & weights |
Score · Grade columns | Score and grade A/B/C/D | Click the Score header to sort |
Status column | Queued, Writing…, Done or Failed | Whole company reviews have a progress bar |
Send email | Sends the review by email | A real email, no AI quota |
Copy | Copies the review content | — |
Export Excel | Downloads the month's review table | — |
Warning
Run and Run again both use quota
Run or Run again uses quota based on the real AI cost. Department and whole company reviews are split into several runs. When your workspace is out of quota, Orova says “Your workspace is out of quota. Top up to run AI Review.”.Note
What the AI receives
Tip
Write descriptions before you run
10 · Employees
Turn on time tracking for employees
Anyone who needs to track time must be turned on here. You also assign each person a shift, a position and the date their work starts counting.
Employee
A member of the workspace. When you invite someone to the workspace, they automatically get a row here. You do not create employees separately in Timekeeping.
Tracking (on / off)
The switch that decides whether a person's work is counted. When it is on, they see the Start button on the Today page. When it is off, they do not need to track time, for example a contractor.
Counted from
The date from which work is counted for that person. For example, if a new hire starts on August 17, set August 17. Leave it empty if you do not need it yet.
Default shift
People without their own shift follow the default shift. In the table, the Shift column shows Default for these people.
Open Timekeeping and click Settings in the menu bar. The left menu has 8 items, and the first is Employees. Only people with the Manage timekeeping permission can see Settings.
Use this screen during initial setup, and whenever someone joins, changes shift or leaves. This screen does not call AI and uses no quota.
| Button / field | What it does | Notes |
|---|---|---|
Search by name, email, department | Quickly find one person | The table narrows as you type |
All departments | Filter by department | Includes No department to find people not yet placed |
All shifts | Filter by shift | Default means people on the default shift |
All positions | Filter by position | Includes No position |
Any status | Filter people with tracking on or off | Tracking on / Tracking off |
Clear filters | Remove all filters | — |
Counted from | The date work starts counting | If not set, the edit dialog shows Not set |
Tracking | That person's tracking status | Pill Tracking on or Tracking off |
Apply / Clear | Bulk change for the checked rows | Appears when you check at least one row |
Turn on tracking and assign a shift to each person
- 1
Open the employee list. Go to
Settings▸Employees. The heading shows the total number of people and how many are tracking time. Use the search box and the four filters to narrow the list. Theshowing {a} / {b}line tells you how many people are shown.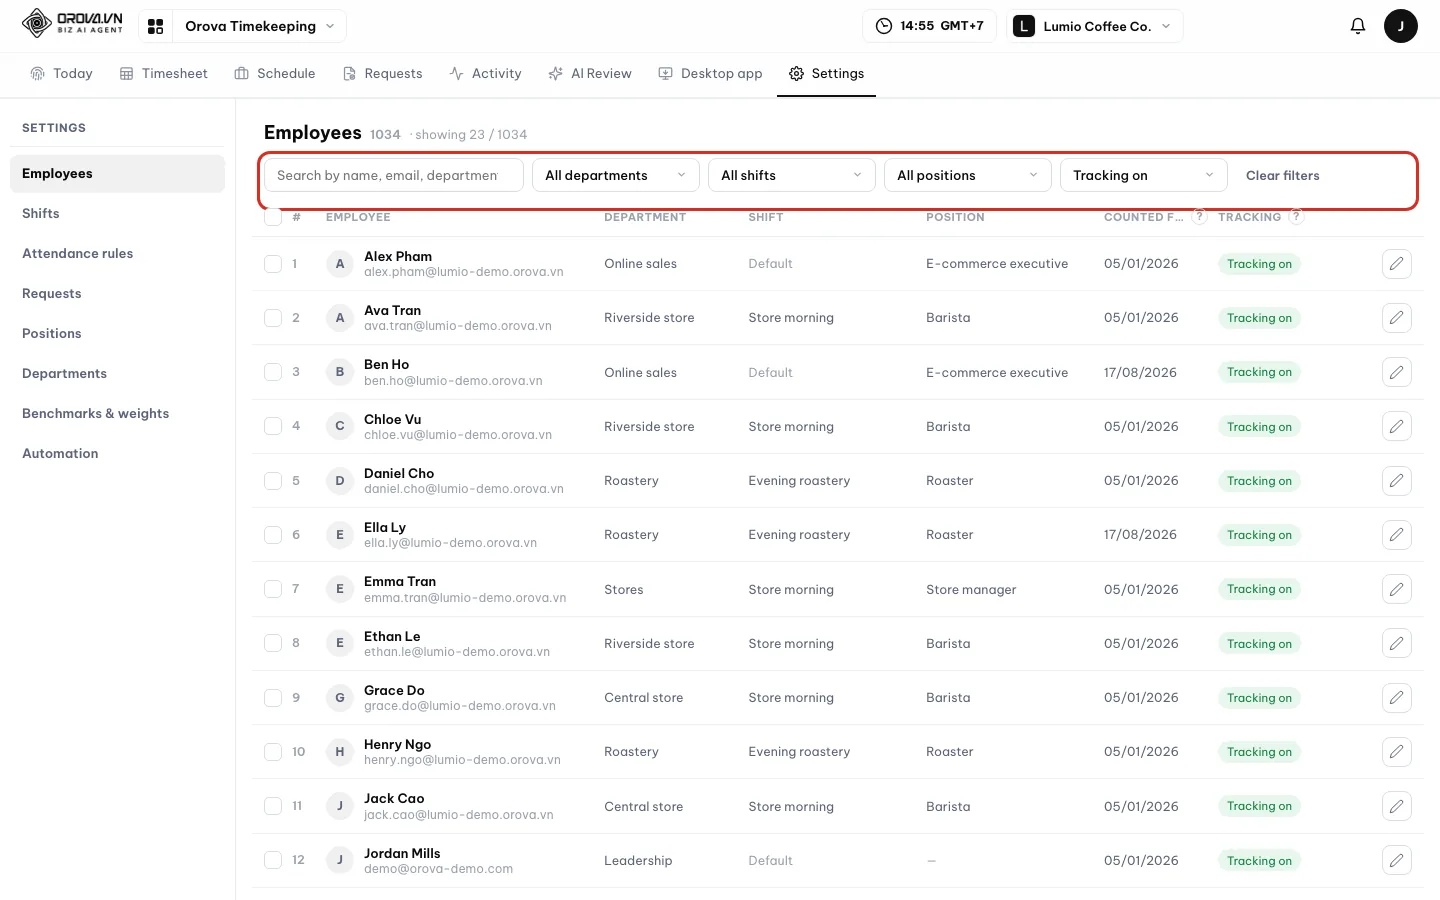
Each workspace member is one row. - 2
Edit one person. Click that person's row or the pencil button. The edit dialog opens. Pick a
Shiftand aPosition, and set theCounted fromdate. Turn on theTrackingswitch if this person needs to track time. ClickSaveand the row in the table updates right away.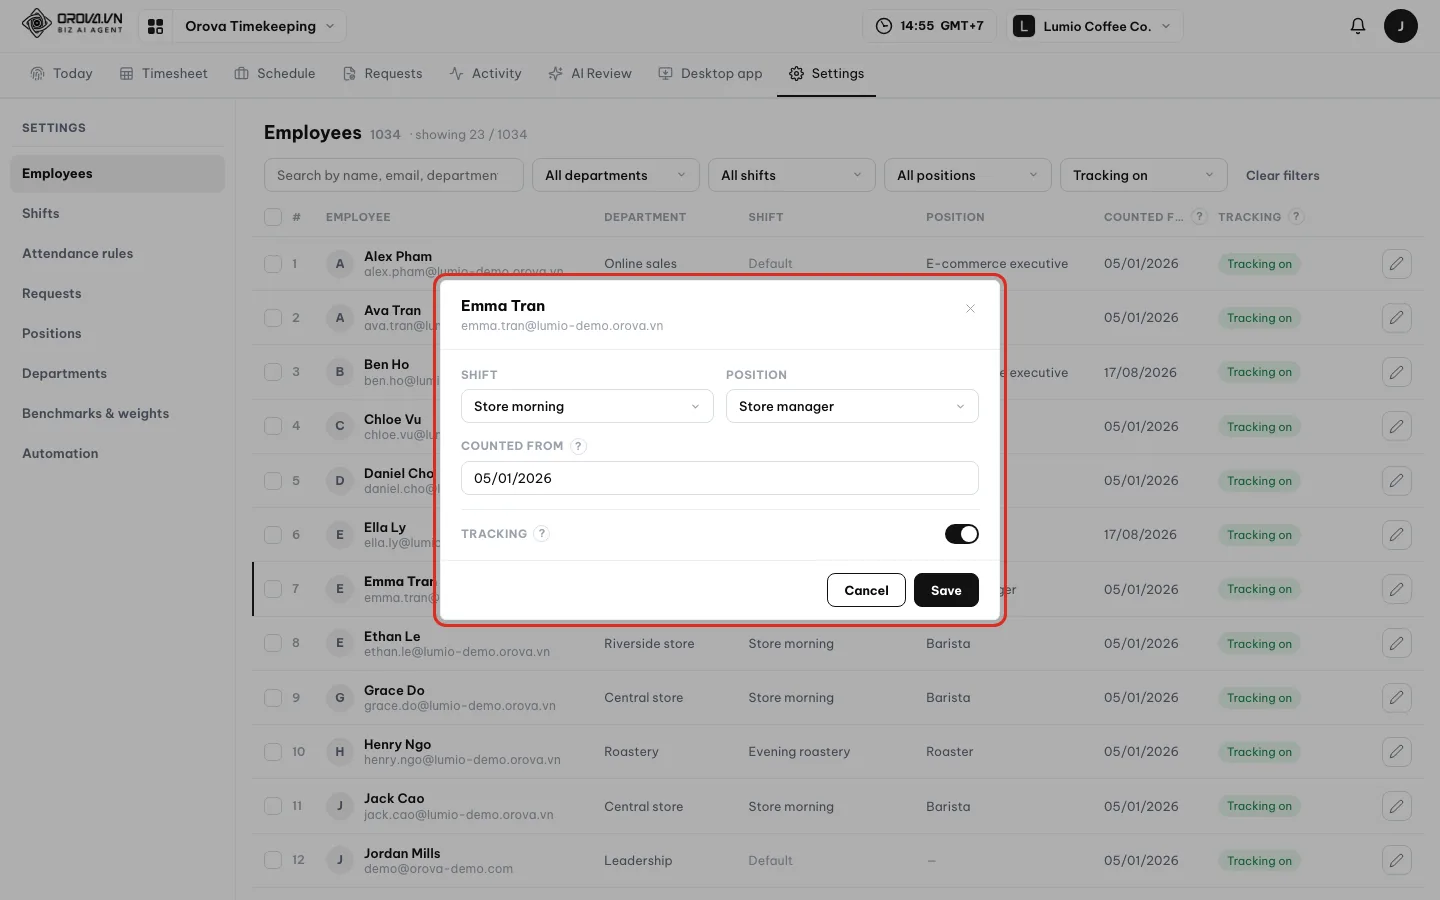
The four fields you can change for a person. - 3
Change several people at once. Check the box at the start of each row you want to change. The bulk bar appears at the top of the table and shows
{n} selected. Pick a shift, a position, orTracking on/Tracking off. Any field left atKeepdoes not change. ClickApply.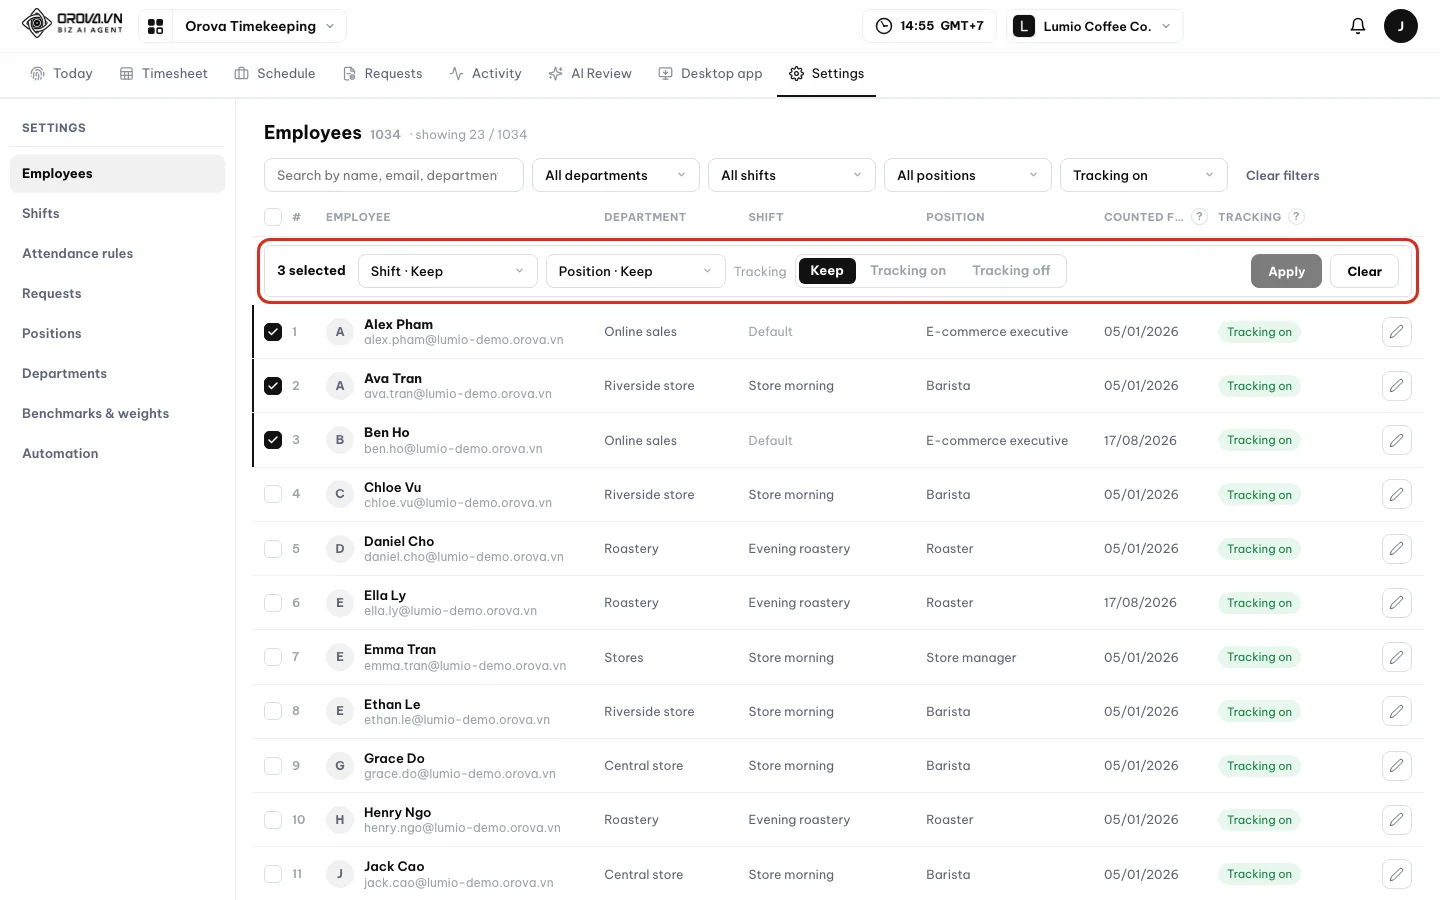
Only the fields you change are applied; fields set to Keep stay as they are.
Note
Departments are not edited here
Department column comes from workspace settings. To move someone to another department, go to workspace settings. If the workspace has no one yet, this screen shows “This workspace has no members yet. Invite people to the workspace to start tracking time.”Tip
People with tracking off
Tracking off do not need to track time and are not counted in a department's employee count.11 · Shifts
Create shifts
A shift tells the system when people start, when they finish, when lunch break is and which days they work. Without a shift, work credit cannot be calculated.
Shift
The standard working hours and the working days of the week. For example, an Office shift runs 08:30–17:30, Monday to Friday, with a one-hour lunch break.
Work / Break segments
A shift is split into several segments in a row. The first and last segments must be Work segments. Hours in a Break segment do not count as work credit.
Late / early grace
The number of minutes you allow as leeway. With a 10-minute late grace, arriving 8 minutes late does not count as late. Leaving early works the same way.
Credit multiplier
The work credit for each day with a full shift. The default is 1. For example, if an evening shift is set to 1.3, a full day earns 1.3 days of credit. Section 05 explains the calculation in detail.
Go to Settings ▸ Shifts. Create shifts before you turn on tracking for employees. A workspace has only one default shift, which applies to everyone without an assigned shift.
| Button / field | What it does | Notes |
|---|---|---|
Add shift | Opens the new shift dialog | — |
Shift name | Name shown in the table and on the Today page | The default shift has a Default pill |
Working hours | Work segments and break times | For example 08:30–12:00, break, 13:00–17:30 |
Working days | Days of the week with work | Unchecked days are days off for the shift |
Late grace (min) / Early leave grace (min) | Minutes of leeway | From 0 to 240 minutes |
Credit multiplier | Work credit for a full-shift day | From 0.1 to 10, default 1 |
Default shift | Makes this shift the default | Only one default shift per workspace |
| Trash can | Deletes the shift | Cannot be undone |
Create a shift with a lunch break
- 1
View your shifts. Go to
Settings▸Shifts. The table lists every shift with its working hours, working days, grace minutes and theMultipliercolumn. The default shift has aDefaultpill.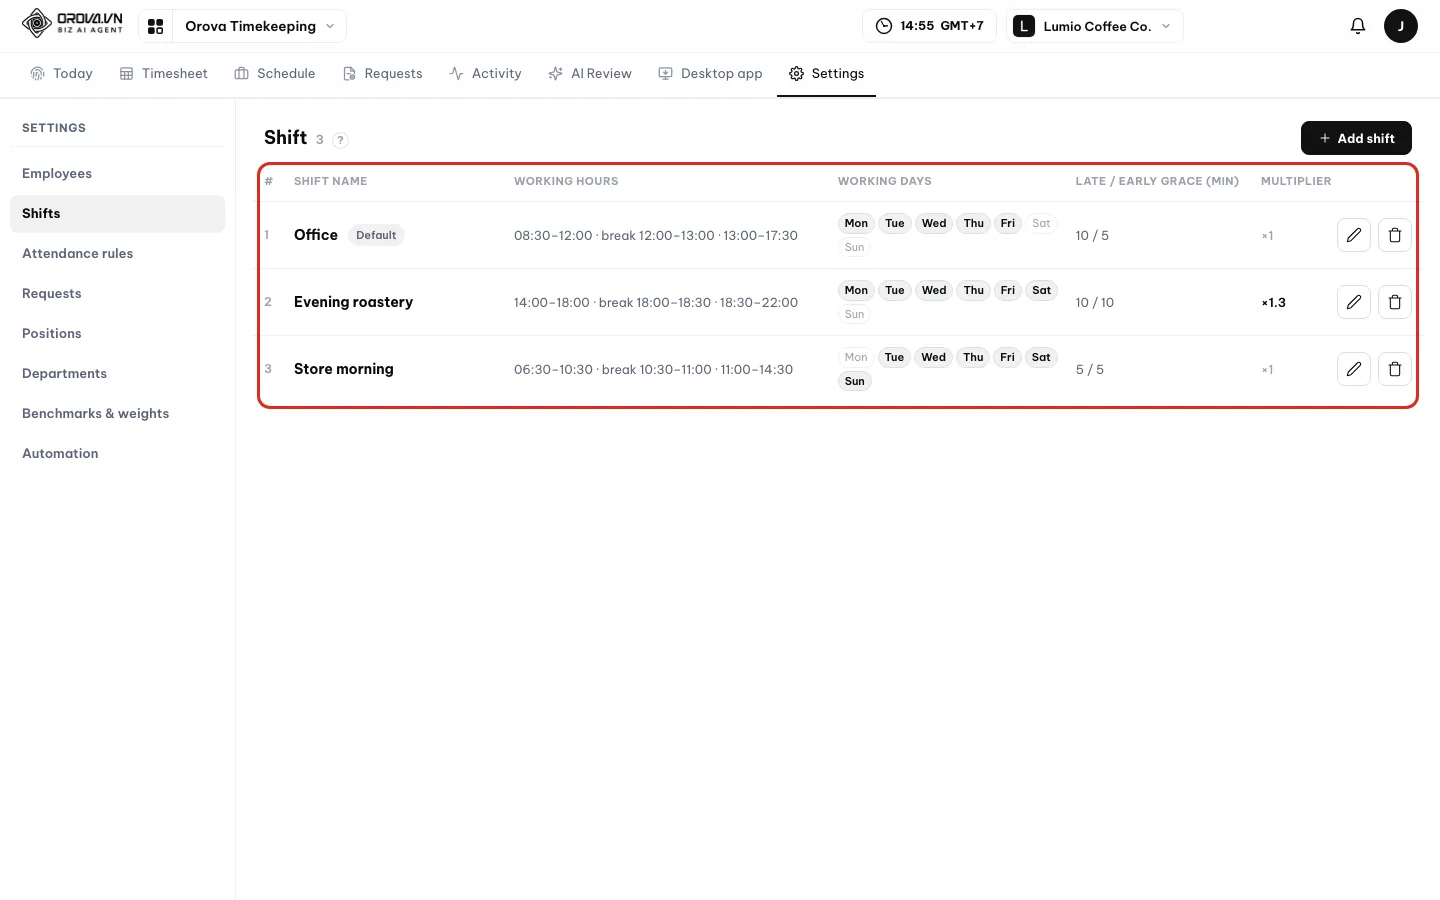
One row per shift; the evening shift has a multiplier of 1.3. - 2
Add a shift and split it into segments. Click
Add shift. Type aShift name, for example “Office hours”. UnderShift segments, fill in the times for each Work and Break segment. ClickAdd segmentif you need more. Segments must be in time order.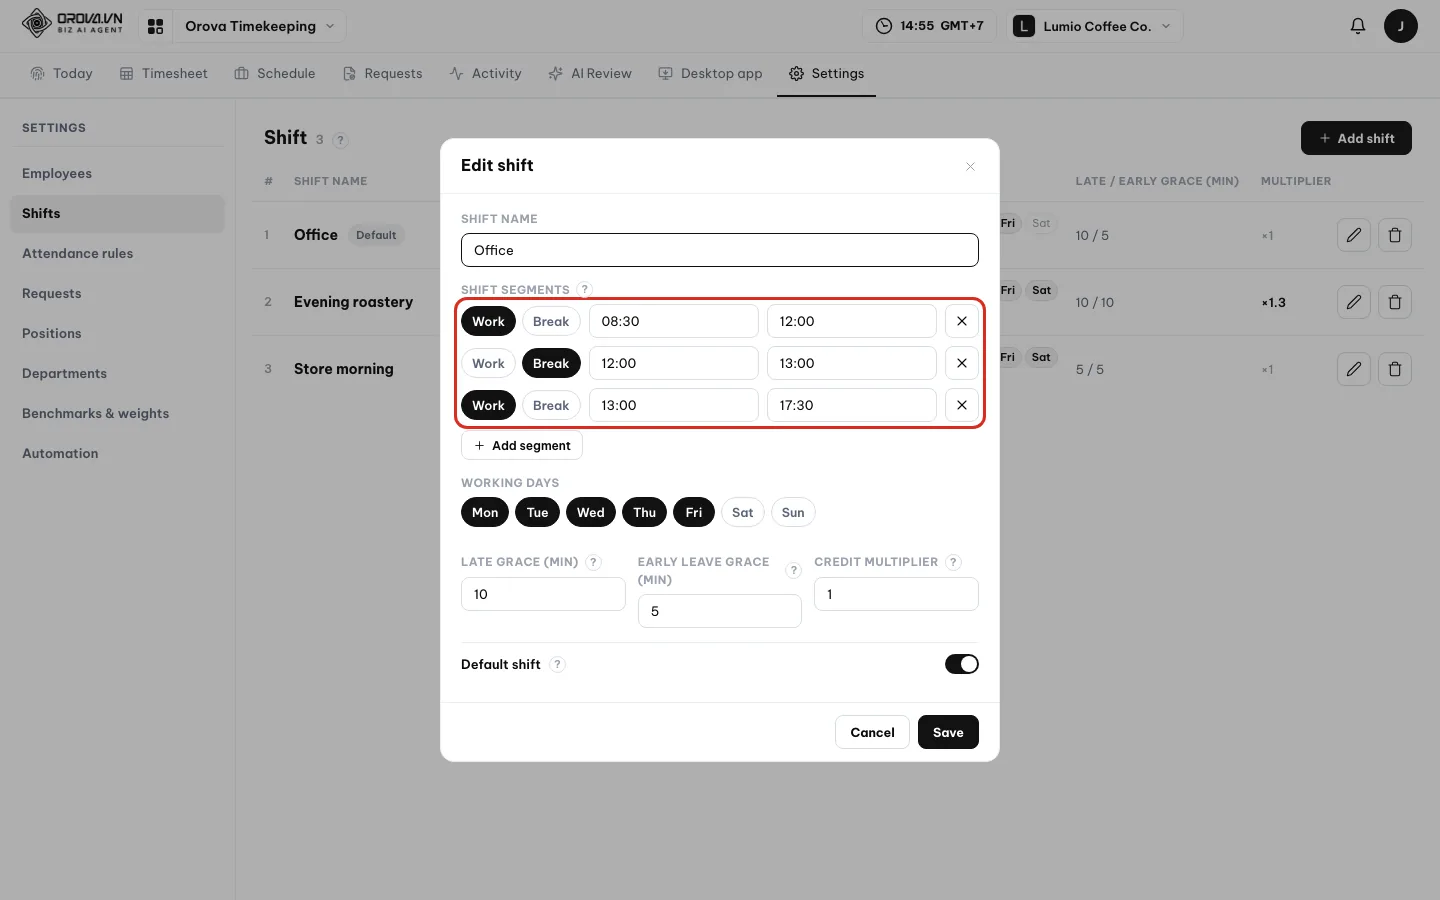
The first and last segments are always Work segments. - 3
Pick working days, grace minutes and multiplier. Check the working days from Mon to Sun. Fill in
Late grace (min)andEarly leave grace (min). KeepCredit multiplierat 1 if this is a regular shift. Turn onDefault shiftif you want this shift to apply to everyone without a shift. ClickSave.The Credit multiplier field sits at the bottom of the dialog, above the Default shift switch. - 4
Delete a shift you no longer use. Click the trash can on the shift's row. The dialog asks “Delete {name}? This cannot be undone.” If people still use the shift, unassign them in
Employeesfirst. If it is the default shift, pick another default shift first.
| Message | Cause | Fix |
|---|---|---|
| “Enter a shift name.” | The Shift name field is empty | Type a shift name and save again |
| “Pick at least one working day.” | No day is checked | Check the days with work |
| “Segments must be in time order…” | Segment times overlap or are out of order | Fix the times so each segment starts after the one before |
| “Grace minutes must be between 0 and 240.” | Grace minutes are out of range | Enter a number from 0 to 240 |
| “Used by {n} employees — unassign them first.” | The shift still has people assigned | Change those people's shift in Employees |
| “This is the default shift — set another default first.” | You are deleting the default shift | Turn on Default shift for another shift, then delete |
Warning
A new multiplier applies from today
12 · Attendance rules
Set attendance rules
Attendance rules decide where people can clock in from, how overtime is counted, what happens when someone forgets to click End, and how the desktop app behaves.
Allowed networks
Your office network addresses. Anyone who clocks in from another network is flagged or blocked, depending on the mode you pick.
Auto-close
If an employee forgets to click End, the system closes that work day at the shift's end time. That session gets an “Auto-closed” pill.
Perfect attendance
A month with full work days, no late arrivals and no early leaves. Turn on Close perfect attendance monthly and the system closes the list of people who qualify at the end of each month.
Seniority leave
Extra leave days based on years of service. For example, every 5 full years adds 1 day, up to 5 days. Years are counted from the Counted from date.
Go to Settings ▸ Attendance rules. The page has several blocks but only one shared Save button at the bottom. After saving you see “Saved.”
| Button / field | What it does | Notes |
|---|---|---|
Off / Flag / Block | Network check mode | Flag still lets people clock in but records it. Block does not let them |
Network address / Label | One allowed network | Label for example “Head office” |
Add network / Add this network | Add a network row / quickly add the network you are on | Click Add this network while you are at the office |
Overtime | How hours outside the shift are counted | Track only, Convert to credit, Convert to comp time. See section 05 |
Make-up time | Use extra hours to cover missing hours | Scope Same day, Same week, Same month |
Public holidays | Counts the holidays of the year | Taken from Schedule. Click Manage in Work schedule to add or edit |
Auto-close days with no clock-out | Closes the day at the shift end time | — |
Close perfect attendance monthly | Closes the list of people with perfect attendance | Closed once the month is over |
Time zone | Time zone for all attendance times | For example “Vietnam time (GMT+7)” |
Seniority leave | Every how many years, days added, maximum | Set the years field to 0 to turn it off |
Require a connected desktop app to start the work day | Locks the Start button when the app is not connected | When off, people can click Start at any time |
Record apps & websites in use | Records app names and website domains | Does not record window titles, URLs or content. Needs app version 0.3.0 or later |
Keep per-minute data (days) | How many days per-minute activity data is kept | From 30 to 365 days, default 90 |
Set your company's rules from top to bottom
- 1
Add your office networks. In the
Allowed networksblock, pickFlagorBlock. ClickAdd networkand fill inNetwork addressandLabel. If you are at the office, clickAdd this networkto save time. If no network has been added, the page shows a warning.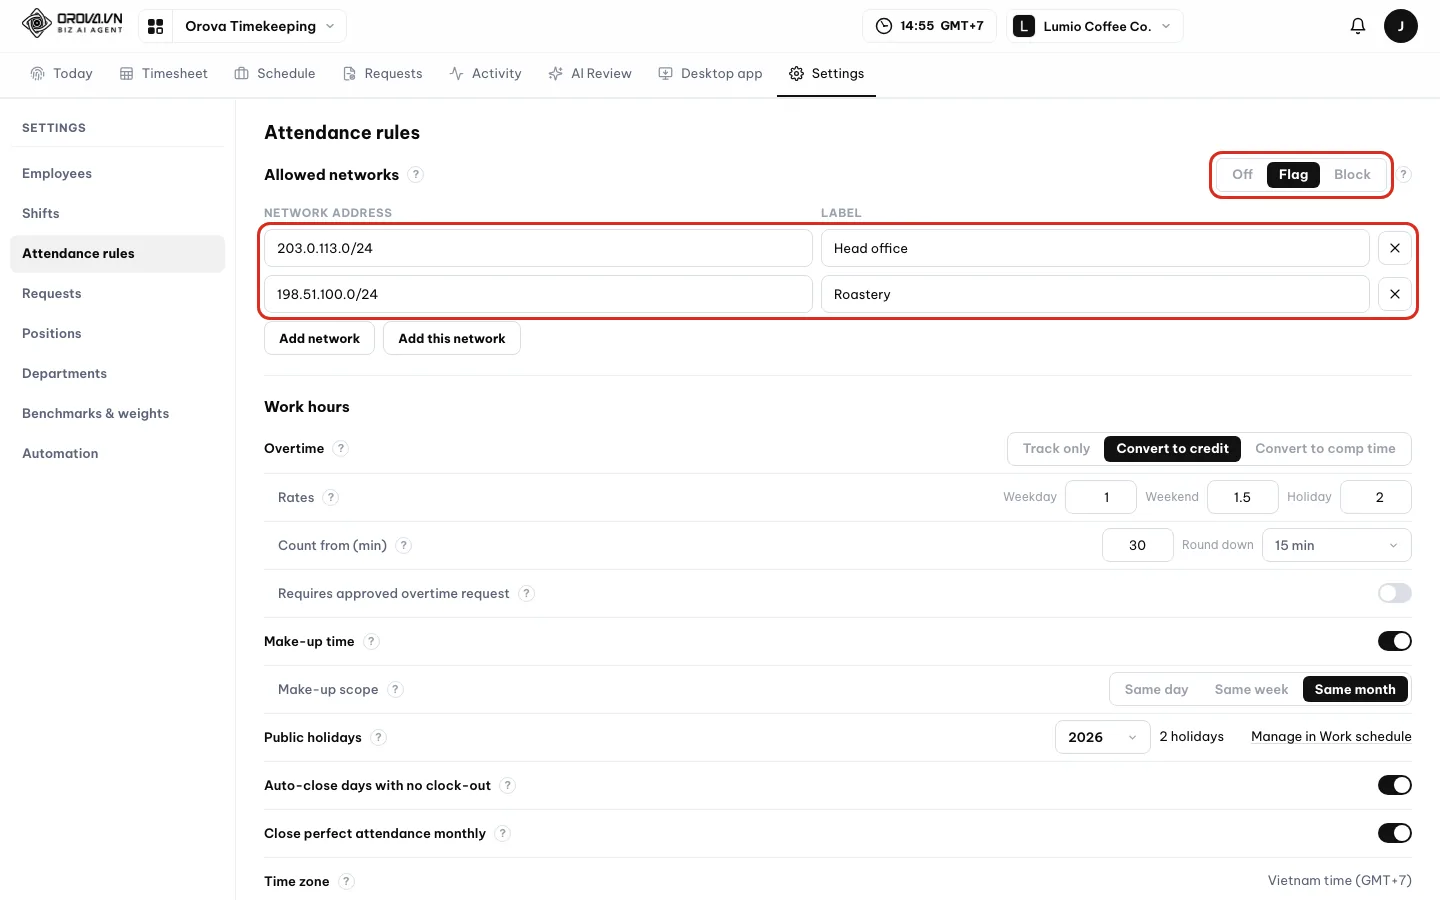
Flag still lets people clock in and only records it for you to review. - 2
Choose how overtime and make-up time are counted. In the
Work hoursblock, pick one option underOvertime. Fill in theRatesfor Weekdays, Weekends and Holidays. SetCount from (min)andRound down. Turn onMake-up timeif you want extra hours to cover missing hours first.Section 05 explains the calculation. - 3
Public holidays, auto-close, perfect attendance, seniority leave. The
Public holidaysline counts the holidays for the year entered in Schedule. ClickManage in Work scheduleto add holidays. Turn onAuto-close days with no clock-outandClose perfect attendance monthlyif needed. Fill in the threeSeniority leavefields.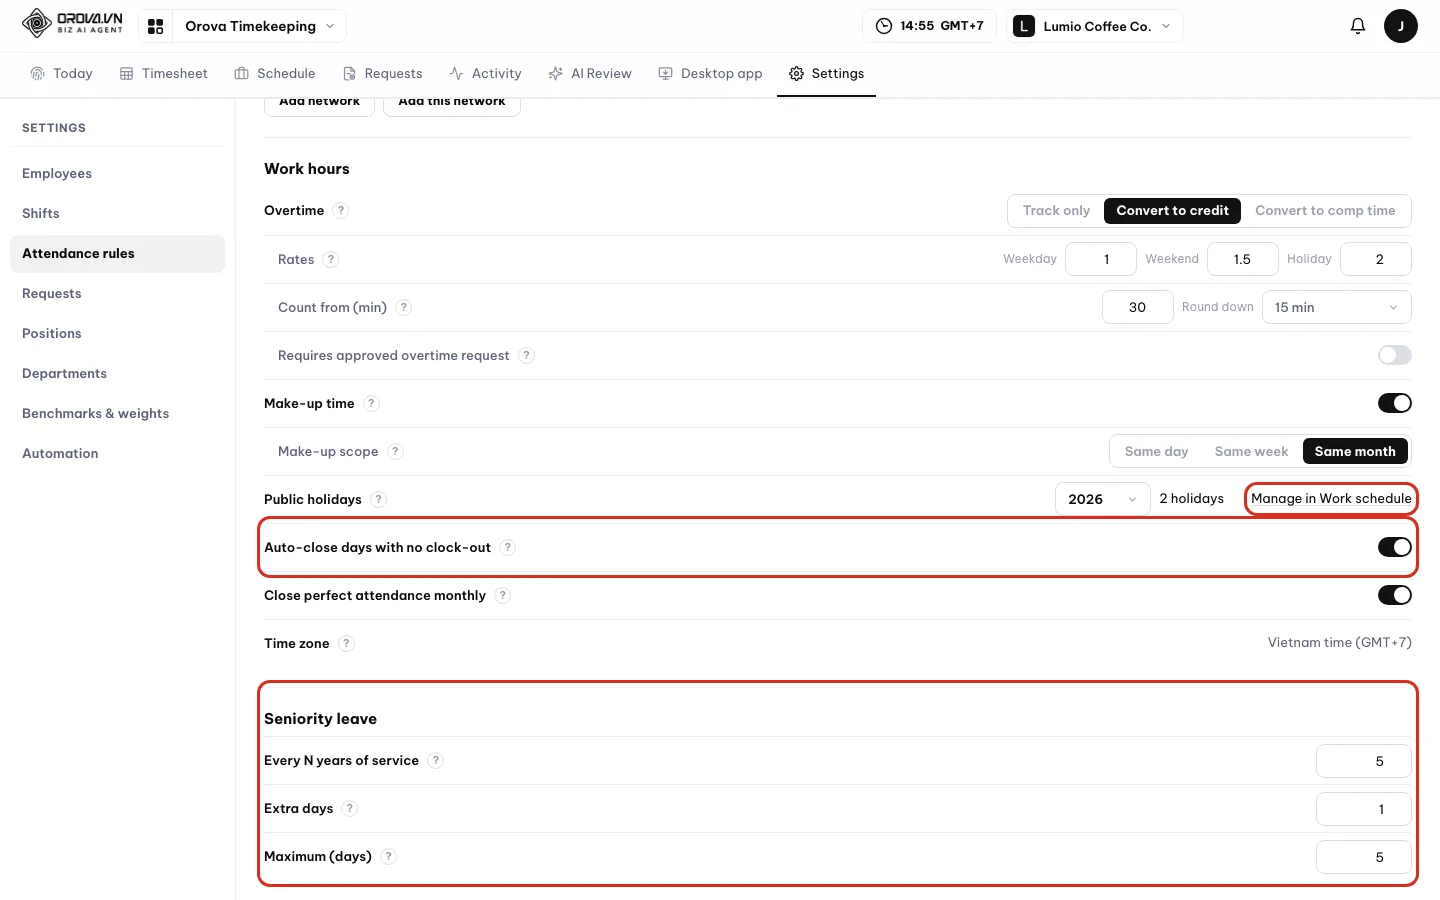
Holidays are entered in Schedule; here they are only counted. - 4
Set the desktop app rules. In the
Desktop appblock, turn onRequire a connected desktop app to start the work dayif you want. Turn onRecord apps & websites in useif your company needs it. Pick the number of days inKeep per-minute data (days).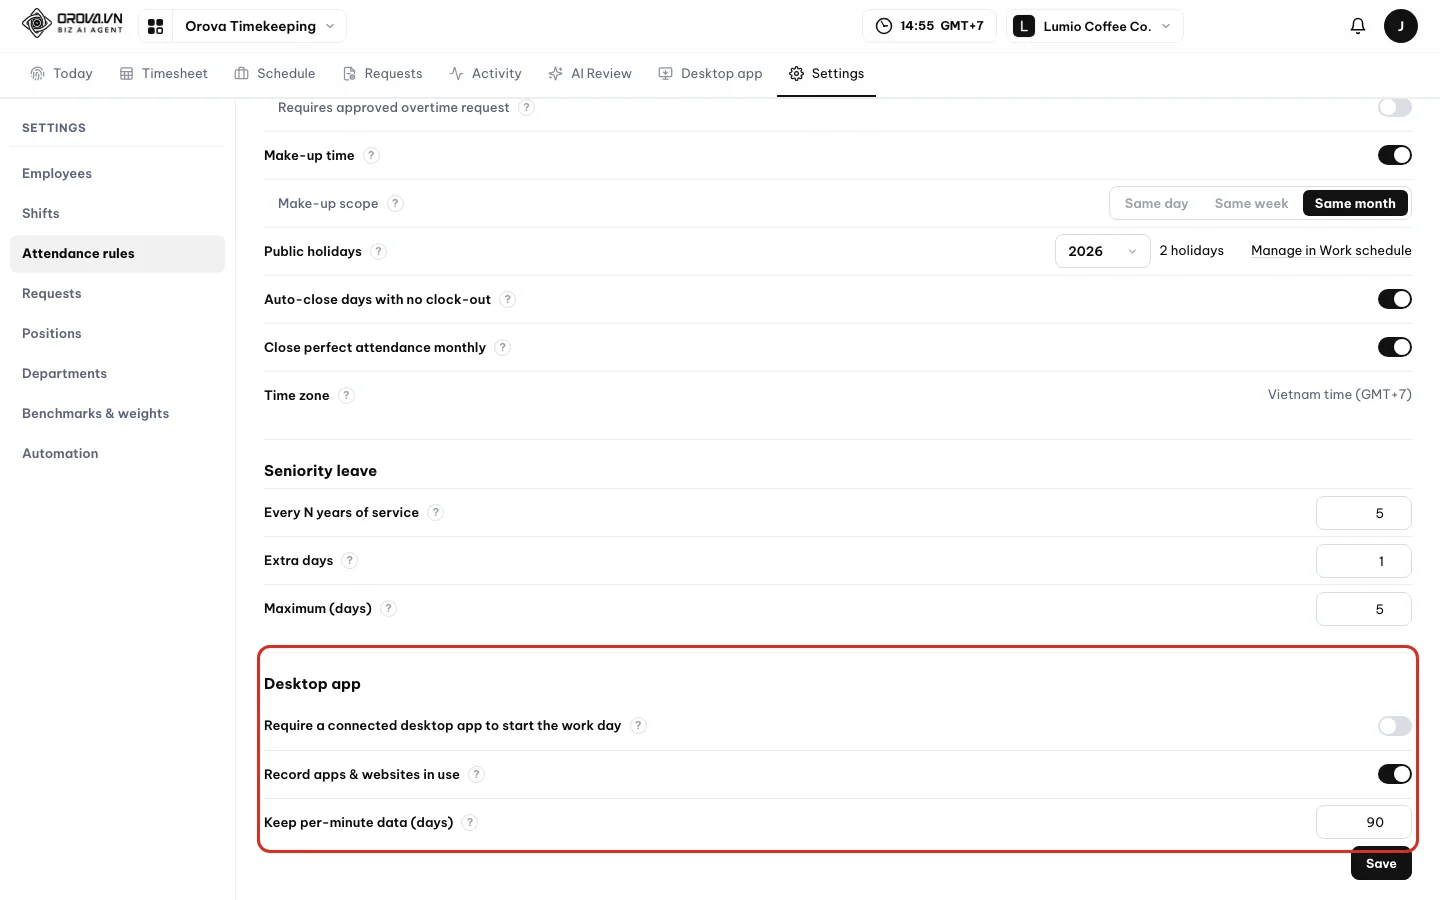
Three rules for the Orova Timekeeping app. - 5
Click Save. Scroll to the bottom of the page and click
Save. When you see “Saved.” you are done.
Warning
Block with no networks added
Block without adding any network, nobody can clock in. Always add at least one network before you pick Block.Note
Attendance data belongs to your company
Tip
Tell employees when you turn on app recording
Record apps & websites in use is on, your company is responsible for informing employees. The app also shows the line “Your company has enabled recording of app names and website domains in use.”13 · Request settings
Leave types, leave balances and approval flow
Here you decide which kinds of leave your company has, how many days each person gets, and who has to approve a request.
Leave type and symbol
Each kind of leave is a type, for example Annual leave or Sick leave. Each type has a symbol of 1–4 letters or digits, such as P or O. The symbol appears in the Timesheet cell when a request is approved.
Paid / Unpaid
Paid: a day of leave still counts as 1 day of credit, half a day 0.5. Unpaid: a day of leave counts 0 but is not counted as absent.
Leave balance
Remaining = entitled − used − pending approval. Entitled includes the leave type's days per year and any personal adjustment for each person.
Approval flow
The steps a request has to go through, in order. For example, step 1 is the direct department head and step 2 is the director. When all steps are done, the request is approved.
Go to Settings ▸ Requests. The page has four blocks. Leave types are saved in their own dialog. Balances, approval flow and attendance fixes are saved together with one Save button.
| Button / field | What it does | Notes |
|---|---|---|
Add type | Creates a new leave type | Opens the leave type dialog |
Type name / Symbol | Name and abbreviation of the leave type | Symbol is 1–4 letters or digits |
Paid | Paid or Unpaid | A change only applies to requests approved from now on |
Days per year | Day limit for this type | Leave empty for no limit. People who join mid-year get a share based on the remaining months |
Applies to | Who can see and send this type | Everyone, Departments, Positions, Employees |
On | Turns the leave type on or off | When off, employees cannot pick it |
Block requests when out of days | Stops requests when the balance runs out | When off, requests can still be sent but get an over-limit label |
Adjust | Add or subtract days for one person | Positive adds, negative subtracts, in steps of 0.5 |
Add step / Remove step | Add or remove an approval step | Direct department head, Upper department head, A specific person |
Remind approvers after {n} hours without action | Sends a reminder email to approvers | Enter 0 for no reminders. Each request is reminded at most 3 times |
Let employees request attendance fixes | Turns on the Attendance fix request type | With the number of days after the work day a request can be sent; 0 means no limit |
Set up requests for your company
- 1
View the leave types. Go to
Settings▸Requests. TheLeave typesblock lists each type with itsSymbol,Paid,Per year,Applies toand theOnswitch.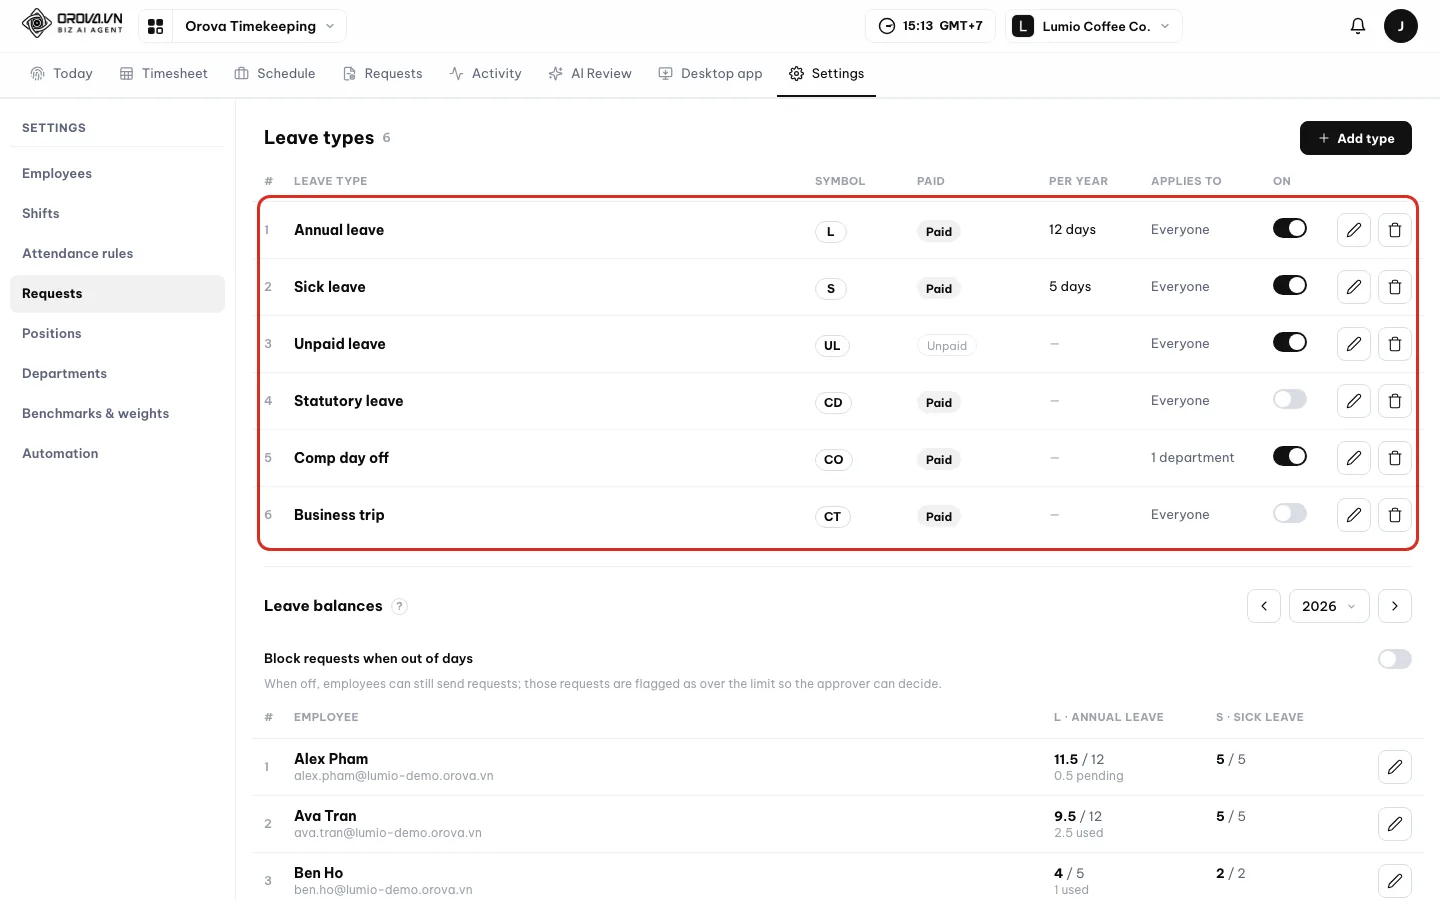
One row per leave type, each with an On switch. - 2
Add a leave type. Click
Add type. Type aType name, for example “Comp day off”, and aSymbol. PickPaidorUnpaid. Fill inDays per yearor leave it empty. PickApplies to, then clickSave.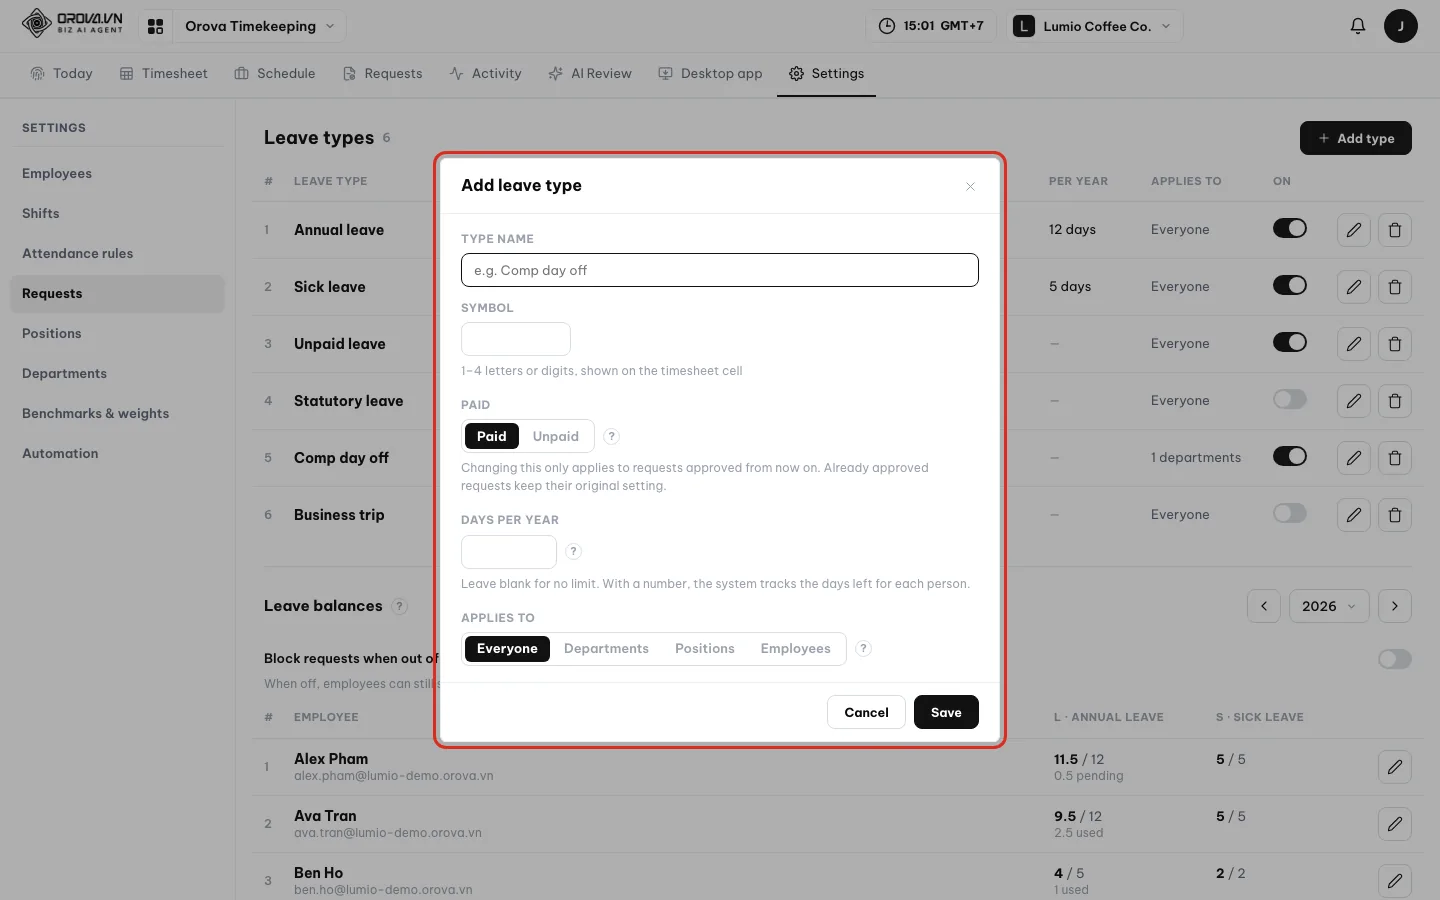
The symbol will appear in the Timesheet cell. - 3
View and adjust leave balances. Scroll to the
Leave balancesblock. Pick a year. Each cell shows the days remaining, with{n} usedand{n} pending. ClickAdjuston a person's row. Pick theLeave type, type theDaysand aNote, for example “carried over from last year”.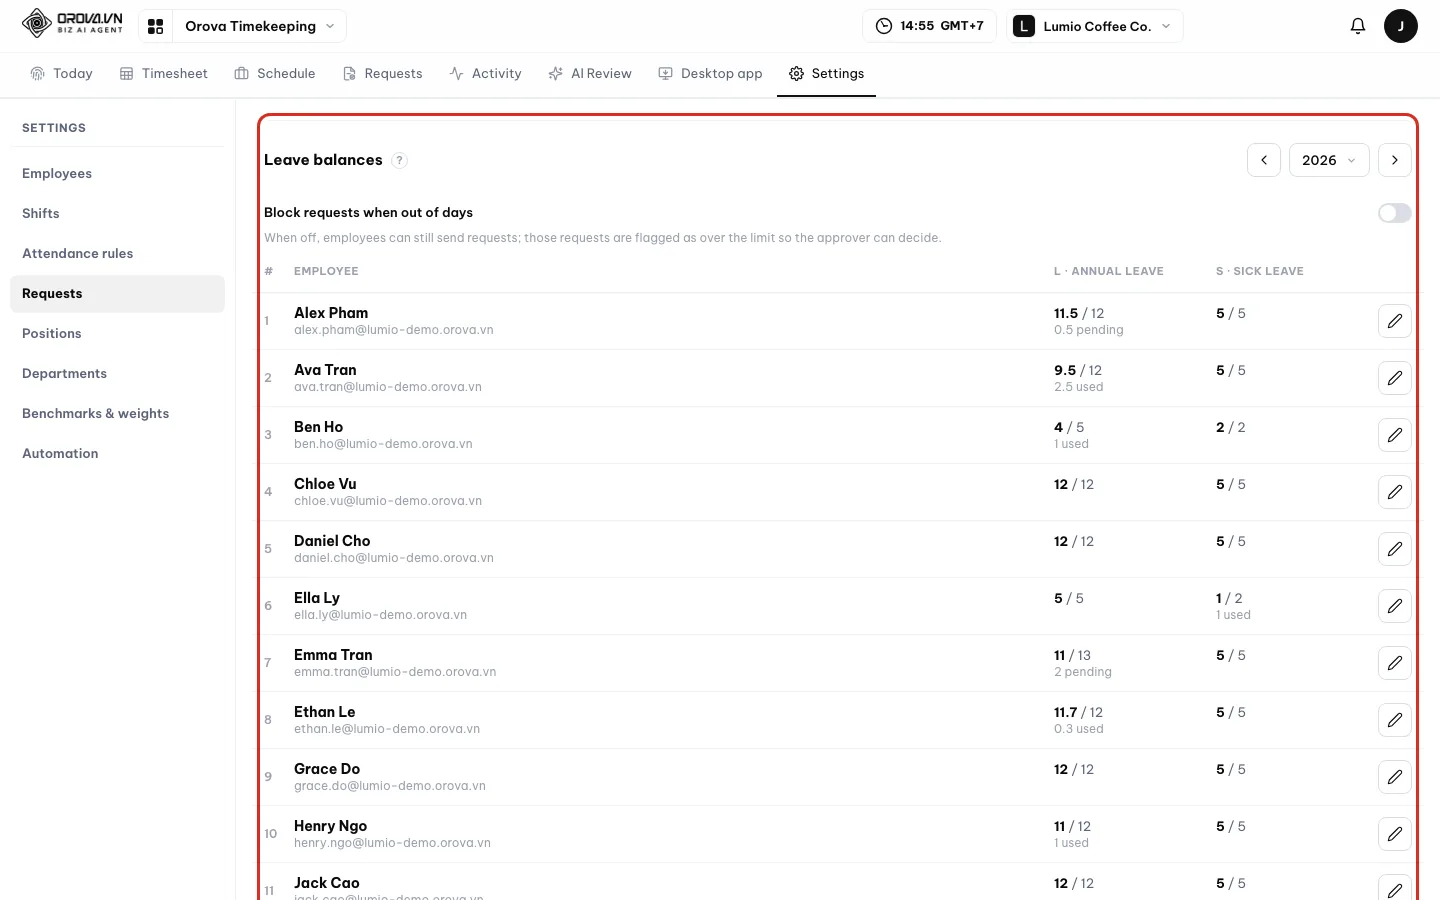
Remaining = entitled − used − pending approval. - 4
Set the approval flow and attendance fixes. Under
Approval flow, pick the approver forStep 1. ClickAdd stepif you need a step 2. If you pickA specific person, clickChoose approver. Fill in the reminder hours. UnderAttendance fixes, turn on the switch and fill in the number of days a request can be sent.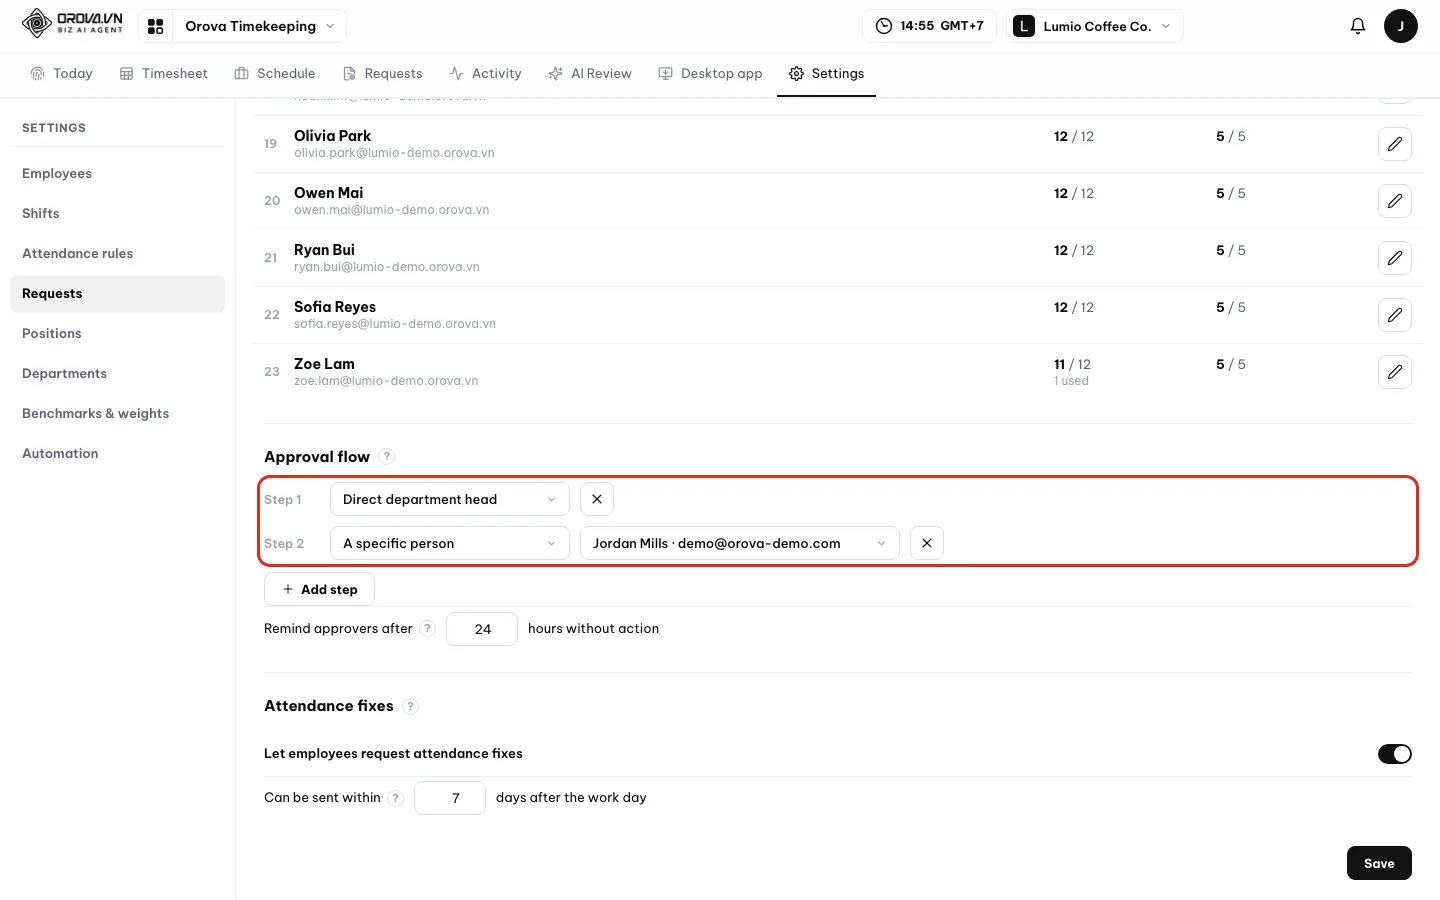
A request goes through each step in turn. - 5
Click Save. Click
Saveto save balances, the approval flow and attendance fixes. Leave types were already saved when you clickedSavein their dialog.
Note
When an approval step is skipped
Note
Leave types already in use
On switch so employees can no longer pick it.Tip
Employees do not see any leave type
Leave types block.14 · Positions
Positions and job descriptions
Each position has its own job description and its own activity benchmarks. AI Review uses this description to judge each person against the work they actually do.
Position
A job role such as Barista, Roaster or Accountant. Everyone in the same position shares one description and one set of benchmarks.
Job description
A paragraph about what that position does every day. AI uses it to understand the context when reviewing. You can edit it by hand at any time.
Own standards
The activity level that counts as meeting the bar for this position: coverage, keys per minute, clicks per minute. Empty fields follow the general benchmarks. Positions that use the computer less should be set lower.
Go to Settings ▸ Positions. A position without a description makes AI Review less accurate, so fill them all in before you run AI Review.
| Button / field | What it does | Notes |
|---|---|---|
Add position | Creates a new position | Opens the position dialog |
AI write all | AI writes descriptions for every position that lacks one | Only shown when some position has no description. Uses quota |
Position name | Name of the role | For example “Sales executive” |
Job description | Description editor | Type the key points here and click AI write, or write it yourself |
AI write | AI rewrites the description from the key points | Uses quota, no estimate shown first |
Undo | Restores the text from before AI wrote | — |
Activity coverage (%) | Own standard for coverage | From 1 to 100 |
Keys per minute / Clicks per minute | Own standard for input pace | Keys 0–500, clicks 0–200. The faded number is the current general benchmark |
Write a description for a position
- 1
View the position list. Go to
Settings▸Positions. The table has thePosition,Description,Own standardsandEmployeescolumns. A position without a description shows “No description”.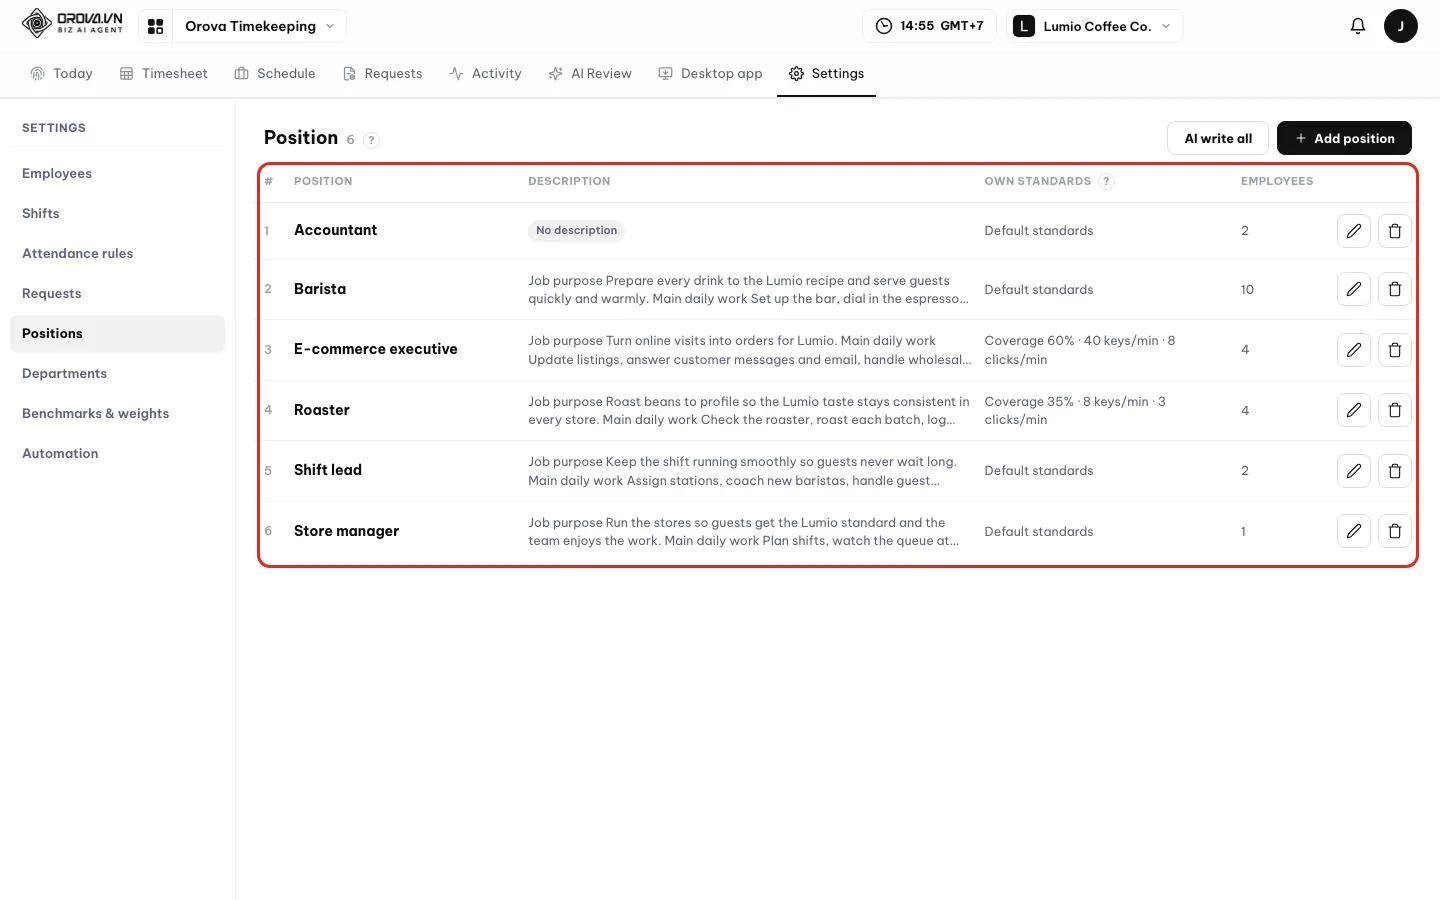
Positions missing a description stand out in the table. - 2
Type the key points and let AI write. Click the position's row. Type a few key points into the
Job descriptionfield. ClickAI write. If the field already has text, the system asks “Replace description?”. AI replaces the text in the field with a full version. If you do not like it, clickUndo.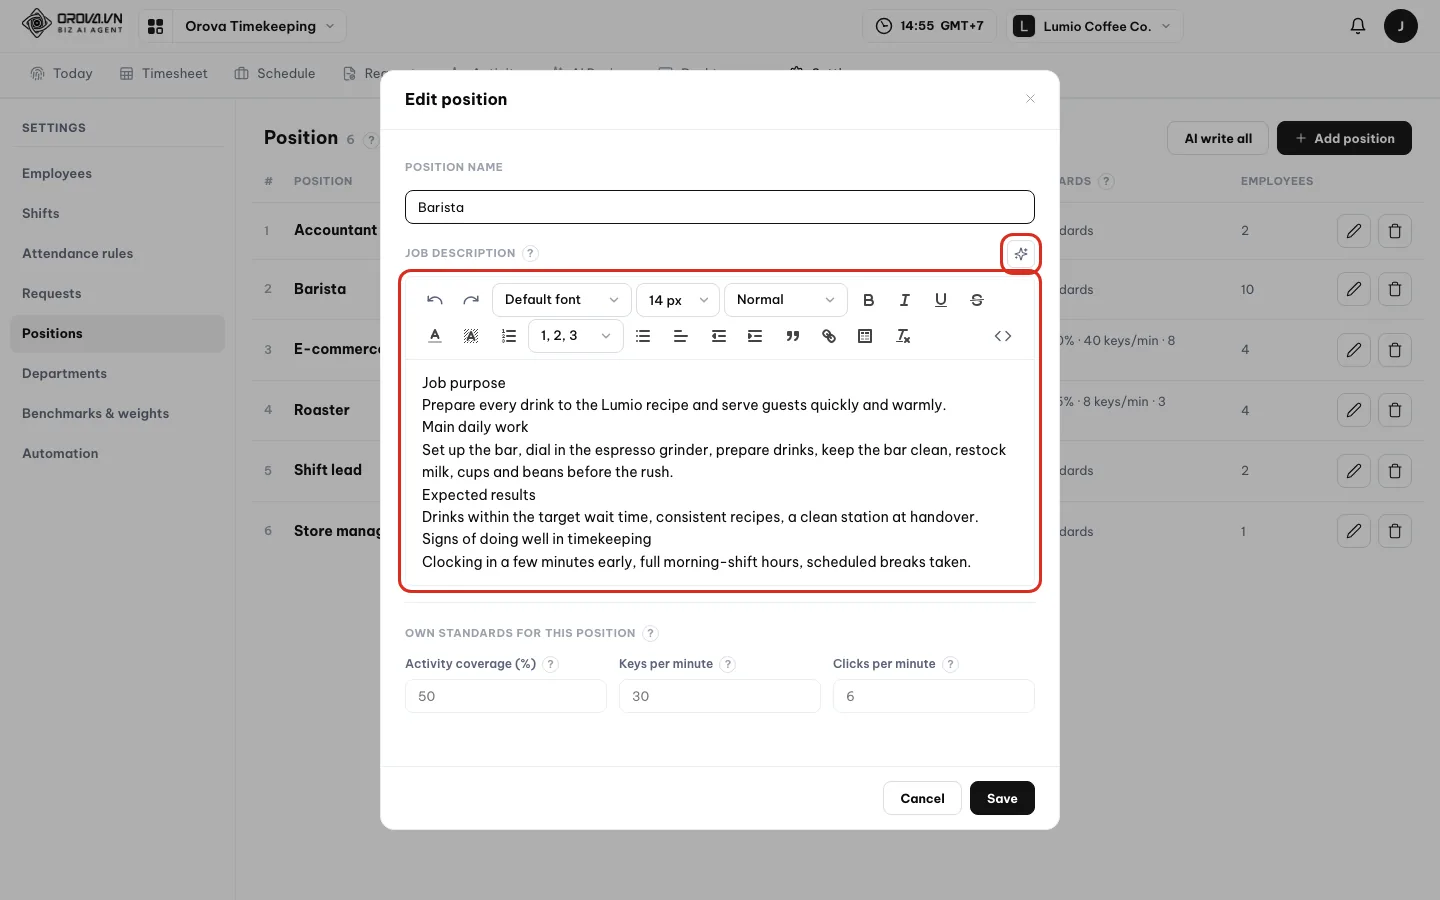
You can write it yourself; AI is optional. - 3
Set own standards if needed, then Save. Under
Own standards, fill in any field that should differ from the general benchmarks. Empty fields follow the general benchmarks; the faded number shows the current general value. ClickSave. - 4
Write descriptions for all positions that lack one. Click
AI write all. The dialog asks “{n} items · ≈ {n} AI calls, uses quota. Run?”. If you agree, you see “AI is writing {n} items, reload in a few minutes.” Wait a few minutes, then reload the page to see the result.
Warning
AI writing uses quota
AI write deducts workspace quota based on the actual AI usage. AI write all shows the number of AI calls before it runs. If the workspace runs out of quota, top up to keep using it.15 · Departments
Department descriptions
Departments are managed in workspace settings. In Timekeeping you only write a job description for each department, so AI Review understands what that department does.
Department
A group of people in the company structure, for example Store or Roastery. Departments belong to the workspace and are shared with other modules such as CRM.
Manager
The head of the department, set in workspace settings. Managers can see their department's attendance and can be the approver for the Direct department head step.
Key responsibilities
A few short lines about what the department does, one point per line. AI reads these points to write a full description.
Go to Settings ▸ Departments. To add or remove a department, click the “Add or remove departments in workspace settings” link. After creating it, come back here to write the description.
The Employees column counts the manager too and adds people in sub-teams to the parent department. People with tracking off are not counted.
| Button / field | What it does | Notes |
|---|---|---|
Department | Department name | Sub-teams also show “under {name}” |
Manager | Manager's name and email | Set in workspace settings |
Description | The current description | If there is none, it shows “No description” |
Employees | Number of people in the department | Includes the manager and sub-teams, excludes people with tracking off |
AI write all | AI writes descriptions for departments that lack one | Uses quota |
Key responsibilities | Field for key points, one per line | Required before you click AI write |
AI write / Undo | AI writes the description from the key points / restores the old version | AI write uses quota |
Job description | The full description | You can edit it by hand after AI writes it |
Write a description for a department
- 1
View the department list. Go to
Settings▸Departments. The table shows the department name,Manager,Descriptionand the number ofEmployees. Sub-teams show “under” their parent department. - 2
Type the key points, let AI write, then edit. Click the pencil on the department's row. Type a few lines into
Key responsibilities. ClickAI write. The description appears in theJob descriptionfield. Edit it until it is right, then clickSave. If you do not like it, clickUndo.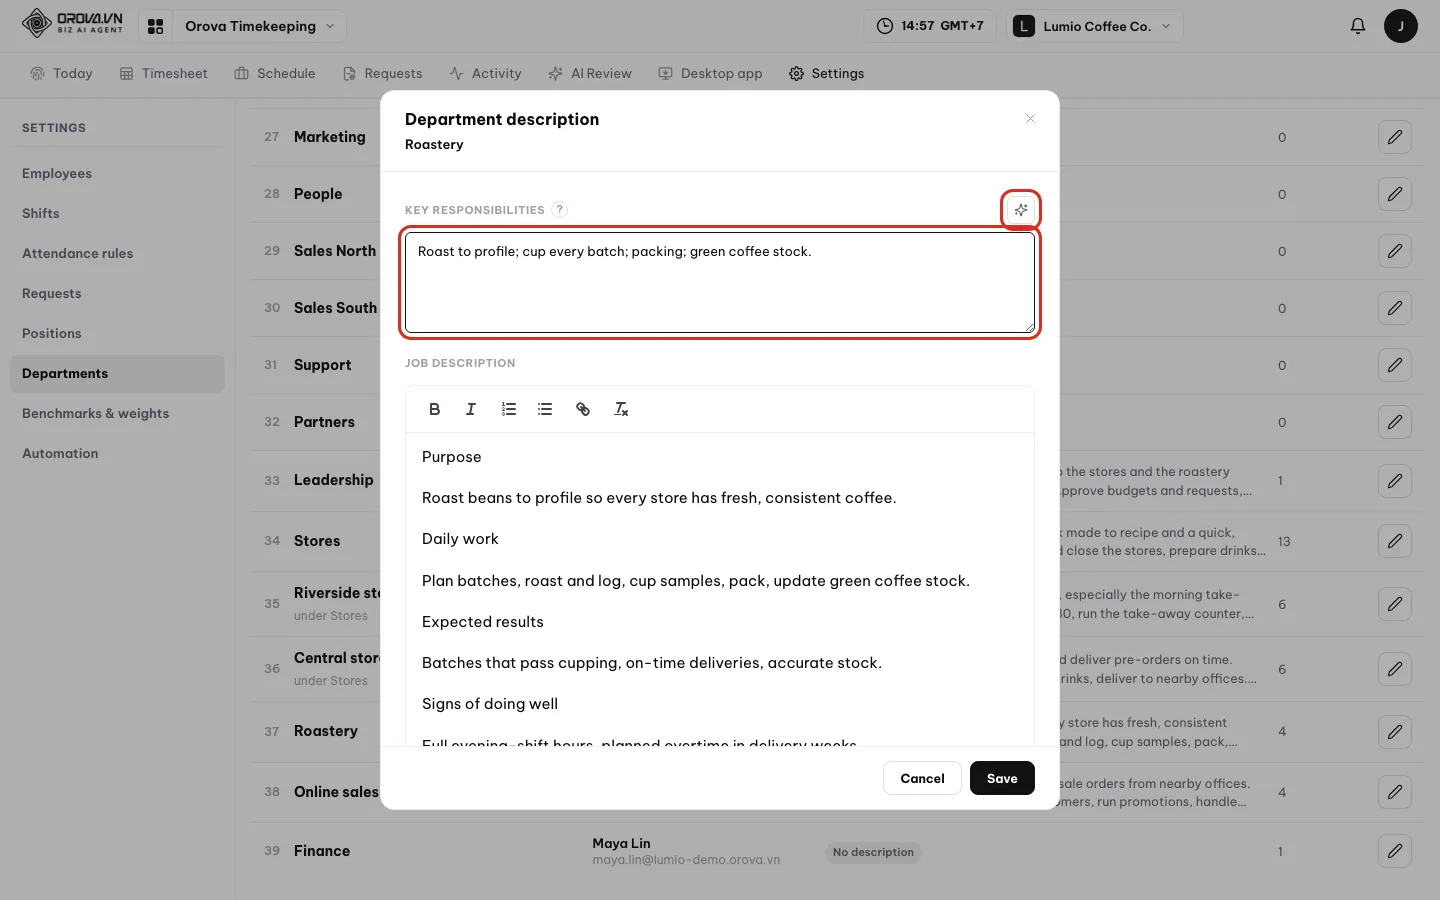
One point per line; AI turns them into a full paragraph. - 3
Write for all departments that lack one. Click
AI write all. The dialog shows the number of items and AI calls before it runs. Agree, wait a few minutes, then reload the page to see the result.
Warning
AI writing uses quota
AI write and AI write all deduct workspace quota. If you click AI write before typing any key points, the system says “Please type a few key points before clicking AI write.”16 · Benchmarks & weights
Benchmarks, weights and the AI Review rubric
This screen decides how each employee's 0–100 score is calculated, what level counts as meeting the bar, and which rubric AI Review uses.
Score
A number from 0 to 100 for each employee. Score = the sum of six metrics multiplied by their weights. Any metric the machine cannot measure is left out and the weights are redistributed.
Weight
How much each metric matters. For example, if your company values punctuality, set a higher weight for Punctuality. The system rescales the total to 100%.
General benchmarks and benchmarks by position
A benchmark is the activity level that counts as meeting the bar. General benchmarks apply to everyone. Benchmarks by position override the general benchmarks for people in that position.
AI Review rubric
The list of criteria AI uses to score, each with a weight and a source of evidence. Each criterion is scored on 4 levels: Good, Fair, Average, Weak.
Go to Settings ▸ Benchmarks & weights. The page has six cards. The benchmarks-by-position table is saved with Save table, and the AI Review rubric with Save rubric. The other cards are saved with the Save button at the bottom of the page.
| Metric | How it is calculated | Notes |
|---|---|---|
Attendance | Credit actually worked divided by the month's standard days | — |
Punctuality | Days without late arrival divided by days with credit | — |
Full hours | Hours worked in the shift plus make-up time, divided by the shift hours | — |
Activity coverage | 10-minute blocks with activity divided by all blocks, compared with the benchmark | Needs the desktop app |
Typing pace | Key presses per active minute, compared with the benchmark | Going over the benchmark still earns at most full marks |
Click pace | Mouse clicks per active minute, compared with the benchmark | Going over the benchmark still earns at most full marks |
| Button / field | What it does | Notes |
|---|---|---|
General benchmarks | Coverage (%), keys per minute and clicks per minute for everyone | Apply preset fills in suggested starting numbers based on the nature of the role |
Benchmarks by position | Table of positions × three benchmarks | Empty cells use the general benchmarks. Saved with Save table |
AI Review rubric | Criteria, weights, evidence, minimum score per level, grades | Weights must add up to 100. Saved with Save rubric |
Reset | Restores the original rubric | Asks again “Sure?” |
Score colors | Green from and Yellow from | Below the yellow threshold shows in red |
Activity checks | Thresholds for detecting minutes not made by a person | Minutes over a threshold are not counted and are noted for review |
Adjust how your company is scored
- 1
Set the weights for the six metrics. On the
Weightscard, type a number in theWeightcolumn for each metric. TheActual %column shows the share after rescaling to 100%. TheTotalline adds up the numbers you typed. Hover over the question mark to read how each metric is calculated.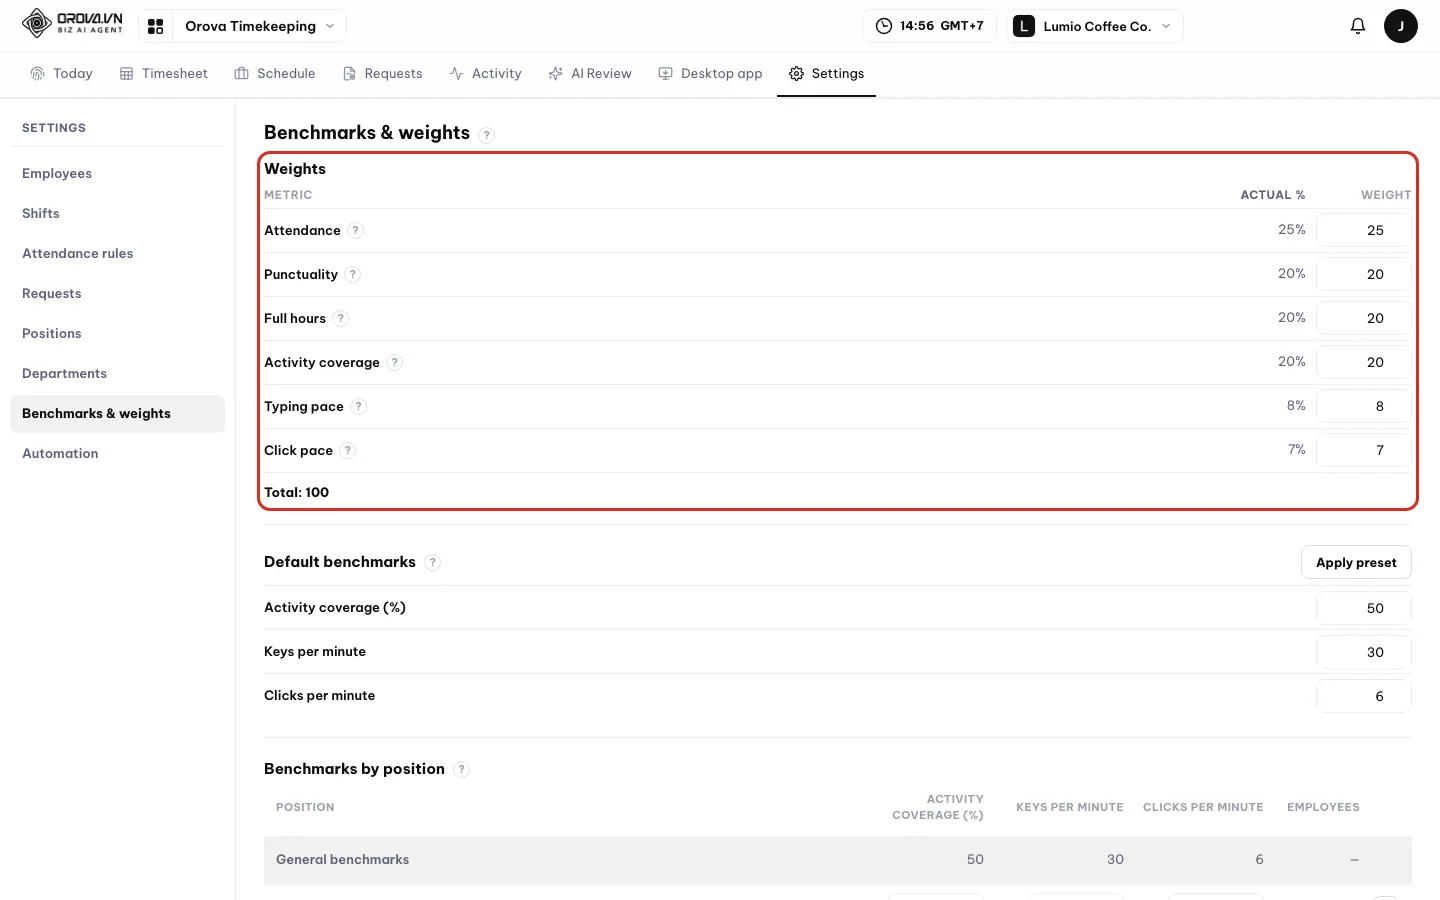
The system rescales to 100%, so you do not need round numbers. - 2
Set general benchmarks and benchmarks by position. On the
General benchmarkscard, fill in the three fields or clickApply presetfor suggested numbers. UnderBenchmarks by position, each row is one position with its own preset button. Empty cells use the general benchmarks. ClickSave table.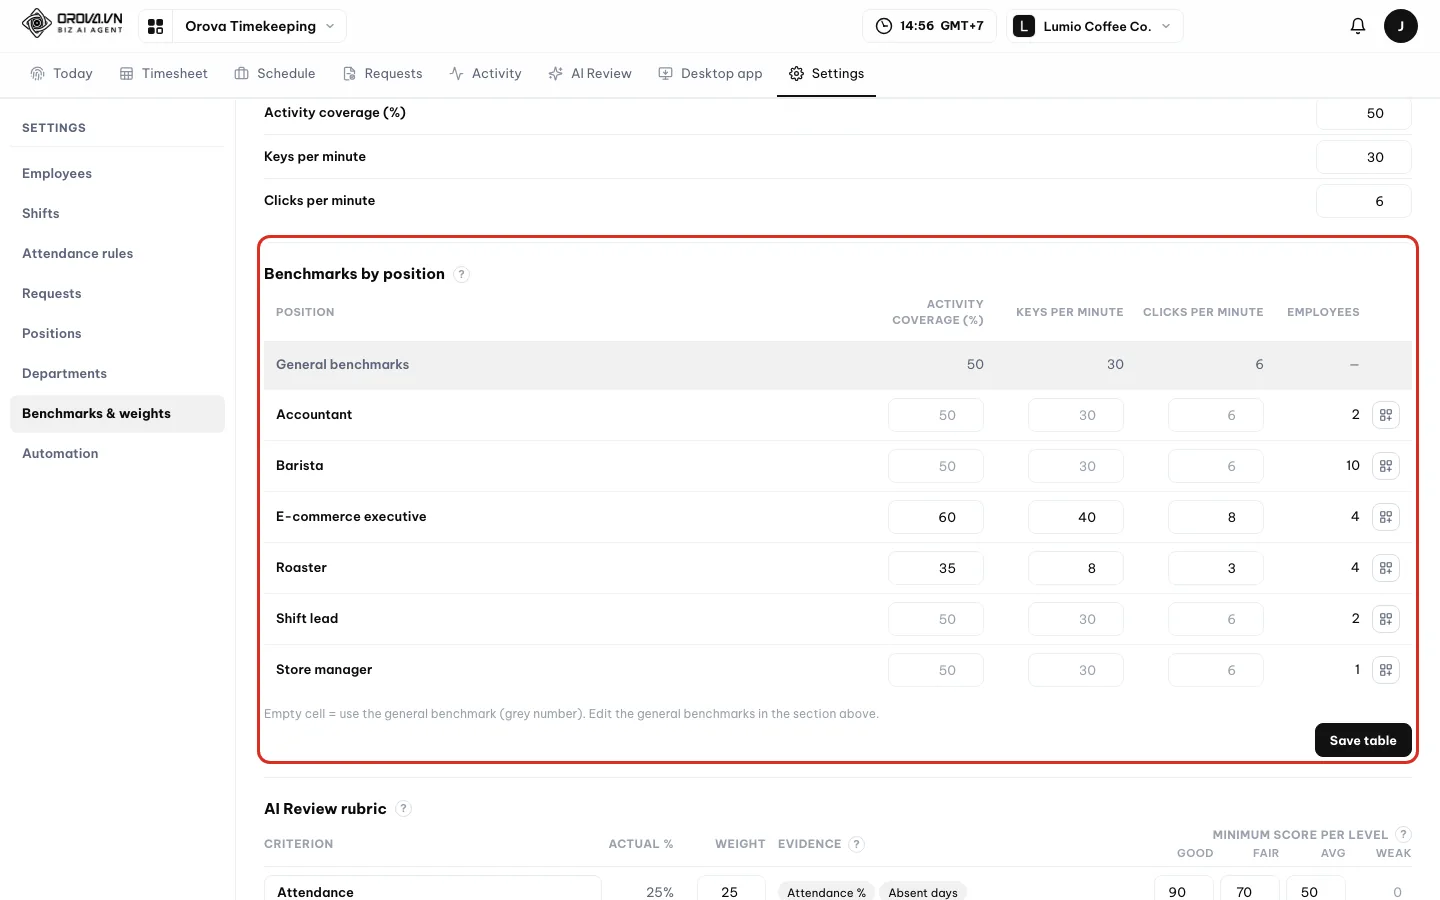
Preset numbers are only suggestions; adjust them to fit reality. - 3
Adjust the AI Review rubric. Under
AI Review rubric, edit each criterion's weight so the total is 100. Set the minimum score for the Good, Fair, Avg and Weak levels. Set theGradesthresholds. ClickSave rubric. To go back to the original, clickReset.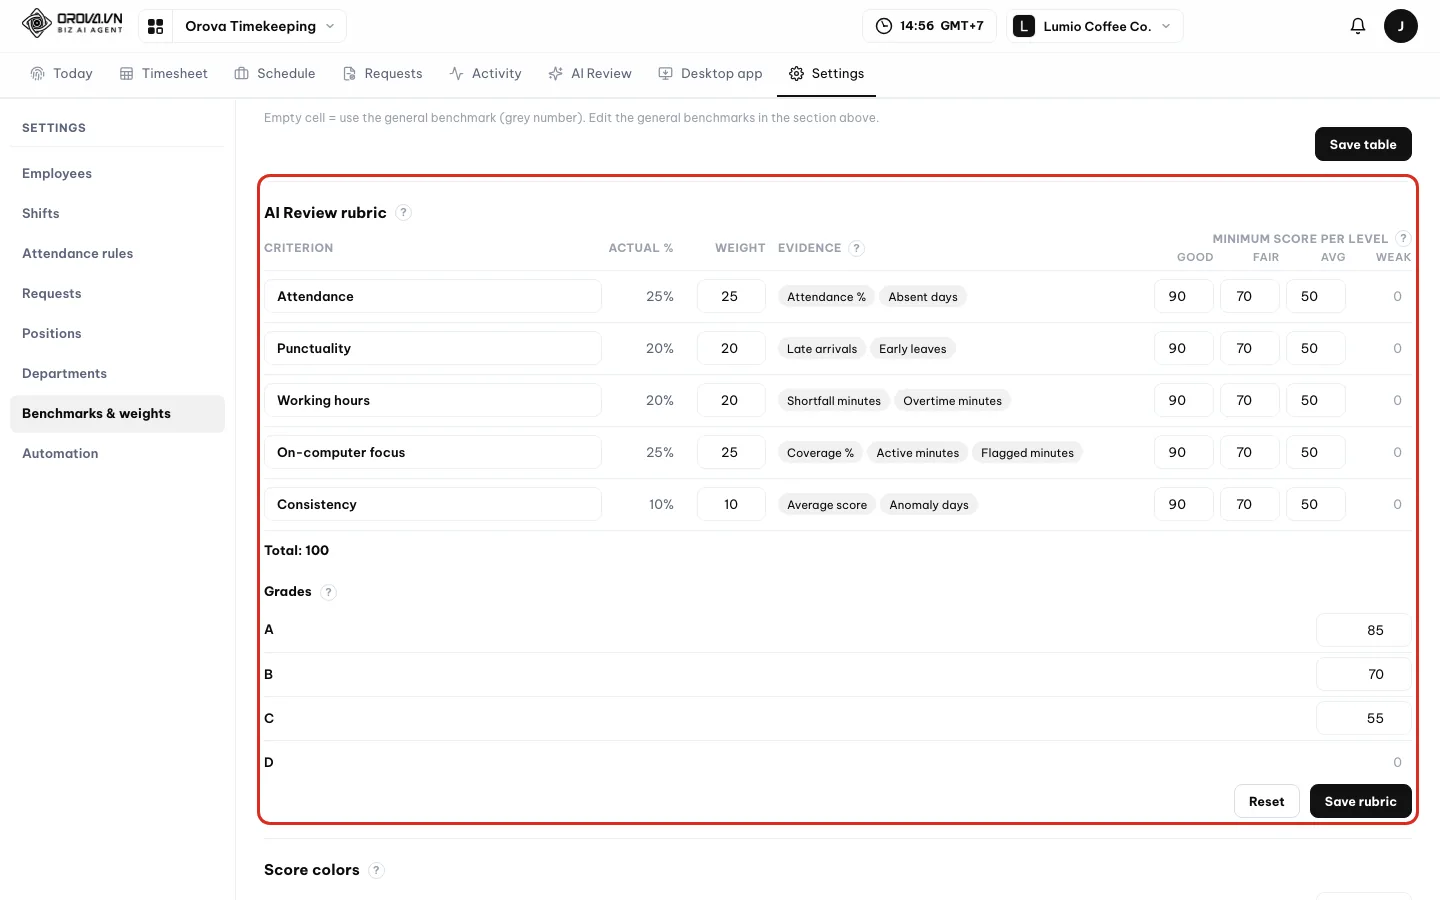
A rubric change only affects reviews created afterwards. - 4
Set score colors and check thresholds, then Save. Under
Score colors, fill inGreen fromandYellow from; the chip next to them shows a preview. UnderActivity checks, keep the default numbers if you are not sure. ClickSaveat the bottom of the page.
| Field | What it does | Notes |
|---|---|---|
Max keys per minute | Typing more than this in one minute is treated as machine typing | That minute is not counted |
Max clicks per minute | Clicking more than this is treated as not made by a human hand | That minute is not counted |
Mouse-only minutes in a row before they stop counting | Only moving the mouse, no typing or clicking, for that many minutes in a row | That whole stretch is not counted |
Evenly moving mouse minutes in a row before they stop counting | The mouse moves unusually evenly for that many minutes in a row | Usually caused by a mouse jiggler |
Typing evenness treated as a machine | Typing more even than this is treated as machine typing | The smaller the number, the stricter |
Minimum active seconds for a 10-minute block to count | A 10-minute block needs at least that many seconds of real activity | Affects coverage |
Program-made actions in a minute to note for review | A minute with at least this many actions made by other software | Noted for review, not counted |
Share of program-made actions to note for review | For example 0.3 means 30% of actions or more | The smaller the number, the stricter |
Note
Uncounted minutes are a hint, not a verdict
17 · Automation
Send emails automatically based on conditions
Automation sends emails for you when something happens: someone arrives late, is absent, or earns perfect attendance. You can also schedule AI Review to run every month.
Automation rule
A “when … then send an email” statement. For example: when an employee arrives 15 or more minutes late, send that employee a reminder email.
Condition and Threshold
The condition is what triggers the rule. The threshold is the limit that goes with it, for example 15 or more minutes late, or 3 or more late arrivals in a month.
Send from and Template
Send from is the address the email goes out from. Orova system mailbox works right away, or pick one of your Connect mailboxes. The template is the content: use a Saved template or Compose your own.
Variable
A code you insert into a custom template. When sending, the system replaces it with each employee's real data, such as their name or minutes late.
Go to Settings ▸ Automation. Sending emails by rule uses no AI quota. Only the Monthly AI Review rule deducts quota.
| Button / field | What it does | Notes |
|---|---|---|
Add rule | Opens the rule dialog | The dialog has three parts: Condition, Email, Recipients |
Condition | What triggers the rule | Groups Time, Working days, Month end, Security |
Threshold | The condition's limit | The unit changes with the condition, for example minutes or times |
Send from / Add mailbox | Where the email is sent from | Orova system mailbox or a Connect mailbox |
Saved template / Compose | Use an existing template or write your own | Preview to see it first, New template to create one in Connect |
Variables for custom templates | List of variables | Click a variable to insert it into the subject or body |
Recipients | Who gets the email | Employee and Manager switches, plus up to 5 workspace member emails |
Sent | Number of emails the rule has sent | — |
On | Turns the rule on or off | When off, the rule sends nothing |
Send test | Sends a sample email to your address | Sends a real email |
- Time:
Late arrival,Early leave,Not clocked in,Missed clock-out. - Working days:
Frequent late arrivals,Absent,Work on a day off,Overtime,Short hours. - Month end:
Monthly summary,Perfect attendance,Monthly AI Review. - Security:
Daily activity score below threshold,Unusual activity,Outside allowed network,Desktop app disconnected.
Create a rule that emails a late arrival reminder
- 1
View your rules. Go to
Settings▸Automation. Each rule is one row with itsTemplate,Send from,Recipients, numberSentand theOnswitch. If a row says “Template or mailbox was removed”, you need to pick it again.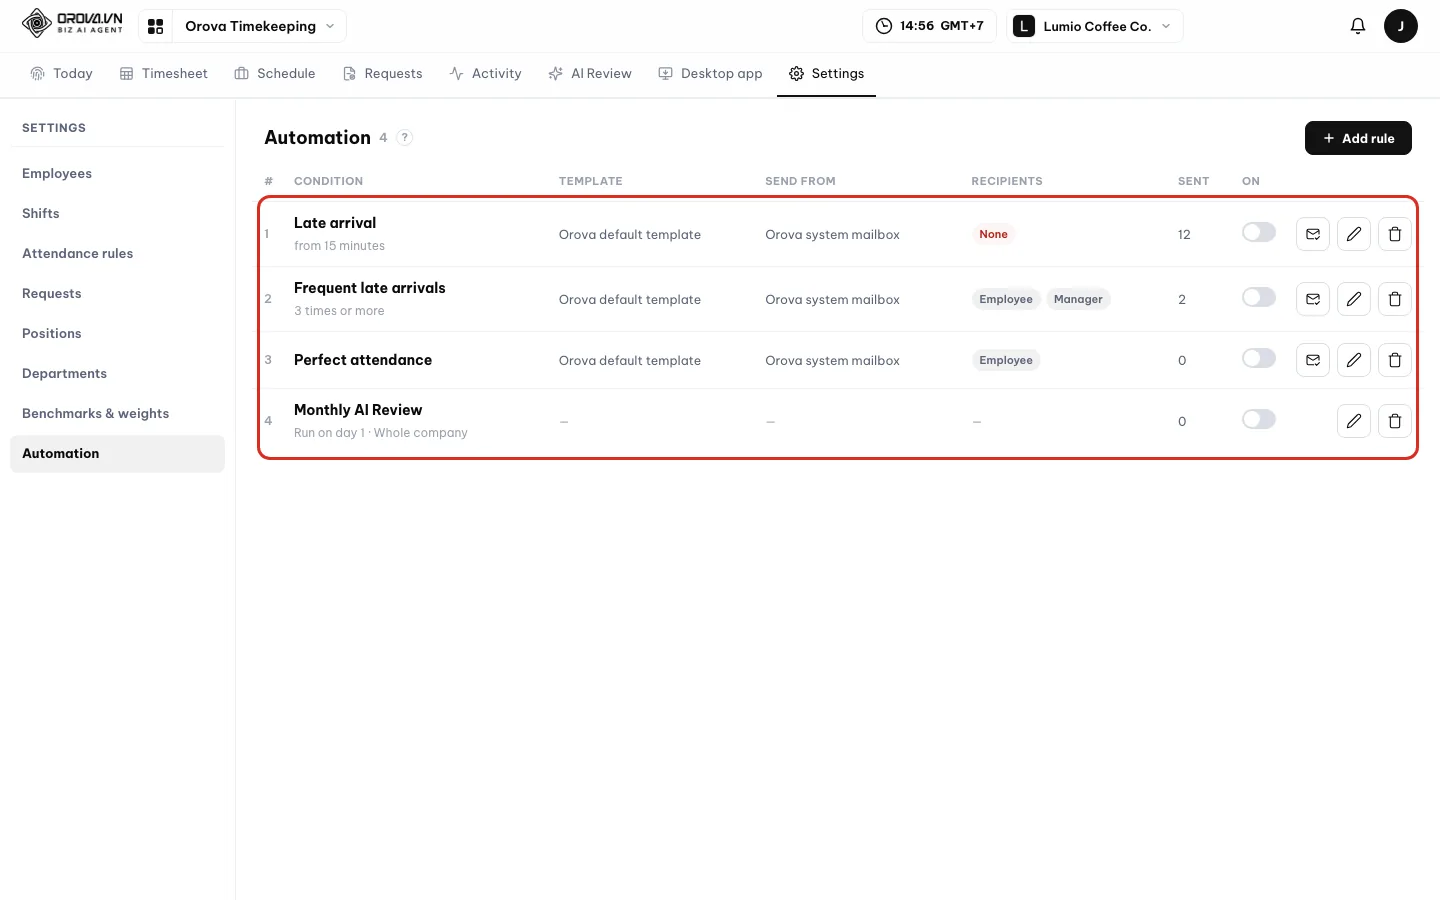
Turn each rule on or off with its switch. - 2
Add a rule: pick the condition, email and recipients. Click
Add rule. In part 1Condition, pickLate arrivaland fill in theThreshold. In part 2Email, pickSend from, then pickSaved templateorCompose. ClickPreviewto see it first. In part 3Recipients, turn on Employee or Manager. ClickSave.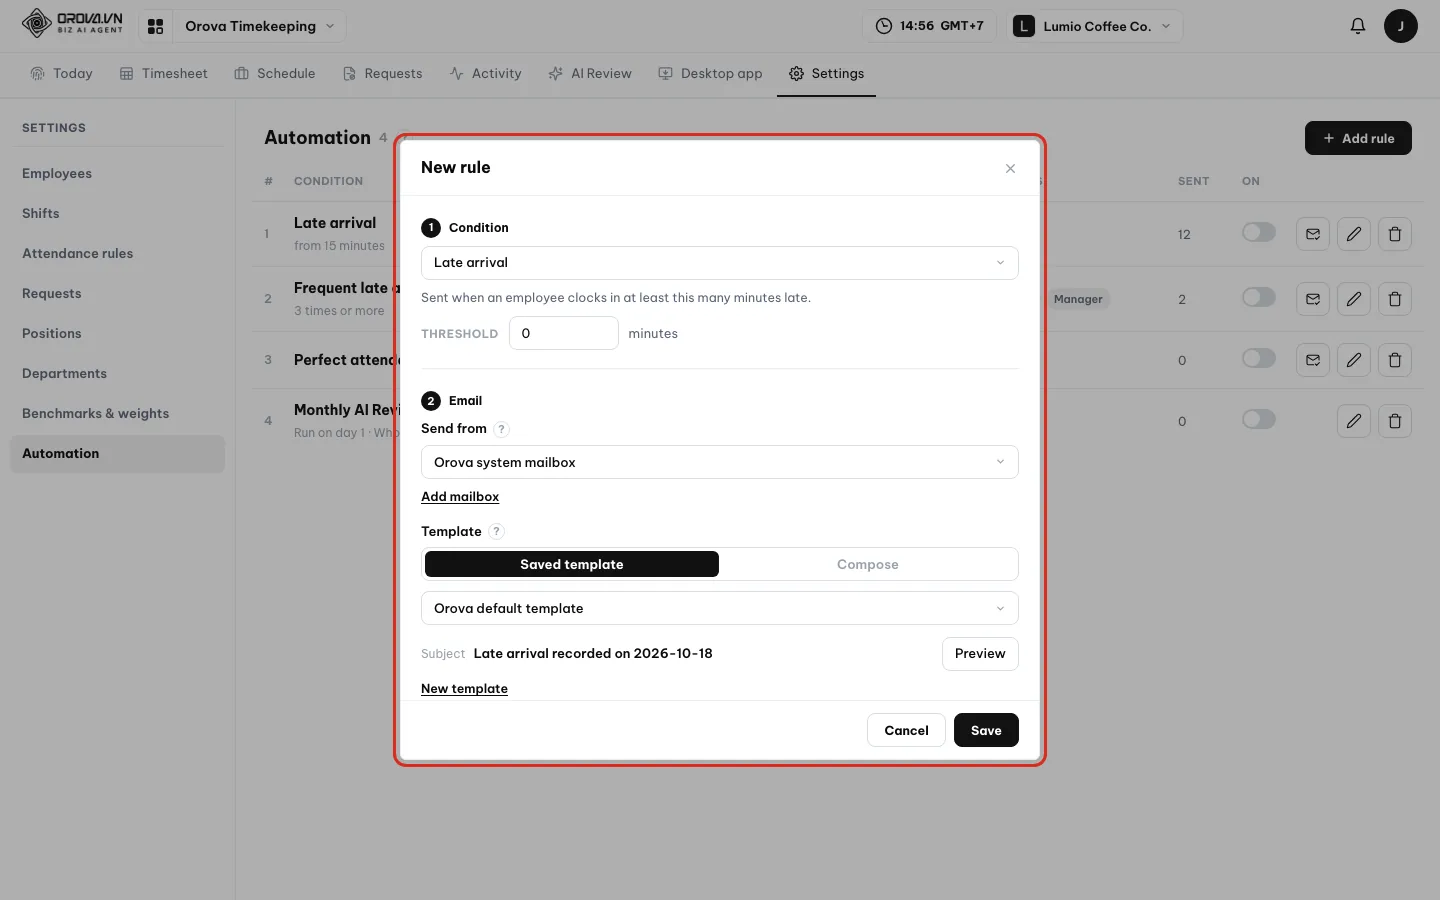
The three parts of a rule: condition, email, recipients. - 3
Schedule AI Review to run every month. In the rule dialog, pick the
Monthly AI Reviewcondition. Pick aRun on dayfrom 1 to 28, aScopeof Whole company or Department, and who toSend resultsto. On that day, the system reviews the previous month in the background.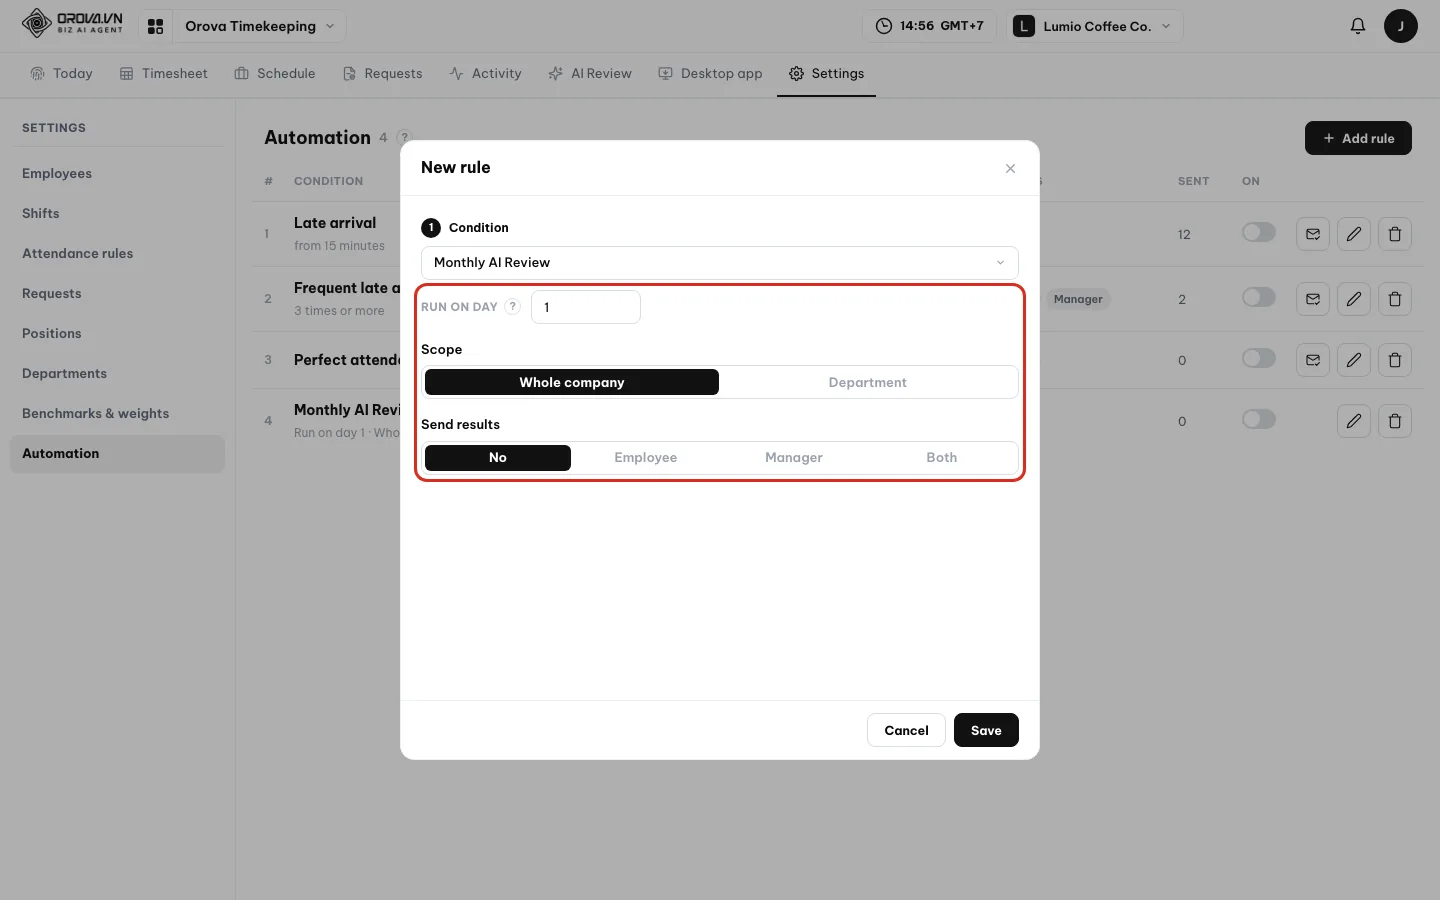
Each run deducts quota based on the number of people.
Warning
Send test sends a real email, and Monthly AI Review uses quota
Send test sends a real email to your address. When the Monthly AI Review rule is on, it deducts quota every month based on the number of people reviewed. Turn off the On switch if you do not want it to run yet.Note
Common errors when saving a rule
18 · FAQ
Frequently asked questions and troubleshooting
The messages you are most likely to see, why they happen and how to fix them.
The Start button is grayed out and cannot be clicked
Your company has turned on the Require a connected desktop app to start the work day rule. The page shows the line “Open Orova Timekeeping on your computer, then start.” Open the app on your computer, wait until the status strip says “App connected”, then click Start.
It says “You are outside the network allowed for clocking in.”
Your company has set the network rule to Block and you are on a different network. Connect to the office network and click again. If this is a company network, ask your manager to add it in Settings ▸ Attendance rules.
I forgot to click End
If your company has turned on Auto-close days with no clock-out, the system closes that day at the shift end time and the session gets an “Auto-closed” pill. If your real clock-out time was different, send an Attendance correction request in Requests, within the time your company allows.
It says “Timekeeping is not enabled for your account.”
Your manager has not turned on tracking for you yet. Ask someone with the Manage timekeeping permission to go to Settings ▸ Employees and turn on the Tracking switch on your row.
The Timesheet is completely empty
Your company has no shift yet, or has not turned on tracking for anyone. The page shows “Turn on timekeeping for employees in Settings to fill the timesheet.” Click Create shift, create a shift, then turn on tracking in Settings ▸ Employees.
I cannot see Settings or AI Review
You do not have the permission. Settings needs the Manage timekeeping permission. AI Review needs the AI Review permission. Ask the workspace owner to add the permission to your group.
The app says “Not connected” or “Lost connection to server”
The app is closed, or the computer is offline. Open the app again and check your network. If the app says “This version is out of date and cannot send data.”, click Download new version and install it again.
SmartScreen blocks the install on Windows
Windows shows a warning because the app is not yet digitally signed. On the warning screen, click More info, then Run anyway to continue installing. On macOS, open it by following the Open Anyway steps on the Install and first launch tab.
My Mac does not count keys and clicks
The computer has not granted access to the app. In the app, click Grant access and follow the steps. On the web, the Desktop app page has a How to allow it button.
The app says “Code expired”
A pairing code is valid for only 10 minutes and works once. On the web, click New code on the Desktop app page, copy the code and paste it into the app again.
The app says “This account already has 3 devices”
Each person can pair up to 3 computers. Go to the Desktop app page, in the My computers block click Disconnect on a computer you no longer use, then pair again.
It says “You do not have enough days left for this request.”
Your company has turned on Block requests when out of days and this leave type has no balance left. Check your balance in My requests. If it looks wrong, ask your manager to Adjust the balance in Settings ▸ Requests.
It says “You already have a request for these dates.”
You have already sent another request for that day. Open the old request, click Cancel request if it is still pending, then send a new one.
It says “It is too late to request a correction for this day.”
Your company only allows requests within a set number of days after the work day. Ask your manager to use Edit day directly on the Timesheet for that day.
Employees see “Your company has no leave types turned on yet.”
No leave type has been turned on. A manager goes to Settings ▸ Requests and turns on at least one type in the Leave types block.
AI Review says “Your workspace is out of quota. Top up to run AI Review.”
The workspace quota wallet is empty. Top up quota and run it again. Work that does not use AI, such as clocking in, timesheets and requests, keeps running as usual.
AI Review says “Three reviews are already running…”
Only up to 3 reviews can run at a time. Wait for one to finish, then run the next one.
Why does one day show 1.3 days of credit
That person works a shift with a Credit multiplier of 1.3. Credit = time worked × multiplier, so a full shift earns 1.3 days of credit. Their monthly standard days are multiplied too. See section 05.
I cannot edit my own attendance
The system says “You can’t edit your own timesheet. Ask another manager.” Ask someone else with the Manage timekeeping permission to edit it for you.
I cannot delete a shift
The shift still has people assigned, or it is the default shift. Change those people's shift in Settings ▸ Employees, or make another shift the default, then delete it.
Who owns the attendance data? How do I view, edit or delete it
Orova only provides the tool. Attendance data belongs to and is managed by your company. To view, edit or delete your own data, contact your company's administrator. Per-minute activity data is deleted automatically after the number of days your company chooses, from 30 to 365 days, default 90.
/ Need help?
Can't find what you need? Open the Support section in your workspace, or send us a message.