
Orova CRM is the shared customer list of your sales team. You record customers in one place, take care of each person, move deals through the sales stages, then create orders and collect payment.
This guide is written for someone who has never used CRM software. Every section starts by explaining the new words, then walks through what to click, what to fill in and what you should see.
One rule holds in every section: you only see and edit the customers that fall within your own permissions.
01 · Customers
Get started with Customers
Customers is the screen you will open most. Understand it first and the rest reads quickly.
Customer (customer profile)
A person or a point of contact you are taking care of. Each customer has their own profile with details, notes, history, reminders, deals and orders.
Customers
The shared table of every customer you are allowed to see. Think of it as the whole team's contact book, except each person picks the columns they want to look at.
Owner and Shared pool
The owner is the person responsible for a customer. Customers nobody has taken yet sit in the Shared pool, like a basket of customers waiting for someone to pick them up.
Use Customers when you need to find someone, see the whole list, or get ready to call a batch of customers. From here you can open each person's profile.
Open Customers and read the table
- 1
Open CRM and pick
Customers. Go to your workspace and open the CRM module. The top menu hasOverview,Customers,Pipeline,Sales,Field visits,Reminders,Follow-ups,Settings. ClickCustomers.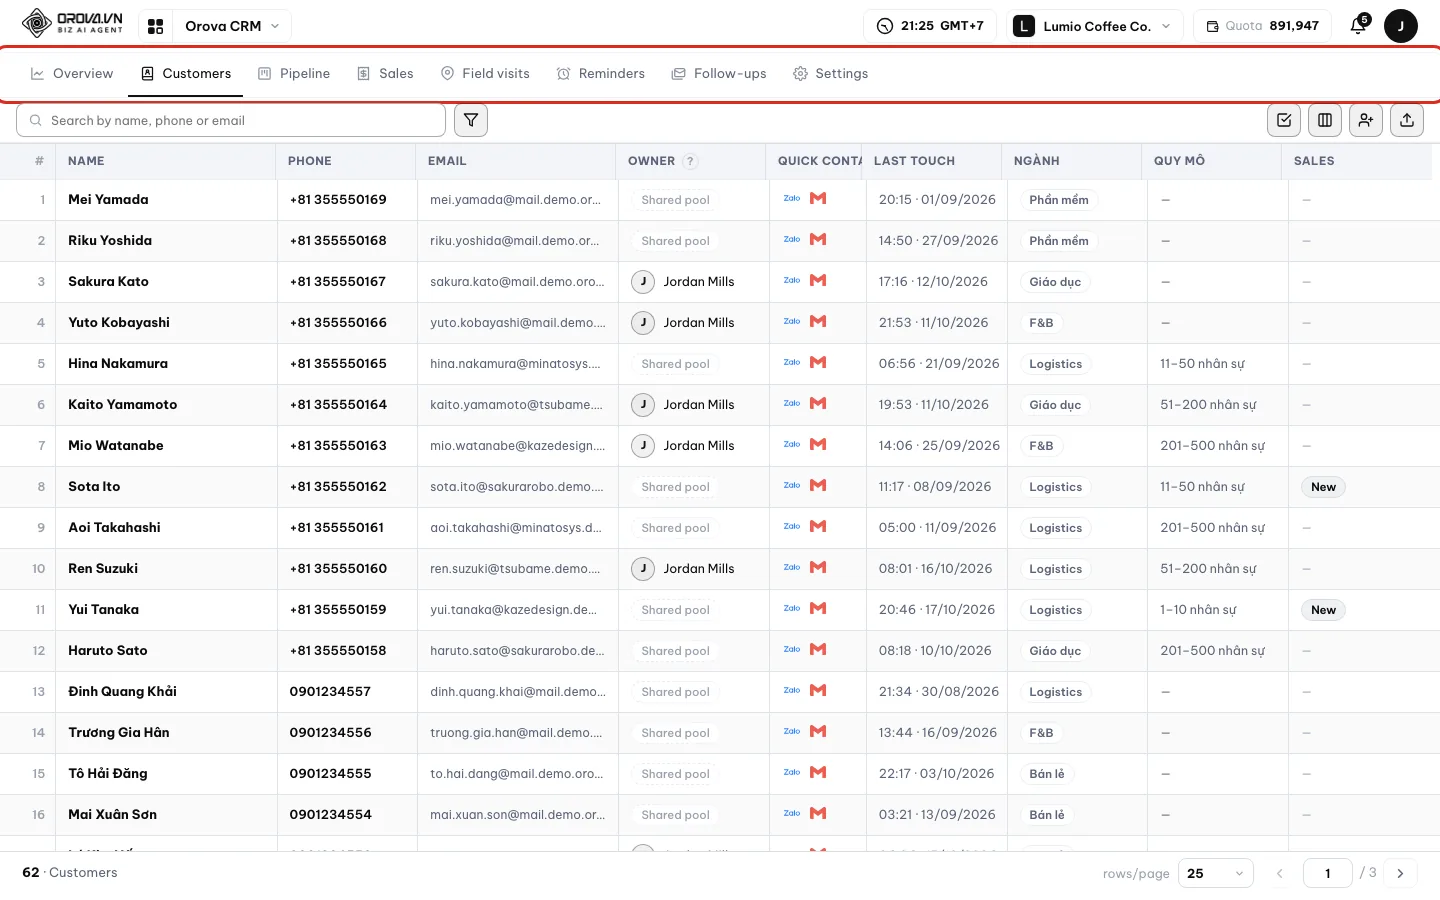
The CRM menu. Customers is the second item. - 2
Read each column of the table. Each row is one customer. Columns you will use often:
Name,Phone,Company,Owner,Stage,Lead level,Last touch. Click a name to open the profile.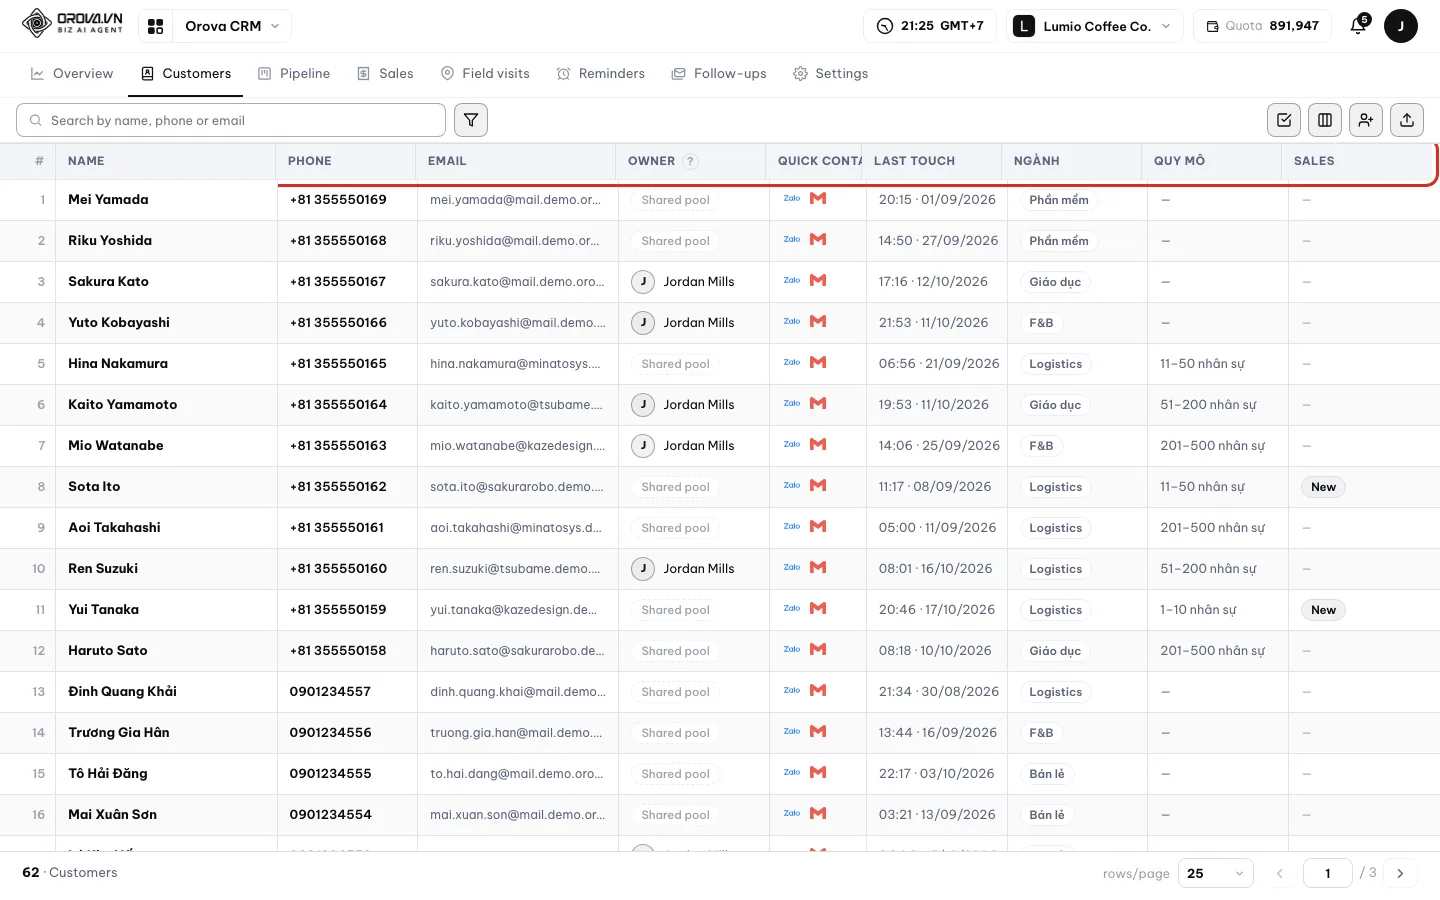
The customer table. The colored chip in Lead level tells you whether a customer is hot or cold. - 3
Find a customer fast. Type into
Search by name, phone or email. Part of a name, number or email is enough. The table filters as you type.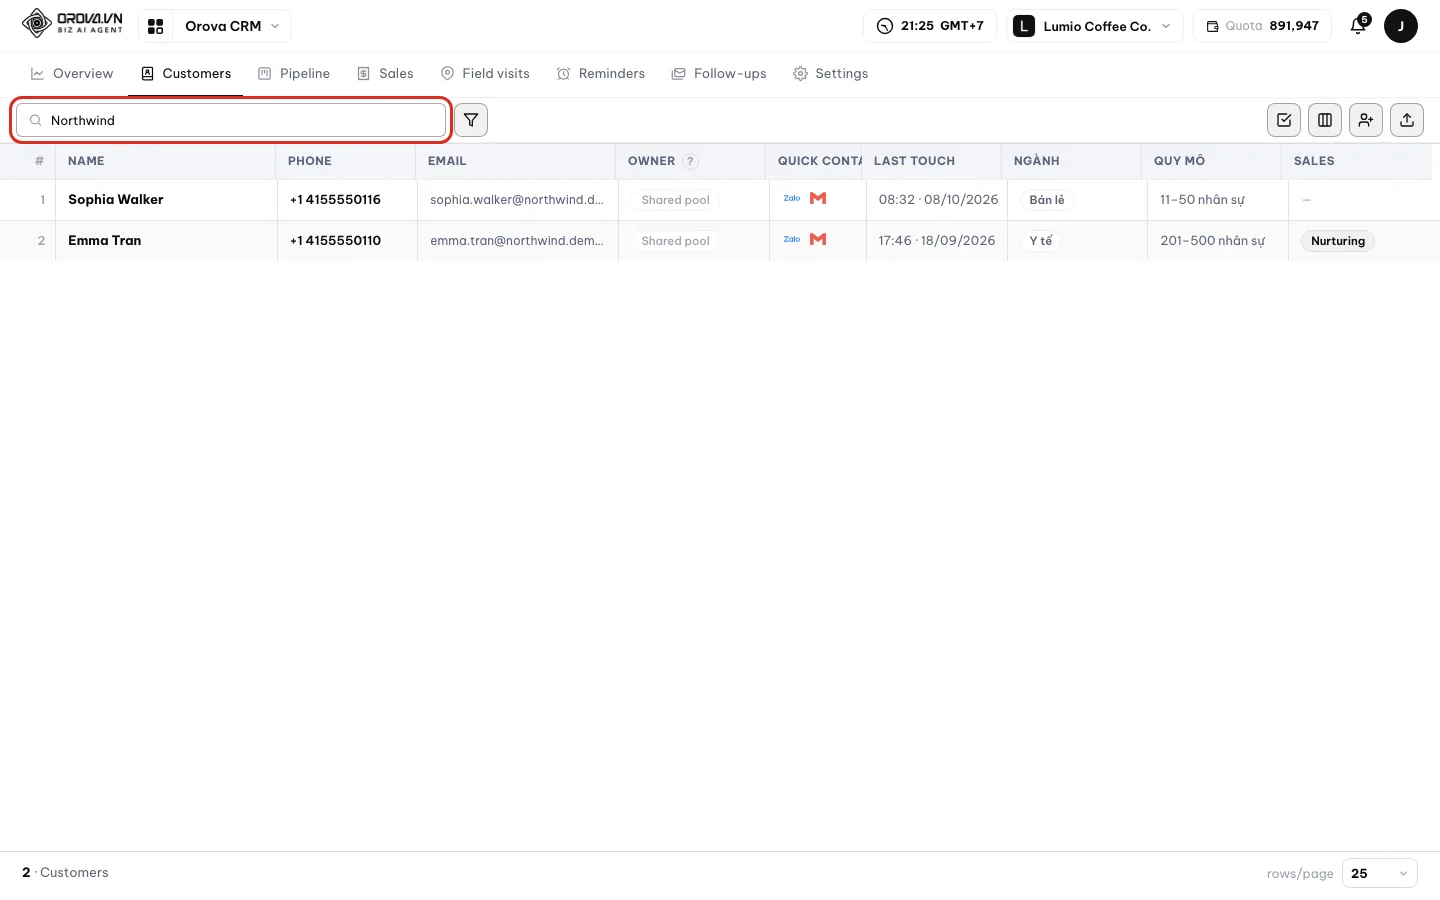
Part of the company name is enough. - 4
Pick the columns you want to see. Click
Columns to show. Tick the columns you need and untick the ones you don't. If the list is long, type intoFind a column. Orova remembers this choice just for you, so your teammates' views don't change.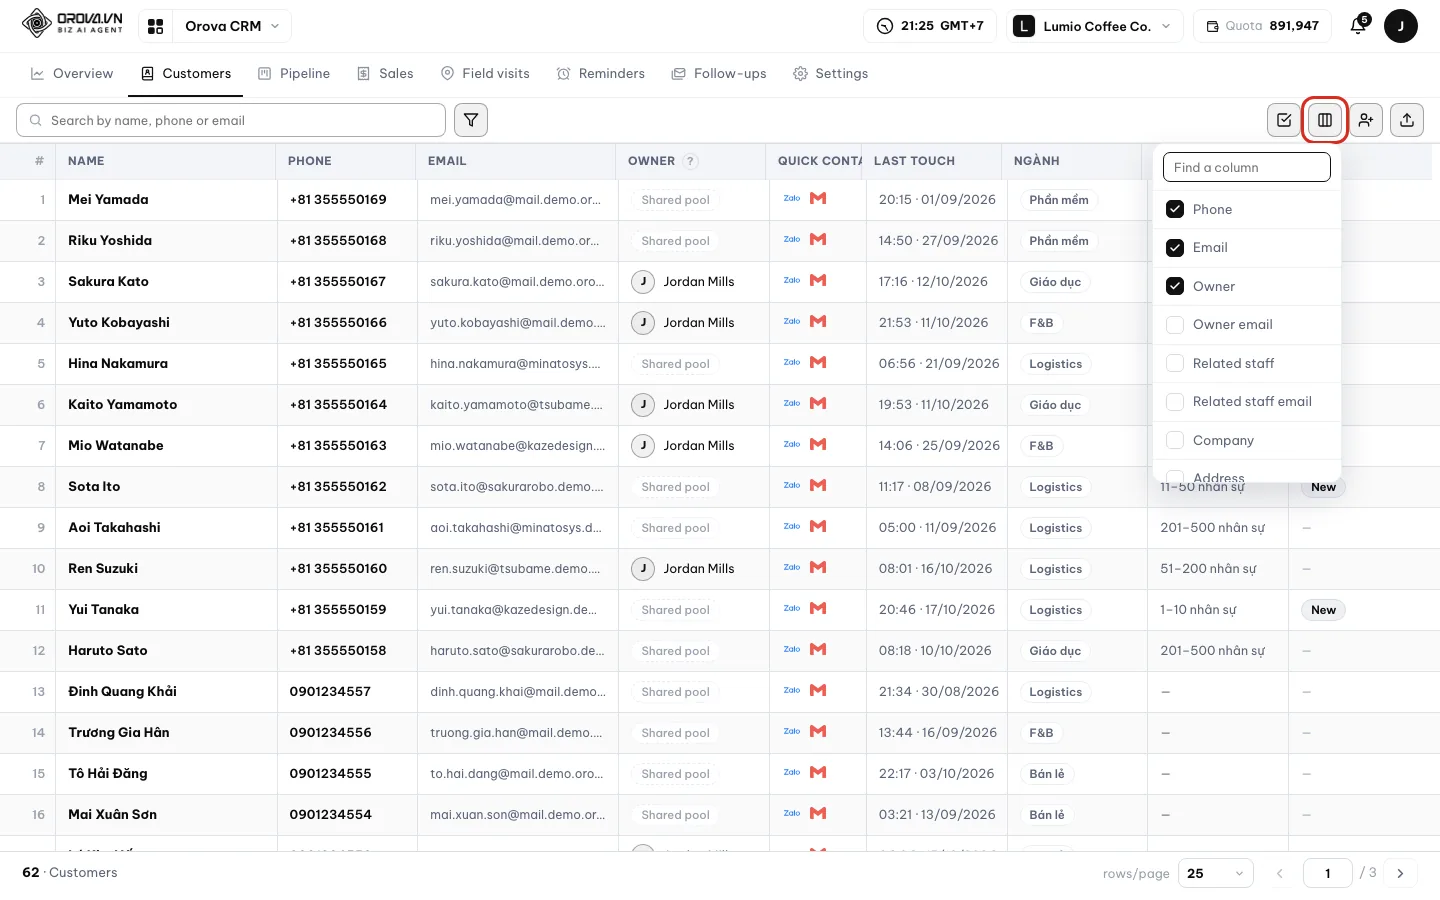
Everyone has their own set of columns. - 5
Change the number of rows per page. At the bottom of the table you have
rows/pageandpage {a} / {b}. Pick a larger number if you want to see more customers at once.
| Button / field | What it does | Notes |
|---|---|---|
Search by name, phone or email | Filters the table by what you type | Part of it is enough |
Filter | Opens the multi-condition filter box | See Filter and save filters |
Columns to show | Picks the columns shown in the table | Saved separately for each person |
Bulk select | Turns on a checkbox at the start of each row | Shows the bulk action bar |
Add customer | Opens the New customer box | Add people by hand, one at a time |
Excel ▸ Sample file | Downloads a sample Excel file with exactly your fields | Choice fields come with a drop-down list |
Excel ▸ Bring in from Excel | Brings in many customers at once | Uses no quota |
Excel ▸ Download as Excel | Exports exactly the columns and filters you are viewing | Needs the data export permission |
| Column | What it means | Notes |
|---|---|---|
Added via | How the customer got into the list | Added by hand, From Excel, Through the API, From a sales page |
Owner | Who is responsible for the customer | Empty means “Shared pool — nobody is on it yet” |
Related staff | Other people who can also see the customer | Not the owner |
Stage | Which pipeline stage the customer is at | Can be changed in bulk |
Lead level | The interest level you rate yourself | Hot, Warm, Cold, Not rated yet |
Quick contact | Call, Zalo… buttons that open the app on your device | Orova does not send on your behalf |
Email opt-out | The customer has unsubscribed from emails | Yes or No |
Last touch | The last time anyone worked on the customer | Use it to find forgotten customers |
Tip
Empty table at first
Add customer for a few people, or Bring in from Excel if you already have a list.Note
Can't see your teammates' customers
02 · Add customers
Add customers by hand
The fastest way to get your first customer into the list.
Custom fields
Fields your team adds in Settings, for example Industry or Company size. They appear in the add customer box, in the table and in the sample Excel file too.
Lead level Hot / Warm / Cold
The customer's interest level, rated by you. A customer who keeps asking for prices is Hot; a customer who just left their number is Cold.
Related staff
People who are not mainly responsible but still need to see the customer. For example, an accountant tracking that customer's debt.
Use this when you have just met a new customer, or only have a few people to record. For a long list, use Excel in the next section.
Add a new customer
- 1
Click
Add customer. The button is on the Customers toolbar. TheNew customerbox opens.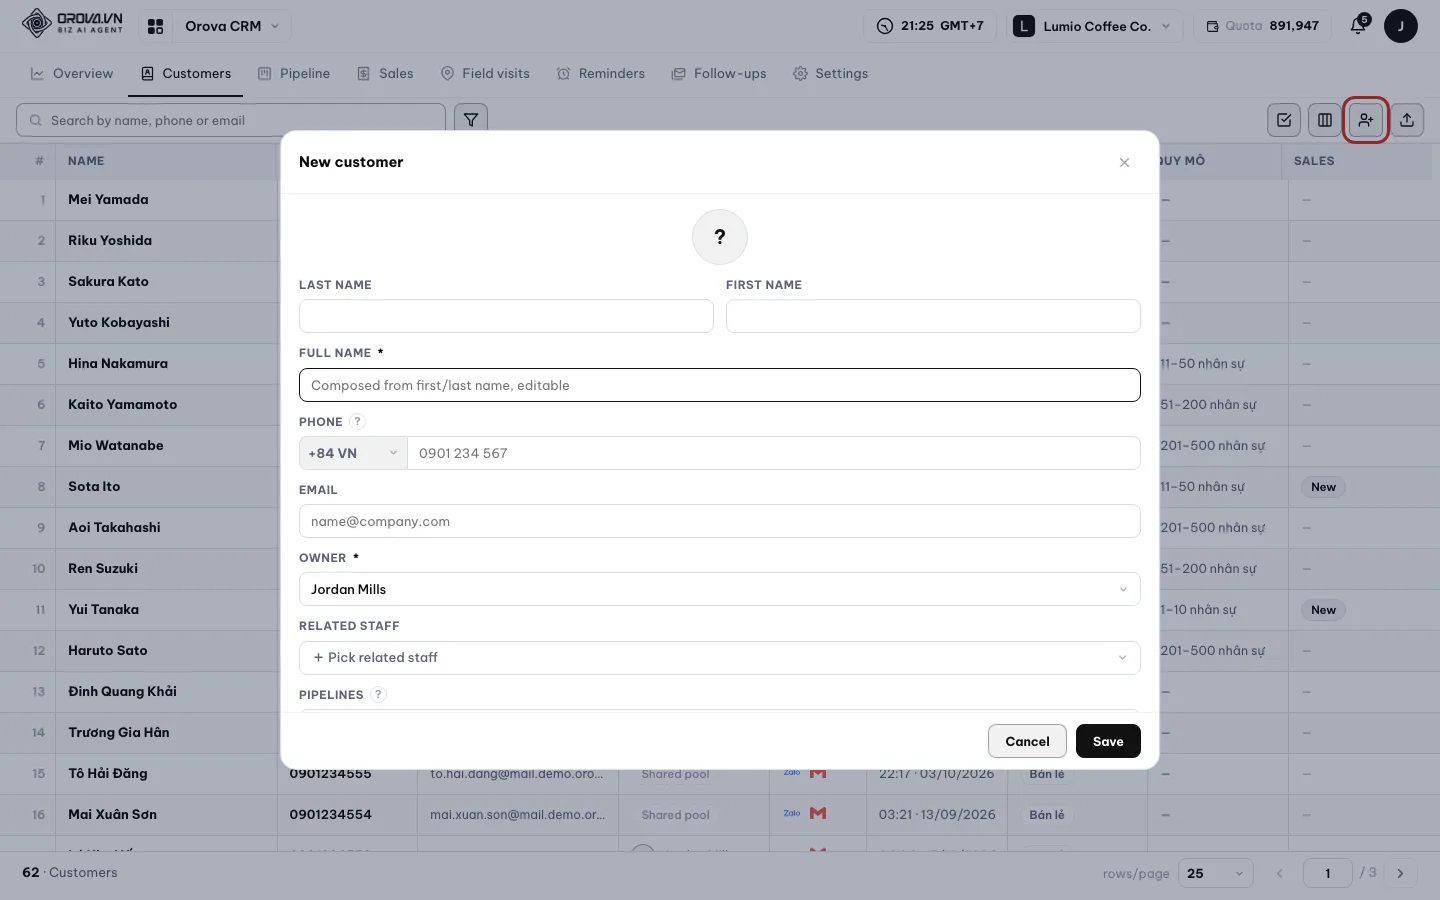
The New customer box. - 2
Fill in the name and contact details. Fill in
Last nameandFirst nameseparately.Full nameis put together for you, and you can edit it. Pick the country code, then type thePhone number, theEmailand theCompany.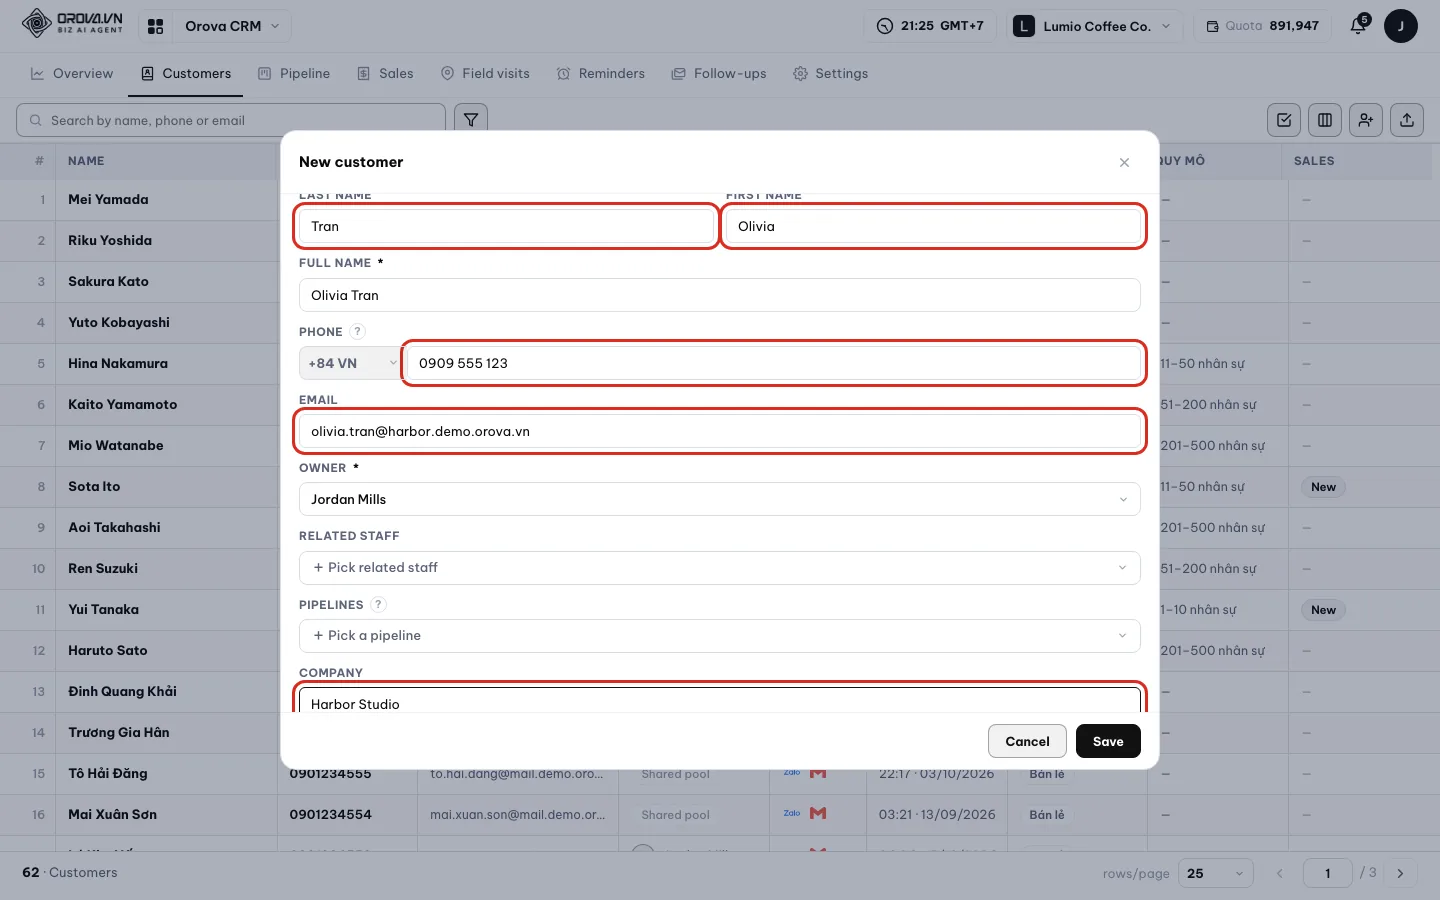
Write the phone number any way you like. - 3
Add more if you need. Pick
GenderandLead level.Tax codeis printed on the quote; leave it blank for individual customers. You canUpload photoas PNG, JPG or WebP, up to 4 MB. - 4
Choose who takes care of this customer. In
Who takes care of them, pick a staff member, aRouting grouporNobody yet. If you pick a group, the system picks the person based on how the group splits work.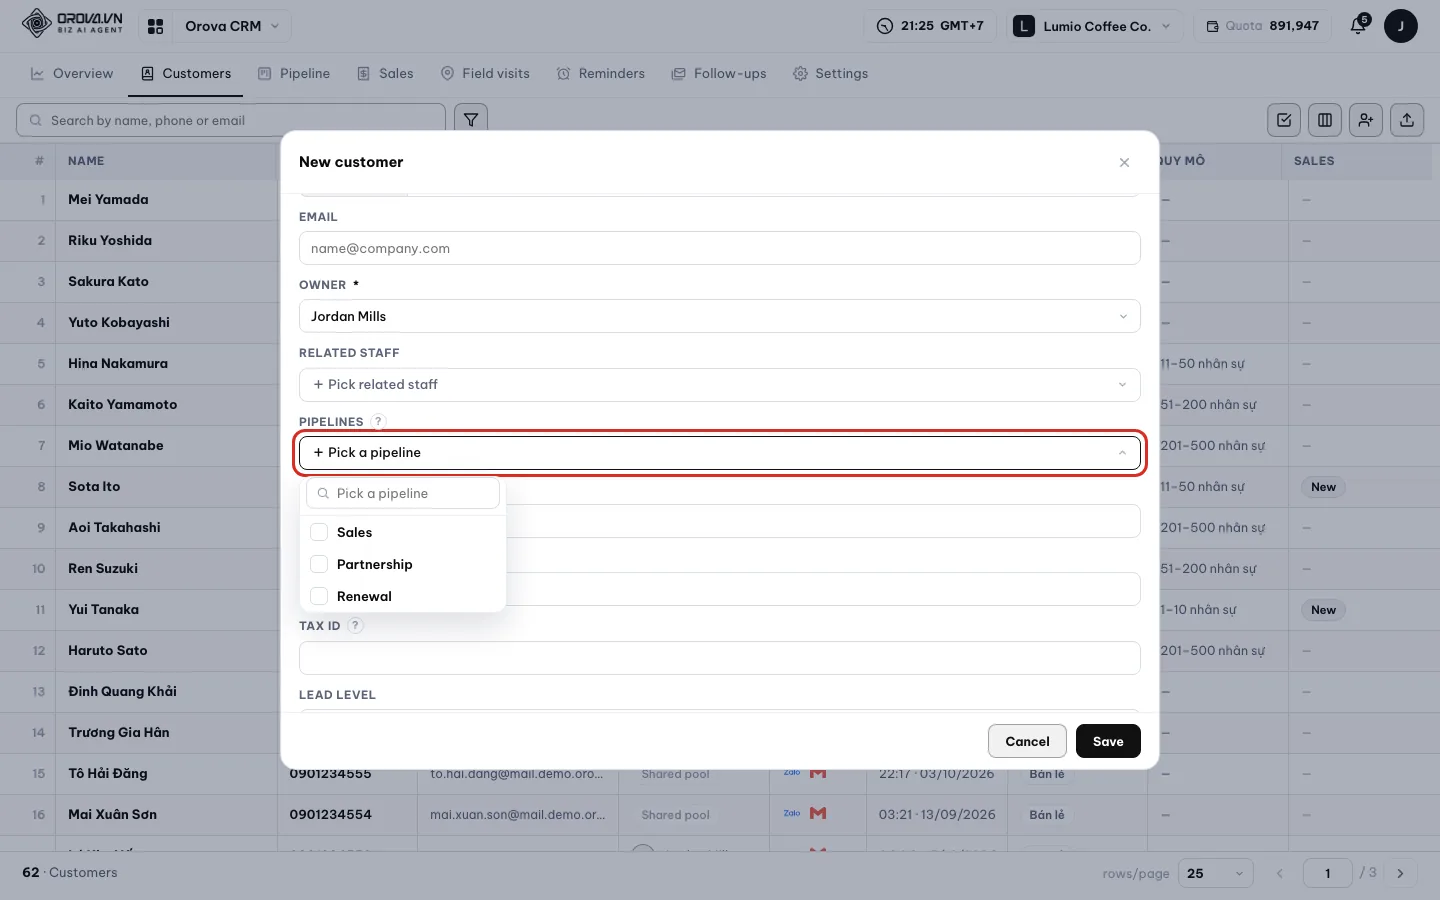
Assign an owner and tick pipelines right when you add the customer. - 5
Tick a pipeline if you want to open a deal. In
Pipelines, tick the pipeline you want. Orova creates a deal for the customer at the first stage of that pipeline. - 6
Click
Save. The box closes and the new customer appears in the table. If a required field is still empty, Orova says “{ten} is still empty. It is required…”; fill it in and save again.
| Button / field | What it does | Notes |
|---|---|---|
Last name / First name | Splits last name and first name | Full name is put together for you, editable |
Upload photo / Remove photo | The customer's photo | PNG, JPG, WebP, up to 4 MB |
Country code + Phone number | Contact number | Default country code comes from the Company profile |
Email | Email address | Used to detect duplicate customers |
Address / Tax code | Printed on the quote | Leave blank for individual customers |
Lead level | Hot, Warm, Cold, Not rated yet | You choose it yourself |
Who takes care of them | Staff, Routing group or Nobody yet | If nobody is assigned, the customer goes to the Shared pool |
Related staff | People allowed to see the customer | Pick several people |
Pipelines | Creates a deal at the first stage | You can tick several pipelines |
Currency | The customer's currency code | Type a code such as USD, VND, EUR |
When the phone number or email already exists
Orova checks for duplicates by phone number and email. A number starting with 0 or with +84 counts as the same number.
Merge two customers into one
- 1
Read the merge box. If you click
Saveand there is a duplicate, theMerge two customers into onebox appears with the line “This phone number or email is already in the book…”. The two profiles sit side by side.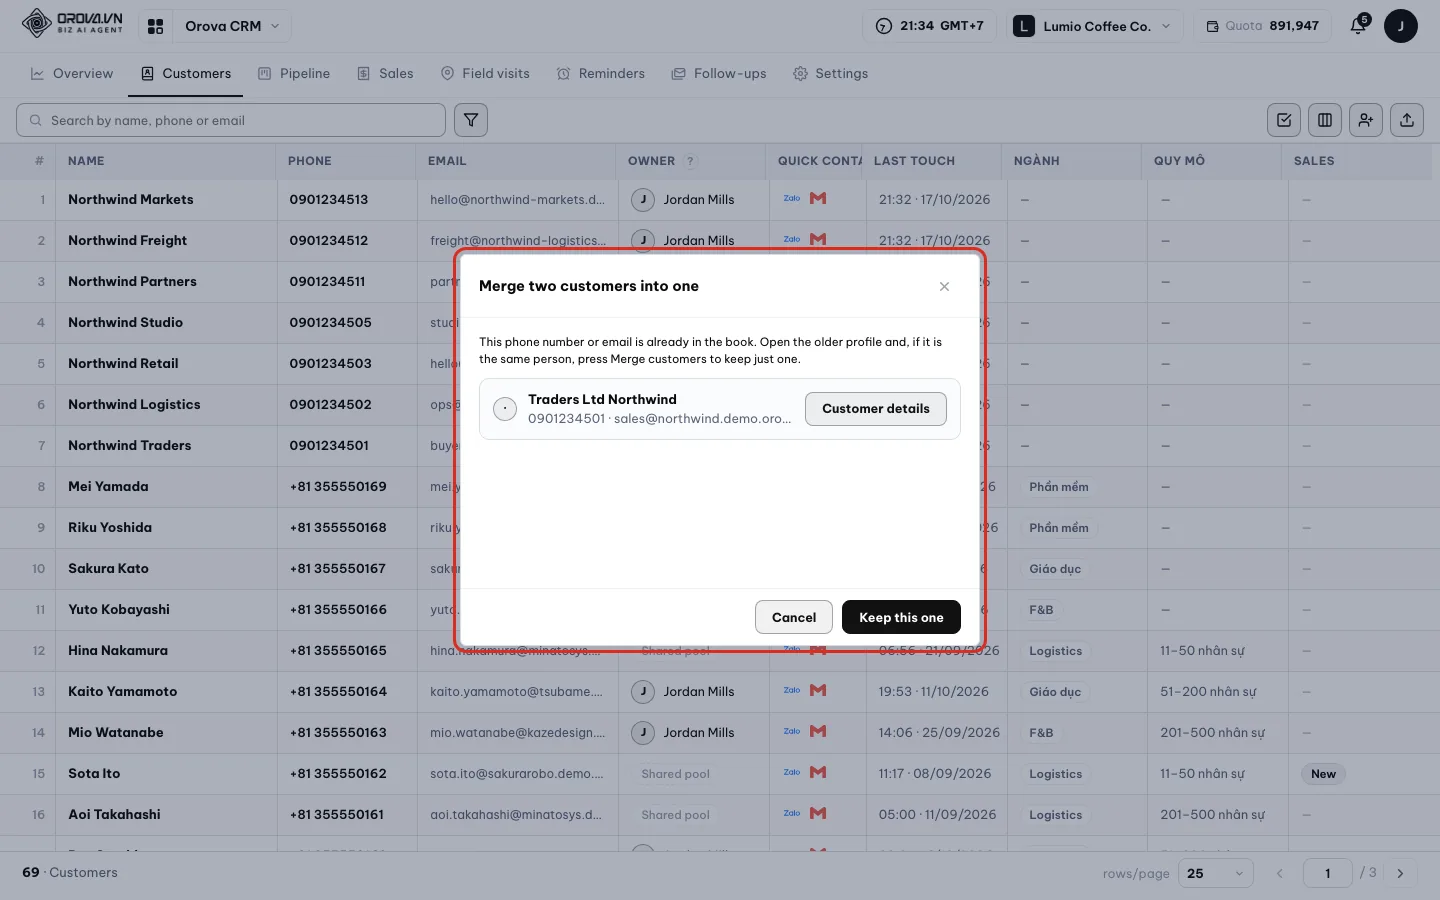
Pick the profile you want to keep. - 2
Click
Keep this one. Click it under the profile you want to keep. The two customers become one, and the list no longer has a duplicate.
03 · Excel import and export
Bring customers in and out with Excel
Put a whole list into Orova at once, or take a list out to work with elsewhere.
Sample file
An Excel file Orova builds just for your workspace. Its columns match your fields exactly, including fields you added yourself such as Industry.
Duplicate customers on import
Rows whose phone number or email is already in the list. Orova skips those rows and does not overwrite the existing customer.
Use Excel when you are moving from an old list to Orova, or have just collected a list of customers at an event. Excel import does not call AI and uses no quota.
Download the sample file and bring customers in
- 1
Open the
Excelmenu. On the Customers toolbar, clickExcel. The menu has three items:Sample file,Bring in from Excel,Download as Excel.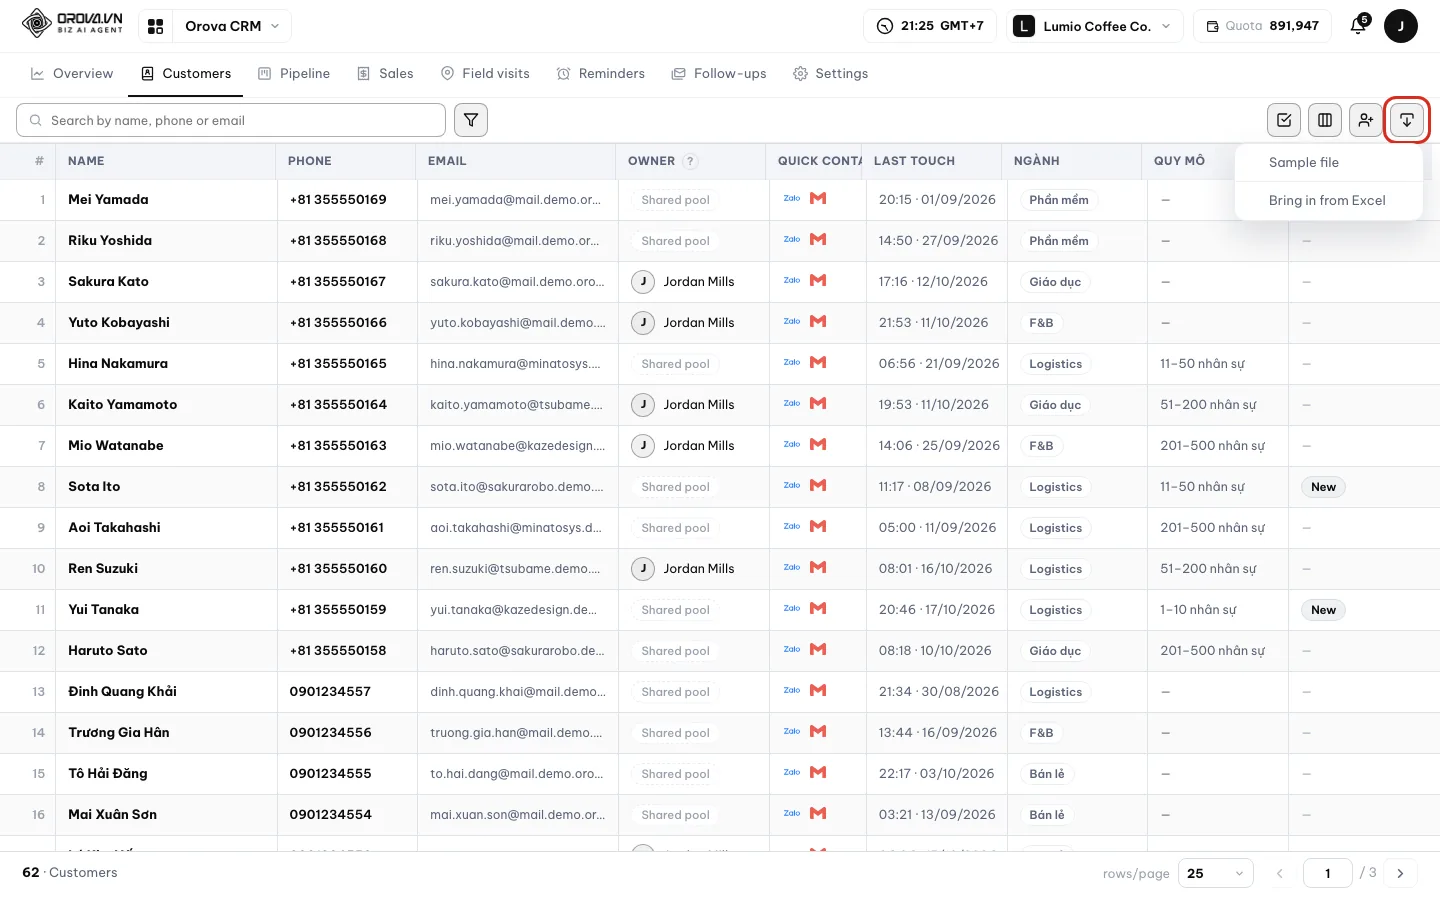
All three Excel tasks live in one menu. - 2
Click
Sample file. Your device downloads an .xlsx file. Open it and you will see a header row with exactly your fields. Choice fields come with a drop-down list.
The sample file includes the columns you added yourself. - 3
Copy your data into the sample file. One customer per row. Keep the header row as it is. For cells with a drop-down list, pick from the list instead of typing something else.
- 4
Click
Bring in from Excel. TheBring customers in from Excelbox opens. Drag the file onto “Drag a file here, or click to pick one”, or clickChoose a file.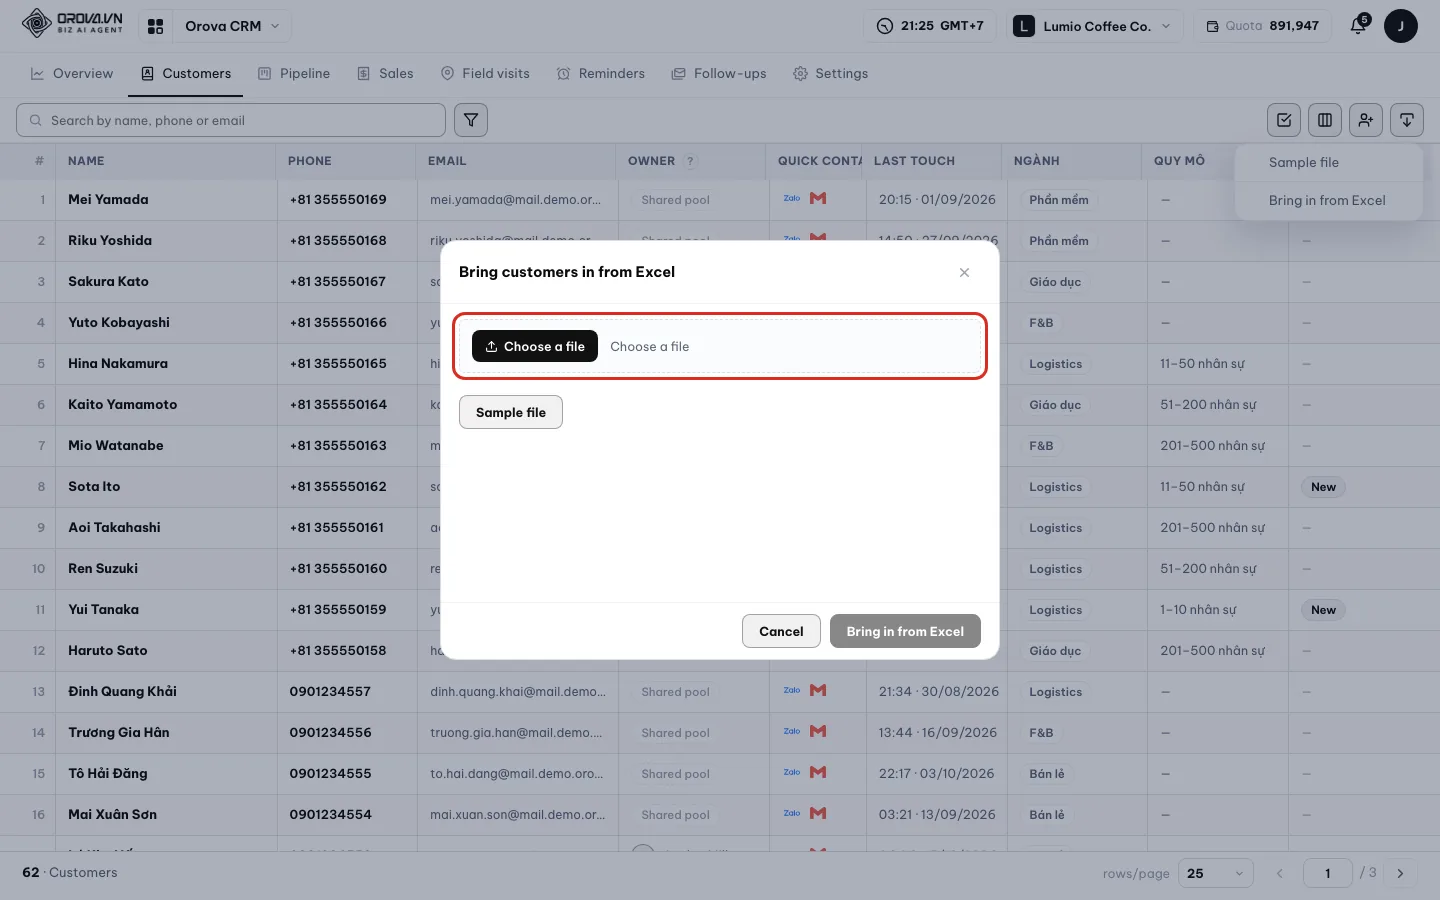
Drag the file in, or click Choose a file. - 5
Read the result line. When the import finishes, Orova says “All done: {n} new customers, {n} already in the book so skipped, {n} rows…”. New customers appear in the table right away.
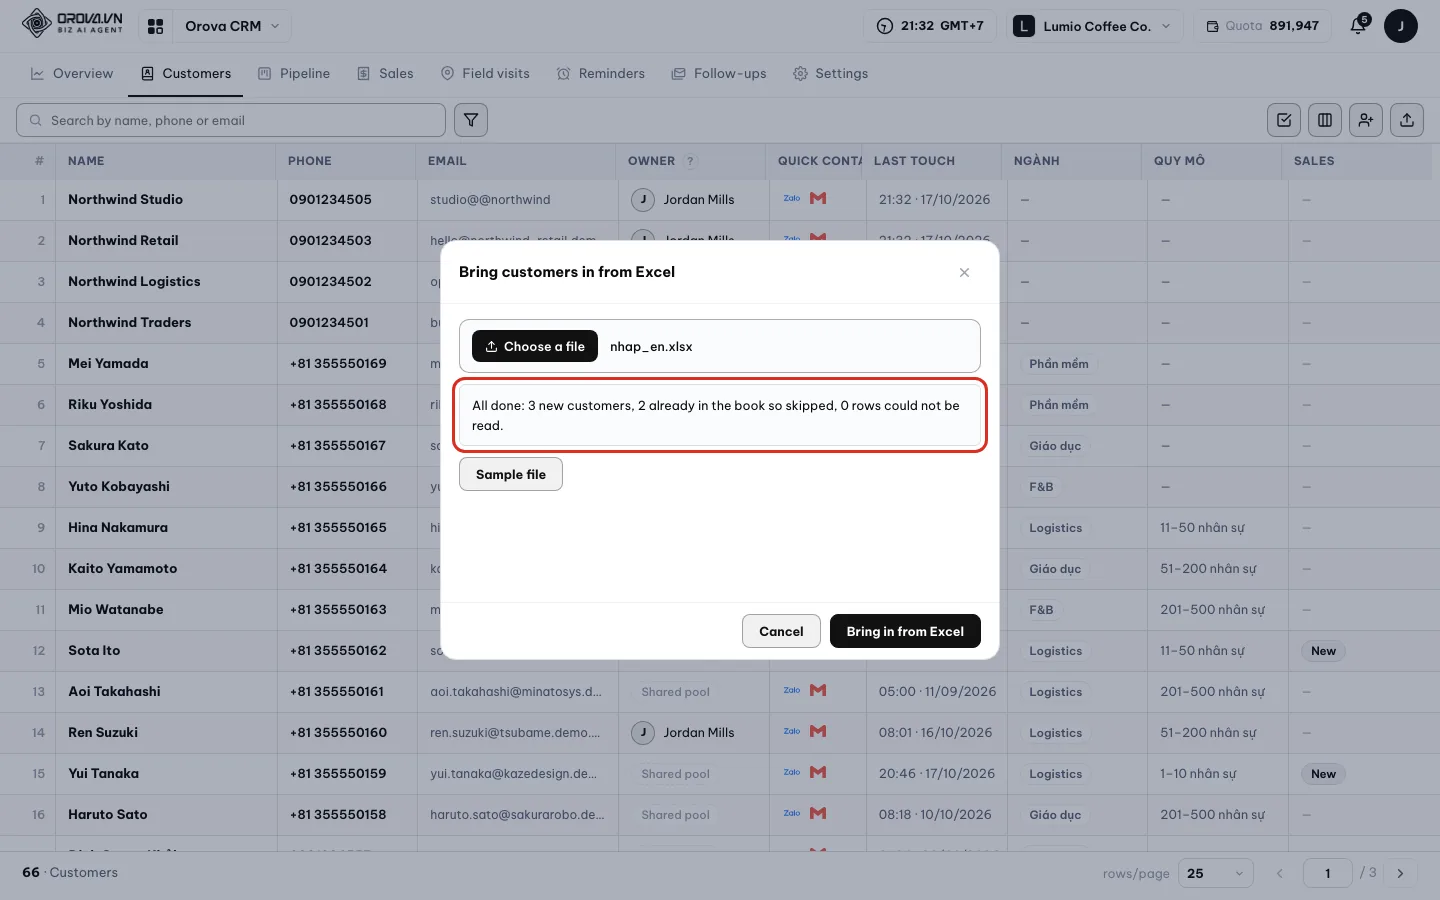
You see at once how many customers came in and how many were skipped.
Note
Limits for one file
Tip
The owner may change on its own
Export customers to Excel
- 1
Filter and pick columns first. The export takes exactly the columns and filters you are viewing. For a tidy file, turn on only the columns you need and filter before you export.
- 2
Click
Excel▸Download as Excel. Your device downloads an .xlsx file. If you don't see this item, your account doesn't have the data export permission yet.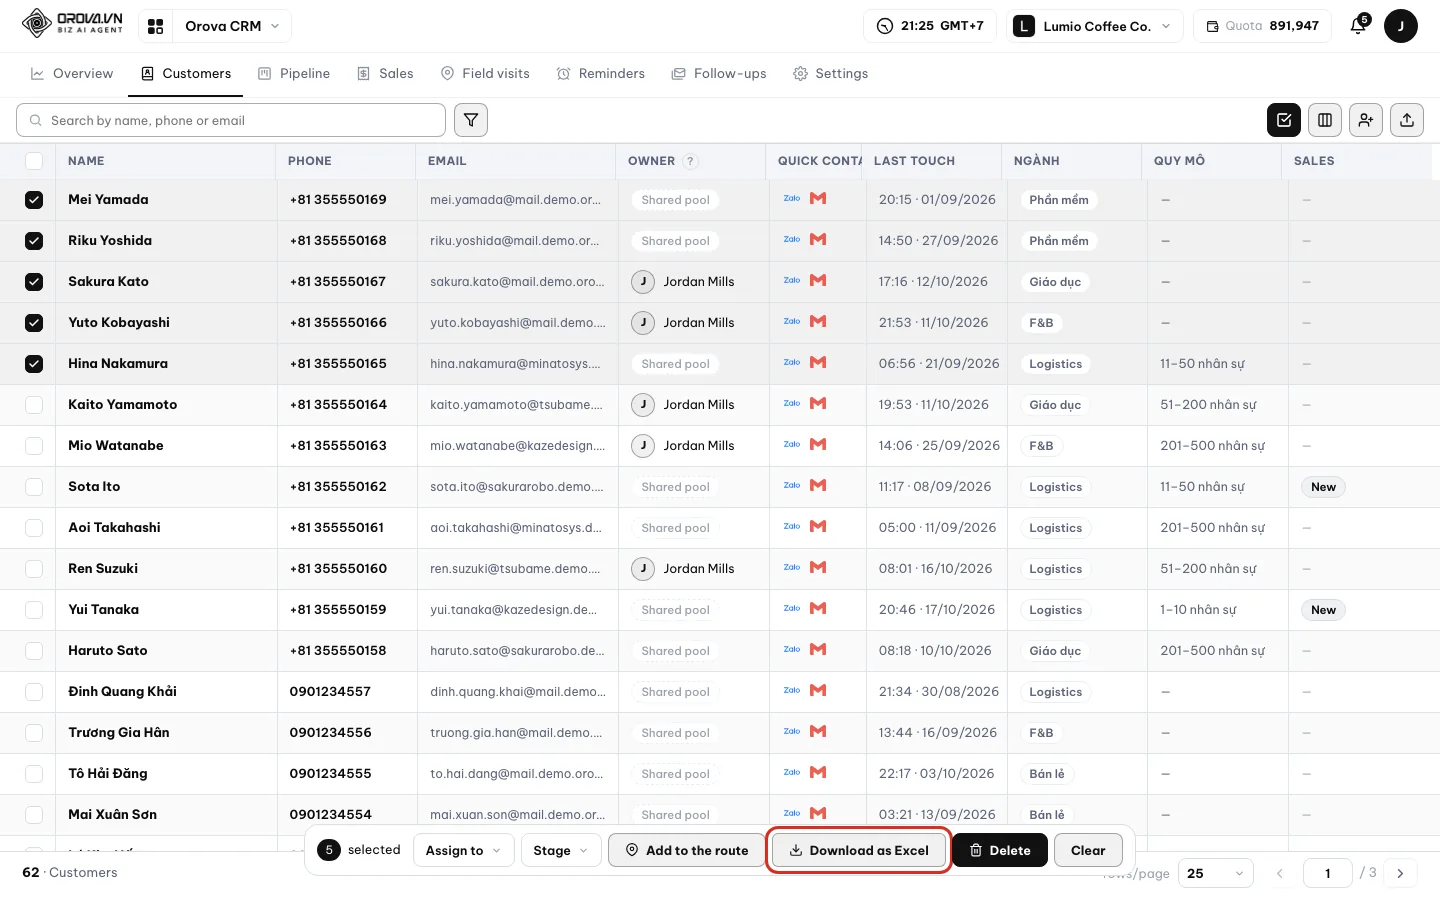
The export follows exactly what you see on screen.
04 · Filters
Filter customers and save filters
Find exactly the group of customers to work on with just a few conditions.
Filter condition
Made of three parts: pick a field, pick a comparison, enter a value. For example: Lead level · is · Hot.
Saved filter
A set of conditions you name and keep. It becomes a small chip above the table; one click filters the table exactly as before.
Use filters when the search box isn't enough. For example, finding Hot customers in the Software industry, or customers nobody has touched for over 30 days.
Add filter conditions
- 1
Click
Filter. The filter box opens. Type intoFind a field…to quickly pick the field to filter on. - 2
Pick a comparison and a value. The comparisons change with the field type; see the table below. Enter a value or pick one from the list. Add a second condition if you need one.
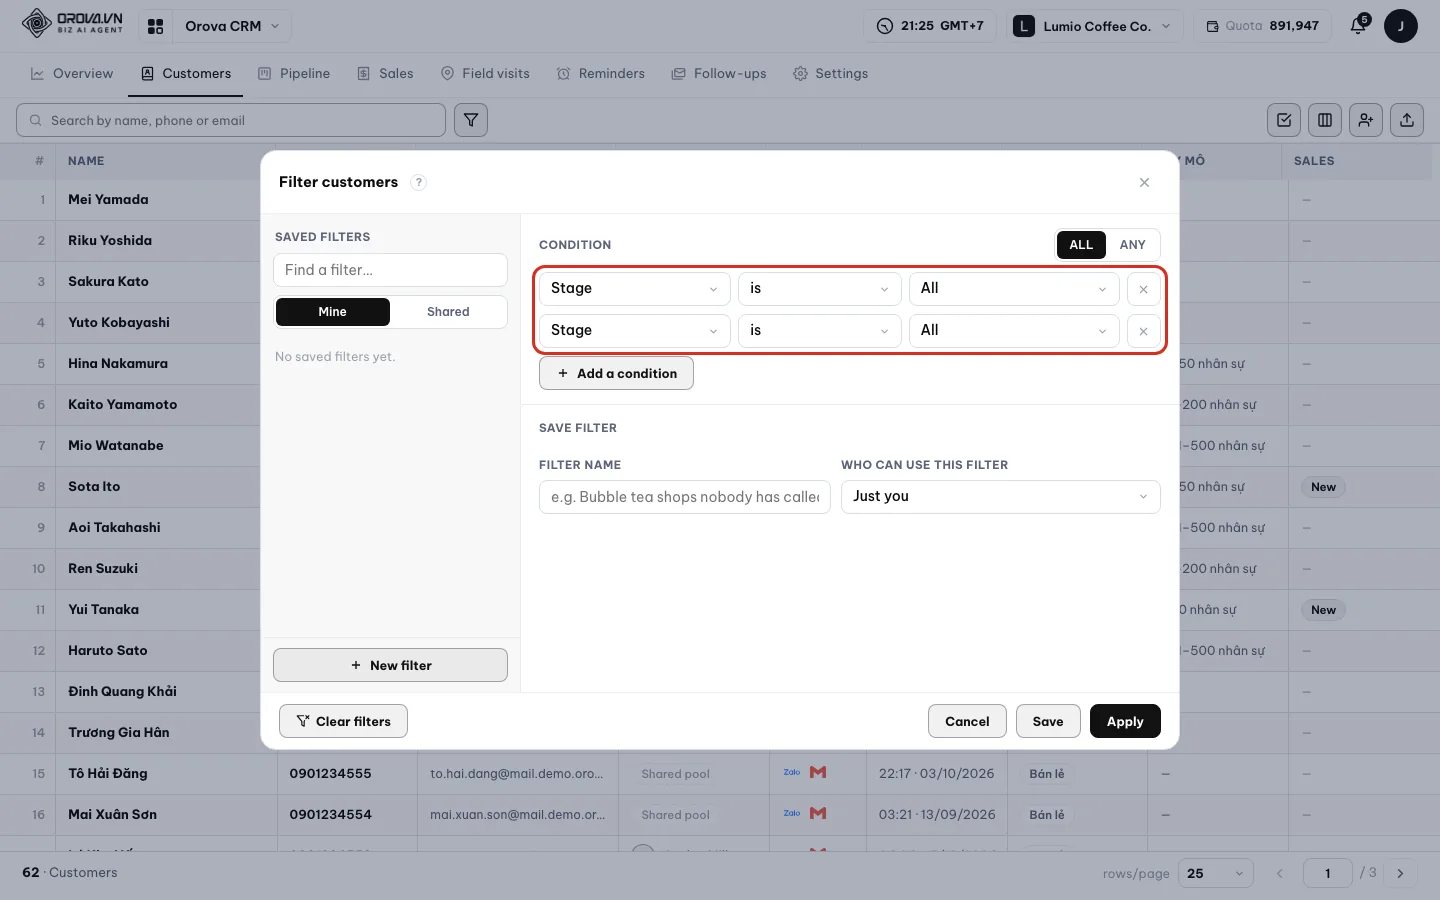
Each condition has a field, a comparison and a value. - 3
Check the result. The table only keeps customers that match every condition. If nobody matches, the table says “No customer matches.” Click
Clear filtersto get the full list back.
| Field type | Comparisons | Notes |
|---|---|---|
| Text | contains, does not contain, is, is not, is empty, is filled in, starts with, ends with | Used for name, email, company |
| Number | equals, is more than, is less than, is at least, is at most | Used for value, quantity |
| Date | before, after, between, in the last {n} days, untouched for over {n} days | “Untouched for over {n} days” finds forgotten customers |
| Choice | is one of…, is not one of…, has a selection, has no selection | Used for Lead level, Industry |
| Yes / no | is yes, is no | Used for Email opt-out |
| Person | is me | Filters the customers you own |
Save a filter as a chip
- 1
Name the filter. In the filter box, type into
Filter name, for example “Hot software customers”. Click save. - 2
Reuse it with one click. The filter becomes a chip above the table. Next time, just click the chip and the table filters exactly as it did when you saved it.
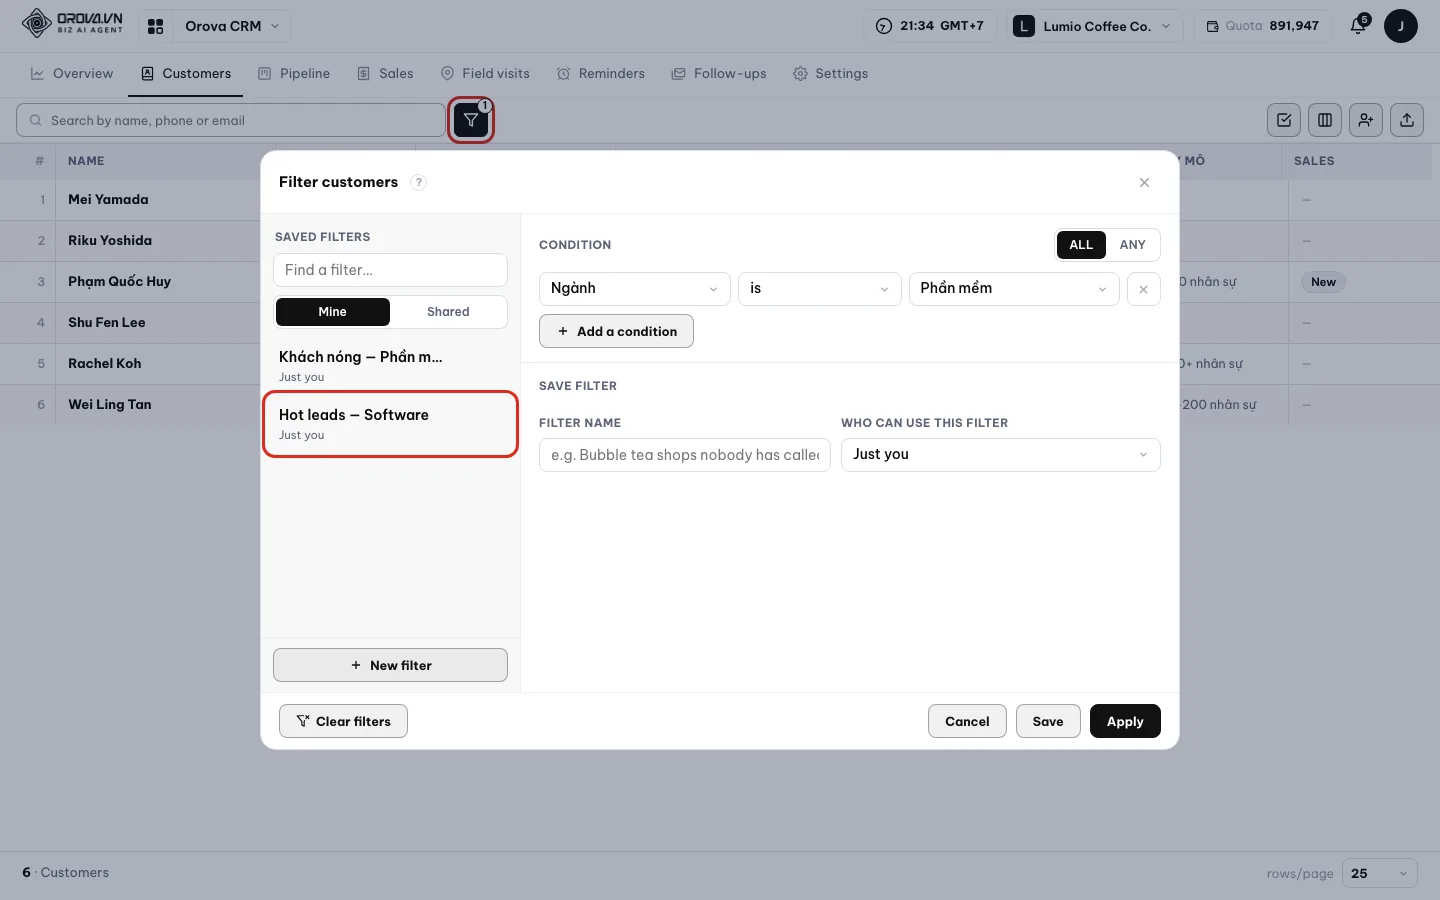
Saved filters show up as chips. - 3
Delete the chip when you no longer need it. Orova asks “Delete the filter “{ten}”? No customer goes anywhere — you only lose this shortcut.” Confirm and you're done.
Note
Conditions that no longer work
05 · Bulk actions
Work with many customers at once
Change the stage, assign an owner or delete a hundred customers in one click.
Bulk select
A mode that turns on a checkbox at the start of each row. You tick several customers and do the same thing to all of them.
Select by filter
Selects every customer that matches the filter, including customers on later pages. This is different from selecting only the rows you can see.
Use it when you need to hand a whole group of customers to a new person, move a whole group to another stage, or clean out junk customers.
Select customers and act in bulk
- 1
Click
Bulk select. A checkbox appears at the start of each row. Tick customers one by one; the selection bar shows “{n} selected”.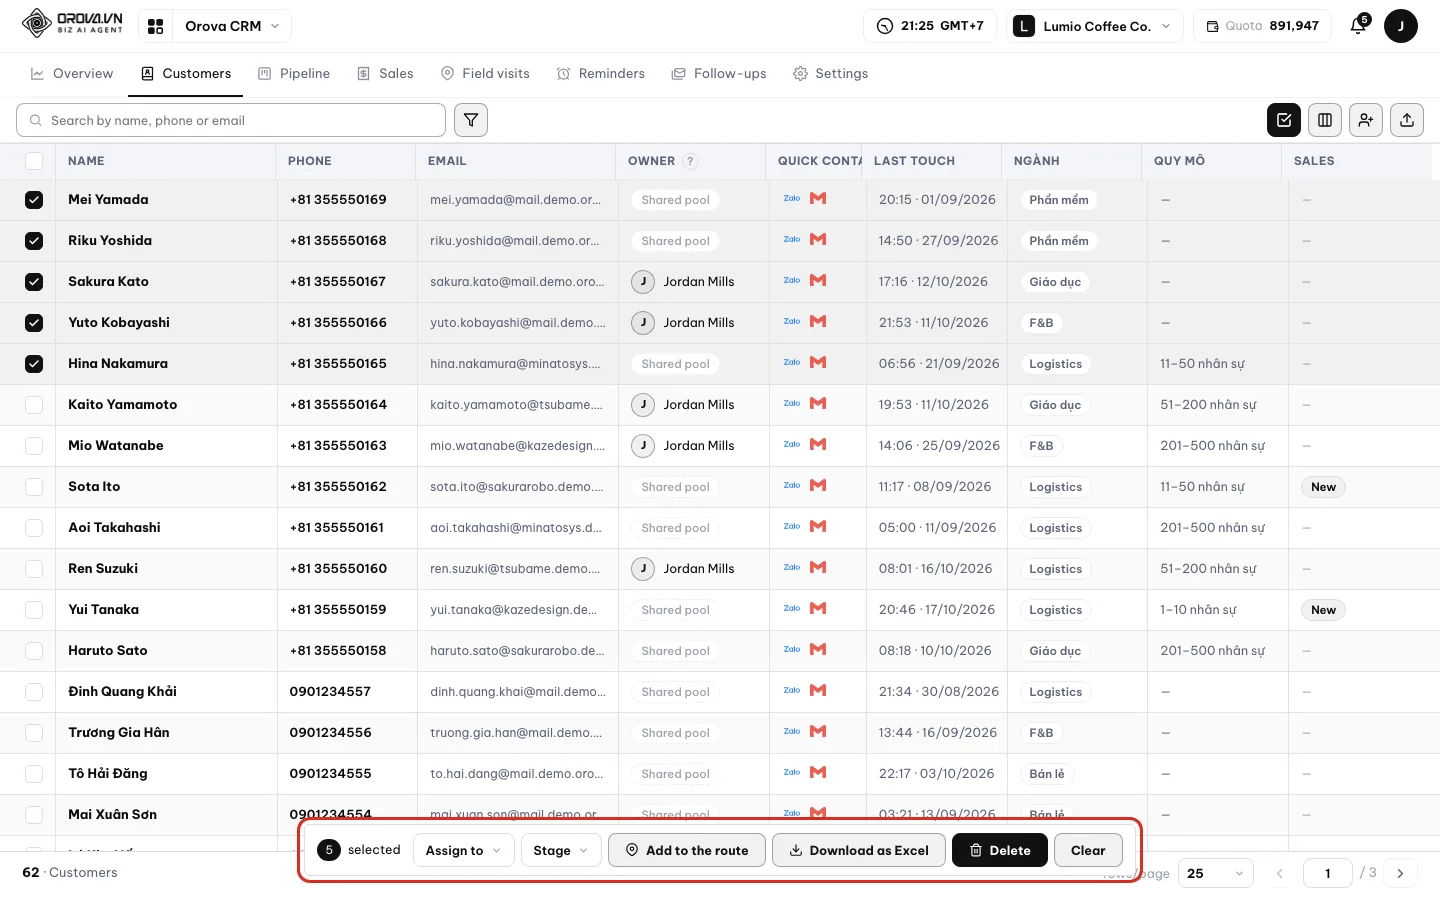
The selection bar counts the customers you ticked. - 2
Select more if you need. Click
Select this page ({n})to select the whole page. ClickSelect all {n} customers in this filterto select every customer that matches the filter. - 3
Pick what to do. The selection bar has
Stage,Assign to,Add to the route,Delete. ClickStageand a menu lists the stages, grouped by pipeline.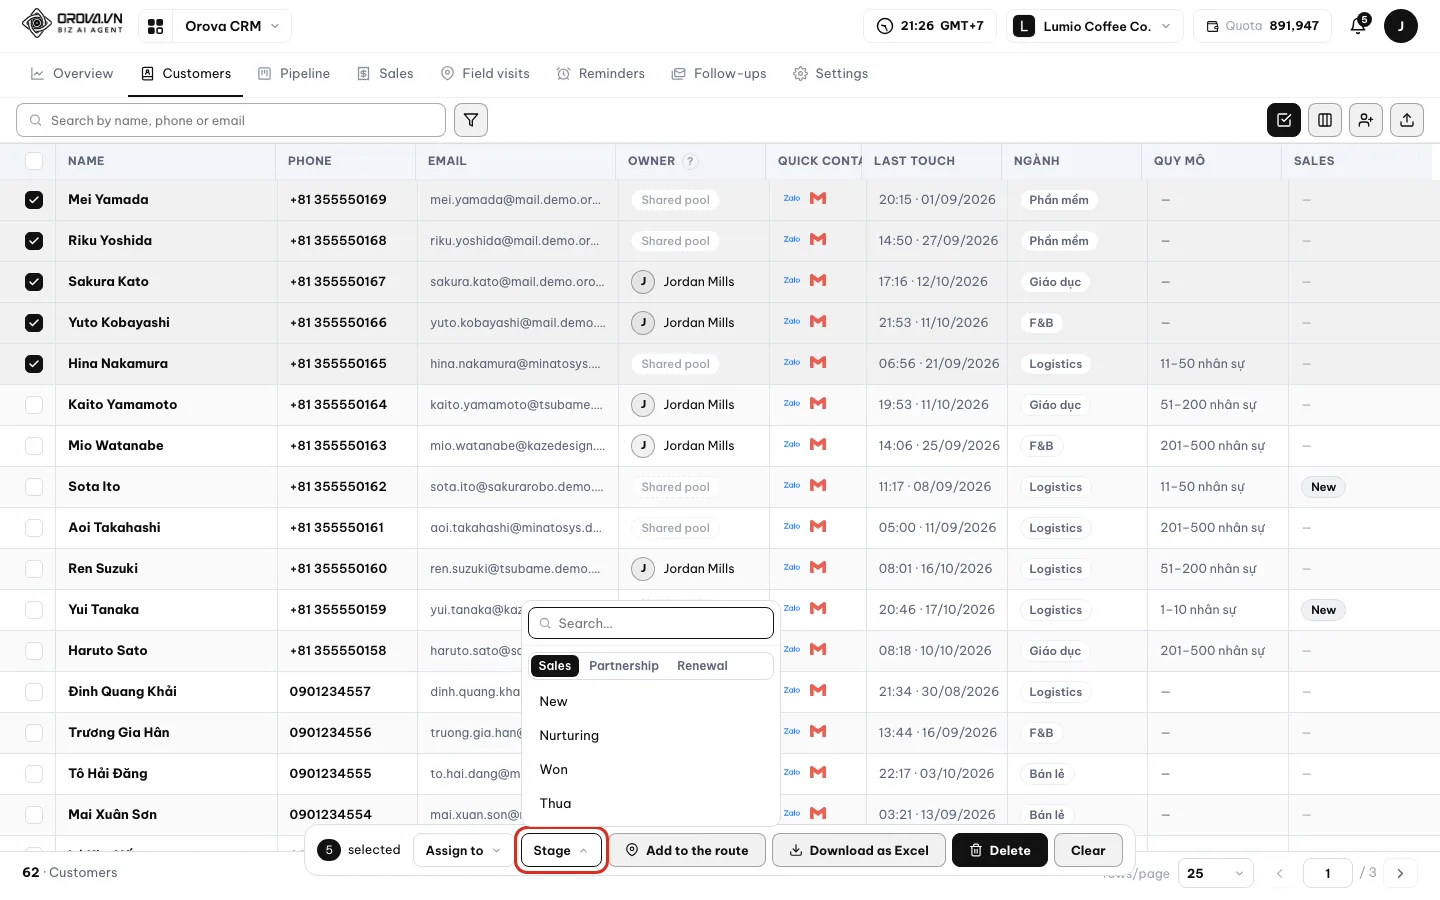
Change the stage for a whole group of customers at once.
| Button / field | What it does | Notes |
|---|---|---|
Stage | Moves customers to a stage | Moves open deals, or creates one if there is none |
Assign to | Changes the owner | Pick Staff, Routing group or Shared pool |
Add to the route | Adds customers to a field visit route | See Field visits |
Delete | Deletes the selected customers | Cannot be undone |
Warning
Bulk delete cannot be reversed
06 · Quick contacts
Call or message on Zalo in one click
One click opens the app on your device, no copying numbers.
Quick contact
Buttons such as Call, Zalo and email. Clicking one opens the app on your device directly. Orova does not send on your behalf; you talk to the customer yourself.
Quick contact buttons appear in the Quick contact column of the table and at the top of the customer profile. Orova uses the customer's phone number or email to build the buttons.
Use and adjust quick contacts
- 1
Click a button in the table. Turn on the
Quick contactcolumn inColumns to show. ClickCallorZaloon the customer's row, and the app on your device opens.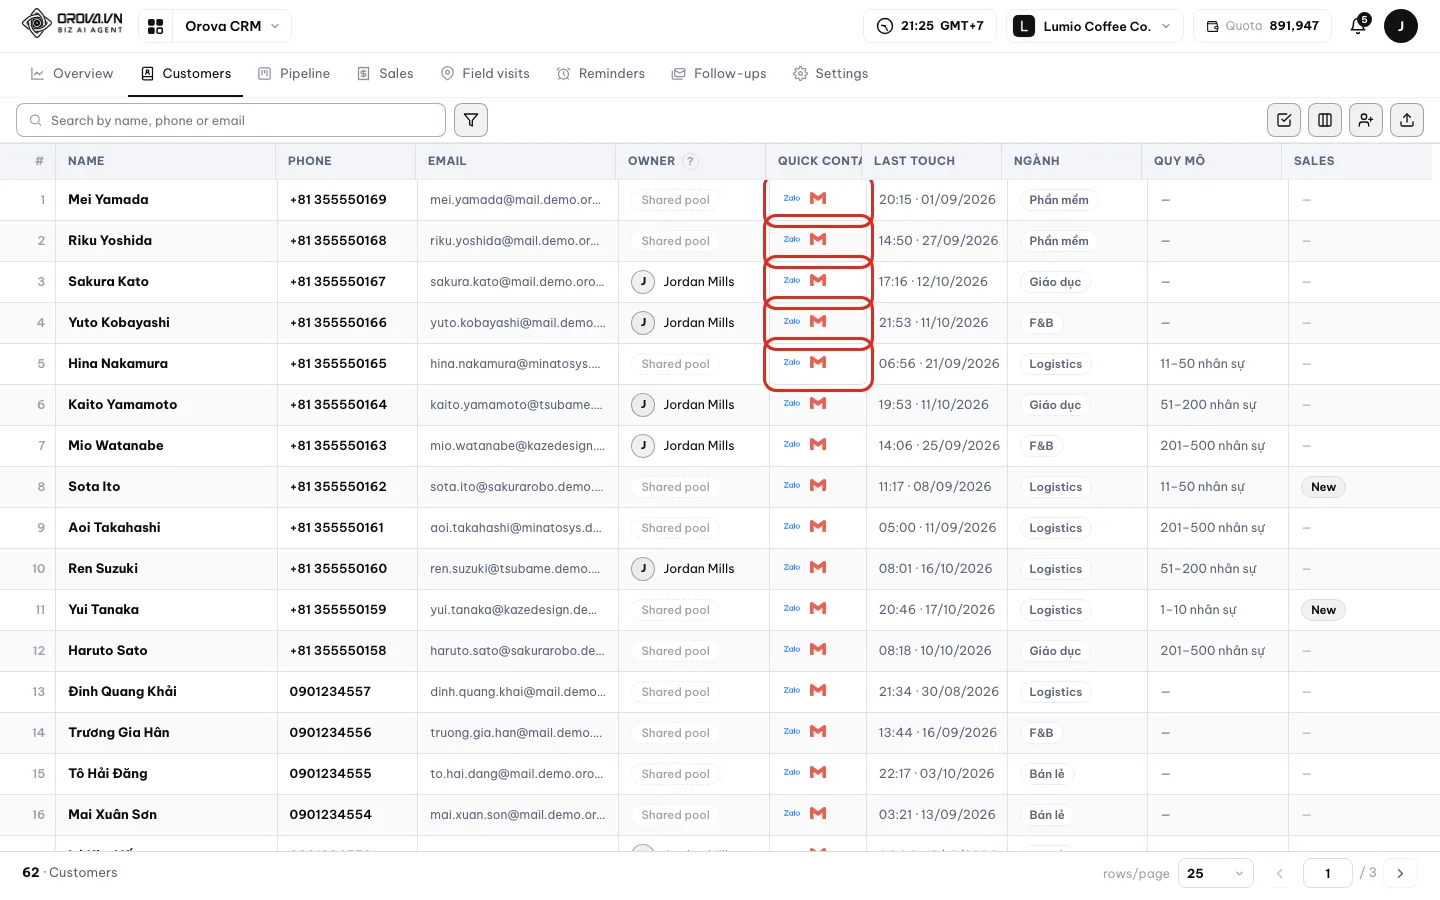
Every row has contact buttons ready. - 2
Edit a channel for one customer. Open the customer profile and find
Quick contacts for this customer. Edit each channel, for example to use a WhatsApp number that differs from the calling number. Leave it blank to use the phone number or email automatically.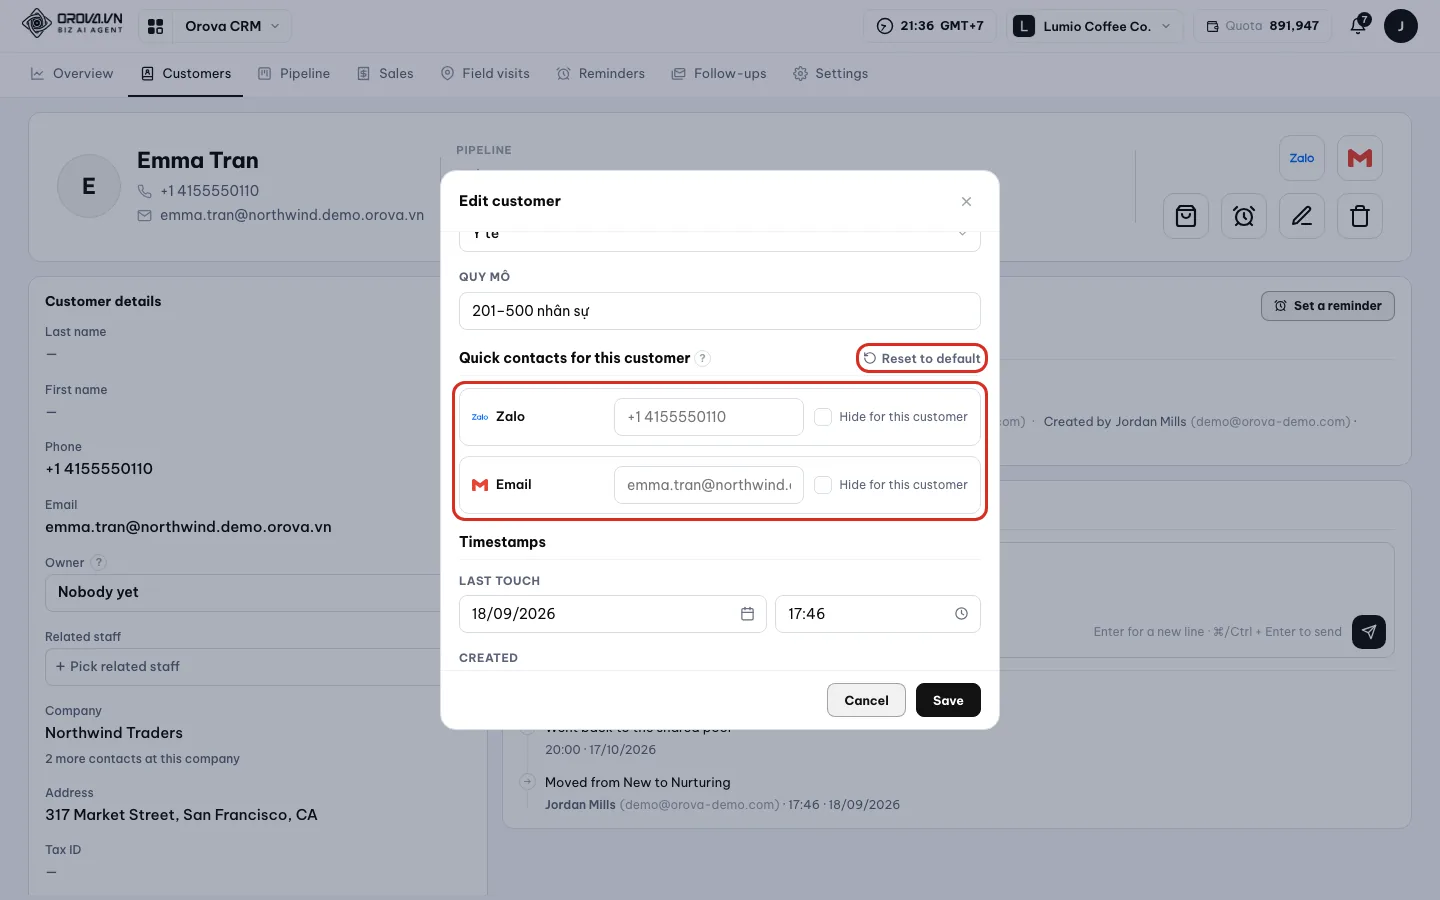
Adjust each channel for a single customer. - 3
Reset or hide a channel. Click
Reset to defaultto drop your manual edits. ClickHide for this customerto hide a channel you don't use.
07 · Customer profile
Work with a customer in their profile
Everything about one customer fits on one page.
History
A log of everything done with the customer: calls, meetings, notes, stage changes, emails sent. Anyone who opens the profile can read the story from the start.
Reminder
A task with a due time, tied to a customer. For example, “call Ms. Lan back at 9 tomorrow morning”.
Deal
One chance to sell to a customer, with a value and an expected close date. A customer can have several deals across several pipelines.
Click a customer's name in Customers to open the profile. The page has a header and four cards: Customer details, Deals, Reminders, History.
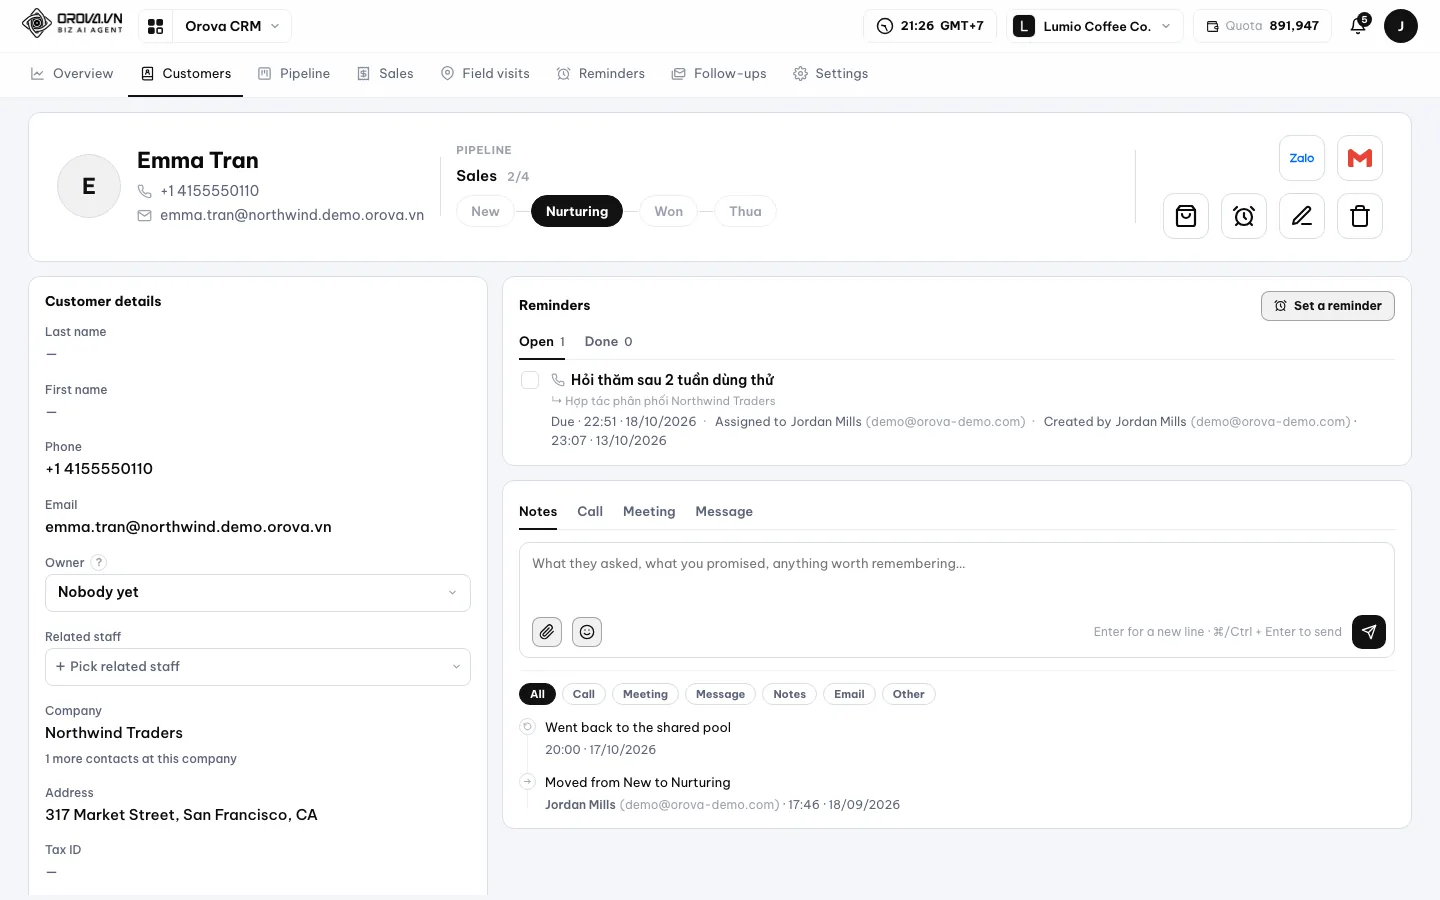
Use the profile header
- 1
See the customer's status at a glance. The header shows the photo, the name, the Lead level chip and the line “{n} deals still open”.
Current stagetells you where the customer is in the pipeline.
The profile header gathers the things you do most. - 2
Change the stage right there. Pick a new stage in
Current stage. Orova saves it at once and adds a line “Moved from {tu} to {den}” to History. - 3
Edit the customer's details. Click
Edit. TheEdit customerbox opens with the same fields as when you added the customer. Save when you're done. - 4
Delete the customer if needed. Click the trash icon. Orova asks “Delete {ten}? The notes, the deals and the whole history go with them.”
Warning
Deleting a customer deletes their history
View details and assign an owner
- 1
Read the
Customer detailscard. The card lists every field. TheTimestampsgroup showsLast touchandCreated. The line “{n} more contacts at this company” leads to the customer's colleagues.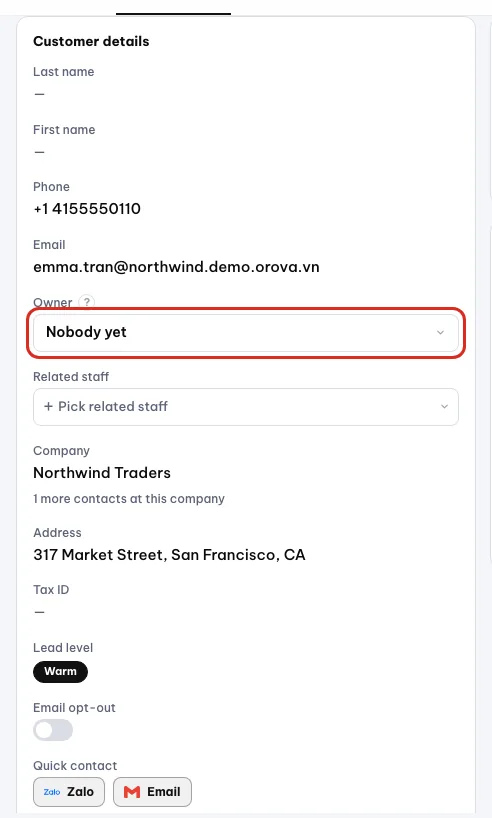
The Customer details card. - 2
Assign an owner. If nobody takes care of the customer yet, the card says “No owner yet”. Click
Assign an ownerand pick a staff member.
Log a customer interaction
- 1
Pick the activity type. In the
Historycard, pick a type:Notes,Call,Meeting,Message,EmailorOther. - 2
Record the result and the details. Pick a
Result, for example Answered, No answer, Met. Type the details into “What they asked, what you promised, anything worth remembering…”.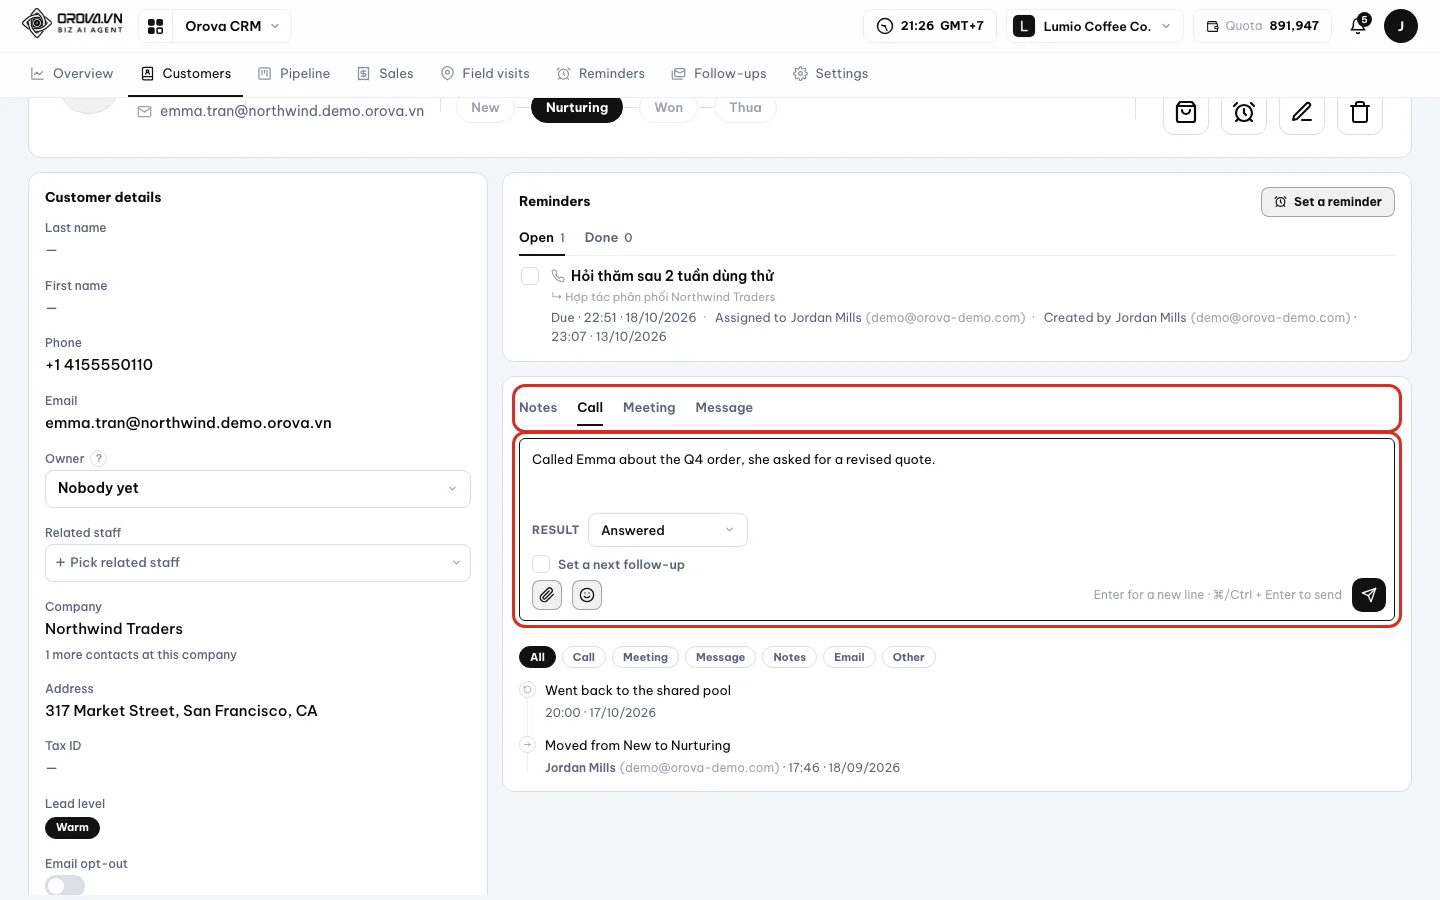
Log a call along with its result. - 3
Set the next follow-up. Turn on
Set a next follow-upif you want to come back. Orova creates the reminder “Next follow-up with {ten}” for you. - 4
Attach files if you have any. Attach contracts, photos or documents, up to 10 MB per file. Executable files such as .exe, .bat and .sh are rejected.
- 5
Check it on the history. Once saved, the activity appears at the top of
History. You will also see automatic lines here, such as stage changes and emails sent.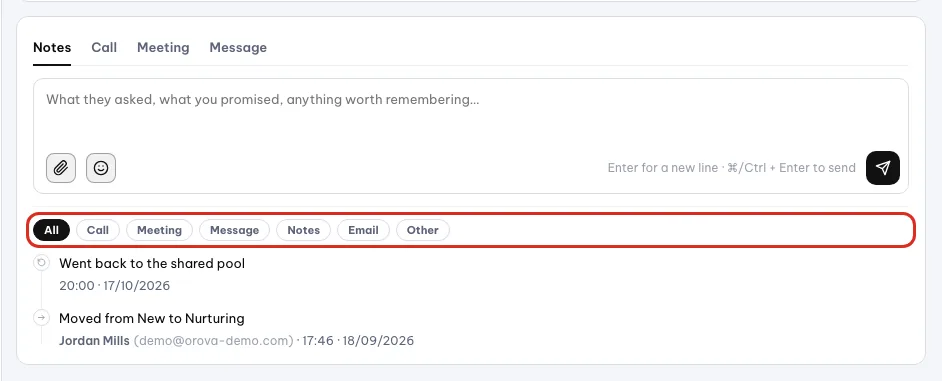
Everything done with the customer, in time order.
Set a reminder
- 1
Click
Set a reminder. The button is in the profile header. TypeWhat to do, then click a quick button:Today 5 PM,Tomorrow 9 AM,In 3 daysorNext week.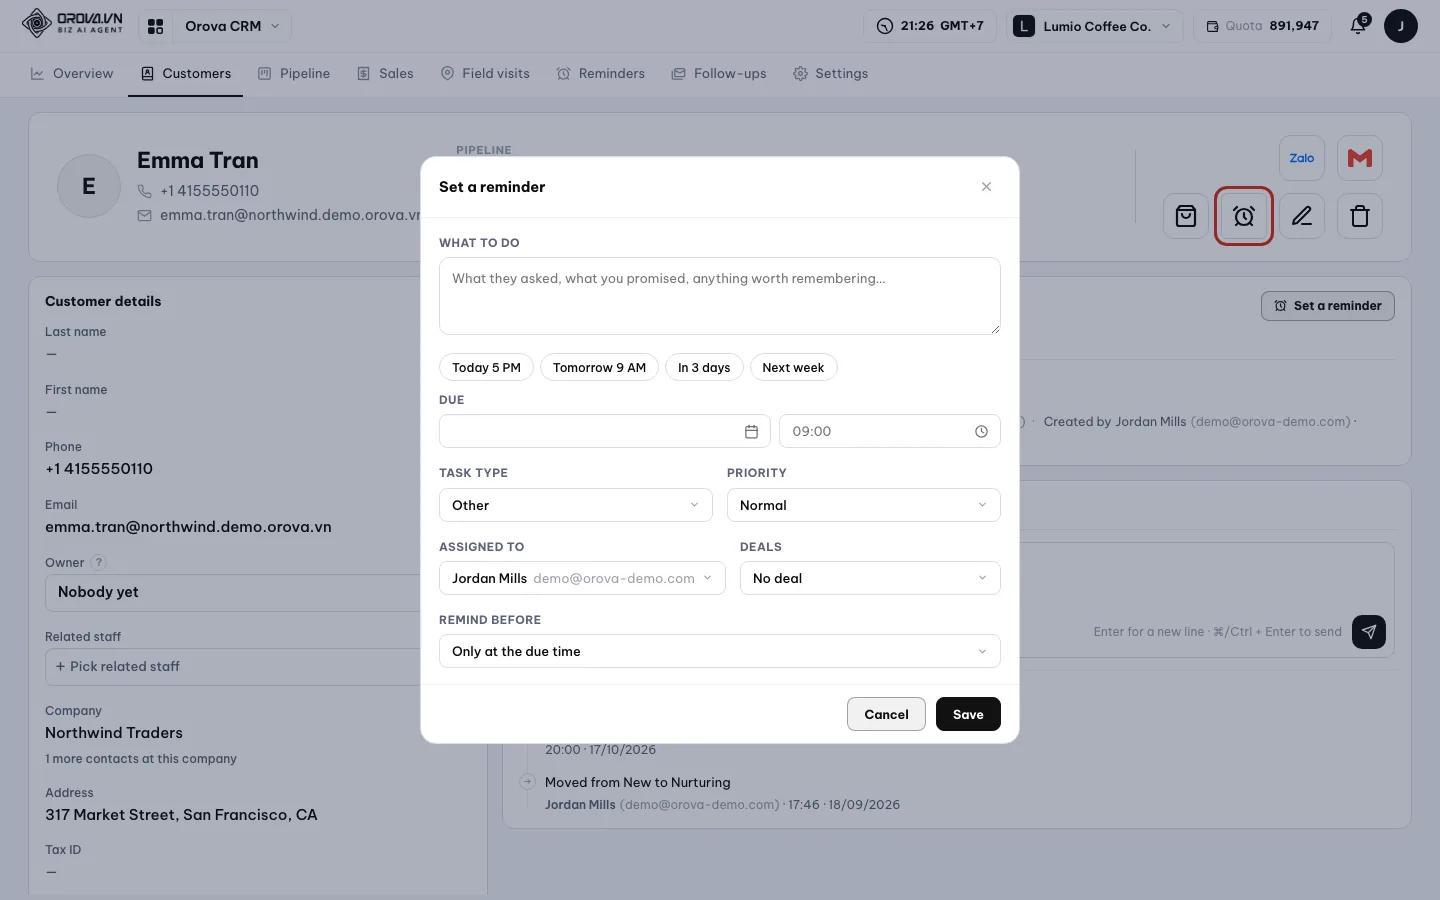
Quick buttons let you pick a due time in one click. - 2
Fill in the details. Adjust
Due,Task type,Priority,Assigned to. Link it to a deal or pickNo deal. Choose how many minutes toRemind before. - 3
Track it in the
Reminderscard. The card has three tabs:Open,Coming up,Done. Late tasks carry theOverduelabel. When you finish, tickMark as done.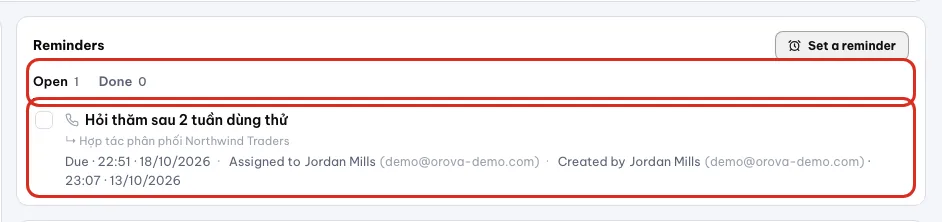
Late tasks are clearly marked.
Note
Marking as done is one way
Mark as done, you cannot untick it. Only tick it when the task is really done.Create a deal
- 1
Click
New deal. The button is in the profile header. Fill inDeal name,Valueand the currency. Pick thePipeline, theCurrent stageand theExpected close.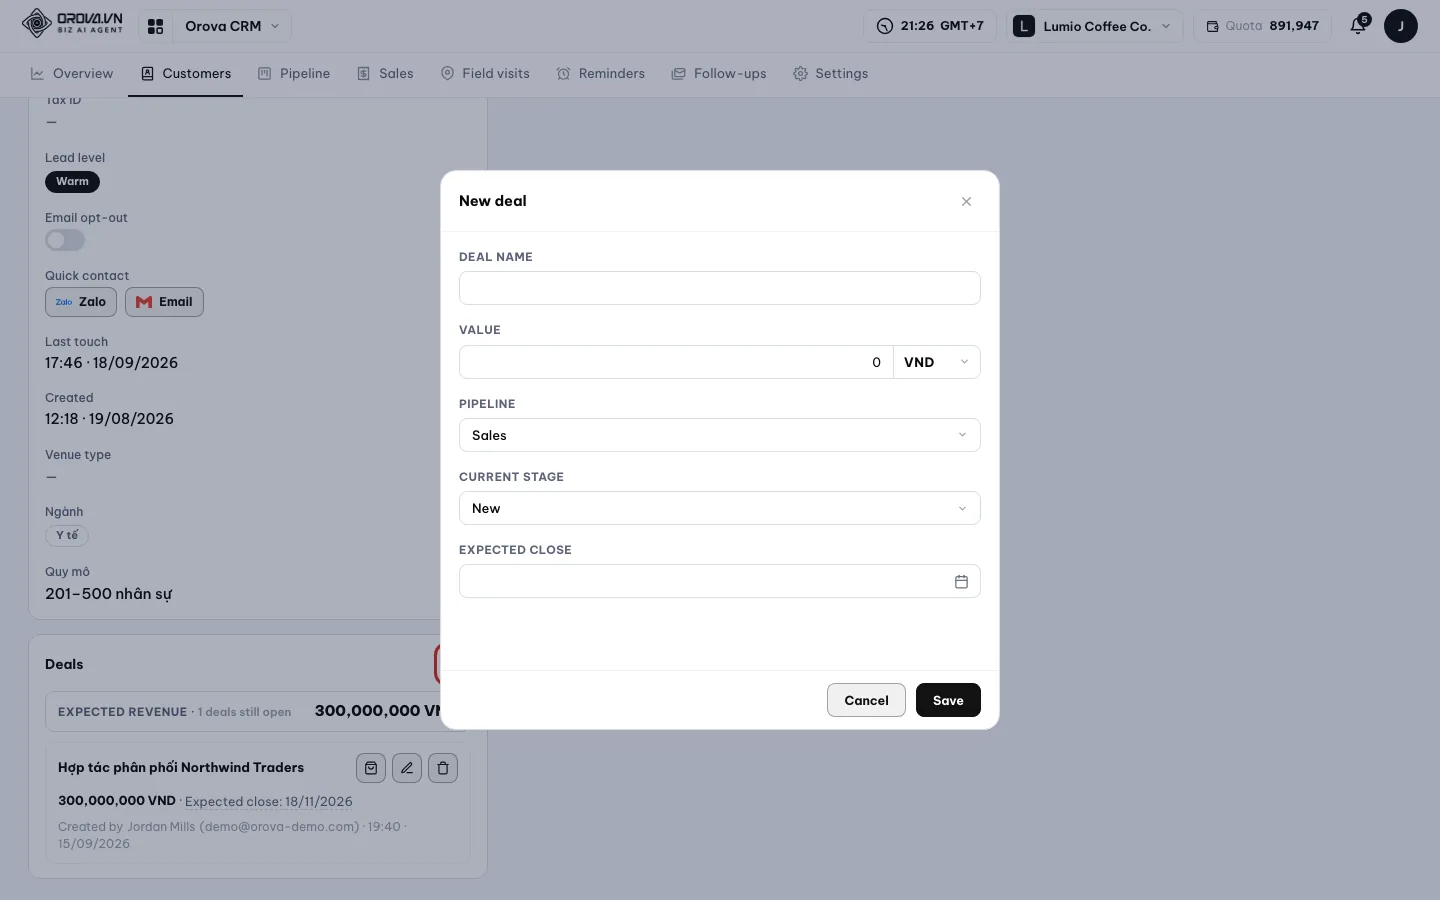
A deal needs a name, a value and a pipeline. - 2
Read the
Dealscard. Each deal shows its value, pipeline, stage andExpected revenue. Past the expected date, it carries thePast expected closelabel. Linked orders show how much isStill owed.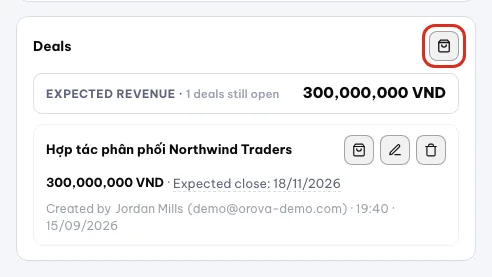
From a deal, click New order to create an order. - 3
Create an order from a deal. Click
New orderon the deal card. The order box opens; see the Orders section for how to fill it in.
08 · Pipeline
Move deals through the sales stages
See your whole sales funnel on one board; drag a card to change its stage.
Pipeline
A sales process made of stages in a row, for example New → In progress → Closed. A workspace can have several pipelines for different kinds of sales.
Stage
A column in the pipeline. Whatever stage a deal is at, its card sits in that column.
Open Pipeline when you want to know how many deals the whole team has, at which stage, and how much they are worth.
Read and use the pipeline board
- 1
Pick a pipeline. Click
Pipelinein the CRM menu. InPick a pipeline, choose the process you want to see. Each column is a stage, each card is a deal.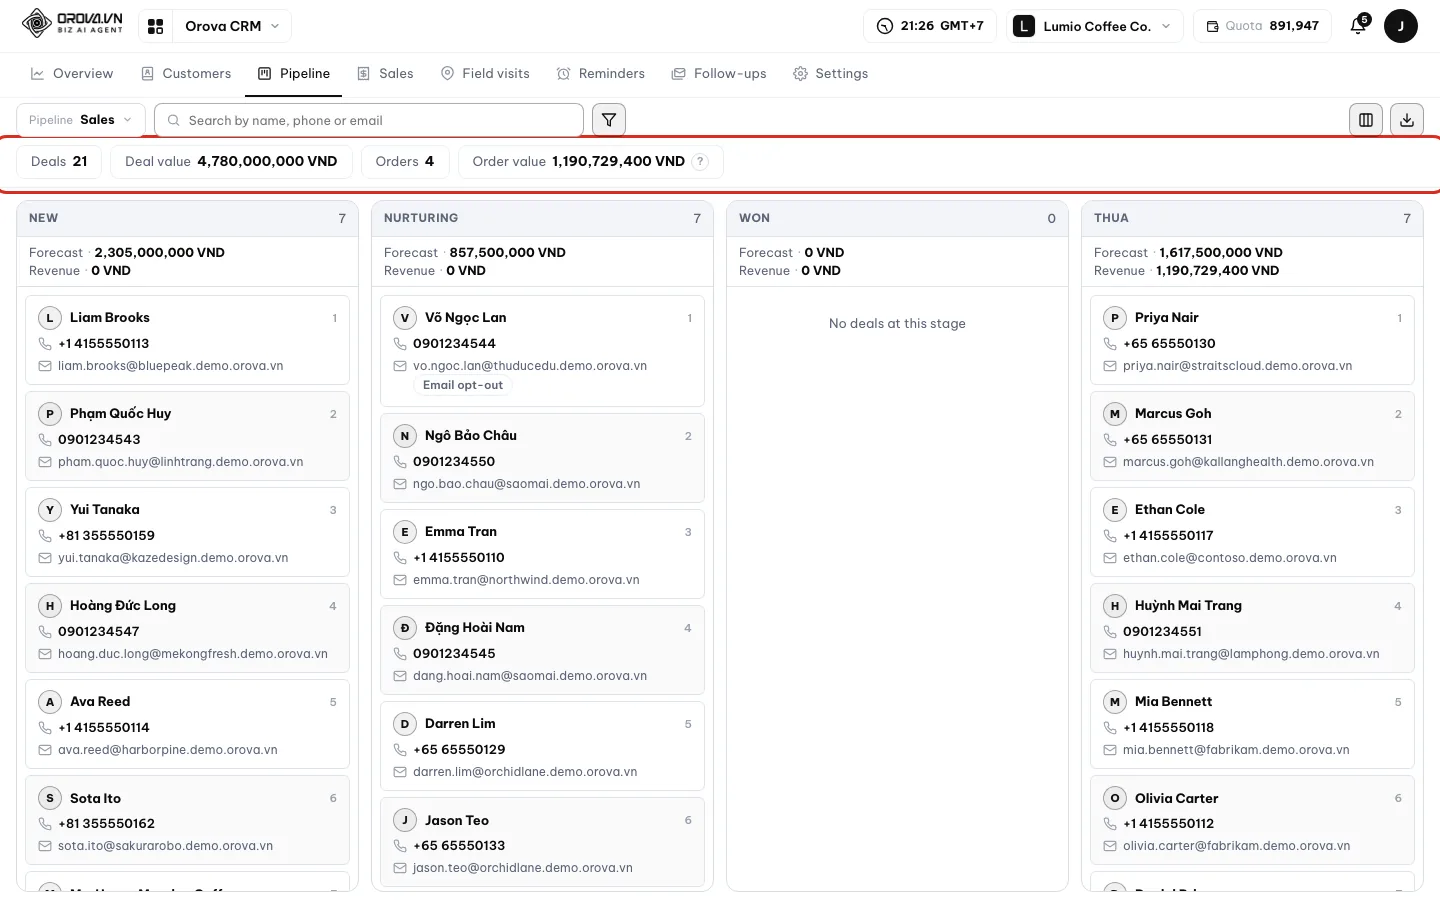
Columns are stages, cards are deals. - 2
Read the totals strip. Above the board you have
Deals,Deal value,Orders,Order value. With several currencies, each currency shows separately, without conversion. - 3
Drag a card to change its stage. Hold the card, drag it to another column and drop it. Orova saves at once and shows “Saved.” No extra questions.
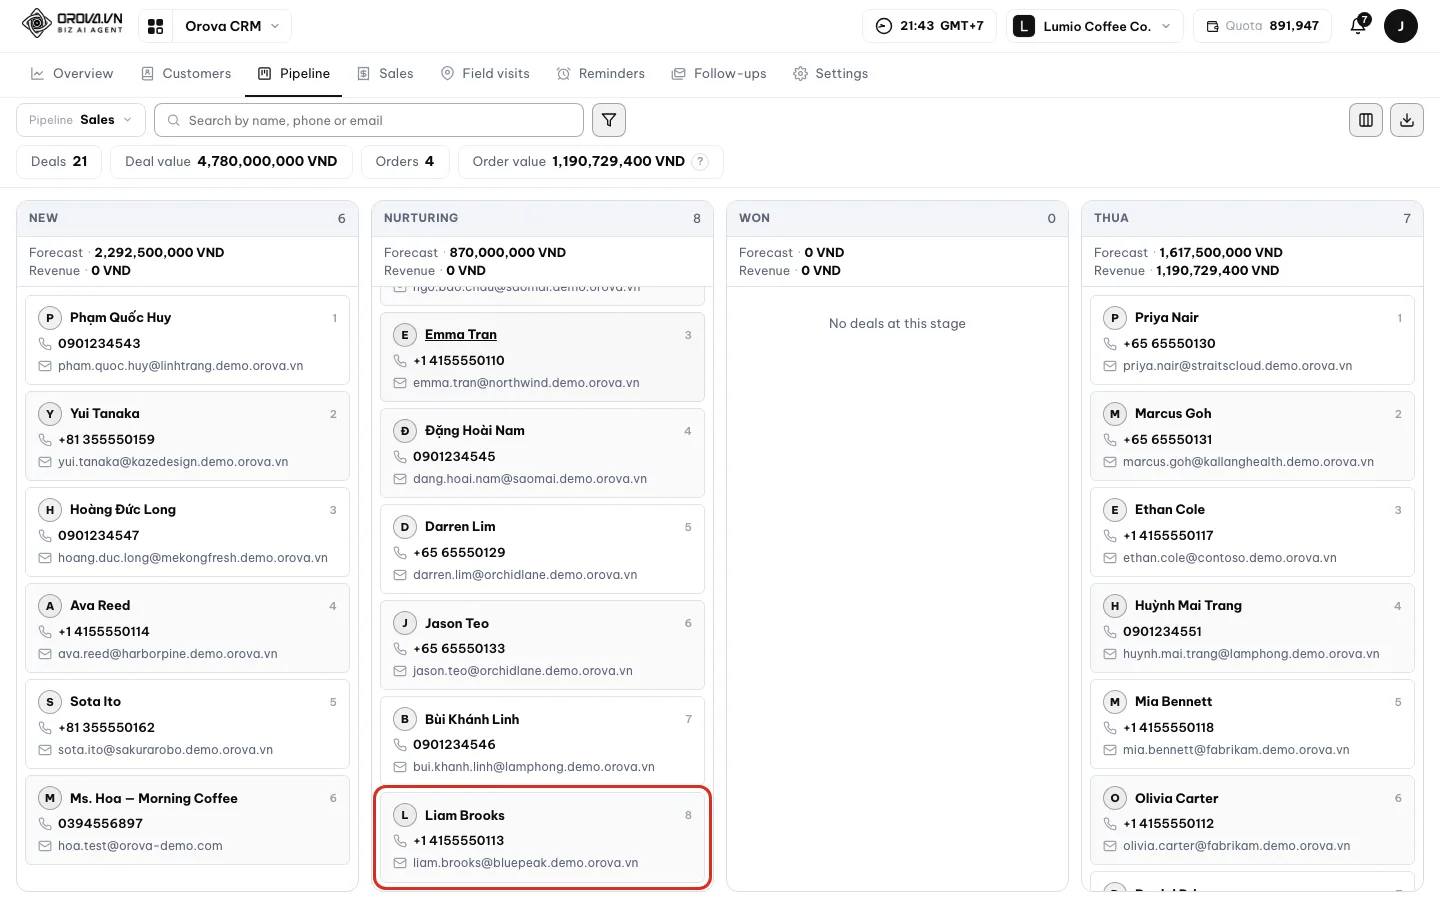
Drop the card and the new stage is saved. - 4
Pick the details shown on cards. Click
Card fieldsand tick the fields you want to see on each card, for example Owner or Industry.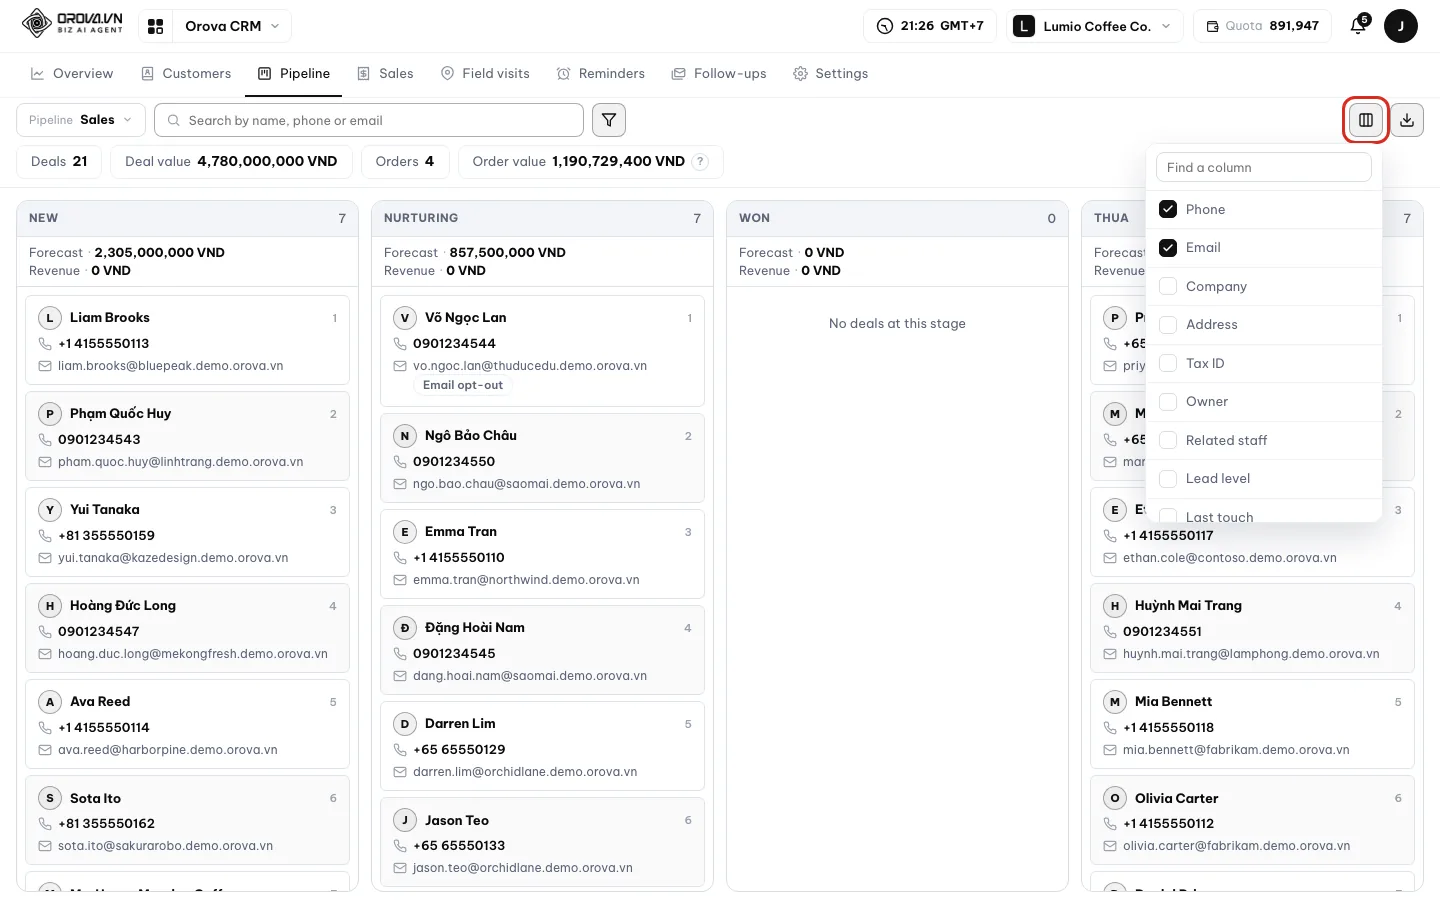
Pick the fields shown on cards. - 5
Filter and export to Excel. The search box and
Filterwork just like in Customers. ClickDownload as Excelto get exactly the deals you are viewing.
| Button / field | What it does | Notes |
|---|---|---|
Pick a pipeline | Switches the process you are viewing | Each pipeline has its own stages |
Filter | Filters deals by conditions | Same as the Customers filter box |
Card fields | Picks the fields shown on cards | — |
Download as Excel | Exports the deals you are viewing | — |
| Drag and drop a card | Changes the deal's stage | Saved at once, shows “Saved.” |
Note
The board has no button to create deals
New deal, or tick Pipelines when you add a customer. An empty column says “No deals at this stage”.Tip
A pipeline with no stages
New pipeline or Add a stage button. These buttons take you to Settings; see Pipeline settings.09 · Catalogue
Sales: build your catalogue
Record your products and services once; creating an order is then just a matter of picking.
Item
A product or service you sell, with a price and a unit. For example “Roasted coffee 1kg” or “1-day training course”.
Stock on hand
The quantity you have left. Only fill it in if you want Orova to warn you when an order goes over what's left.
The Sales screen has three tabs: Catalogue, Orders, Documents. There is no separate tab for quotes or payments; both live inside each order.
Add an item
- 1
Open the
Cataloguetab. ClickSalesin the CRM menu and pick theCataloguetab. If the catalogue is empty, the screen says “Nothing in the catalogue yet.”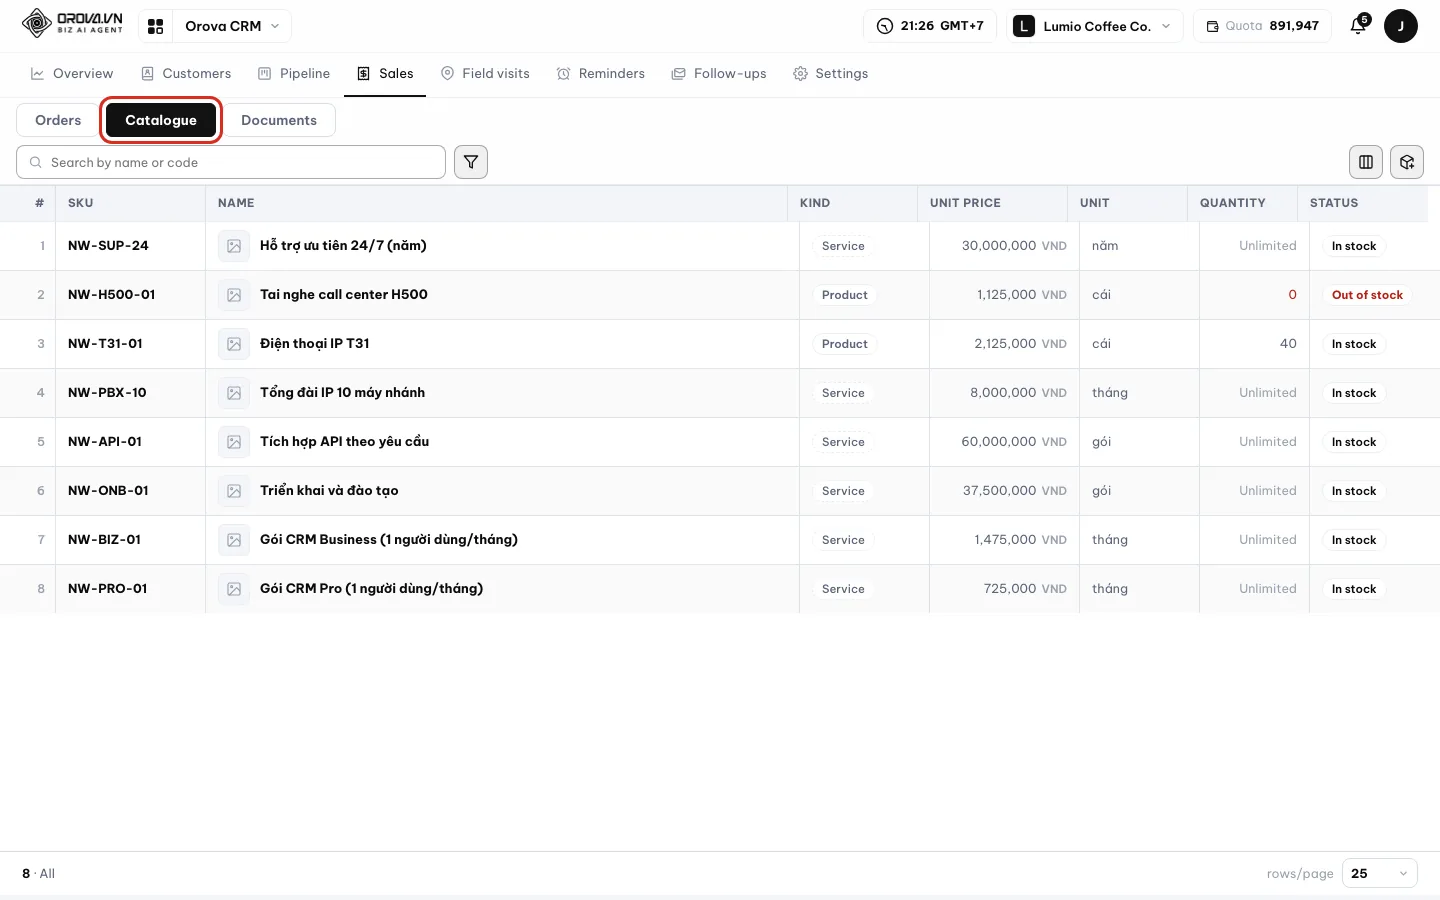
The catalogue. - 2
Click
Add product. Fill in the name. Pick aKind:ProductorService. Fill in theUnit, the unit price and the currency.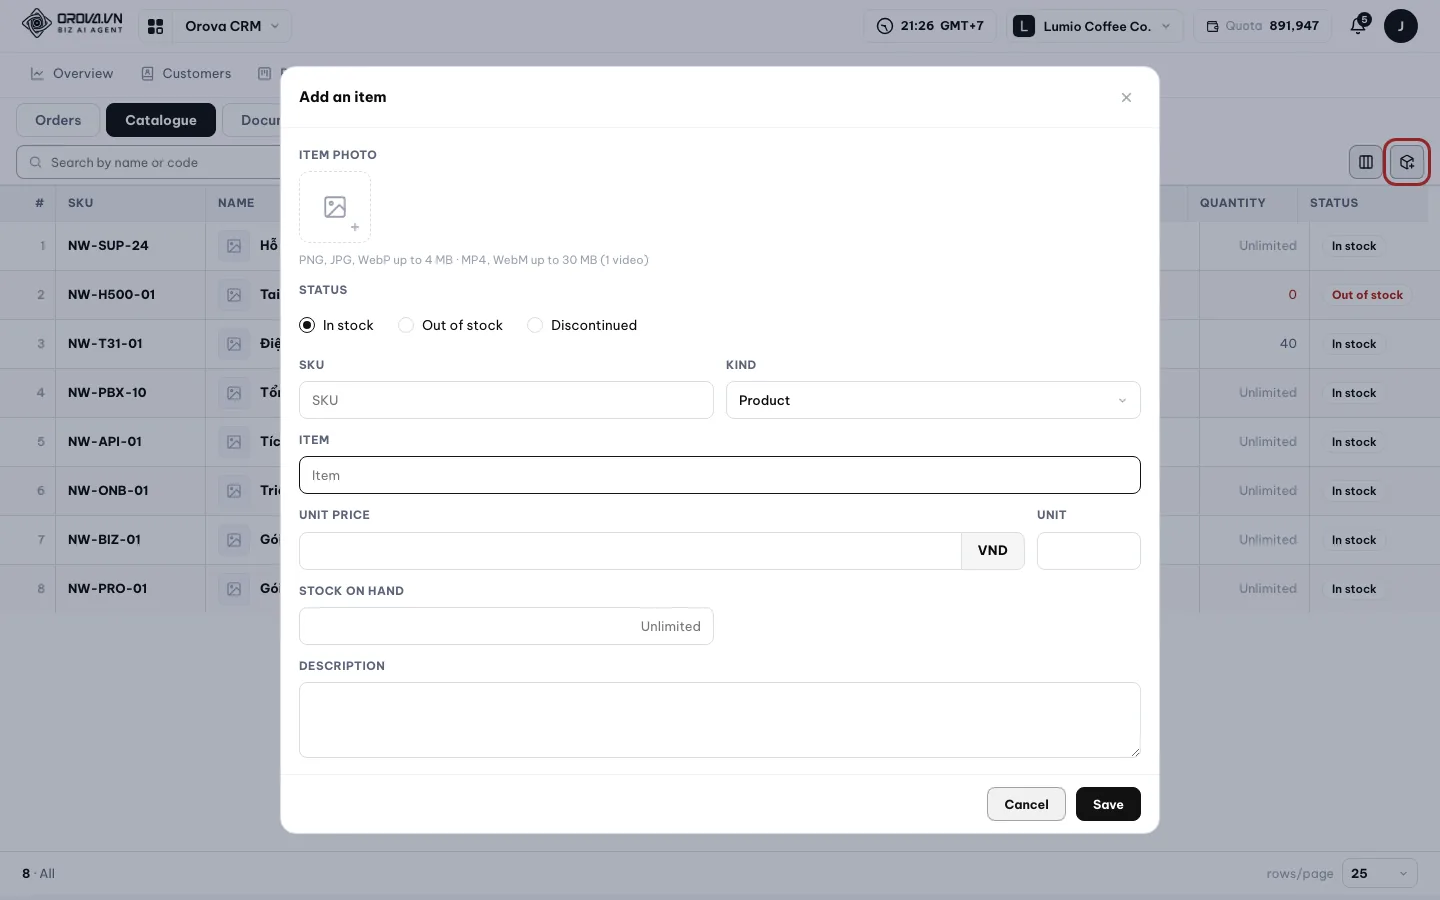
An item needs a name, a kind, a unit and a price. - 3
Fill in stock and status. Leave
Stock on handblank if you don't track it. Pick a status: In stock, Out of stock or Discontinued. Add aDescriptionif you need. - 4
Add item photos. In
Item photo, upload several PNG, JPG or WebP images up to 4 MB each. You can add one MP4 or WebM video up to 30 MB. Drag to reorder. - 5
Save. The item appears in the catalogue. From now on you can pick it when you create an order.
| Button / field | What it does | Notes |
|---|---|---|
Add product | Adds a new item | Uses no quota |
Search by name or code | Filters the catalogue | — |
Filter | Filters by kind, unit, price range | — |
View | Opens the item details | — |
Hide it / Show it again | Hides the item for now | Not deleted, can be shown again |
| Delete item | Removes the item from the catalogue | Older orders with this item stay as they are |
Tip
Discontinued? Hide it, don't delete it
Hide it keeps the item so you can turn it back on later. If you delete an item that is in an order, Orova tells you how many order lines it appears in.10 · Orders and quotes
Create orders, send quotes, record payments
An order goes from draft, to quote, to closed and fully paid.
Order status
An order moves in order: Draft → Quote sent → Closed, or Cancelled. Only Closed orders count toward revenue.
Quote
It is simply an order in the quote status. You send it to the customer as a printed PDF, by email or as a link to view online.
Payments in installments and Still owed
Each time the customer pays, you record a payment. Still owed is the order total minus what has been received. If it's past the payment due date and money is still owed, it's Overdue.
Currency
Each order uses one currency code, for example VND or USD. Totals in several currencies show each currency separately, with no exchange rate conversion.
The Orders tab is where you create orders, send quotes to customers, close orders and record the money customers pay.
Create an order
- 1
Click
New order. On theOrderstab, clickNew order. Pick theCustomerandCreated by. Pick the currency first, because once you add lines it can't be changed. - 2
Add item lines. Click
Add a lineand pick theItem. Adjust theUnit price,Qty,Disc.. TheAmountis calculated for you.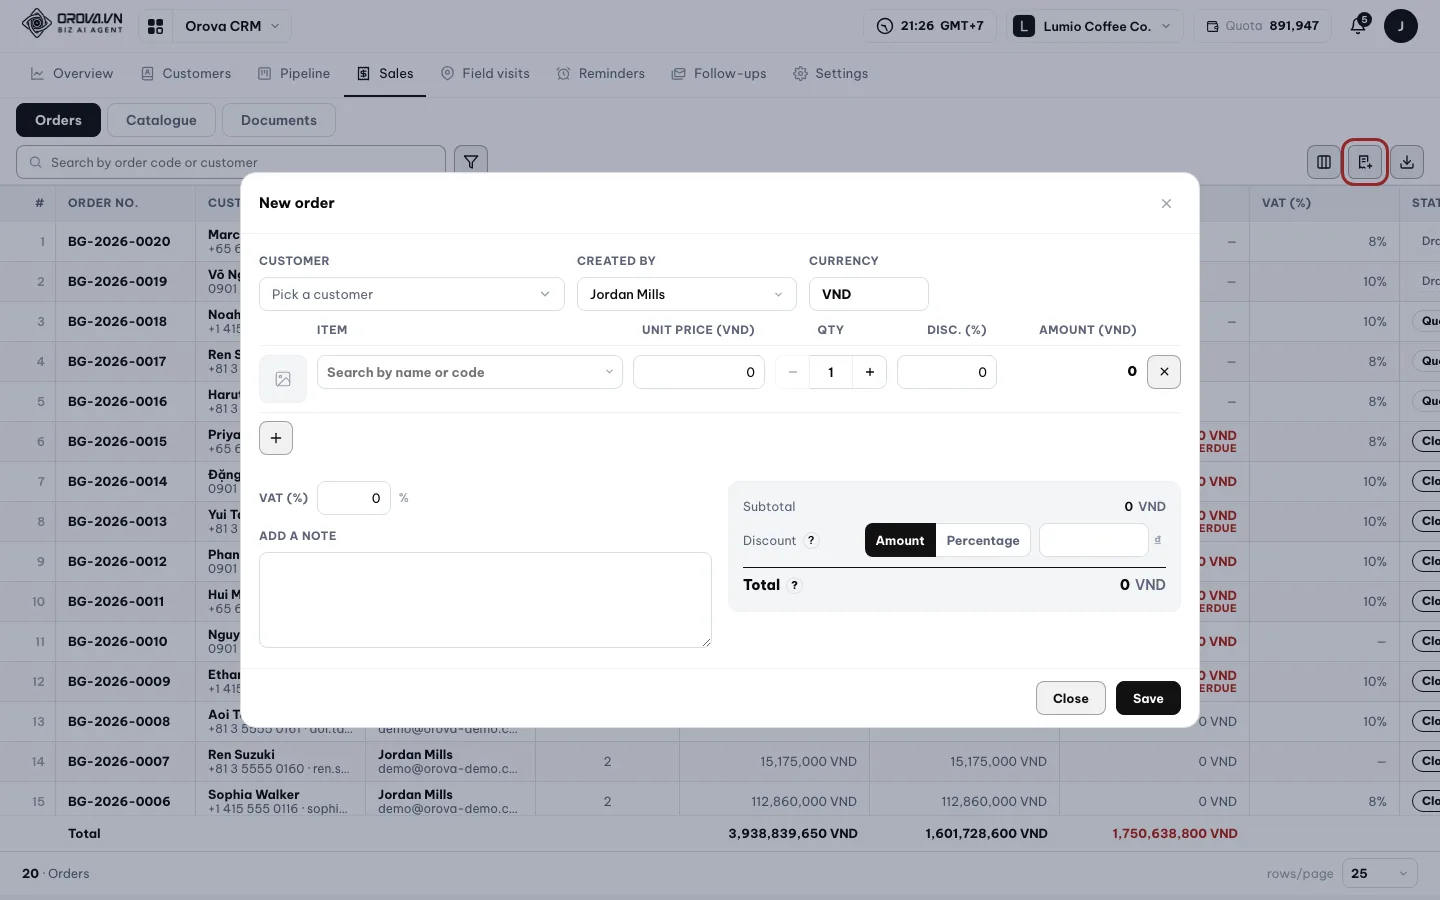
An order with item lines, a discount and totals. - 3
Check stock. Items with stock tracking show “{n} left”. If you order more than what's left, Orova says “Not enough stock: {ten} has only {n} left”.
- 4
Discount and tax. In
Discount, pick Amount or Percent and add a reason. The discount comes off before tax. TheVAT ({n}%)line is added after that. - 5
Fill in the payment due date and save. Fill in
Payment due,Quote no.and a note if needed. Click save. The new order is inDraftstatus.
| Button / field | What it means | Notes |
|---|---|---|
Subtotal | Sum of the item lines | — |
Discount | Reduction for the whole order | Amount or percent, taken off before tax |
After discount | Item total after the reduction | — |
VAT ({n}%) | Tax on the amount after discount | — |
Total | What the customer has to pay | Preview only; the system recalculates when you save |
Track and close orders
- 1
Filter the order list. Click the
Draft,Quote sent,Closed,Cancelledor unpaid chip. Filter further byDate range,Created by,Overdue.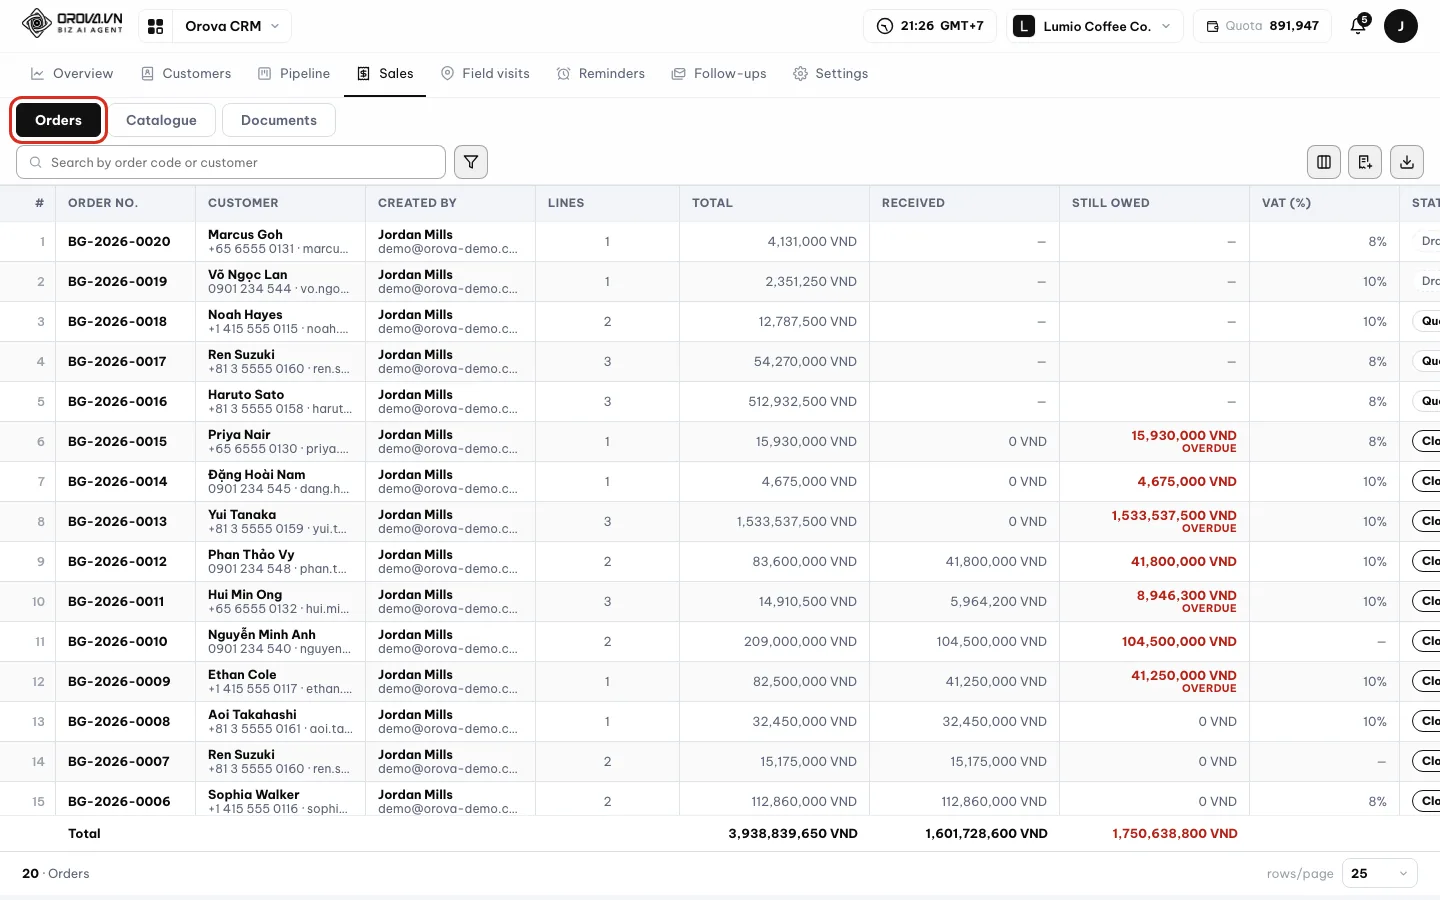
The TOTAL row is calculated on exactly the filter you are viewing. - 2
Read the TOTAL row. At the bottom of the table you see the number of orders, the total amount, what has been received and what is still owed. These numbers use exactly the filter you have selected.
- 3
Close the order. Change the status to
Closed. Orova asks “Close this order? Revenue counts from the moment it closes…”. Confirm and the order counts toward revenue.
Warning
Closing an order records revenue
Send a quote to the customer
- 1
Get the quote link. Open the order and find the
Quote linkblock. ClickGet a link. UseCopyto send it over Zalo or chat.Turn the link offwhen you no longer want the customer to see it.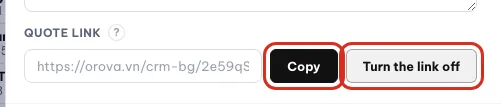
Anyone with the link can see this quote. - 2
See the page your customer gets. Click
Public view. The page opens without a login and is laid out like the printed version: the order, the customer, the item lines, the totals and your company details.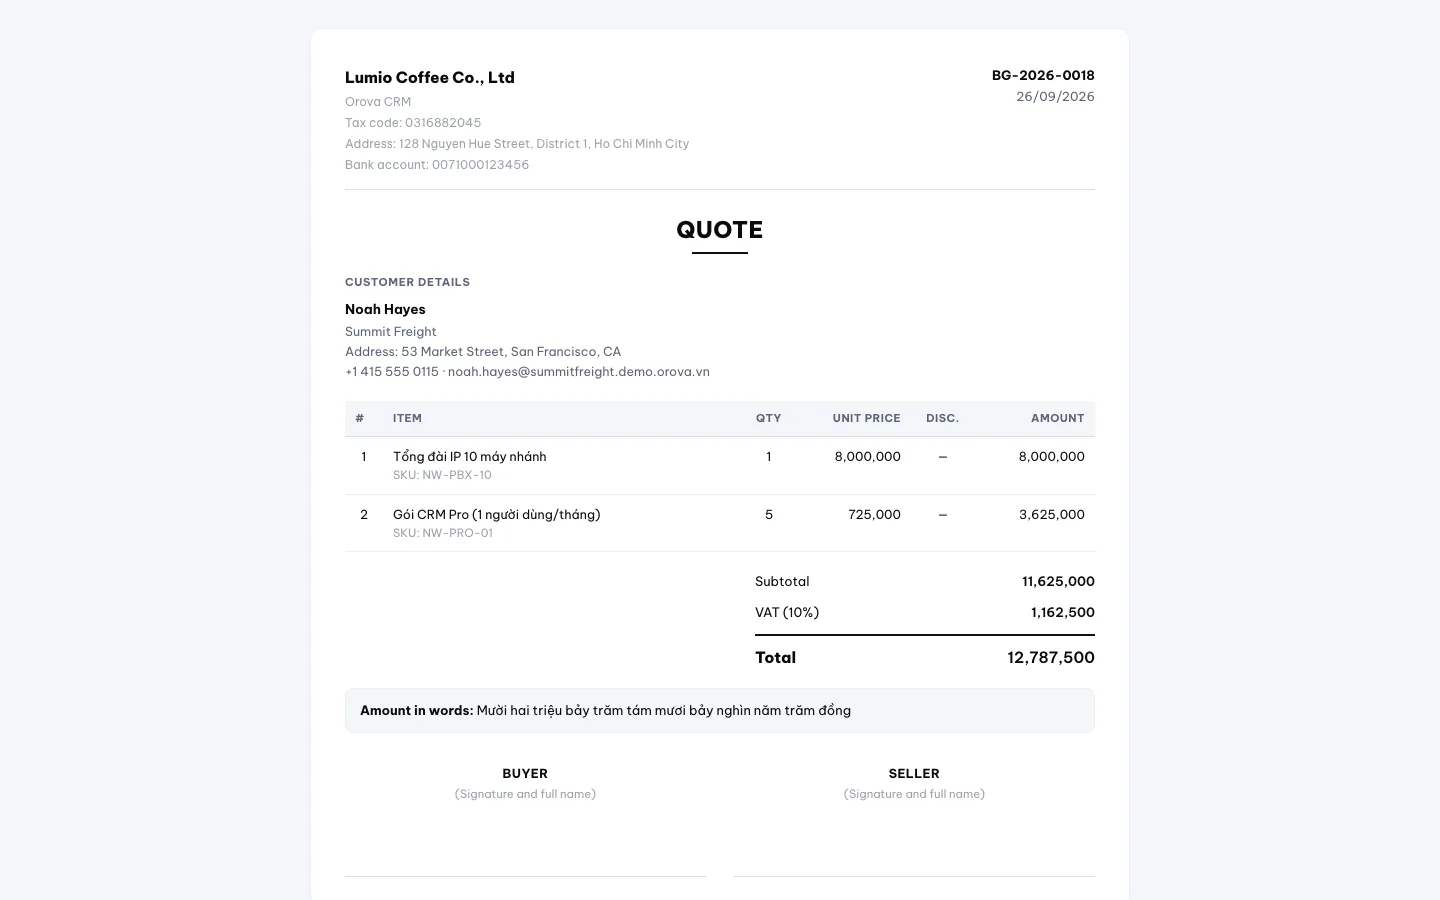
This is the page your customer sees when they open the link. - 3
Print or save as PDF. Click
Print the quoteto open the print version. From there you can print on paper or save as PDF. - 4
Send by email. Click
Send quote. PickSend from,To,Email template,Quote template. Edit theSubjectandMessage. TickAttach quote PDFif you need it.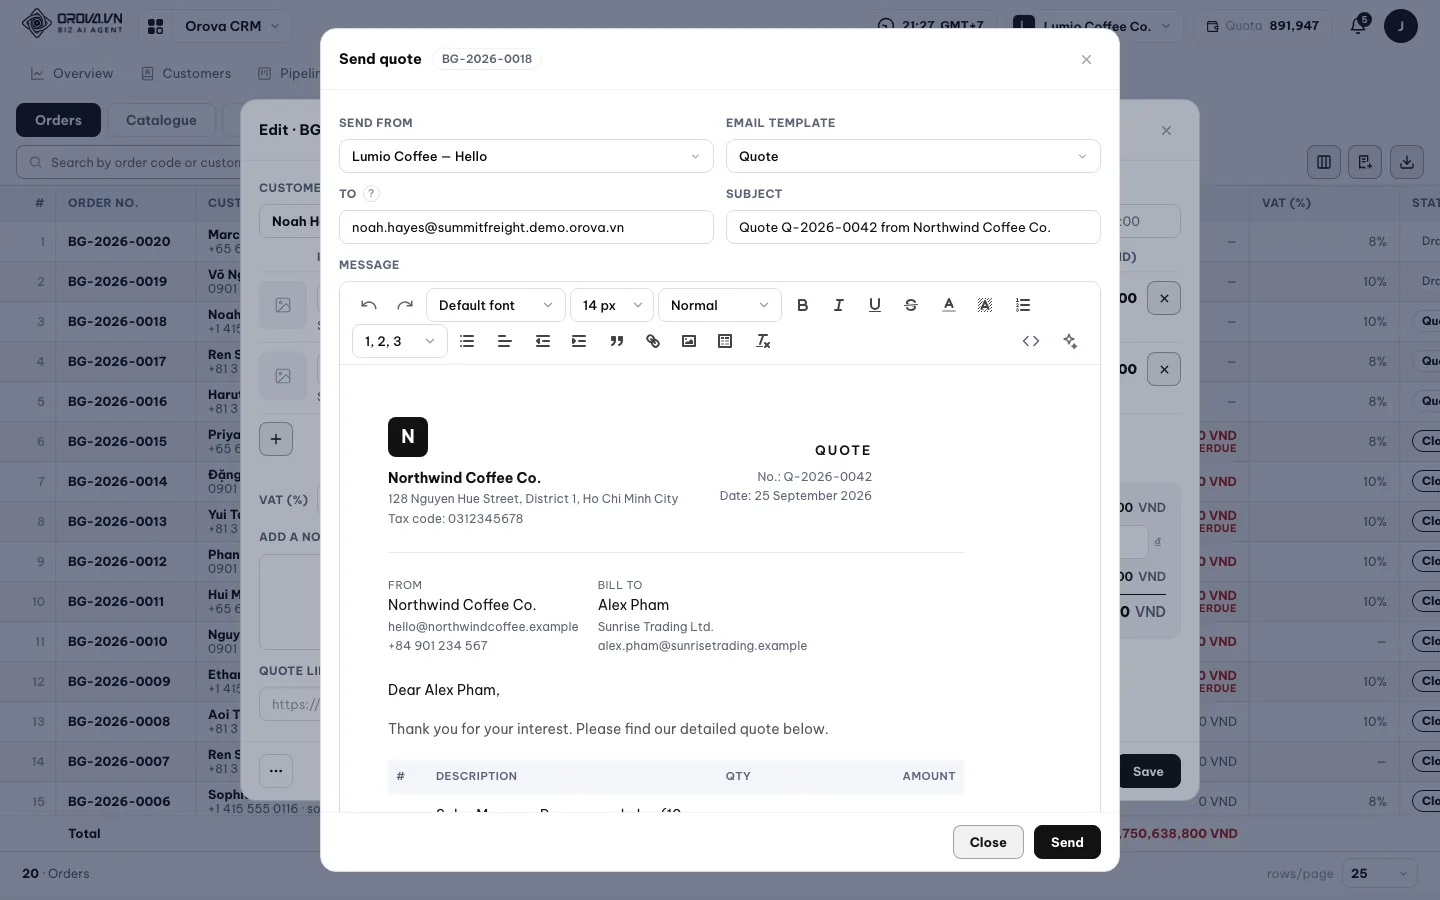
The email includes a link to view the quote online. - 5
Click
Send. Orova shows “Quote sent by email”. The email already includes a link to view the quote online.
Note
Connect a mailbox first
Warning
Links and emails are real
Turn the link off when you no longer need it. Clicking Send really sends the email to the customer, and it can't be recalled.Record payments in installments
- 1
Click
Record a payment. Open the order and clickRecord a payment. Fill in the amount, the time and a note. If the customer paid everything, clickPaid in full.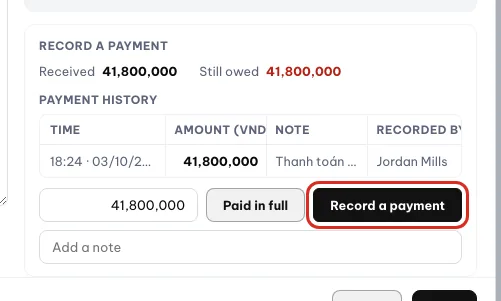
Each time the customer pays is one payment. - 2
Read the
Payment history. The table lists the time, amount, who recorded it and the note for each payment. Next to it you seeReceivedandStill owed.
Note
The currency is locked
11 · Document templates
Templates for quotes, invoices and payment requests
Write a template once; for each order, just merge it in and download the PDF.
Document template
A ready-made document layout with blanks, for example the customer name or the total amount. There are three types: Quote, Invoice, Payment request.
Template variables
Blanks written as {{…}}. When you print for an order, Orova replaces the variables with that order's real data.
Quota
The unit your workspace spends on AI, like money in a shared wallet. In CRM, only AI draft for document templates uses quota.
Open Sales ▸ the Documents tab. The table lists your templates with Document name, Type, Source, Format. If there are none yet, it says “No documents yet”.
Use a ready-made Orova template
- 1
Click
Template library. Pick theOrova templatesorCommunitytab. Sort by Popular or New. Each template shows how many times it's been used and how many ratings it has. - 2
Preview and use it. Click Preview to look at the template. If you like it, click
Use this template. The template is copied into yourDocumentstab.
Let AI draft a template
- 1
Click
Create document. The editor opens. Pick theAI draftmode. - 2
Describe the template. Describe the template you need, for example an invoice with the logo in the top left and bank details at the bottom. The box shows the estimated quota before you click.
- 3
Read and edit the AI draft. AI only drafts a layout with variables. AI does not see your customer data. Edit the wording if you need.
- 4
Save or publish. Click
Save draftto continue later. ClickPublishand pick the document type so you can use it to print orders.
Warning
Redrafting replaces all the content
Print an order with a template
- 1
Click
Print with template. On a published template row, clickPrint with template. The “Pick the order to fill the template” box opens. - 2
Pick the order. Type into “Search by order code or customer” and pick the order. Orova merges the order data into the template.
- 3
Click
Download PDF. Your device downloads a PDF with all the order details filled in.
| Button / field | What it does | Notes |
|---|---|---|
Create document | Writes a new template | Has an AI draft mode |
AI draft | AI drafts a template layout from your description | Uses quota; the amount shows before you click |
Template library | Orova templates and community templates | Click Use this template to copy one |
Upload template | Brings in your own template | Up to 10 MB |
Print with template | Merges an order into a template | Produces a file via Download PDF |
Share to the community library | Shares a template with the community | Must be published first |
Note
Uploaded Word and Excel templates
Warning
Sharing to the community library is public
Share to the community library, other users can see the template. Don't leave private company information in it.12 · Common issues
Common issues: customers, pipeline, sales
Each answer explains why it happens and how to fix it.
When I save a customer, it says “This phone number or email is already in the book”.
This customer already has a profile. Click Keep this one to merge the two customers into one, or find and open the existing profile.
Excel import says “This file could not be read”.
The file has the wrong format or is missing columns. Click Sample file, copy your data into it, keep the header row as it is, then import again.
My Excel file is very long and won't import.
Each file can have up to 5,000 rows. Split the list into several files and import them one after another.
After the Excel import, fewer customers came in than there were rows.
Rows with a duplicate phone number or email are skipped, not overwritten. Rows with errors are counted separately in the result line.
The filter says “{n} conditions no longer work”.
The field in the condition was deleted or changed type in Settings. Remove that condition and add it again using the new field.
I can't upload a photo or file.
Photos can be up to 4 MB and attachments up to 10 MB. Executable files such as .exe, .bat and .sh are always rejected.
Sending a quote says “No mailbox connected yet”.
There is no mailbox to send from yet. Open Orova Connect ▸ Email, connect a mailbox, then send again.
I can't change the currency of an order.
The order already has item lines or a payment, so its currency is locked. Create a new order and pick the currency code before adding lines.
Why do totals show several lines, one per currency?
Orova doesn't convert exchange rates. Orders and deals are added up separately by whatever currency code they use.
Why can't I see my teammates' customers?
You only see customers within your view permission. Ask your manager to adjust it under Permissions.
13 · Overview
Overview: know what to do today and where the team stands
Overview is the first screen you see when you open CRM. At the top are your own tasks for today. Below are the sales numbers for the period you pick.
Period
The stretch of time you are looking at. This week and This month follow the calendar. Last 30 days counts back from today. A custom range can be up to 366 days long.
vs previous period
Each number card is compared with the period just before it, of the same length. For example, this month is compared with last month. That way you know if a number is going up or down.
Cash collected and Revenue closed
Closed means the customer agreed to buy and there is a closed order. Cash collected is money that has actually come in. When a customer pays in several installments, the two numbers differ.
Weighted forecast
Each open deal multiplied by the Chance of closing of the stage it sits in. It is an estimate for planning, not a promise.
Money owed
Money customers still owe on closed orders. Past due is the part that is past its payment date and not yet collected.
Whose numbers
You can view your own numbers, the whole team's, one department's or one person's. Picking a department also includes every team under it.
Open Orova CRM and click the Overview tab. This screen does not call AI and uses no quota. Use it every morning to see what is waiting for you.
Managers use it to see how much of the target the team has reached. Regular members only see their own numbers.
| Button / field | What it does | Notes |
|---|---|---|
What needs you today | Your own tasks that need doing now | Always the viewer's own tasks, not affected by filters |
Looking at | Pick the period to view | Today, This week, This month, This quarter, last 7/30/90 days, This year, Custom |
From / To | The two ends of a custom range | Only shown when you pick Custom. Over 366 days keeps the last 366 days |
Whose numbers | Whose numbers to view | The whole team, Departments, People are for the owner and admins only |
Pipeline | Filter by one pipeline | Default All pipelines |
Filter | Filter customers by field | Shares the same filter as Customers |
Save report | Save the current period and scope as a chip | Click the chip to reopen it quickly |
Person by person | Each person's target and results | Only lists people with a target in the period |
Read Overview from top to bottom
- 1
Handle What needs you today first. The
What needs you todayblock has four kinds:Reminders due today,Reminders already overdue,Hot leads going cold,About to be taken back. Click a row to open the customer profile and act right away. With nothing to do, you see “Nothing needs you today.”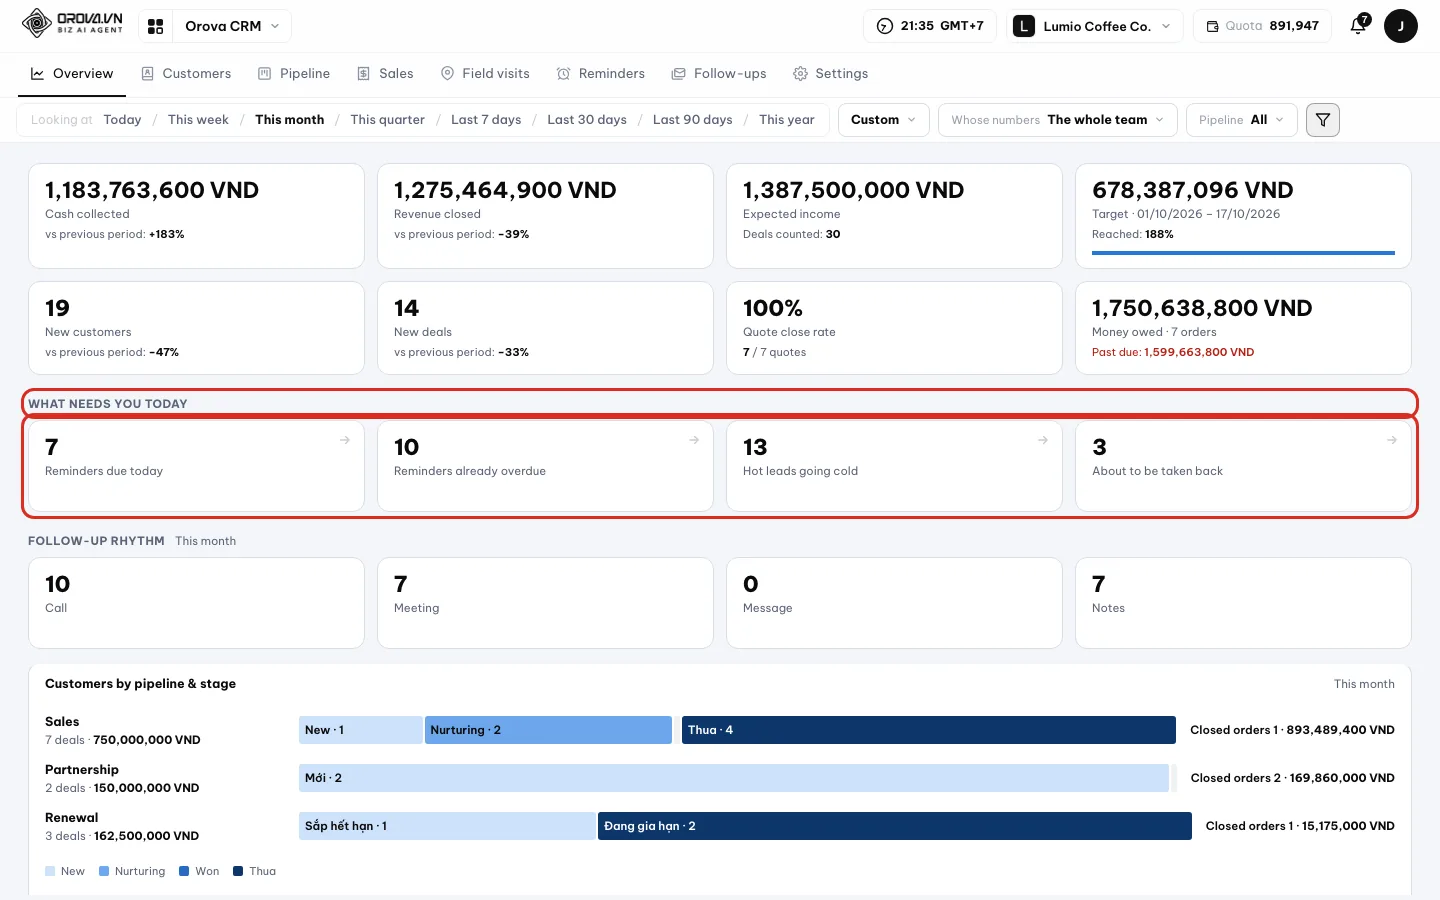
Four kinds of tasks that need you today. - 2
Pick the period. Click
Looking at. Pick a quick option such asThis monthorLast 30 days. The page reloads and every number card and chart follows the new period.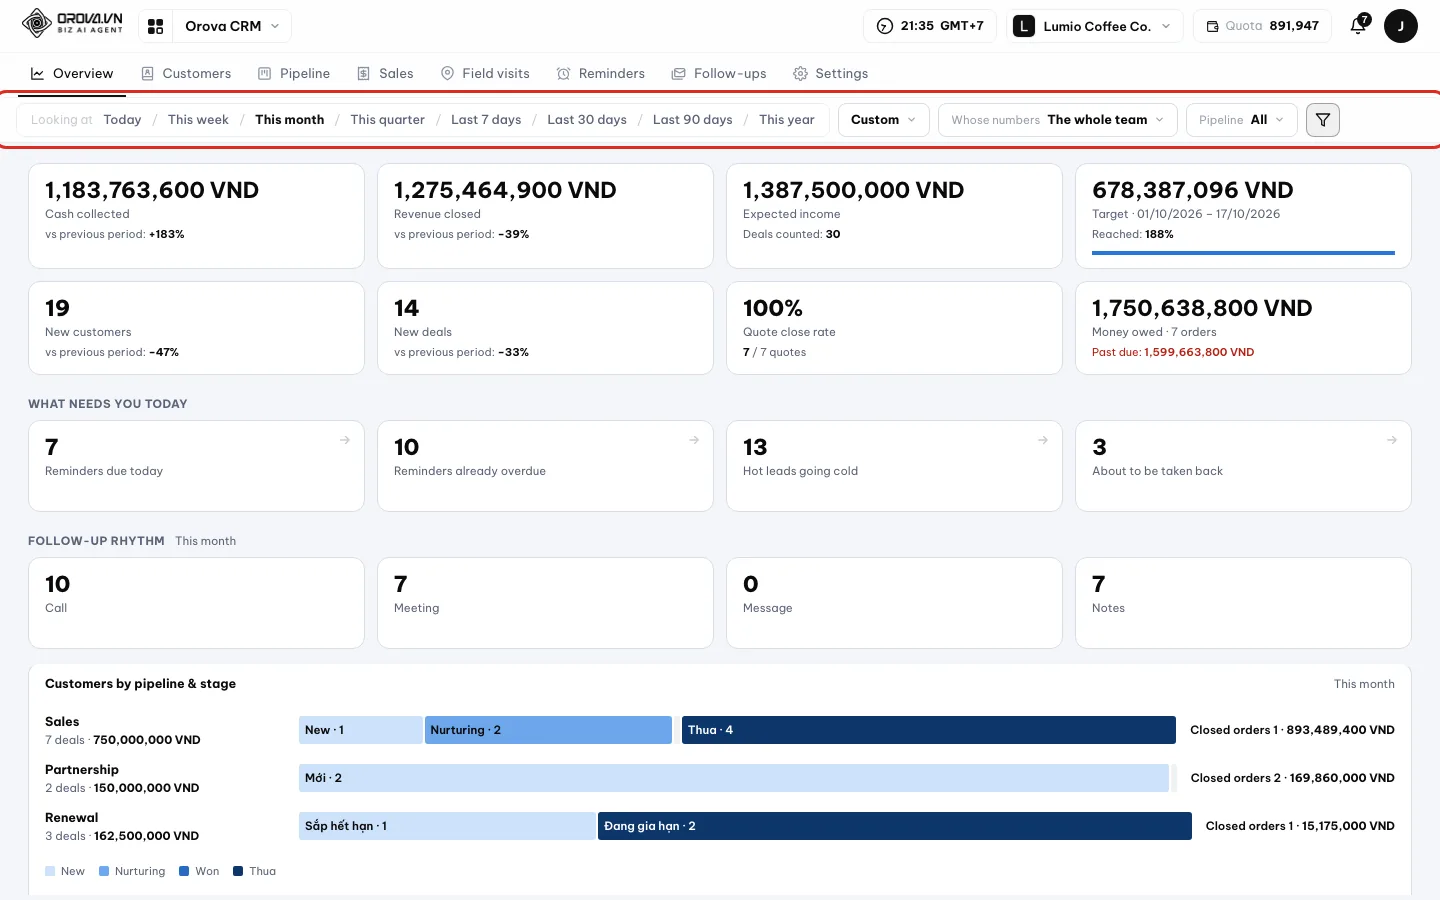
The period options in the Looking at menu. - 3
Need your own range? Pick Custom. Pick
Custom. A date box appears withFromandTo. Choose the first and last day, then clickApply. A range longer than 366 days is cut to the last 366 days.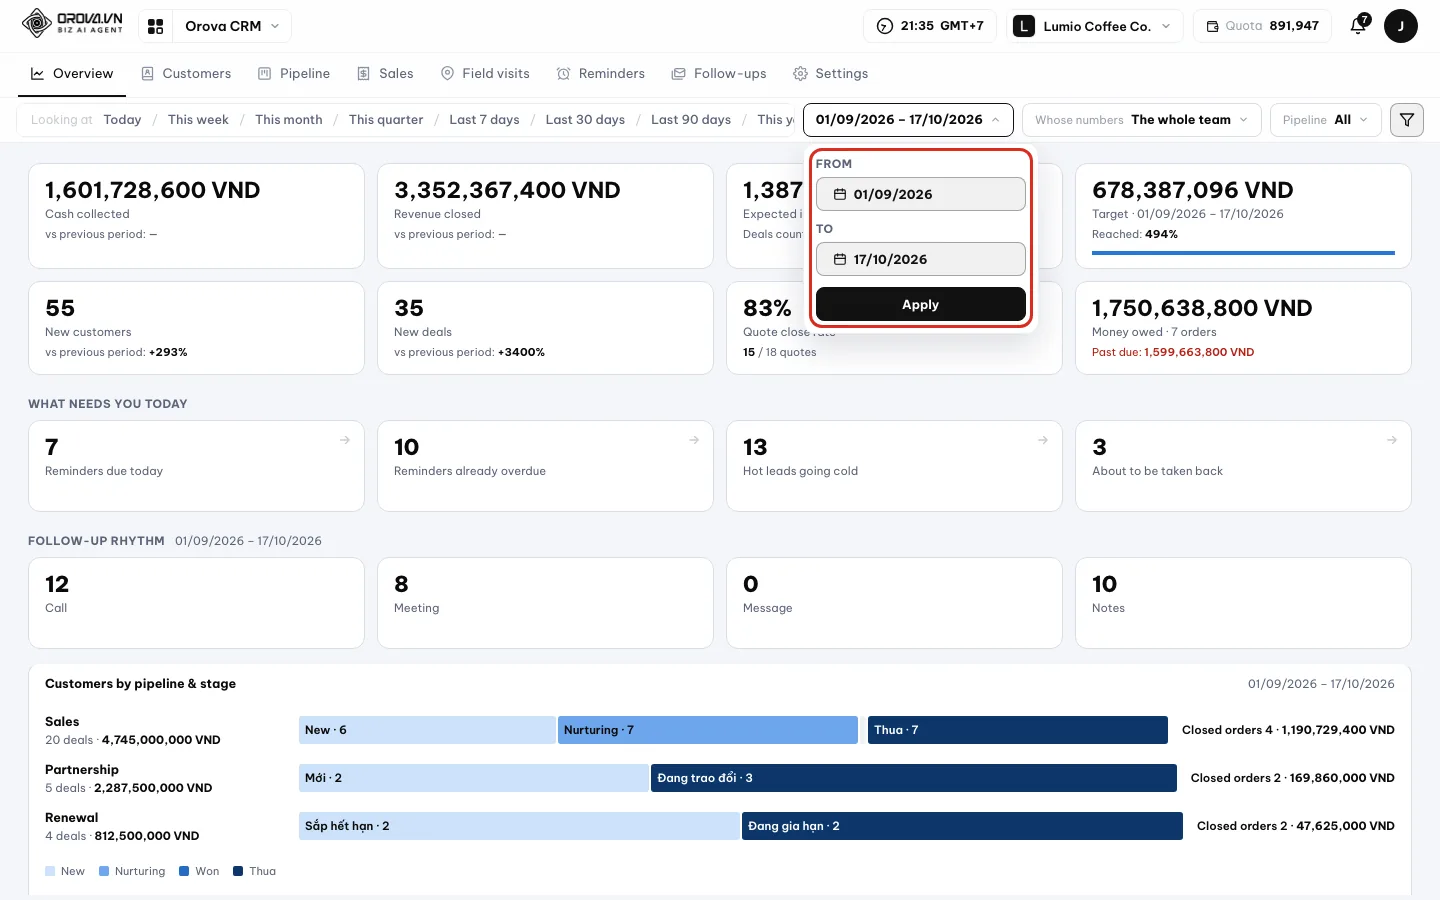
A custom range is at most 366 days. - 4
Pick whose numbers. Click
Whose numbers. PickMineorThe whole team. TheDepartmentsgroup shows how many people each department has. ThePeoplegroup has aSearch peoplebox for typing a name.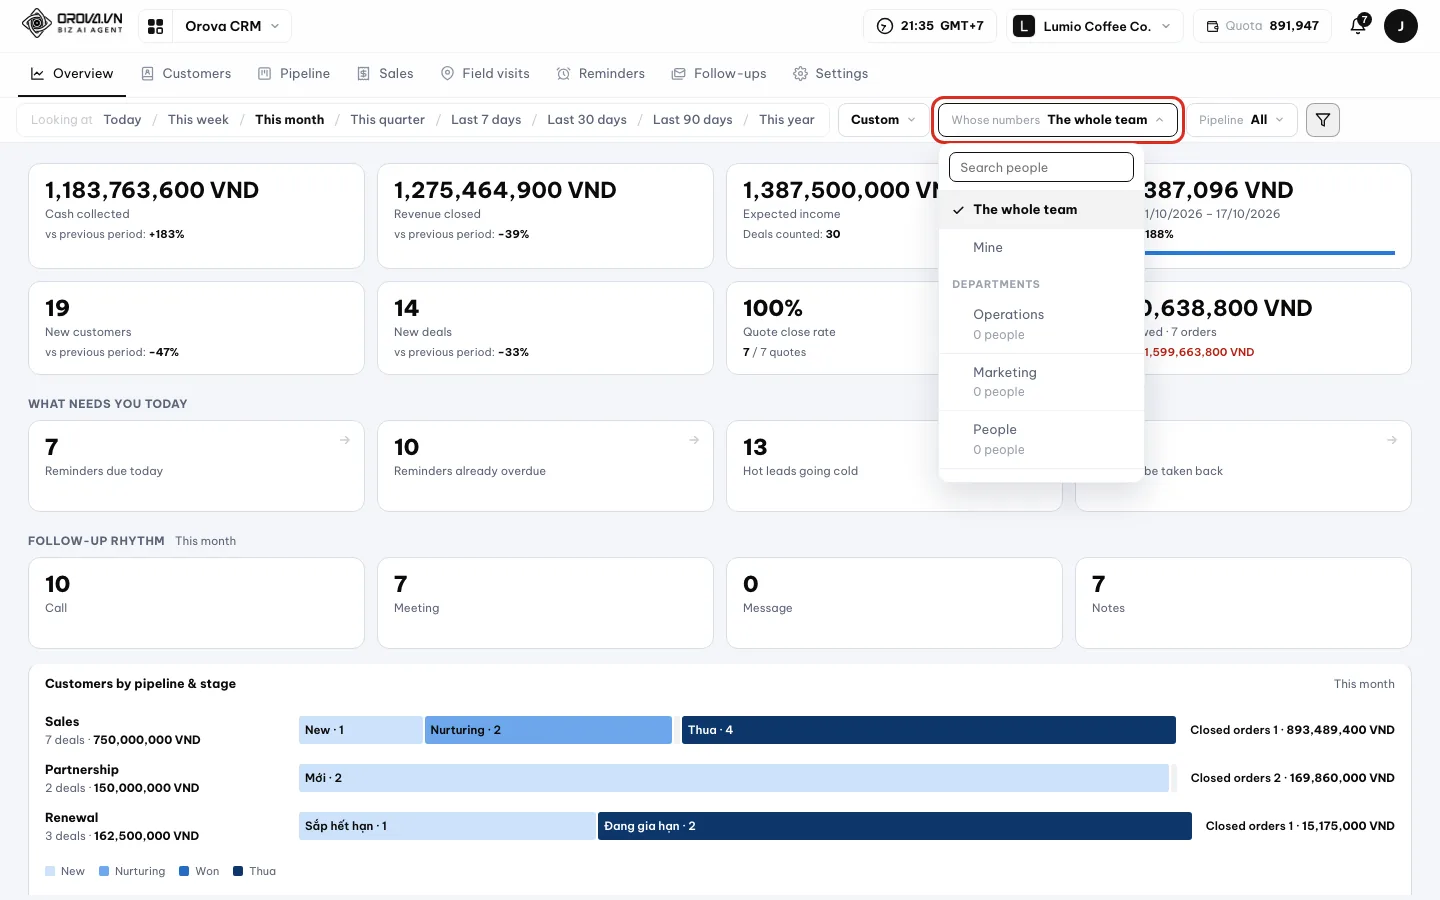
Owners and admins can view the whole team, one department or one person. - 5
Read the number cards. The cards are
Cash collected,Revenue closed,Expected income,Period target,New customers,New deals, two close rates andMoney owed. Thevs previous periodline under each card tells you if it went up or down.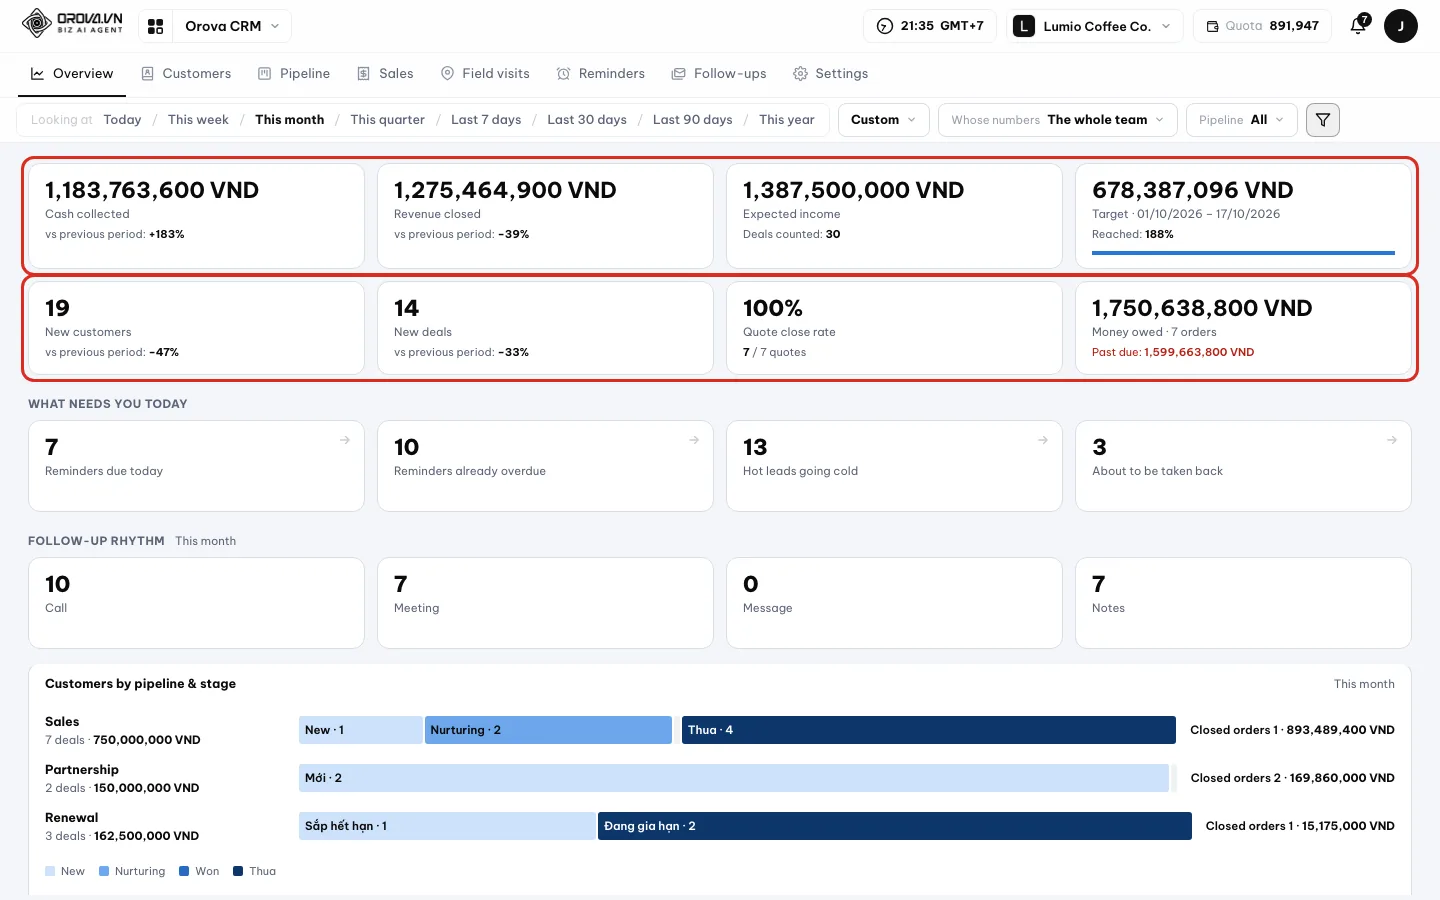
The Period target card shows the percent reached. - 6
Look at the charts. Scroll down.
Leads by sourcesplits new customers by how they were added.Stage funnelshows what percent got through each stage.Revenue by weekhas Closed and Collected columns.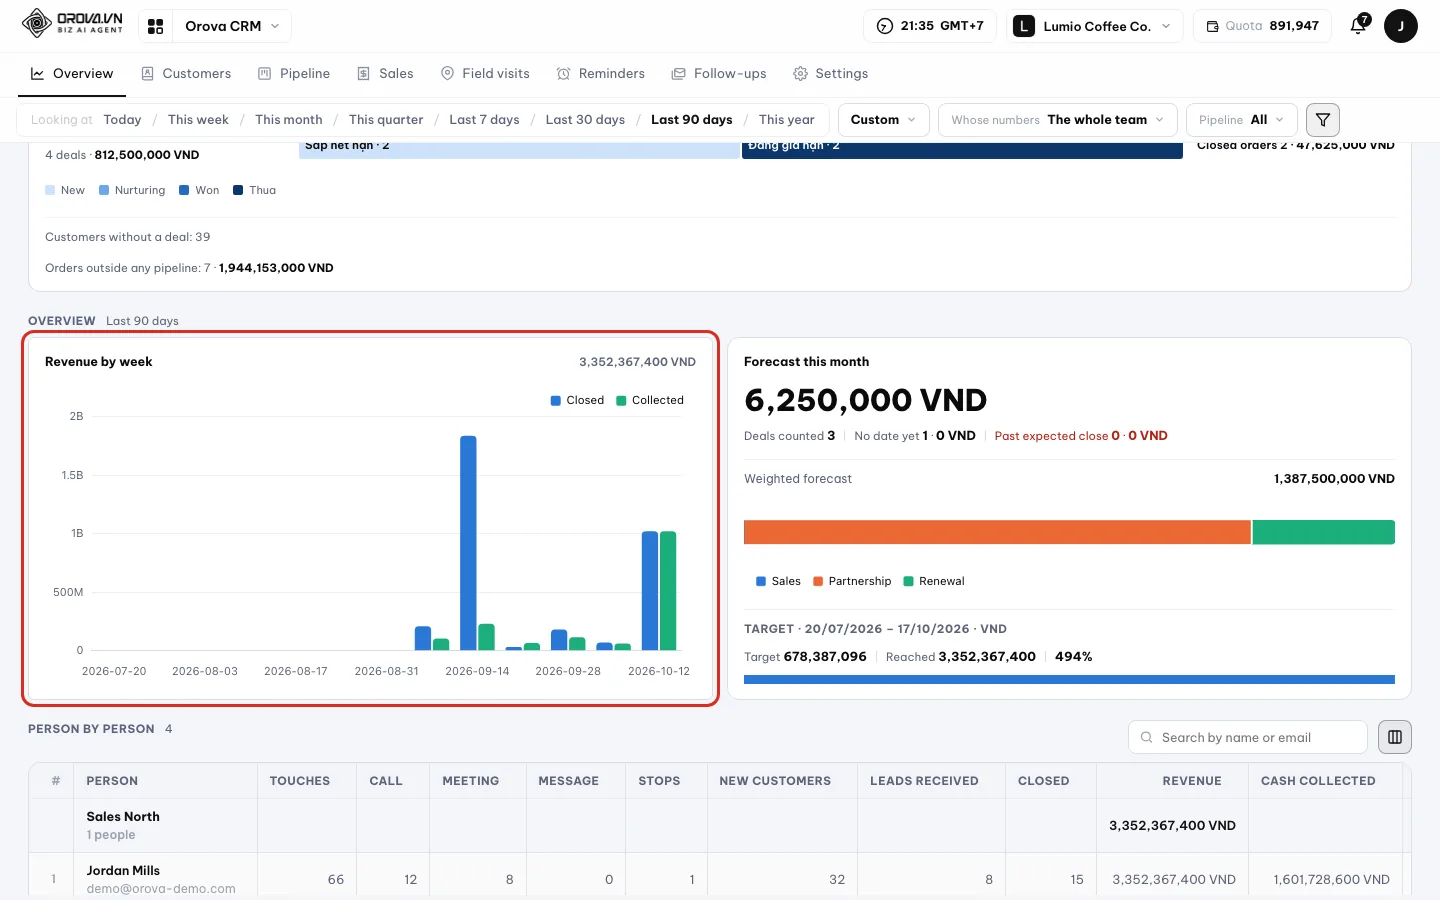
Charts follow the period and scope you pick. - 7
Read the forecast. The
Weighted forecastblock hasForecast total,Deals counted,Forecast this month,No date yetandPast expected close.Past expected closelists deals that are past their expected close date.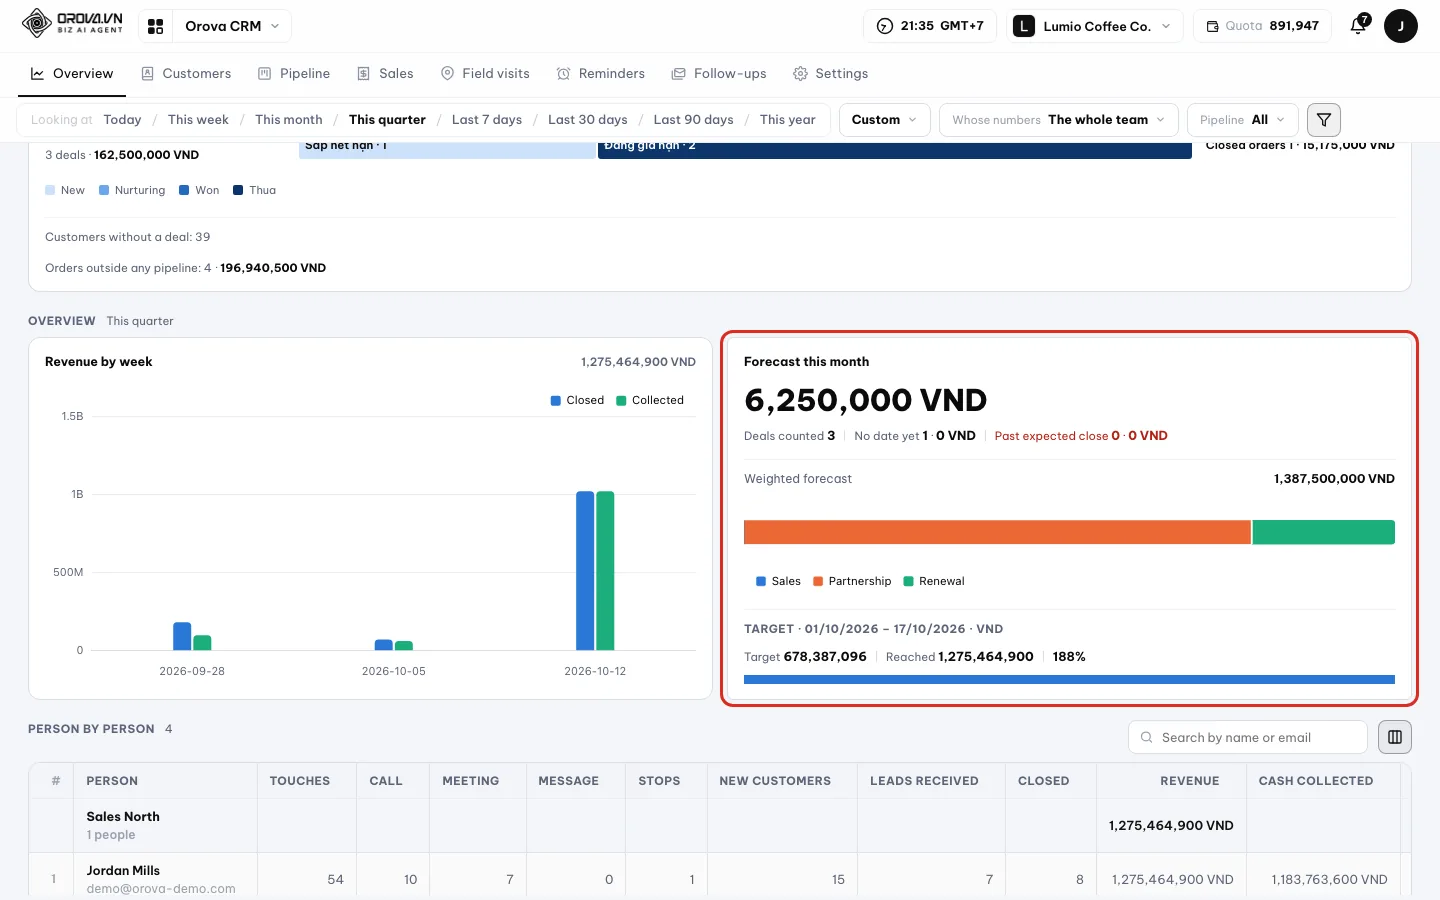
Forecast = deal value times the stage's chance of closing. - 8
See customers by pipeline and stage. Pick a pipeline under
Pipeline. TheCustomers by pipeline & stageblock shows how many customers are in each stage, the number of deals and theCustomers without a dealline.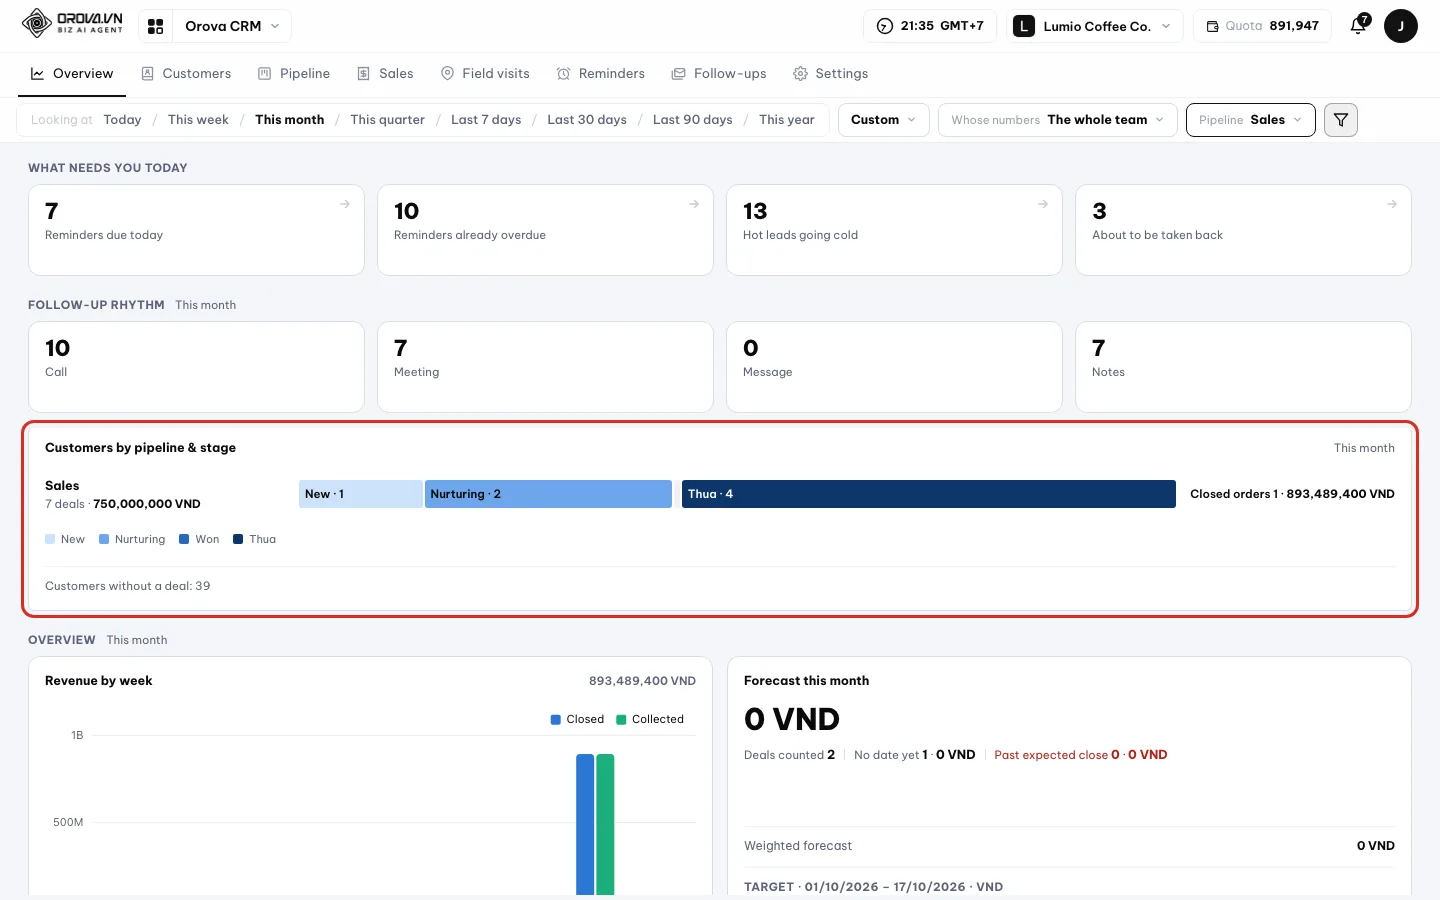
Each stage of the chosen pipeline shows customers and deals. - 9
Compare each person with their target. Scroll to the
Person by persontable. It is grouped by department, one row per person. TheTarget,% doneandRevenuecolumns show where each person stands.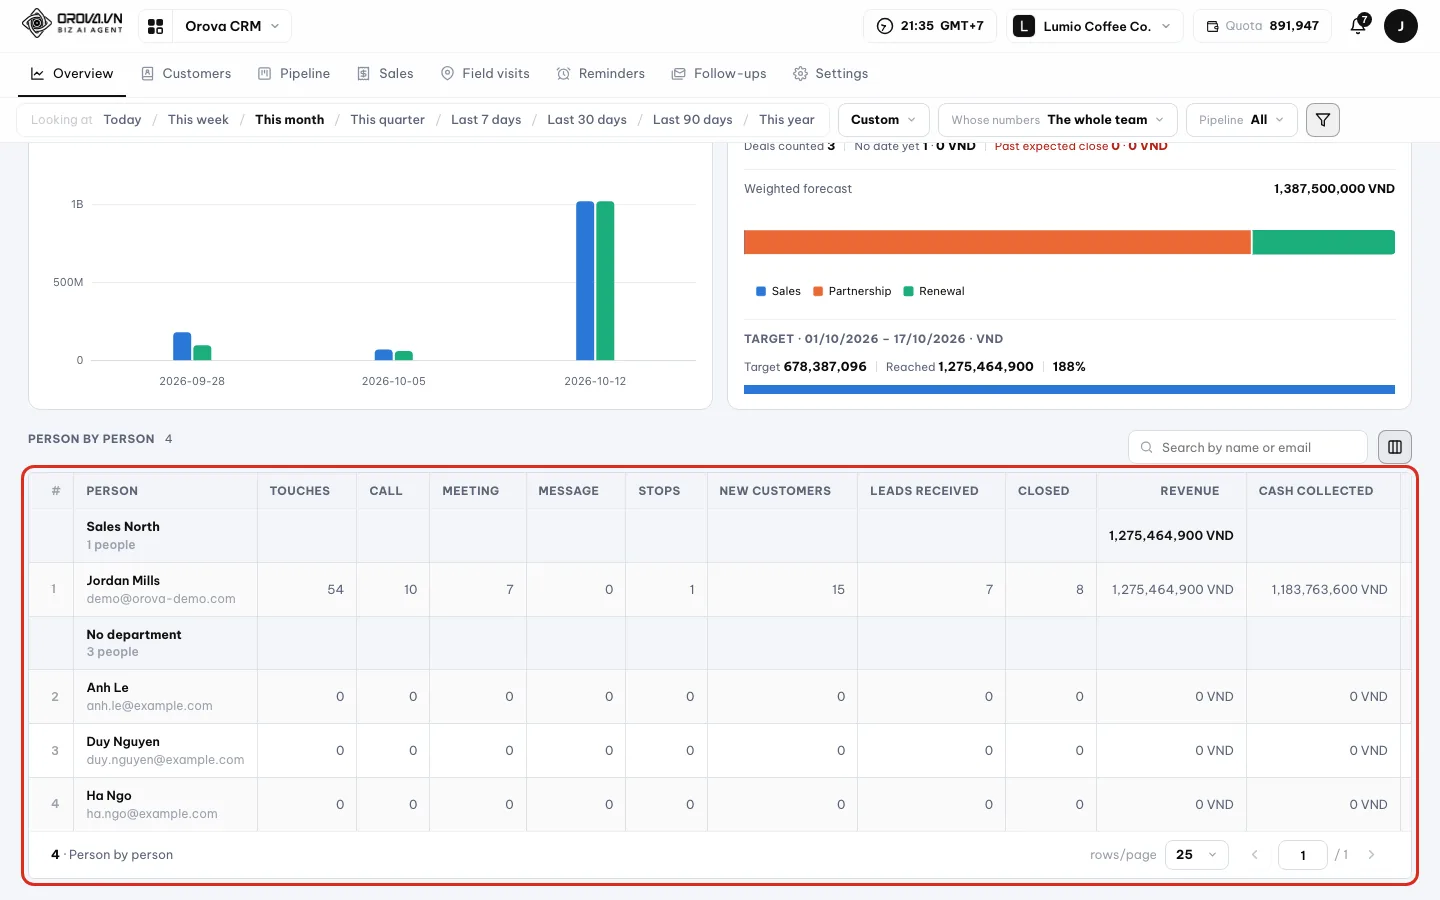
The table only lists people with a target in the period. - 10
Find one person in the table. Type a name or email into
Search by name or email. The table narrows to matching people. ClickColumns to showto hide or show columns such asTouches,Stops,Taken back.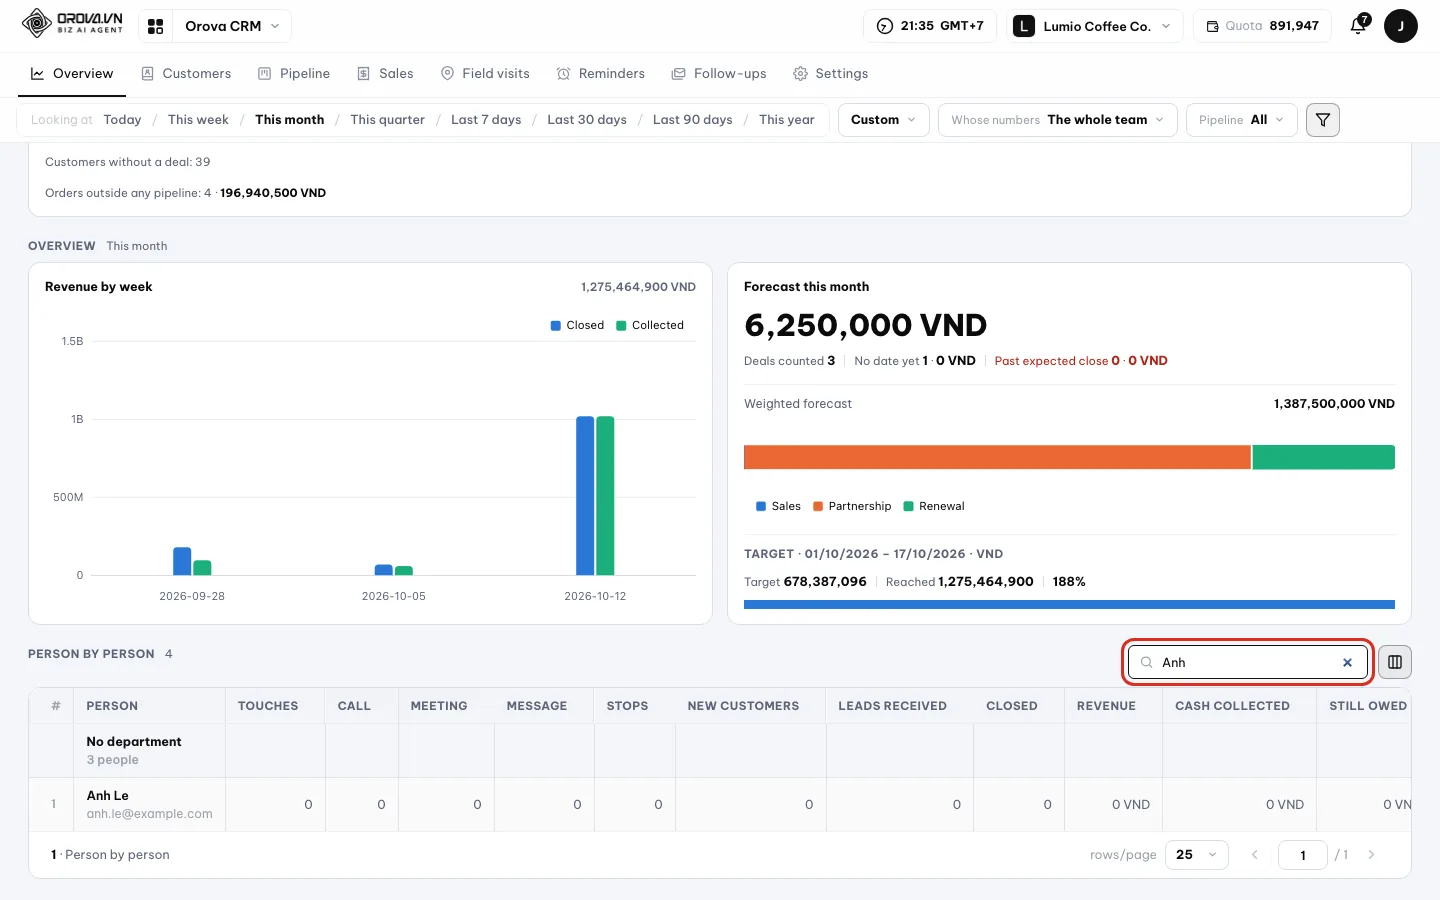
Find one person fast in a big team. - 11
Filter by customer details. Click
Filter. Add a condition on a field, for example Industry or Category. ClickApply, and every number on the page only counts matching customers.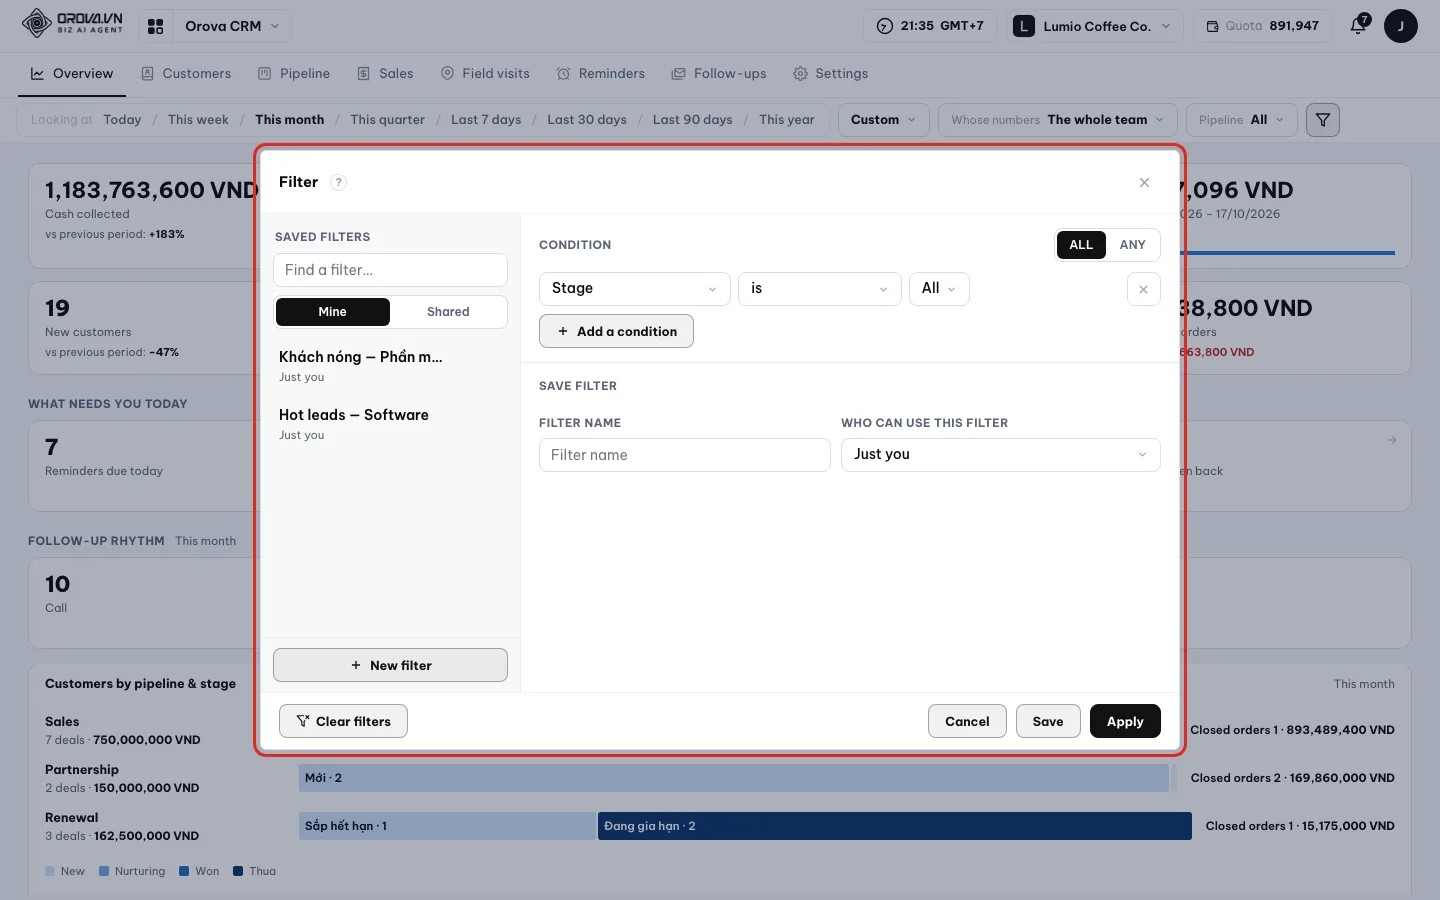
The filter is shared with Customers. - 12
Save it as a report to reopen fast. Click
Save report. Type aReport name, for example “Whole team this month”. Once saved, a new chip appears at the top of the page. Next time, click the chip to return to that exact period and scope.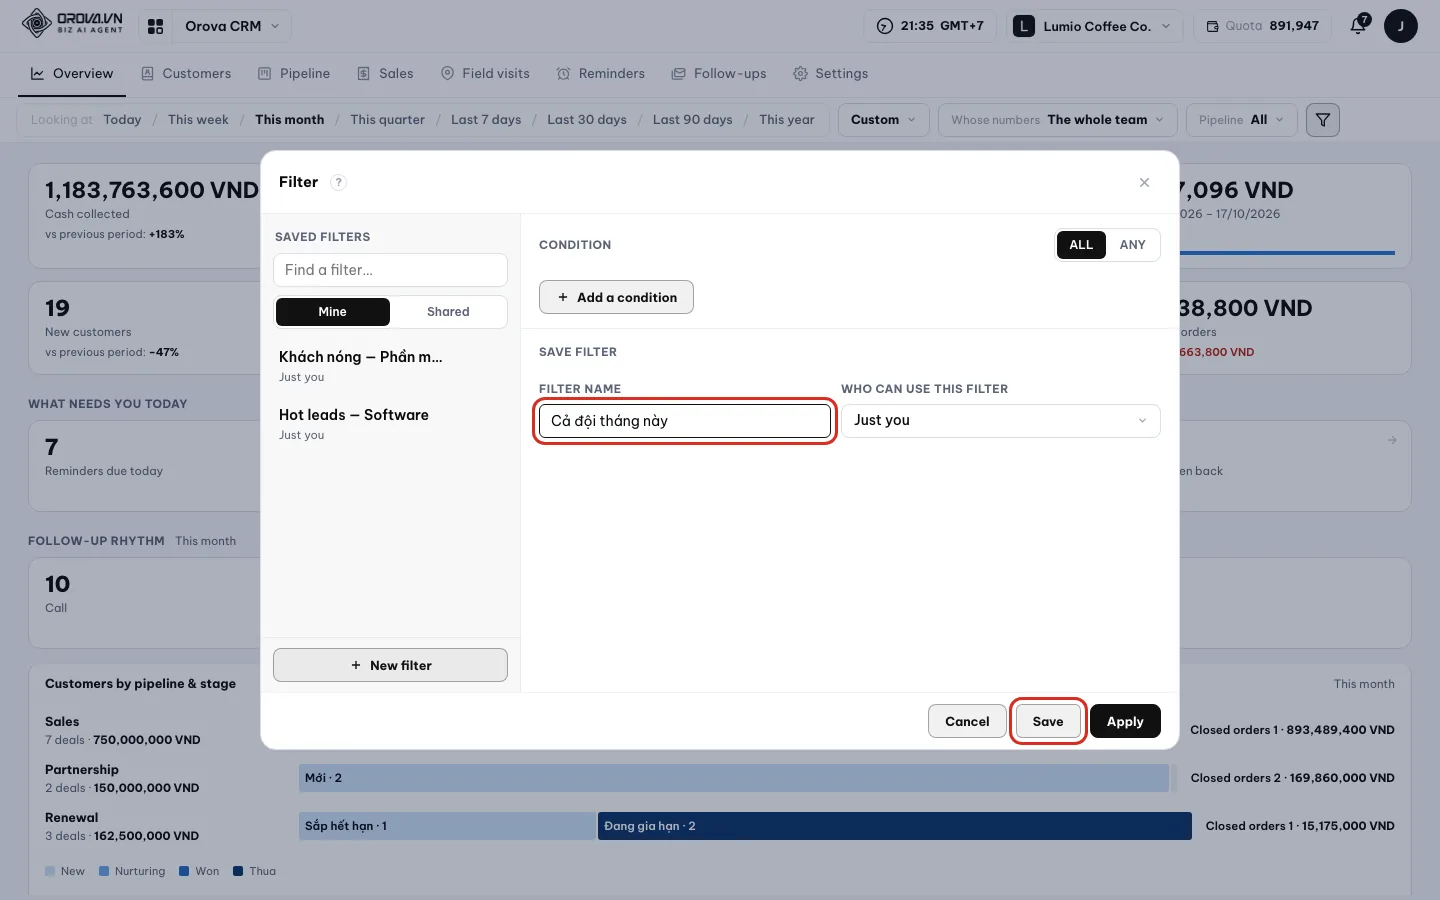
A saved report is a quick shortcut.
Note
Who can see team-wide numbers
The whole team, Departments, People and the Person by person table. Everyone else only sees their own numbers.Tip
Deleting a report chip keeps the numbers
14 · Targets
Set targets for departments and each person
A target is the revenue you assign to a department or a person. Once set, Overview works out the percent reached for you.
Target
The revenue assigned to a department or a person for one period. A period can be a day, week, month, quarter or year.
Stage sub-targets
Pick a pipeline as well and each stage gets a sub-target. That is the number of customers to move into the stage during the period.
Target scaling
If you set a monthly target and view 10 days, Overview takes the share for those 10 days. When several levels exist, it uses the most detailed one.
Department
A department in your org chart, set up in Workspace ▸ Departments. Picking a department includes every team under it.
Go to the Settings tab and pick Targets in the side menu. Only owners and admins see this area. Revenue counts closed orders and goes to the person in charge of the customer.
The currency follows your workspace settings. If none is set, it defaults to USD. Numbers are written like 1,234,567.89: commas between thousands, a dot before the decimals.
| Button / field | What it does | Notes |
|---|---|---|
Department | Pick Whole company or one department | Has a Search departments box. Each department shows its head count |
Target period | Pick the period type | Day, Week, Month, Quarter, Year |
Previous / Next | Go back or forward one period | Open calendar jumps to the period containing the day you pick |
Pipeline | Add sub-targets per stage | Pick None to set revenue only |
Revenue | The main target | Type a number, it saves in place and shows “Saved” |
Reached | What has been done so far in the period | Read-only |
Members' total / Gap vs department | Compare the sum of each person with the department level | Helps you split it evenly |
Copy the previous period | Copy every level from the previous period into the one you are viewing | Handy when levels stay the same |
Set a monthly target for one department
- 1
Pick the department and period. In
Targets, clickDepartmentand pick one, for example Sales North. UnderTarget period, pickMonth. The table shows a department row and one row per person in it.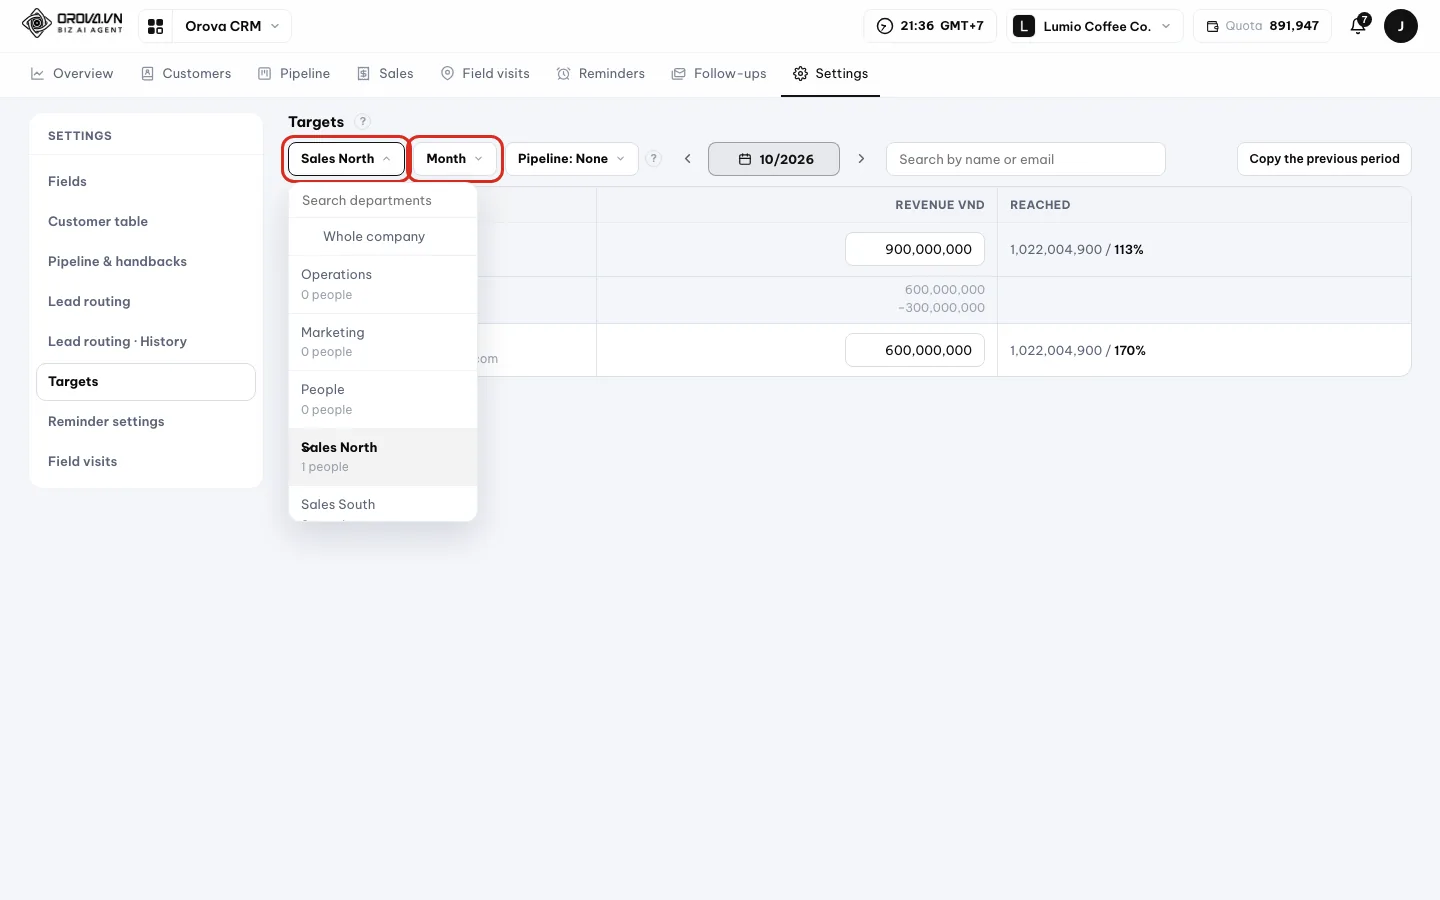
Pick the department first, then the period type. - 2
Type revenue for the department and each person. Type a number in the
Revenuecolumn on the department row. Then type one for each person. Each field saves itself and shows “Saved”. TheGap vs departmentline tells you if the people's total is short or over.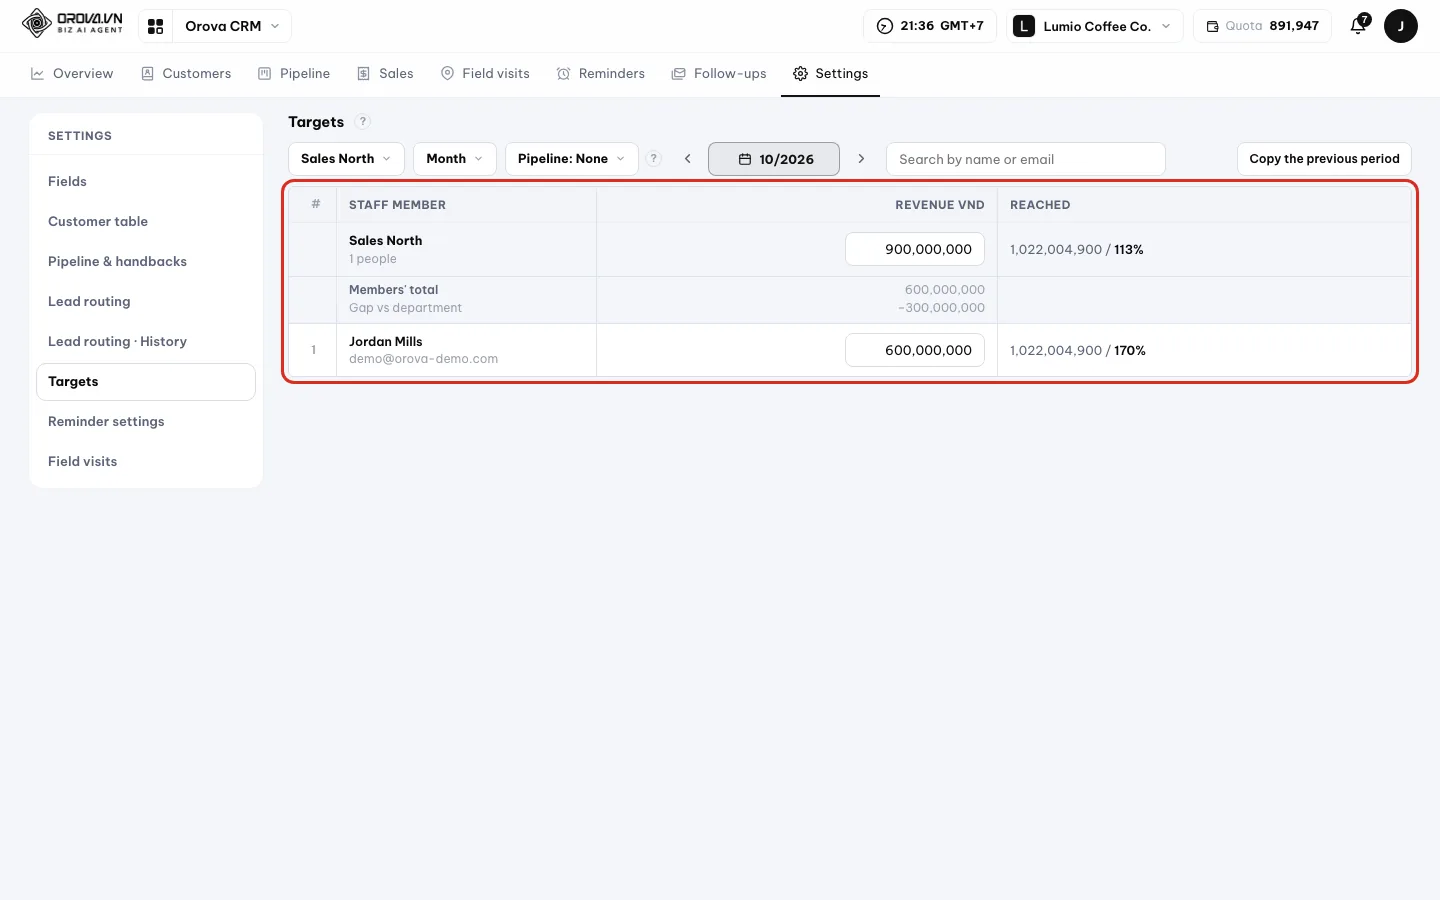
The people's total is compared with the department level. - 3
Add stage targets if you need them. Click
Pipelineand pick a pipeline. The table adds one column per stage. Type how many customers should enter that stage in the period. Hover over a stage name to read the explanation.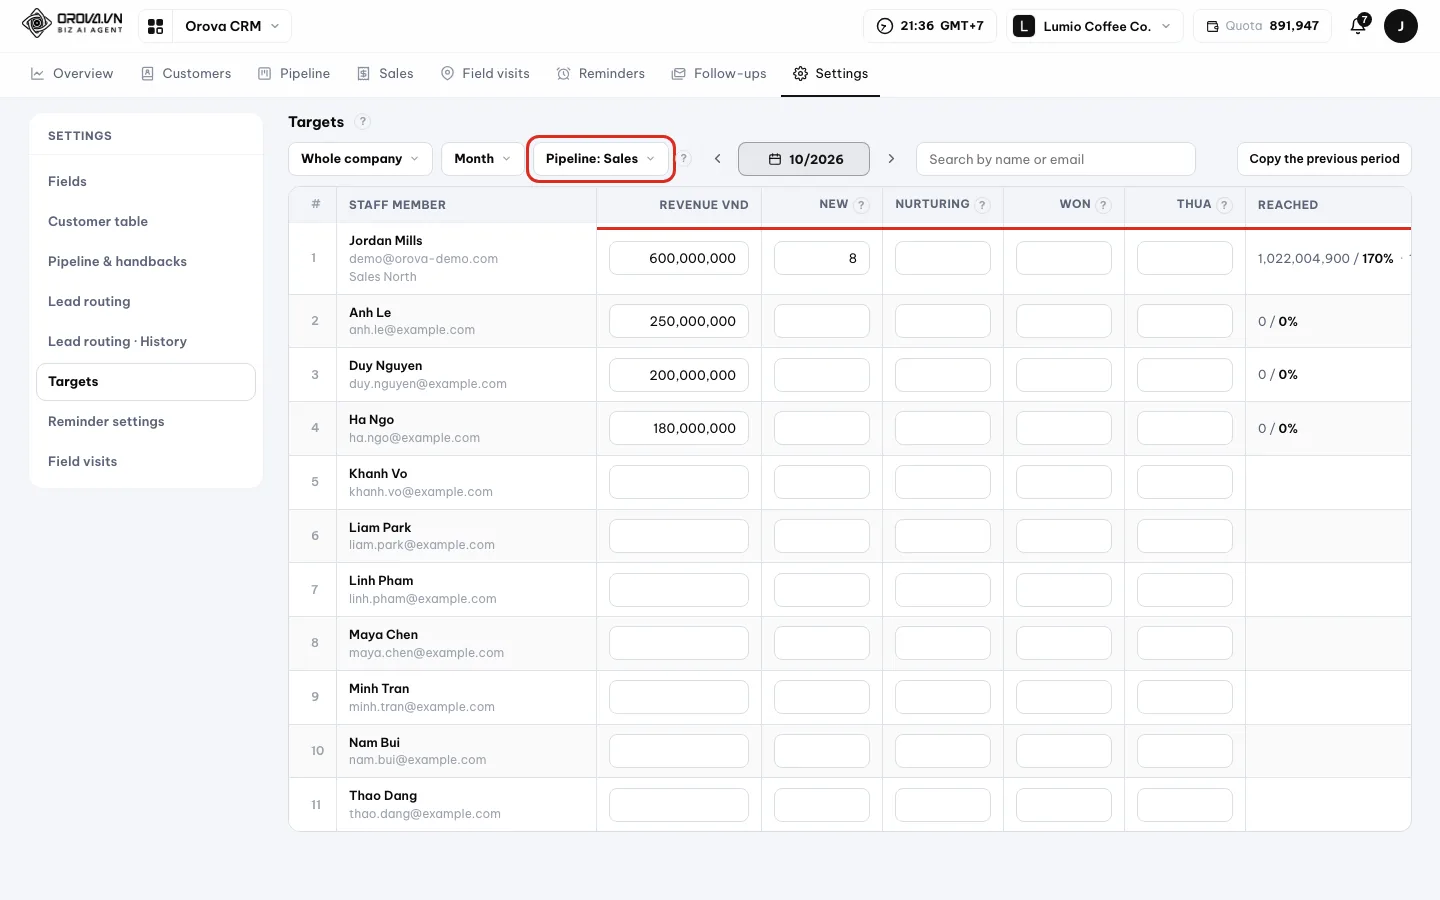
Each stage's sub-target is the number of customers entering it. - 4
Copy to a new period. Move to the new period with
Next. ClickCopy the previous periodto copy every level from the previous period. Then edit the fields that need to change.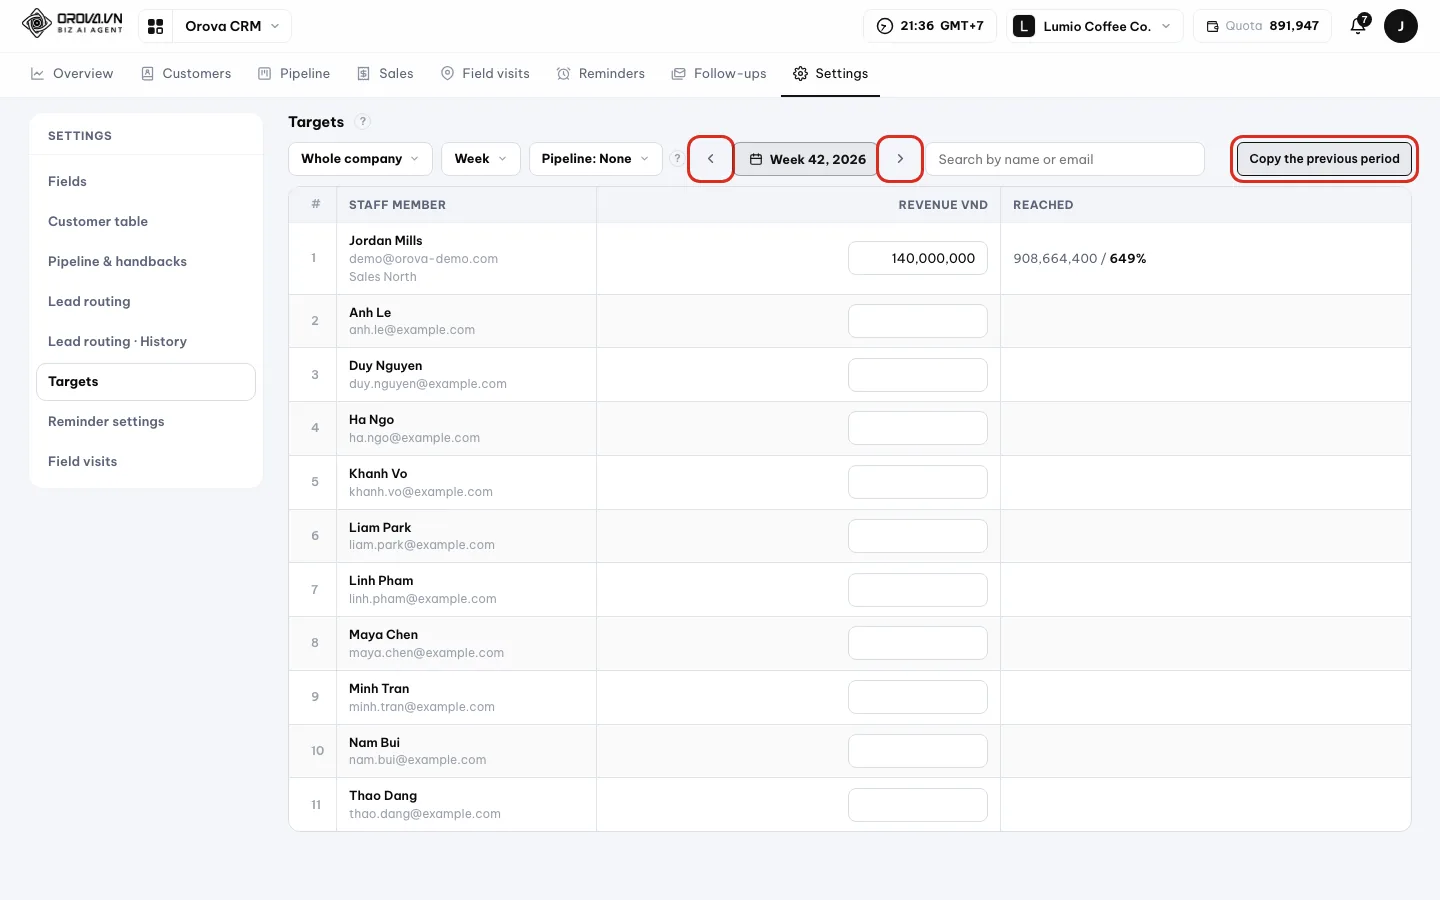
Copy the previous period, then edit what differs. - 5
See the results on Overview. Go back to the
Overviewtab and pickThe whole team. ThePeriod targetcard and thePerson by persontable now show numbers and percent reached.People who were just given a target appear in the table.
Note
0 means no target
Person by person table.Tip
Set it monthly, still view it weekly
Note
Orders without a deal
All pipelines.15 · Field visits
Plan field visits to meet customers
Field visits help field staff list the stops for their day. They check in on arrival, and managers review it on a map.
Route
One person's list of customer stops for one day. For example, three shops in the morning and two customers at a coffee shop in the afternoon.
Check-in
Click I'm here to mark that you have arrived. The system records GPS location if your device allows it, plus a note and a display photo.
Customers you have not visited in a while
Customers nobody has looked after for longer than the number of days set in Settings ▸ Field visits. The system suggests them so you can add them to a route.
Click the Field visits tab. The page has two tabs: Map and Route for the day. This screen does not call AI and uses no quota.
| Button / field | What it does | Notes |
|---|---|---|
Search for a customer to add | Add a stop | After you pick a customer, the Meeting place box opens |
Meeting place | Where, when and how long you meet | At the customer's address or Somewhere else |
Move up / Move down | Change the order of stops | The route saves itself |
I'm here | Check in at the stop | Note, display photo, whether it led to an order |
Skip this stop | Mark it as not visited | The stop changes to Skipped |
Get directions | Open directions in Google Maps | Only goes through stops not yet visited |
Copy this route | Copy the route to another day | Asks Copy to which day |
Note for the trip | A shared note for the whole route | — |
Plan a route and go meet customers
- 1
Open the day's map. The
Maptab opens first. Pick theDay. Each check-in is a dot on the map, with a list beside it. TheAccurate to about {n} mline tells you how precise the GPS was.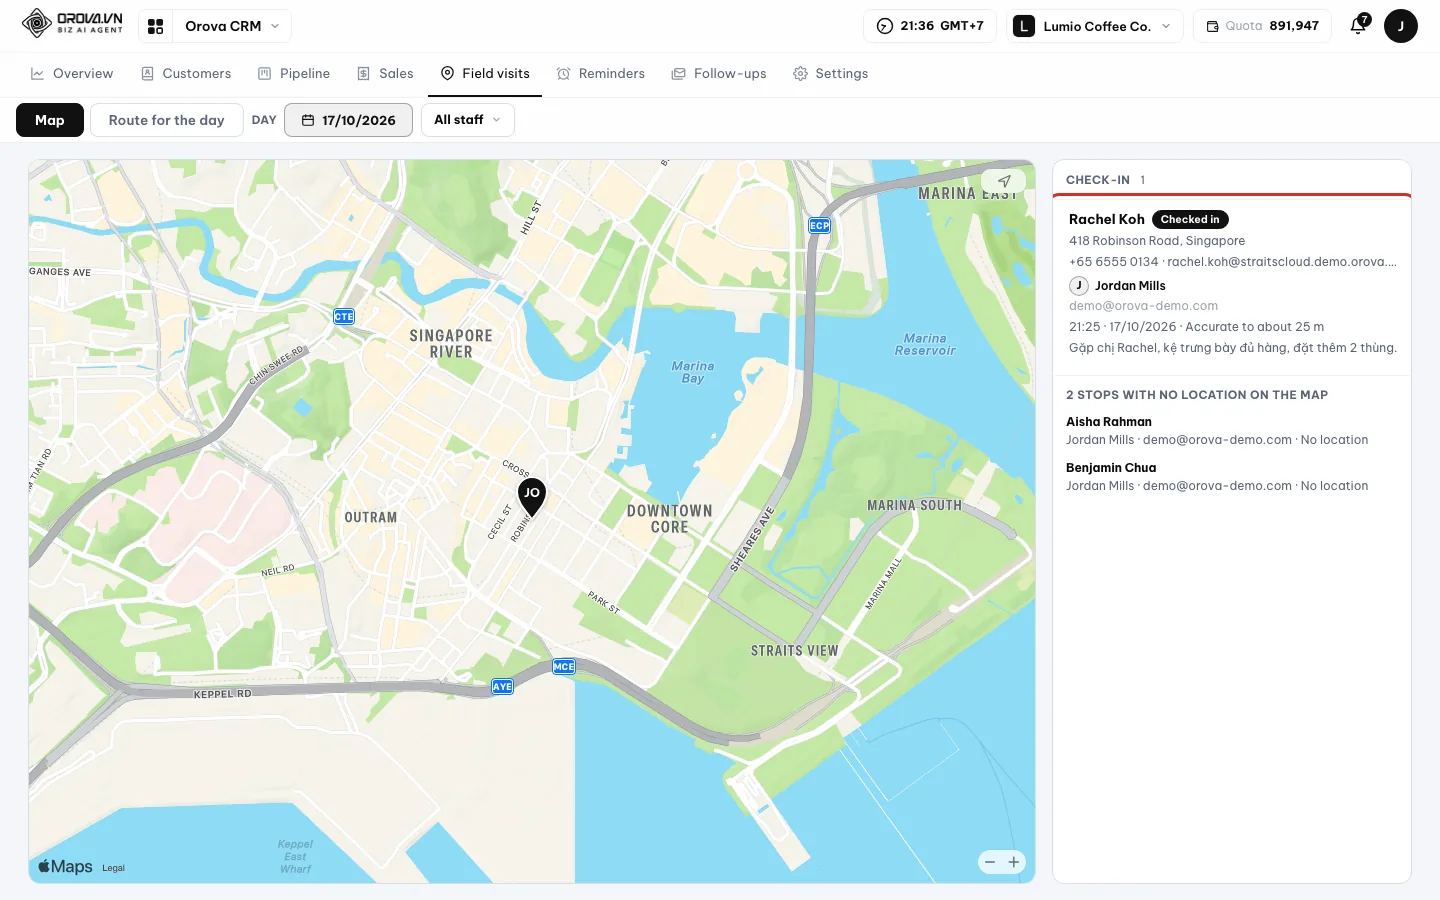
The map shows every check-in of the day. - 2
Add customers to the route. Switch to the
Route for the daytab. Type a customer's name or email intoSearch for a customer to add. Pick the customer from the suggestions.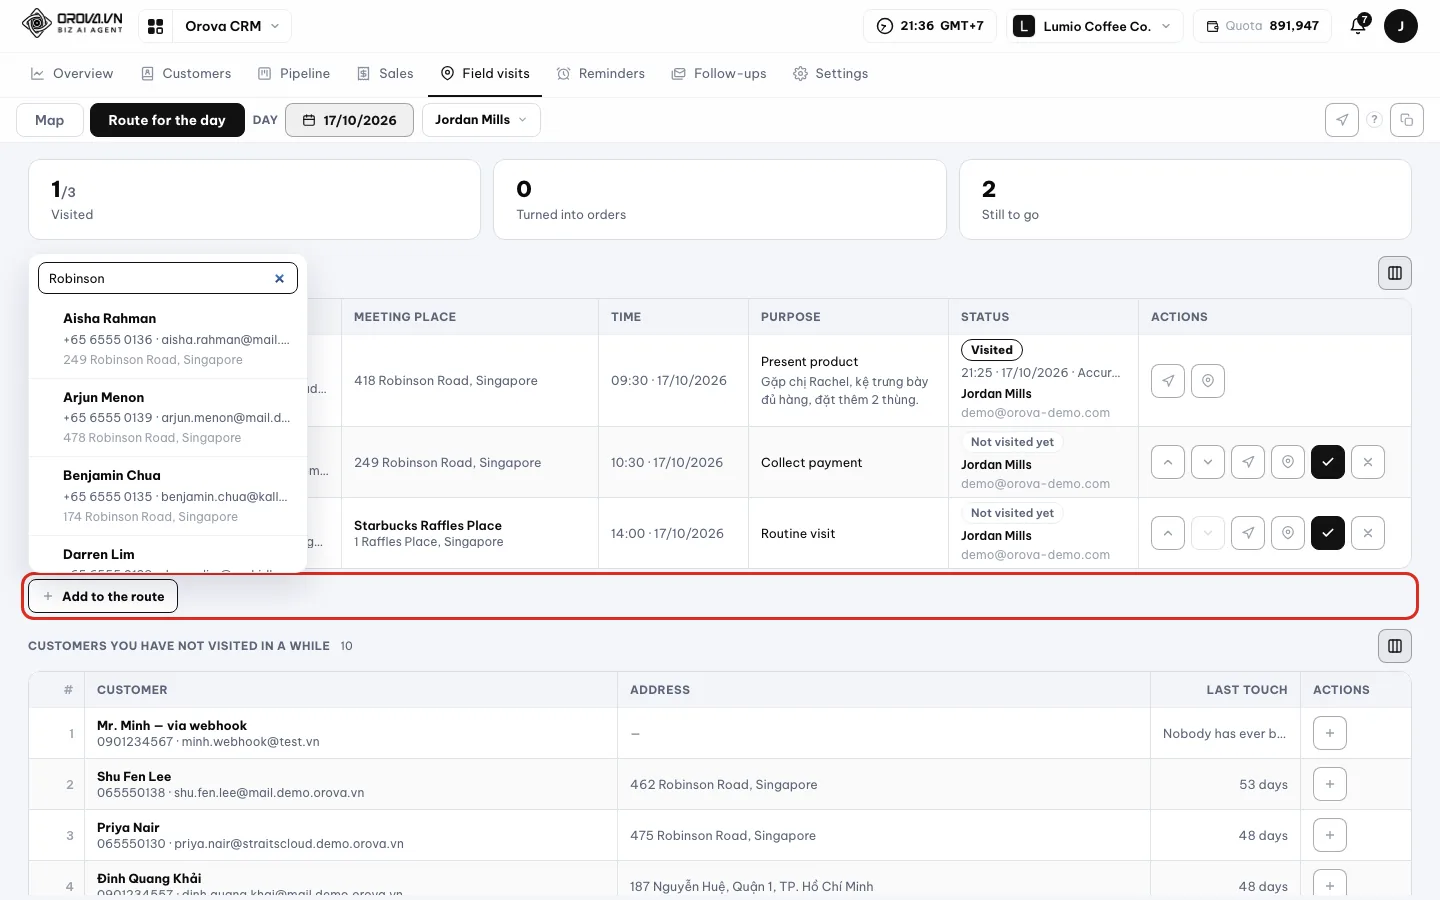
Type a name to find the customer to visit. - 3
Pick the meeting place and time. The
Meeting placebox opens. PickAt the customer's addressorSomewhere else, then search for a coffee shop or office. Fill inTime,DurationandPurpose. Turn onRemind 30 min beforeif needed, then save.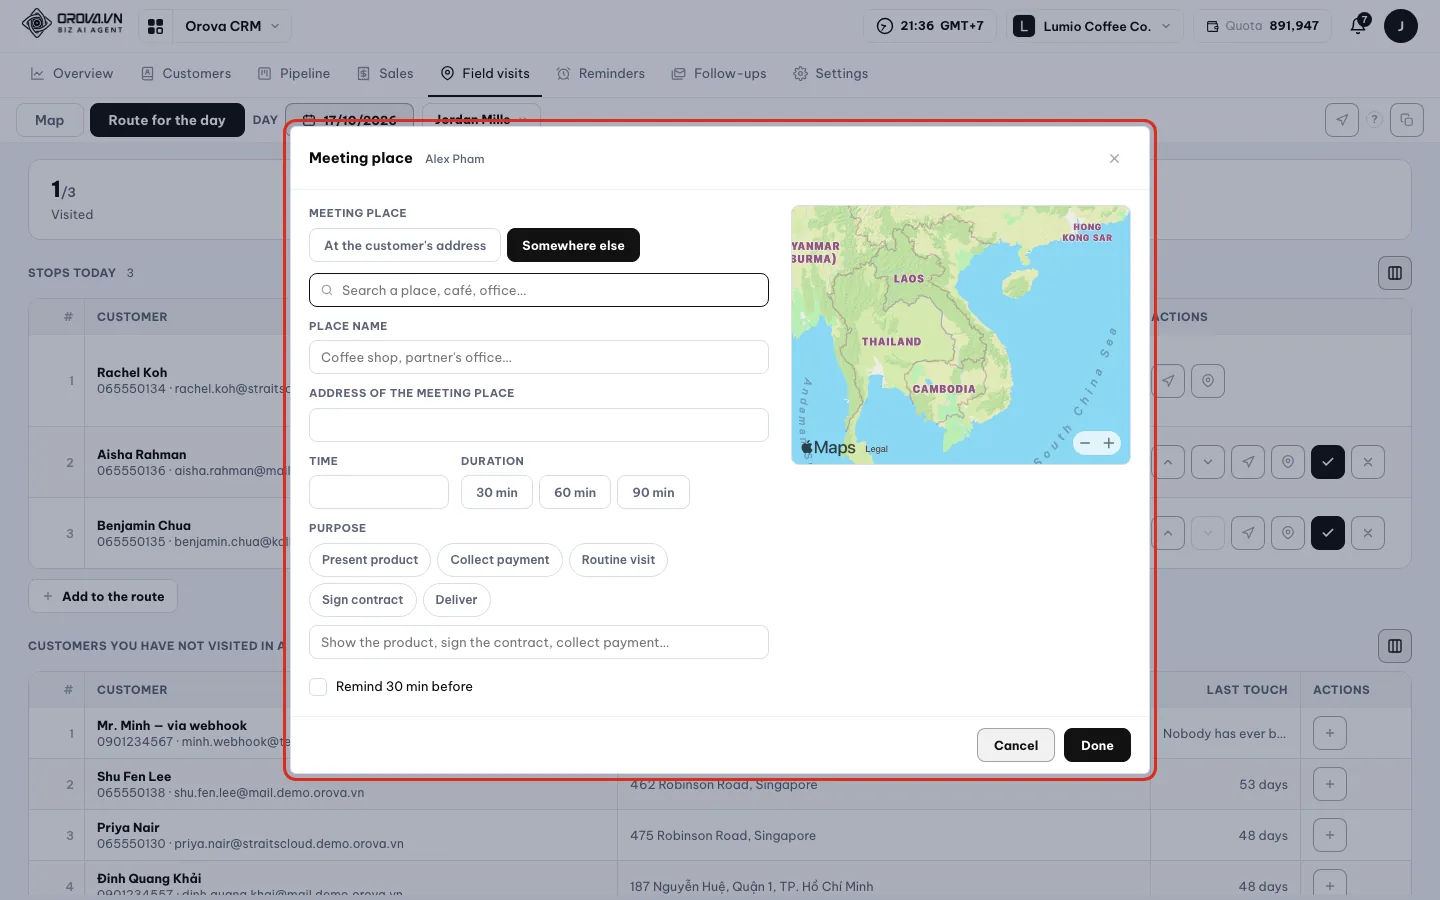
Meet at the customer's address or somewhere else. - 4
Order the stops and get directions. Use
Move up/Move downto order the stops. Each stop shows how many km and minutes it is from the previous one. ClickGet directions, pick a leg, and Google Maps opens.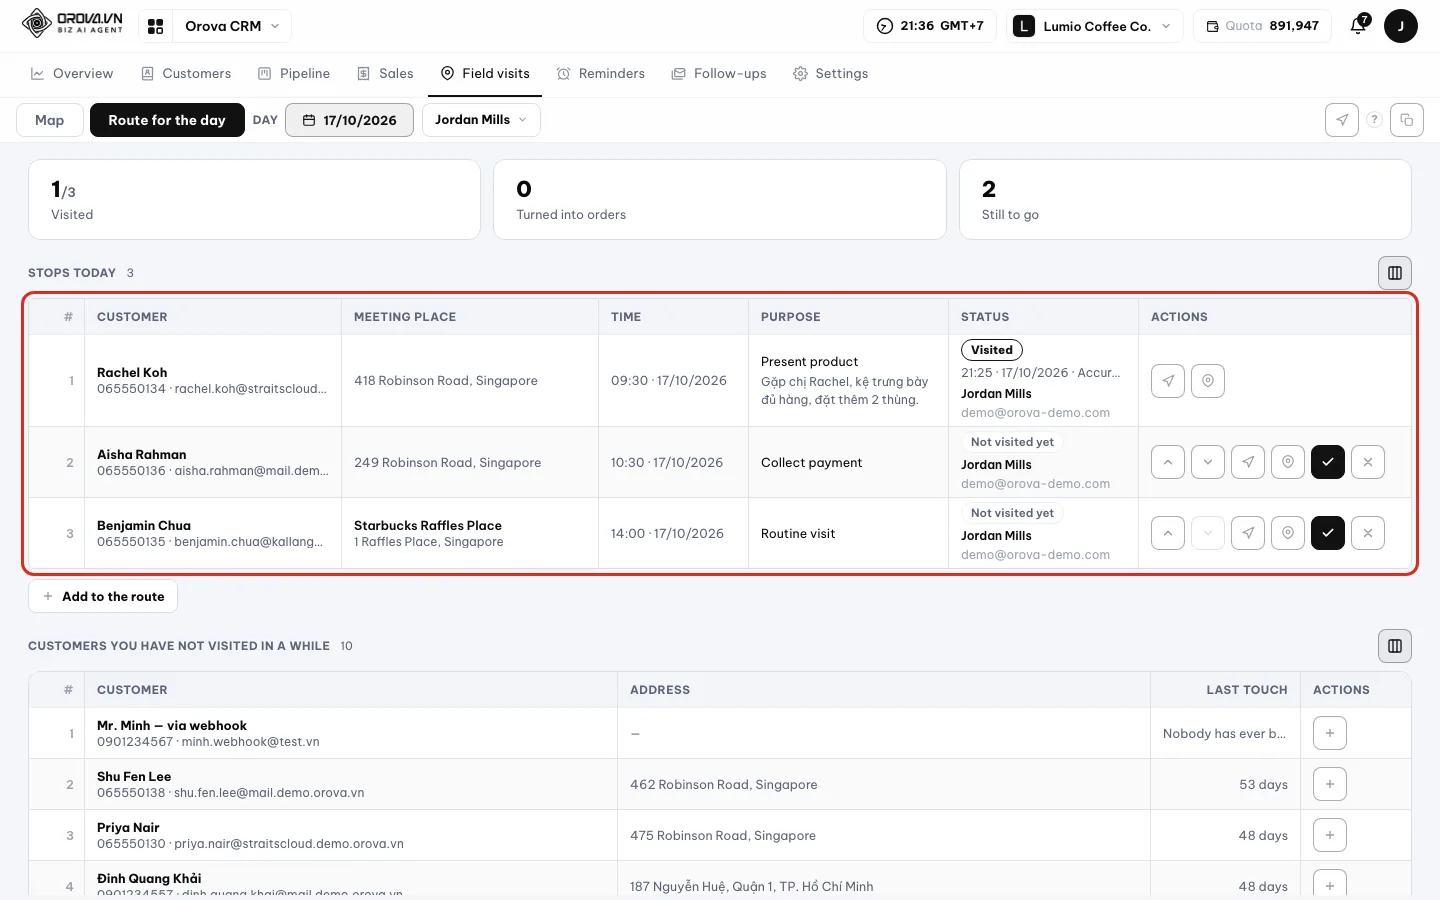
Directions skip stops you have already visited. - 5
Check in when you arrive. When you arrive, click
I'm here. Type aNoteand clickPhoto of the displayif needed. Turn onDid the visit end in an order?if you closed a sale. Once saved, the stop changes toVisited.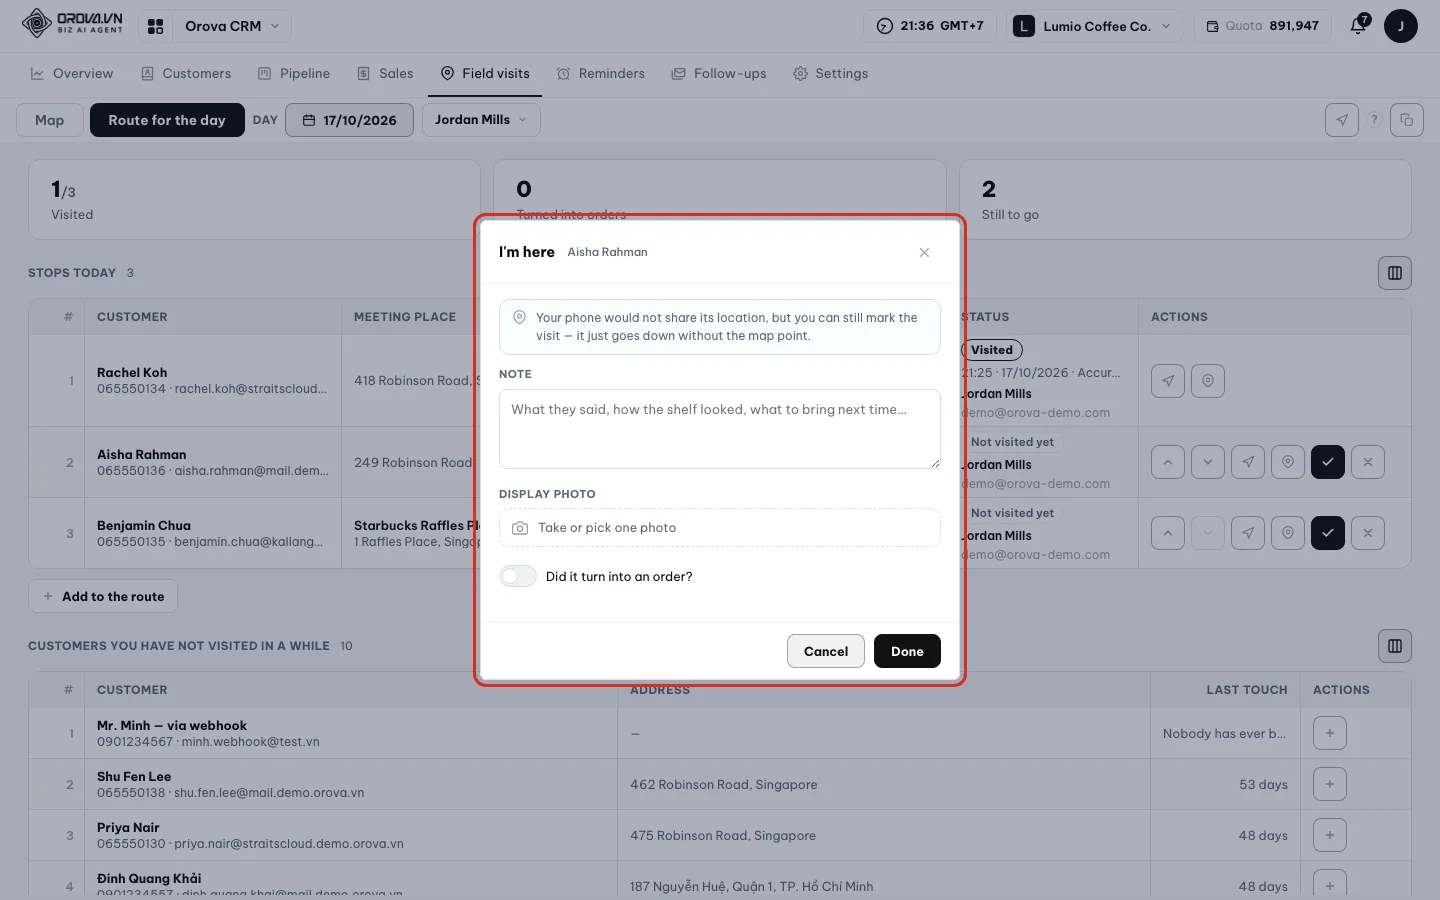
A check-in records location, a note and a photo. - 6
Add customers you have not visited in a while. Scroll down to the
Customers you have not visited in a whiletable. Each row says “{n} days with nobody on it”. ClickAdd to the routeto put that customer on the day you are viewing.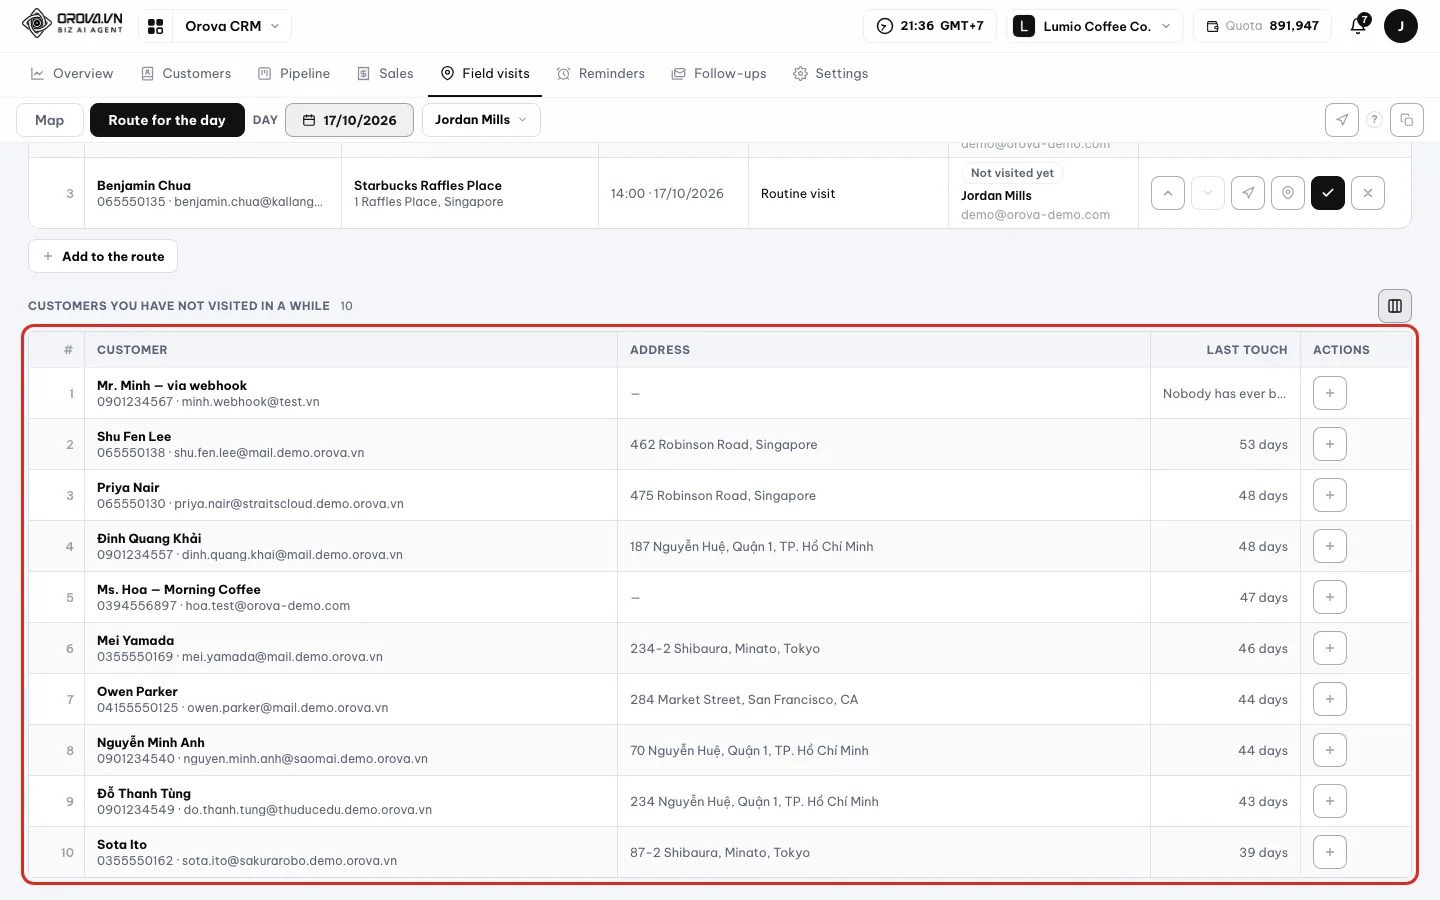
Suggested customers to visit again. - 7
Copy the route to another day. Click
Copy this route. Pick a day inCopy to which dayand confirm. That day's route now has the same stops as today.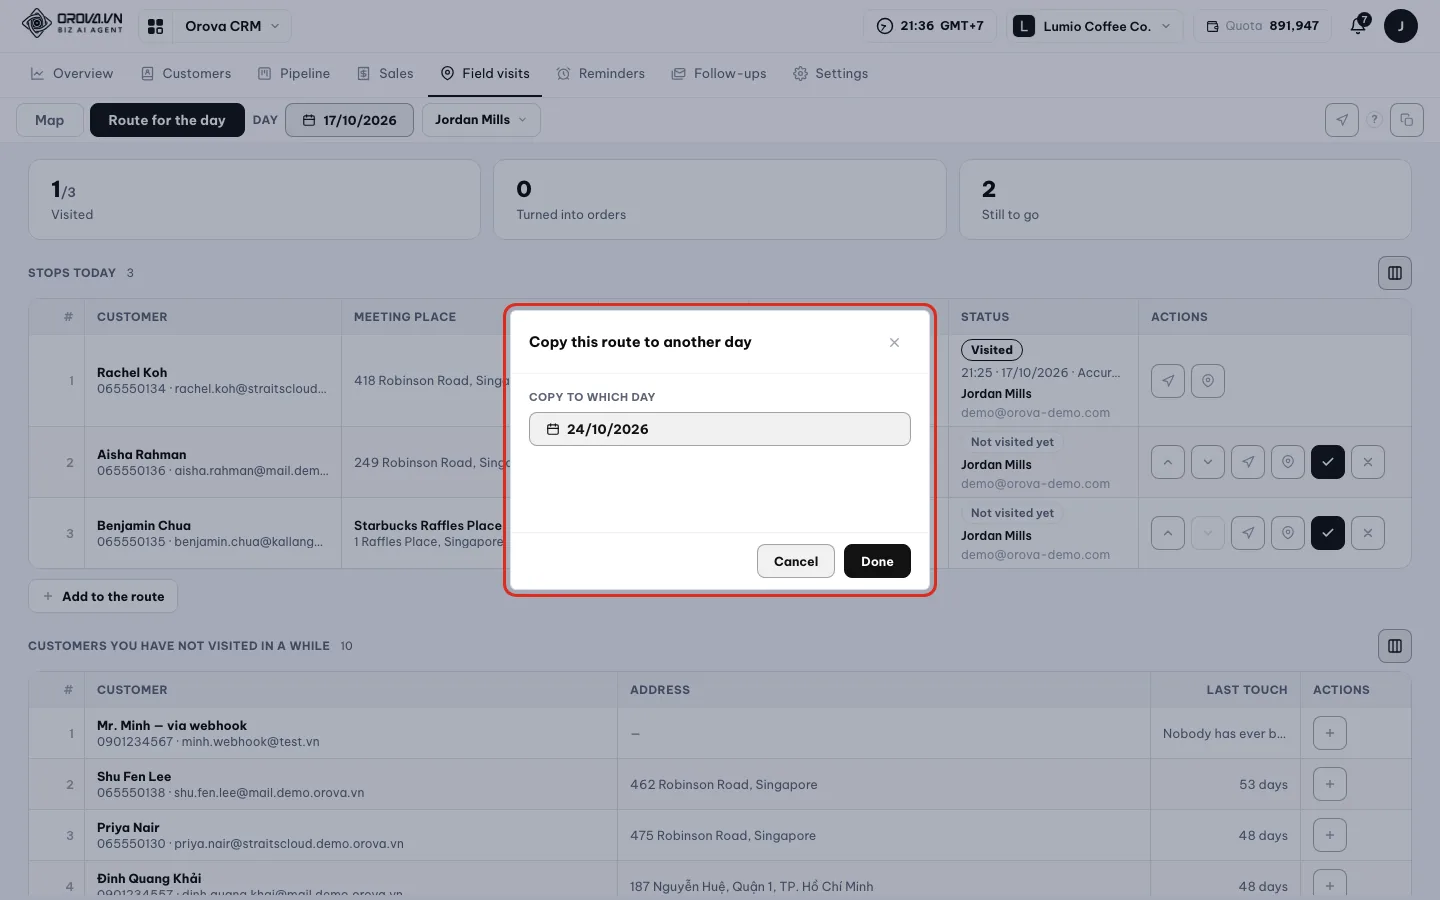
Handy when you ride the same route every week. - 8
Managers: view your staff's routes. In the
Maptab, clickWhose routeand pick one person orAll staff. You can only view people inside your permission scope.Pick All staff to view the whole team.
Set up suggestions for customers not visited in a while (owners and admins)
- 1
Open Settings ▸ Field visits. Go to the
Settingstab and pickField visitsin the side menu. Turn onSuggest customers not visited in a while. Fill inNot visited for (days)andSuggestions shown, each at least 1.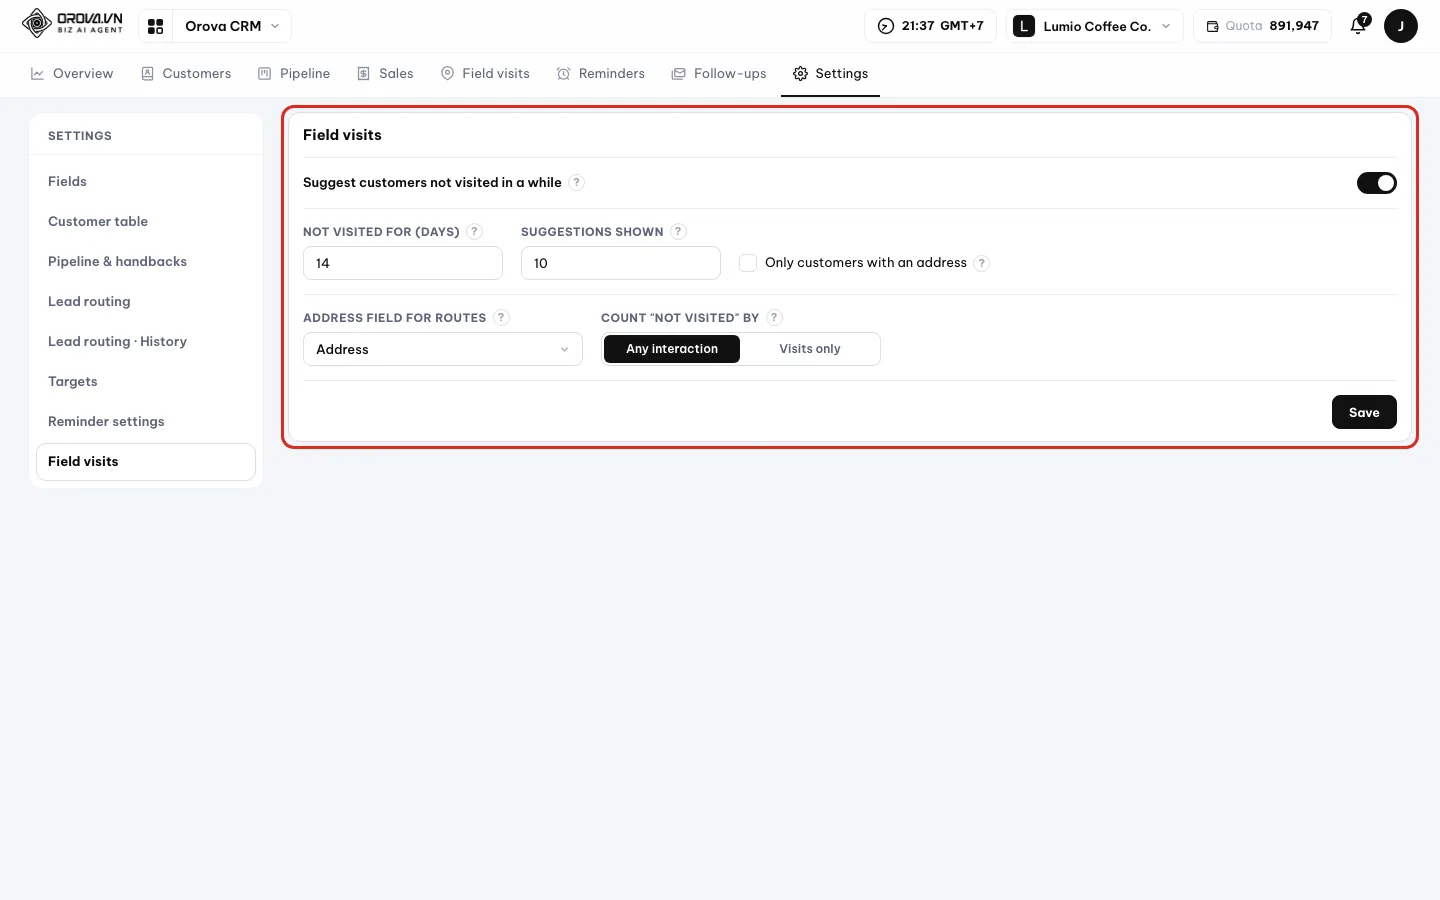
Decide which customers count as not visited in a while. - 2
Pick how to count and save. Turn on
Only customers with an addressif you only want suggestions you can reach. Pick theAddress field for routes. UnderCount “not visited” by, pickAny interactionorVisits only. Once saved, you see “Field visit settings saved”.
Note
Customers without an address
At the customer's address and the customer has no address, the system says “The customer has no address yet. Please pick another place.” Pick Somewhere else and it saves.Tip
Display photo
16 · Reminders
Reminders so you never forget a customer
Reminders are the list of things to do with customers: call back, send a quote, set a meeting. When it is time, Orova lets you know.
Reminder
A task to do with a customer at a set time. You can assign it to someone else, set a priority and get reminded ahead of time.
Push notification
Your browser alerts you when it is time, even when Orova is not open. You turn it on separately on each device.
Snooze
Push the alert back a few minutes without changing the due time. Like hitting snooze on an alarm.
Click the Reminders tab. This screen does not call AI. To set a reminder, you need the Add & edit customer data permission.
| Button / field | What it does | Notes |
|---|---|---|
Open / Done | Tasks not done and tasks done | Two tabs at the top |
Yours / All | Your tasks or the whole team's | All only includes tasks inside your view scope |
Filter | Filter by type, priority, owner, due date | You can save a filter to reuse |
Set a reminder | Create a new task | Pick the customer, task, time, type, priority, assignee |
Mark as done / Reopen | Change a task's status | — |
Snooze 5 minutes / 10 minutes | Snooze the reminder | On the notification when it is due |
Reminder settings | Sound and push notifications | Set by each person for themselves |
Set reminders and work through tasks
- 1
View the task list. The
Opentab opens first. TheDuecolumn saysOverdue,TodayorComing up. PickAllto see the whole team's tasks. Tasks the system made say “Created by the system” in theCreated bycolumn.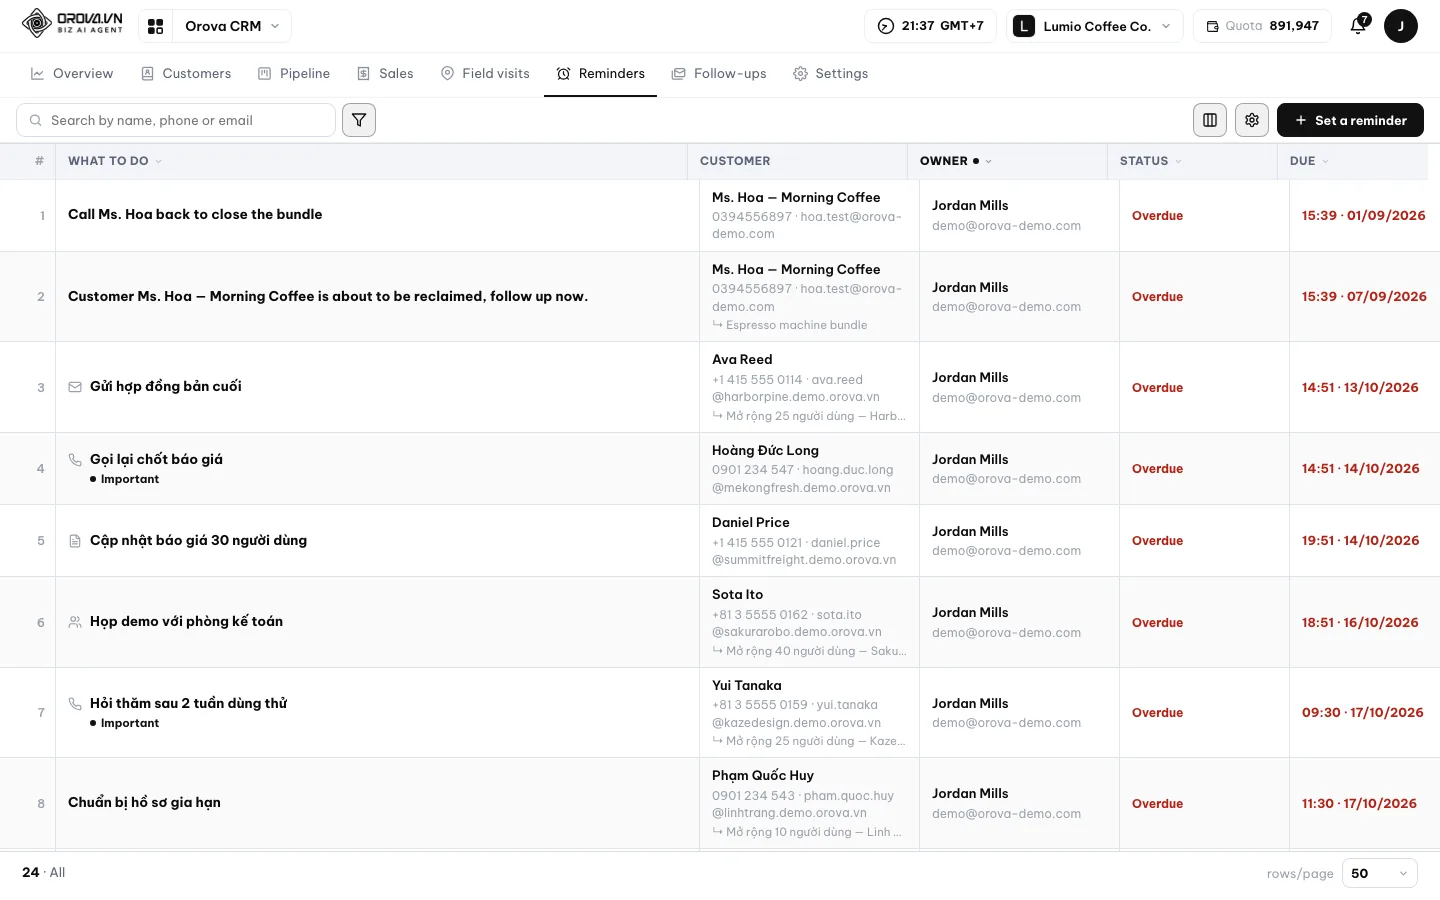
Overdue, today and upcoming tasks in one table. - 2
Set a new reminder. Click
Set a reminder. Pick a customer and typeWhat to do, for example “Call back about the quote”. Pick a time or click a quick button such asTomorrow 9 AM. Pick theTask type,Priority,Assigned toandRemind before, then clickSave.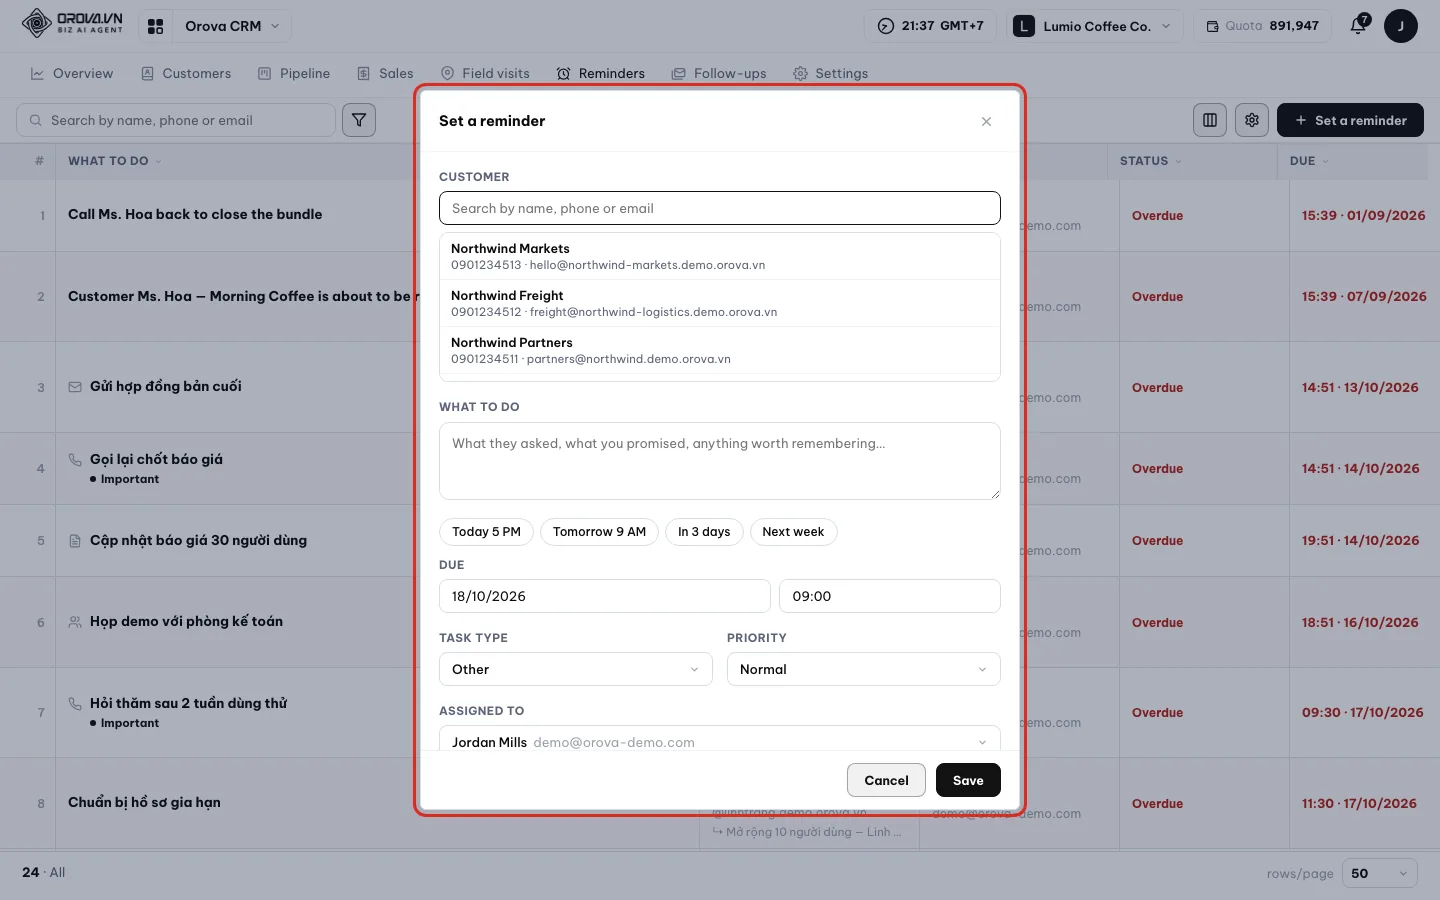
A reminder has a customer, a task, a time and an assignee. - 3
Filter the tasks you need. Click
Filter. TheFilter remindersbox hasType,Priority,Ownerand due date options such asNext 7 days. ClickApply. Save the filter with a name, for example “My overdue tasks”.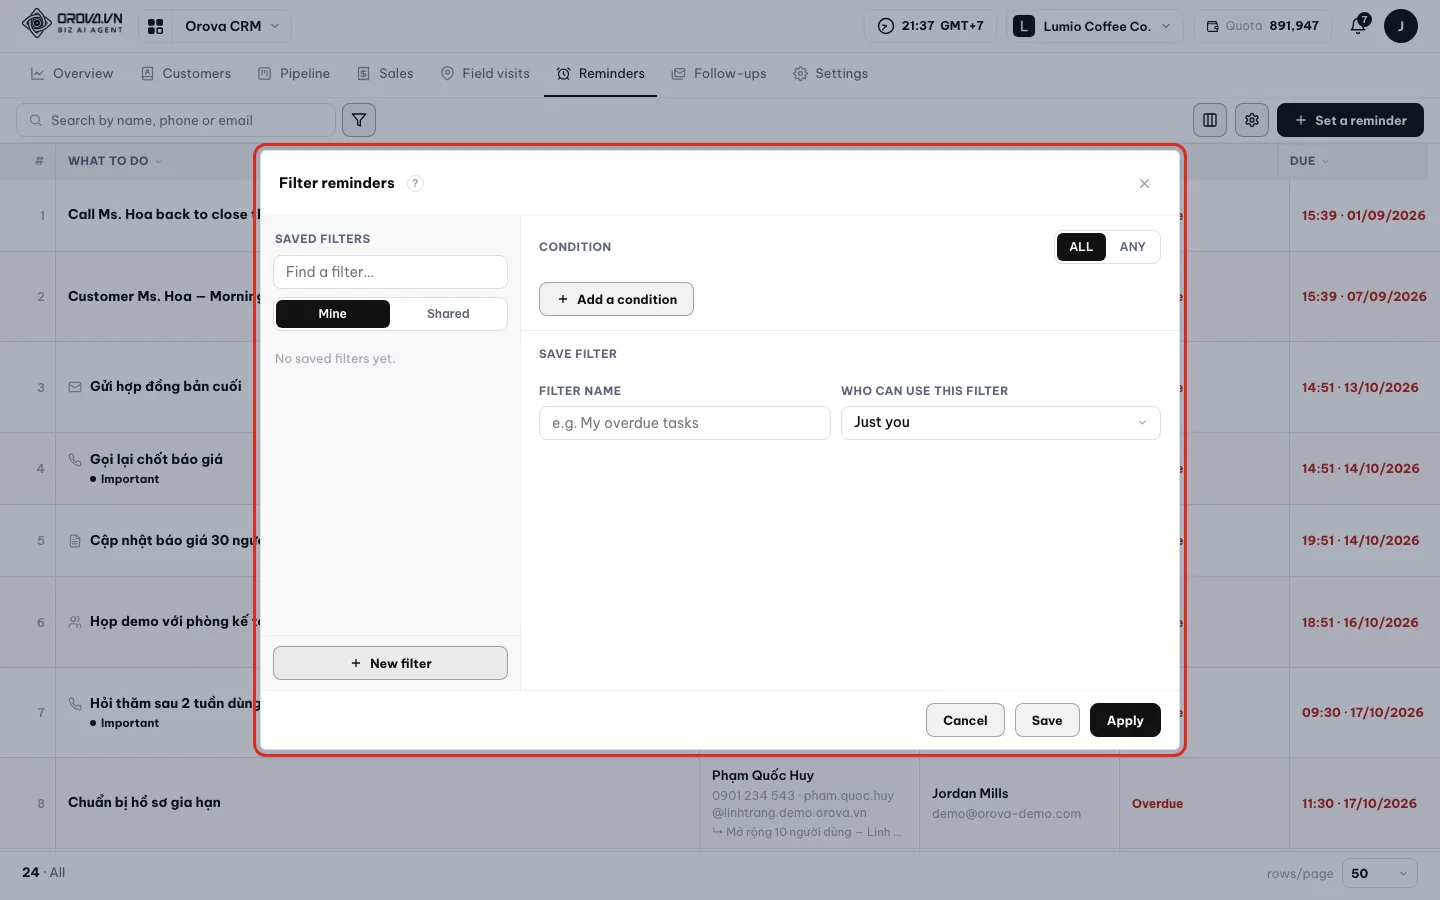
Save filters you use often to reopen them fast. - 4
Mark tasks done when finished. Click
Mark as doneon the row. The task moves to theDonetab. To handle several tasks, tick several rows and a bulk bar appears withDone,Reopen,Delete.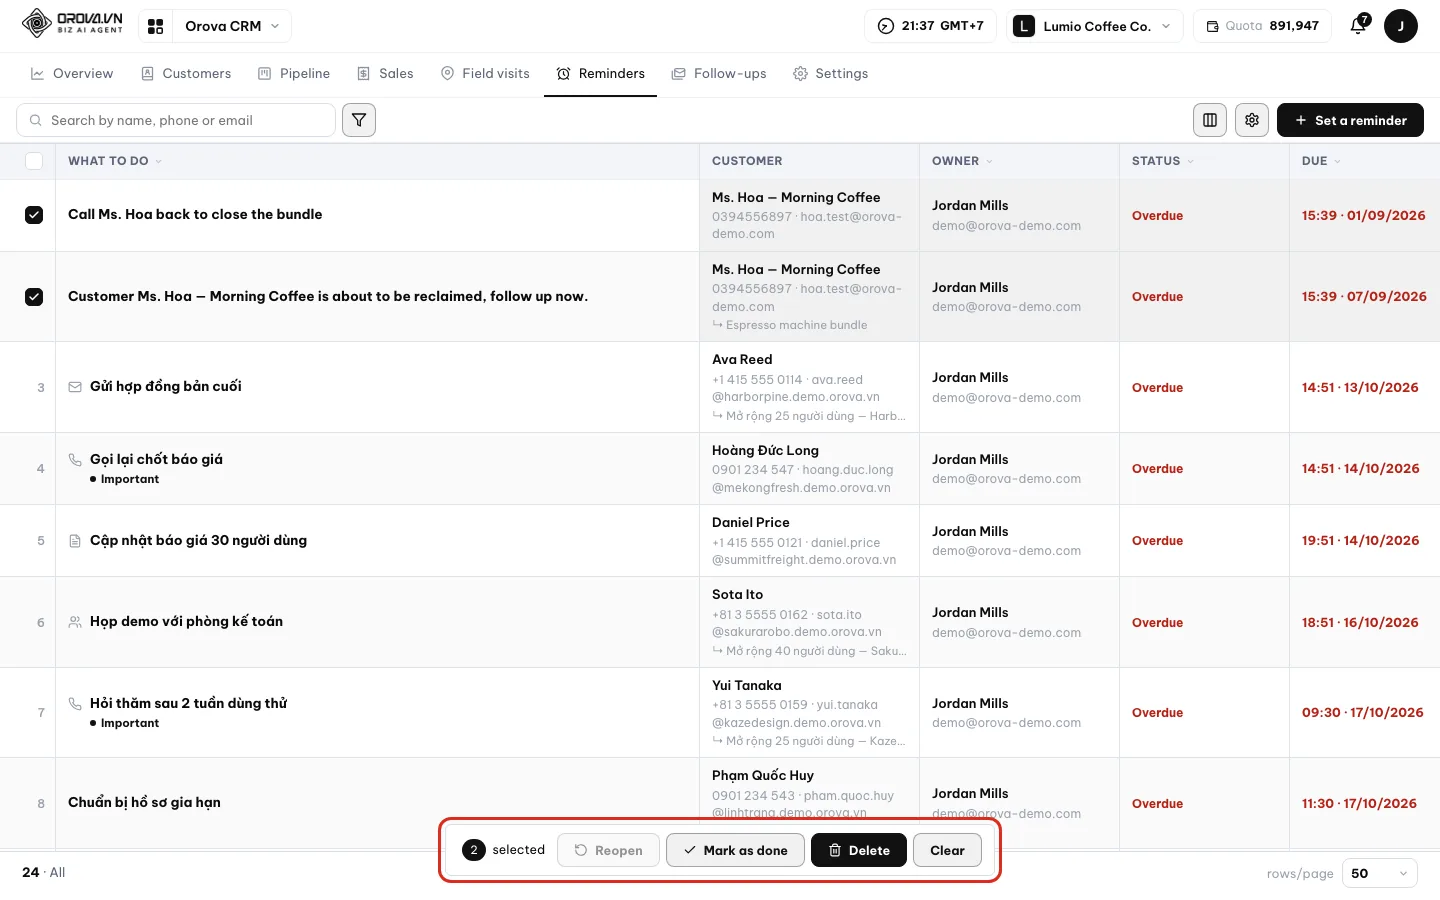
Handle many reminders at once. - 5
Turn on push notifications and pick a sound. Click
Reminder settings. UnderPush notifications on this device, clickTurn on notificationsand allow it in your browser. Pick aSound when a task is dueand clickPreview. You can upload a sound file of your own.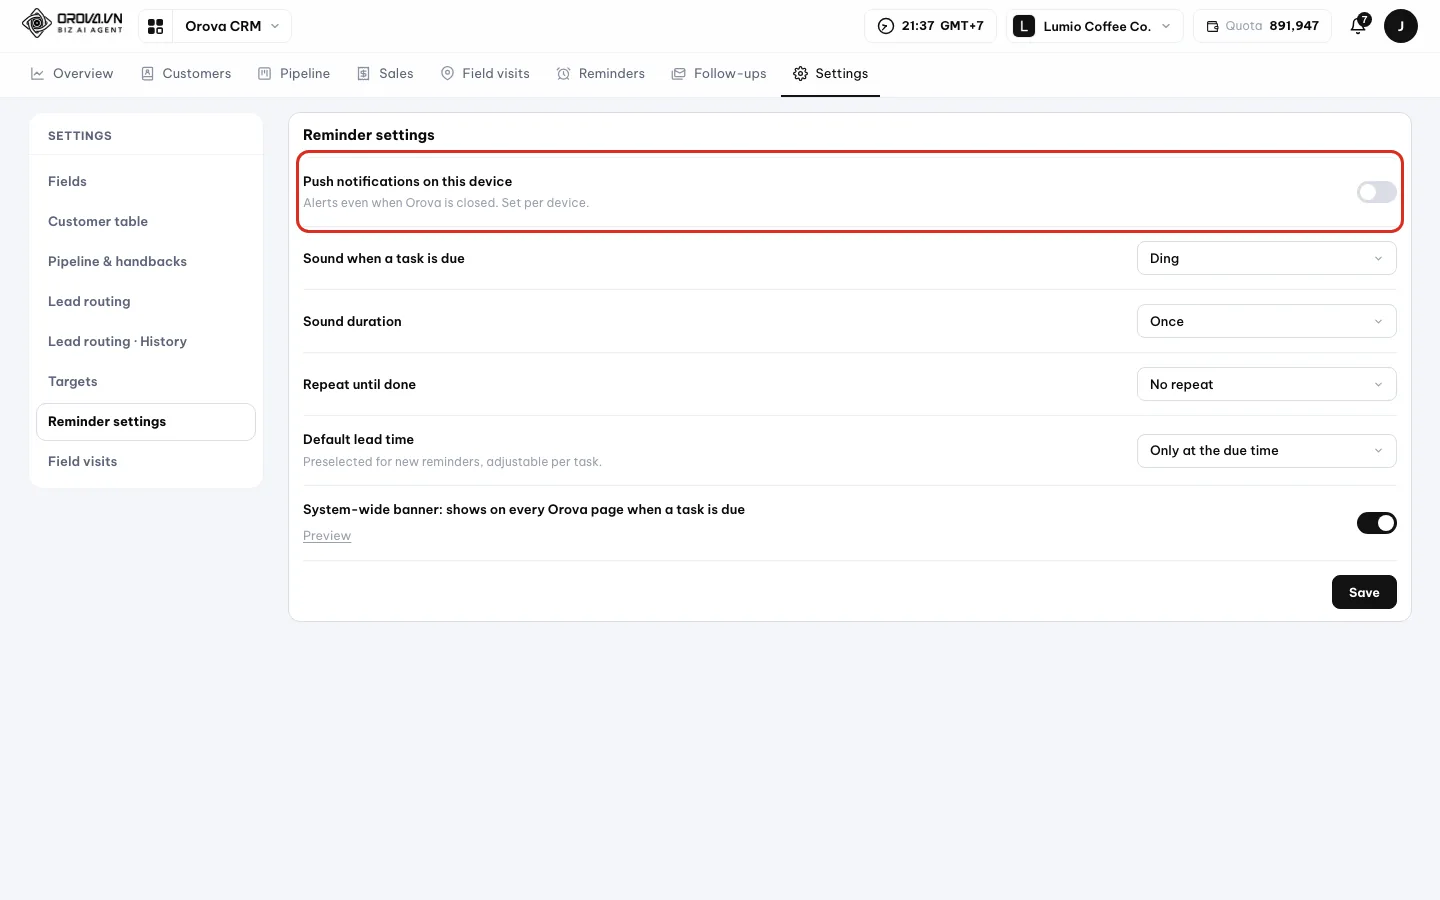
Each device turns on push notifications separately. - 6
Snooze when you are not ready. When the notification shows, click
Snooze 5 minutesor10 minutes. You see “Will remind again in {n} minutes”. The task's due time stays the same.
Warning
Deleting reminders cannot be undone
Delete in the bulk bar asks “Delete {n} selected tasks? This cannot be undone.” You need the Delete customers, deals, orders permission.Note
Reminders the system creates
17 · Follow-ups
Follow up with customers using email series
A follow-up series sends several emails on a schedule to customers who match a condition. The emails go out for real through the mailbox you connected in Orova Connect.
Follow-up series
A set of emails sent on a schedule, for example a hello on day 1, materials on day 3 and a meeting invite on day 7. If a customer stops matching the condition, unsent emails are cancelled.
Trigger
The condition that puts a customer into the series automatically. For example a new customer, a customer entering a pipeline stage, or a customer with a tag.
Connect mailbox and test mode
A series only sends for real when you pick a mailbox connected in Orova Connect. With no mailbox, it is in test mode and sends nothing.
Unsubscribe
The customer clicked to stop receiving email. Every profile with the same email gets Email opt-out, and series skip them automatically.
Click the Follow-ups tab. The list shows every series with sent, opened, clicked and replied numbers. Click a series name to edit it.
| Button / field | What it does | Notes |
|---|---|---|
New email series | Create a new series | Creates it with a default name, then opens the series page |
| Period | Pick the time range for the numbers | Default 30 days |
Mailbox | Filter by sending mailbox | Leave empty for all mailboxes |
Status | Running or Paused | — |
Enroll customers when | The condition for joining the series | New customer, new lead, enters a stage, has a tag, matches a filter |
Sending mailbox | The Connect mailbox used to send | None picked means “Test mode — nothing is sent” |
Add step | Add one email to the series | Pick the wait time and the email template |
Rewrite with AI (star icon on the editor toolbar) | AI rewrites the passage you are drafting | Uses quota |
View history | See sent emails | Opens the Follow-ups tab in Orova Connect |
Build an email series
- 1
Read the series list. The table has columns such as
Trigger,Steps,Sent,Opened,Clicked,Replied,Unsubscribed,Bounced. Hover over a column name to read the explanation. ClickColumns to showto hide some columns.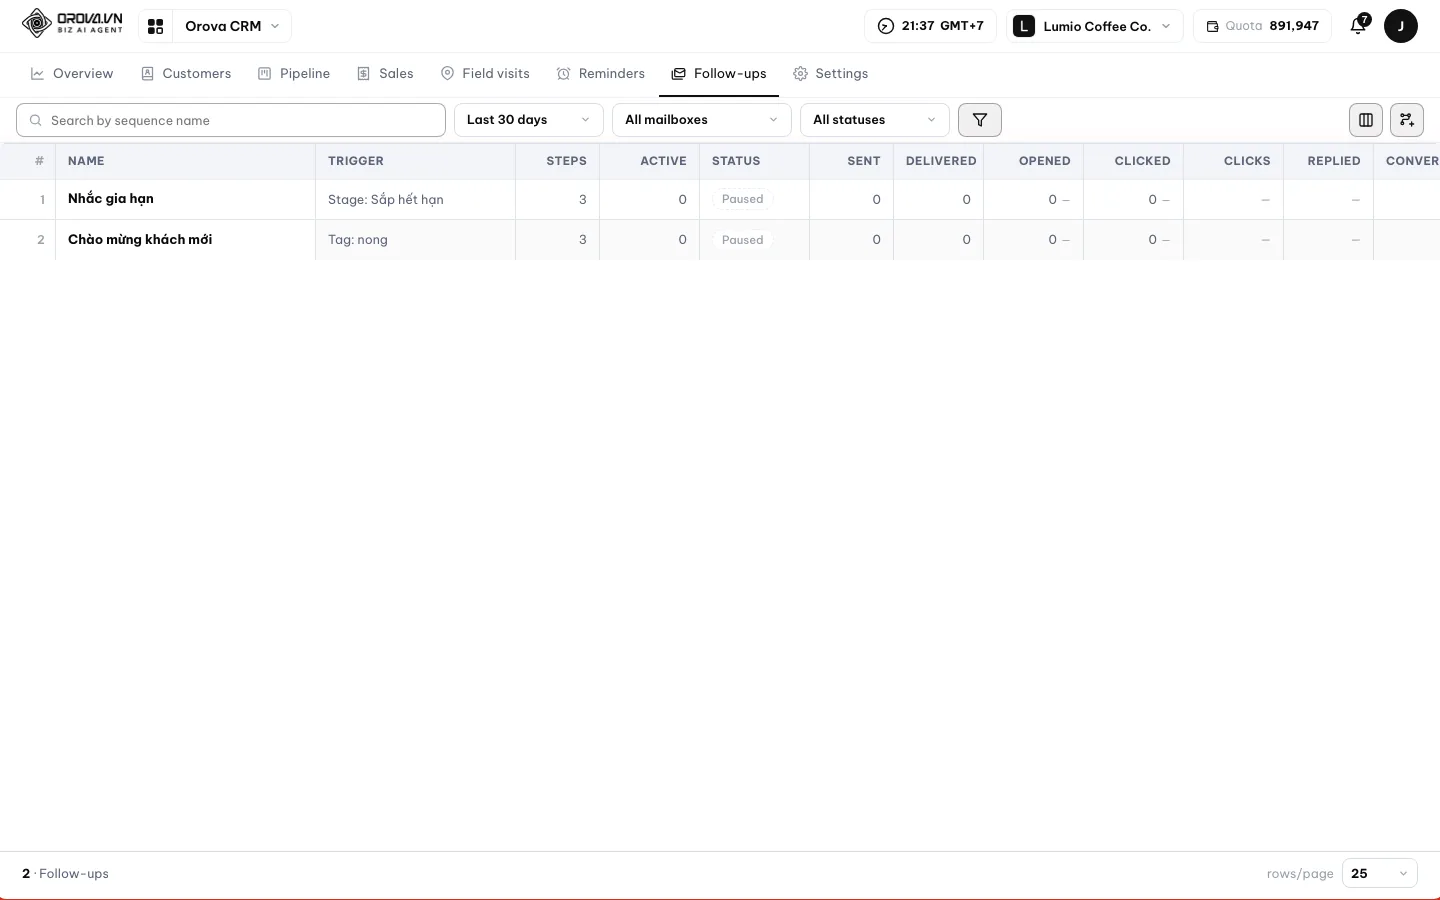
Same numbers as the Follow-ups tab in Orova Connect. - 2
Filter by period, mailbox and status. Pick a period, for example
This month. The list keeps only series created in, or with emails in, that period. Pick aMailboxandStatusto narrow it further.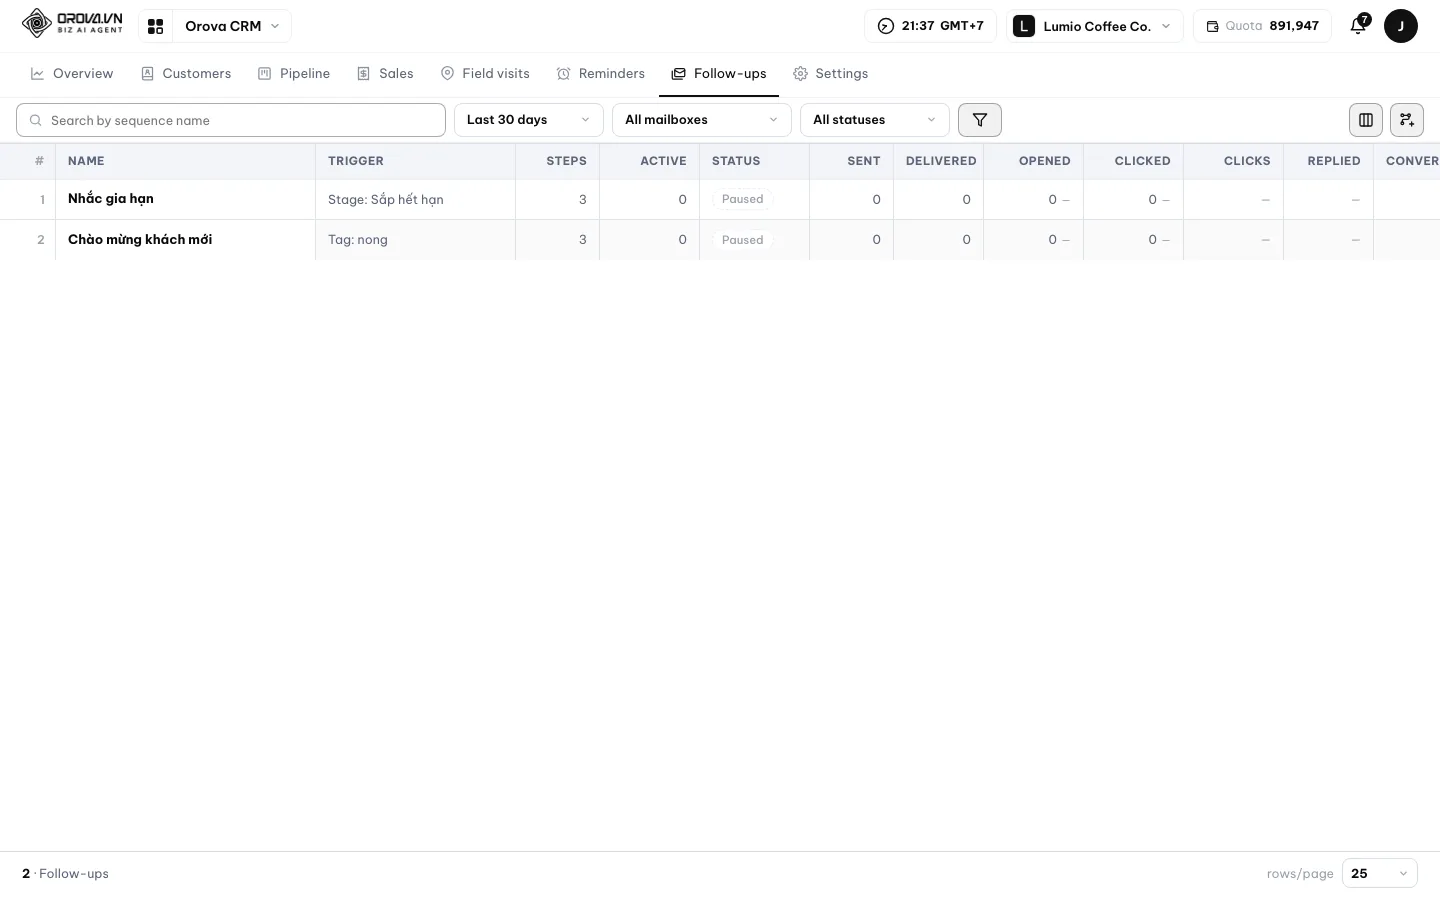
Numbers are counted within the period you pick. - 3
Create a series and pick the trigger. Click
New email series. The series page opens; click the name to change it. UnderEnroll customers when, pick for exampleCustomer enters stageorCustomer has tag. PickCustomer matches filterto build a filter or pick a saved one.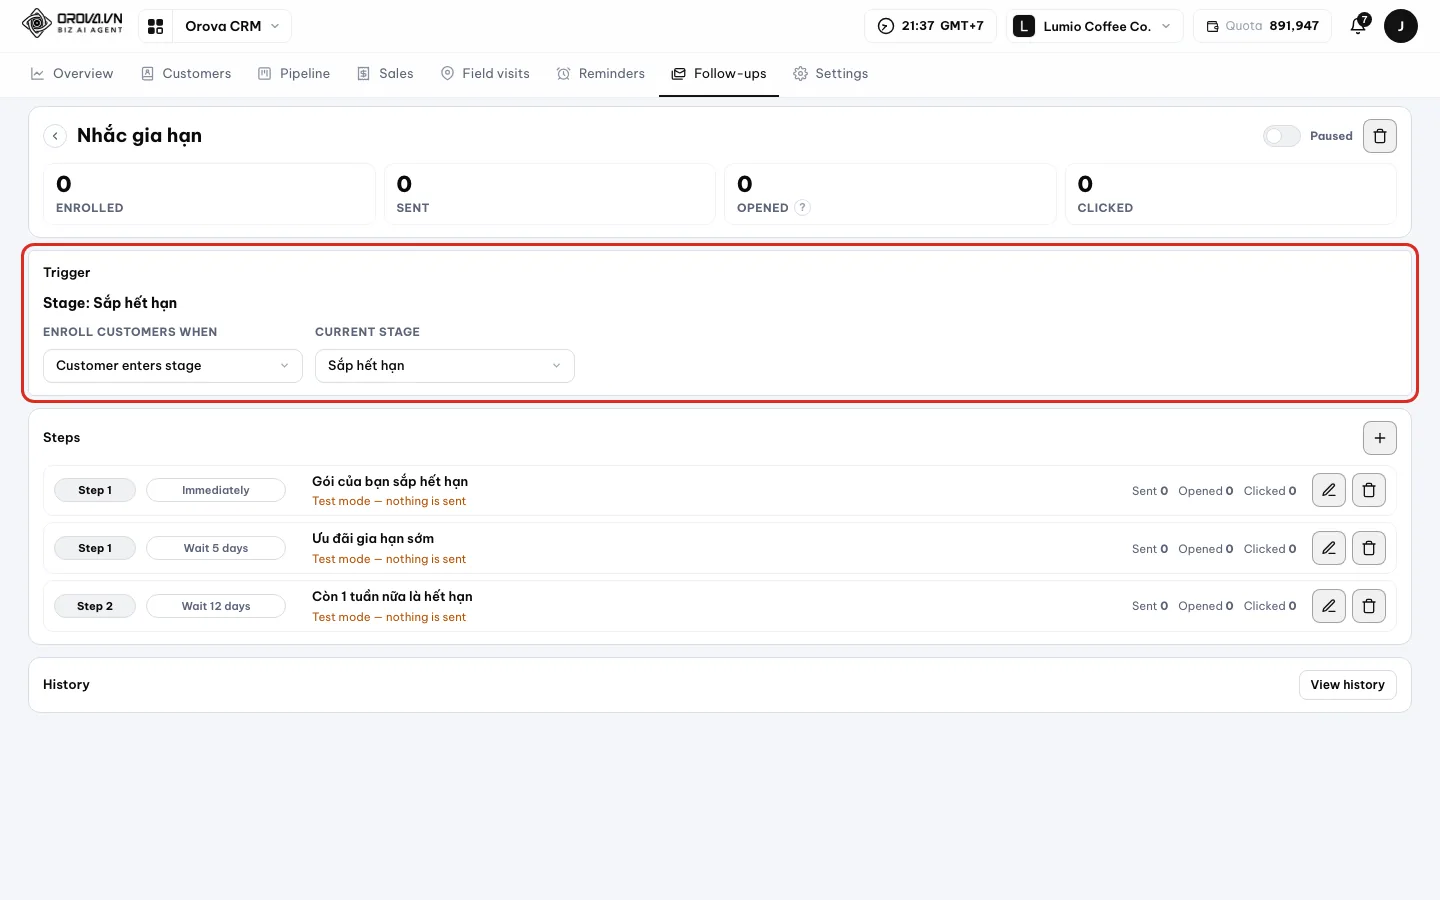
Matching customers join the series automatically. - 4
Pick the sending mailbox. Under
Sending mailbox, pick a mailbox connected in Orova Connect. You see “Sent via {mailbox name}”. Leave it empty and the series stays in “Test mode — nothing is sent”.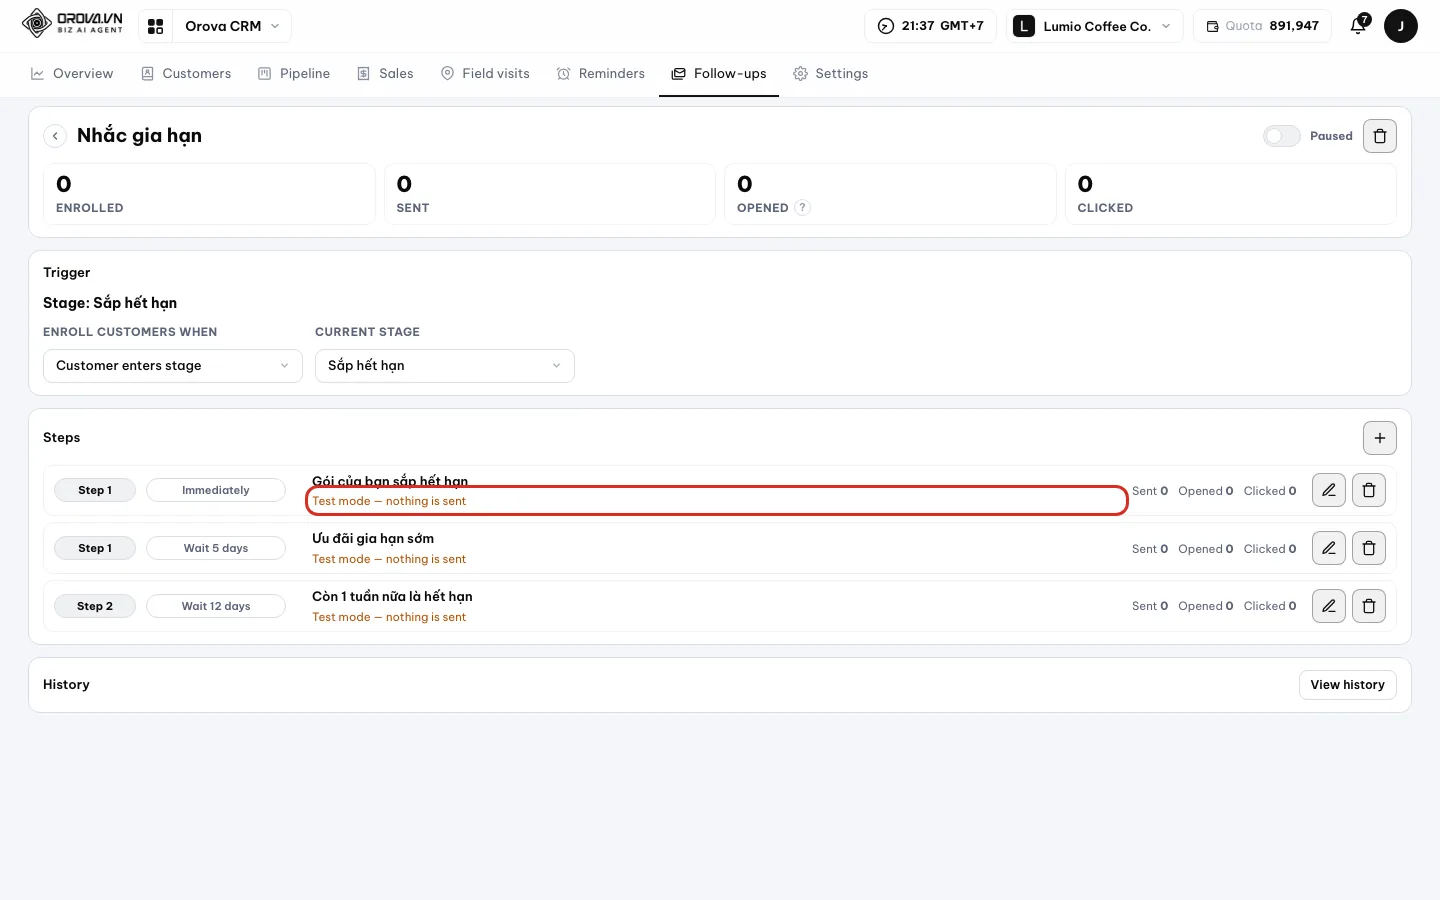
No mailbox picked means no email is sent. - 5
Add each email step. Click
Add step. Pick the wait time: after a number of minutes, hours or days, or a specific date and time. Pick one ofYour templatesor a system template underEmail template. Edit the subject and body.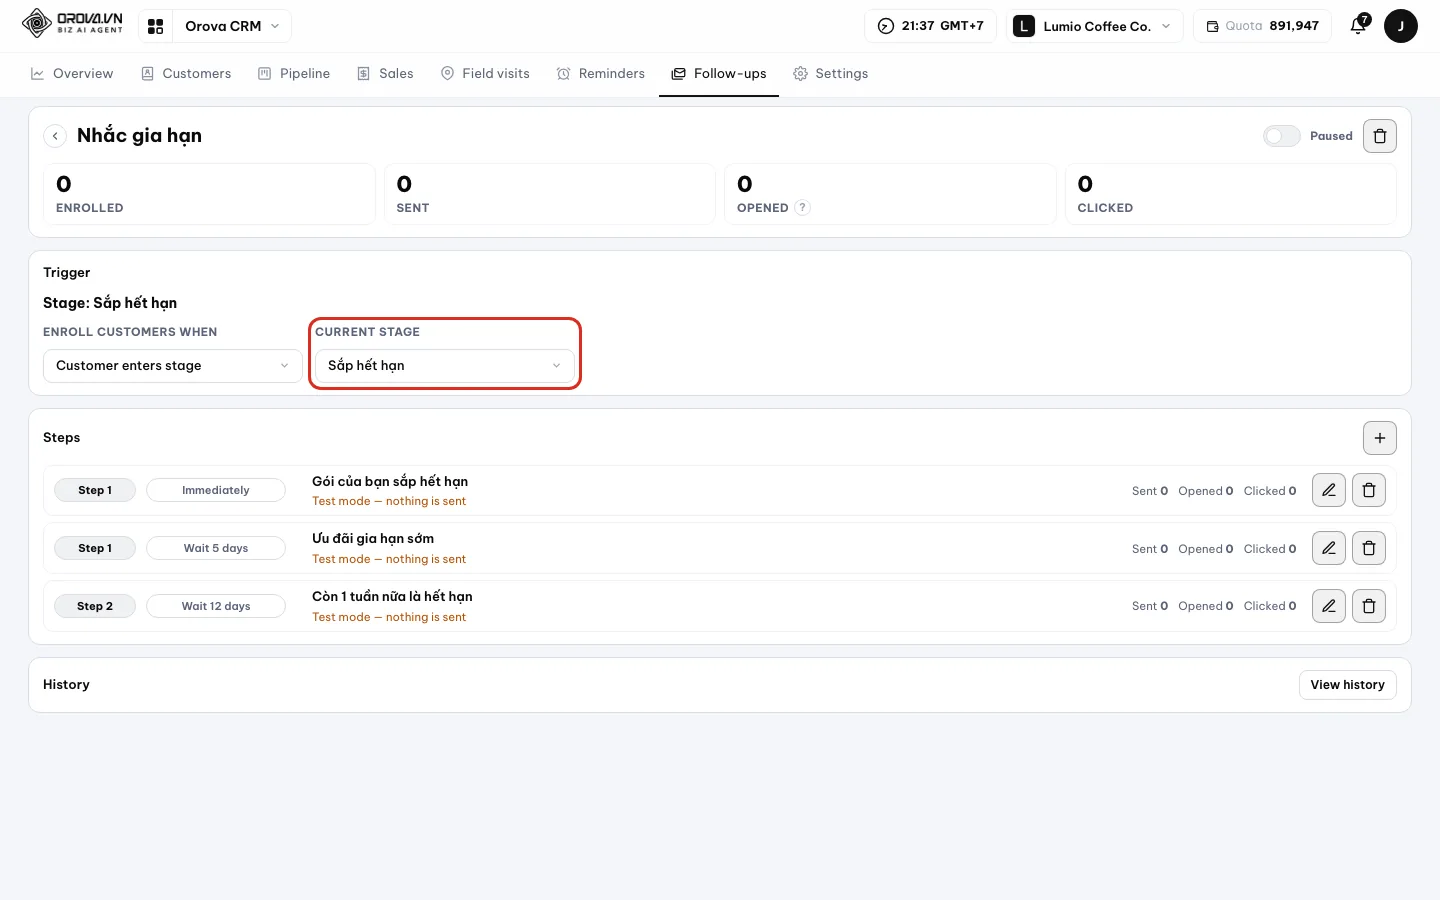
Each step is an email sent after a wait. - 6
Let AI write the email if you like. Open
Edit step, draft a few lines in the email box, then click the star buttonRewrite with AIon the editor toolbar. AI rewrites that passage and this uses quota. Read and adjust it before turning the sequence on.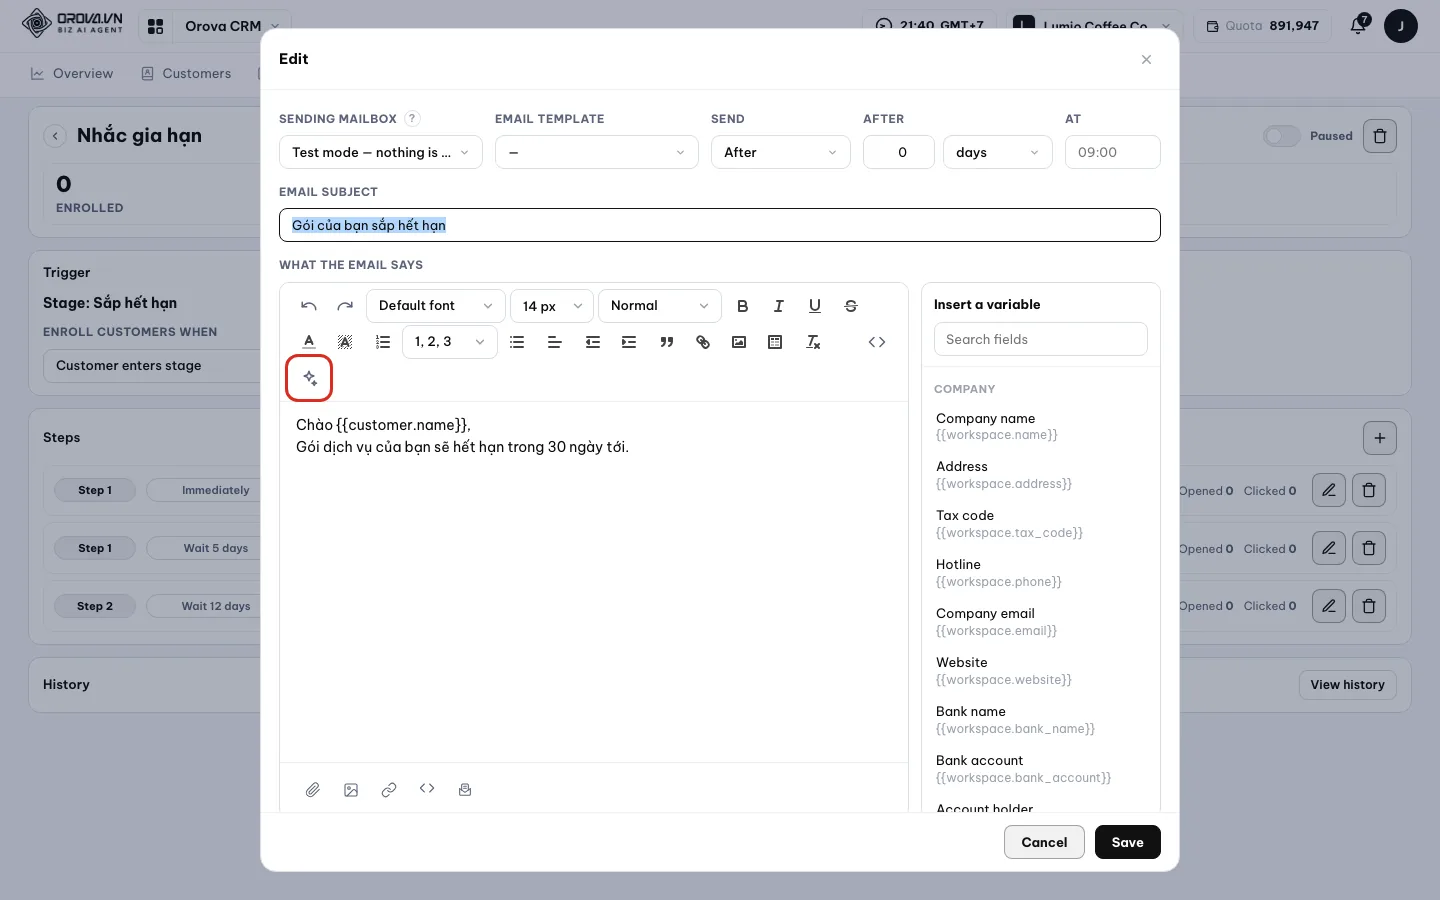
Rewrite with AI sits on the editor toolbar; each click uses quota. - 7
See sent emails. Click
View history. Orova opens the Follow-ups tab in Orova Connect, filtered to this series. Sending history lives in Connect, not in CRM.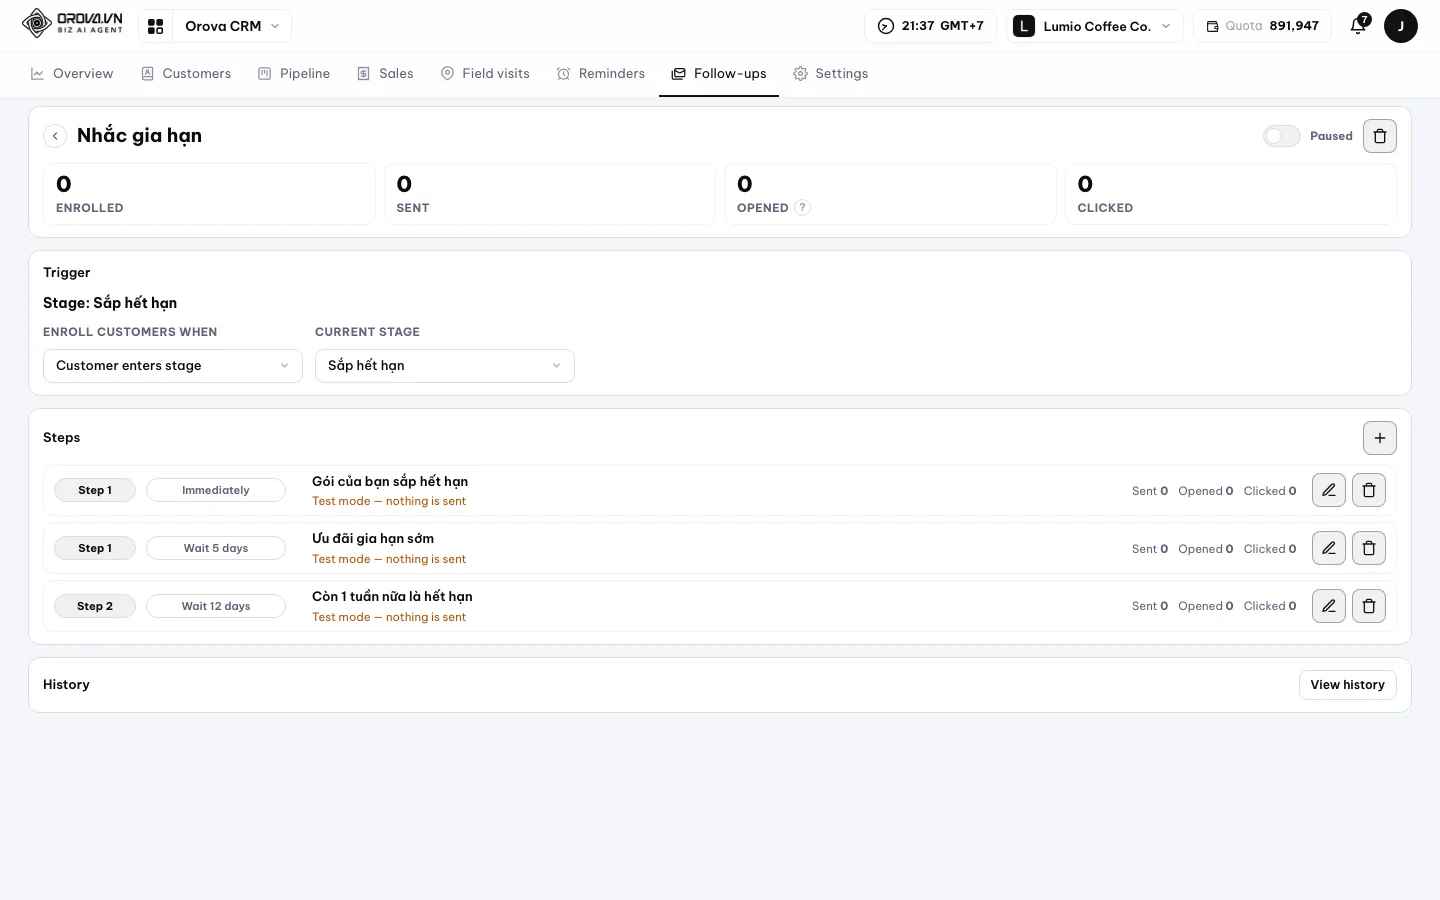
See each email's history in Orova Connect.
Warning
Picking a mailbox means real sending
Running. Sent emails cannot be pulled back.Warning
Deleting a series
More actions ▸ Delete sequence. The system asks “Delete sequence “{ten}”? Pending emails will be cancelled.” Once deleted, it cannot be recovered.Note
Customers who unsubscribe
Skipped (unsubscribed). Every profile with the same email gets Email opt-out, and no series sends to them again.18 · Settings
CRM settings for the whole workspace
Settings decide how the whole company's CRM looks and works: which fields exist, how the table looks, who gets new customers.
Field
One column of customer data, for example Industry or Size. There are default fields and fields you add yourself, from 22 types.
Lead routing
Rules that hand new customers to the right group or person automatically. Share them out by taking turns, evenly, or by ratio.
Shared pool
Where customers with no one in charge, or customers taken back, are kept.
Handback
A customer who stays in a pipeline stage past the deadline with no follow-up goes back to the shared pool automatically. The deadline is set per stage.
Click the Settings tab. It only shows when you have the CRM settings permission. The side menu on the left has eight areas.
| Area | Used for | Who sees it |
|---|---|---|
Fields | Add, edit and hide customer data fields | People with the CRM settings permission |
Customer table | Excel-style table formatting | People with the CRM settings permission |
Pipeline & handbacks | Stages, chance of closing, handback deadlines, working hours | People with the CRM settings permission |
Lead routing | Groups and rules for sharing out new customers | Owners and admins |
Lead routing · History | See who got which customer and when | Owners and admins |
Targets | Set revenue targets | Owners and admins |
Reminder settings | Sound and push notifications | Each person's own |
Field visits | Suggestions for customers not visited in a while | Owners and admins |
Add a field
- 1
Pick the field type. Go to
Fieldsand clickAdd a field. Pick one of the 22 types, for examplePick one,Money,Date,Staff (multiple).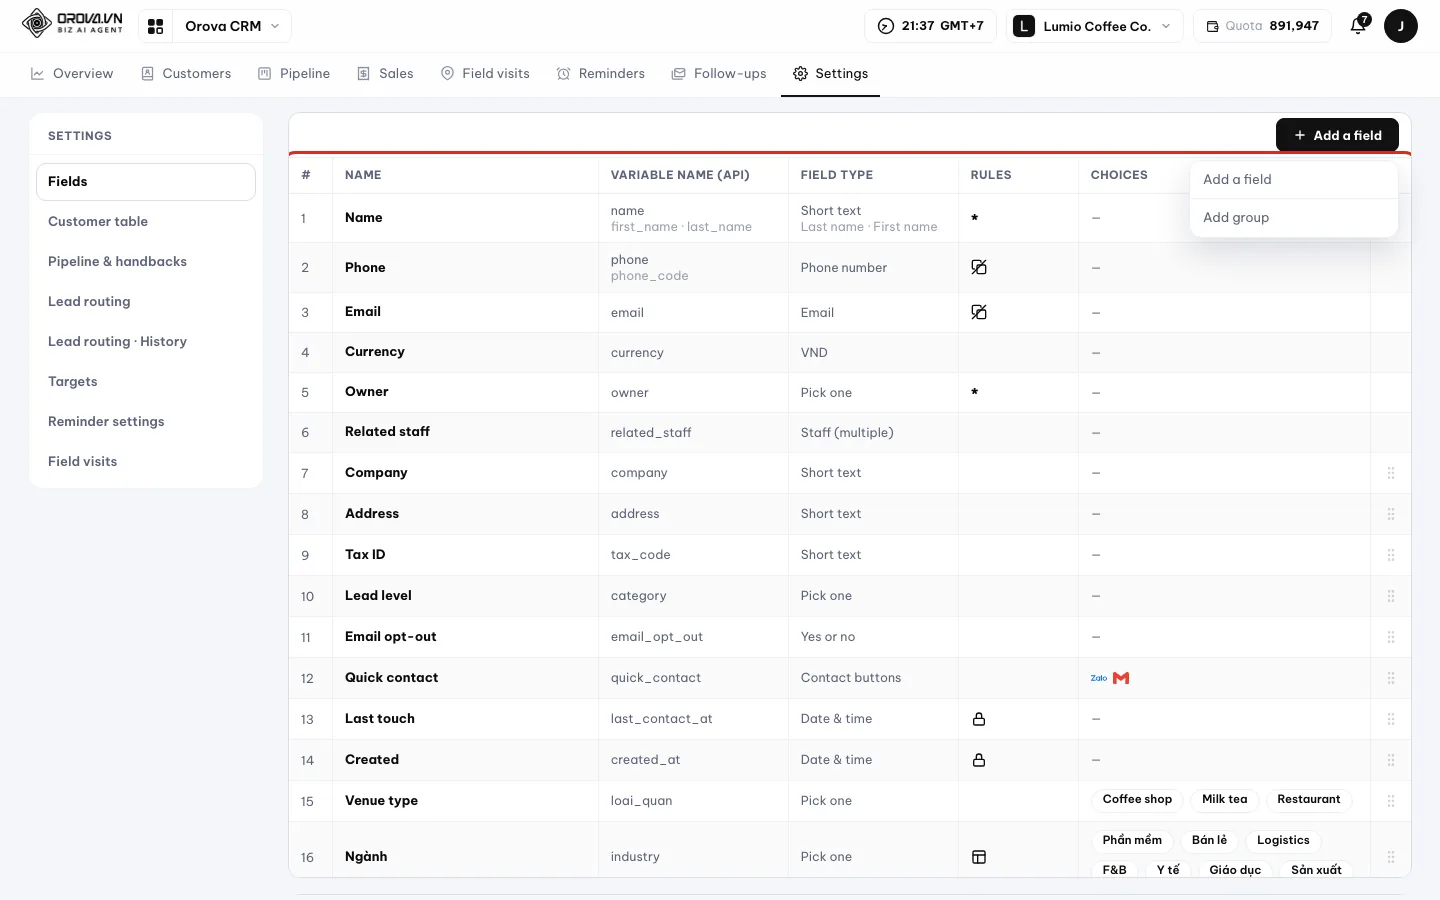
Each field type has its own input. - 2
Set the field's rules. Under
Rules, tick what you need:Must be filled in when adding a customer,No two customers may share a value,Show it as a column in the customer book,Managers only. Hover over the ? mark to read the explanation. - 3
Group fields and set their order. Pick a
Field groupto group fields on the customer form. Drag rows to reorder them. Default fields such as Name, Phone, Email can be renamed or hidden.
Format the customer table
- 1
Pick a preset, then adjust. Go to
Customer table. Pick one of thePresets. AdjustHorizontal lines,Vertical lines,Alternating row colors,Text size,Bold header row. The preview changes right away. Once saved, it applies to the table for the whole workspace.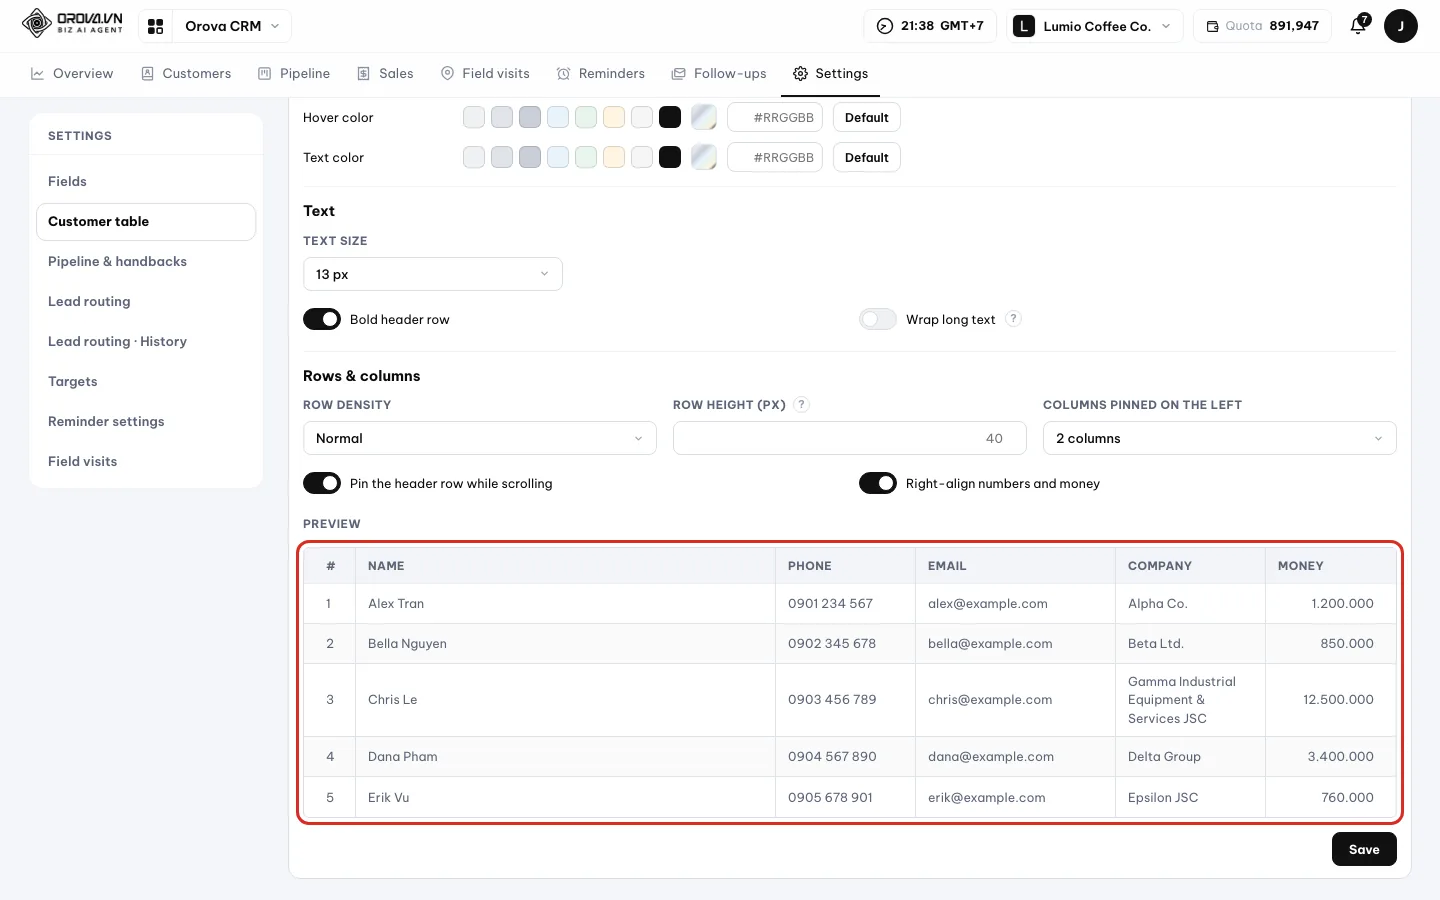
Format the table like Excel.
Share out new customers with Lead routing
- 1
Create a routing group. Go to
Lead routing, click the floating button and pickAdd group. Fill in theGroup name. Take members from a department or pick them by hand. PickHow to share out:Take turns,EvenlyorBy ratio. Turn the group on.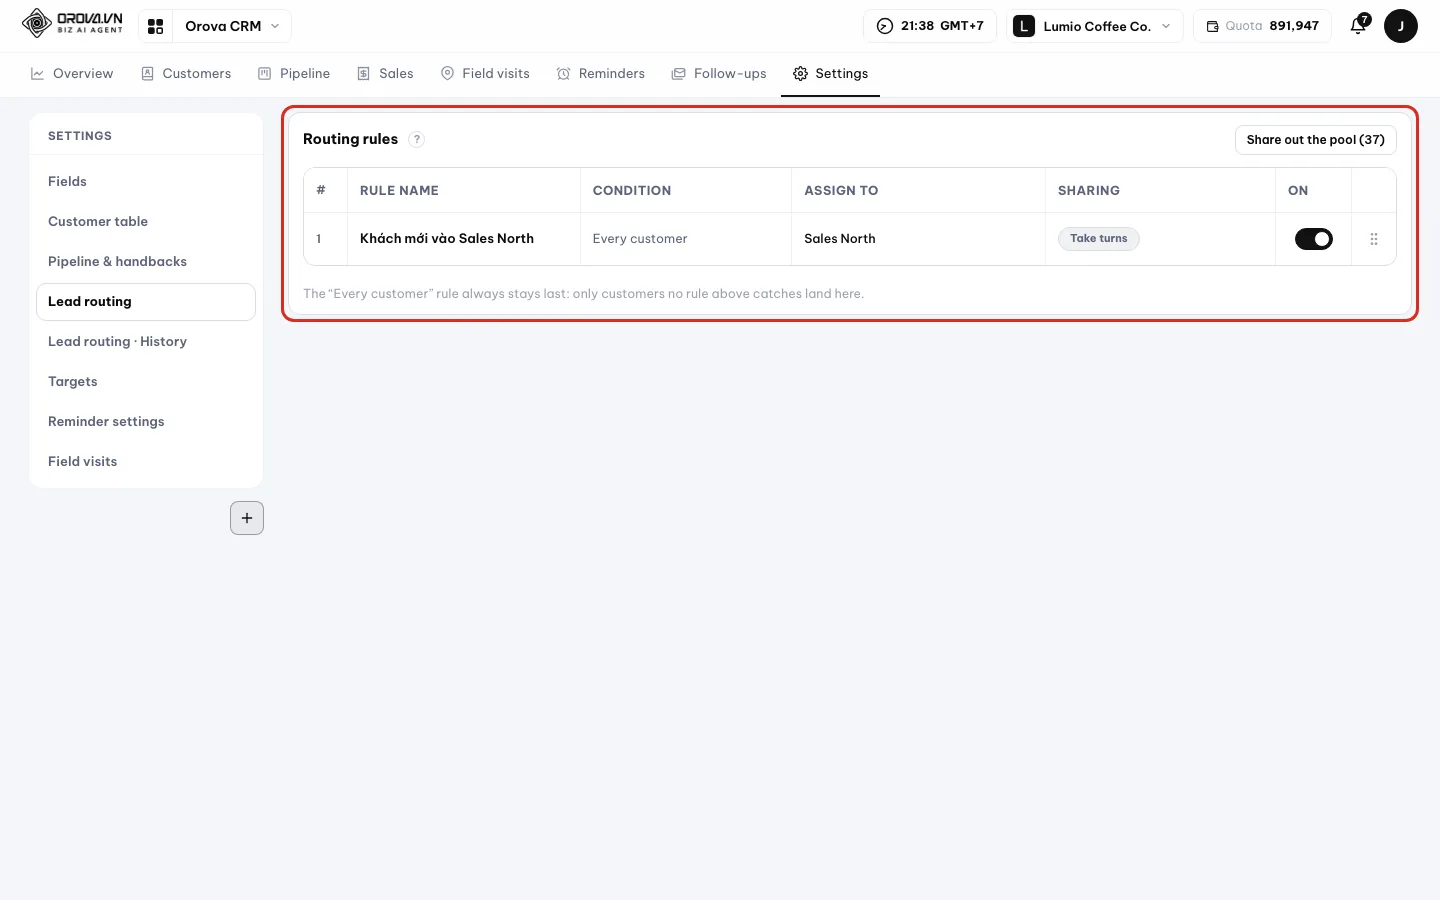
Groups and rules decide who gets new customers. - 2
Add a routing rule. Pick
Add rule. Fill inRule name,Condition,Assign to. New customers go through the rules from top to bottom. TheAll customersrule always sits last to catch everyone left. - 3
Share out customers in the shared pool. Click
Share out the poolto run the rules on customers with no one in charge. See the results inLead routing · History, with Customer, Assigned to, Rule and Method columns.
Note
Pipelines and working hours
Pipeline & handbacks sets stages, Chance of closing and handback deadlines in minutes. Turn on Count working hours only so deadlines only count during that pipeline's working hours.Note
Company profile and currency live in Workspace settings
Currency code for the whole CRM field is read-only; change it in Workspace settings.19 · Permissions
CRM permissions: who can do what and see which customers
CRM permissions live in the workspace's permission groups. Each group has two permission sections and one customer scope.
Permission group
A bundle of permissions given to many members. CRM has 8 permissions, split into two sections: Access & actions and Sensitive actions.
View scope and Edit scope
The customers a person can see and can edit. The edit scope always sits inside the view scope.
Custom scope
A scope set for one person that overrides the group's scope. Use it when someone needs to see more or less than the rest of the group.
Go to Workspace settings ▸ Permissions and open a group. Scroll to the CRM card. The Select all / Clear all buttons only change permission boxes, not the scope.
| Permission | Lets you | Notes |
|---|---|---|
View CRM | Open Overview, Customers, Pipeline, Sales, Field visits, Reminders, Follow-ups | Only sees customers in the View scope |
Add & edit customer data | Create and edit customers, deals, orders, quotes, reminders, series | Only for customers in the Edit scope |
Import customers from Excel | Add customers in bulk from a file | — |
Export to Excel | Download customers, orders, products to Excel | Data leaves the system |
CRM settings | Change fields, table, pipelines, lead routing, targets, field visits | Applies to the whole workspace |
Take back or reassign customers | Take back customers in your branch and hand them to someone else | Sensitive actions section |
Remove customer from a pipeline | Unticking a pipeline deletes the open deal there | Sensitive actions section |
Delete customers, deals, orders | Permanently delete records | Sensitive actions section, cannot be restored |
Set permissions and scope for a group
- 1
Tick permissions for the group. On the CRM card, in
Access & actions, tick the permissions needed, for exampleView CRM,Add & edit customer data. Only tickSensitive actionsfor people you trust.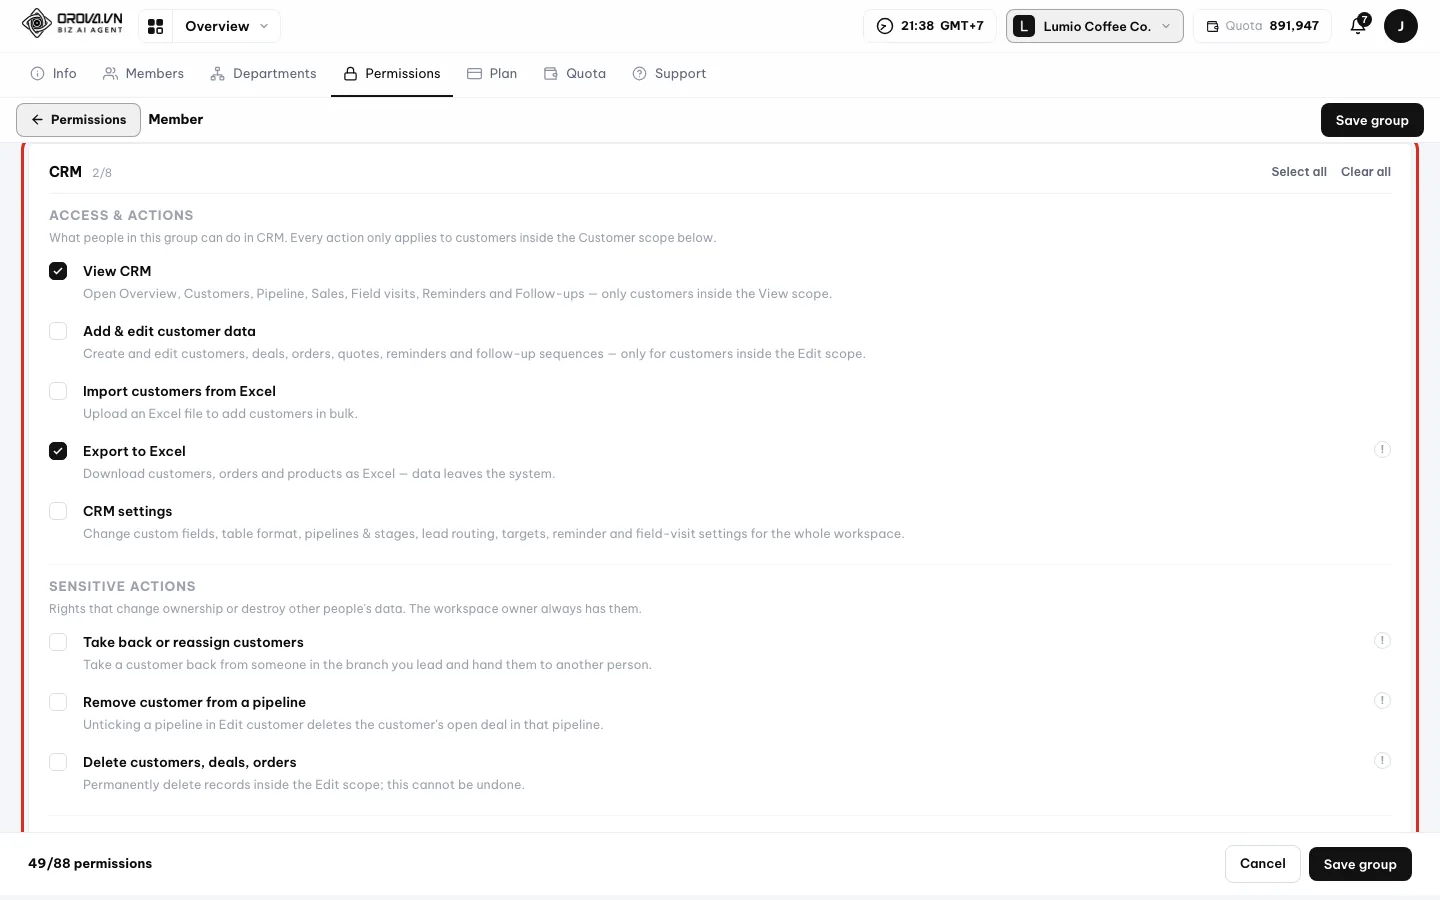
The three sections of the CRM card in a permission group. - 2
Turn on a custom scope. In
Customer scope, turn on the customize switch. When off, the group follows the default rule: their own customers plus the branch they lead. - 3
Pick the view and edit scope. In each column, tick:
Their own customers,Department/team heads automatically get their whole branch,Shared pool, departments including sub-units,Specific people,Field filters. A customer matching any item is in scope. - 4
Copy view to edit, then save. Click
Copy View → Editif both scopes are the same. Untick some items in the edit column if needed. Save the group. - 5
Set a custom scope for one person. Go to the Members tab and click
Custom scopefor that person. Turn on “Override the scope for this person”, pick the scope and save.
| Group | CRM permissions | Notes |
|---|---|---|
| Administrator | All permissions | Admins always see and edit every customer |
| Marketing | All permissions except Remove customer from a pipeline | — |
| Member | View CRM | Add permissions if they need to edit customers |
Warning
Two warnings when saving
Note
A custom scope overrides the group scope
20 · FAQ
Frequently asked questions and fixes
The most common error messages and questions in Orova CRM, with the cause and how to fix it.
Most cases here come down to permissions and scope. If you cannot see a button or a customer, check your permission group first.
Adding a customer says “This phone number or email is already in the book”
This customer already has a profile; Orova checks for duplicates by phone and email. Merge into the existing profile or open it to edit.
Excel import says “This file could not be read”
The file has the wrong format or is missing columns. Download the template again, keep the header row as is and paste your data in. If the file has more than 5,000 rows, split it.
A filter says a condition can no longer be used
The field in that condition was deleted or its type changed. Open the filter, remove that condition and add it again with the new field.
An image or file upload is rejected
Profile pictures are up to 4 MB, attachments up to 10 MB. Executable files such as .exe are always blocked. Compress the file or change its format, then upload again.
Sending a quote says “No mailbox connected”
CRM sends email through Orova Connect mailboxes. Go to Orova Connect ▸ Email to connect your company mailbox, then send again.
I cannot change an order's currency
Once an order has line items or payments, its currency cannot be changed. Create a new order with the right currency.
Totals mix several currencies
Orova does not convert exchange rates. Each currency is added up separately.
I cannot see “The whole team” or the Person by person table
Both are only for the workspace owner and admins. Ask the workspace owner for an admin role if you need to see team-wide numbers.
The Person by person table is empty
No one has a target in the period you are viewing. Click Set targets or go to Settings ▸ Targets to set them. A level of 0 counts as no target.
The target on Overview differs from the number I typed
Overview scales targets by the number of days in the period you are viewing. A monthly target viewed over 7 days only takes the share for those 7 days.
I cannot see the Settings tab, or Targets, Lead routing, Field visits are missing
The Settings tab needs the CRM settings permission. Those three areas are only for owners and admins. Typing the address directly also sends you to the first area; it is not a broken link.
Field visits says “The map is not set up yet”
The system has no map key yet; this is not your mistake. The check-in list below still works as usual.
A check-in has no location
Your device or browser is blocking location access. The visit is still recorded, just without coordinates. Allow location for the site so next time includes coordinates.
I cannot edit a colleague's route
The system says “This is someone else's route, so you can only view it”. Each person edits their own route.
No reminder notification arrived on time
You have not turned on push notifications on this device, or the browser is blocking them. Go to Reminder settings and click Turn on notifications. If blocked, allow them again in your browser settings.
A follow-up series sends no emails
There are three causes. The series has no Sending mailbox, so it is in test mode. The series is Paused. Or the customer has unsubscribed.
I cannot see a colleague's customers
That customer is outside the View scope of your permission group. Ask an admin to add that department or person to your scope.
Where do I change the currency
In Workspace settings, not in CRM. If none is set, CRM uses USD.
/ Need help?
Can't find what you need? Open the Support section in your workspace, or send us a message.