/ Orova Ads guide
Using Orova Ads
step by step.
A walkthrough of every screen in Orova Ads — and every action you can take on it — with screenshots from a sample workspace.
Orova Ads lives inside a workspace — the shared space where your team and your work sit. After you sign in and open a workspace, the Ads module has eight areas, listed down the left sidebar. This guide goes through each one in order and explains what every button and action does. The fastest path for a new account is: create a project, connect an ad account, switch AI on for a campaign, then review the recommendations.
01 · Overview
The Overview dashboard
Overview is the first screen inside an Ads workspace. It is a status board — it changes nothing by itself; it shows where your advertising stands across every connected platform and points you to the next useful action.
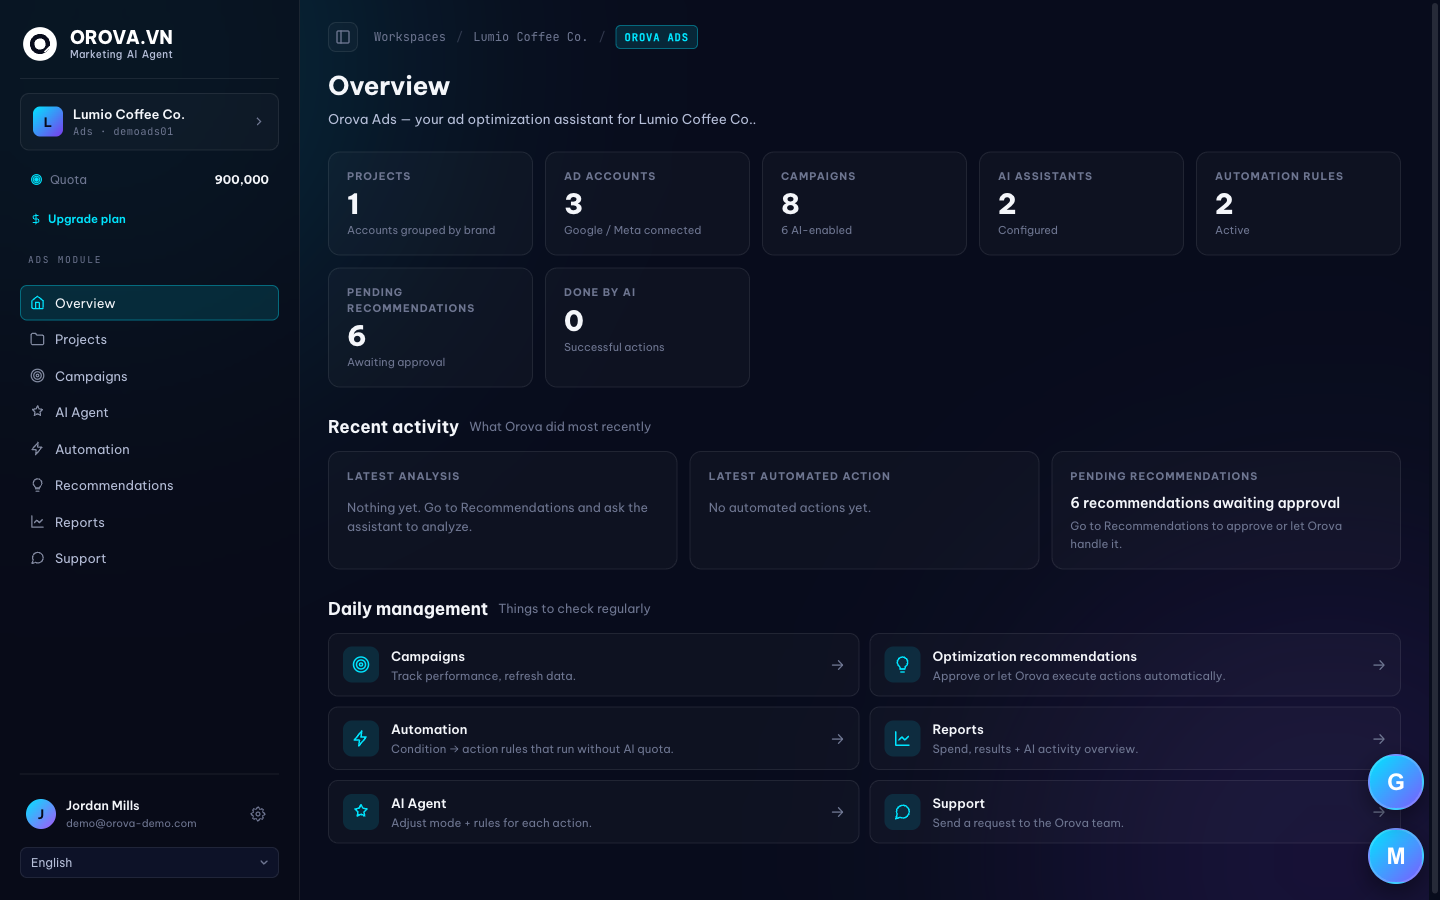
What you can do here
- 1
Read the stat cards. Projects, Ad accounts, Campaigns, AI assistants, Automation rules, Pending recommendations and Done by AI each show a live number. Every card is also a shortcut — click it to jump to that section.
- 2
Check the Quota counter. Near the top of the sidebar, Quota shows the credit left in this workspace. Every AI analysis or chat spends quota; automation rules do not. Click it to open the wallet.
- 3
Scan Recent activity. The three cards show the last analysis, the last automated action, and how many recommendations are waiting — each links straight to the matching screen.
- 4
Use Daily management. These shortcut tiles cover the routine jobs — review campaigns, approve recommendations, set automation, adjust the AI Agent — so you always know what to check next.
- 5
Switch language. The language selector at the bottom of the sidebar changes the dashboard language. It does not change how your campaigns or ads are named on each platform.
02 · Projects
Projects — and connecting ad accounts
A project groups the ad accounts for one brand or website. You connect your Google Ads, Meta and TikTok accounts to a project, and everything else (campaigns, recommendations, reports) flows from there.

What you can do here
- 1
Create a project. Click “+ Create project”, give it a name and (optionally) the website it advertises. A project is just a container — you can have one per brand.
- 2
Connect Google, Meta or TikTok. Open the project and connect each ad platform. Orova requests read-and-manage access so it can both analyse and, when you allow it, execute changes.
- 3
Pick which accounts to manage. After authorising, choose the specific ad accounts to pull in. Only the accounts you select are synced and billed against your plan limits.
- 4
Let the first sync run. Orova pulls daily metrics into its own store, so every date range you view later is instant and never re-queries the platform live.
03 · Campaigns
Campaigns — turn on AI per campaign
The Campaigns screen is one table for Google, Meta and TikTok together. It is where you decide which campaigns the AI is allowed to see and which assistant handles each one.
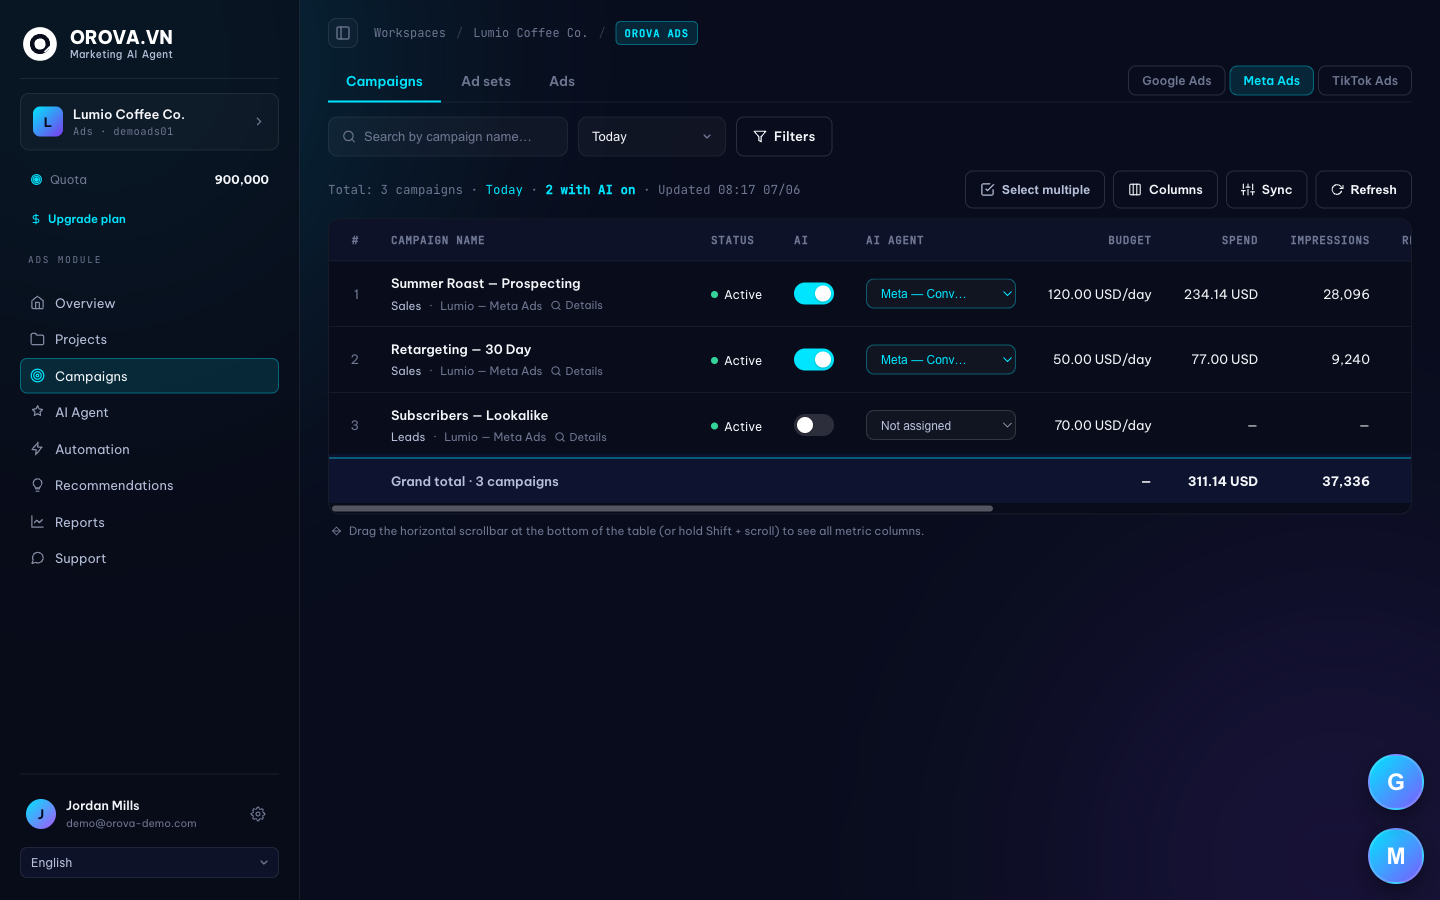
What you can do here
- 1
Switch platform tabs. Google Ads, Meta Ads and TikTok Ads each have a tab. Spend, results, CTR and budget all read from the same daily store, so the numbers stay consistent.
- 2
Filter by date and status. Use the date range and Filters to focus on a platform, account, objective or status. The grand total at the bottom updates with your filter.
- 3
Toggle AI on a campaign. The AI switch decides whether Orova may read and act on that campaign. The agent only ever touches campaigns you have switched on — nothing else.
- 4
Assign an AI Agent. In the AI Agent column, choose which assistant analyses each campaign. Each assistant only sees the campaigns assigned to it, so its advice stays focused.
- 5
Sync or refresh. Sync pulls the latest data from the platforms; Refresh re-reads the local store. Use Columns to show or hide metric columns.
04 · AI Agent
The AI Agent and custom assistants
The AI Agent is who you talk to. You can run the base Orova agent, or create custom assistants — each with its own goal, rules and memory — so a Meta specialist and a Google specialist behave differently.
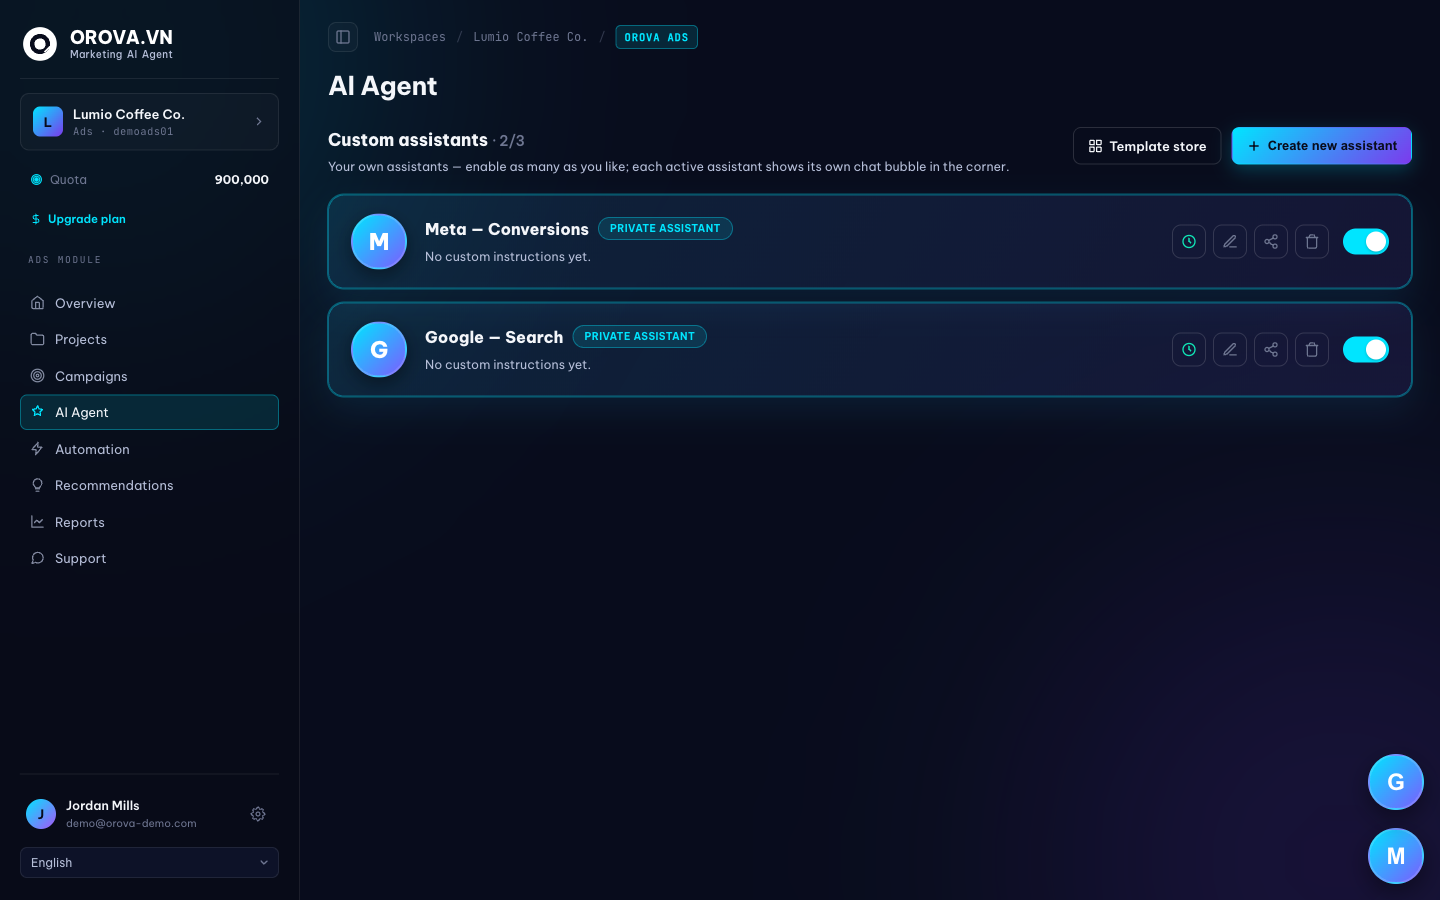
What you can do here
- 1
Create a custom assistant. Click “+ Create new assistant”, give it a name and a goal (for example, “lower CPA on prospecting”). It appears as its own chat bubble in the corner.
- 2
Set its rules and memory. Give the assistant instructions and a knowledge note. These persist between chats, so it remembers your account’s context and constraints.
- 3
Choose what it can do. Per assistant, set which of the 200+ optimization actions it may take, and whether each is advisory, approve-each, or auto. Sensitive changes can always wait for you.
- 4
Set a run schedule. Tell the assistant when to work: on each data sync, every N minutes, or on a weekly schedule — so it keeps analysing in the background.
- 5
Use the Template store. Start from a ready-made assistant template instead of a blank one, then adjust it to your account.
05 · Automation
Automation — condition → action rules
Automation handles the mechanical jobs that do not need a brain: pause a campaign when CPA crosses a line, raise budget on a winner. Rules run on real numbers, fire instantly, and use no AI quota.
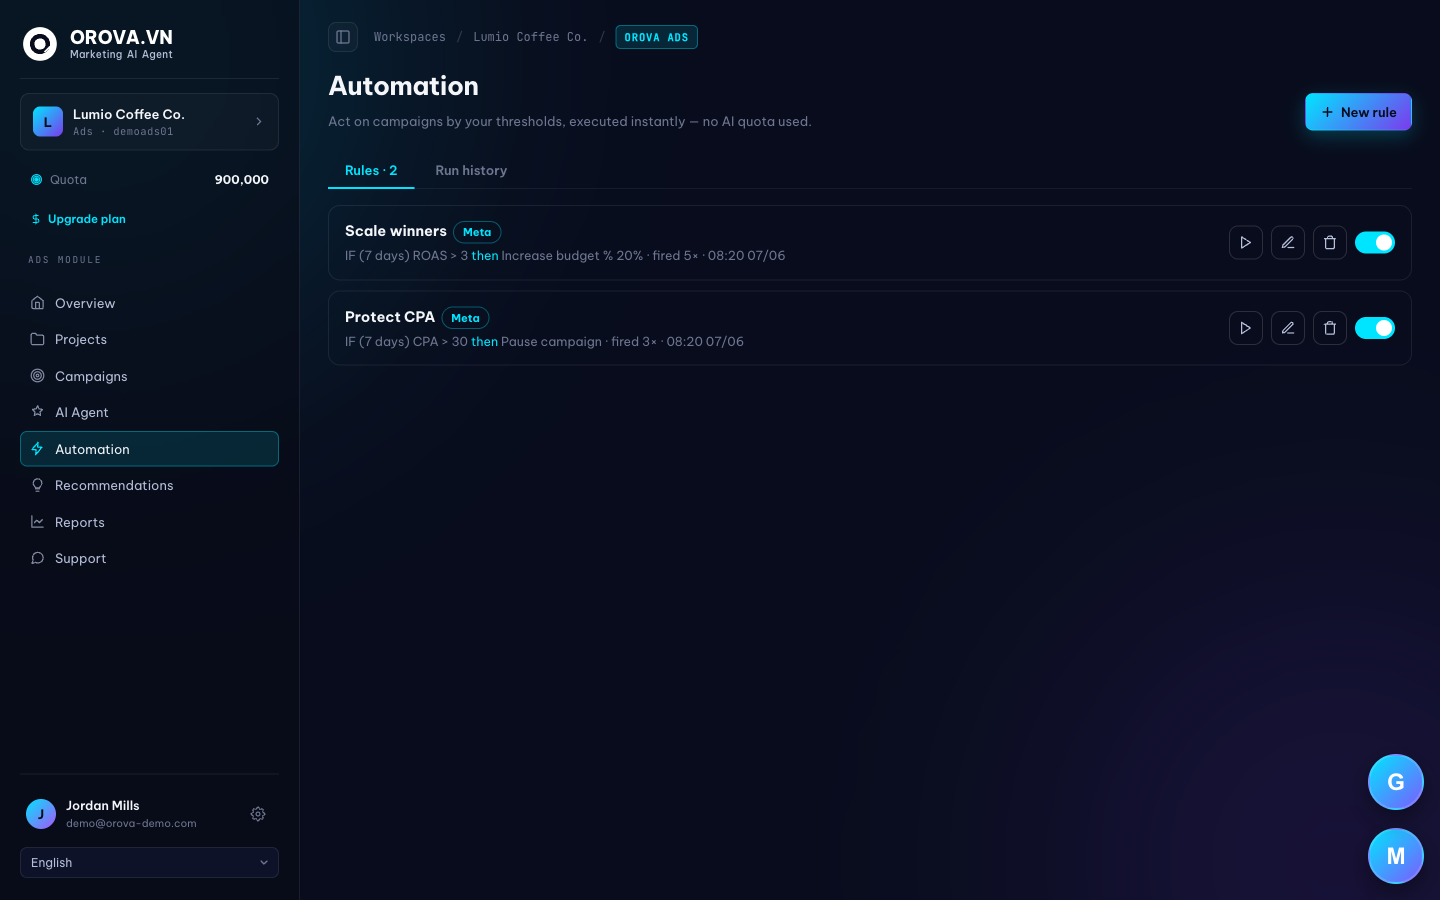
What you can do here
- 1
Create a rule. Click “+ New rule”. A rule is IF a condition is met (over a window) THEN an action — for example, IF 7-day CPA > $30 THEN pause campaign.
- 2
Set the condition. Pick a metric (CPA, ROAS, spend, CTR, frequency…), an operator and a value, plus the look-back window. Combine multiple conditions with all/any matching.
- 3
Choose the action. Pause, enable, set budget, or increase/decrease budget by a percentage. Scope the rule to a platform and to active campaigns only.
- 4
Turn it on. Toggle the rule on. It checks on a fixed interval, respects a cooldown so it never thrashes, and runs without spending AI quota.
- 5
Review the Run history. The Run history tab shows every time a rule fired and what it changed, so automation is never a black box.
06 · Recommendations
Recommendations — review and approve
Recommendations is where the AI’s suggestions land. Orova analyses each project’s data, separated by platform, and proposes optimization actions. Nothing is applied until you approve it — or let the agent execute it for you.
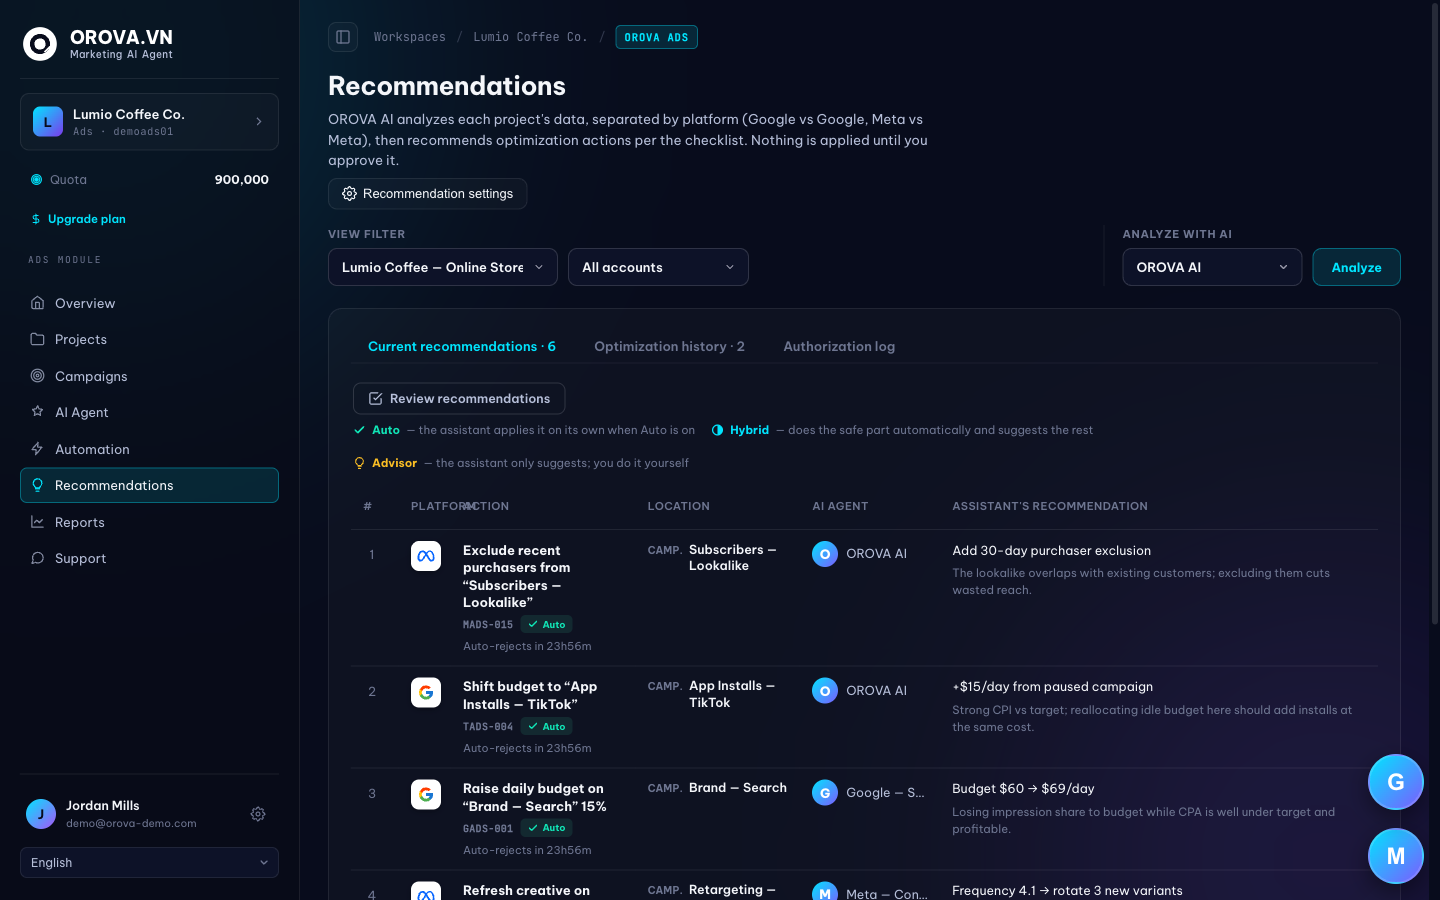
What you can do here
- 1
Run an analysis. Pick a project and an assistant, then click Analyze. The agent reviews the campaigns you have switched on and writes back a list of concrete actions.
- 2
Read each card. Every recommendation states the target campaign, the exact change (old → new), and the reason. The platform and the assistant that proposed it are shown too.
- 3
Approve or dismiss. Approve applies the change through the platform; Dismiss removes it. You can also let the agent auto-execute approved low-risk actions.
- 4
Check the history tabs. Optimization history shows past recommendations; the Authorization log records every change the agent actually made, with a timestamp and result.
07 · Reports
Reports — performance and AI activity
Reports is the read-only overview: spend, results, cost per result, CTR and more — per platform, with charts — plus a summary of what the Orova AI has been doing.
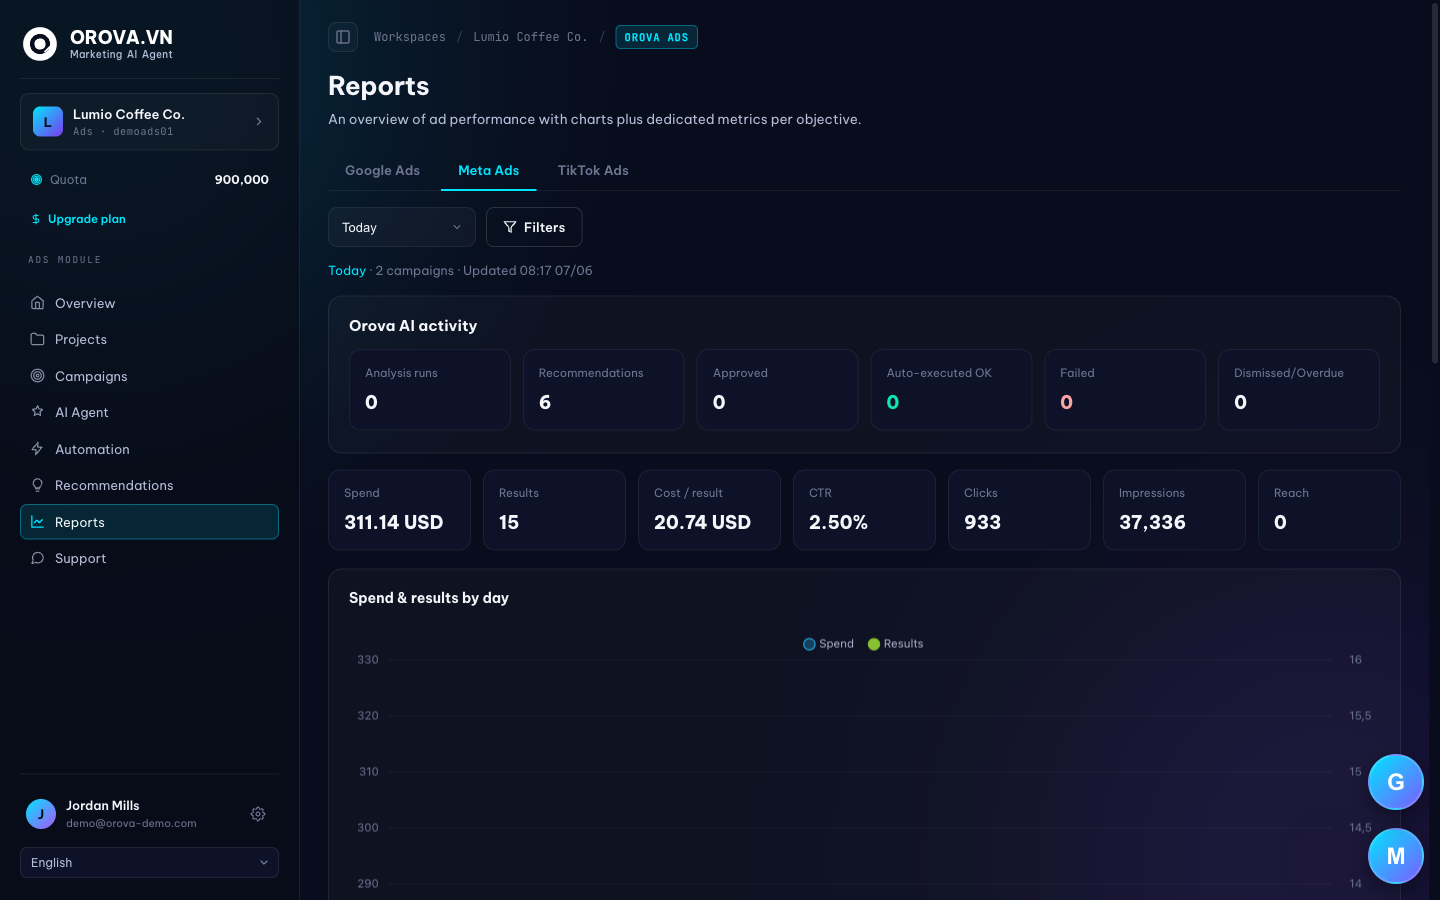
What you can do here
- 1
Pick the platform and range. Switch between Google, Meta and TikTok and choose a date range. Every metric aggregates from the daily store, so it loads instantly.
- 2
Read the headline metrics. Spend, Results, Cost per result, CTR, Clicks, Impressions and Reach summarise the period at a glance.
- 3
Review Orova AI activity. See how many analyses ran, how many recommendations were made, approved, auto-executed or dismissed — your record of the agent’s work.
- 4
Read the daily chart. “Spend & results by day” plots both lines together so you can spot trends, spikes and the effect of recent changes.
- 5
Get it by email. Turn on weekly or monthly email reports in your Account settings to receive a combined SEO + Ads summary automatically.
08 · Conversion API
Conversion API — send leads & sales back to the platforms
The Conversion API forwards your real conversions — qualified leads from a CRM, completed orders from a website — back to Meta, Google and TikTok. That second signal teaches each platform’s bidding which clicks turned into customers, and it can push those customers into the audiences you already own. Orova never creates pixels or audiences; you point it at IDs that already exist in your account, and Orova only delivers the data.
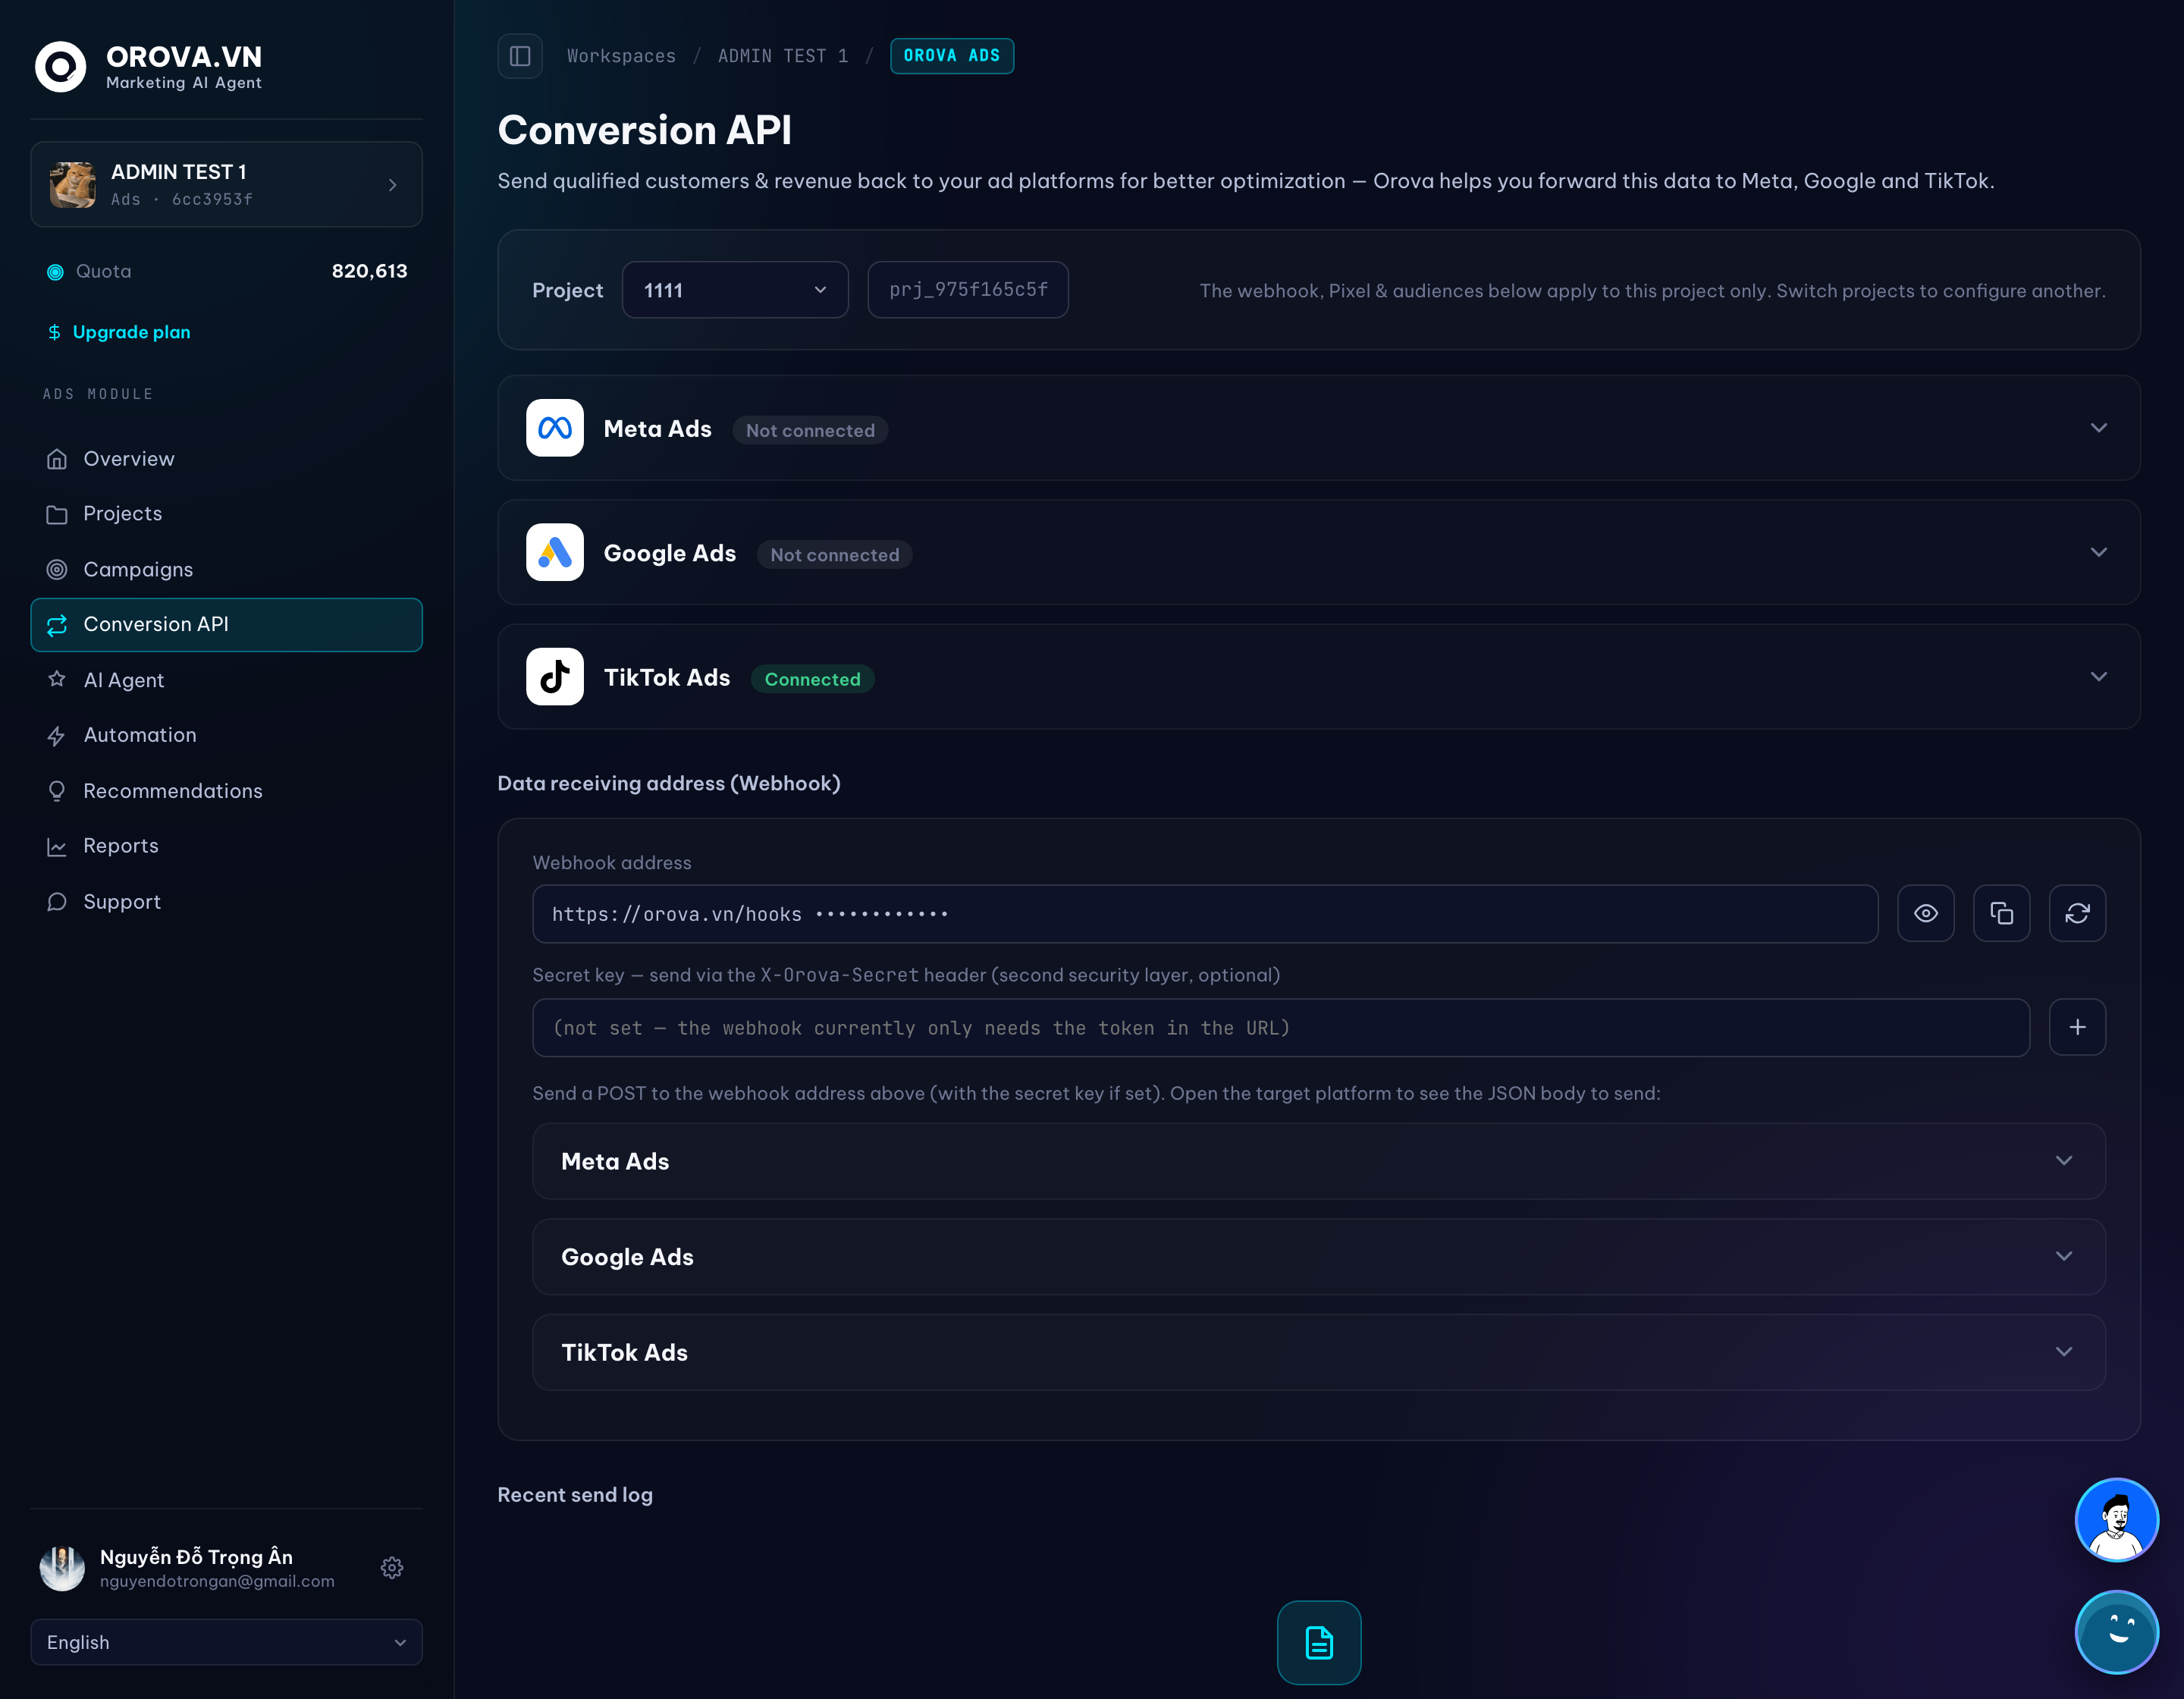
What you can do here
- 1
Each project has its own webhook. Open Conversion API and copy the webhook address for the current project. Your CRM or website sends a POST request to that URL whenever a lead or order happens — one secret URL per project, so events always route to the right account.
- 2
Pick the destination you already own. Expand Meta, Google or TikTok and choose the target that exists in your account — a Meta Pixel, a Google Conversion Action, or a TikTok Pixel — plus, optionally, a Custom Audience / Customer Match list. Orova does not create these; it only sends data into the ones you select.
- 3
Turn on conversions, audiences, or both. Each platform has two independent switches: send conversions (to the pixel, for bid optimisation) and sync audiences (push the customer’s hashed email/phone into your list to exclude buyers or build lookalikes). Enable whichever you need and save.
- 4
Match the customer accurately. Send the identifiers you have: email and phone always help; add the click ID when you can — fbc/fbp for Meta, gclid for Google, ttclid for TikTok. Email and phone are hashed before they ever leave; Orova never stores raw personal data.
- 5
Add a secret key (optional). For a second layer of security, set a secret key — then every webhook call must include a matching X-Orova-Secret header, or it is rejected.
- 6
Watch the send log. The Recent send log shows each event received and whether it was sent, skipped or failed, with the matched keys masked. Use it to confirm your CRM is firing correctly and to diagnose any rejected events.
09 · Support
Support — reach the Orova team
Support is the direct line to the Orova team from inside your workspace. Use it when something looks wrong, a connection drops, or you want help setting up a strategy.
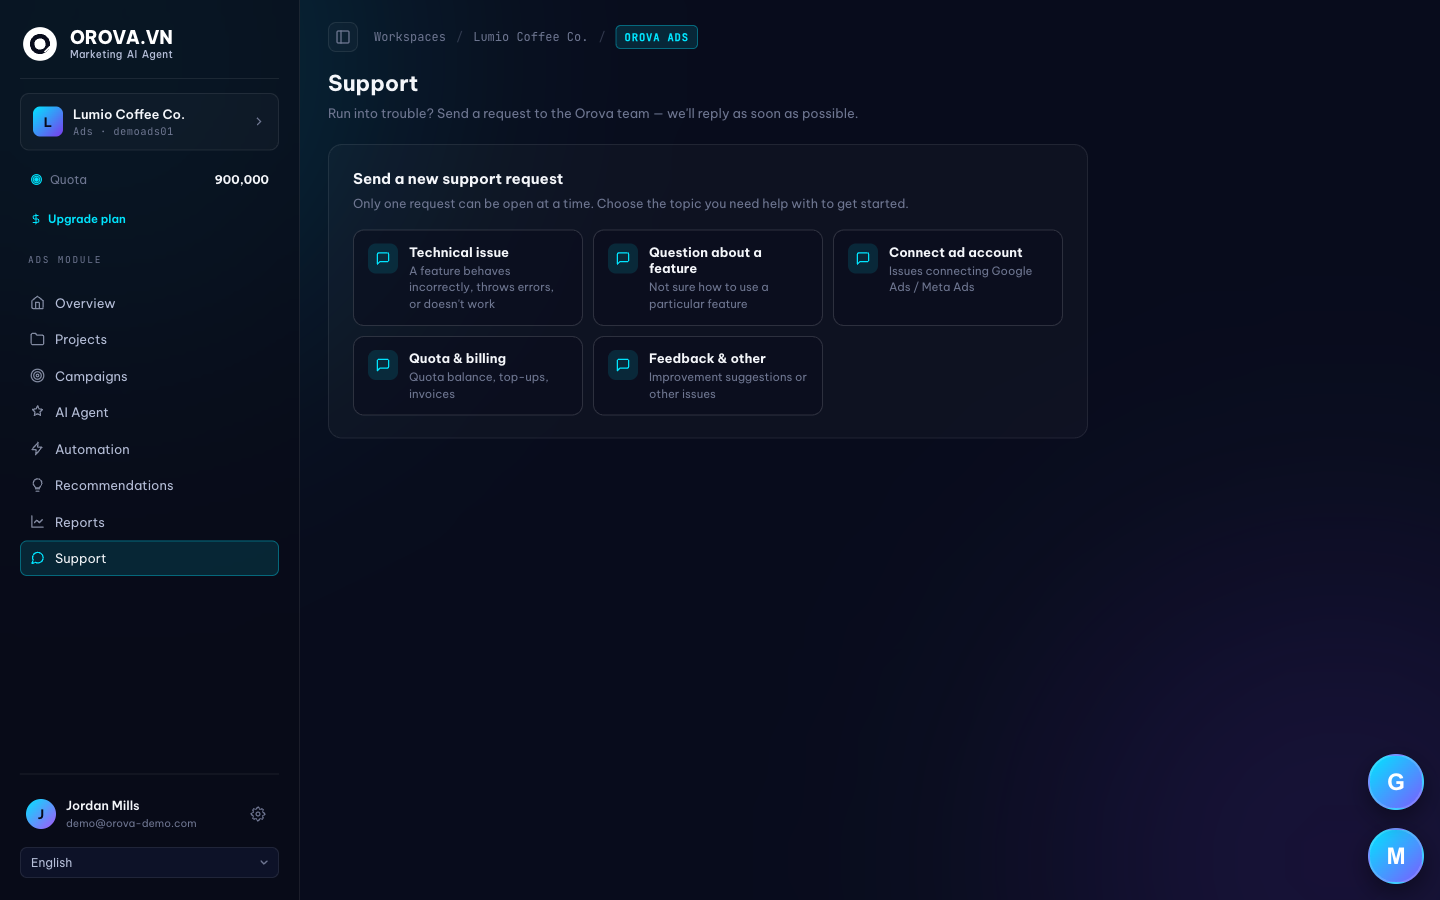
What you can do here
- 1
Send a message. Describe the issue or question. Include the project or campaign name so the team has the context to help quickly.
- 2
Check connections first. If data looks stale, confirm the ad account is still connected under Projects — an expired platform token is the most common cause.
- 3
Reach us any time. You can also email contact@orova.vn directly; support inside the workspace and email reach the same team.
/ Need a hand?
Can’t find what you’re looking for? Open the Support section inside your workspace, or send us a message.