
Orova Connect brings three things together inside your Orova workspace: an Inbox for several mailboxes, a meeting calendar that sends invitations, and Orova Meet, a meeting room that runs in the browser. Its promise is short: meetings without note-taking, email without writing.
This guide is written for someone opening the module for the first time. Each section explains the new words first, then walks through what to click, what to fill in and what you should see. Follow the sections in order: connect a mailbox, read and sort, write, keep contacts, then move on to meetings and AI recaps. The last section collects the questions and errors people hit most.
Two things are worth knowing up front. Almost everything in Orova Connect is free of quota; only two AI features cost quota, and the amount is estimated before anything runs. Button names in this guide match the English interface word for word, so you can look for them on screen.
00 · Before you start
What Orova Connect is and what to know first
This section explains the three areas of the module, the few words you will meet throughout the guide, and exactly where quota is spent.
Orova Connect
The Orova module for email and meetings. Tagline: Meetings without note-taking, email without writing. The hard, repetitive work — writing up a meeting, rewording an email so it reads well — goes to AI. Everything else you use freely.
Workspace
The shared space for you and your colleagues. Mailboxes, contacts, templates, meetings and the quota wallet all belong to the workspace. Who can see or use each mailbox is something you decide per mailbox.
Mailbox
One email address connected to Orova, for example a Gmail account or your company address. A workspace can connect many mailboxes. In the left column you can look at All mailboxes together or open one mailbox at a time.
Quota
The allowance of AI usage in your workspace wallet. Orova estimates the cost before an AI job runs and blocks it up front if the wallet is short, so a job never stops halfway. You can see the balance and every deduction on the workspace Wallet page.
The three areas
| Area | What you do there | Where to find it |
|---|---|---|
| Inbox | Read, sort and write email across all connected mailboxes. Also home to Contacts, Templates and Settings. | Inbox in the module menu. Settings has 8 tabs. |
| Meeting calendar | Schedule meetings, invite people by email, manage rooms, topics and tags. | Meeting in the module menu, opens the Calendar. |
| Meeting room (Orova Meet) | Hold online meetings in the browser, share your screen, chat, run AI recap and read the meeting report. | Join meeting on a meeting's details, or the room link. |
The only two places that cost quota
- AI rewrite of an email or a template. Each rewrite is charged by the AI it actually uses.
- AI transcription and summary of a meeting — AI recap in the room, the in-person recap page, or a recording you upload to the meeting report. Transcription is charged by the length of the audio, the summary by the amount of text. Each
Summarize againcounts as a new run.
Everything else is free of quota: connecting and syncing mailboxes, reading, sending and scheduling email, signatures, templates, contacts, filters, the calendar, invitations, meetings on Orova Meet (not counted by people or by minutes), screen sharing, chat, backgrounds, recording to your device, attendance and Excel export, and emailing a summary. Every plan has every feature; plans only differ in the amount of quota.
Note
9 interface languages
01 · Connect a mailbox
Connect a mailbox and decide who can use it
Before anything shows up in the Inbox you need at least one mailbox. This section covers Gmail, company email over IMAP/SMTP, and the access settings for each mailbox.
App password
A separate 16-character password that Google (and many other providers) create just for mail apps. It is not your normal sign-in password. Orova Connect uses it to reach Gmail, because signing in with your Google account is not available in Orova Connect.
IMAP and SMTP
IMAP is the server Orova reads your mail from (Incoming mail server (IMAP)). SMTP is the server it sends through (Outgoing mail server (SMTP)). Your email provider or IT team gives you both addresses, their ports and the security type.
Create a Gmail app password (on Google's side)
- 1
Turn on 2-Step Verification. Open your Google Account, go to Security, and turn on 2-Step Verification. Google only offers app passwords once this is on.
- 2
Create the app password. Still in your Google Account, open the App passwords page, type a name you will recognise (for example
Orova) and create it. Google shows a 16-character password. - 3
Copy it straight away. Google shows the password only once. Copy it now; you will paste it into Orova in the next steps. If you lose it, delete it on Google and create a new one.
Add the mailbox in Orova
- 1
Open the Mailboxes tab. Go to
Settingsand open theMailboxestab, then clickAdd mailbox. If no mailbox exists yet, the Inbox also showsAdd mailbox.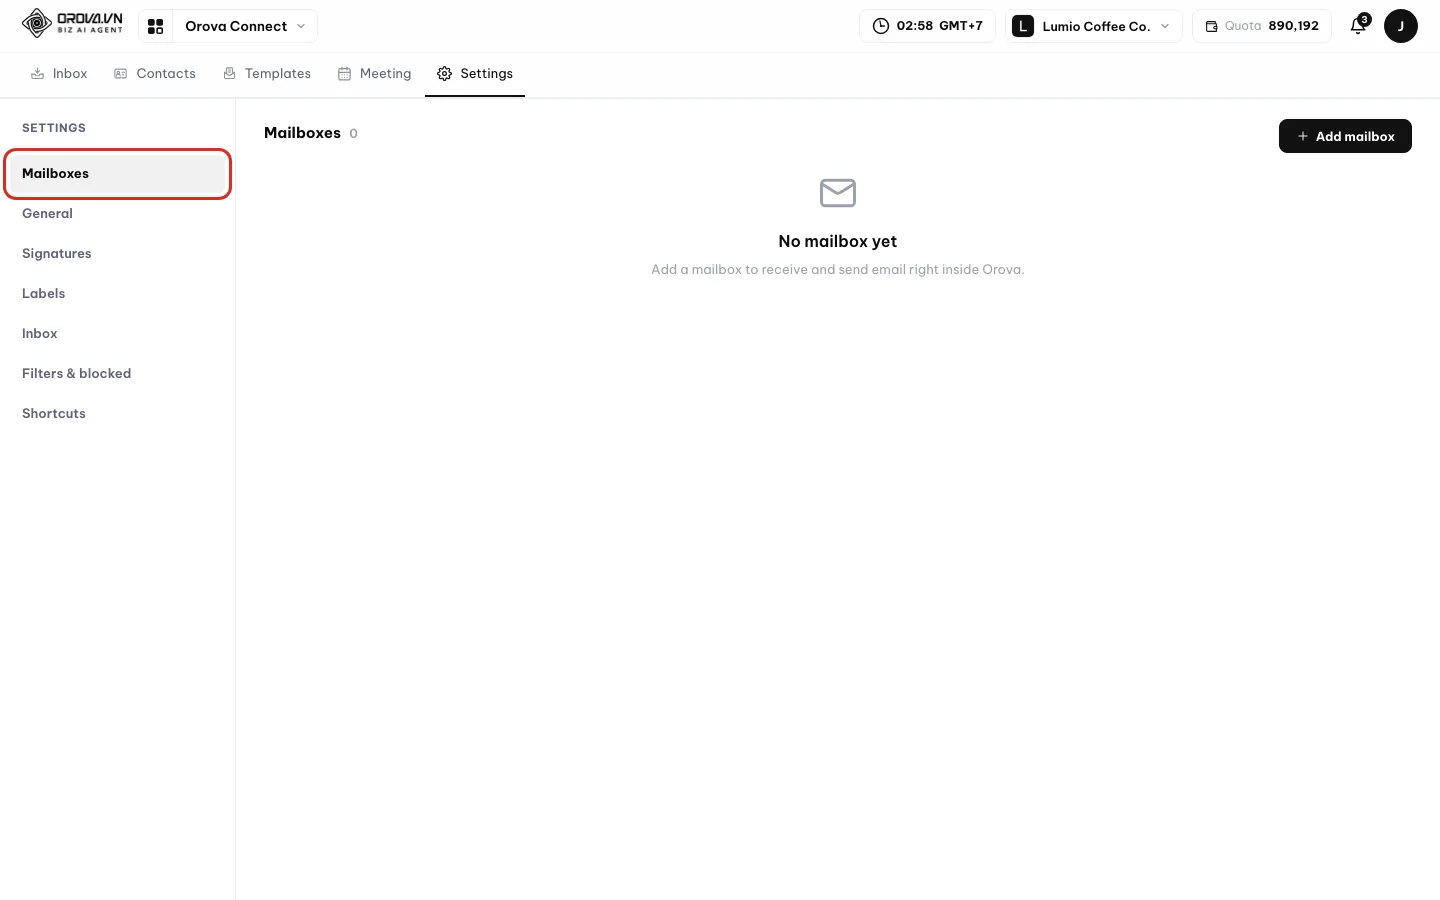
Settings › Mailboxes: start here, then click Add mailbox. - 2
Gmail: use Connect Gmail. Click
Connect Gmail. Orova fills in Gmail's servers for you and opens Google's app password page. Type your address inEmail address, paste the 16-character code intoApp password, and optionally set aSender display name.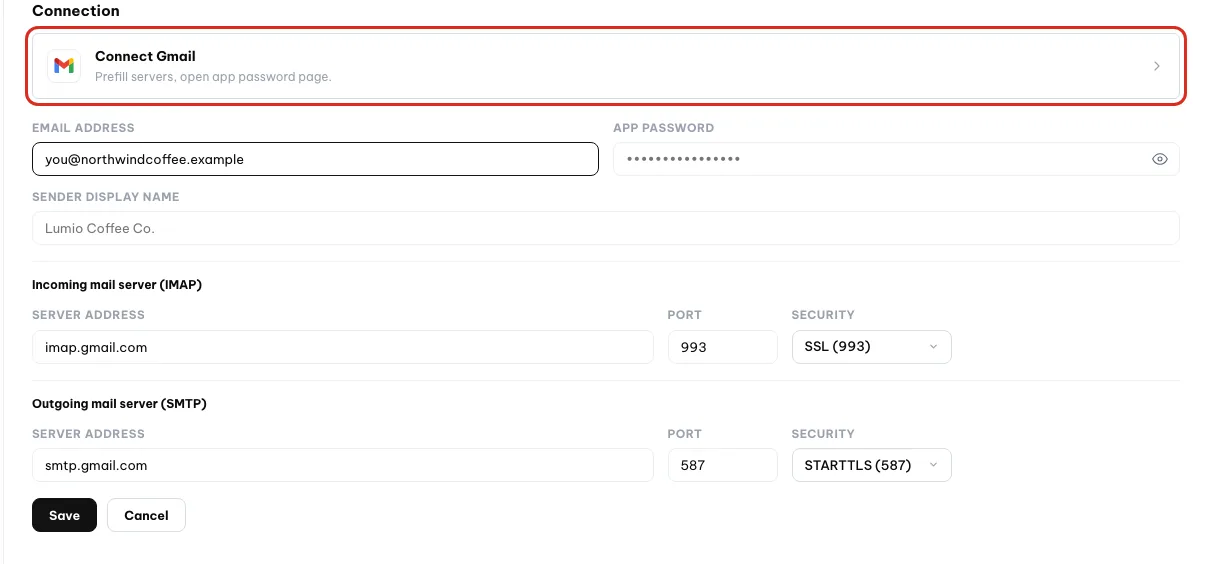
Connect Gmail fills in Gmail's IMAP and SMTP servers for you. - 3
Company email: fill in the servers. Type your
Email addressand password, then fill in theIncoming mail server (IMAP)andOutgoing mail server (SMTP)groups:Server address,PortandSecurity. Copy these from your provider exactly as given.
Company email: copy server address, port and security from your provider. - 4
Click Save.
Saveis also a live test: Orova tries to sign in to both servers for real. You seeTesting the connection…, thenConnection works. Mailbox saved.If something is wrong, the message says which server failed and why.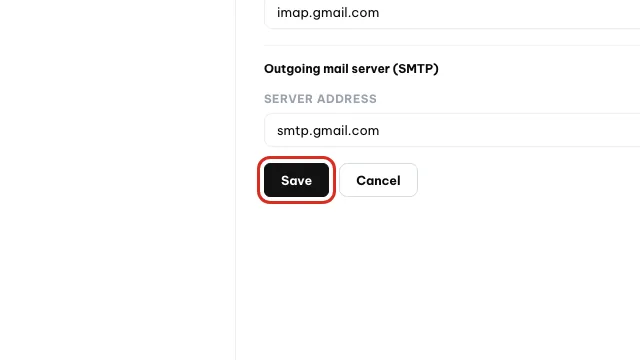
Save also tests the connection to both servers. - 5
Wait for the first sync. On the first run Orova pulls in the last 90 days of mail. After that, new mail arrives almost instantly. You can also click
Syncin the Inbox at any time.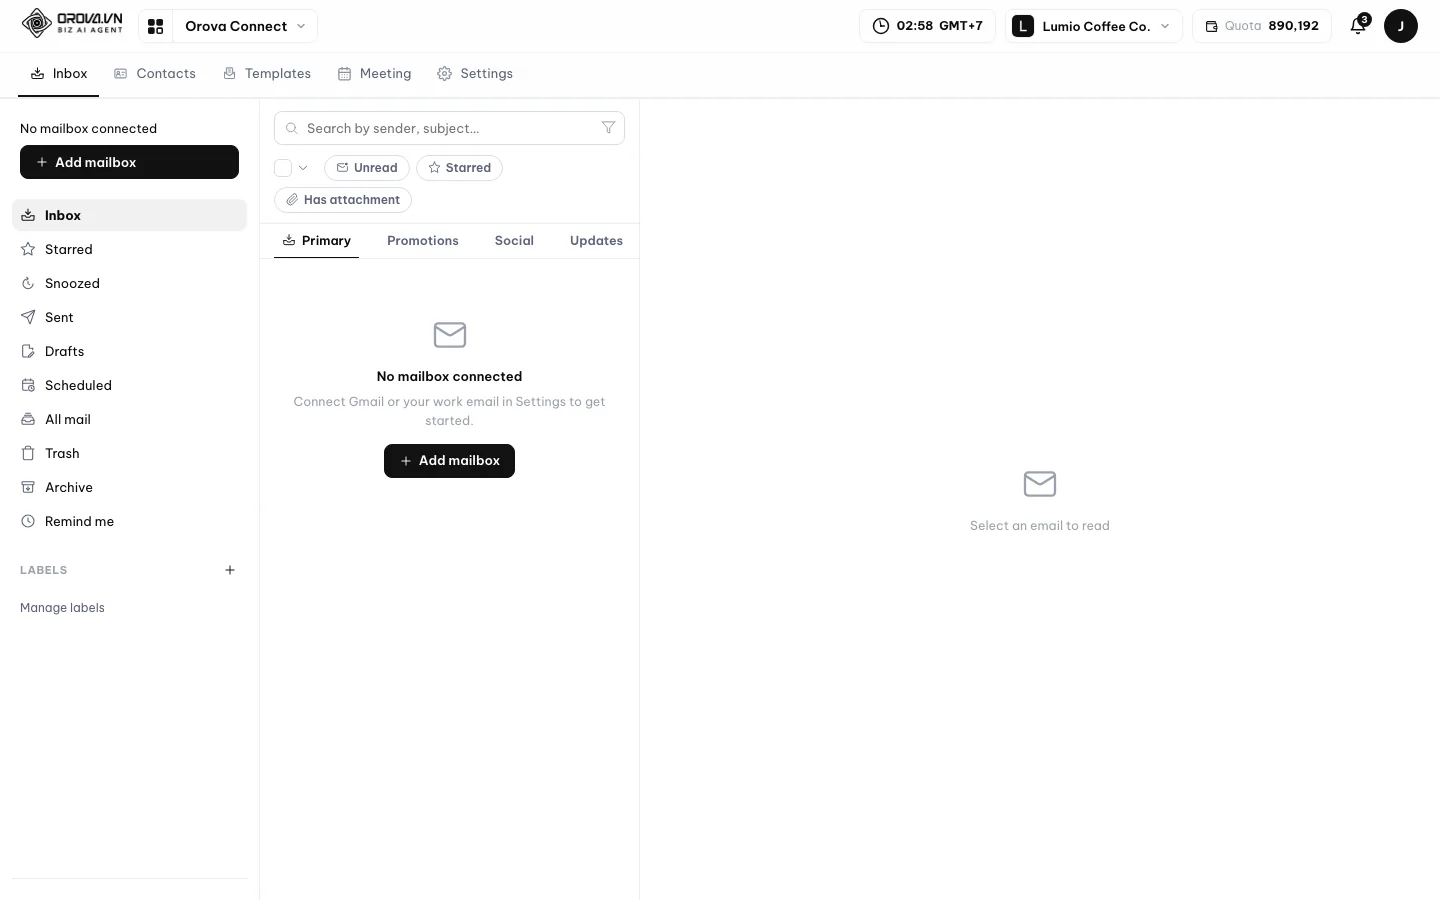
Until a mailbox is connected and synced, the Inbox stays empty.
Managing each mailbox
Set as defaultpicks the mailbox used first when you write a new email.Test againre-checks the connection. The status column showsConnected,Connection errororNot tested yet.Upload logogives the mailbox its own picture (PNG, JPG or WEBP, up to 1 MB). It shows in the mailbox list and when you choose which mailbox to send from.- Each mailbox holds up to 2 GB of mail. When it is full, Orova keeps downloading the text of new mail but skips the attachments.
Deleteremoves the mailbox from Orova together with every folder, message and attachment already downloaded. It does not touch the mail on your provider's server.
Who can see and use the mailbox
| Option | What it means |
|---|---|
Only me | Only you see this mailbox. |
Workspace can view | Everyone in the workspace can read the mail, but not send from it. |
Workspace can use | Everyone in the workspace can read and send from it. |
Per person: View only · View & send · No access | Override the general rule for one member. Default means the person follows the workspace rule. |
Warning
Only the person who connected it sees the password
Connected by. For older mailboxes where that is unknown, it is the workspace owner. Colleagues with access can read and send, but cannot see how the mailbox is connected.02 · Read and sort
Read and sort your email
The Inbox works much like Gmail. This section covers the category tabs, conversations, the everyday actions, search, filters and blocking, and the out-of-office auto-reply.
Category tabs
The Inbox splits into Primary, Promotions, Social and Updates; you can switch on Forums too. Orova sorts mail into them automatically. Starred mail always stays in Primary. In Settings › Inbox you can show, hide and reorder the tabs, and create up to 10 custom categories with Add category.
Conversation
Emails on the same subject are grouped into one conversation, and the quoted text of older messages is folded away. You can turn this off with Conversation view in Settings › General.
Everyday actions
| Button | What it does |
|---|---|
Star · Label | Mark important mail, or file it under a label. Labels can have colours and parent labels; manage them in Settings › Labels. |
Archive · Delete | Move mail out of the Inbox, or send it to Trash. |
Report spam · Block sender | Send the mail to Spam, or block an address or a whole domain so future mail goes to Spam. |
Unsubscribe | Ask the sender of a newsletter to stop sending. |
Snooze | Hide a message until Later today, Tomorrow, This weekend, Next week, or a time you choose with Pick time. |
Remind me | At the time you set, Orova sends a reminder email to that same mailbox. |
Print · Download .eml | Print the message or save the original file. |
- Right-click a message to open
Message actions: move it to another tab,Find emails from this sender, reply, forward and more. - Keyboard shortcuts in Gmail style (j/k, c, r, a, f, e, #, s, /) are off by default. Turn on
Keyboard shortcutsinSettings›General; change any key in theShortcutstab. - External images show by default. Set
External imagestoAsk firstif you prefer to load them only after clickingShow images. - Trusted senders always show images and are never sent to Spam. Add them in
Settings›Filters & blocked. - The reading pane can be dragged wider or narrower.
Search
Type in the search box to find mail by sender or subject. Open Advanced search to combine From, To, Subject, Has words, Doesn't have, size, date range, the folder to Search in and Has attachment. From the same panel, Create filter turns your search into a filter.
Filter
A rule made of conditions and actions that runs on new incoming mail. Conditions are joined with All or Any and can check the sender, recipient, Cc, subject, body, size (MB), attachments, mailbox, label, category and received date.
Create a filter
- 1
Open Filters & blocked. Go to
Settings›Filters & blockedand clickNew filter. Give it aName.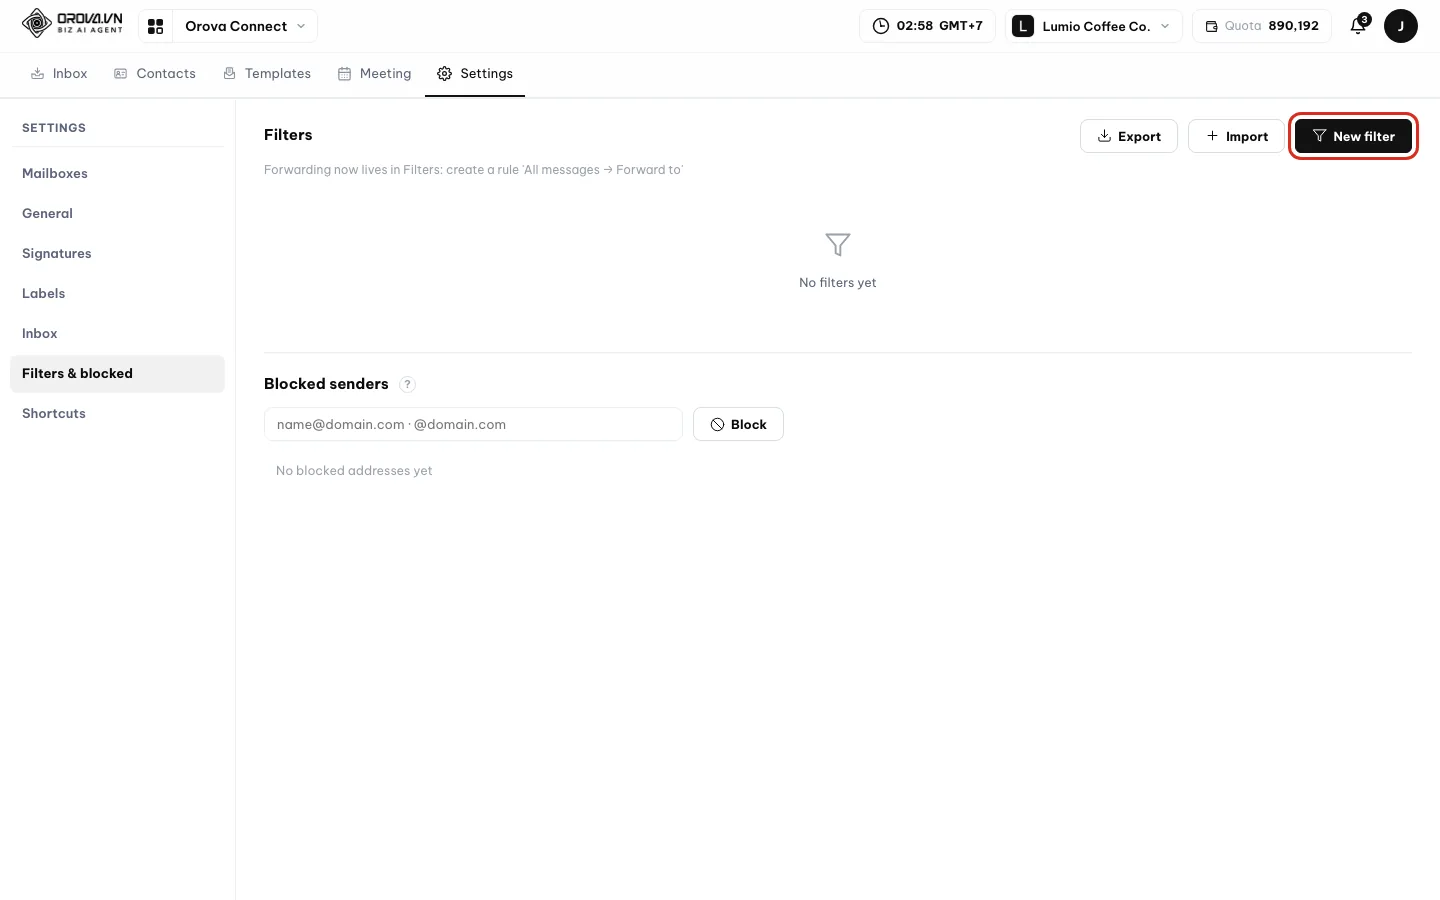
Settings › Filters & blocked: click New filter. - 2
Set the conditions. Under
When a message, chooseAllorAny, then useAdd conditionfor each check — for exampleFromcontainsa domain.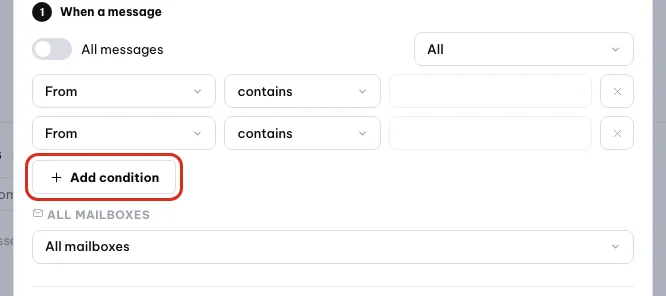
Pick All or Any, then add one condition per check. - 3
Choose the actions. Under
Then, pick one or more:Archive,Mark as read,Star,Apply label,Categorize,Delete,Never spam.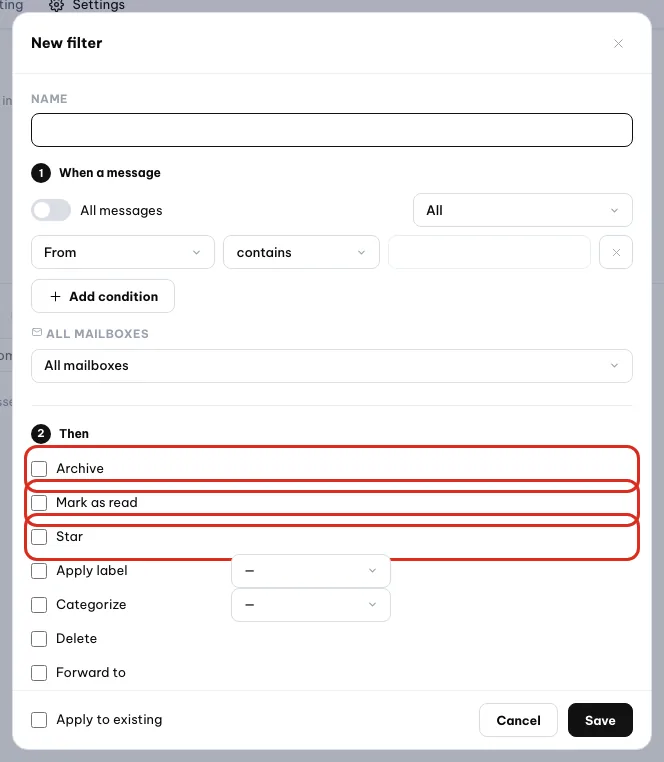
Tick one or more actions under Then. - 4
Apply to older mail if you want.
Apply to existingruns the filter over mail you already have. On older mail it only changes labels, stars and read status inside Orova.
ExportandImportmove your filters as a file, for example between workspaces.Blocked senderslists every blocked address or domain (name@domain.comor@domain.com), with who blocked it and when.Unblockreverses it.
Warning
Forwarding inside a filter is saved, not sent
Forward to addresses (verified with a code sent to that address). Right now Orova only stores that rule; it does not yet send forwarded mail automatically. If you need a message passed on, open it and click Forward yourself.Auto-reply while you are away
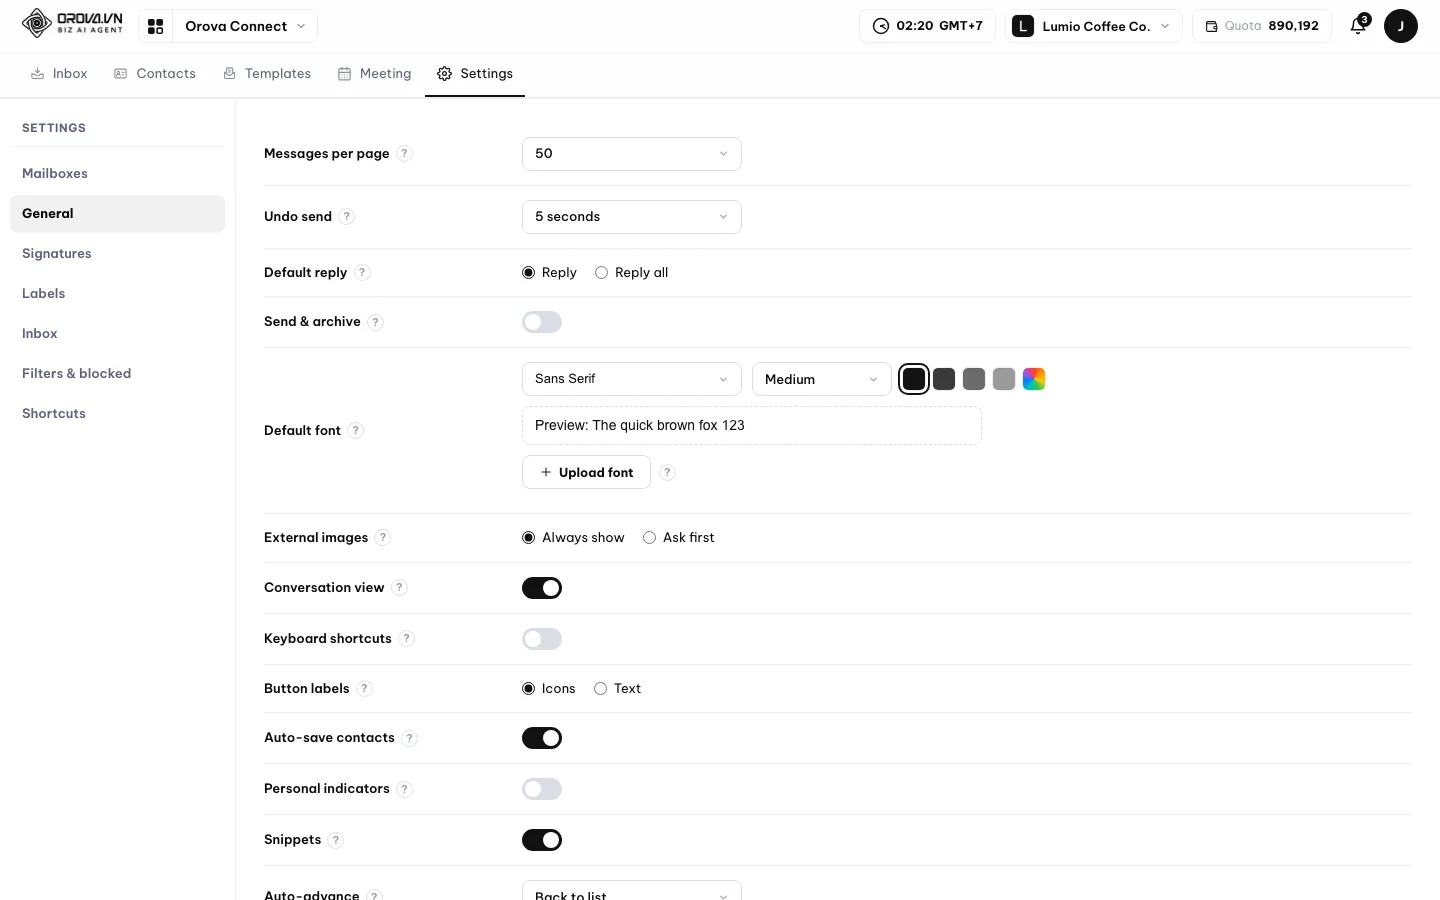
In Settings › General, open Auto-reply for the mailbox you want and switch it On. Under Reply mode choose By dates (a From–Until range), By work schedule (outside Working hours, on Weekly days off and on the Holidays and custom days off you add), or Both. Write the Subject and the message. Tick Contacts only to reply only to people in your contacts. Each sender gets at most one auto-reply every 4 days.
03 · Compose and AI
Write email, signatures, templates and AI rewrite
Click Compose to start. This section covers the editor, signatures, recipients, scheduled sending, undo, rewriting with AI and working with templates.
The compose window
- The editor handles text formatting, lists, tables,
Insert imageandInsert link. Switch toHTML modeto paste or edit raw HTML, and back toEditor. - The window can
Minimize,Expandor goFull screen. - Default font, size and colour come from
Default fontinSettings›General.Upload fontadds your own .woff2 or .ttf file up to 2 MB. - Choose the sending mailbox in
From. Its signature is inserted automatically. - Recipients are suggested from
ContactsandGroups. One email can go to at most 100 recipients across To, Cc and Bcc, with attachments up to 25 MB in total. - Replies and forwards open right under the message you are reading. The original is quoted and folded;
Remove quoted textdrops it.
Signatures
Each mailbox can have as many signatures as you like. In Settings › Signatures, use Add signature, then pick which one is the default for New mail and which for Replies. While writing, you can switch signature or choose No signature.
Send now, later, or take it back
- 1
Send. Click
Send. The email is held for a few seconds so you can clickUndoin the bar that appears. - 2
Adjust the undo window.
Undo sendinSettings›Generalsets how long email is held: 5 seconds by default, anywhere from 0 (Off) to 60 seconds.
Undo send sets how many seconds mail is held before it goes out. - 3
Schedule instead. Open
Schedule sendand pickTomorrow 8:00 AM,This afternoon 1:00 PM,Monday 8:00 AM, orPick date & time. Scheduled mail waits in theScheduledfolder.
Rewrite with AI
Ask AI to rewrite a passage
- 1
Select the text. Highlight the part you want reworked. If nothing is selected, Orova asks you to
Select the text you want the AI to rewrite first. - 2
Open the AI box. Click
AIin the editor toolbar, or press theikey. TheRewrite with AIbox opens. - 3
Say what you want. Type an instruction such as "shorter and more polite". Leave it empty and the AI simply improves the writing. Click
Run. - 4
Check the result. The AI keeps the original language, the links, the images and any template variables. It never translates on its own.
Note
This is the only part of email that costs quota
Email — AI rewrite. If the wallet is short you see Out of AI quota. and nothing is charged. Writing, sending and scheduling email never cost quota.Templates
Open Templates in the module menu. There are two libraries. Your templates are the ones you create, edit, tag, group and handle in bulk (Add tag, Move to group, Delete templates). System templates are 35 read-only templates — quotes, invoices, payment requests, order confirmations, thank-you notes and more. They follow your interface language: Vietnamese if your interface is Vietnamese, English in every other language.
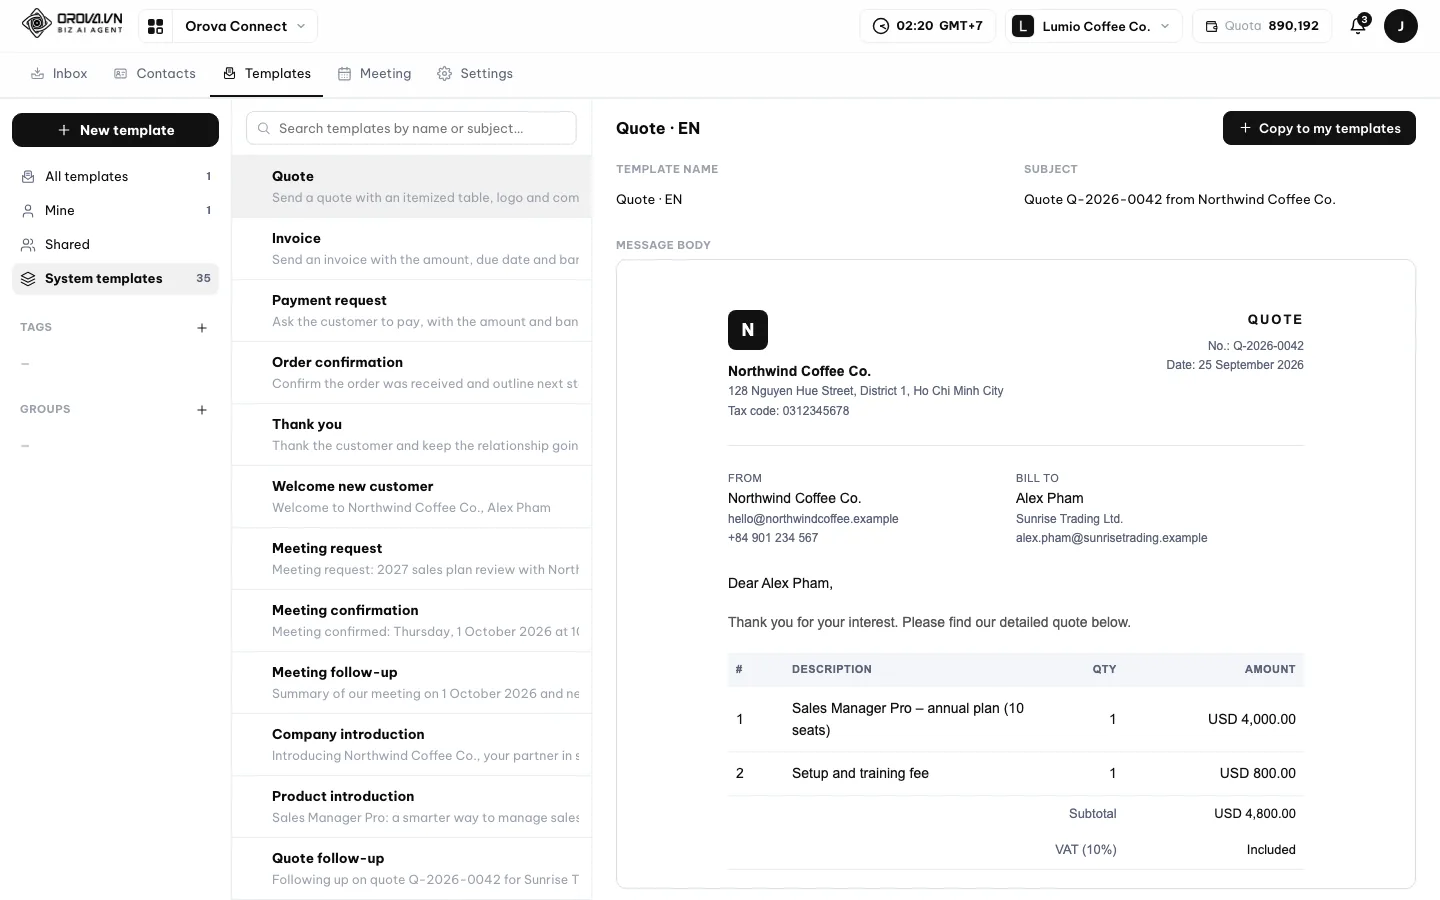
Build and share a template
- 1
Start from a system template or from scratch. On a system template, click
Copy to my templates(orUse as template) to get your own editable copy. To start from nothing, clickNew template.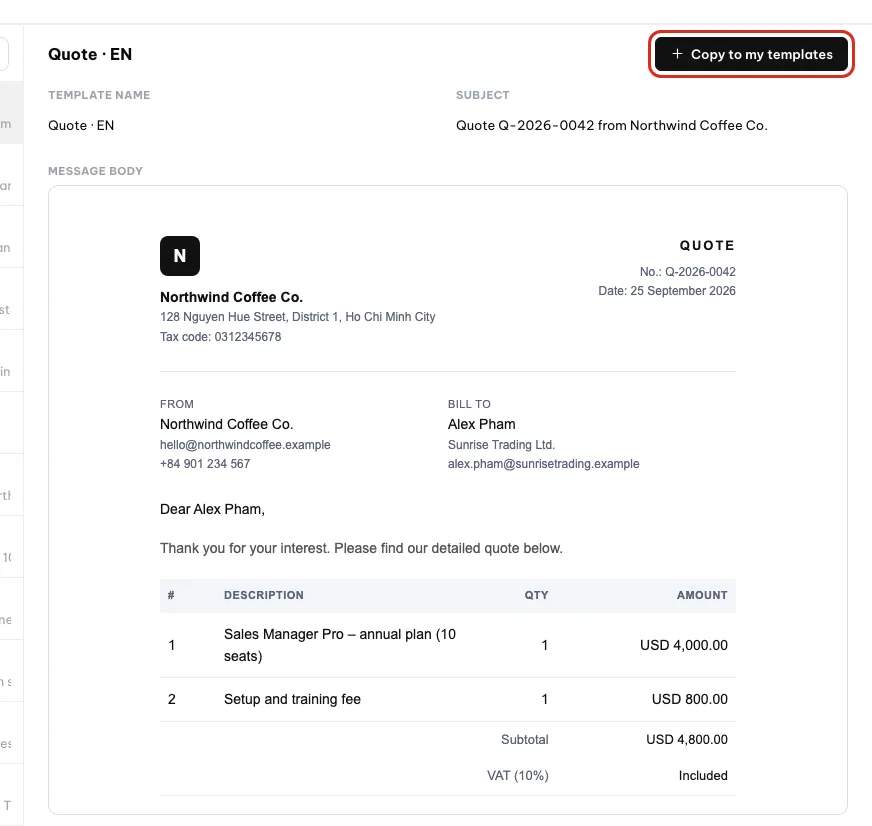
System templates are view-only; copy one to edit it. - 2
Write the content. Use the
Editoror theHTMLtab. The editor has three tabs:Editor,HTMLandPreview. Table-layout templates open inHTMLso the layout stays intact, because switching them toEditormay break it.
Write in Editor or HTML; Preview shows the result. - 3
Insert variables and preview.
Insert variableadds fields such as customer, company or sender details. ClickPreview: variables are filled with your real workspace data, and those without data stay blank.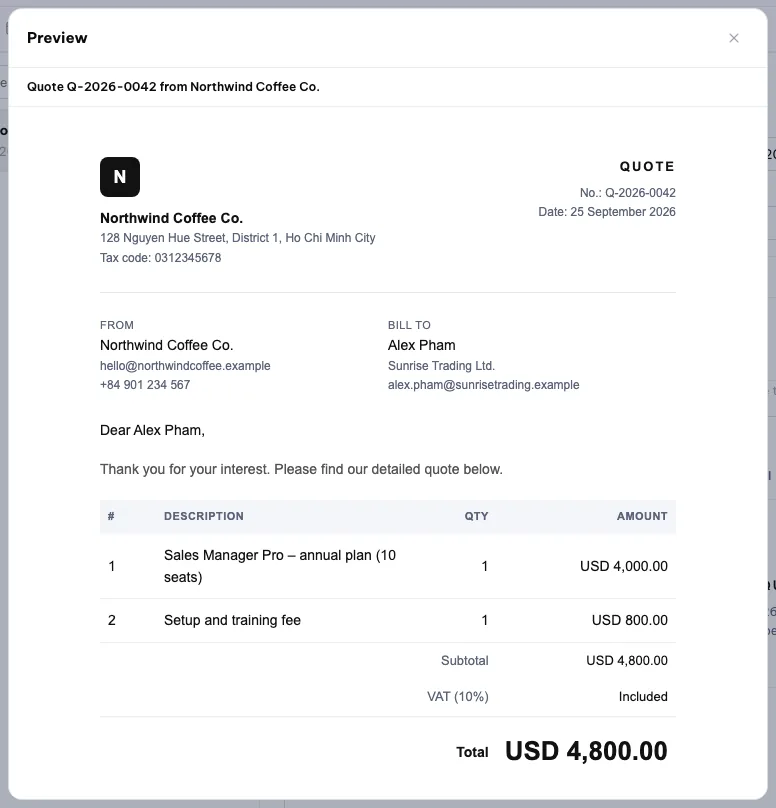
Preview fills variables with your workspace data. - 4
Share it. Click
Share…and chooseOnly me,Whole workspace, orCustom— pickDepartments(ticking a department includes its sub-departments) or individualMembers, each withCan useorCan edit.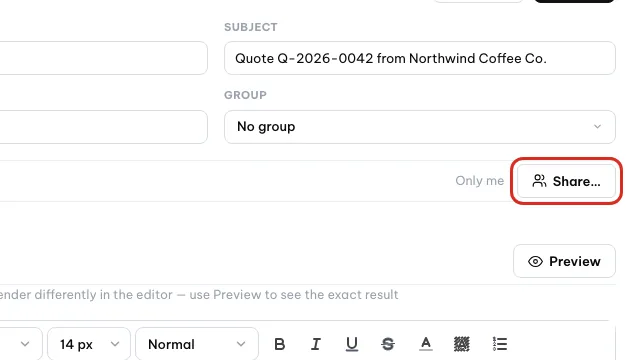
Click Share… to choose who can use or edit the template. - 5
Use it in an email. While writing, click
Insert template. To turn an email you are writing into a template, clickSave as template.
A template a colleague shared with Can use opens read-only: you can use it but not change it. Creating and using templates is free; AI rewrite inside a template costs quota just as it does in an email.
04 · Contacts
Keep your contacts
Contacts is the workspace's shared address book for email. It feeds the recipient suggestions when you write, and it is separate from the customer records in Orova CRM.
Contact
One person with First name, Last name, Email, Phone, Company and Notes. Click New contact to add one by hand, or Compose on a contact to start an email already addressed to them.
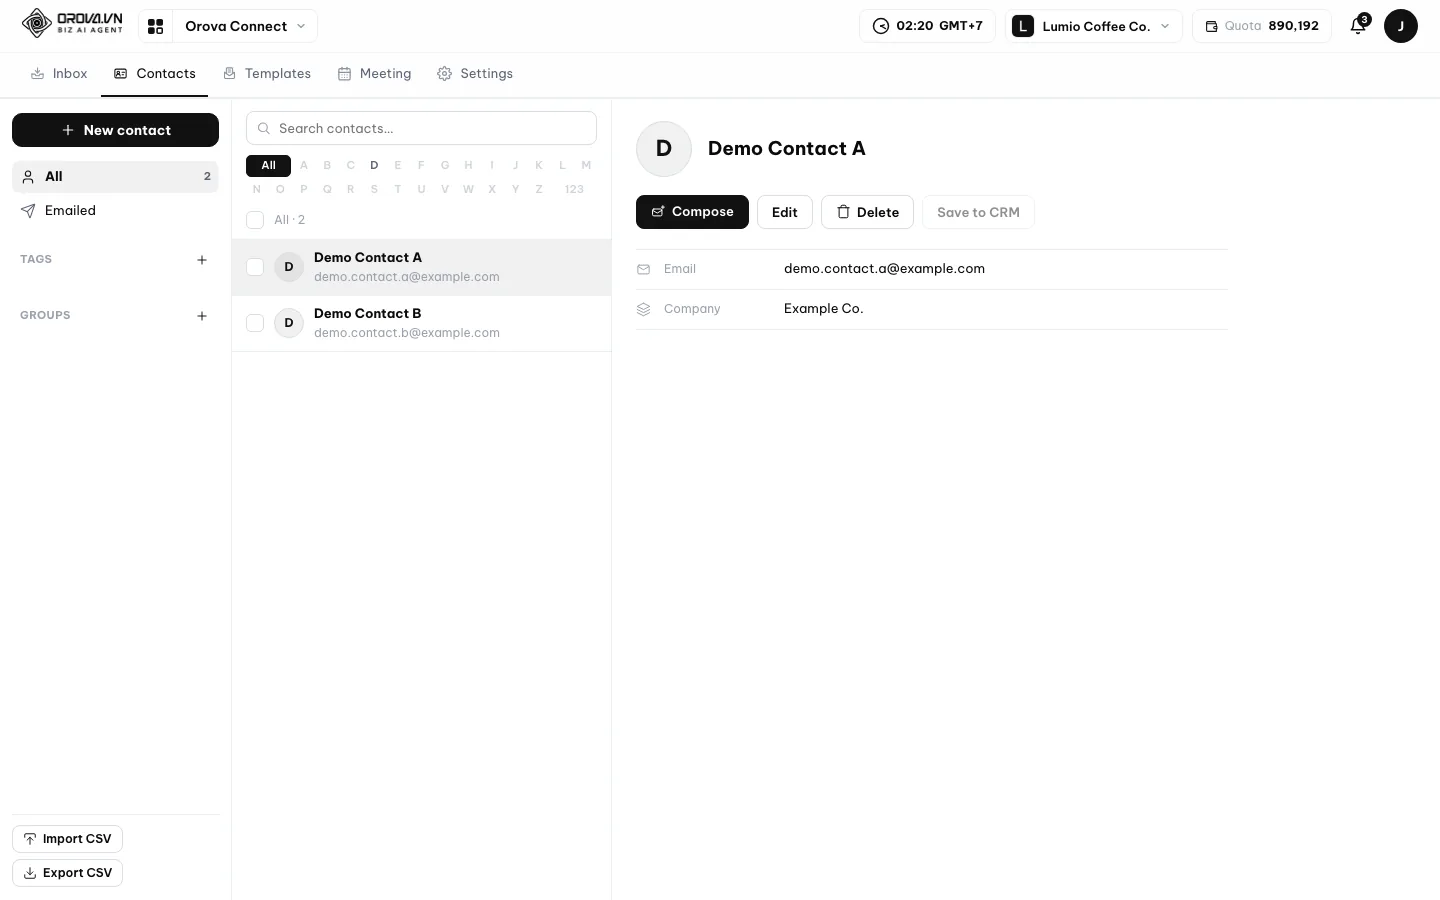
- Search and filter. Use the search box, the first-letter filter (names with Vietnamese accents still sort under the right letter, so "Đặng" goes under D), the
Tagsfilter orEmailedto see people you have written to. - Tags. Pick from a palette of 24 colours. One person can have several tags. Create one with
New tag. - Groups. A group is a list of addresses you can drop into the To field in one go. Create one with
New group. - Select several. Tick rows to
Tag,Untag,Add to grouporDeletethem all at once. - Auto-save contacts (on by default, in
Settings›General) adds everyone you email to Contacts, so they are suggested next time. - Columns can be dragged wider or narrower.
Import contacts from a CSV file
- 1
Prepare the file. Save a UTF-8 CSV file whose first row holds the column names. An
emailcolumn is required; the others may stay empty. Put several tags in thetagscolumn separated by;.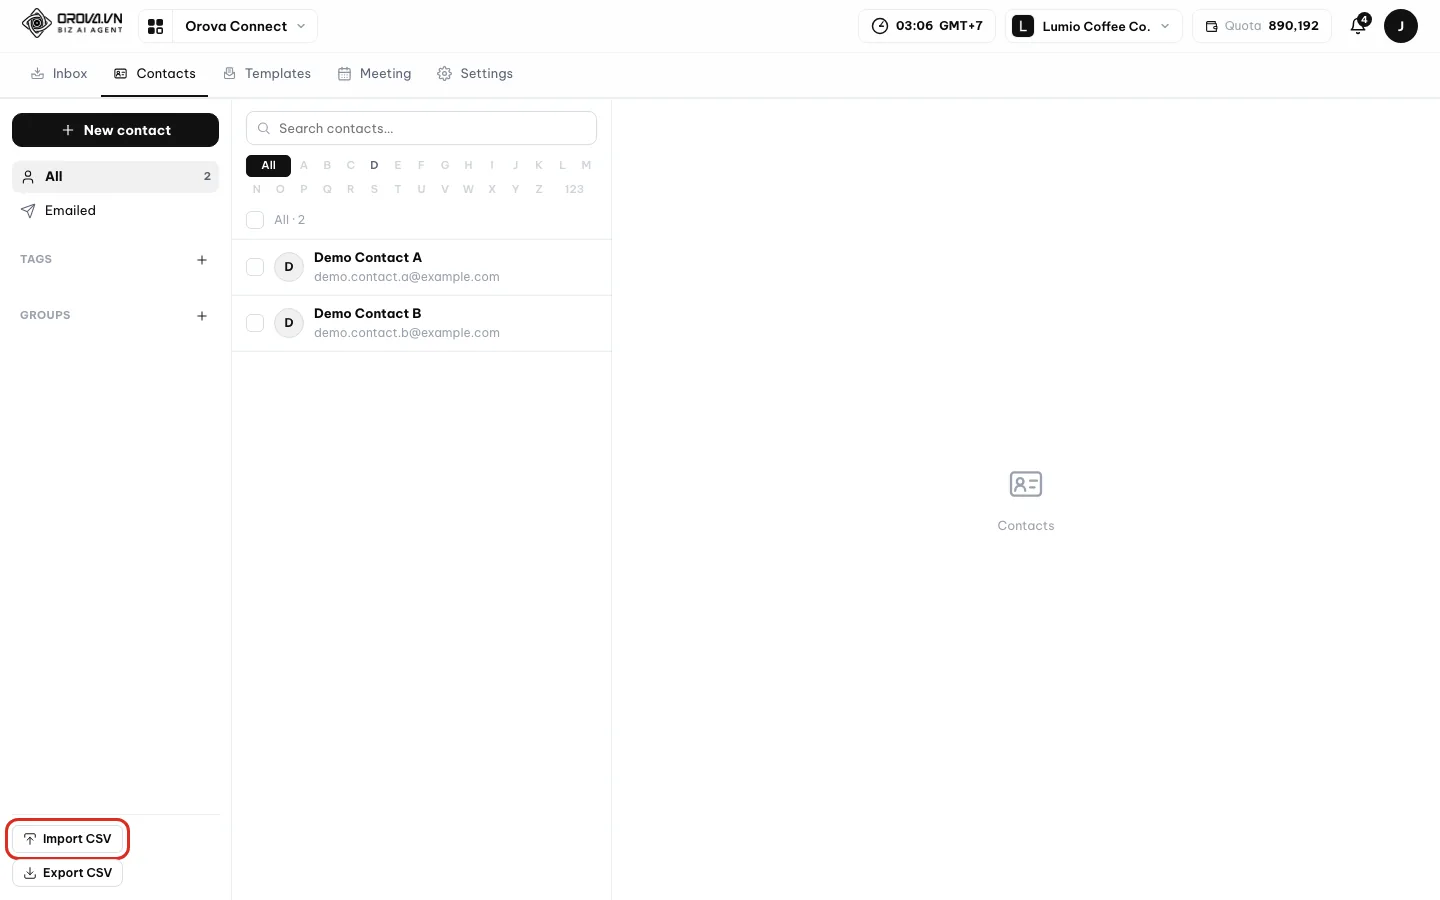
Import CSV sits at the bottom of the left column on the Contacts page. - 2
Check the limits. Each import takes up to 5,000 rows and 2 MB. Click
Download templatein the dialog if you want a ready-made file to fill in. - 3
Import. Click
Import CSV, thenChoose CSV file. An address that already exists is updated rather than duplicated, and tags that do not exist yet are created for you. When it is done, Orova tells you how many contacts were imported.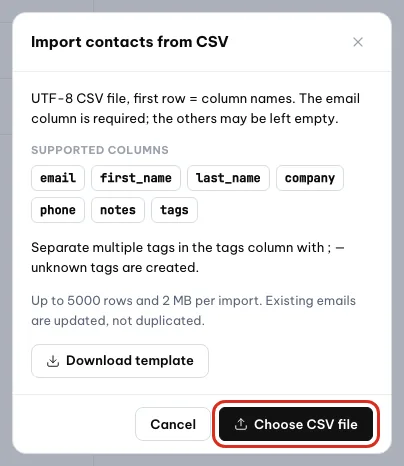
Check the columns and limits, then click Choose CSV file.
Export CSV downloads the whole address book as a CSV file.
Tip
Contacts is not your CRM
05 · Calendar
Schedule meetings and send invitations
The meeting calendar is where every meeting starts. You set the time and the people, Orova creates the room and emails the invitations.
Online and in person
Every meeting has a Format. Online meetings happen in a meeting room on the web — Orova Meet or a link you paste. In person meetings happen around a real table; for those Orova offers an in-person recap instead of a room (see section 07).
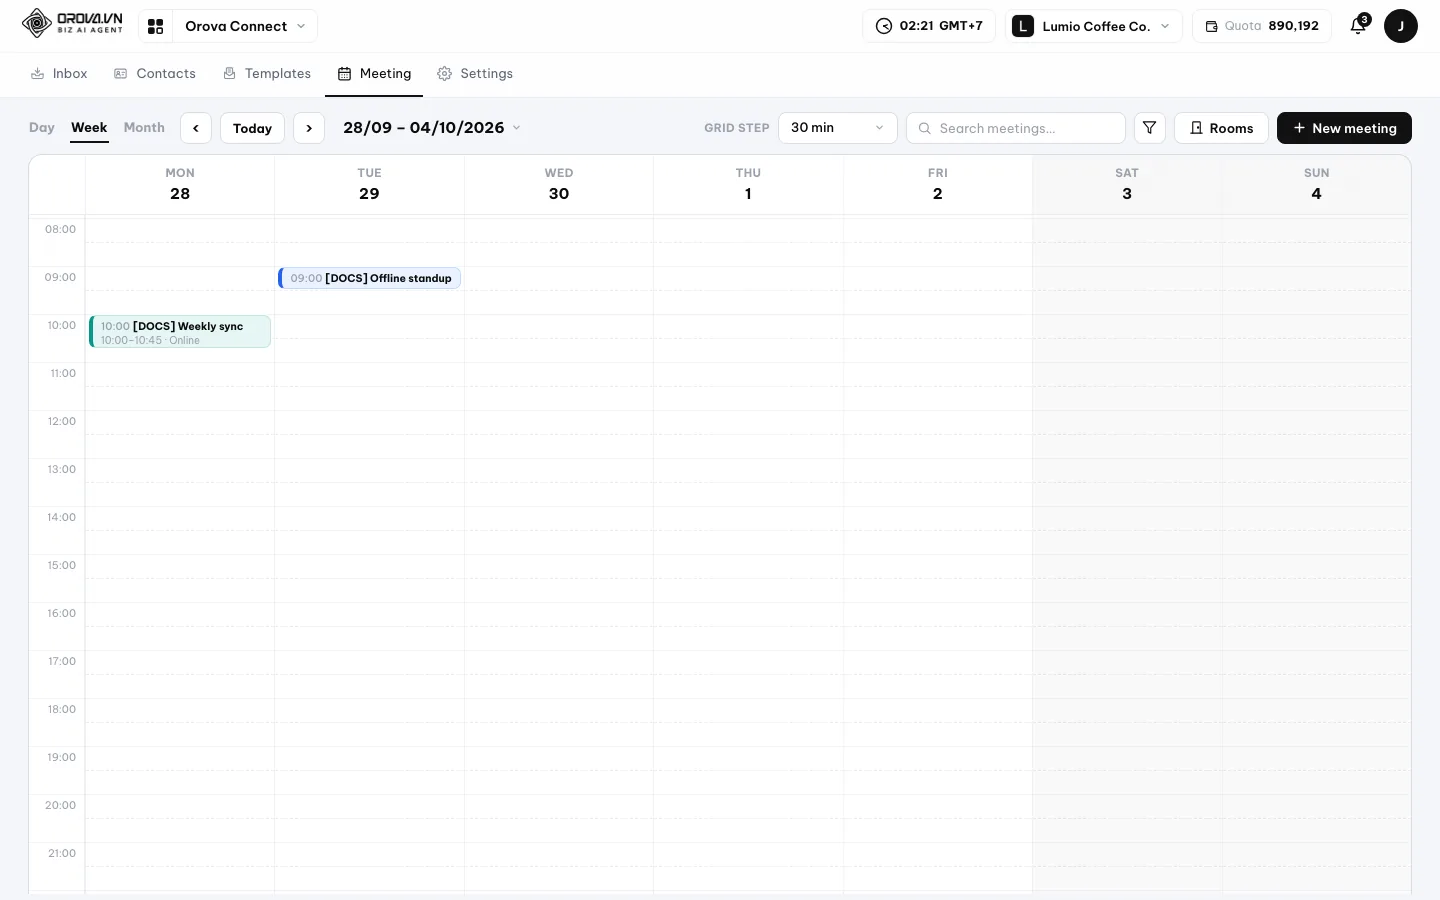
- Switch the view between
Day,WeekandMonth(Week is the default).Todayjumps back to the current date. - The time grid moves in steps of 30 minutes by default; you can change the step.
- Search meetings by title, organizer, room or tag with
Search meetings…, and narrow the calendar withFiltersby tag or by room. - Drag a meeting to a new slot to move it. For a repeating meeting, the edit form opens instead so you can decide what to change.
Schedule a meeting
- 1
Open the form. Click an empty slot on the calendar, or click
New meeting.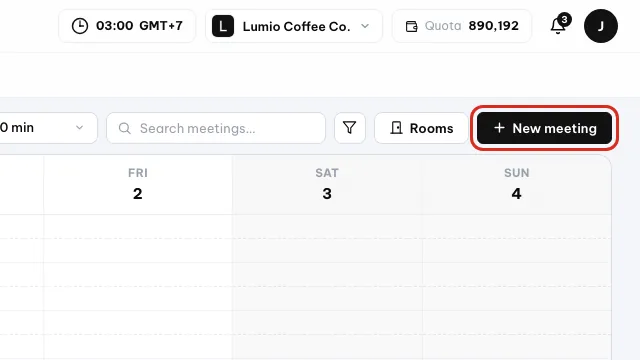
Click New meeting, or an empty slot on the calendar. - 2
Fill in the basics. Type a
Title, chooseOnlineorIn person, then setStartandEnd. Add aDescriptionif people need context.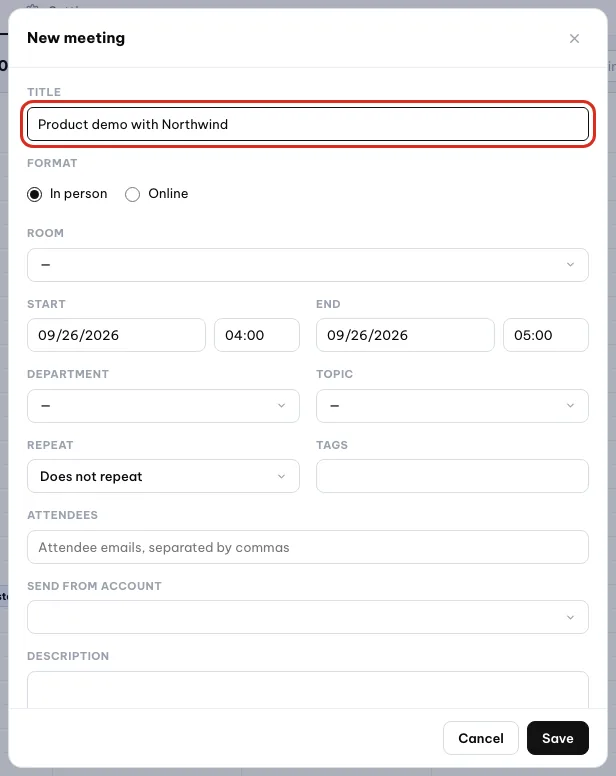
Type a title and choose In person or Online. - 3
Room and link (online). Leave
Meeting linkempty and Orova creates an Orova Meet room for you. Paste a Zoom or Google Meet link instead if you meet there. Then chooseWho can join(explained in section 06).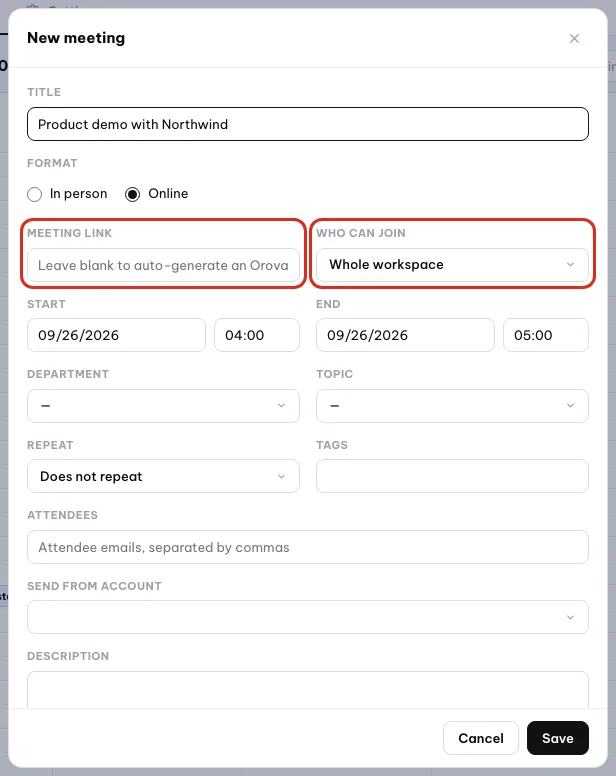
Leave the link blank for an Orova Meet room, then pick who can join. - 4
Classify it. Optionally pick a
Room, aDepartment, aTopicand one or moreTags. They make the calendar easier to read and to filter.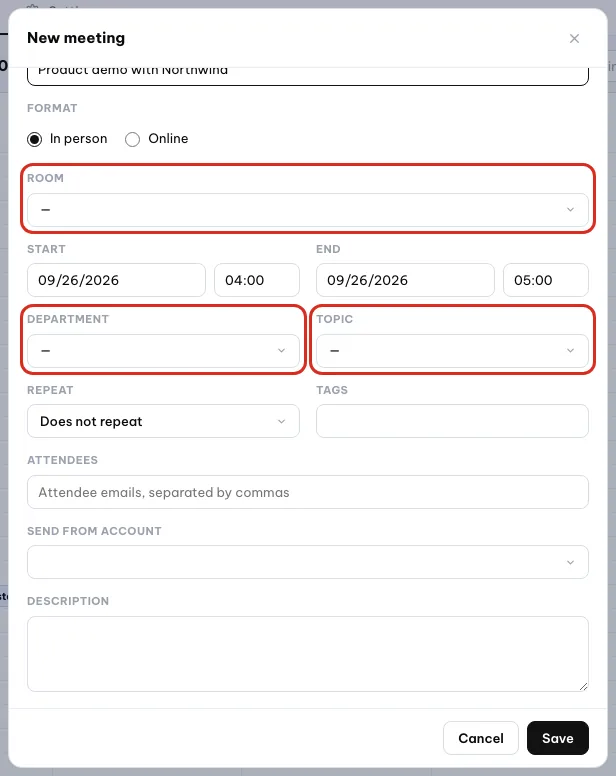
Room, Department and Topic are optional labels. - 5
Invite people. Type the
Attendeesemails separated by commas, and choose the mailbox inSend from account. Without a sending mailbox, no invitation goes out.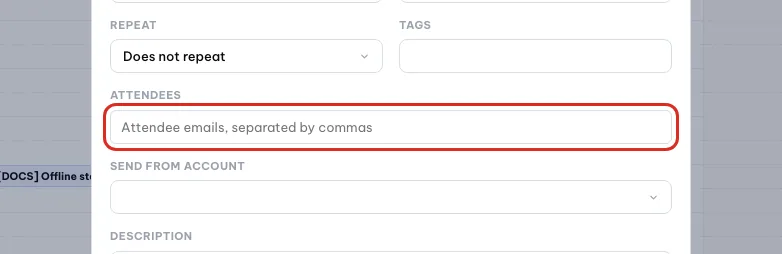
Enter attendee emails and the mailbox that sends invitations. - 6
Repeat if needed. Under
Repeat, chooseDaily,WeeklyorMonthly, then setRepeat untila date or pickNo end date. Save — you seeMeeting scheduled and invitations sent.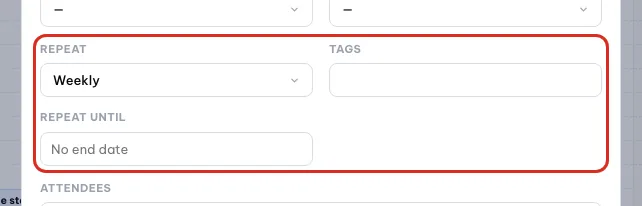
Choose how often it repeats and until when.
Invitations and replies
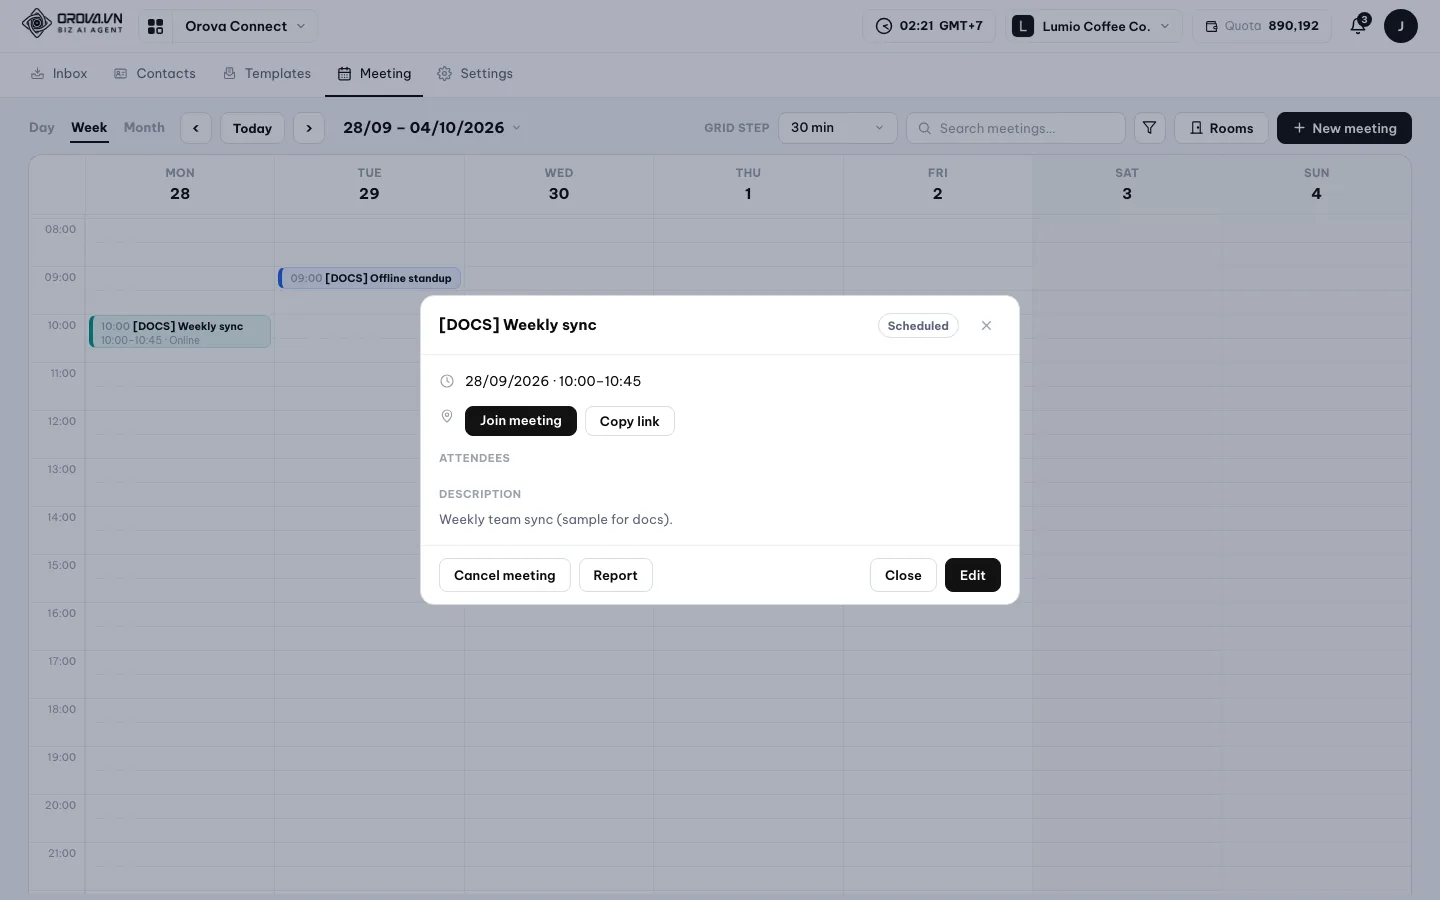
Each invitee receives an email with a calendar file (.ics) and two buttons, Accept and Decline. Answering from those buttons requires signing in to Orova. Replies show on the meeting as Accepted, Declined or Pending. Cancel meeting asks whether to cancel and notify attendees, then sends a cancellation email.
Rooms, topics and tags
Click Rooms on the calendar to open a window with three tabs: Rooms, Topic and Tags, each with a name and a colour. A physical room can have opening hours; Orova warns you with Room is already booked for this time or Room is closed at this time. On the calendar each meeting is painted in two layers: the left bar follows its topic, the background follows its first tag.
Note
Limits
End must be after Start. The calendar, the rooms and the invitations cost no quota.06 · Meeting room
The Orova Meet room and hosting a meeting
Orova Meet runs on Orova's own servers, not through Zoom or Google. Nobody installs anything: open the link in a browser and you are in. This section covers who can join, what you can do in the room, and the host controls.
Host
The people who run the room: the meeting organizer, the workspace owner and admins, and any co-hosts. Hosts see Room settings and the controls on each participant.
Who can join
| Option | Who gets in |
|---|---|
Workspace members and invitees (default) | Workspace members plus the invited emails. Everyone signs in to Orova. |
Invitees only | Only the organizer and the invited emails. Anyone else sees You are not on the invite list. |
Anyone with the link (name only) | Guests need no Orova account. They type a name and join. |
Register first (name, phone, email) | Guests fill in name, phone and email before joining. Orova keeps the list of registrations. |
Change the option by editing the meeting; it applies from the next person who joins. Get the link with Copy link on the meeting details or in the lobby. The room opens 15 minutes before the start time and stays open up to 24 hours after it. Guests joining by name are rate-limited against spam.
Join a meeting
- 1
Open the room. On the meeting details, click
Join meeting(it opens a new tab), or open the room link. Guests seeJoin as guestand fill inYour name(plusPhoneandEmailif registration is required).![Meeting details for [DOCS] Weekly sync with Join meeting circled](/docs/orova-connect/en/s06-01-join-meeting.webp)
Join meeting opens the room in a new tab. - 2
Get ready in the lobby. Microphone and camera are off by default. The browser only asks for permission when you turn one on. Pick a
Backgroundhere if you want one. - 3
Join. Click
Join. If you are early you see when the room opens; if nobody is there yet you seeWaiting for others to join….
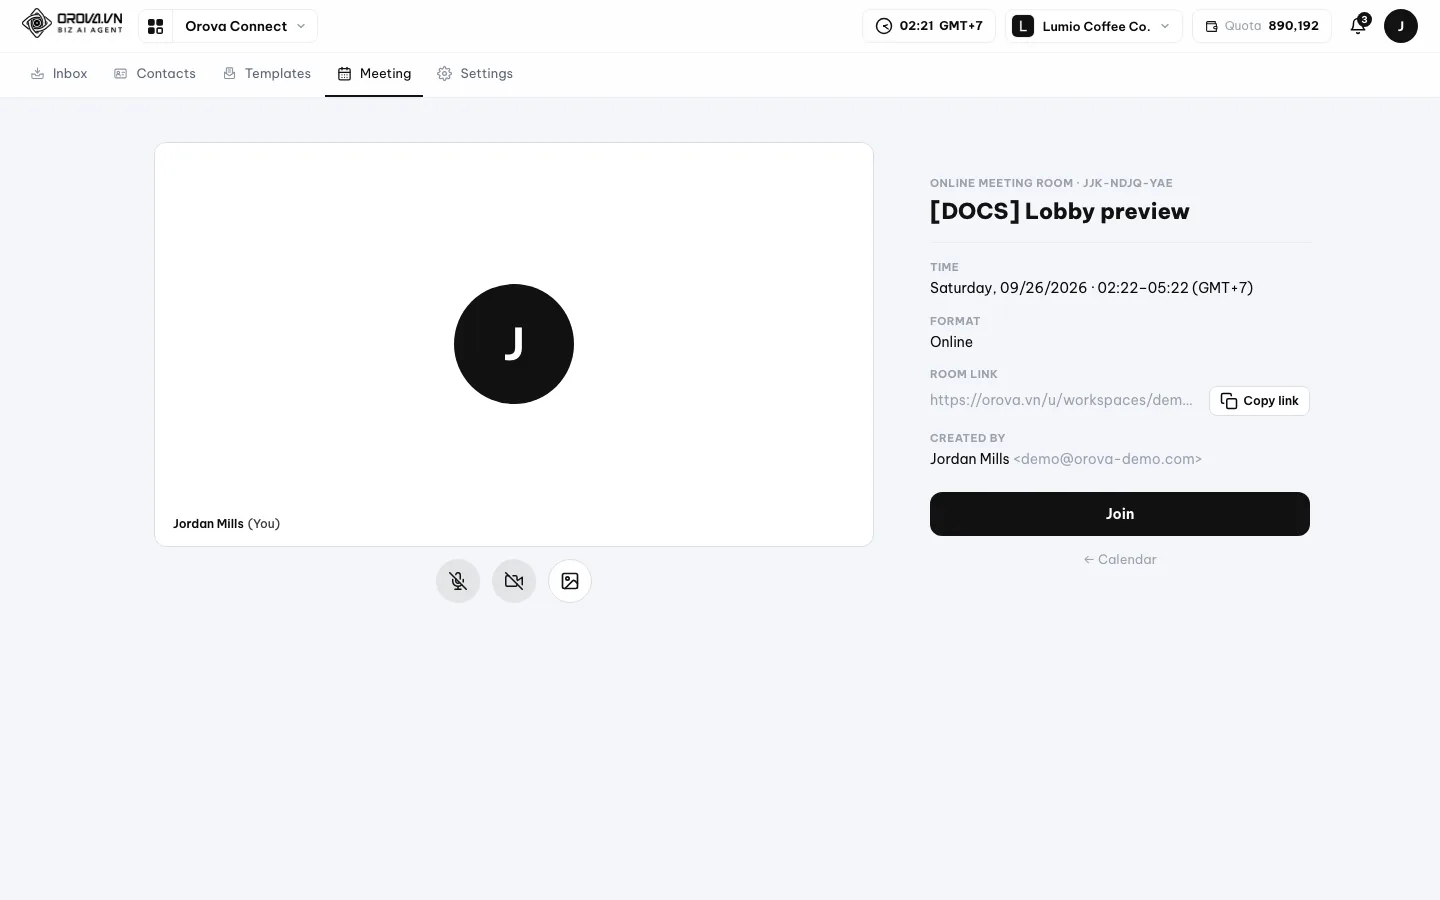
In the room
- Quality.
Auto (by server bandwidth)goes up to 1080p and steps down to 720p, 360p and 180p as the server needs; you can also choose underQuality. When the server has room, up to 50 people fit in one meeting. - Layout.
Auto,Speaker, or a grid of 4, 9 or 16 tiles.Full screenhides everything else. - Share screen. Your screen appears as its own large tile.
Stop sharingends it. - Chat. Messages with emoji and files up to 25 MB.
- Raise hand and React let you signal without talking. Everyone is told when someone joins.
- Background.
Blur,Strong blur,White,Dark, 10 ready-made images, orUpload image(under 8 MB). The effect is processed on your own device. - Record. Saves the meeting to your device as 2 files: video and separate audio. Orova does not keep a copy on its servers.
Host controls
Room settings: setWho can chat,Who can unmuteandWho can turn on cameratoEveryoneorHosts only. It applies at once; nobody has to rejoin.Co-hosts (email): type an email or pick someone from the participants, up to 20 co-hosts. Guests who joined by name cannot become co-hosts.- On each participant:
Mute,Stop video,Allow mic,Allow camera,Lock chat/Unlock chat,Make co-host/Remove co-host, andRemovefrom the room. - The
Raised handsstrip is visible to hosts only and has aLower all handsbutton. - Only a host can start AI recap (section 07). Meetings cost no quota, however many people or minutes.
Warning
Ending the meeting
End meeting closes the room for everyone and the link stops working. Only the organizer or a workspace owner/admin can press it — co-hosts cannot. For a repeating meeting, the link opens again for the next occurrence, from 15 minutes before it starts.Note
Fallback mode
Server busy, fallback mode up to 8 people). In fallback mode hosts can still remove people, but cannot mute microphones or cameras remotely.07 · AI recap and report
AI recap, in-person recap and the meeting report
This is the "meetings without note-taking" part. AI listens, writes a transcript and turns it into a four-part summary — for online meetings, for meetings around a table, and for recordings you already have.
Transcript and summary
The transcript is what was said, turn by turn, in the language each person spoke — nothing is translated. The summary has four parts: Key points, Decisions, Action items (owner – task – due date) and Open questions. It is written in the interface language of the person who started the recap or pressed summarize, in any of the 9 languages.
AI recap in an online meeting
- 1
Start it (hosts only). Click
AI recapin the room controls. Everyone in the room is told the meeting is being recorded for a summary. Only one device records each meeting; a second one seesAnother device is already recording this meeting. - 2
Keep talking. Your browser mixes the room's audio and sends it to the server in 15-second pieces, together with who was speaking when. If your own mic is off, Orova reminds you to turn it on so your voice is captured.
- 3
Stop it. Click
Stop AI recap. You seeRecording sent, AI is summarizing — see the meeting report. The AI builds the transcript with each speaker's real name, merges consecutive turns by the same person, then writes the summary. - 4
Read the result. Open the meeting report. The AI works in the background, so you can leave the page and come back. AI recap runs happily alongside
Recordto your device.
Recap an in-person meeting
- 1
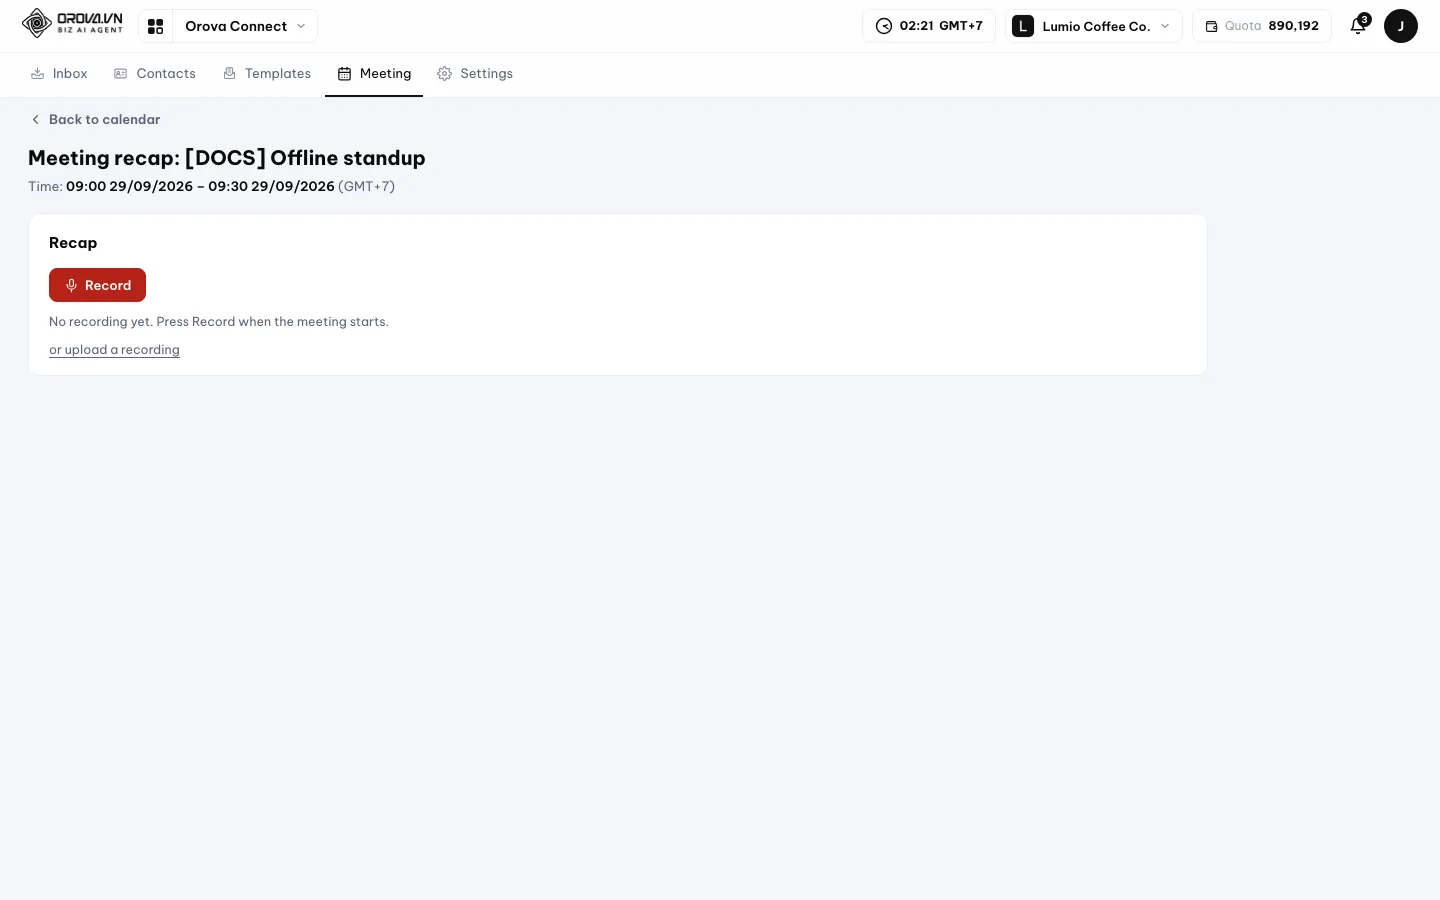
Open the recap page. Open the in-person meeting on the calendar; it takes you to
Meeting recap. - 2
Record. Place a laptop or phone in the middle of the table and click
Record. The page uses that device's microphone and uploads in 15-second pieces, so keep the tab open. If the browser has not allowed the microphone, the page saysMicrophone access was denied.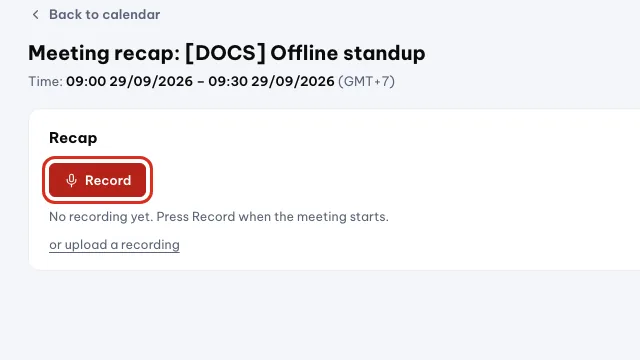
Put the device mid-table and click Record. - 3
Stop and summarize. Click
Stop & summarize. The AI separates the voices into Speaker 1, Speaker 2 and so on, counts the speakers and each one's talking time, then writes the same four-part summary. - 4
Or use a file you already have. Choose
or upload a recordingto send an existing audio or video file.Discard recordingdeletes the recording.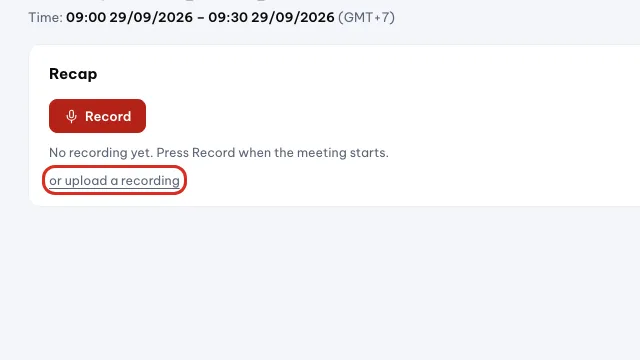
Already have a file? Upload it instead of recording.
Note
Why in-person recaps show Speaker 1, 2…
The meeting report (online meetings)
Open it from the meeting details or Report in the room. In-person meetings go to the recap page instead. The page has two cards: Attendance and AI summary.
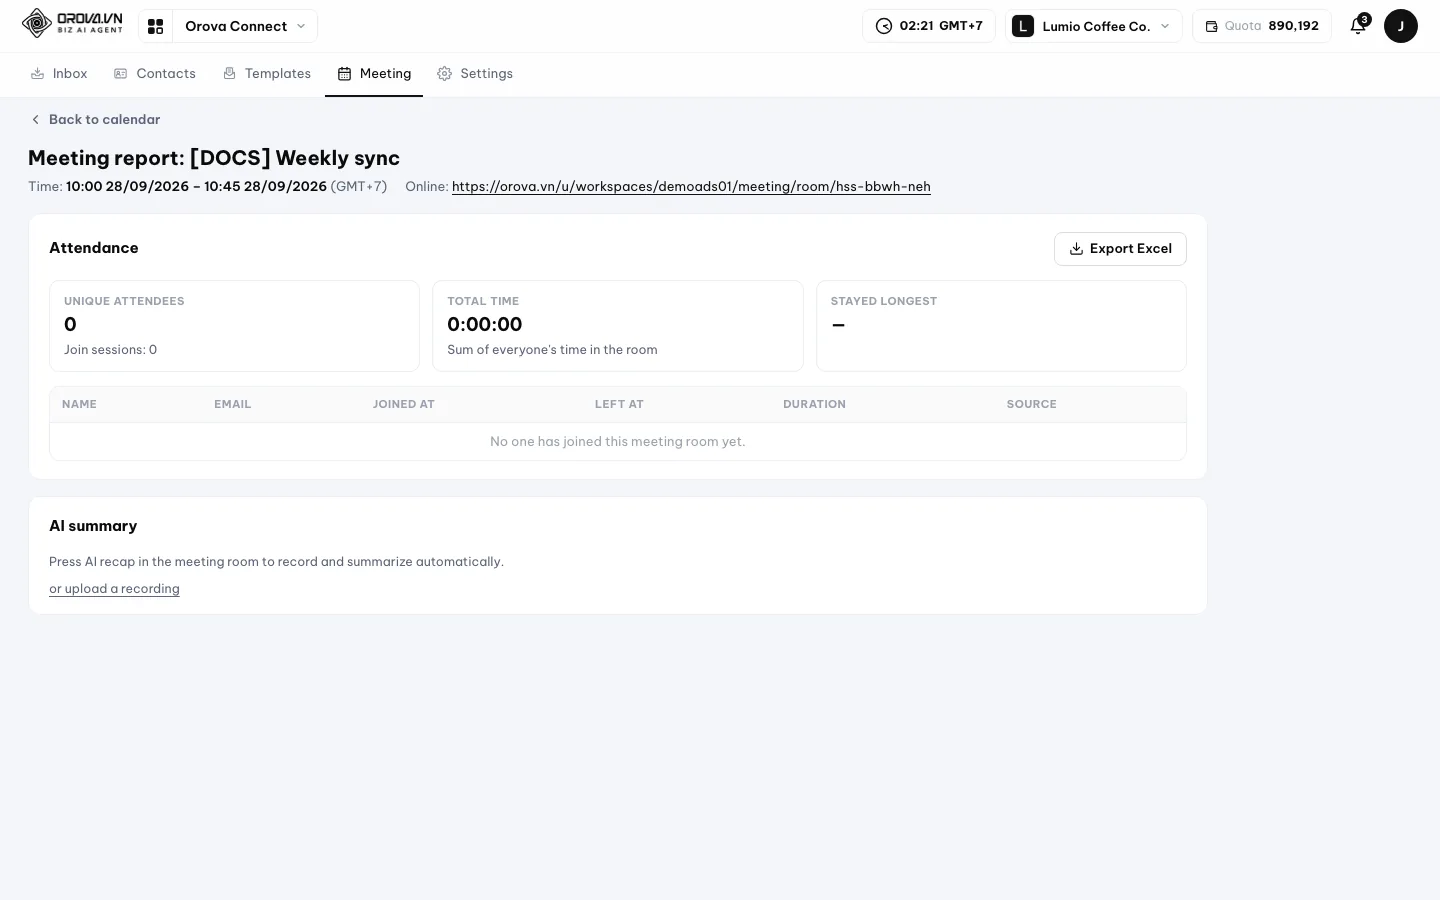
- Attendance lists who joined,
Joined at,Left at,Durationand the number ofSessions. Totals showUnique attendees(one person on two devices is not counted twice),Join sessions,Total timeand whoStayed longest. A session with no recorded leave time is counted until the room closed and markedestimated. Guests who registered appear with their email and phone. Export Exceldownloads a file with 2 sheets: one row per session, and a summary per person.- AI summary comes from the AI recap, or from a file you upload:
Choose file(webm, mp4, m4a or mp3, up to 500 MB), thenSummarize with AI. The transcript shows the number of speakers and each one's talking time. Download .mdsaves the summary as a text file.Summarize againreruns it from the stored recording — for example after switching interface language to get the summary in another language.Send to attendeesemails the summary to the invitees and the organizer, from the meeting'sSend from account. If the meeting has no sending mailbox, edit the meeting and choose one first.
Quota for recaps
- Transcription is charged by the length of the audio, the summary by the amount of text. The wallet shows it as
Meeting — AI meeting summary. - Orova estimates the cost from the recording length before running. If the wallet is short, the recording is kept: top up, then click
Summarize again. - Each
Summarize againis a new charge. - A silent recording, or one with only noise, shows
No speech was detected in the recording— the AI is not called and nothing is charged. - A single recording can be up to 600 MB.
- Attendance, Excel export and emailing the summary cost no quota.
08 · FAQ
Frequently asked questions and common errors
The questions people ask most, followed by the errors they hit most and how to fix each one.
How do I turn on AI recap?
In an online meeting on Orova Meet, a host clicks AI recap in the room controls and Stop AI recap at the end. The transcript and the four-part summary appear on the meeting report. Only hosts can start it.
How do I connect Gmail?
Turn on 2-Step Verification in your Google Account and create a 16-character app password. In Orova go to Settings › Mailboxes, click Add mailbox, then Connect Gmail, paste the app password and click Save. Signing in with your Google account is not available.
How do I book a room and invite people by email?
On the calendar click New meeting, pick a Room, type the Attendees emails separated by commas and choose Send from account. For an online meeting, leave Meeting link empty and Orova creates an Orova Meet room. Invitees get an email with an .ics file and Accept / Decline buttons.
How do I see who attended?
Open the meeting report of an online meeting. The Attendance card lists every person with join time, leave time, duration and sessions. Export Excel downloads it as a 2-sheet file.
How do I record and summarize a meeting held in person?
Open the in-person meeting on the calendar to reach Meeting recap, put a laptop or phone in the middle of the table and click Record. When you finish, click Stop & summarize. You can also upload a recording you already have.
How do I set up a signature and reply quickly with templates?
Add signatures per mailbox in Settings › Signatures and choose the defaults for new mail and replies. For quick answers, save an email with Save as template, then use Insert template when replying.
How do I change my background in a meeting?
Open Background in the lobby or in the room. Pick Blur, Strong blur, White, Dark, one of the 10 images, or Upload image (under 8 MB).
Who can join my meeting room?
It depends on Who can join in the meeting: Workspace members and invitees (default), Invitees only, Anyone with the link (name only) or Register first (name, phone, email). Edit the meeting to change it.
Gmail says my email or password is wrong.
You are most likely using your normal Google password. Gmail needs a 16-character app password, created after 2-Step Verification is on. If the message says IMAP is not turned on for this mailbox, enable IMAP in your mail provider's settings, then click Save again.
New mail is not arriving.
Click Sync in the Inbox. If it still does not arrive, open Settings › Mailboxes and click Test again. A Connection error usually means the password was changed or revoked — Edit the mailbox and enter a new app password.
My mailbox says it is full.
Each mailbox holds up to 2 GB. Once full, Orova still downloads the text of new mail but skips attachments. Delete old mail with large attachments to make room.
The AI says I am out of quota.
The workspace wallet is too low for this job. Top up on the Wallet page. For AI rewrite, run it again; for a meeting summary the recording is kept, so just click Summarize again. Nothing was charged for the blocked attempt.
I cannot get into the meeting room.
Check the time first: the room opens 15 minutes before the start and closes 24 hours after it. You are not on the invite list means the meeting is set to Invitees only — ask the organizer to add your email. Sign in to Orova to join means the room is not open to guests.
Nobody can hear me.
Make sure your mic is on in the room, and that the browser has permission to use the microphone — check the site permissions next to the address bar. A host may also have set Who can unmute to Hosts only.
The recap says no speech was detected.
The recording held only silence or noise, so the AI was not called and no quota was used. For an in-person recap, move the device closer to the speakers; in an online meeting, check that microphones were on.
I cannot make a guest a co-host.
Guests who joined with only a name have no Orova account, so they cannot be co-hosts. Co-hosts must be signed-in Orova users.
A co-host cannot end the meeting.
That is by design. End meeting is reserved for the organizer and workspace owners/admins. Co-hosts can manage participants but cannot close the room for everyone.
Tip
Test with a short meeting first
/ Need help?
Can't find what you need? Open the Support section in your workspace, or send us a message.