
Bumper ads: how to plan and launch them in 7 steps (2026)

Bumper ads give growth teams and media buyers one of the most cost-efficient unskippable formats for capturing immediate audience attention across YouTube and Google video partner networks. When planned correctly, these six-second assets reinforce brand recall without quickly triggering ad fatigue. Following this walkthrough will give you a fully configured, quality-tested campaign running inside a multi-touch video ad sequence with calibrated Target Cost-Per-Thousand-Impressions (Target CPM) bids.
Before you begin, ensure you have standard administrative access to an active Google Ads account, an associated YouTube channel hosting your unlisted creative files, an exported video master cut to exact frame boundaries, and basic target audience parameters. Setting up the campaign architecture, establishing targeting parameters, and building the ad sequence takes approximately three hours. If your primary objective is long-form product education or direct response software demonstrations requiring over 30 seconds of context, bumper ads are not suitable as a standalone format; you should deploy them strictly as supplementary reinforcement.
What Are Bumper Ads and Why Launch Them?
Bumper ads are non-skippable video advertisements capped at a strict duration of six seconds, served before, during, or after streaming content on YouTube and embedded Google video partners. The primary objective of deploying bumper ads is driving cost-efficient brand reach and message retention, billed exclusively through a Target CPM model where you pay per thousand impressions delivered. The complete implementation process spans seven execution phases and typically requires three to four hours from initial script drafting to campaign activation.
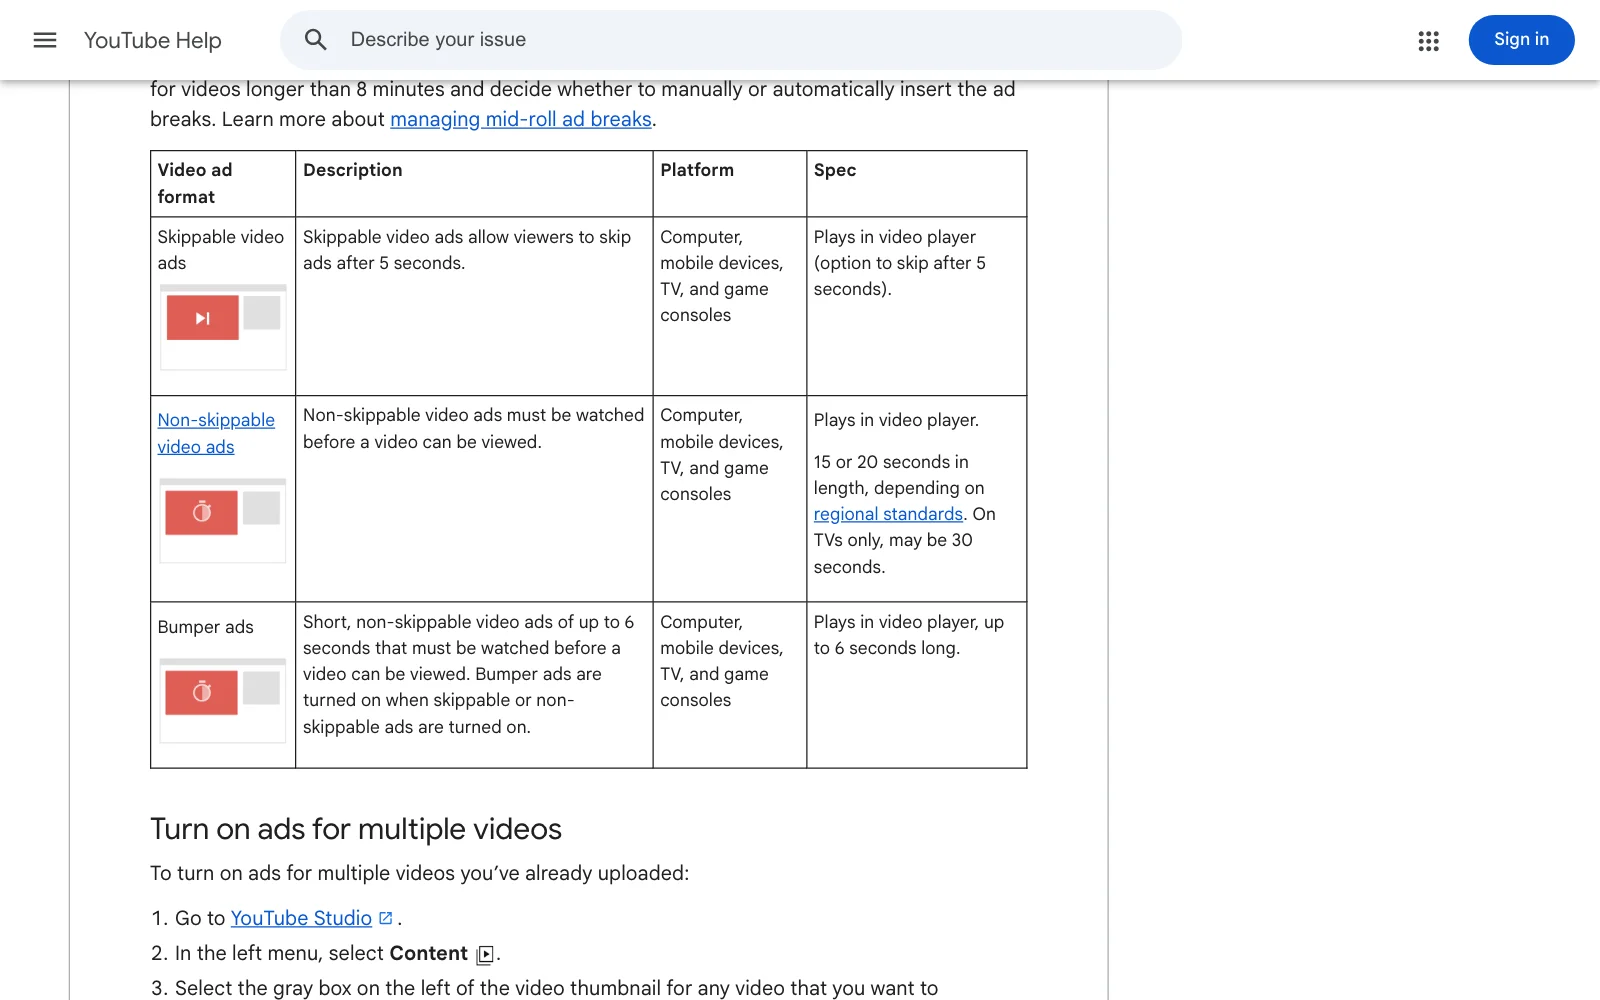
Unlike skippable in-stream formats where users can opt out after five seconds, bumper ads guarantee that your entire creative plays to completion. Because the window is exceptionally brief, the format functions best as an unskippable visual and auditory reminder rather than an expansive sales pitch. As of 2026, media buyers leverage bumper ads primarily to anchor brand recall, reinforce longer brand films, or announce time-sensitive promotional windows at a fraction of the cost required by standard 15-second or 30-second inventory.
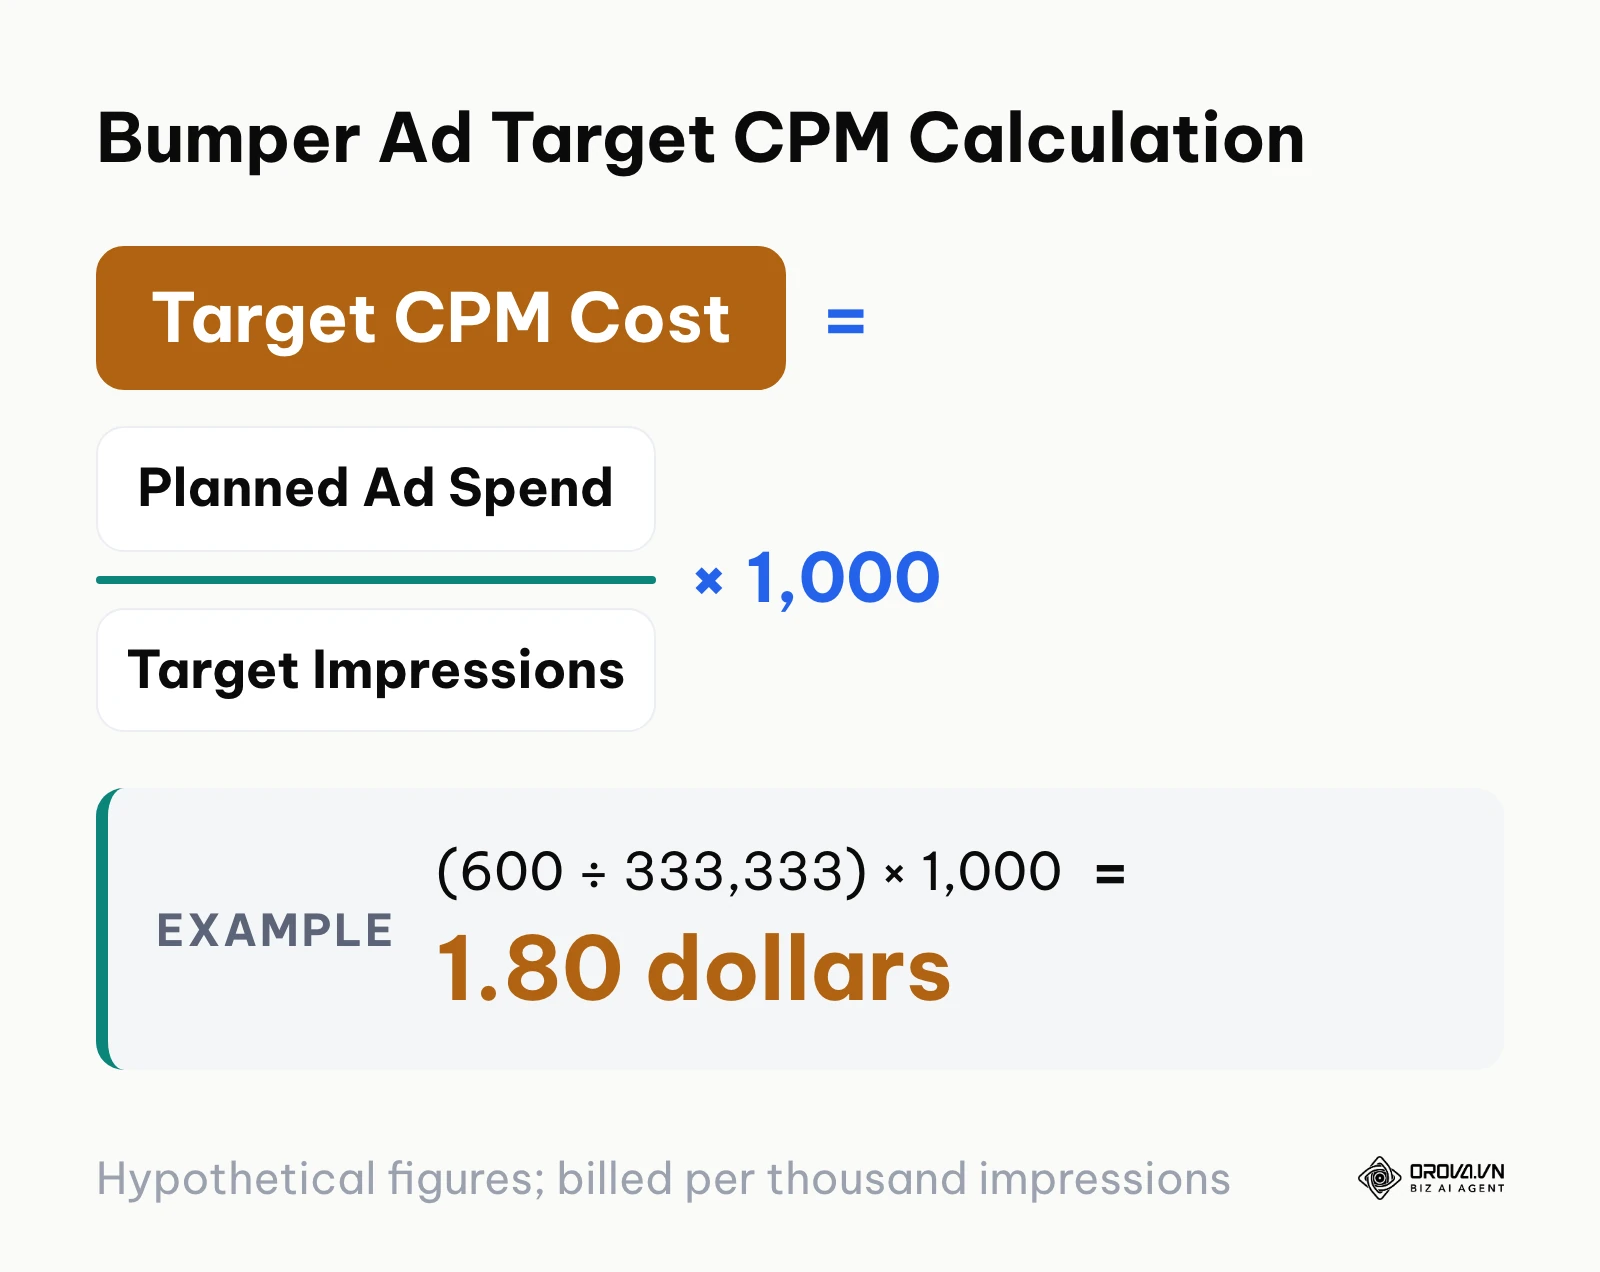
The formula diagram below illustrates how Target CPM billing determines your campaign costs based on impression volume. For example, 600 dollars buying 333,333 impressions works out to a 1.80 dollars CPM (hypothetical figures).
Prerequisites to Prepare Before Setting Up Bumper Ads
Launching an unskippable video campaign without verified technical assets and proper account linkages results in policy rejections or bidding inefficiencies. Collect and verify each prerequisite item in the table below before opening Google Ads.
| Asset or Prerequisite | Source / Tool | Estimated Prep Time | Consequence If Missing |
|---|---|---|---|
| Active Google Ads Account | Google Ads Admin Portal | 10 minutes | Inability to create campaigns or access video inventory |
| Linked YouTube Channel | YouTube Studio > Settings > Channel > Advanced | 15 minutes | Cannot pull video assets or view organic engagement metrics |
| Rendered 6.0-Second Video Master | Video Editing Software (Premiere / DaVinci) | 1–3 days | Ad review rejection if file duration exceeds 180 frames |
| Unlisted YouTube Video URL | YouTube Studio Upload Interface | 10 minutes | Creative cannot be linked during ad group configuration |
| Audience Lists / Segment Rules | Google Ads Shared Library > Audience Manager | 30 minutes | Cannot build sequential remarketing streams |
| Target CPM Budget Allocation | Media Planning Spreadsheet | 20 minutes | Overbidding or premature budget exhaustion |
Reviewing this inventory in advance prevents configuration bottlenecks once you enter the Google Ads campaign creation flow.
Step 1: Lock in Your Single Message and Storyboard for Bumper Ads
Your objective in this step is to isolate exactly one customer takeaway and translate it into a storyboard that communicates value within six seconds. Bumper ads fail when creative teams attempt to condense a 30-second script into a six-second container. You cannot introduce a problem, build narrative tension, explain multiple features, and deliver a complicated call to action within 180 frames.
Crafting the Three-Beat Storyboard Framework
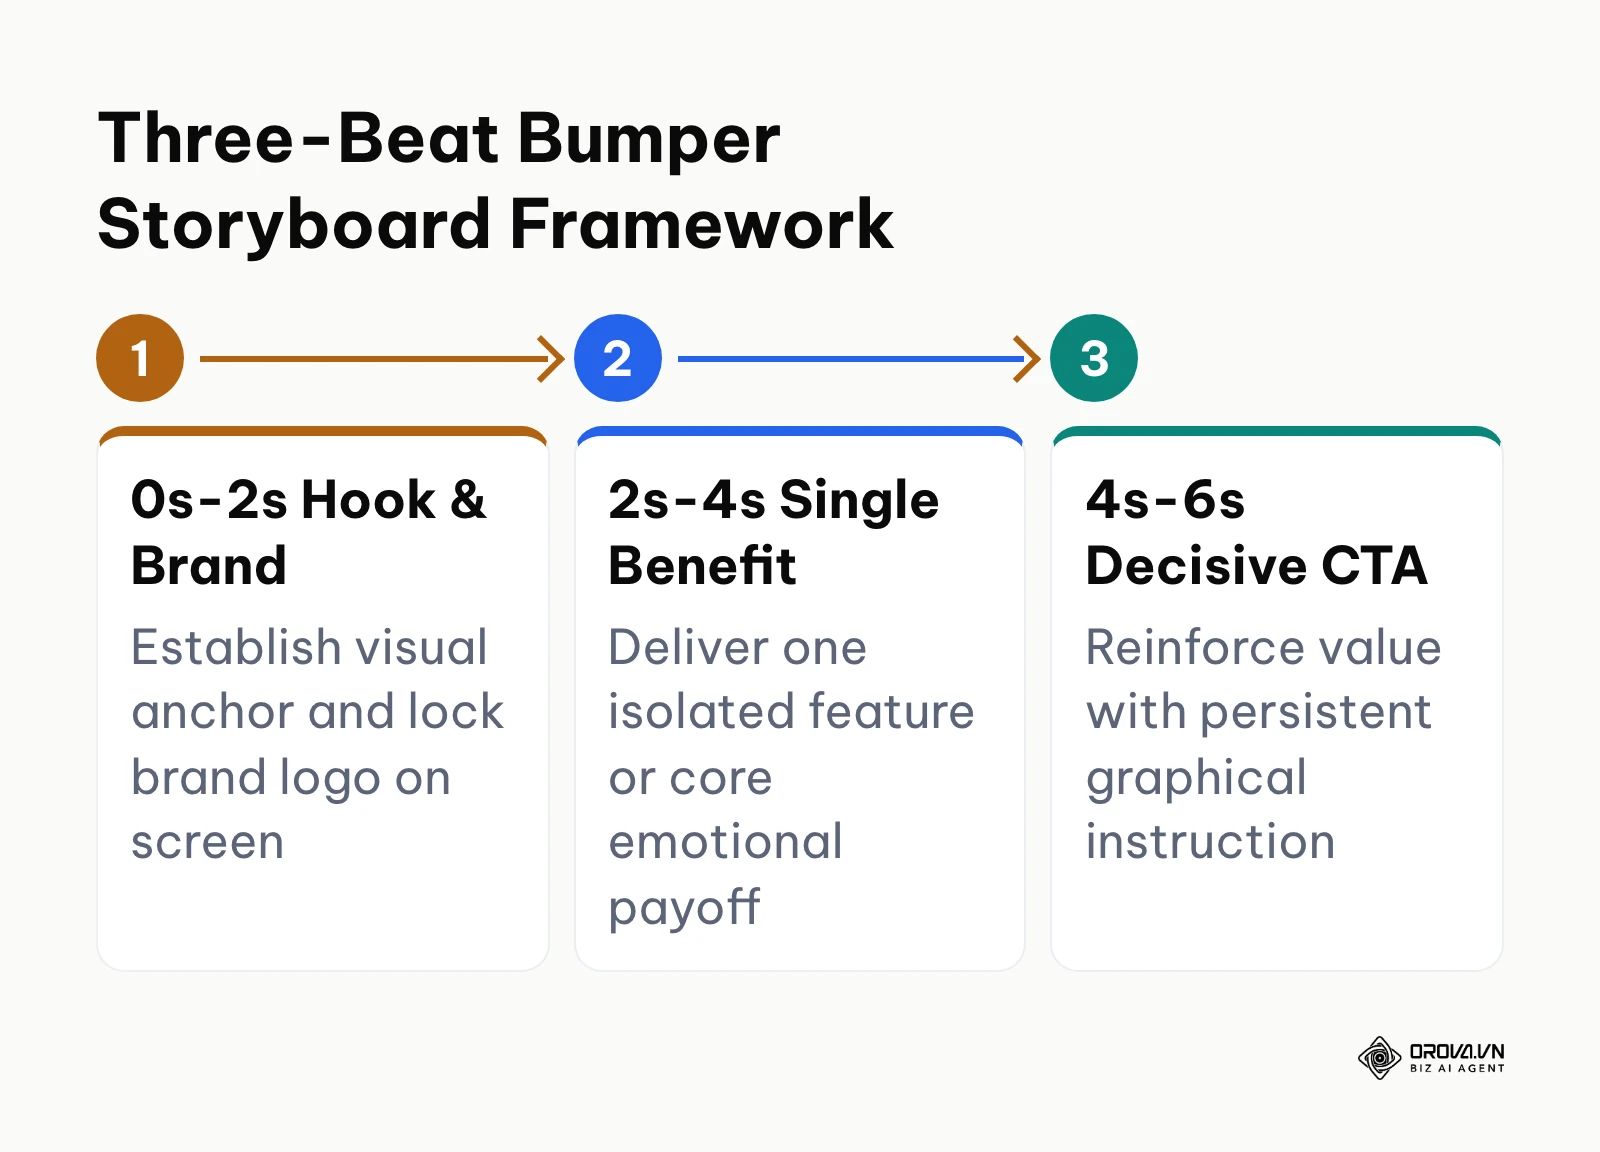
Open your storyboard document or physical planning template. Structure your creative using a rigid three-beat timing model: Beat 1 (0.0s to 2.0s) serves as the visual hook and brand imprint; Beat 2 (2.0s to 4.0s) delivers a single core benefit; Beat 3 (4.0s to 6.0s) locks in a decisive call to action and persistent brand sign-off. The diagram below summarizes this chronological creative flow.
To ensure seamless production, use the standardized four-column storyboard framework below. This structure forces alignment across timing, visual composition, sound design, and brand cues across industries.
| Timing Window | Visual Composition (Video Track) | Audio & Voiceover (Audio Track) | Logo & Call to Action (Graphics) |
|---|---|---|---|
| 0.0s – 2.0s | High-contrast macro action or visual twist capturing immediate focus | Signature sound effect or punchy opening hook | Prominent brand logo fixed in upper-left or center-top safe zone |
| 2.0s – 4.0s | Demonstration of a single product feature or dramatic outcome | Single-sentence voiceover stating the primary benefit | Product name or benefit tag displayed in clean secondary typography |
| 4.0s – 6.0s | Clean hero product lockup with persistent directional pointer | Final voiceover prompt aligned with visual call to action | Persistent button graphic stating clear action (e.g., "Shop Now", "Get Demo") |
Industry Storyboard Templates
Review these three industry-specific storyboard templates to guide your copywriters and video animators:
| Industry | 0.0s–2.0s (Hook & Brand) | 2.0s–4.0s (Single Benefit) | 4.0s–6.0s (Call to Action) |
|---|---|---|---|
| Consumer Packaged Goods (FMCG) | Condensation drops roll down a chilled sparkling water can opening with a sharp, resonant hiss; logo pinned top-left | Can tilts, pouring crisp liquid over ice with a title card: "Zero Sugar. Real Fruit." | Hero packshot with the call to action: "Find it in the cold aisle near you." |
| Business-to-Business SaaS | A messy spreadsheet turns into a streamlined pipeline board; logo pinned top-left | Voiceover: "Stop rebuilding manual pipeline reports every Monday." Overlay: "Automate in 60 Seconds." | Clean software interface frame with a button graphic: "Start Free Workspace." |
| E-commerce Apparel | Model steps through heavy rain in dry waterproof boots, water splashing in slow motion; logo anchored top-left | Dynamic text cut: "100% Recycled Stormproof Leather." | Footwear packshot on a clean gradient with a persistent end-card: "Shop the Winter Drop." |
Hypothetical example: Single-Message Editing Pivot
A direct-to-consumer beverage company with five regional retail partners planned a summer product launch. Their initial bumper ad concept contained three distinct claims: zero artificial sweeteners, locally sourced ingredients, and home delivery discounts. During storyboard reviews, the creative team realized the voiceover required 14 words, forcing an unnaturally fast reading speed that obscured the brand name. The team resolved this by cutting two secondary claims entirely, focusing the visual track solely on the chilled can opening and narrowing the voiceover to: "Real fruit fizz, zero sugar." The resulting cut delivered clear visual branding at second 0.8 and left a full 2.2 seconds for the retail location call to action.
Visually verifiable result: A completed storyboard document containing exactly one benefit statement, a voiceover script under 10 syllables, and visual brand placement present from frame one.
Common mistake: Hiding the brand logo until the final two seconds. Viewers glancing away or closing their browser before second six will completely miss brand attribution. Fix this by burning your logo into the top safe zone starting at frame one.
Step 2: Render Bumper Ad Video Assets to Exact Technical Specifications
Your objective in this step is to render your final video export from your non-linear editing software (such as Adobe Premiere Pro, Final Cut Pro, or DaVinci Resolve) to match Google's ingestion standards without exceeding duration limits. Google Ads Help states that bumper ads must be 6 seconds or shorter, so any asset that runs longer cannot be used as a bumper ad.
Core Export Specifications
Configure your export settings inside your video editing suite to match these exact parameters:
| Export Setting | Recommended Value | Note |
|---|---|---|
| Target Container | MP4 or MOV | MP4 keeps file sizes smaller for upload |
| Video Codec | H.264 (.mp4), High Profile, 2 consecutive B-frames, closed GOP | Matches YouTube's recommended upload encoding |
| Aspect Ratio & Resolution | 16:9 widescreen (1920×1080 progressive); optional 9:16 vertical (1080×1920) companion cut | 16:9 for desktop and TV, 9:16 for YouTube Shorts mobile inventory |
| Frame Rate | 23.976, 25, 29.97, or 30 fps | Avoid variable frame rates |
| Audio Codec | AAC-LC stereo, 48 kHz, 384 kbps (YouTube's recommended upload setting) | Many editors also aim for about -14 LUFS integrated loudness for consistent voice clarity |
Managing Frame Boundaries and Duration Limits
The most critical technical hurdle in bumper ad production is the strict six-second boundary. If your timeline runs 6 seconds and 1 frame (6.033 seconds at 30 fps), YouTube can report the video as longer than 6 seconds, and Google Ads will not accept it as a bumper ad, blocking campaign launch.
To eliminate this risk, set your editing timeline to an absolute ceiling of 5 seconds and 28 frames (at 29.97 fps) or 5 seconds and 29 frames (at 30 fps). Trimming the timeline to about 5.9 seconds leaves a safety margin so encoding does not push the file past 6 seconds.
Visually verifiable result: Inspecting file properties in your operating system or media player confirms a duration reading of 00:00:05.90 or 00:00:06.00 and zero variable frame rate warnings.
Common mistake: Exporting with an audio tail that extends beyond the video cut. Even if your video track ends at 5.9 seconds, a trailing reverb tail extending to 6.2 seconds can make YouTube report the file as longer than 6 seconds. Always place a hard audio cut and volume fade-to-zero at 5.8 seconds.
Step 3: Run the 7-Point Technical Pre-Flight Quality Assurance Check for Bumper Ads
Your objective in this step is to run a rigorous quality assurance inspection on your rendered video before uploading it to YouTube and submitting it to Google Ads. Catching formatting errors at this stage prevents delayed campaign starts and policy disapprovals under standard digital marketing compliance checklist guidelines.
Review each checkpoint in the technical QA framework below:
| # | Inspection Item | Verification Method | Pass Criteria | Remediation If Failed |
|---|---|---|---|---|
| 1 | Exact Duration Ceiling | NLE timeline counter & file inspector | Duration ≤ 5 seconds, 29 frames (≤ 180 frames @ 30fps) | Trim tail frames to 5.9s total duration |
| 2 | Horizontal Safe Zones | Visual overlay grid on 1920×1080 canvas | Clear margin: 20% bottom, 15% top, 10% sides | Re-center titles away from YouTube UI overlays |
| 3 | Vertical Safe Zones (Shorts) | Mobile UI mock overlay on 1080×1920 canvas | Critical text kept within central 1080×1080 box | Shift text elements out of right-side button rail |
| 4 | Audio Loudness Standards | Loudness radar meter plugin | Integrated loudness reads -14 LUFS (±1 LUFS) | Adjust master audio limiter and re-render |
| 5 | Brand Presence Timing | Visual frame inspection | Brand mark visible prior to frame 60 (second 2.0) | Move logo graphic to appear at frame 0 |
| 6 | Call to Action Clarity | Single-frame freeze check at 5.0 seconds | High-contrast font, readable at 200px width | Boost font size and add background drop shadow |
| 7 | Audio Copyright Clearance | YouTube Studio upload pre-check | Zero Content ID copyright claim flags | Replace commercial audio with licensed stems |
After passing all seven checkpoints, navigate to YouTube Studio, click the Create button in the top-right corner, select Upload videos, and set the video visibility parameter strictly to Unlisted. Setting the asset to Unlisted ensures it remains publicly accessible to the Google Ads ad review engine without cluttering your public channel feed.
Visually verifiable result: The YouTube Studio video details page displays the video status as "Unlisted", with a green "Checks complete: No issues found" indicator under the Copyright tab, and duration listed as exactly 0:06.
Common mistake: Setting the video to "Private" instead of "Unlisted". Google Ads cannot crawl or serve videos marked as Private, which triggers an immediate asset error when attaching the creative in campaign setup.
OROVA ADS applies AI Agent to automate and optimize ad performance on Google, Meta and TikTok. Scale your budget safely, monitor 24/7 and expand your business quickly.
Experience the solution at orova.vn/ads
Step 4: Calculate and Allocate Your In-Stream and Bumper Ad Budget
Your objective in this step is to establish an optimal budget distribution between longer storytelling assets and short bumper ads. Bumper ads deployed in complete isolation often struggle to educate cold audiences. Conversely, running only skippable in-stream ads increases overall campaign CPMs and limits overall reach.
The 70/30 Budget Allocation Formula
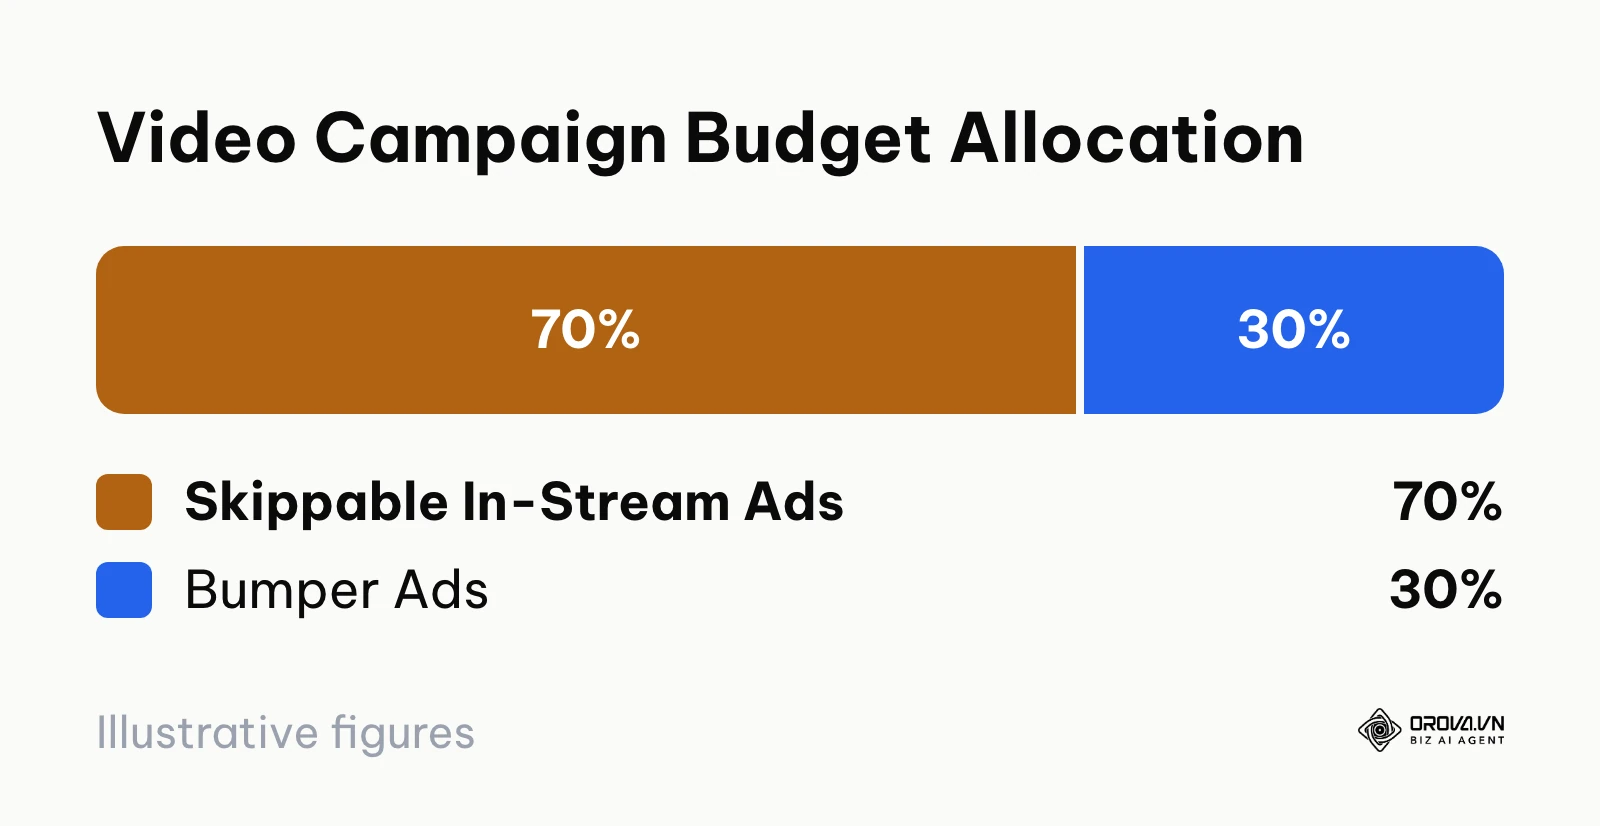
For comprehensive video campaigns balancing brand building with frequency capping, implement a 70/30 budget allocation model:
- 70% of Budget to Skippable In-Stream Ads: Allocates the majority of spend to longer assets (15s to 30s) billed on Cost-Per-View (CPV) or Target CPM. This drives comprehensive product storytelling, audience qualification, and narrative depth.
- 30% of Budget to Bumper Ads: Allocates the remainder to six-second unskippable bumper ads billed on Target CPM. This ensures high-frequency reinforcement, keeping your brand top-of-mind across viewers who were exposed to the longer narrative.
Worked Budget Allocation Calculation (Hypothetical 2,000-Dollar Flight)
To demonstrate how this math operates in live media buying, evaluate the following hypothetical scenario based on an initial 2,000-dollar YouTube advertising flight. The CPM figures are assumptions for the math, not Google benchmarks; use the estimates shown in your own account:
- Total Campaign Budget: 2,000 dollars
- Skippable In-Stream Budget (70%): 1,400 dollars
- Bumper Ads Budget (30%): 600 dollars
- Estimated In-Stream Target CPM: 3.50 dollars
- Estimated Bumper Target CPM: 1.80 dollars
All amounts are in US dollars. Using standard CPM calculation formulas (Impressions = [Budget ÷ Target CPM] × 1,000), calculate expected impressions and reach metrics:
| Campaign Tier | Budget Allocation | Modeled Target CPM | Estimated Impressions | Target Frequency | Estimated Unique Reach |
|---|---|---|---|---|---|
| Skippable In-Stream (Tier 1) | 1,400 dollars (70%) | 3.50 dollars | 400,000 | 1.6 touches | ~250,000 users |
| Bumper Ads (Tier 2) | 600 dollars (30%) | 1.80 dollars | 333,333 | 2.5 touches | ~133,000 retargeted users |
| Blended Total Campaign | 2,000 dollars (100%) | 2.73 dollars (Blended) | 733,333 | 2.9 touches (Avg) | ~250,000 blended reach |
Hypothetical example: Budget Realignment Under Rising CPMs
A mid-sized B2B SaaS platform allocating 2,000 dollars a month across video channels noticed their standalone skippable in-stream campaigns suffered from escalating costs, reaching a 4.80 dollars CPM that capped the 2,000 dollars budget at roughly 417,000 impressions. The media team realigned their media plan by applying the 70/30 split, reserving 600 dollars specifically for bumper ads bid at a 1.90 dollars Target CPM. By funneling users who viewed the primary product overview into the lower-cost bumper ad pool, total delivered impressions rose to roughly 600,000 (1,400 dollars at 4.80 dollars plus 600 dollars at 1.90 dollars) while maintaining a consistent weekly touchpoint for engaged prospects.
Visually verifiable result: A documented media plan spreadsheet displaying formulas that link total spend, planned Target CPM caps, and projected impression output across both creative formats.
Common mistake: Setting bumper ad Target CPM bids equal to or higher than in-stream CPV bids. Bumper ad inventory typically clears auctions at lower CPM rates than full-length formats; overbidding inflates costs without delivering incremental placement priority.
Step 5: Configure the Bumper Ad Campaign Architecture in Google Ads
Your objective in this step is to create the foundational campaign shell within Google Ads and configure bidding, networks, languages, and geographic targeting. When you advertise on Google Ads, selecting the correct campaign goal and subtype determines available bidding strategies and placement controls.
Campaign Setup Navigation
- Log into your Google Ads dashboard.
- In the left-hand navigation menu, click Campaigns, then click the blue "+" (New Campaign) button.
- On the Choose your objective screen, select Create a campaign without a goal's guidance (or Awareness and consideration). Starting without a goal keeps every video subtype and Target CPM bidding available.
- Under Select a campaign type, select Video.
- When prompted to Select a campaign subtype, you have two paths depending on your flight architecture:
- Standalone Bumper Flight: Choose Video reach campaign, then pick the non-skippable or efficient reach option, and choose Bumper ads as the format when you create the ads. Google renames these menu labels from time to time, so look for the option that lists bumper ads.
- Sequenced Retargeting Flight: Choose Ad sequence (video ad sequencing). This is the recommended enterprise configuration for coordinating long-form and bumper touchpoints.
Core Settings Configuration
Once inside the campaign configuration screen, establish your top-level parameters:
| Setting | What to Enter | Why It Matters |
|---|---|---|
| Campaign Name | A structured taxonomy such as VID_BUMPER_US_Awareness_Q3_2026 | Keeps reports and filters readable as campaigns multiply |
| Bid Strategy | Target CPM (tCPM) with your calculated bid (e.g., 1.80) | Bumper ads are bought on impressions, not views |
| Budget and Dates | Campaign Total or Daily; for the 600 allocation over a 30-day flight, 20.00 / day | Spreads delivery evenly across the flight |
| Networks | Check YouTube; uncheck Video partners on the Google Display Network for strict player quality control | Keeps the six-second creative inside the YouTube player |
| Locations & Languages | Your target markets (e.g., United States) and language (e.g., English) | Matches the audience your creative was made for |
| Content Exclusions | Inventory type = Standard inventory; under Excluded types and labels, exclude Embedded YouTube videos and Live streaming videos | Protects brand safety and cuts unengaged background impressions |
Visually verifiable result: The Google Ads campaign summary sidebar shows a Video campaign with the reach or sequence subtype you chose and the bid strategy confirmed as "Target CPM".
Common mistake: Leaving "Video partners on the Google Display Network" checked when running delicate, high-precision creative. Display network video placements often appear in small outstream widgets where six-second audio cues lose impact.
Step 6: Build the Video Ad Sequence and Link Your Bumper Ads Creative
Your objective in this step is to assemble the sequential delivery rules connecting your initial longer video ad to your secondary bumper ad reminder. Google's video ad sequencing guidance describes this exact pattern: a longer ad tells the story first, then shorter ads such as bumpers follow up as reminders.
Step-by-Step Sequence Construction
- In the campaign builder under Video ad sequence steps, click Add step.
- Step 1 Configuration (The Story Anchor):
- Name the step: Step 1 - Skippable Longform.
- Paste the unlisted YouTube URL of your 30-second brand video.
- Set the ad format to Skippable in-stream ad.
- Input your Final URL and display URL.
- Set your Target CPM or Maximum CPV bid for Step 1.
- Click Add to sequence.
- Step 2 Configuration (The Bumper Reminder):
- Click the "+" icon directly under Step 1 to add a downstream branch.
- Under Interaction with previous step, select your trigger condition:
- Choose Impression if you want every user exposed to Step 1 to see the bumper ad, regardless of whether they skipped.
- Choose View if you want only qualified users who watched at least 30 seconds of Step 1 to receive the reminder.
- Paste the unlisted YouTube URL of your rendered 5.9-second bumper ad video.
- Select Bumper ad as the format (it is only available for videos of 6 seconds or less).
- Set the step name: Step 2 - 6s Bumper Reinforcement.
- Input your Target CPM bid (e.g., 1.80).
Hypothetical example: Resolving Sequence Drop-Off
An apparel e-commerce brand built a two-step sequence requiring users to complete a full 30-second view in Step 1 before qualifying for a 6-second discount bumper ad. After five days of serving, the media buyer noticed that Step 2 was delivering fewer than 500 impressions per day, leaving over 80% of the allocated bumper budget unspent. The issue stemmed from an overly restrictive entry gate: 82% of cold prospects skipped the initial video at second 6. The buyer resolved this by changing the sequencing condition from "View" to "Impression". This allowed anyone exposed to the initial brand hook to immediately receive the 6-second bumper ad reminder, restoring delivery to planned daily volume within 24 hours.
Visually verifiable result: The sequence flow builder displays a visual branching diagram showing Step 1 connecting via a directional line to Step 2 with the label "Trigger: Impression / View" clearly indicated.
Common mistake: Forgetting to assign identical Final URLs and tracking parameters across both steps. Mismatched UTM parameters complicate cross-channel attribution reporting downstream.
Step 7: Set Bid Targets, Frequency Caps, and Launch Bumper Ads
Your objective in this final step is to configure delivery pacing controls, apply audience frequency caps, review campaign diagnostics, and officially submit the campaign for Google policy review. Implementing an automated ads playbook requires clean pacing thresholds at initial deployment.
Frequency Capping and Demographic Controls
- In the left-hand navigation pane for your new campaign, click Additional settings.
- Click Frequency capping.
- Select Cap impression frequency. Enter 3 impressions per Week per user across the campaign. This protects users from excessive repetition while ensuring sufficient ad weight to solidify recall.
- Select Devices. If your creative was produced strictly in 16:9 widescreen, you can leave all devices active, or restrict delivery to Mobile phones, Tablets, and Computers while excluding TV screens if your landing page requires immediate digital clicks.
- In the Ad Group setup section, define your audience targeting:
- Under Demographics, uncheck age brackets or household income tiers that do not match your ideal customer profile.
- Under Audience segments, layer your in-market segments or custom intent segments built around high-value competitor search terms.
- Verify your Target CPM bid is entered in the bid field at the bottom of the page.
- Click Create campaign, review the campaign overview confirmation screen, and click Continue to campaign.
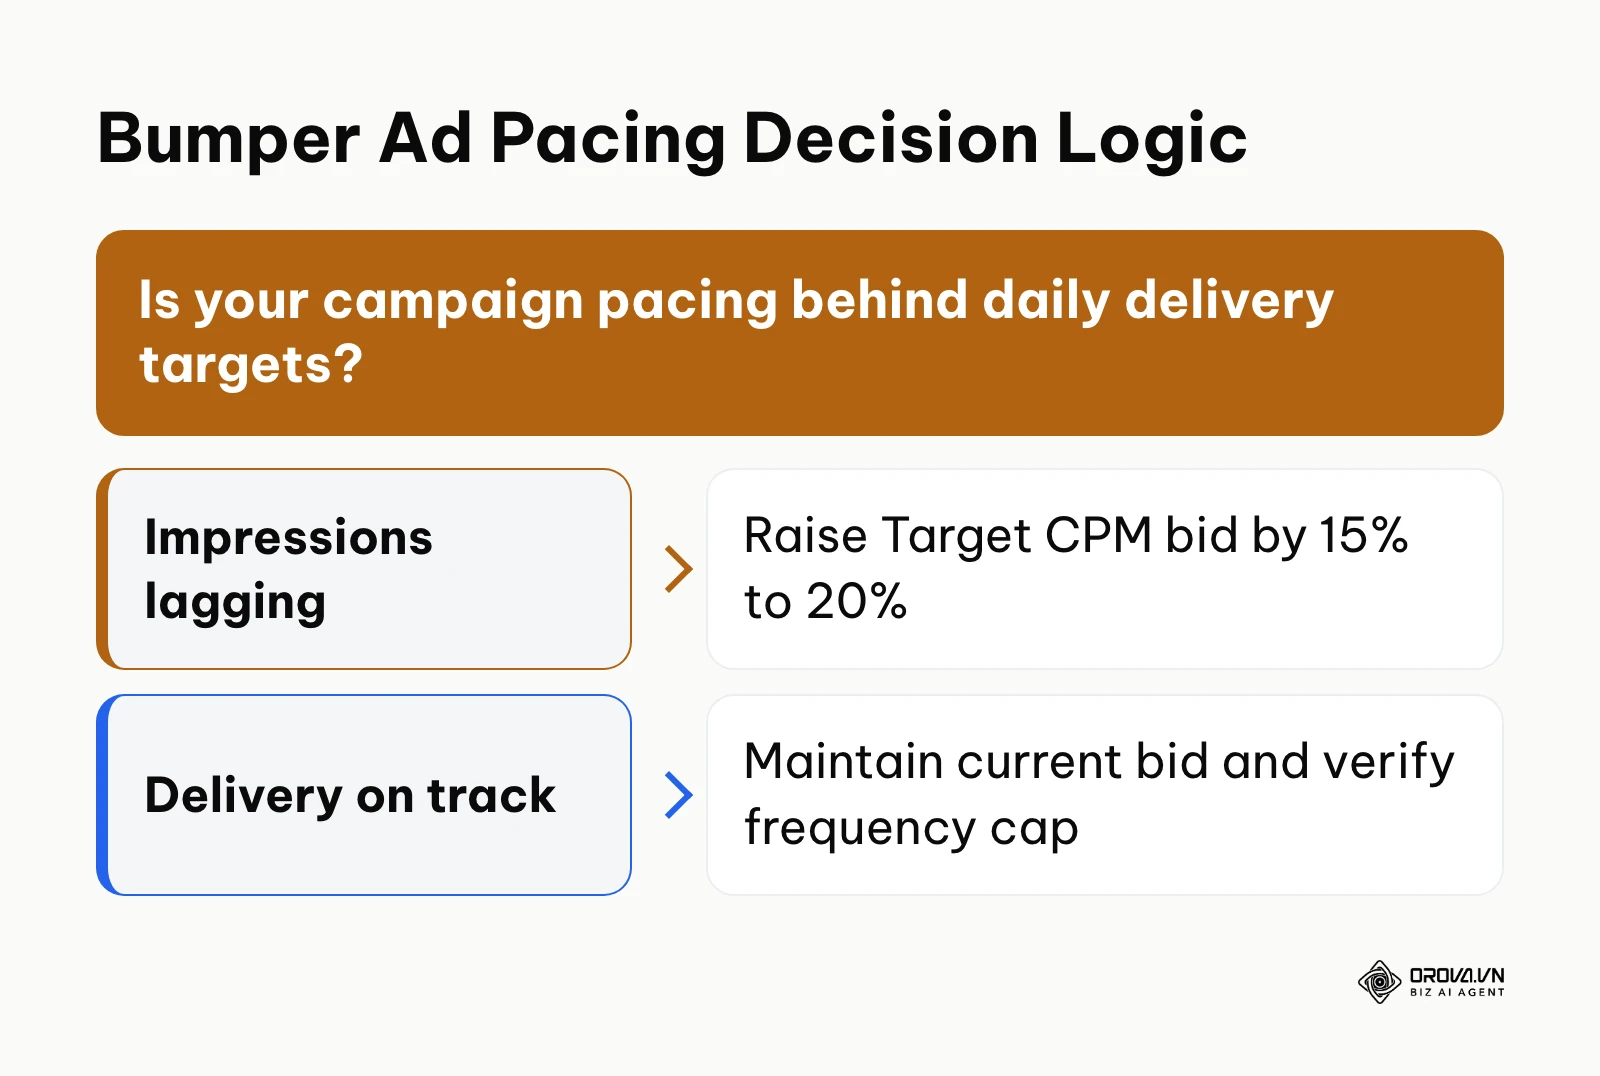
The decision tree below outlines how to evaluate and calibrate your Target CPM bids during the initial 48 hours following launch: if impressions lag behind your daily pacing, raise the Target CPM bid by 15% to 20%; if delivery is on track, hold the bid and verify the frequency cap.
Visually verifiable result: The campaign status column in your Google Ads dashboard reads "Eligible", the ad approval column shows "Under review" (typically clearing within 24 to 48 hours), and the daily budget displays your designated allocation.
Common mistake: Setting frequency caps too high (e.g., 10 impressions per day). Because bumper ads are unskippable, aggressive frequency can generate negative brand sentiment. Cap frequency between two and four impressions per user weekly.
Overall Checklist for Bumper Ads Setup
Use this operational checklist to track your implementation progress across all campaign phases. Print or reference this table during setup to ensure zero skipped steps.
| Setup Phase | Core Operational Task | Completion Signal | Estimated Time |
|---|---|---|---|
| Phase 1: Concept | Write 3-beat storyboard with 1 isolated value proposition | Storyboard approved with logo visible at 0.0s | 2–4 hours |
| Phase 2: Video Render | Export 16:9 MP4 at 1920×1080, duration ≤ 5.9 seconds | File properties confirm duration ≤ 0:05.90 | 1–2 hours |
| Phase 3: QA & Upload | Run 7-point QA check and upload to YouTube as Unlisted | YouTube checks show zero Content ID or policy issues | 30 minutes |
| Phase 4: Budget Math | Calculate 70/30 split and determine Target CPM floor | Allocation spreadsheet completed with reach models | 30 minutes |
| Phase 5: Shell Setup | Create Video campaign without goal guidance in Google Ads | Campaign shell created with Standard Inventory set | 20 minutes |
| Phase 6: Sequencing | Assemble Step 1 (Longform) and Step 2 (Bumper) logic | Branching visual sequence rendered in Google Ads UI | 30 minutes |
| Phase 7: Bidding & Launch | Set Target CPM bid, apply 3/week frequency cap, activate | Campaign status switches to Eligible / Under review | 15 minutes |
Maintaining this systematic cadence ensures your campaigns launch without technical delays or configuration errors.
Want to scale your budget but afraid of breaking performance?
Integrate OROVA ADS now - an AI Agent that automatically monitors and optimizes Google, Meta, TikTok ads 24/7. Now, expanding and replicating your Performance Ads team is just one click away.
Try it now at: orova.vn/ads
Common Bumper Ad Mistakes and Troubleshooting
Even experienced media buyers occasionally hit delivery snags when launching short-form unskippable video campaigns. Review the diagnostic guide below to troubleshoot performance issues.
| Observed Issue | Probable Root Cause | Recommended Remediation |
|---|---|---|
| Ad rejected: "Video length exceeds 6 seconds" | Editing timeline exported at 6.03s, so YouTube reports it as over 6 seconds | Trim master timeline to 5 seconds, 28 frames; re-export and re-upload |
| Zero impressions after 48 hours | Target CPM bid set below competitive auction clearing price | Increase Target CPM bid by 15% to 20% until delivery begins pacing |
| Bumper step in sequence not serving | Step 1 completion rate is too low; gate set strictly to "View" | Change sequence trigger from "View" to "Impression" to widen pool |
| High CPMs (> 5.00 dollars) on bumper placement | Audience targeting is over-constrained with stacked criteria | Loosen demographic exclusions; broaden custom audience segment size |
| Negative viewer feedback or channel complaints | Frequency capping omitted; single users exposed 8+ times daily | Apply strict frequency cap of 2 to 3 impressions per week at campaign level |
| Disapproved for copyright issues | Background music flagged by automated Content ID scanner | Replace track with commercially licensed audio stem or royalty-free asset |
Once several video, search, and social campaigns run at the same time, dedicated Google Ads management tools help media teams keep bids, budgets, and pacing rules consistent across accounts.
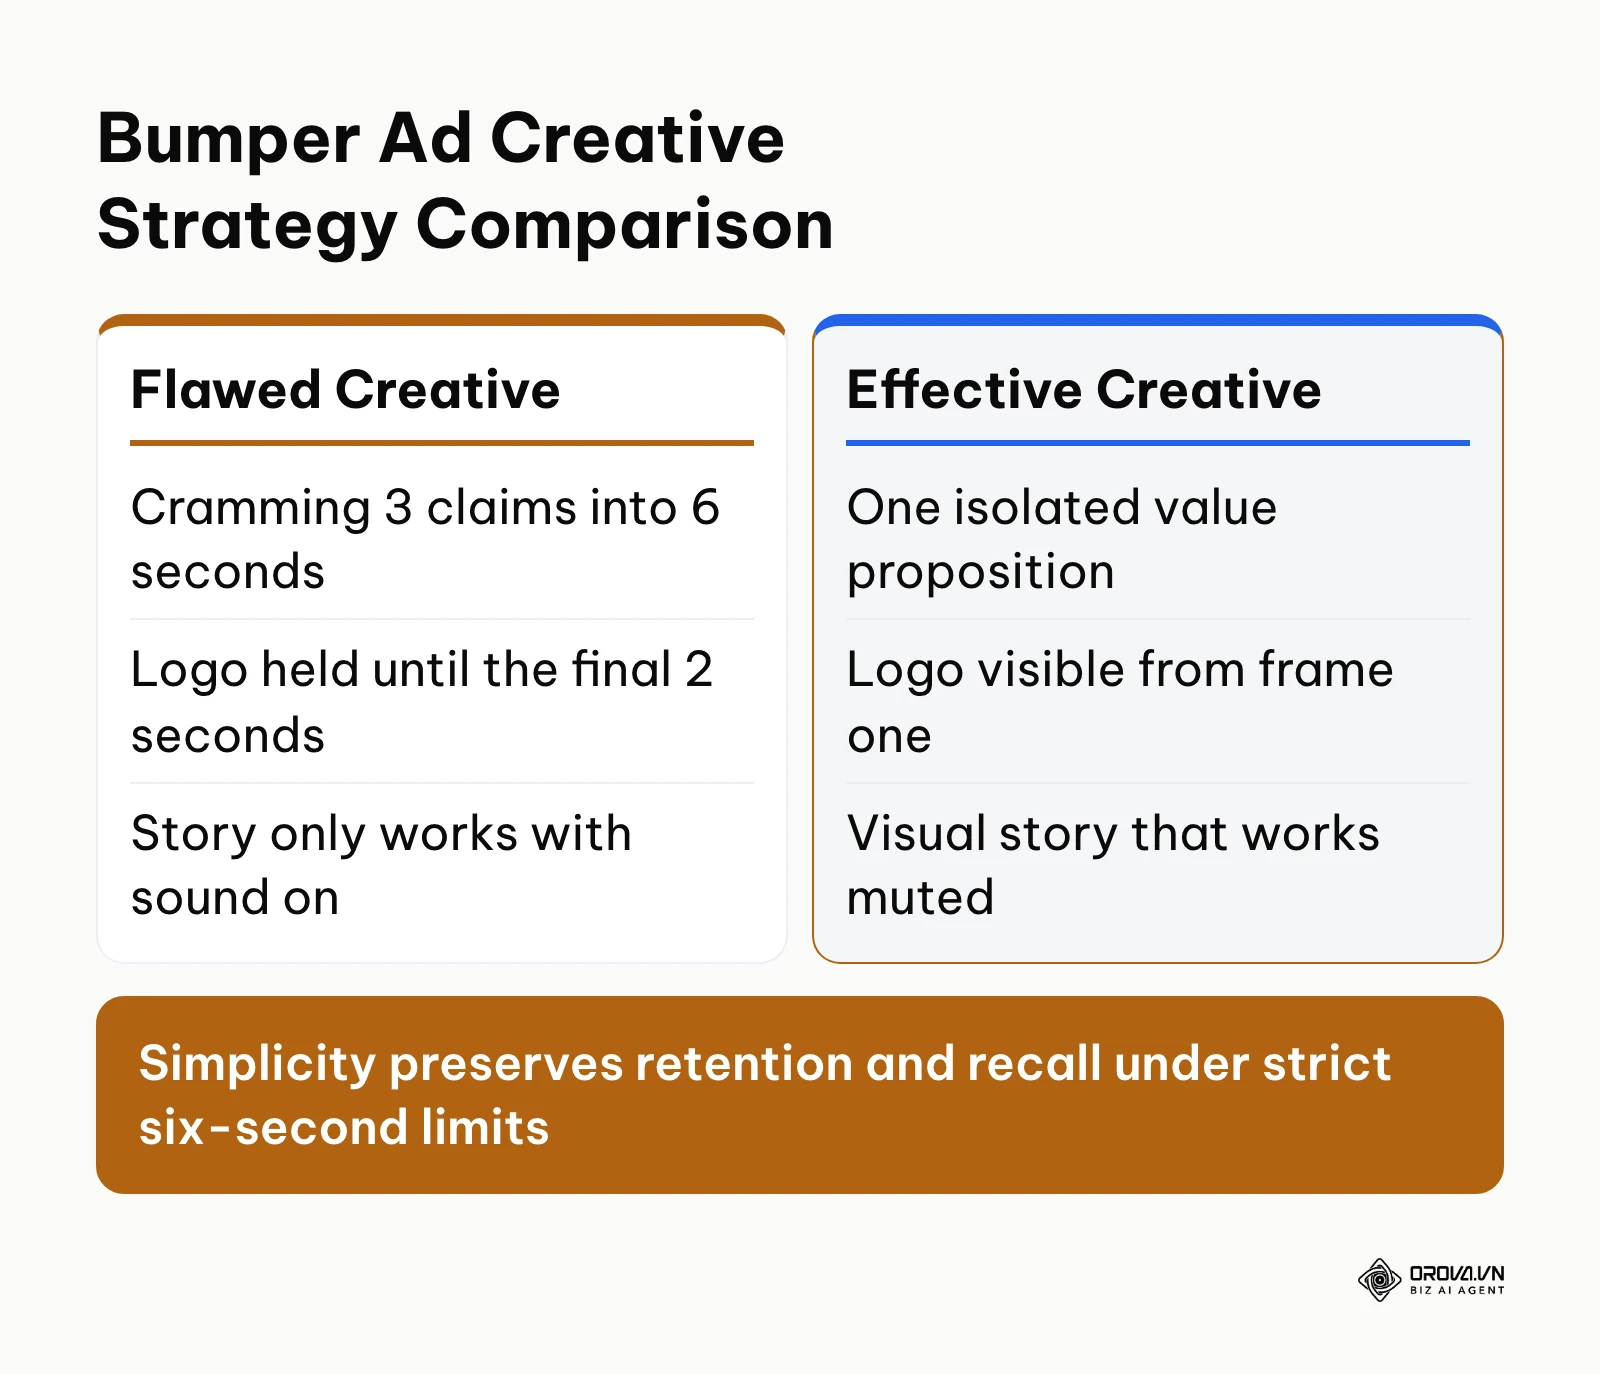
On the creative side, the most frequent errors happen before launch: cramming three claims into six seconds, holding the logo until the final two seconds, and building a story that only works with the sound on. The comparison below contrasts a flawed bumper creative with an effective one.
Measuring Bumper Ad Performance and Key Metrics
Because bumper ads function primarily as unskippable awareness and frequency vehicles, judging their performance solely on click-through rate (CTR) or direct-response return on ad spend (ROAS) will lead to flawed conclusions. Non-skippable short-form video is better judged on completion rate and reach in your target audience than on click-through rate alone.
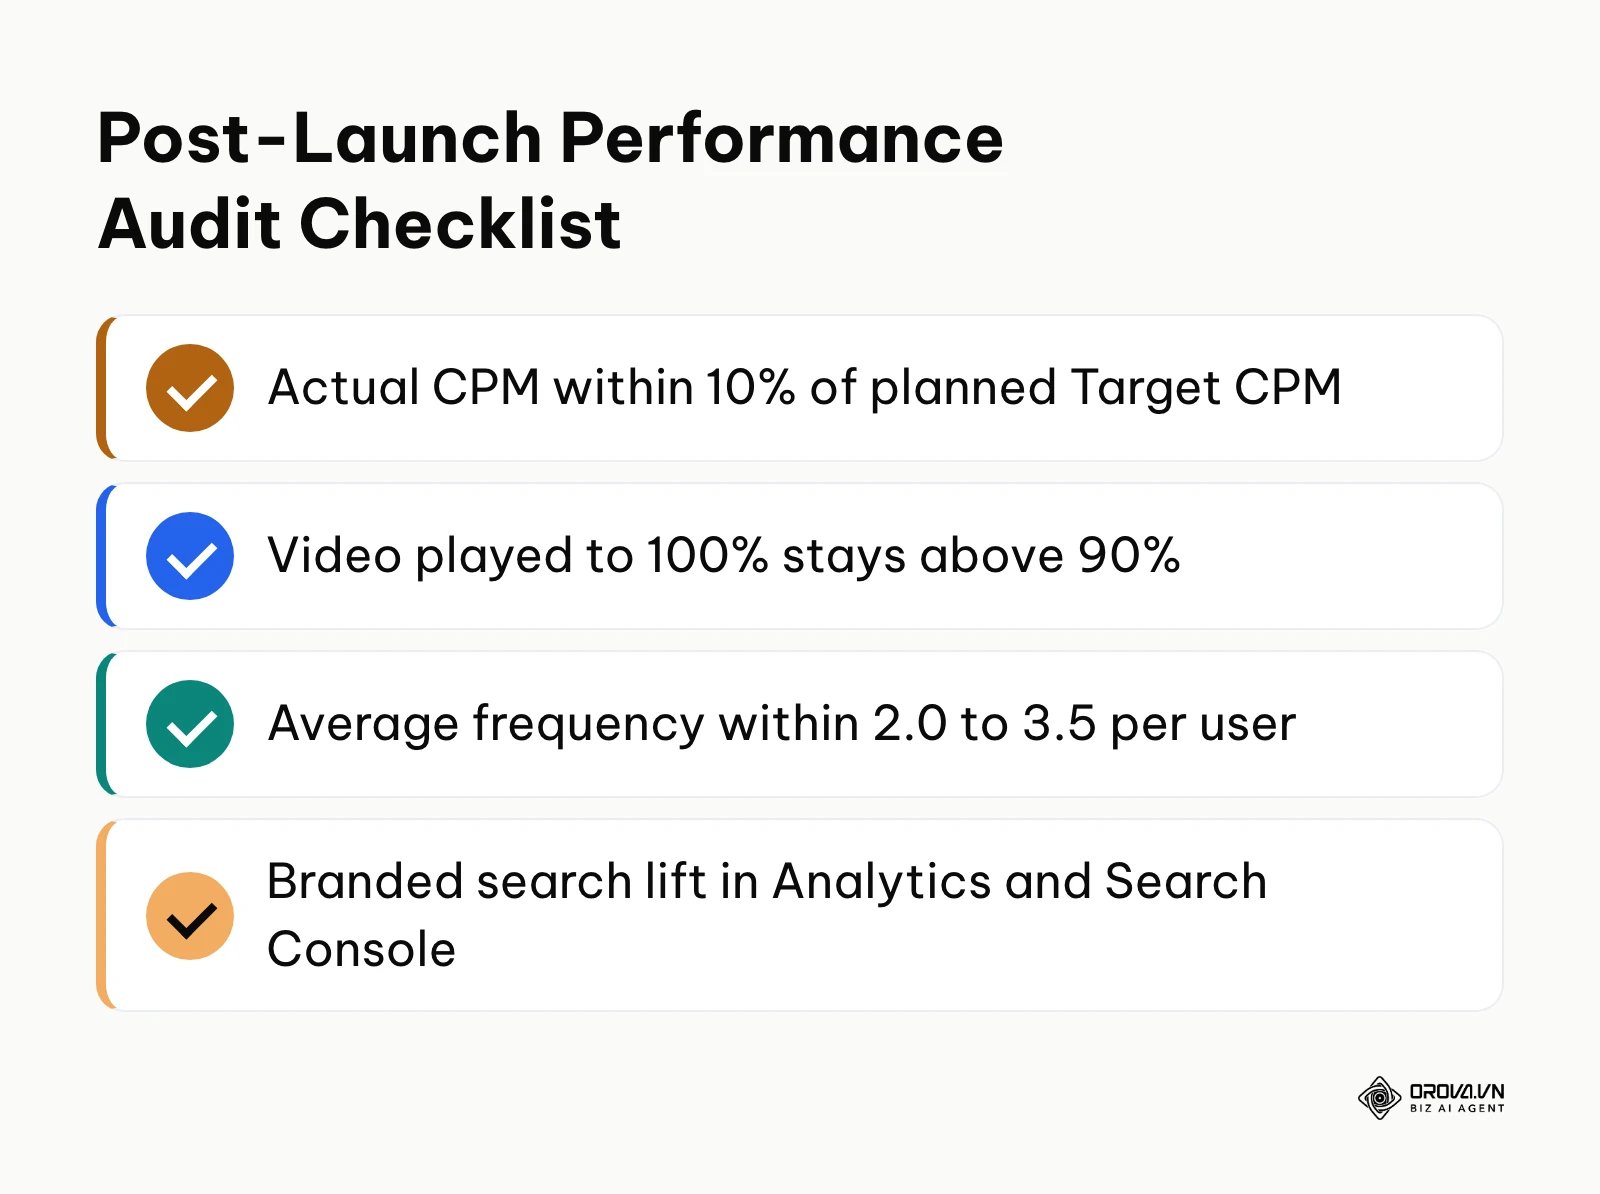
Focus your evaluation on these primary performance indicators within Google Ads reporting:
- Target CPM Efficiency: Compare your actual delivered Average CPM against your planned Target CPM. Delivering within 10% of your benchmark indicates accurate audience sizing and healthy auction competitiveness.
- Video Completion Rate: Because bumper ads cannot be skipped, a practical rule of thumb is that your Video Played to 100% metric should stay above 90%. A noticeably lower figure usually points to technical buffering failures or user drop-off from poor mobile connection environments.
- Unique Reach & Average Frequency: Track the Unique Users metric in Google Ads reporting over a 30-day window. Divide total delivered impressions by unique reach to verify your average frequency aligns with your planned ceiling of 2.0 to 3.5 touches per user.
- Search Lift and Brand Volume: In your linked Google Analytics and Google Search Console accounts, observe branded search query volume during and immediately following your bumper ad flight. A healthy bumper campaign lifts downstream organic and paid search demand.
Review these metrics weekly inside Google Ads reporting columns to calibrate bids and sequence triggers as campaign flighting progresses.
Future Trends in Bumper Ads: Author's Perspective
Looking at video ad delivery across major advertising ecosystems as of 2026, video consumption has decentralized across mobile shorts, vertical feeds, and connected television (CTV) living room screens. Based on these observable shifts, I foresee three fundamental evolutions shaping bumper ads over the next two to three years.
First, I believe the boundary between horizontal YouTube bumper ads and vertical short-form placements will dissolve completely into unified, responsive micro-creative containers. Today, advertisers still treat YouTube 16:9 bumpers and 9:16 Shorts as separate production workflows. Over the next 24 to 36 months, ad platforms are likely to ask advertisers to provide modular asset packs that automatically render across both widescreen CTV streams and vertical mobile feeds simultaneously. Media teams should prepare today by mandating that every six-second video concept is storyboarded and filmed with safe zones supporting both 16:9 and 9:16 aspect ratios from day one.
Second, in my view, generative artificial intelligence will fundamentally reshape the iteration speed of six-second creative testing. Today, producing five distinct bumper ad variations requires substantial editing and voiceover recording overhead. Over the next two to three years, ad platforms may increasingly assemble modular hooks, voiceover pitches, and calls to action based on real-time viewer signals. Advertisers who rely on rigid, monolithic six-second edits may find it harder to keep creative fresh than competitors using composable video assets. Media buyers should prepare by breaking their video creative into swappable 2-second visual and auditory stems today.
Third, I lean toward the expectation that privacy-first attribution will elevate bumper ads as essential anchors in multi-touch sequence modeling. As browser cookie deprecation and mobile tracking restrictions limit direct-response tracking, advertisers will increasingly evaluate short-form video based on aggregated media mix modeling rather than click attribution. If economic headwinds suppress overall digital ad spend or platforms roll out aggressive ad-free subscription tiers faster than expected, CPM inflation could compress the viability of low-margin brands using this format. Advertisers should prepare by establishing solid first-party data capture mechanisms and conversion APIs to maintain audience qualification signals independent of third-party cookies.
Frequently Asked Questions About Bumper Ads
How do bumper ads differ from skippable in-stream ads?
Bumper ads are capped at a strict duration of six seconds and cannot be skipped by the viewer, billing advertisers on a Target CPM (cost per thousand impressions) model. Skippable in-stream ads can run for several minutes, allow viewers to skip after five seconds, and typically bill on a Cost-Per-View (CPV) basis when a viewer watches 30 seconds or interacts with the card. Bumper ads prioritize rapid, cost-effective frequency and brand recall, whereas skippable in-stream ads focus on in-depth product education and audience qualification.
Why was my 6-second video ad rejected for exceeding the duration limit?
Google Ads only accepts videos of 6 seconds or less as bumper ads. If your editing software exports a timeline containing even a single frame beyond six seconds (such as 6 seconds and 1 frame, or trailing audio reverb), YouTube can report the runtime as longer than 6 seconds. To eliminate this issue, trim your editing timeline to about 5.9 seconds (5 seconds and 28 frames at 29.97 fps) before uploading.
What is an ideal Target CPM benchmark for YouTube bumper ads?
Google does not publish a single benchmark, because CPMs vary by country, audience, season, and inventory. Highly competitive B2B audiences and fourth-quarter holiday retail periods usually cost noticeably more. Start with the bid estimate and reach forecast Google Ads shows for your targeting, then adjust after 48 hours of delivery data.
Can bumper ads drive direct sales conversions on their own?
Bumper ads rarely function effectively as standalone direct-response drivers for complex, high-consideration products due to their brief six-second format. However, when deployed inside a sequential campaign behind a longer explanatory video or retargeting previous website visitors, bumper ads can trigger impulse purchases and promotional conversions at very competitive acquisition costs.
How does artificial intelligence impact bumper ad production and optimization?
Artificial intelligence streamlines bumper ad deployment by automating video timeline reframing between widescreen and vertical Shorts formats, analyzing script pacing, and predicting audience visual retention. On the campaign management side, machine learning algorithms optimize real-time Target CPM bidding, pacing delivery across intraday auction fluctuations to secure impressions when target audiences are most active.
How many times per week should a user see a bumper ad?
An optimal frequency cap for unskippable bumper ads is two to four impressions per user per week. Because viewers cannot skip the format, exposing an individual prospect more than five times weekly can trigger message fatigue and negative brand association. Applying strict frequency caps in your Google Ads campaign settings ensures broad reach while protecting audience goodwill.
Where Should You Start with Bumper Ads?
To begin executing your video advertising strategy without becoming overwhelmed, identify which of the following three scenarios matches your current operational reality:
- Scenario 1: You have existing 30-second brand videos but zero short-form assets. Open your video editing software or contact your creative editor this afternoon. Load your best-performing 30-second brand film, identify the single most compelling 5-second product shot, place your brand logo in the top safe zone, and render a 5.9-second cut following our 7-point QA checklist.
- Scenario 2: You already have 6-second creative assets uploaded to YouTube. Log into your Google Ads dashboard today and navigate to Audience Manager. Build a sequential remarketing audience segment capturing users who visited your core product pages in the last 30 days, create a Video reach campaign, and set a conservative Target CPM bid to test delivery.
- Scenario 3: You are currently running standalone in-stream video ads with plateauing reach. Review your media spend spreadsheet this week. Carve out exactly 30% of your existing video budget and restructure your campaign into a two-step Video Ad Sequence, using your current long-form video as Step 1 and attaching a fresh reminder cut for your secondary bumper ads.
About the author

Builder of Orova
Nguyễn Đỗ Trọng Ân has 8 years of experience in marketing, including 6 years managing market development across Asia. He builds Orova, a Biz AI Agent that never sleeps: it plans, runs and optimizes work for businesses.
Run your business with AI Agents
Orova is the always-on Biz AI Agent — it plans, runs, and optimizes the work for you.
Save time, unlock productivity.