
How to make a Linktree in 7 steps (2026): a creator guide

Learning how to make a Linktree is one of the most effective ways to turn casual social media visitors into newsletter subscribers, loyal customers, and brand advocates. By the time you complete this practical tutorial, you will have a fully functional, mobile-optimized bio landing page published live, complete with conversion-tested visual hierarchy, clean Google Analytics 4 (GA4) parameter tracking on every button, and a dynamic QR code for print packaging.
To execute this guide, you will need an active email address, administrative access to your destination URLs, and about twenty minutes of focused work. If you run a high-volume corporate store that already routes all social traffic to an existing native mobile application, you can bypass third-party link aggregators. For independent creators, consultants, and growing digital brands, the steps below deliver a polished, high-performing hub.
What You Need to Know Before You Make a Linktree
Setting up a Linktree profile consolidates your fragmented web presence into a single, mobile-friendly landing page accessible through a clean, memorable URL. The entire implementation process spans seven straightforward steps and requires approximately fifteen to twenty-five minutes from registration to live deployment.
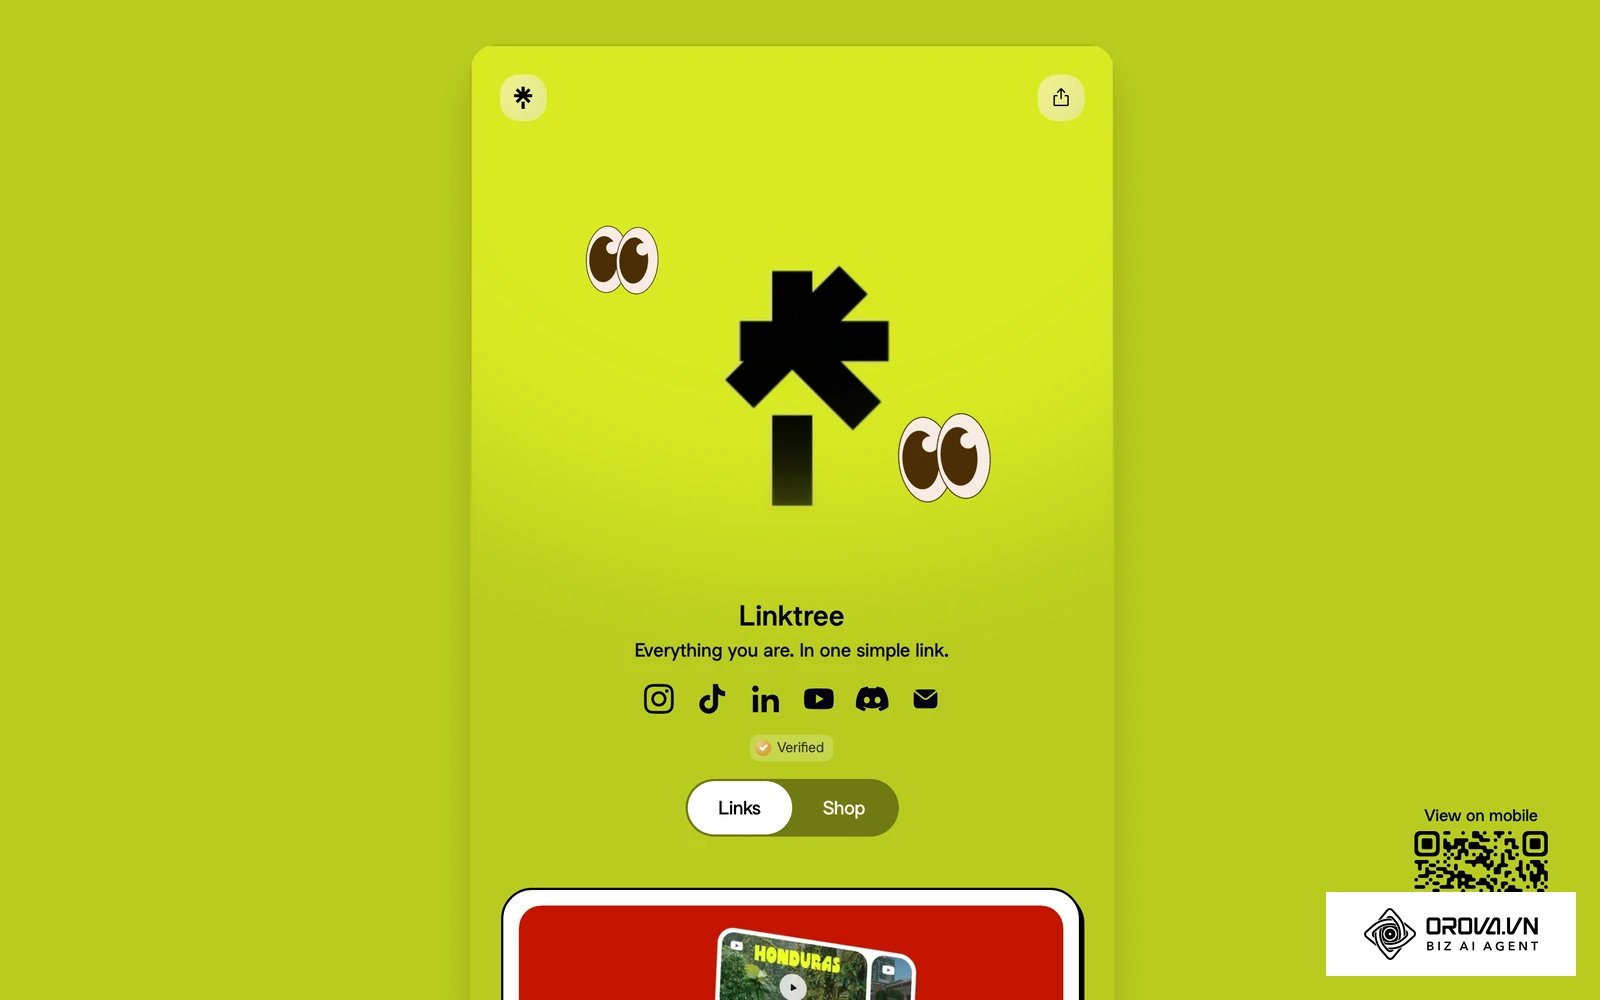
A link in bio page functions as a digital traffic switchboard. Instead of forcing you to constantly swap out the single link permitted in your Instagram, TikTok, or X bio, it presents incoming visitors with a curated menu of prioritized destinations. Creators and businesses use bio pages to send mobile audiences to podcast episodes, shop storefronts, booking schedules, and lead capture forms.
The screenshot below shows Linktree's own live profile page: an avatar, a short bio, and a vertical stack of buttons, which is exactly the structure you will build in the steps that follow.
Pre-Setup Checklist: What to Prepare Before Starting
Attempting to configure your bio page on the fly often results in broken links, mismatched brand colors, and incomplete tracking parameters. Gathering your technical assets beforehand ensures that your setup proceeds without friction.
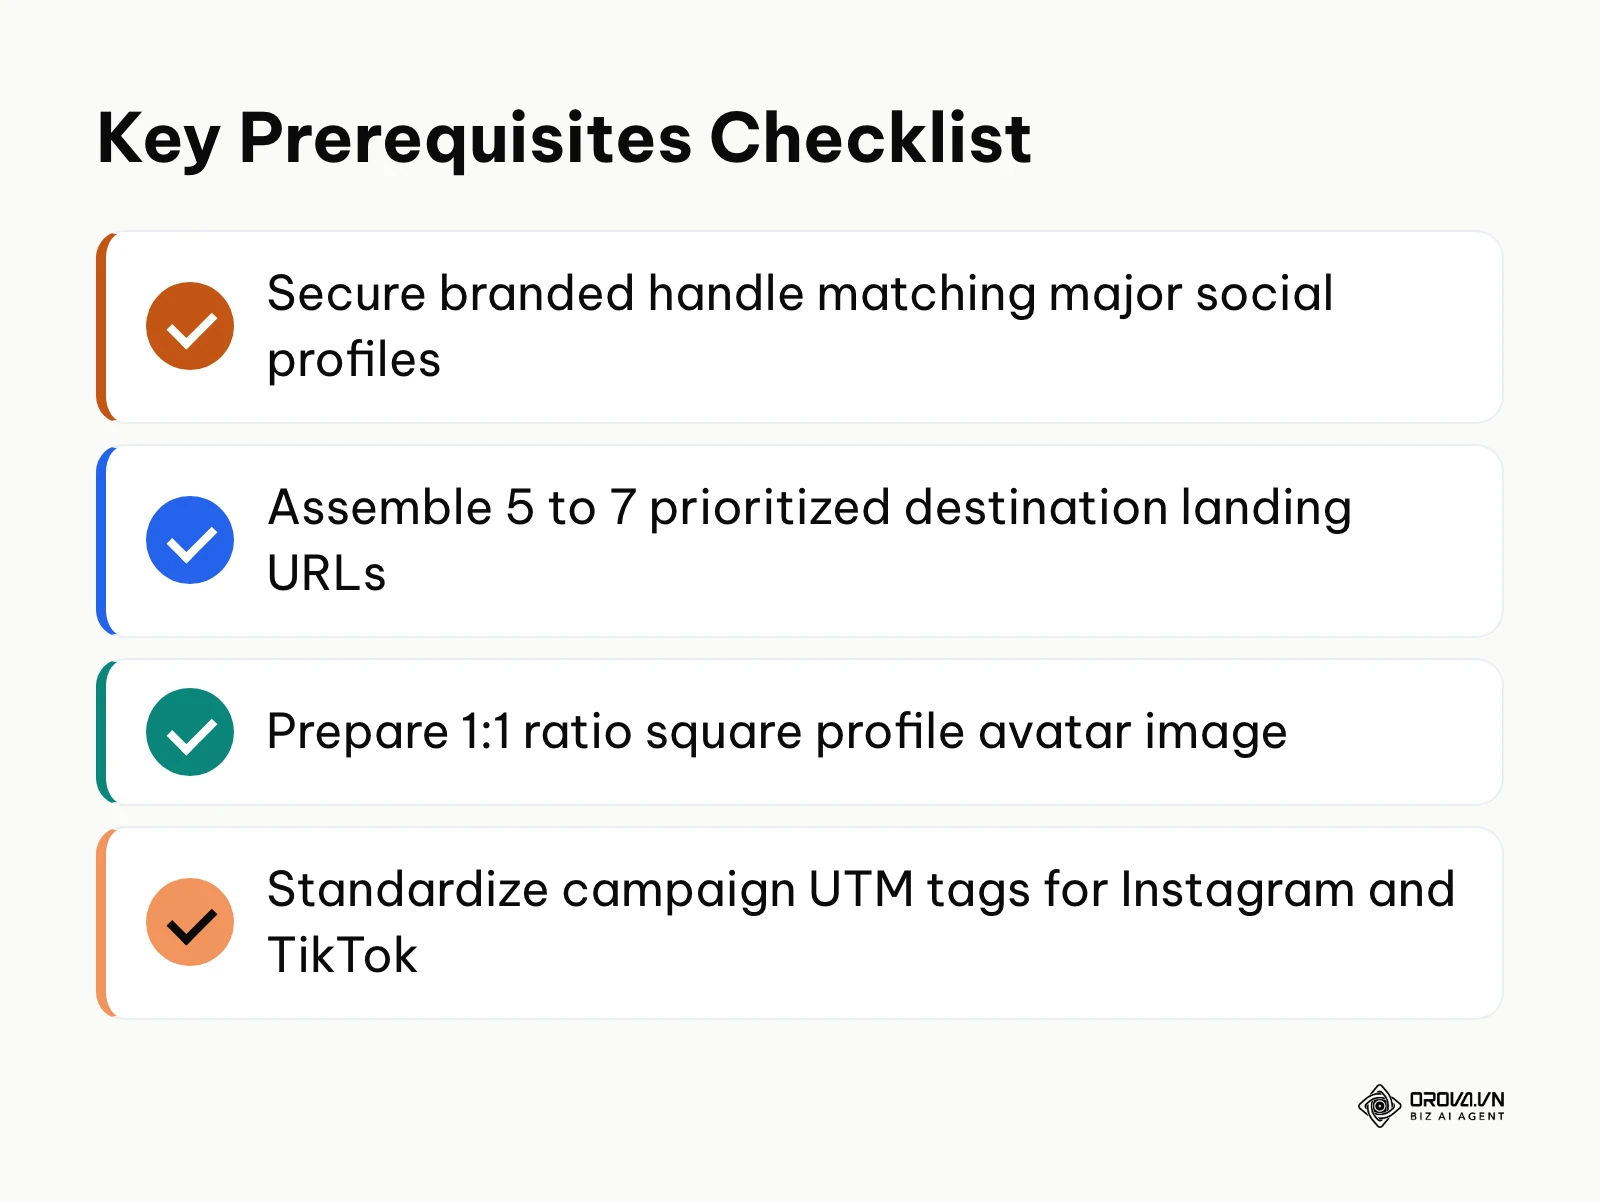
The summary checklist below highlights the four critical preparation milestones before logging into your dashboard.
The table below outlines the core components you need before opening the registration window:
| Asset or Access | Where to Retrieve It | Estimated Time | Impact if Missing |
|---|---|---|---|
| Target Username | Social handle registry | 2 minutes | Fragmented brand recognition across channels |
| Primary Destination URLs | Web browser bookmarks or CMS | 5 minutes | Broken destination links and wasted clicks |
| High-Resolution Avatar (1:1) | Cloud storage or design suite | 3 minutes | Blurry or pixelated profile header |
| Hex Color Codes | Brand style guide | 2 minutes | Inconsistent visual identity on mobile |
| Standardized UTM Parameters | Marketing spreadsheet | 5 minutes | Inability to attribute sales inside GA4 |
Step 1: Register and Claim Your Clean Username
Your initial objective is to secure a clean, permanent username that matches your primary social media handles across Instagram, TikTok, and YouTube.
To create your account:
- Navigate to linktr.ee/register in your web browser.
- Enter your work email address and select your desired username in the handle field.
- Choose a strong alphanumeric password and click the primary Continue button.
- When prompted, select your primary category (such as Business, Creative, or Education) and pick the Free tier plan to enter the administrative dashboard.
You know this step is successful when the browser redirects you to admin.linktr.ee with your handle displayed in the top-right corner alongside a preview phone mockup on the right side of the screen.
A frequent hurdle during registration is encountering an unavailable handle. If your exact handle is claimed, avoid appending long strings of random numbers. Instead, append standard identifiers such as official, hq, or your localized region.
Step 2: Build Your Profile Header and Visual Identity
Your profile header establishes immediate trust with visitors arriving from social feeds within the first three seconds of landing.
To configure your identity elements:
- In the top navigation bar of the Linktree admin dashboard, click the Appearance tab.
- Under the Profile section, click the Pick an image button. Upload a square 1:1 ratio image (minimum 500 by 500 pixels) containing your logo or a clean headshot.
- In the Profile Title input field, type your brand or creator name (keep this under 30 characters).
- In the Bio text area, draft a concise value statement limited to 80 characters explaining what visitors can expect or do next.
Use the quick reference below while you fill in the header:
| Header Element | Recommended Setting | Why It Matters |
|---|---|---|
| Profile image | Square 1:1, at least 500 by 500 pixels, logo or clean headshot | Stays sharp inside the circular frame |
| Profile title | Brand or creator name, under 30 characters | Fits on one line on small screens |
| Bio | One value statement, about 80 characters | Tells visitors what to do next before they scroll |
| Text style | Plain alphanumeric text, no decorative unicode fonts | Renders correctly on older phones |
You can verify your configuration immediately by inspecting the mobile device emulator on the right side of the dashboard. Your avatar should appear crisp within a circular frame directly above your bold profile title and biographical description.
A common mistake is copying an existing social bio filled with special unicode fonts or multiple hashtags. These characters render poorly on older mobile operating systems and waste valuable screen space above the fold. Use standard alphanumeric text and clear spacing.
Step 3: Add Destination Links Using Visual Hierarchy
Your goal in this step is to insert your primary destination links while adhering to strict visual hierarchy so visitors are not paralyzed by choice overload.
To add and order your links:
- Click the Links tab in the main navigation bar.
- Click the purple Add link button.
- In the modal card that appears, paste your target destination URL into the URL field and click Add.
- Click the pencil icon next to the default title text to input a clear, action-oriented button label.
- Repeat this process for up to five to seven total links.
- Hover over the three vertical dots on the left edge of any link card to drag and drop it into its designated position in the vertical stack.
You know your links are properly configured when each button card displays a green toggle switch indicating active status, and the mobile preview updates with clickable buttons that resolve correctly when clicked.
A frequent error is leaving default automated page titles (such as Home - My Store Name - Powered by Shopify) in the button title field. Edit each title to reflect an explicit verb phrase, such as "Browse New Arrivals" or "Book a Strategy Call."
The 3-Tier Bio Link Pyramid and Choice Architecture
Many creators make the mistake of adding ten to twenty links to their page. Usability research on choice overload points the same way: when visitors face too many competing navigation choices, deciding takes longer and more of them give up. When faced with an overwhelming list of unorganized links, visitors frequently bounce without clicking anything.
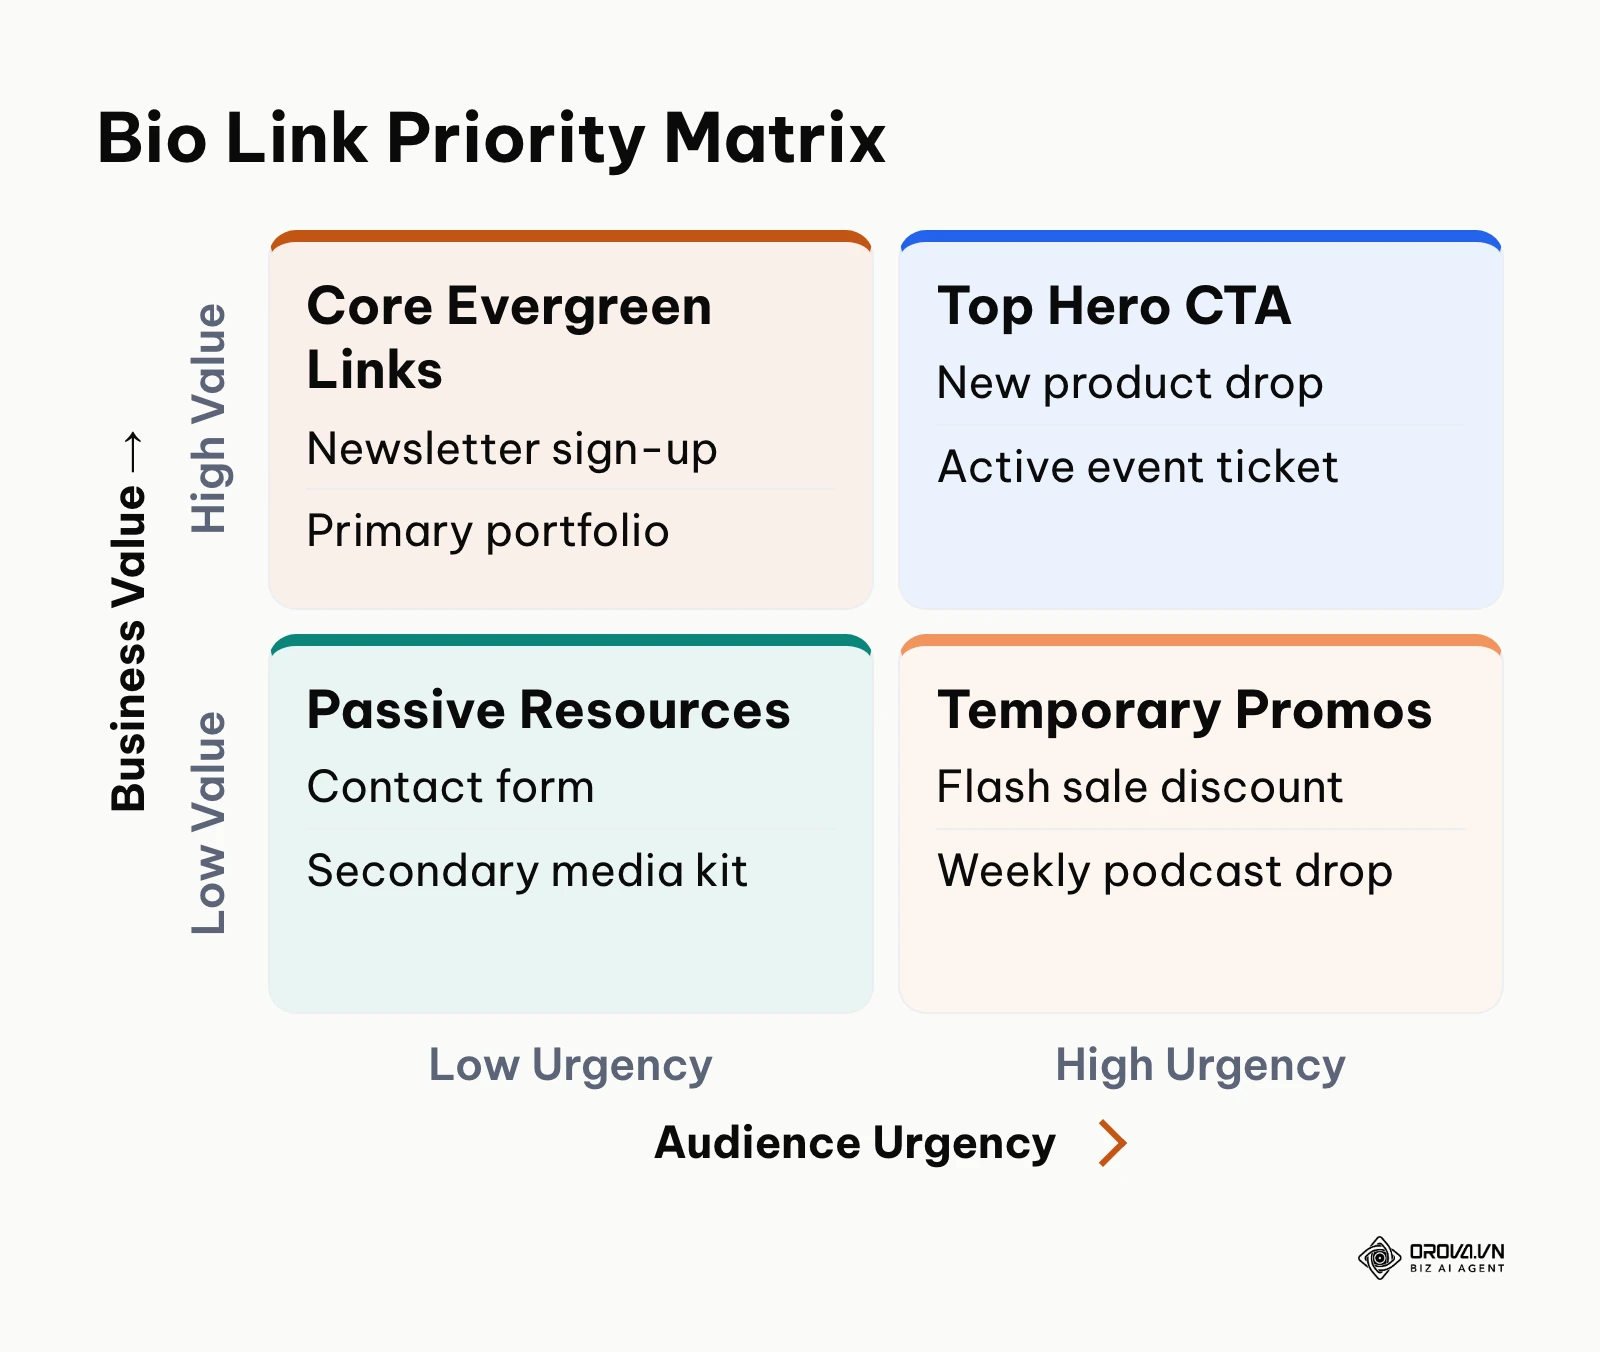
To counter this, organize your buttons into a 3-Tier Pyramid:
- Tier 1: Top Hero CTA (1 button): Your single most urgent business objective, such as a major product launch, a current promotion, or ticket sales for an upcoming event. Use the built-in highlight or leap link feature to make this button visually dominant.
- Tier 2: Core Social and Evergreen Channels (2 to 4 buttons): Consistent high-value resources, including your primary portfolio, newsletter registration, or weekly podcast episode.
- Tier 3: Secondary Information (1 to 2 buttons): Low-frequency utility links, such as customer support contacts or brand sponsorship inquiries.
The two-by-two priority matrix below illustrates how to categorize potential buttons based on business value and audience urgency.
Worked Example: Streamlining a Cluttered Bio Page
Worked example (hypothetical): A boutique fitness coach with 18,000 Instagram followers noticed that despite receiving hundreds of profile visits each week, link clicks remained stagnant.
- Context: A solo service provider attempting to promote personal training, workout programs, supplements, YouTube videos, and affiliate discount codes simultaneously through 14 stacked buttons.
- Steps taken: The coach audited link click history, eliminated 9 redundant affiliate links, and grouped remaining offers into 4 distinct buttons: a prominent top Hero CTA for personal training intake, an evergreen button for the weekly newsletter, a link to the latest workout video, and a combined resource sheet.
- Obstacle and resolution: The coach initially worried that removing affiliate links would eliminate secondary revenue. By consolidating those affiliate codes into a single downloadable Google Doc linked within the resource button, the bio page stayed clean without losing affiliate access.
- Tangible outcome: The mobile preview showed a clean layout requiring zero scrolling on standard smartphones, and the coach observed a clear surge in client intake submissions within forty-eight hours of publication.
Step 4: Tag Every Button With Clean UTM Parameters
This step ensures that every click from your bio page is accurately attributed inside your web analytics rather than vanishing into unclassified traffic buckets.
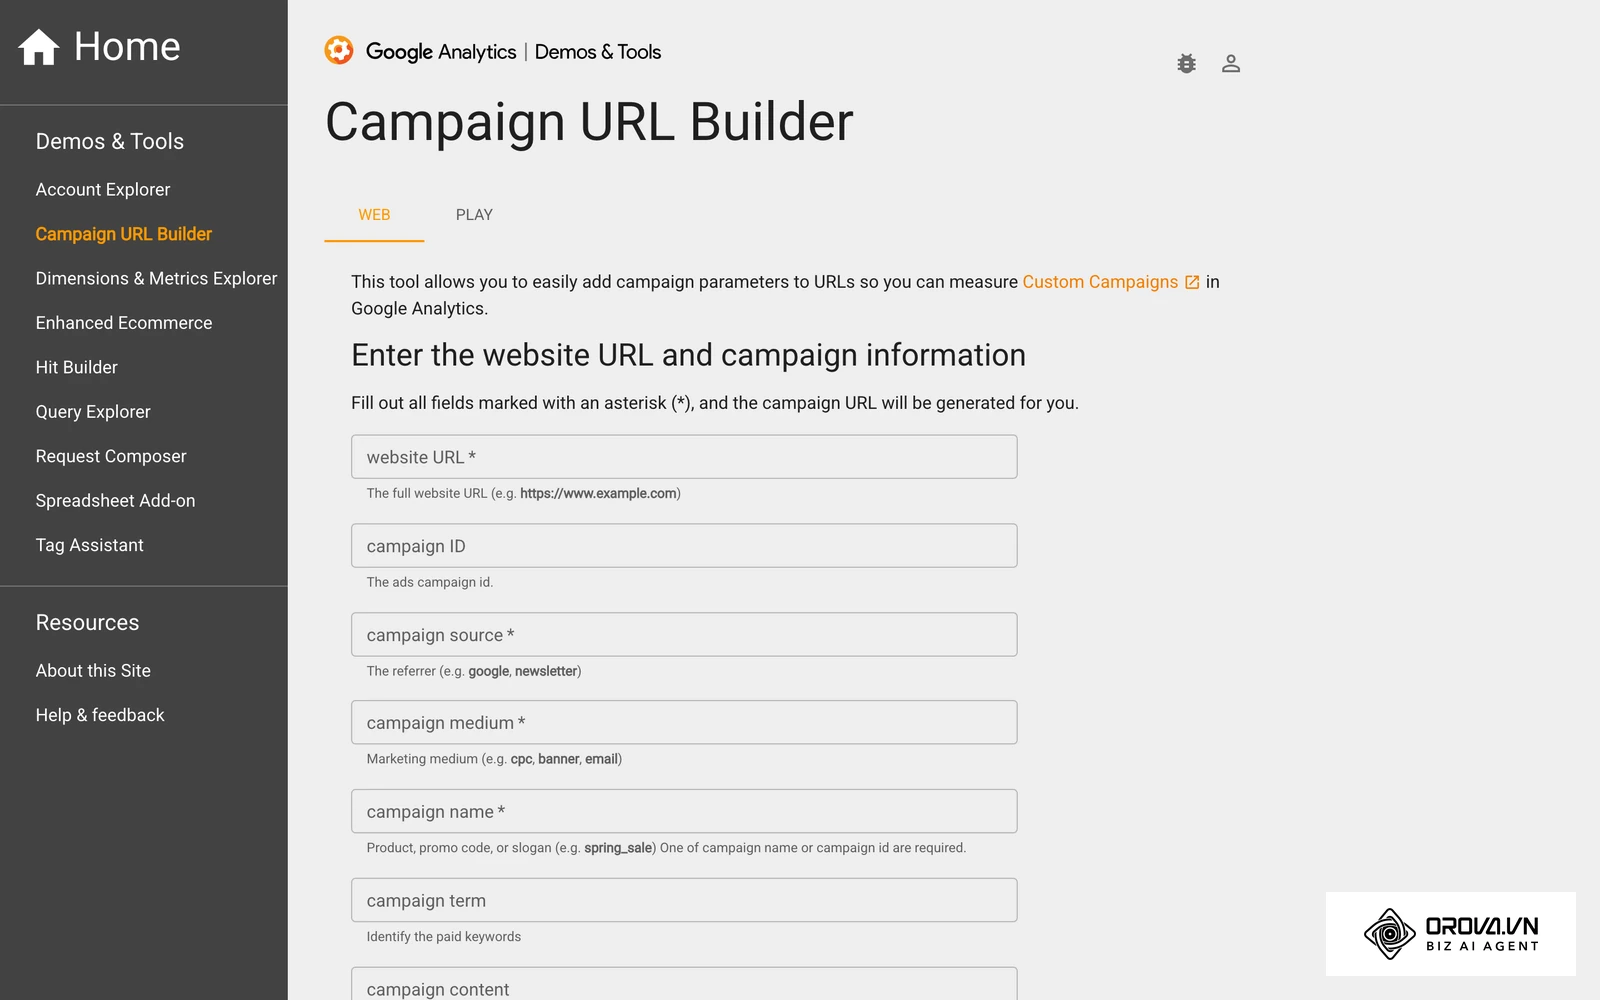
Google's Analytics Help documentation on campaign URLs explains that UTM parameters are how GA4 learns where a visit came from. Without them, clicks opened inside Instagram's or TikTok's in-app browser often arrive without referrer data and end up in Direct instead of Organic Social. When this happens, marketing teams cannot determine whether sales originated from their Instagram bio or their TikTok bio.
To attach clean Urchin Tracking Module (UTM) parameters:
- Open your target destination URL.
- Append a question mark (?) followed by standard UTM parameters defining the source, medium, and campaign.
- In the Linktree dashboard, open the Links tab.
- Select the specific link card, paste the full URL containing the UTM string into the URL field, and press Enter.
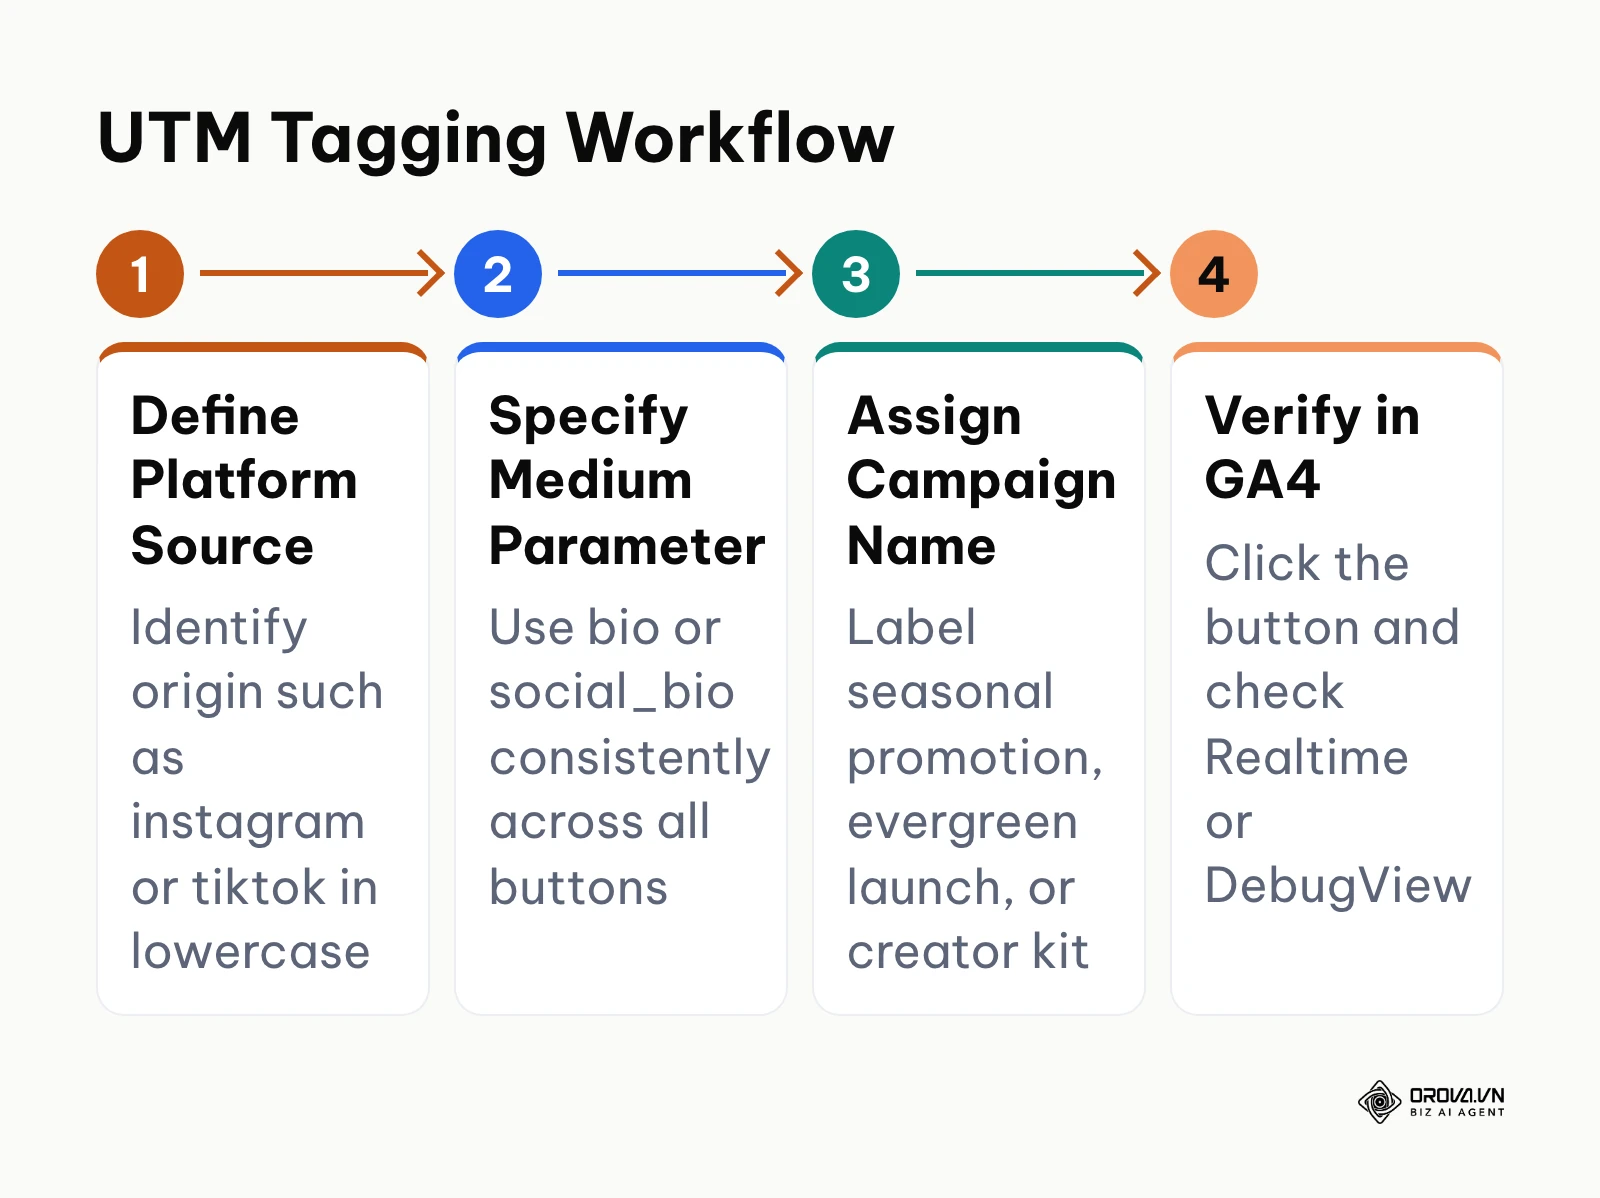
Google's free Campaign URL Builder, shown in the screenshot, assembles these parameters for you. The horizontal process diagram below outlines the standard four-step workflow for assembling and verifying your tracking links.
Use the standardized parameter conventions outlined in the table below:
| UTM Parameter | Purpose | Recommended Syntax | Example Value |
|---|---|---|---|
| utm_source | Identifies traffic origin platform | Lowercase platform name | instagram or tiktok |
| utm_medium | Identifies marketing mechanism | Standard channel tag | social_bio |
| utm_campaign | Identifies specific objective | Descriptive promo name | summer_sale_2026 |
| utm_content | Identifies individual button | Specific button label | hero_consultation_btn |
A reliable Google Sheets formula to automatically concatenate your destination URLs with clean UTM parameters is: =A2 & "?utm_source=" & B2 & "&utm_medium=" & C2 & "&utm_campaign=" & D2 & "&utm_content=" & E2
You know your parameters are working when you open the Google Analytics 4 Realtime report or DebugView, click the button in your live bio preview, and observe an incoming pageview tagged with sessionSource = instagram and sessionMedium = social_bio. When tracking business goals, you can also configure a custom conversion event inside GA4 to measure exact completed actions originating from these buttons.
A common mistake is using inconsistent capitalization (such as mixing Instagram and instagram). Analytics platforms treat uppercase and lowercase strings as separate dimensions, which splits your reporting data into fragmented rows. Always enforce strict lowercase parameters.
Need to route social traffic to custom destinations and track offline scans with professional precision? Orova Link & QR lets you generate short links with built-in UTM parameters and dynamic QR codes in 59 distinct styles, keeping all your click and scan analytics unified in one central dashboard.
Step 5: Customize Themes, Colors, and Contrast Ratios
Your objective here is to tailor the visual presentation of your bio page so that it feels like an authentic extension of your brand while preserving mobile legibility.
To style your profile:
- Navigate back to the Appearance tab in the top navigation bar.
- Scroll down to the Themes section. Browse the available layouts and select a clean preset that matches your aesthetic.
- Scroll further down to the Custom Appearance section (available on selected themes).
- Set your background color using your brand's specific hex color code (for example, #F8F9FA for clean off-white or #121212 for dark mode).
- Choose your Button Style (select from rectangular, rounded corner, or pill-shaped silhouettes) and configure the button fill and outline colors.
- Select a clear, highly legible sans-serif font family.
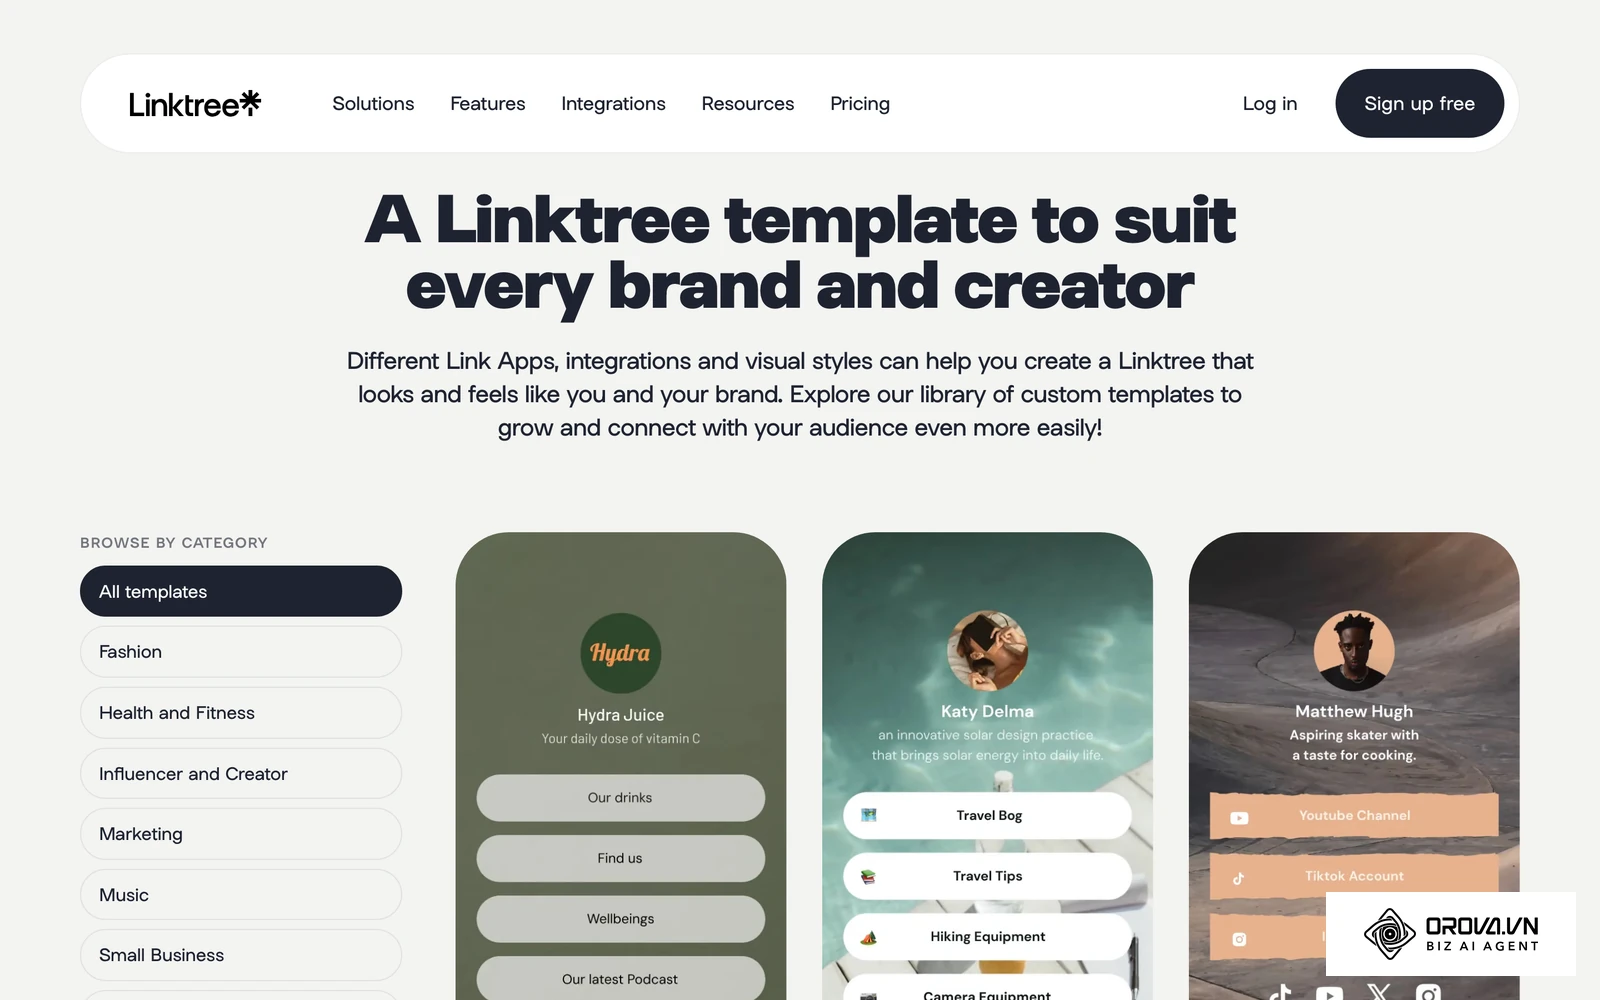
The screenshot of Linktree's template gallery shows the kind of theme presets you can start from. The visual comparison below highlights the critical differences between an unoptimized layout and a conversion-focused mobile theme.
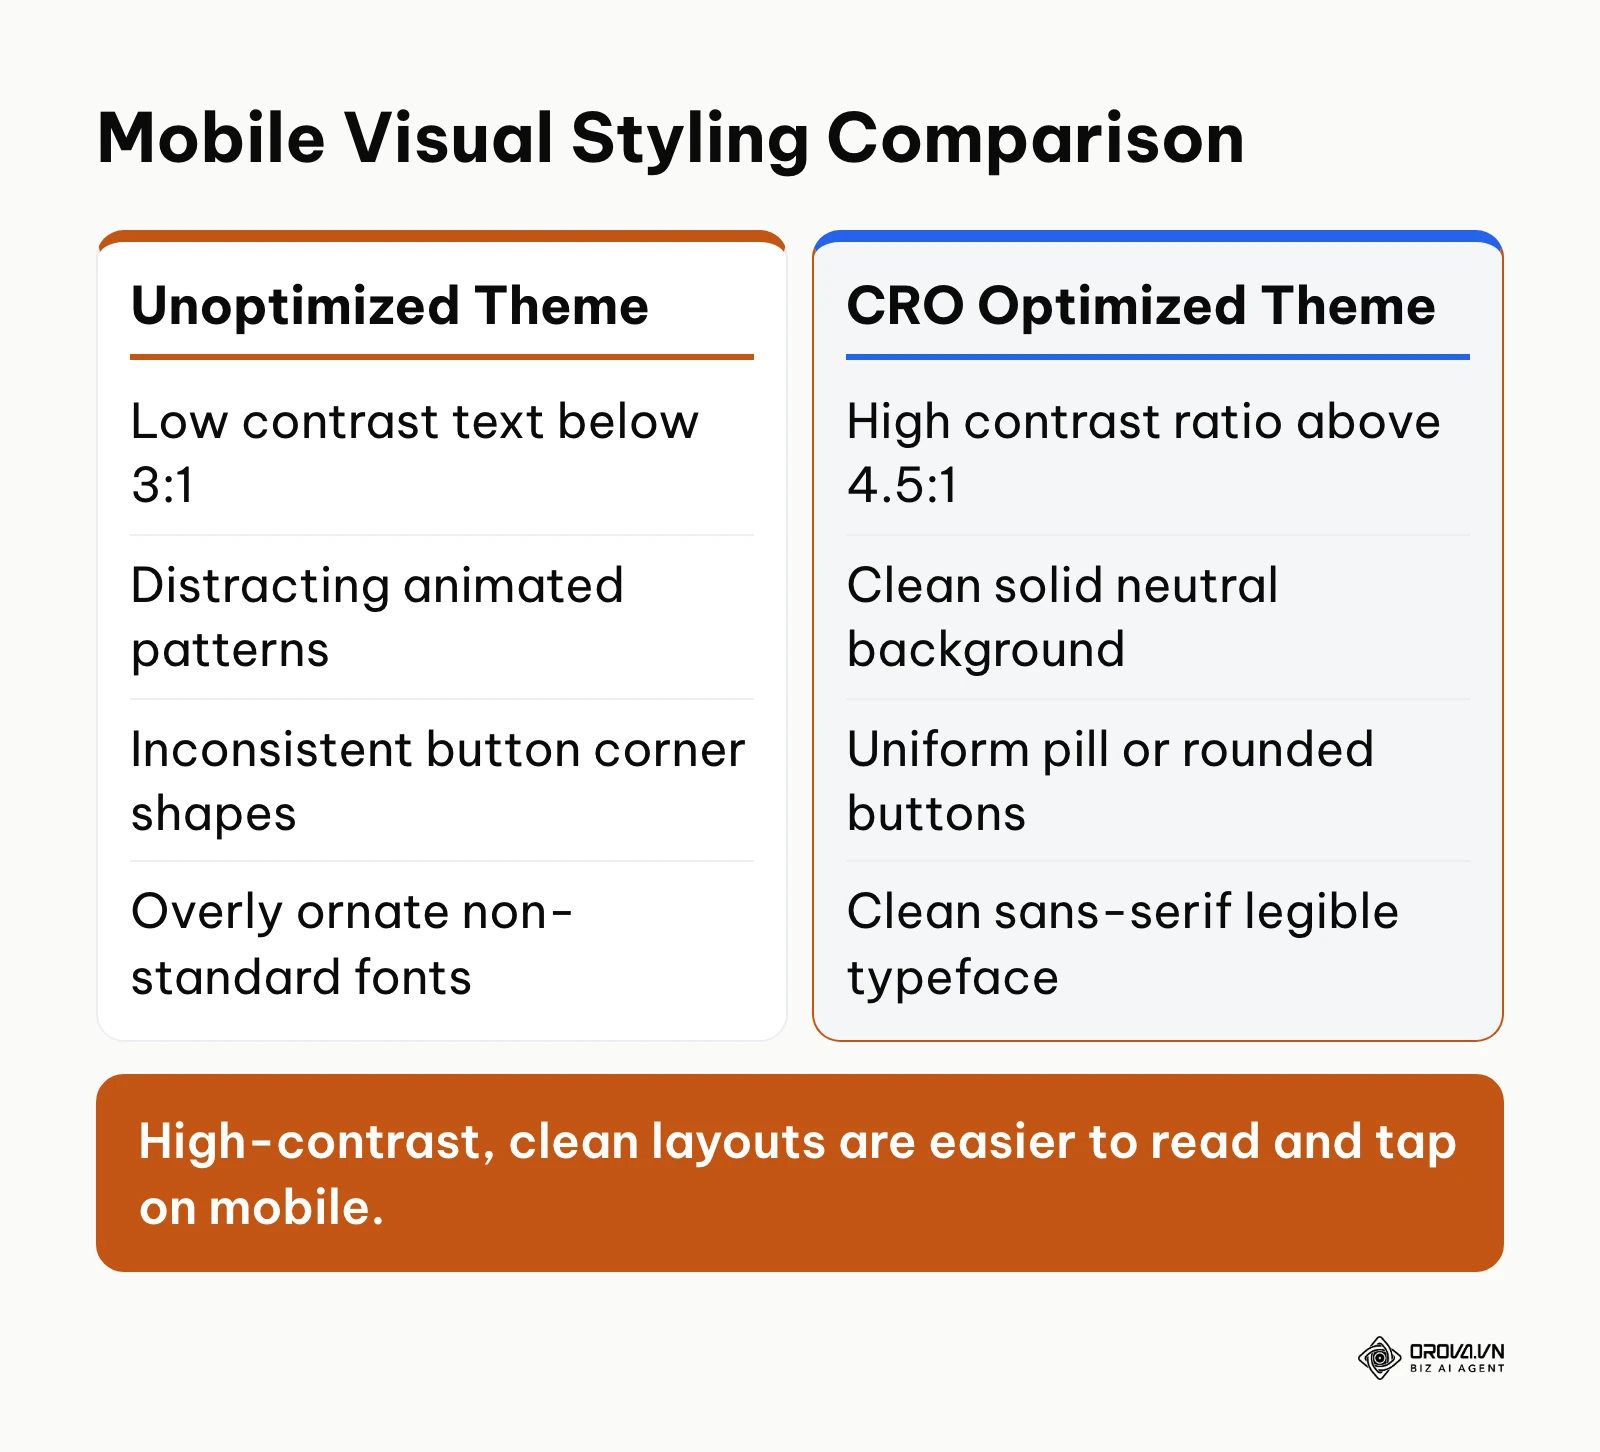
The W3C's Web Content Accessibility Guidelines (WCAG) 2.1, published in 2018, ask for a contrast ratio of at least 4.5:1 between normal-size text and its background, and button labels fall under that rule. The margin also helps on phone screens in bright sunlight. Choosing light gray text on a white button fails this criterion, making your links hard to read for users outdoors.
You can verify success by testing your page preview on a physical mobile device with brightness set to medium. Button text must be immediately legible without squinting, and the visual hierarchy must guide the visitor's eye downward naturally.
A frequent misstep is selecting busy animated video backgrounds. These distract the user from your buttons, inflate page load times over cellular networks, and cause noticeable lag on budget smartphones. Stick to solid tones or soft, subtle gradients.
Step 6: Configure Open Graph Social Share Previews
Configuring Open Graph metadata ensures that whenever you or your audience shares your Linktree link across messaging applications like WhatsApp, iMessage, Slack, or Messenger, a rich card preview with a polished title and thumbnail renders automatically.
To configure social previews:
- In the admin dashboard, click the Settings tab.
- Scroll down to the SEO and Social Metadata configuration section. If the section is locked, it is not included in your current plan; check Linktree's pricing page.
- In the Meta Title field, enter your brand title (for example: Alex Mercer - Official Creative Portfolio & Resources).
- In the Meta Description field, enter a concise summary under 150 characters highlighting what the link contains.
- Upload a dedicated Open Graph image banner formatted to the standard 1200 by 630 pixel dimension.
The table below sums up the preview fields and the values that render cleanly in most chat apps:
| Preview Field | Recommended Value | What Goes Wrong If Skipped |
|---|---|---|
| Meta title | Brand name plus what the page offers | Chat apps show a bare URL or a generic title |
| Meta description | Under 150 characters | Summary is cut off mid-sentence |
| Open Graph image | 1200 by 630 pixels, no small text | Blank grey box or a cropped thumbnail |
| Cache refresh | Re-scrape in a sharing debugger after edits | Old preview keeps showing for days |
You can visually verify your metadata using the official Facebook Sharing Debugger or by sending your link in a private messaging chat. The message bubble should populate with a crisp thumbnail image, your custom title, and your summary text rather than a generic URL string.
Worked Example: Fixing Broken Chat App Thumbnails
Worked example (hypothetical): An indie apparel designer noticed that whenever prospective wholesale buyers requested a catalog link via WhatsApp, sending the bio link generated a blank grey box with no product thumbnail.
- Context: A retail brand owner utilizing a bio link to showcase seasonal lookbooks and line sheets to retail buyers.
- Steps taken: The owner entered the Settings panel in the admin dashboard, realized the SEO metadata module was disabled, uploaded a crisp 1200 by 630 pixel photo of the new outerwear collection, and saved a dedicated title stating "Autumn Lookbook & Wholesale Order Forms."
- Obstacle and resolution: After updating settings, WhatsApp continued displaying the cached blank box. The designer pasted the URL into the Open Graph Object Debugger tool, clicked "Scrape Again" to clear social cache, and re-tested the link.
- Tangible outcome: Sending the link in WhatsApp immediately generated an eye-catching visual card with the collection banner, reassuring wholesale clients that the link was legitimate.
Step 7: Distribute Your Link and Deploy Dynamic QR Codes
Your final implementation step is deploying your published link across digital profiles and generating a physical dynamic QR code to bridge offline foot traffic to your online hub.
To publish your link to your primary profiles:
- In the top-right corner of the Linktree dashboard, click the Share button.
- Click Copy to save your live link (formatted as linktr.ee/yourname) to your clipboard.
- Open Instagram, tap Edit profile, tap Links, tap Add external link, paste your URL, and enter a clean display title. Before updating your bio link, it helps to audit your Instagram profile to ensure your username, bio copy, and highlights align with your target audience.
- Repeat this placement in your TikTok profile under Edit profile and the Website field. TikTok only shows this field to eligible accounts, and the eligibility rules (account type, follower count, region) change over time.
- In the Share drawer in Linktree, click QR code and download the generated image to place on physical promotional assets such as business cards, event banners, and product boxes.
You know deployment is complete when tapping the bio link in your Instagram or TikTok profile opens your bio page directly inside the in-app browser without prompting security warnings. Coordinating these updates with your social media posting schedule ensures your bio link always reflects your latest promotional push.
A common stumbling block occurs on TikTok, where many accounts do not see the Website field yet. If it is missing, check whether switching to a free Business Account in your settings makes it available in your region; if not, place the link on your Instagram, YouTube, or X profile first while your TikTok audience grows.
The Master Bio Link Audit Checklist
Before driving public traffic to your newly created page, review your implementation against the comprehensive quality assurance table below.
| Phase & Step | Primary Action | Visual Verification Sign | Estimated Time |
|---|---|---|---|
| Step 1: Account Setup | Claim exact matching username handle | Handle visible in dashboard header | 3 minutes |
| Step 2: Profile Header | Upload 1:1 avatar and 80-character bio | Avatar centered above crisp bio copy | 3 minutes |
| Step 3: Link Hierarchy | Add 5 to 7 prioritized destination links | Green active toggles; top Hero CTA highlighted | 5 minutes |
| Step 4: Tracking Setup | Append standardized lowercase UTM parameters | Outbound clicks visible in GA4 DebugView | 5 minutes |
| Step 5: Visual Theme | Set background and high-contrast button styling | Contrast ratio exceeds 4.5:1 on mobile test | 4 minutes |
| Step 6: Social Preview | Configure 1200x630 OG image and meta title | Rich card renders inside messaging app chat | 3 minutes |
| Step 7: Distribution | Paste link in bio and download QR code | Live bio link opens in-app browser without error | 2 minutes |
Troubleshooting Common Linktree Mistakes and Fixes
Even experienced marketers encounter configuration glitches when deploying bio pages. The table below consolidates the most prevalent operational issues, their root causes, and immediate technical remedies.
| Issue Encountered | Probable Root Cause | Resolution Protocol |
|---|---|---|
| Link clicks categorized as Direct in GA4 | Destination links lack UTM parameters | Append utm_source, utm_medium, and utm_campaign to every button |
| In-app browser displays a link warning | A destination redirects through several hops or was reported by other users | Point buttons straight at final HTTPS pages, remove redirect chains, and contact Linktree support if the warning persists |
| Button text unreadable outdoors | Theme uses poor text-to-background contrast | Select dark text on light buttons or solid black fills |
| Visitors leave without tapping any button | Excessive link count (10+ buttons) causing cognitive fatigue | Prune button count to about 5 focused actions |
| Thumbnail missing in messaging apps | Open Graph metadata fields left empty | Upload a 1200x630 image in Settings under SEO metadata |
| Instagram rejects URL during profile edit | Incomplete or mistyped link | Copy the full https:// link again from Linktree's Share menu and paste it in the Instagram app |
Measuring Post-Launch Performance and Click-Through Rates
Publishing your bio page is only the halfway mark; optimizing it based on real user behavior drives long-term conversion gains. To evaluate your page, focus on three primary metrics: Overall Click-Through Rate (CTR), Button Distribution Share, and Downstream Conversion Rate.
Track these metrics across two primary interfaces:
- Linktree Analytics Tab: Review total views, total clicks, and the aggregate CTR (how much detail you see depends on your plan). Check this weekly to establish a rolling baseline.
- Google Analytics 4 Traffic Acquisition: Navigate to Reports > Acquisition > Traffic Acquisition, filter by Session source / medium = instagram / social_bio, and observe engagement duration and completed conversion events. Tracking this traffic allows marketing teams to measure content marketing ROI across campaigns without guesswork.
Quantifying the Impact of Button Pruning
To understand the dramatic mathematical impact of reducing link clutter, consider a hypothetical worked scenario comparing two different link configurations subjected to identical traffic volumes.
In this scenario (illustrative numbers, not measured data), a creator drives 10,000 monthly bio link visits across two testing phases:
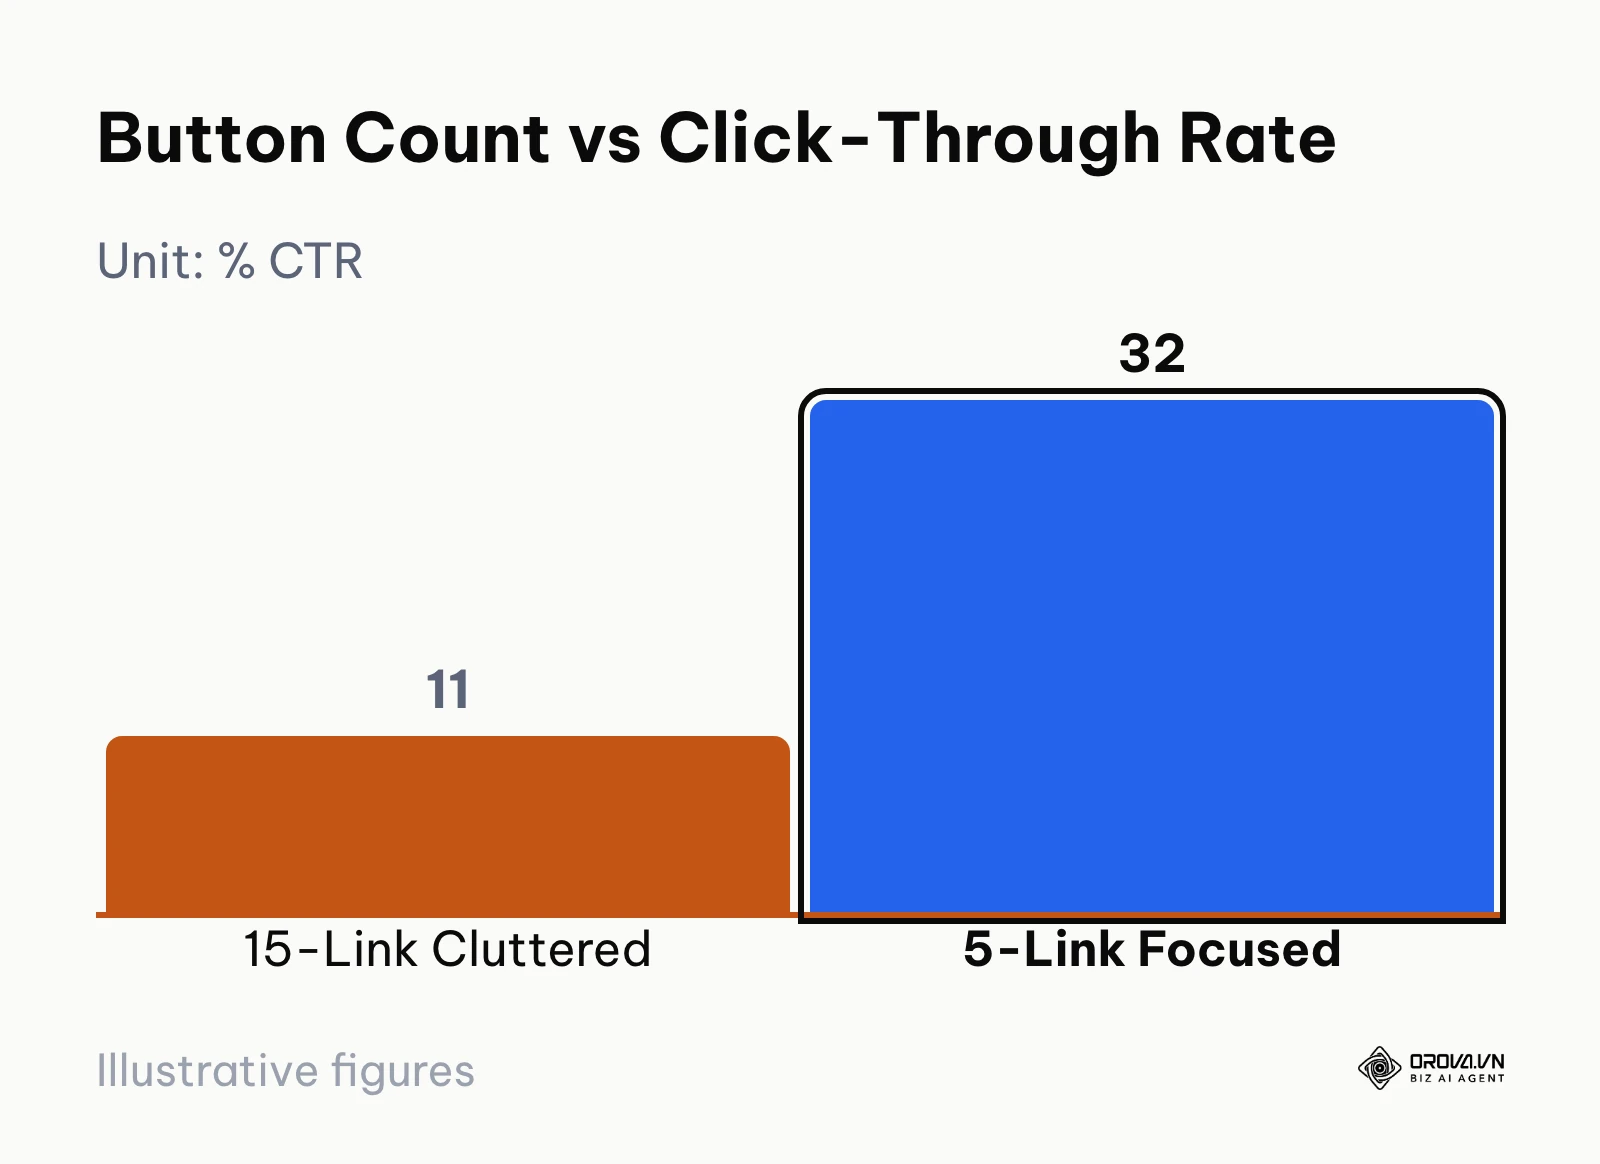
- Phase A (Cluttered 15-Button Layout): With 15 competing links on the screen, visitors scroll repeatedly, encounter decision paralysis, and drop off. The page achieves an aggregate CTR of only 11%, generating 1,100 total outbound clicks distributed randomly across low-priority pages.
- Phase B (Streamlined 5-Button Layout): The creator trims the page down to 5 prioritized buttons arranged according to the 3-Tier Pyramid model. The aggregate CTR jumps to 32%, delivering 3,200 targeted outbound clicks directly into primary lead magnets and checkout pages.
The bar chart below visually contrasts the 11% click-through rate of the cluttered 15-button layout against the 32% click-through rate of the focused 5-button layout.
Worked Example: Tracking Campaign Attribution in GA4
Worked example (hypothetical): A digital educator launching a quarterly certification cohort needed to measure whether Instagram Stories or TikTok educational clips drove more paid enrollments through their bio link.
- Context: An education entrepreneur using a single Linktree URL across multiple social profiles.
- Steps taken: The educator created two distinct Linktree profiles (or configured dedicated dynamic link redirects for each platform). For the Instagram bio button, the destination URL was tagged with ?utm_source=instagram&utm_medium=social_bio&utm_campaign=q3_cohort. For TikTok, the destination was tagged with ?utm_source=tiktok&utm_medium=social_bio&utm_campaign=q3_cohort.
- Obstacle and resolution: Initially, all enrollments showed up inside GA4 under generic referral traffic because the payment processor domain redirected the user upon checkout. The creator added the payment gateway domain to the GA4 Unwanted Referrals list, preserving original session attribution.
- Tangible outcome: The GA4 Acquisition dashboard revealed that while TikTok generated twice as many raw bio views, Instagram traffic converted to paid students at a 4.2x higher rate, allowing the creator to allocate ad spend accurately.
Turn offline foot traffic and social followers into trackable visitors in minutes. With Orova Link & QR, you can design custom dynamic QR codes with 10 high-resolution export formats, update destinations anytime, and analyze visitor devices without complex setups. Get started free through July 7, 2027.
Decision Matrix: Linktree Free vs Pro vs Custom Domain Solutions
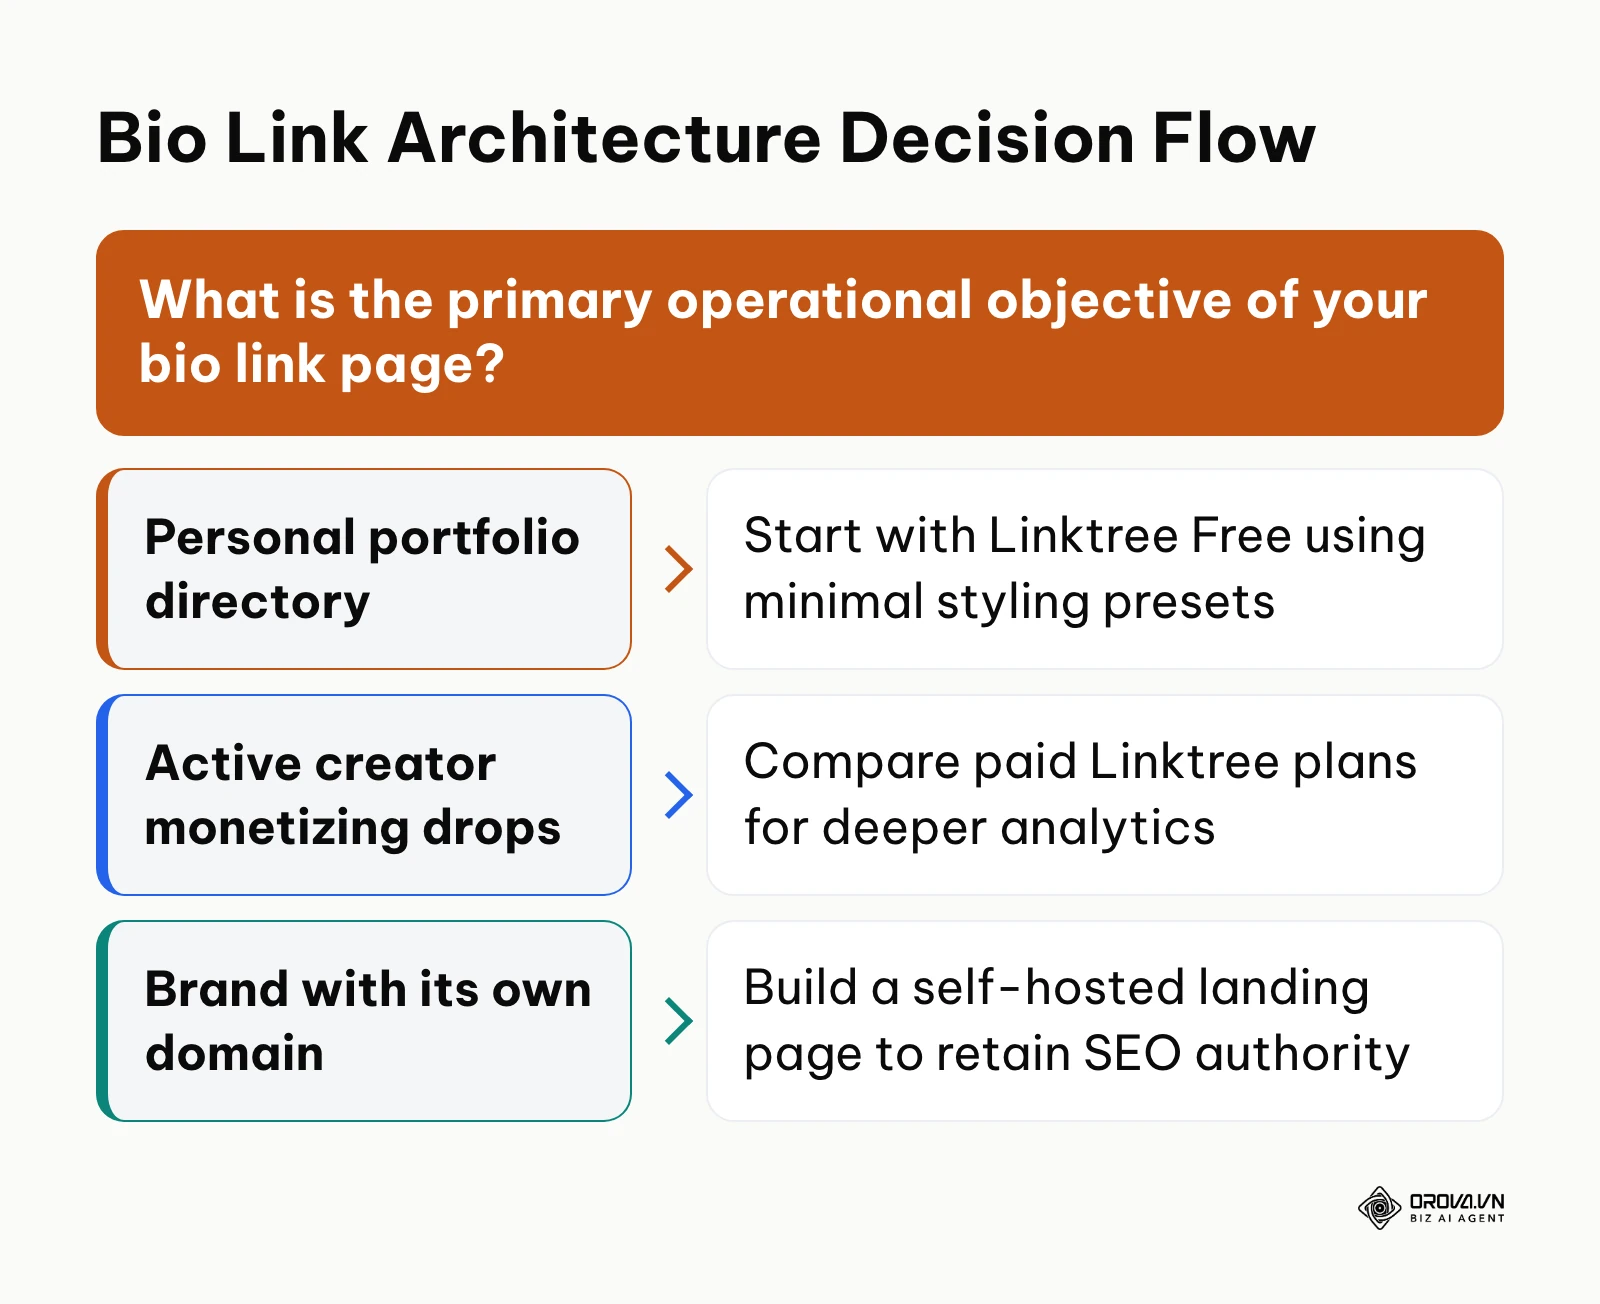
Choosing the appropriate bio link setup depends on your commercial maturity, data privacy requirements, and marketing budget. While the Free tier satisfies beginners, scaling businesses often outgrow third-party aggregator subdomains.
The decision flow diagram below guides you through selecting the ideal bio link tier based on your operational goals.
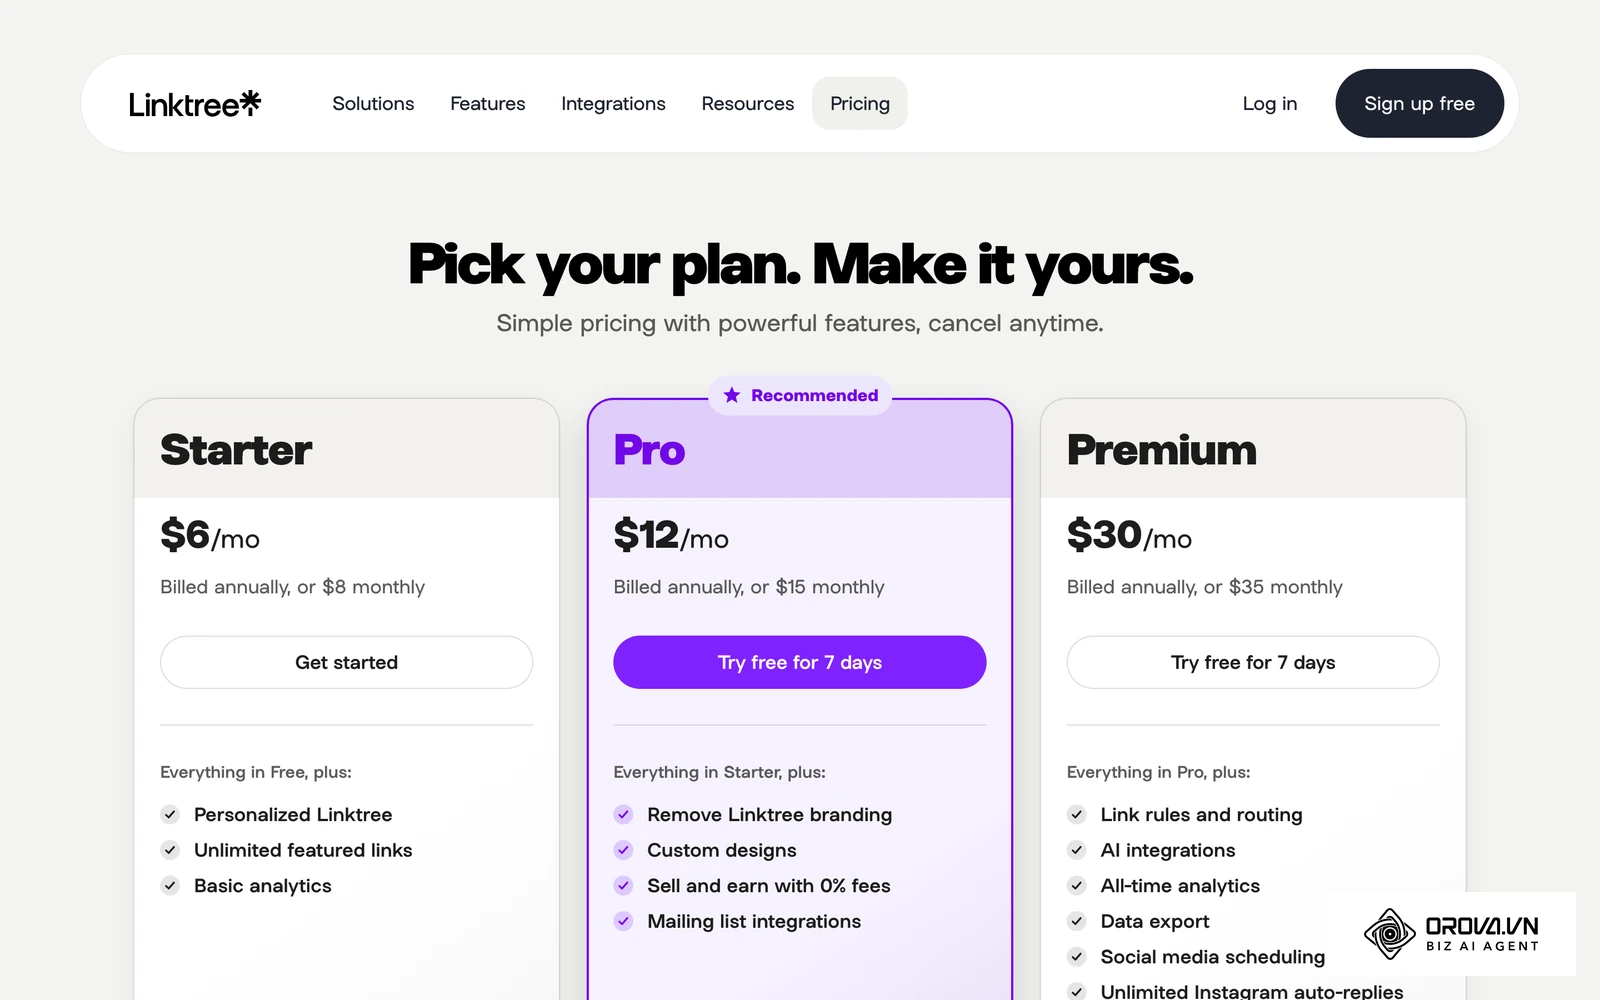
Linktree's pricing page, shown in the screenshot in this section, lists the current plan names and prices; check it before you upgrade, because plans and prices change. The comparative matrix below evaluates the practical trade-offs between Linktree Free, Linktree's paid plans, and a self-hosted page on your own domain:
| Evaluation Criteria | Linktree Free | Linktree Paid Plans (Starter, Pro, Premium) | Self-Hosted Page on Your Domain |
|---|---|---|---|
| Monthly Software Cost | Free | Paid; see Linktree's pricing page | Domain and hosting fees |
| Branding Control | Linktree branding and preset themes | More theme and branding options | Complete brand ownership |
| UTM Tracking | Manual URL parameter tagging | Manual tagging plus extra marketing integrations | Any analytics or tag setup you choose |
| Analytics | Limited | Analytics from Starter upward, deeper on higher plans | Your own first-party analytics (for example, GA4) |
| Retargeting Pixels | Check current plan details | Supported on selected paid plans | Install any pixel or tag manager directly |
| SEO Link Equity | Accrues to the linktr.ee domain | Accrues to the linktr.ee domain | Visits and backlinks land on your own website |
Future Trends in Bio Links and Social Traffic: Author Perspective
Trend 1: Algorithmic Dynamic Link Prioritization Powered by AI
Looking at social marketing as of 2026, bio pages remain static lists where every visitor sees identical buttons regardless of past behavior. I believe that over the next two to three years, bio links will evolve into intelligent, real-time micro-hubs powered by machine learning algorithms.
Instead of showing five static buttons, AI-driven bio software will automatically reorder buttons based on incoming visitor geography, local time, referral source, and previous engagement history. For instance, a visitor arriving from a TikTok video about shoes will automatically see the shoe collection at the very top, while an Instagram user browsing in the evening might see an upcoming live webinar.
Marketers should prepare today by standardizing clean UTM parameter naming across every social channel. Without clean historical attribution data, future personalization engines will have no structured inputs to learn from. However, if browser privacy measures and cookie restrictions continue to restrict client-side device fingerprinting, this algorithmic personalization may struggle to identify returning anonymous users.
Trend 2: Headless In-Bio Micro-Checkouts Replacing External Redirects
Today, bio links act primarily as exit ramps, pushing users away from social apps to external websites where mobile bounce rates remain high. In my view, the next generation of bio landing pages will embed headless micro-checkouts directly inside the bio container.
Visitors will browse a curated product carousel, select sizes, and complete one-click purchases using Apple Pay or Google Pay without ever navigating away from the social application's embedded browser. This transition will dramatically reduce drop-off caused by slow-loading third-party desktop sites.
Brands should prepare by decoupling their product catalogs and adopting headless e-commerce application programming interfaces (APIs). If dominant social platforms such as Instagram or TikTok choose to aggressively restrict external merchant scripts in favor of their native in-app shopping marketplaces, third-party in-bio checkouts could face strict distribution limits.
Trend 3: Migration From Shared Aggregator Subdomains to First-Party Domains
I am observing a noticeable shift among serious creators and mid-market brands away from shared subdomains like linktr.ee/brand toward first-party URLs such as links.brand.com. In my view, relying on a third-party aggregator domain wastes valuable organic search authority and exposes businesses to sudden platform domain blocks.
When millions of users share links on a single domain, a rogue user spamming malicious content can cause social security algorithms to temporarily blacklist the entire shared root domain, cutting off your traffic without warning. Furthermore, directing hundreds of thousands of monthly profile visitors to an external domain forfeits valuable search engine crawl equity that could benefit your primary brand domain.
To insulate your business, I recommend configuring a custom subdomain or self-hosted bio page once your bio page becomes a steady source of leads or sales. If link-in-bio aggregators introduce seamless one-click DNS verification and automated SSL provisioning for custom domains at lower price tiers, the friction of moving off shared domains will diminish rapidly.
Frequently Asked Questions About How to Make a Linktree
How many buttons should I place on my Linktree for optimal click-through rates?
You should maintain between five and seven active buttons on your bio page. Exceeding eight buttons introduces decision paralysis, which causes mobile visitors to drop off without taking action. Group older resources into a single archive link to keep your primary layout focused.
How do I separate Instagram bio clicks from TikTok bio clicks in Google Analytics 4?
You can separate traffic by appending unique UTM parameters to your destination URLs for each platform. Set utm_source=instagram for your Instagram bio and utm_source=tiktok for your TikTok bio, while keeping utm_medium=social_bio consistent across both. This allows GA4 to attribute sessions and revenue to each respective network accurately.
Does using a third-party Linktree link hurt my main website's search engine optimization?
Using a third-party domain does not actively penalize your website, but it forfeits an opportunity to build direct domain authority. Backlinks and traffic that would otherwise flow directly to your brand domain are absorbed by the aggregator's root domain. Growing businesses should eventually consider hosting their bio page on a custom subdomain like links.yourdomain.com.
Can I build an effective, professional Linktree without paying for a subscription?
Yes, the free tier of Linktree covers the core features required to launch a functional bio page, including unlimited links and basic themes. A paid plan becomes worth considering when you need built-in analytics, more design control, or marketing integrations; manual UTM tagging works on every plan.
How is artificial intelligence transforming bio link management?
Some bio link tools have started adding AI features, such as suggestions for button copy or for link order based on click data. Generative tools can also help draft button labels and Open Graph preview graphics. Treat them as helpers: you still decide which goal sits at the top, and clean UTM tags remain the data those features depend on.
Where Should You Start?
If you are a solo creator launching your first social channel, open a free account right now, claim your primary username, and add three essential buttons: your latest creative project, a newsletter subscription link, and a contact email. You can complete this baseline configuration in under fifteen minutes before your next social post.
If you are a growing small business with an active social following, conduct a ruthless audit of your existing bio links this afternoon. Eliminate every button that has received fewer than ten clicks over the past month, rewrite your remaining button labels into direct verb phrases, and apply standardized UTM tracking parameters to ensure every click appears inside Google Analytics 4.
If you are an established e-commerce brand driving heavy traffic, assess whether your commercial goals warrant migrating from a shared third-party aggregator to a dedicated bio landing page on your own domain. By taking immediate action on visual hierarchy and analytics tracking, you will unlock the full potential of learning how to make a Linktree.
About the author

Builder of Orova
Nguyễn Đỗ Trọng Ân has 8 years of experience in marketing, including 6 years managing market development across Asia. He builds Orova, a Biz AI Agent that never sleeps: it plans, runs and optimizes work for businesses.
Run your business with AI Agents
Orova is the always-on Biz AI Agent — it plans, runs, and optimizes the work for you.
Save time, unlock productivity.