
How to boost Facebook page posts: a step-by-step guide to every Boost setting
Learning how to boost facebook page posts comes down to seven decisions you make inside one short form: which post to promote, where you press the Boost button, what goal you pick, who sees it, how much you spend, how long it runs, and how you pay. Get those seven right and a boost becomes a cheap, fast way to put a proven post in front of the right local buyers. Get them wrong and the same button quietly turns your budget into likes from people who will never buy. This guide walks through each screen of the Boost flow in Meta Business Suite and the Facebook app, in the order you meet them, and then shows you how to read the results panel once the boost is live.
How to Boost Facebook Page Posts: Quick Definition, Ideal Use Cases, and Boundaries
Boosting a Facebook Page post means paying Meta to show a post you already published to more people than your organic reach would allow. Meta calls the feature "Boost post" (or simply "Boost") in Meta Business Suite and in the Facebook app. Behind the scenes a boost is a real ad: it goes through ad review, it is charged to an ad account, and it shows up in your billing history. The difference from a campaign built in Meta Ads Manager is the setup: a boost uses a short, simplified form with sensible defaults instead of the full campaign, ad set, and ad structure.
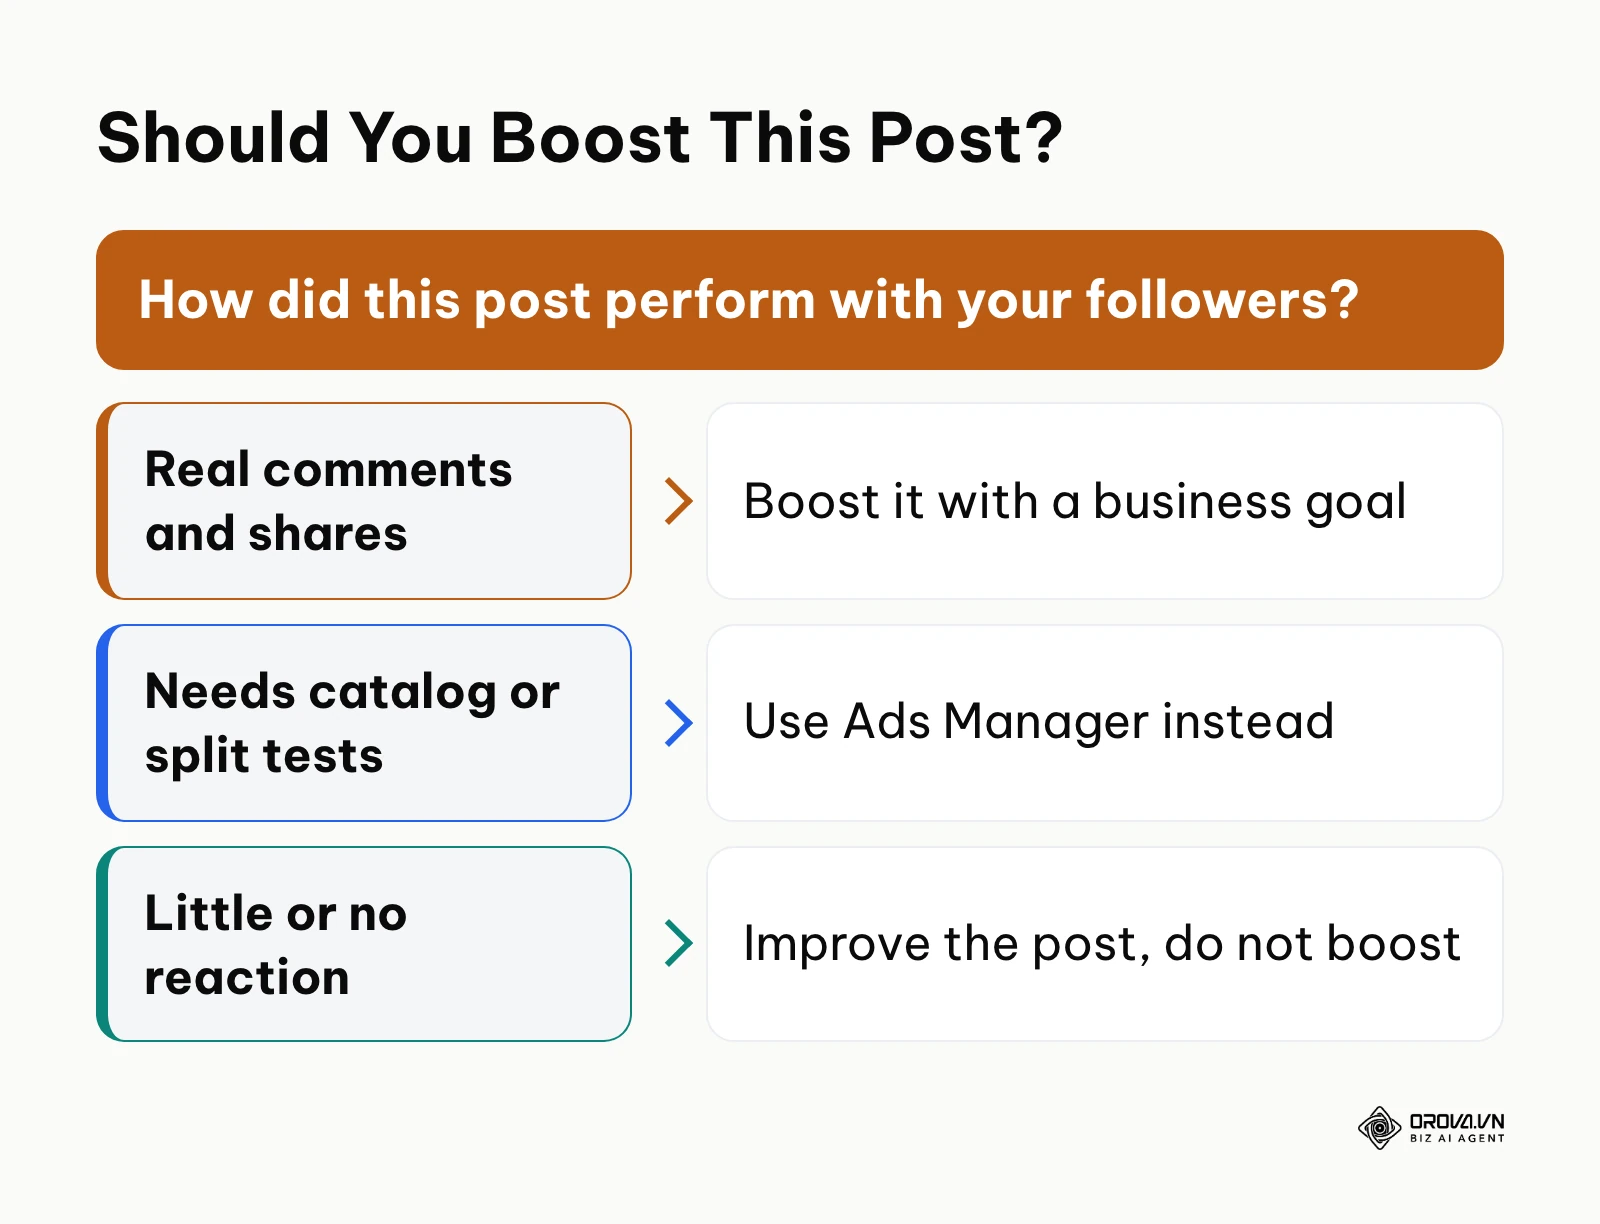
The diagram below outlines the decision you should make before allocating any budget to a boosted post.
When used deliberately, boosting fits a few clear situations:
- Local shops, studios, and service businesses promoting a time-sensitive offer, an event, or a new arrival to people who live nearby.
- Small brands and solo creators who have a post that already earned real comments and shares, and want to extend it to similar people.
- Owners who sell through conversation and want more people to start a chat in Messenger, Instagram Direct, or WhatsApp.
Boosting is a weaker fit when you need a product catalog, several ad variations tested against each other, detailed exclusions, or bidding controls. If you are unsure which tool fits your goal, our side-by-side breakdown of boost post vs Ads Manager covers that choice in detail, so this guide stays focused on the Boost button itself. One rule applies either way: never boost a post that earned no voluntary comments or shares on its own, because paid reach cannot fix a message that does not land.
Essential Prerequisites for Launching a Facebook Page Boost Campaign
Before you press Boost, check that a few basics are in place. Missing one of them is the most common reason a boost stalls at the payment screen or runs without any way to tell whether it worked.
The table below lists what to prepare, where to set it up, and roughly how long each item takes.
| Prerequisite | Where to set it up | Typical setup time |
|---|---|---|
| Full control (or ads access) to the Facebook Page | Page settings or Business settings in Meta Business Suite | 5 to 15 minutes |
| An ad account with a payment method | Billing and payments in Meta Business Suite | 5 to 10 minutes |
| Meta Pixel on your website (if you send traffic there) | Events Manager | 30 to 60 minutes |
| Instant reply or frequently asked questions in the inbox | Inbox settings in Meta Business Suite | 10 to 20 minutes |
| A view of your recent organic results | Insights in Meta Business Suite | 10 minutes |
Access matters because only people with the right Page task can create a boost, and the boost is charged to an ad account connected to that Page. If you manage the Page through Meta Business Suite, you can see which ad account a boost will use before you pay.
The Meta Pixel and, where your developer can set it up, the Conversions API send website events back to Meta, so a boost that sends people to your site can be judged on visits and purchases instead of clicks alone. Inbox replies matter for message-driven boosts: when a boosted post makes someone tap Send message, an instant reply with a few suggested questions keeps the conversation moving even outside business hours.
OROVA ADS applies AI Agent to automate and optimize ad performance on Google, Meta and TikTok. Scale your budget safely, monitor 24/7 and expand your business quickly.
Experience the solution at orova.vn/ads
The Step-by-Step Blueprint to Boost Facebook Page Posts Efficiently
The Boost flow is short, but every screen hides a default that may not suit your business. Work through the seven steps below in order. The first step happens before you touch the button; the last one happens after the boost is live.
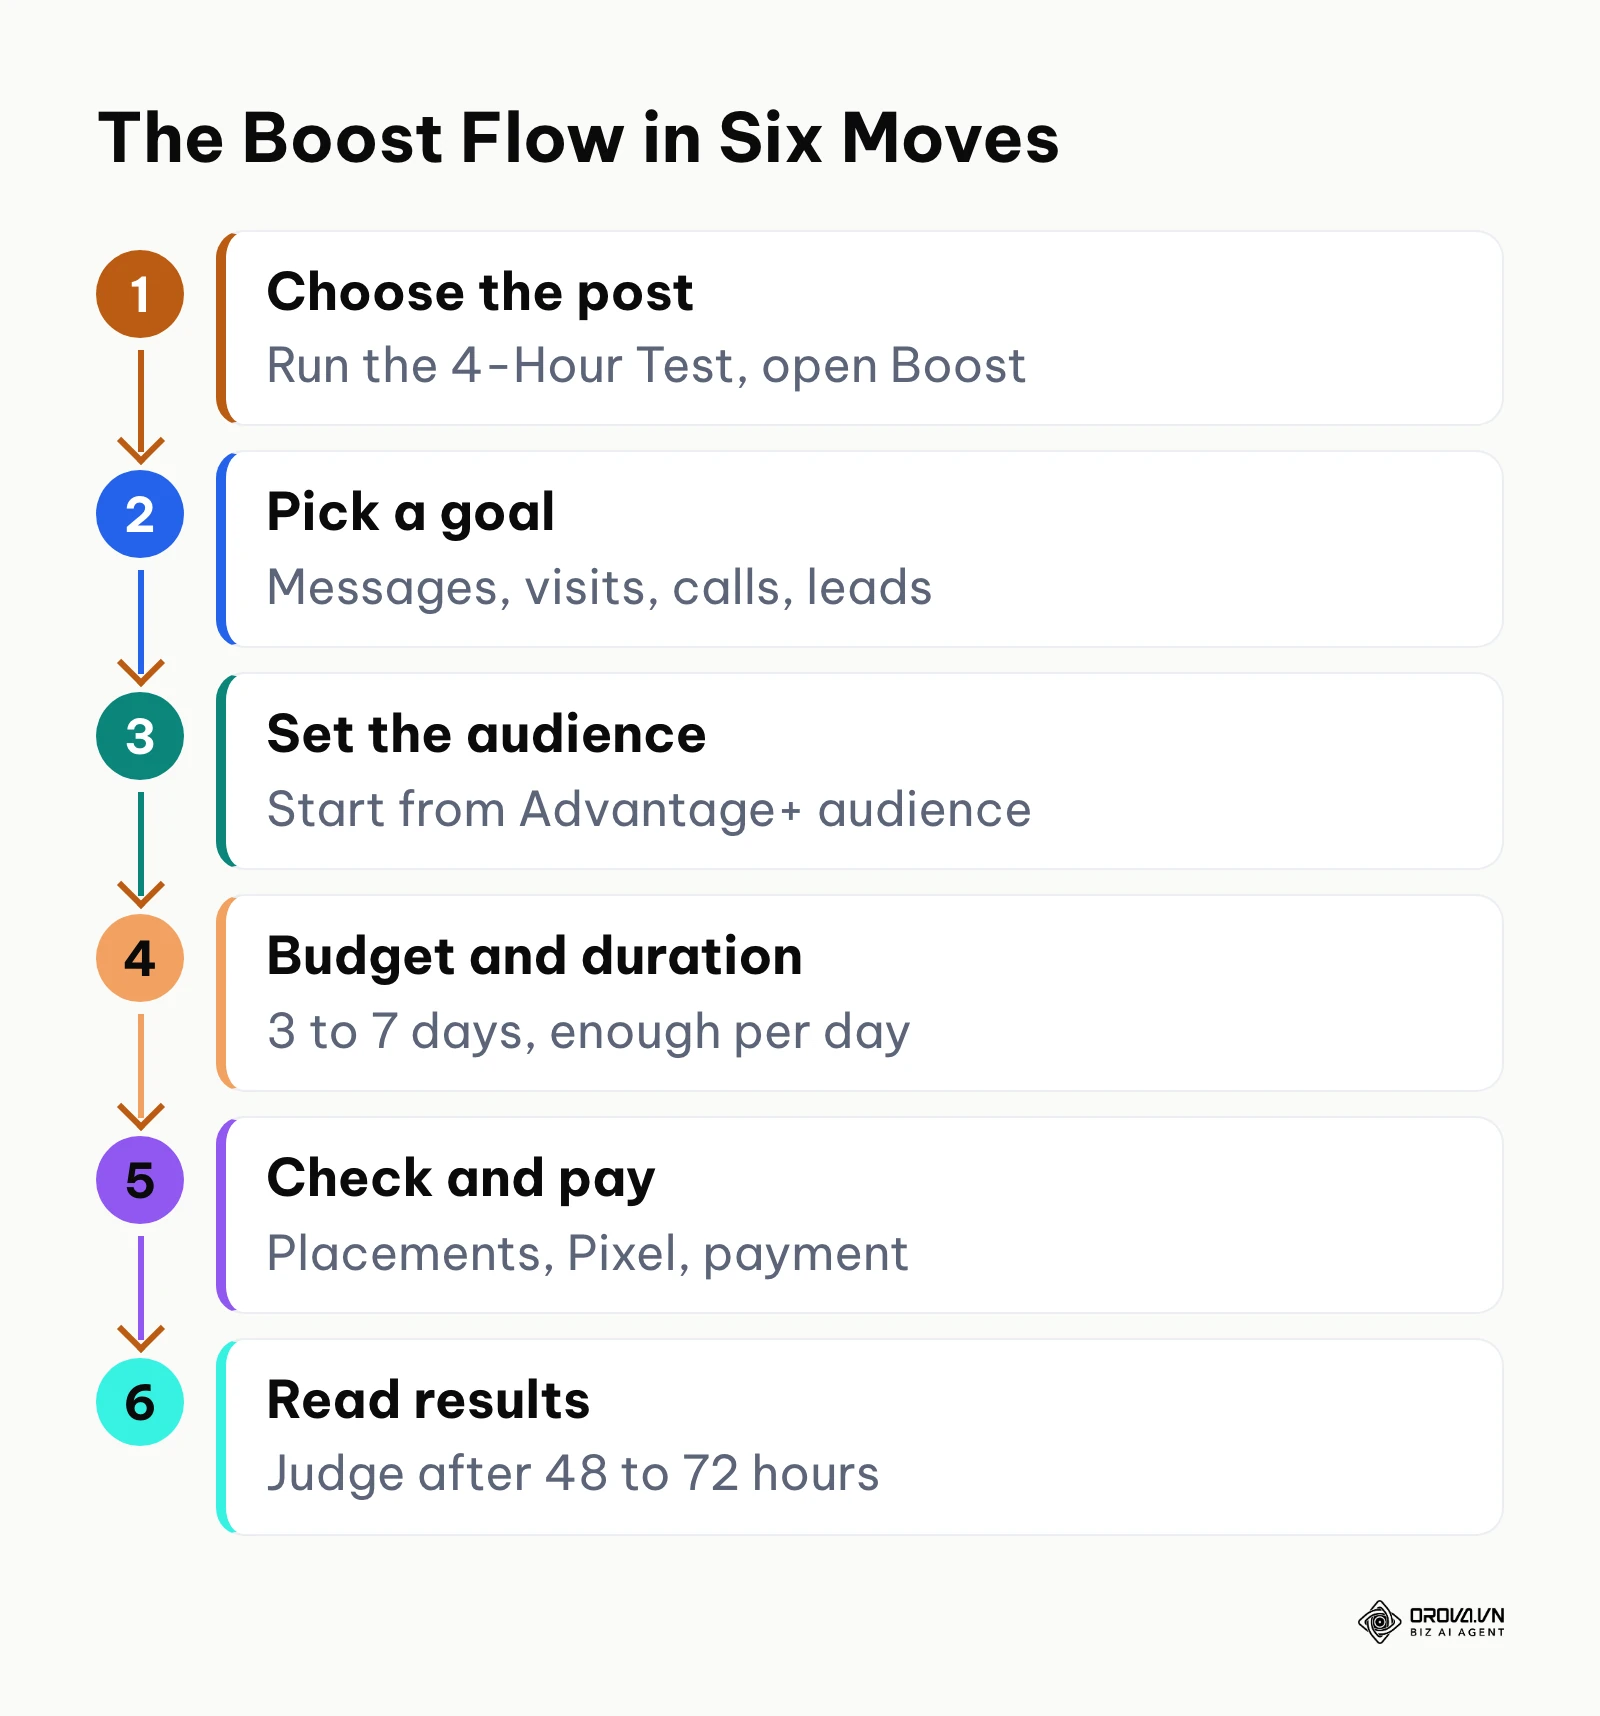
The diagram below groups the seven steps into six moves, since opening the Boost button happens right after you choose the post.
Step 1: Choose the Right Post with the 4-Hour Test
The most common mistake is choosing a post to boost because you like how it looks. A better habit is to let your existing followers vote first. When you publish a post, Meta shows it to a slice of your audience. If that warm audience ignores it, a colder paid audience usually will too, and you pay more for every result.
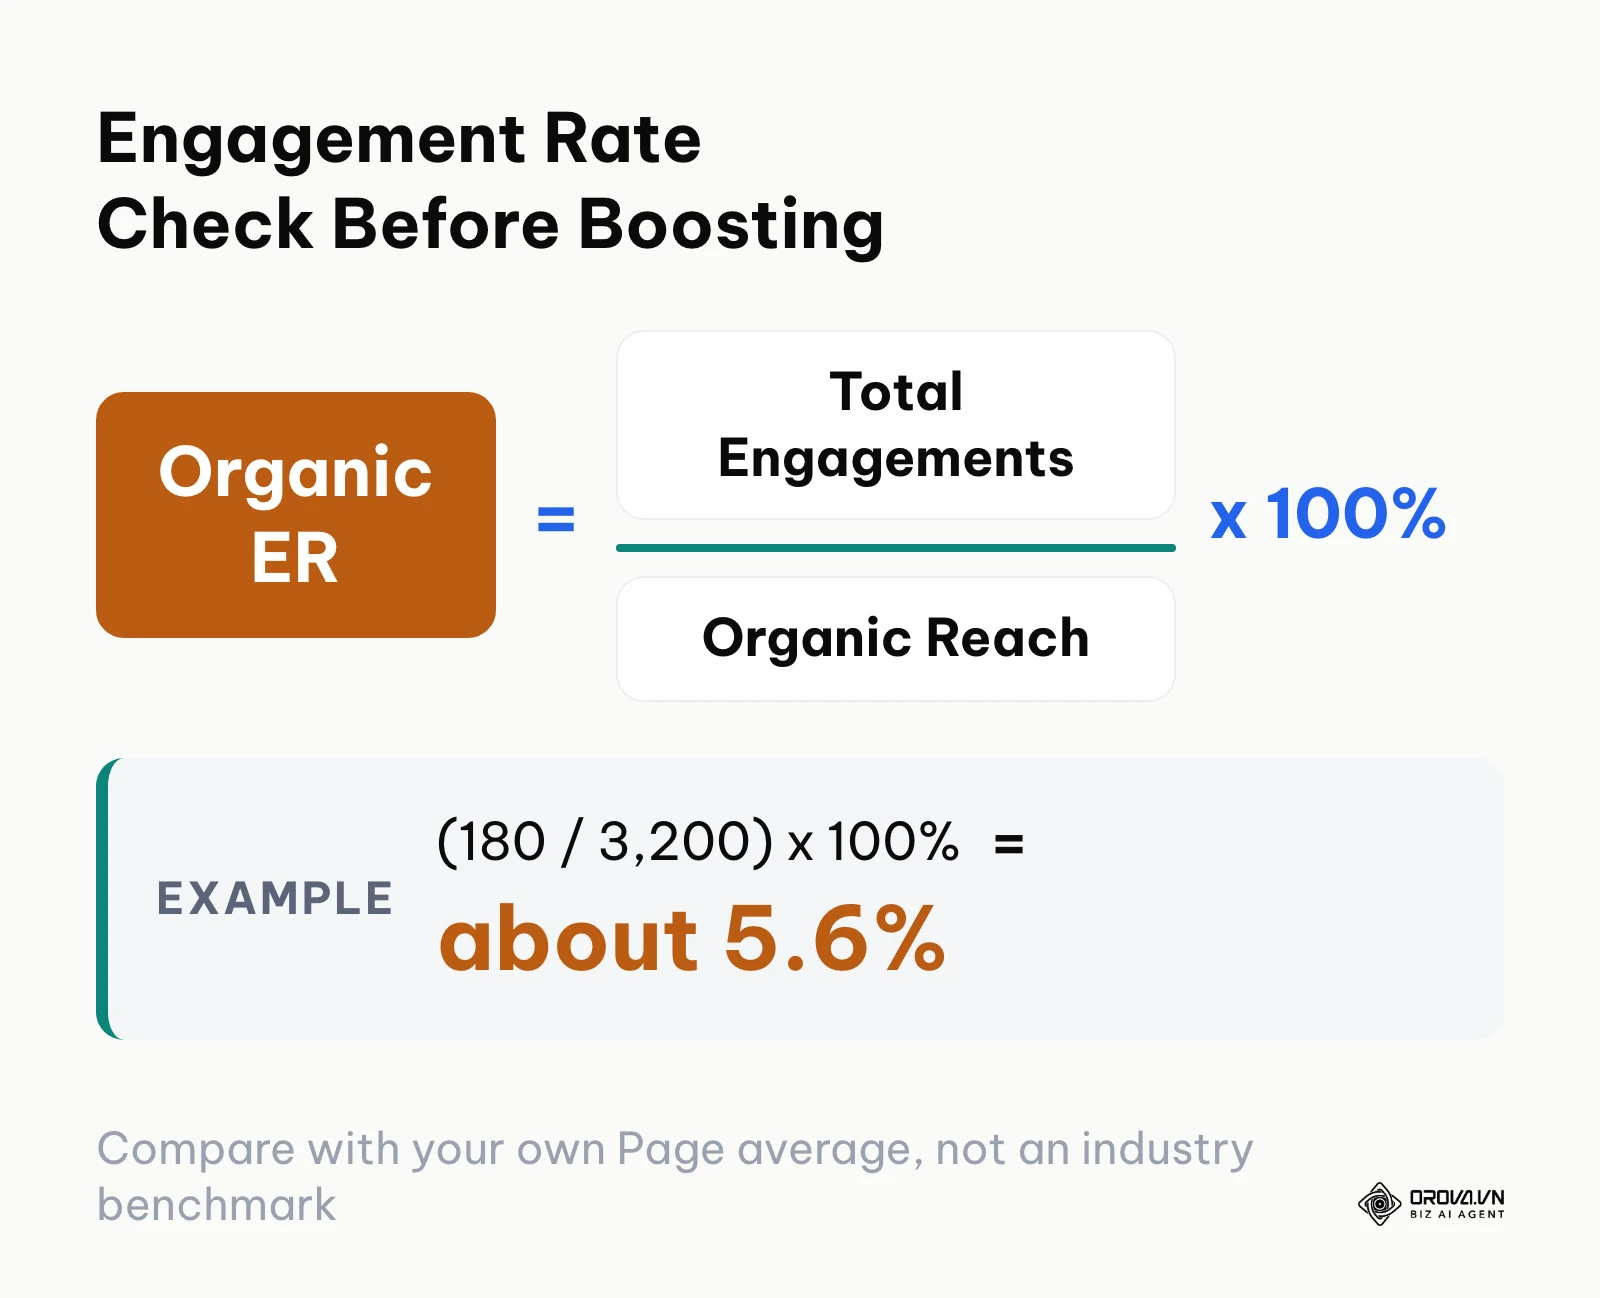
A simple check is the 4-Hour Test. Publish the post organically, wait about four hours without paying anything, then open the post's insights and calculate its engagement rate: total engagements (reactions, comments, shares, and link clicks) divided by the post's reach, multiplied by 100.
The diagram below shows the formula with an illustrative calculation.
Compare the result with your own Page's recent average rather than with an industry benchmark, because rates vary widely by country, niche, and audience size. A good boost candidate usually sits clearly above your average and has at least a few shares and comments that sound like real buyers ("Is this available in size M?", "Do you deliver to my area?").
The scorecard below turns that into a quick checklist you can run on any post.
| Check | How to measure it | Signal worth boosting | If the signal is missing |
|---|---|---|---|
| Engagement rate after 4 hours | (Engagements / Reach) x 100 | Clearly above your Page's recent average | Do not boost; learn from it for the next post |
| Shares | Share count in post insights | Several organic shares | Test a stronger opening image or line next time |
| Buyer comments | Count questions about price, stock, booking | At least a couple of genuine questions | Rewrite the caption with a clearer next step |
| Link clicks (link posts) | Link clicks in post insights | Steady clicks relative to reach | Fix the preview image and headline |
Illustrative example: A small specialty coffee roaster with two cafes publishes a carousel about a new seasonal bean at 9:00 AM. By 1:00 PM the post has 180 engagements, including 14 shares, from an organic reach of 3,200 people, an engagement rate of about 5.6 percent, which is well above the Page's usual level. Six comments ask whether bags are available in store. The owner picks this post to boost and targets people living near the two cafes.
Creative quality still matters at this stage. Posts with a clear focal image or a vertical video, a first line that names a real problem or offer, and one obvious next step ("Send us a message to reserve") tend to hold attention in a busy feed. If the post needs heavy edits to get there, publish a better version organically first rather than editing a boosted ad mid-flight.
Step 2: Open the Boost Button from the Right Place
You can start a boost from three places: the Boost button under the post on your Facebook Page, the Facebook app on your phone, or the Content section of Meta Business Suite on a computer. For anything beyond a quick test, Meta Business Suite in a web browser is the most comfortable option, because you see the full form, the ad account in use, and the payment method on one screen.
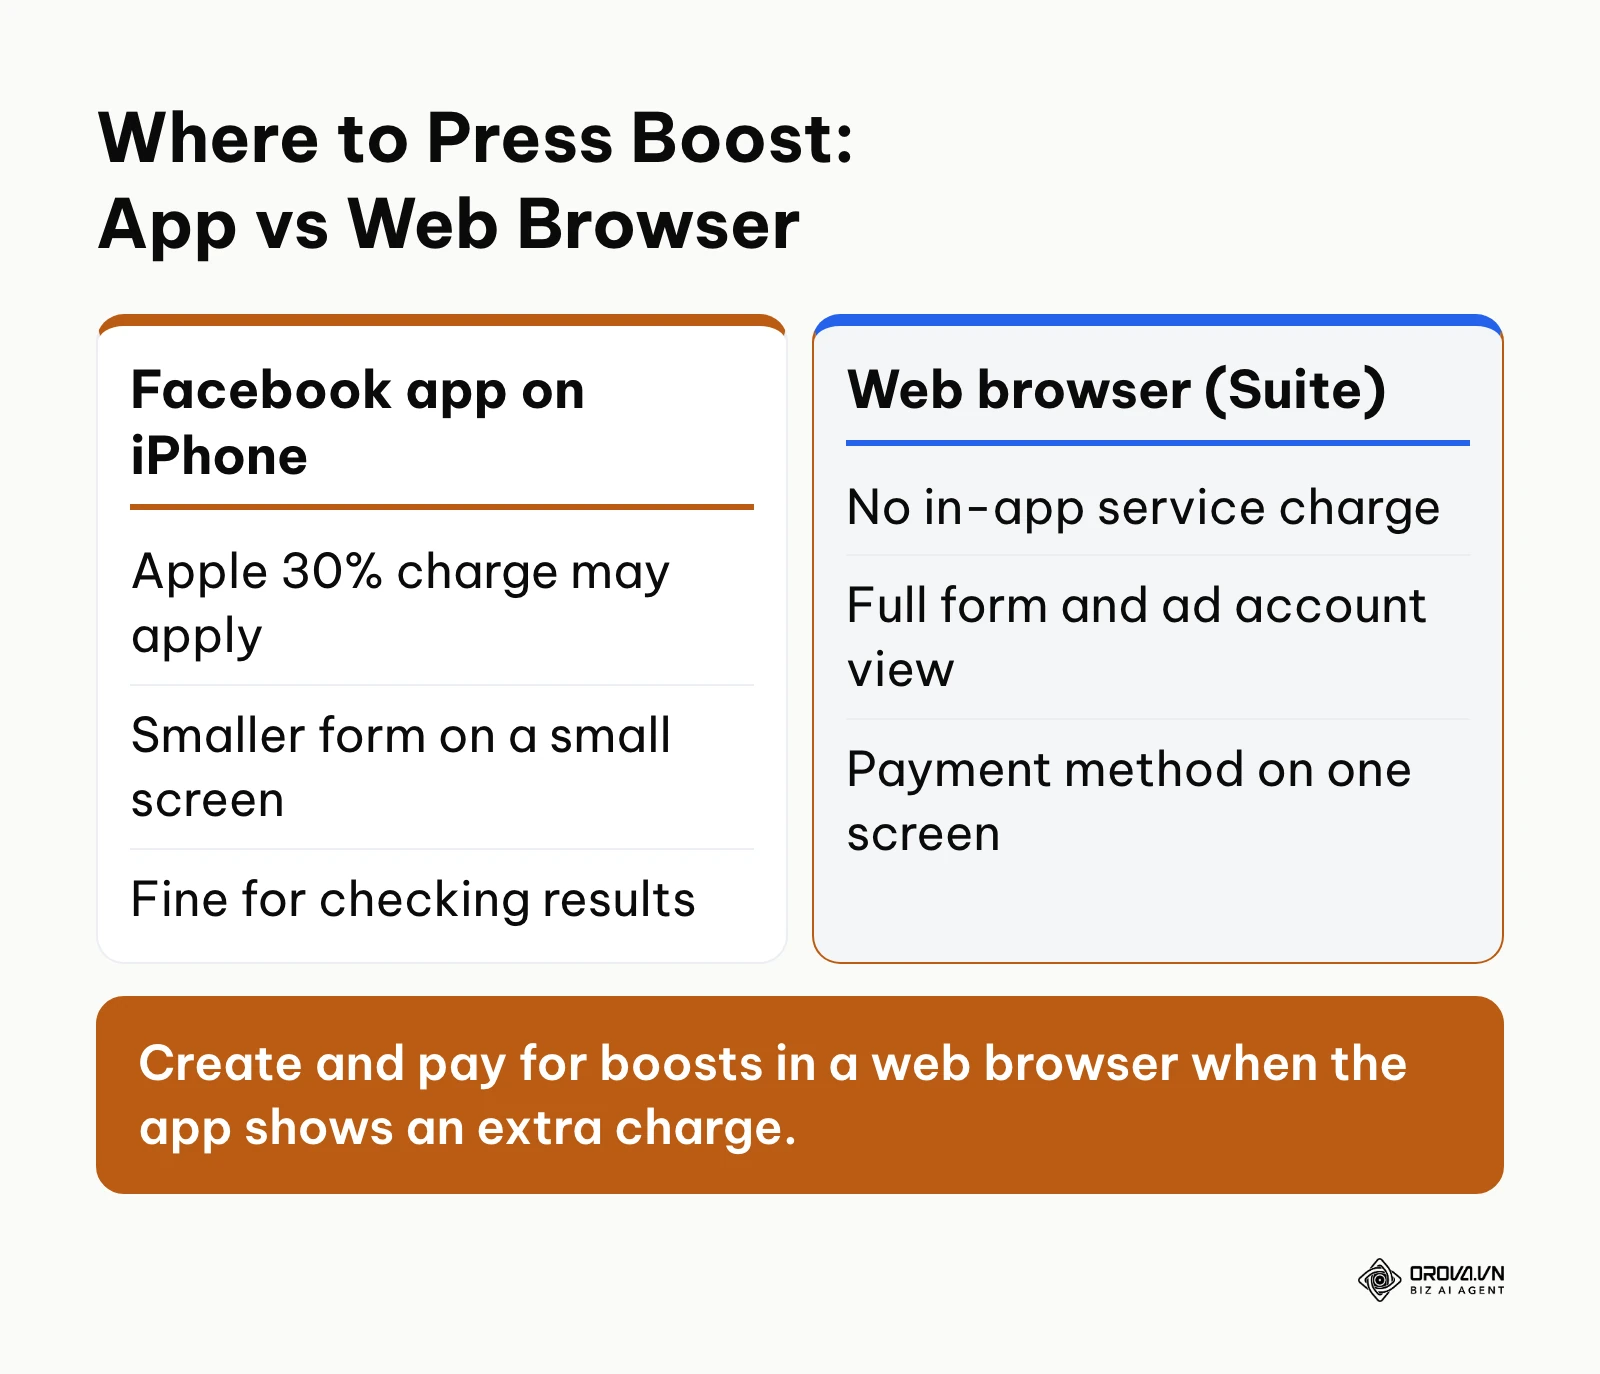
There is also a cost reason to prefer a browser on Apple devices. Meta has told advertisers that boosts paid for inside the Facebook or Instagram app on iPhone and iPad can include Apple's 30 percent service charge in some regions, while boosts paid on the web are not affected. Check the current notice in your own account before you pay.
The diagram below compares the two routes.
To open the Boost flow in a browser:
- Go to business.facebook.com and select the right Page in the top-left menu.
- Open Content (sometimes shown as Posts and reels) and find the post you chose in Step 1.
- Click Boost next to the post. The Boost form opens with the post preview on the right.
- If you are on the Page itself, click Boost post under the post; the same form opens.
If you must manage from your phone, you can still review results in the app, but create and pay for boosts on the web whenever the in-app notice mentions an extra charge.
Step 3: Pick a Goal That Matches a Business Result
The first section of the Boost form asks for a goal. Depending on your Page and post, you will see options such as Automatic, Get more messages, Get more website visitors, Get more engagement, Get more calls, or Get more leads. The list changes over time and by region, so read the short description Meta shows under each option.
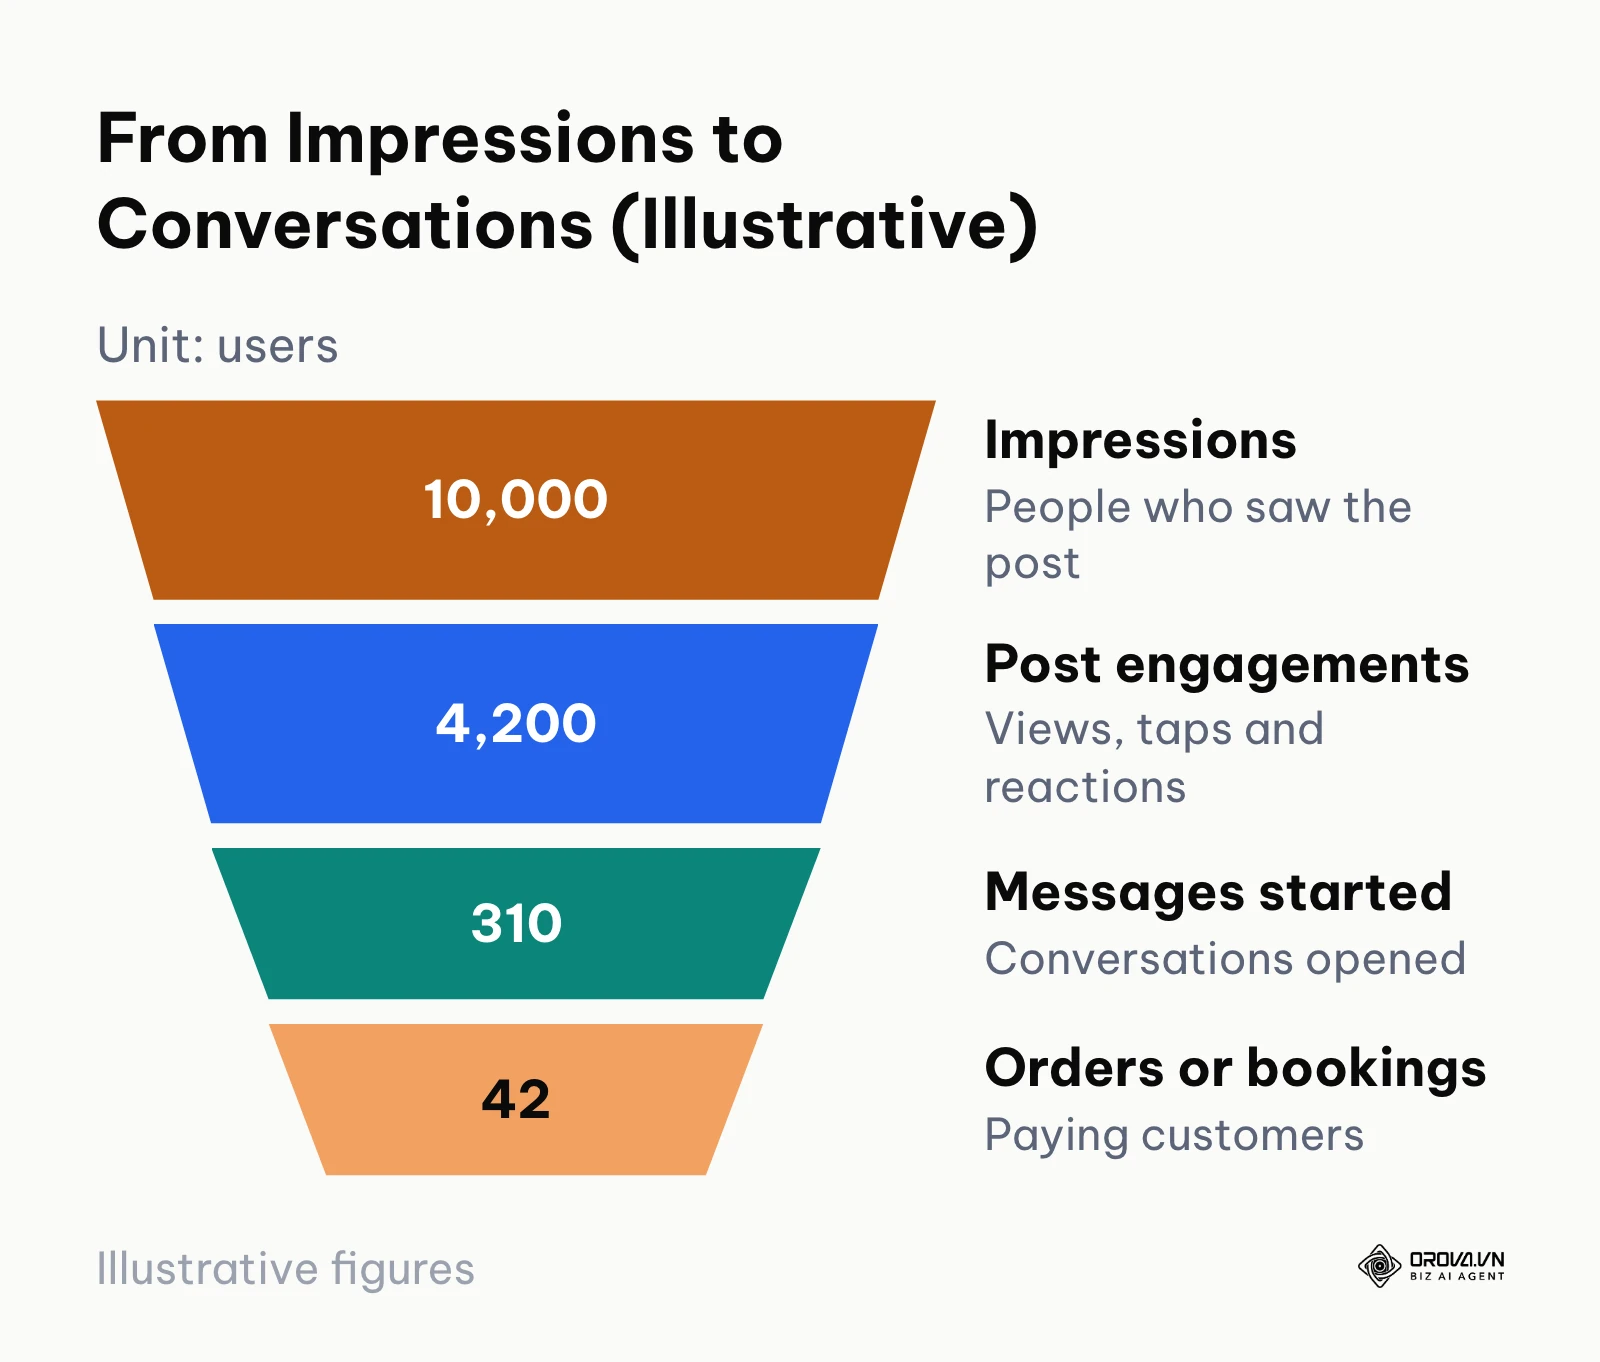
Meta optimizes delivery for exactly the result you pick. If you choose engagement, the system looks for people who tend to react and comment, which is fine for awareness but rarely brings buyers. If you want sales or bookings, pick the goal closest to that outcome.
The diagram below shows how a message-focused goal narrows a large audience down to real conversations.
A practical way to choose:
- Get more messages if you sell through conversation, quotes, appointments, or local services. People see a Send message button and land in Messenger, Instagram Direct, or WhatsApp, depending on what you connect.
- Get more website visitors if the post links to a product page, booking page, or landing page, and you have the Meta Pixel installed to see what visitors do next.
- Get more calls if your customers prefer to phone, and someone can answer during the hours the boost runs.
- Automatic if you are unsure; Meta picks a goal based on your Page setup. Check which goal it chose before you continue.
For message goals, set up the greeting and suggested questions in the same form or in your inbox settings, for example "What are your opening hours?", "Is this in stock?", and "How do I book?".
Illustrative example: A solo consultant who helps dental clinics with scheduling had boosted educational posts with the engagement goal for months and received plenty of reactions but no bookings. They switched one proven post to Get more messages and added an instant reply asking which booking software the clinic uses. With the same budget as before, the boost produced a handful of qualified chats, and several turned into paid audits.
Step 4: Set Your Audience, Starting from Advantage+ Audience
The next section is Audience. Today the default is Advantage+ audience: Meta uses your post, your Page, and its delivery system to find people likely to respond, and you can add suggestions such as location, age, or interests that it treats as hints rather than hard limits. For many small Pages this default works well, because it gives the system room to learn.
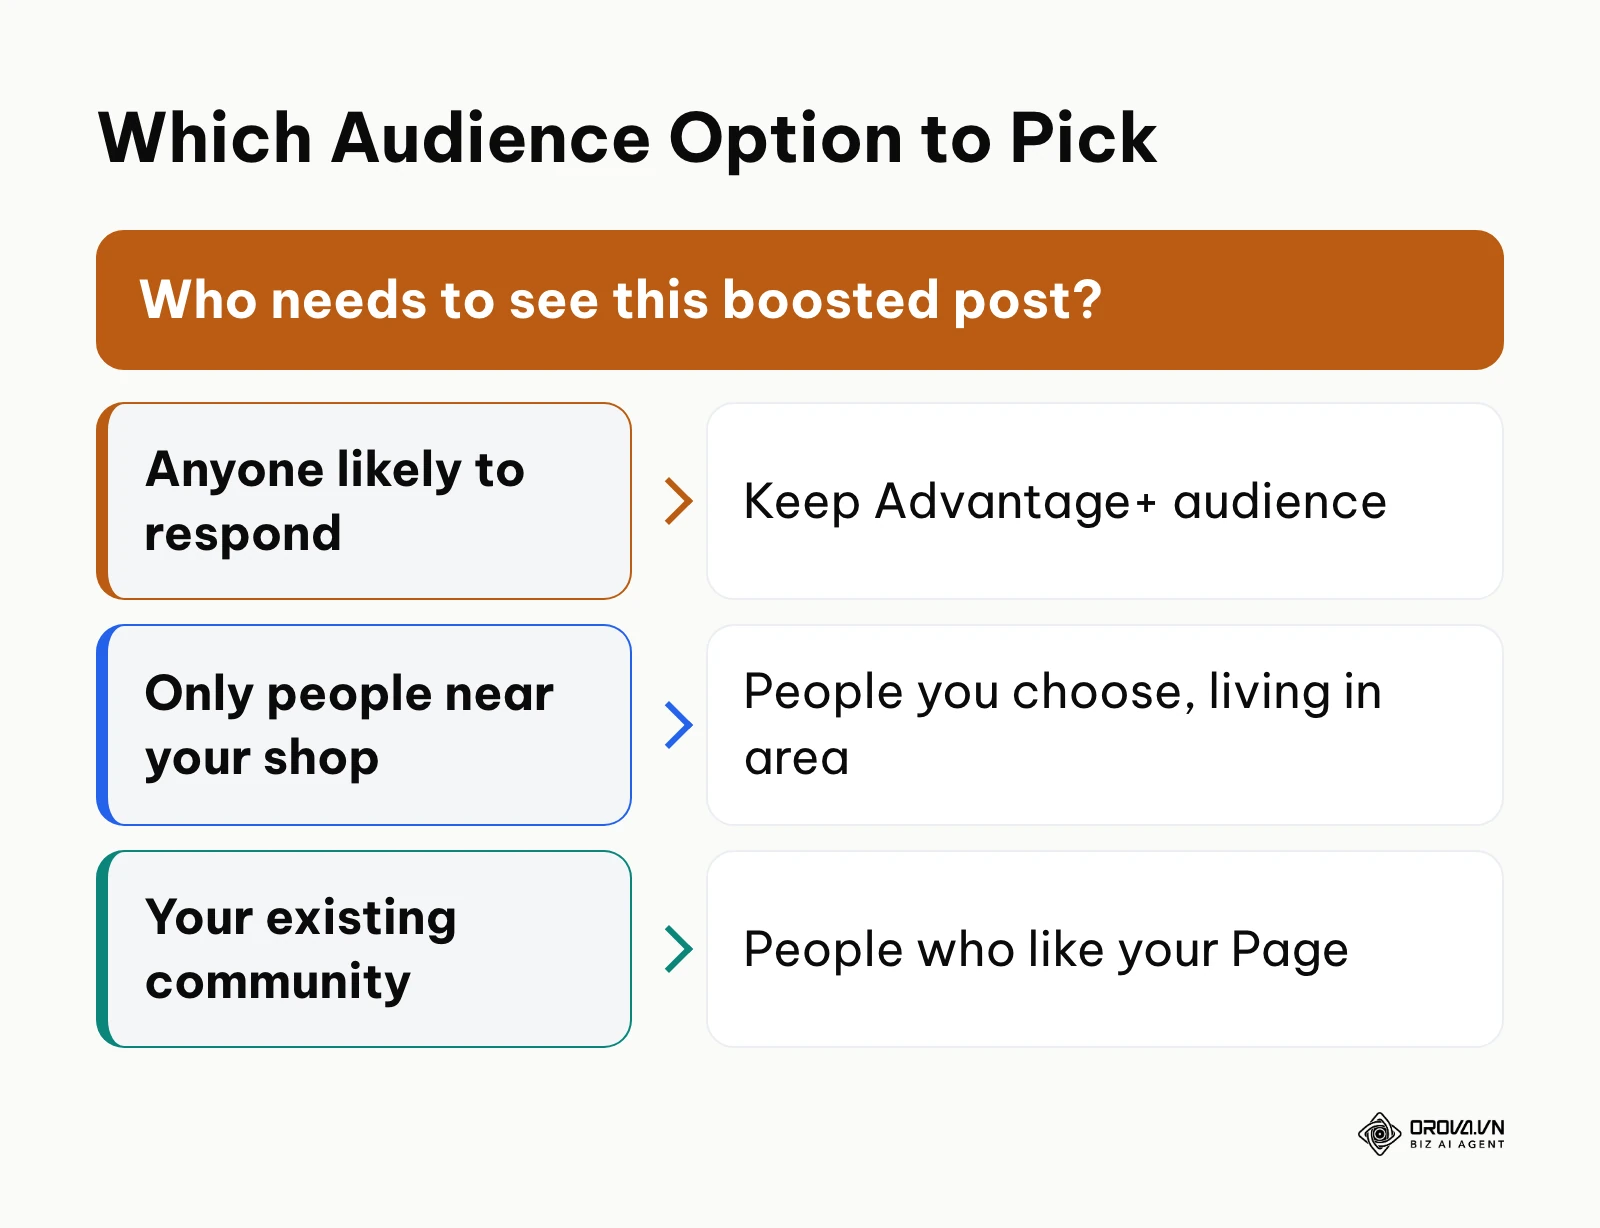
You can switch to a narrower option when you have a strong reason:
- People you choose through targeting: set location, age, and detailed targeting yourself. Use this when your service only makes sense in a small area, for example people living within a short drive of your shop.
- Saved audiences you built before, including custom audiences such as people who engaged with your Page or visited your website.
- People who like your Page (and, in some accounts, their friends), useful for announcements to an existing community.
For local businesses, pick "People living in this location" rather than people recently there, so tourists passing through do not use up your budget. Keep age ranges based on who actually buys from you, not on guesses.
If your post is about credit, employment, housing, or social issues, elections, or politics, you must declare a special ad category in this section. That category limits targeting options and is required by Meta's advertising policies.
For a deeper look at building audiences once you outgrow the boost form, see our guide to Facebook ads targeting.
Step 5: Set Budget and Duration Without Starving the Boost
The Budget and Duration sections decide how much you spend and for how long. Depending on your account, you set a daily budget or a total budget, and choose a number of days or a fixed end date. All amounts appear in your account currency, and Meta shows an estimated reach range next to your choice. Treat that number as a rough guide, not a promise.
Meta's delivery system needs enough results to learn whom to show your post to. Meta's own guidance on the learning phase says an ad set generally needs around 50 optimization events within a week to leave learning. A small boost will rarely reach that, which is fine, but a budget that is too small to produce even a few results tells you almost nothing.
A simple way to size the budget:
- Estimate what one result is worth to you, such as a conversation, a website visit, or a call, based on your margins and past results.
- Set the daily budget at roughly three to five times that target cost per result, so the boost can produce a few results every day.
- Run for three to seven days. A one-day boost is too noisy to judge; a month-long boost left unattended often keeps spending after people stop responding.
If you need a refresher on planning spend across all your ads, read our explainer on managing your ad spend.
Step 6: Choose Placements, Check Tracking, and Pay
Before you pay, the form shows a few more settings worth a quick look:
- Placements: if your Instagram account is connected, you can choose whether the boost also runs on Instagram and Messenger. Leave them on if your customers use those apps; turn them off if the post only makes sense on Facebook.
- Tracking: if the post sends people to your website, turn on the Meta Pixel option so website actions are tied to the boost.
- Payment method: confirm which ad account and payment method will be charged. Depending on your country, you can pay by card, PayPal, a local payment option, or prepaid funds added in advance in your account currency.
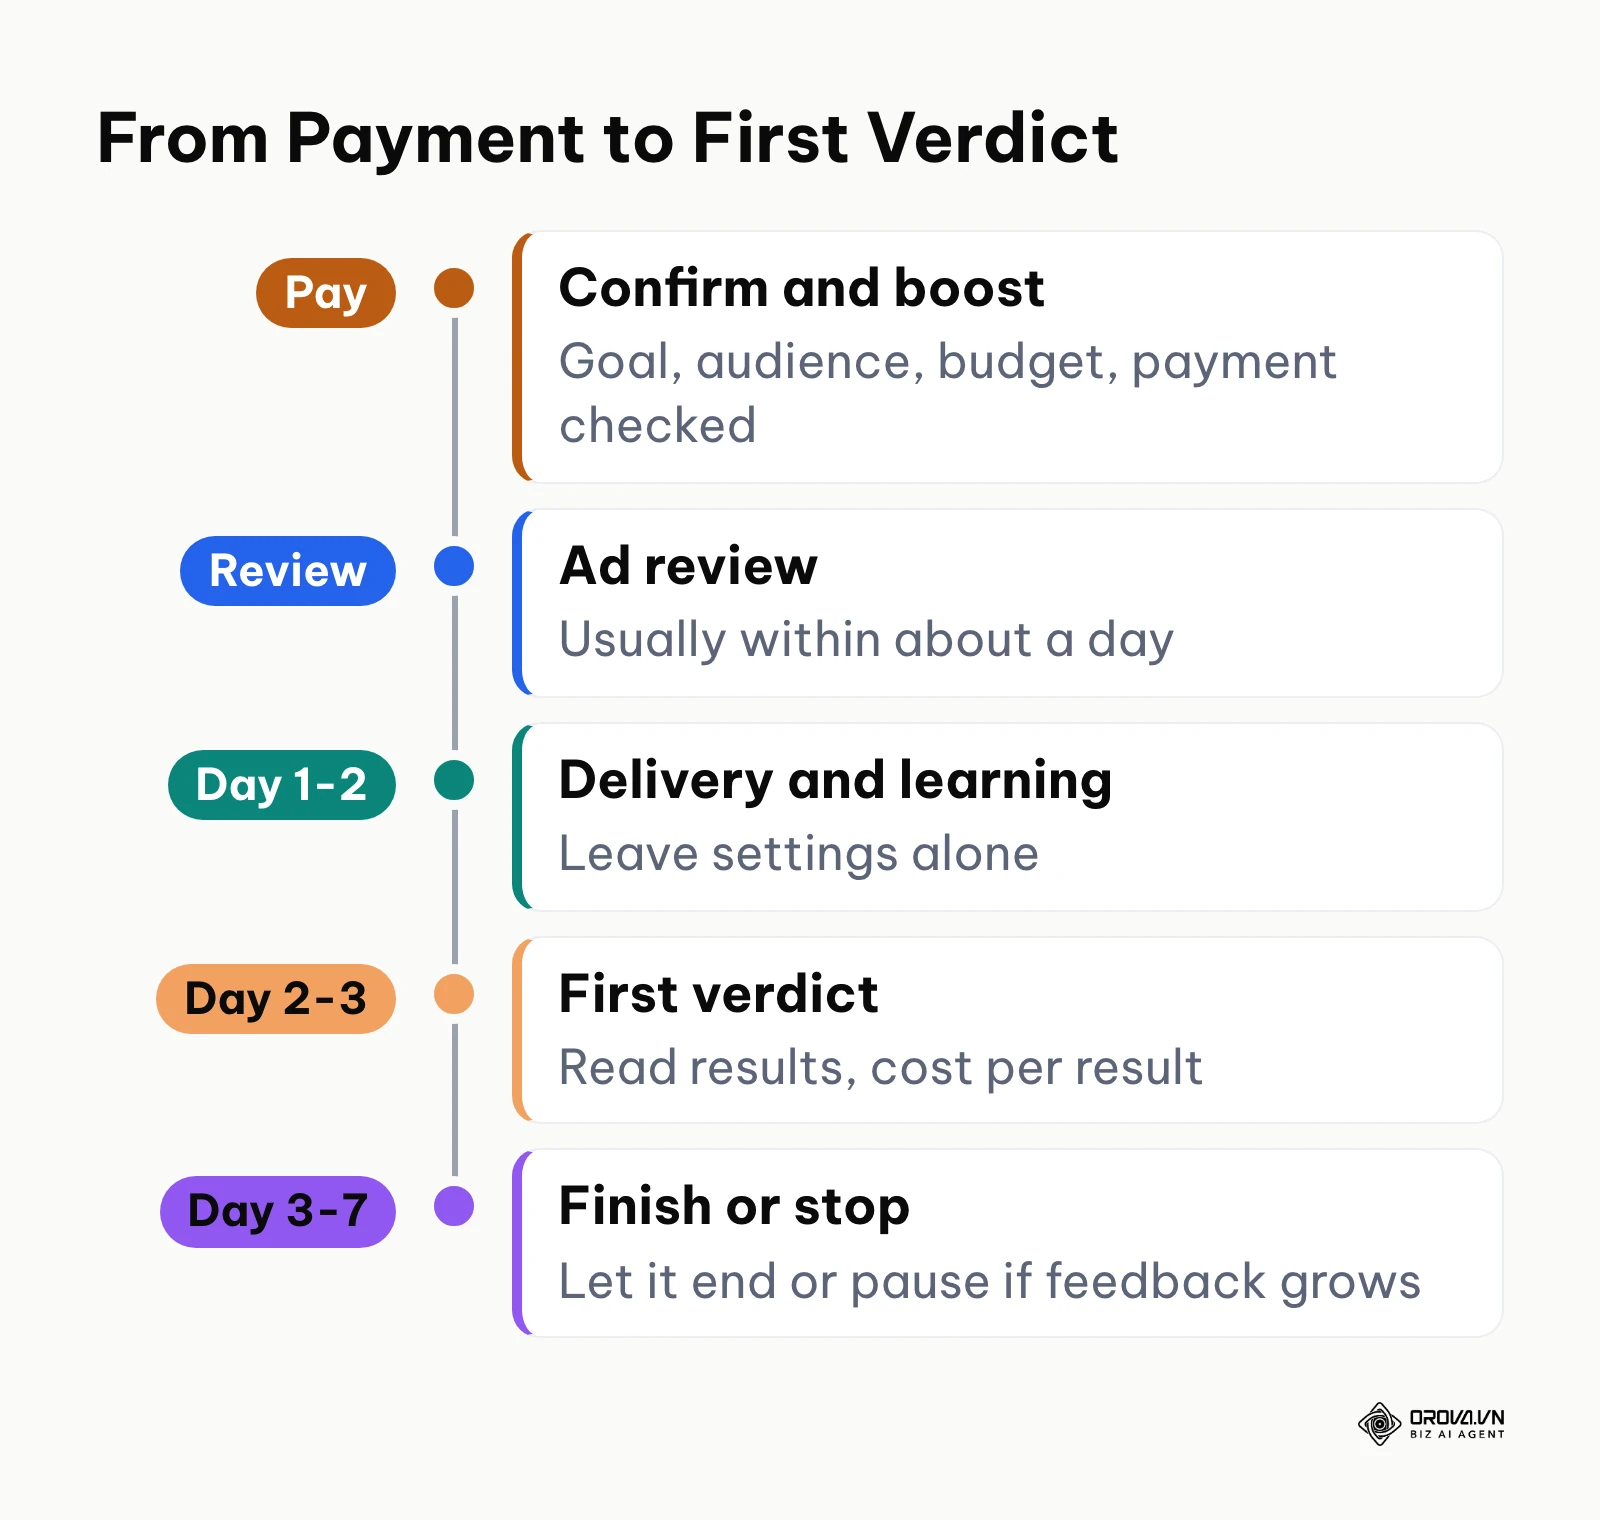
The payment screen also shows the total you agree to spend. Meta usually bills as the boost delivers or when you reach a billing threshold, so you see the charges in Billing and payments rather than as one upfront payment.
When you click Boost post now (the exact button label varies), the ad goes into review. Most ads are reviewed within about a day, often much faster. If the boost is rejected or stays in review, our checklist for a Facebook boost post not working covers the common causes, so they are not repeated here.
A short pre-flight checklist before you click:
| Setting | What to confirm | Why it matters |
|---|---|---|
| Goal | Matches the business result you want | Delivery follows the goal literally |
| Audience | Location type and area are right | Avoids paying for people who cannot buy |
| Budget and duration | Enough for a few results per day | A tiny budget gives unreadable results |
| Placements | Only apps your customers use | Keeps the post where it makes sense |
| Pixel | On, if traffic goes to your site | Lets you see visits and purchases |
| Payment | Correct ad account and method | Prevents failed or misbilled boosts |
Step 7: Read the Results Panel and Decide What to Do Next
Once the boost is active, open the post in Meta Business Suite and click View results (or See results under the post on your Page). The panel shows the amount spent so far, reach, impressions, the main result for your goal, and the cost per result. You can also see a breakdown by age, gender, and location, which tells you who actually responded.
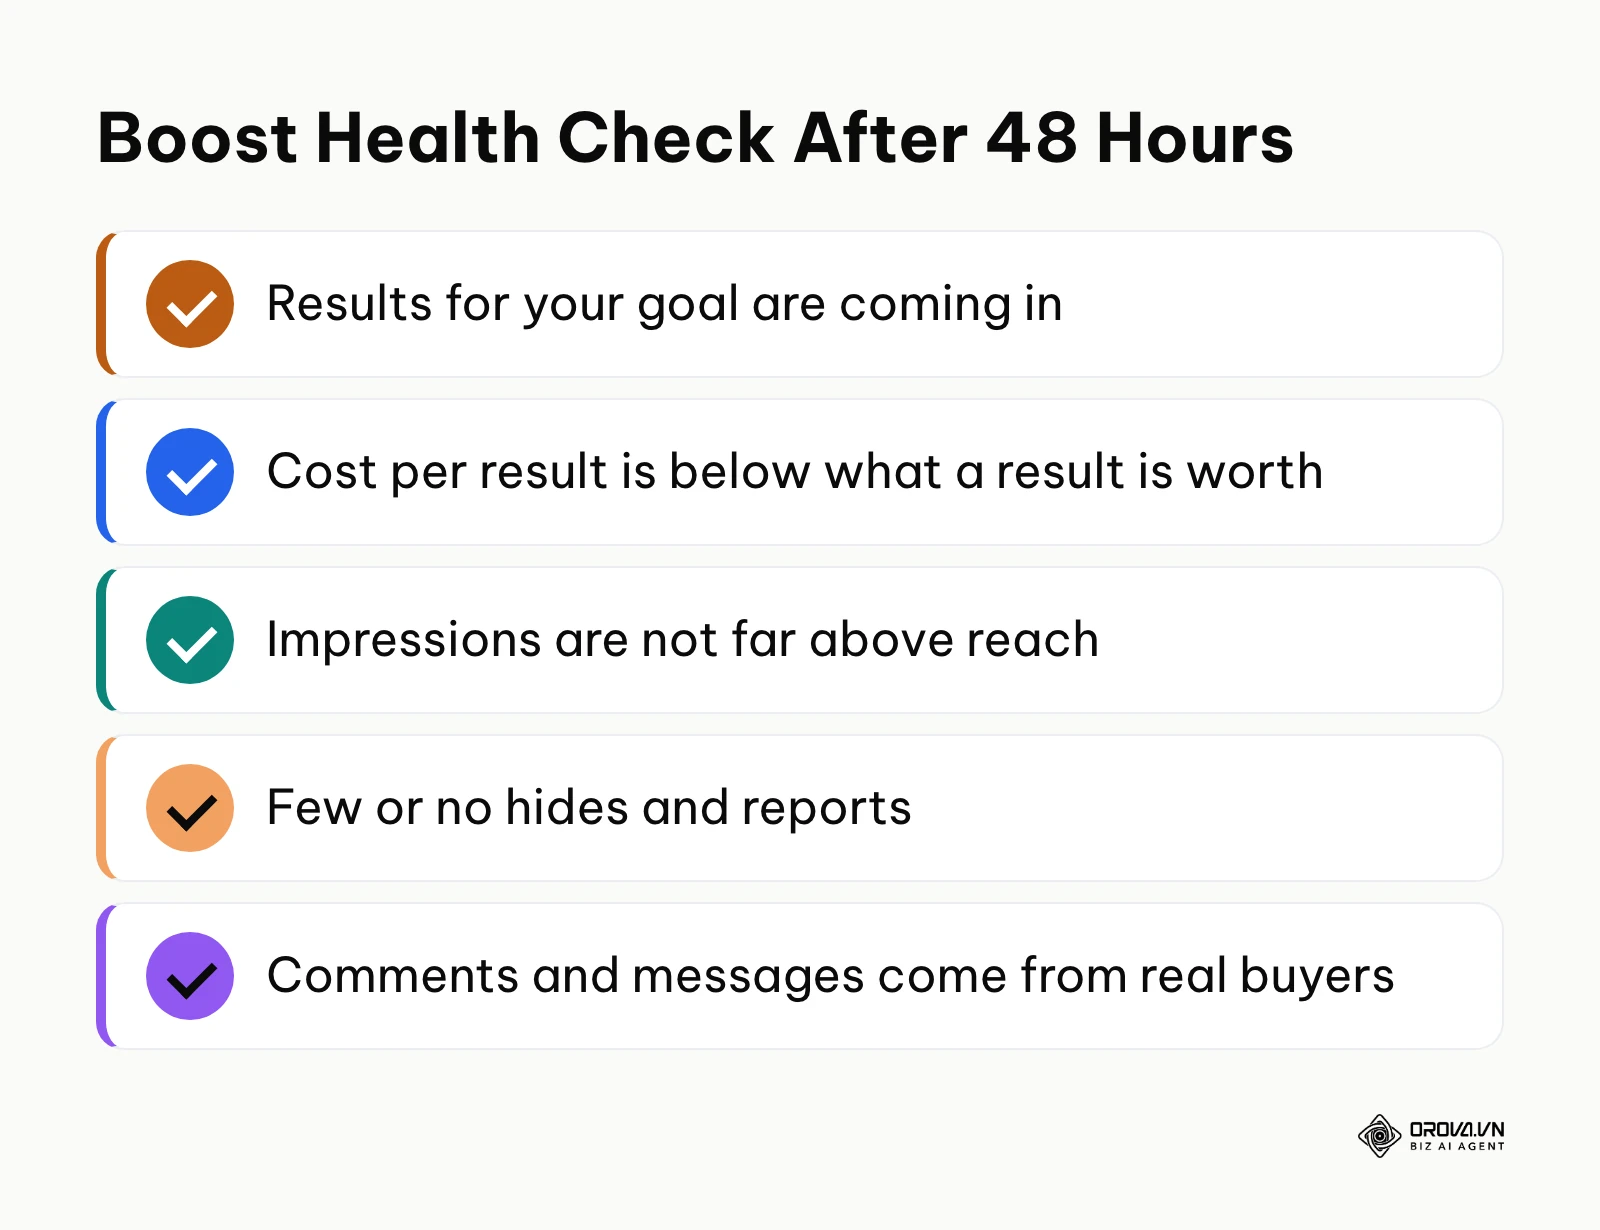
The diagram below lists the checks to run after the first two days of delivery.
The table below shows how to read the main numbers and what to change.
| Metric | What it tells you | Warning sign | What to do |
|---|---|---|---|
| Results (messages, visits, calls) | Whether the boost does its job | Few or no results after 48 hours | Check the goal and audience before adding budget |
| Cost per result | What each result costs | Above what a result is worth to you | Narrow the area or improve the post next time |
| Reach vs impressions | How often the same people see it | Impressions far higher than reach | End the boost earlier or widen the audience |
| Link clicks (website goal) | Interest in your offer | Clicks but no website actions | Check the landing page and Pixel events |
| Negative feedback (hides, reports) | Whether the post annoys people | Feedback appearing steadily | Pause the boost and rethink the message |
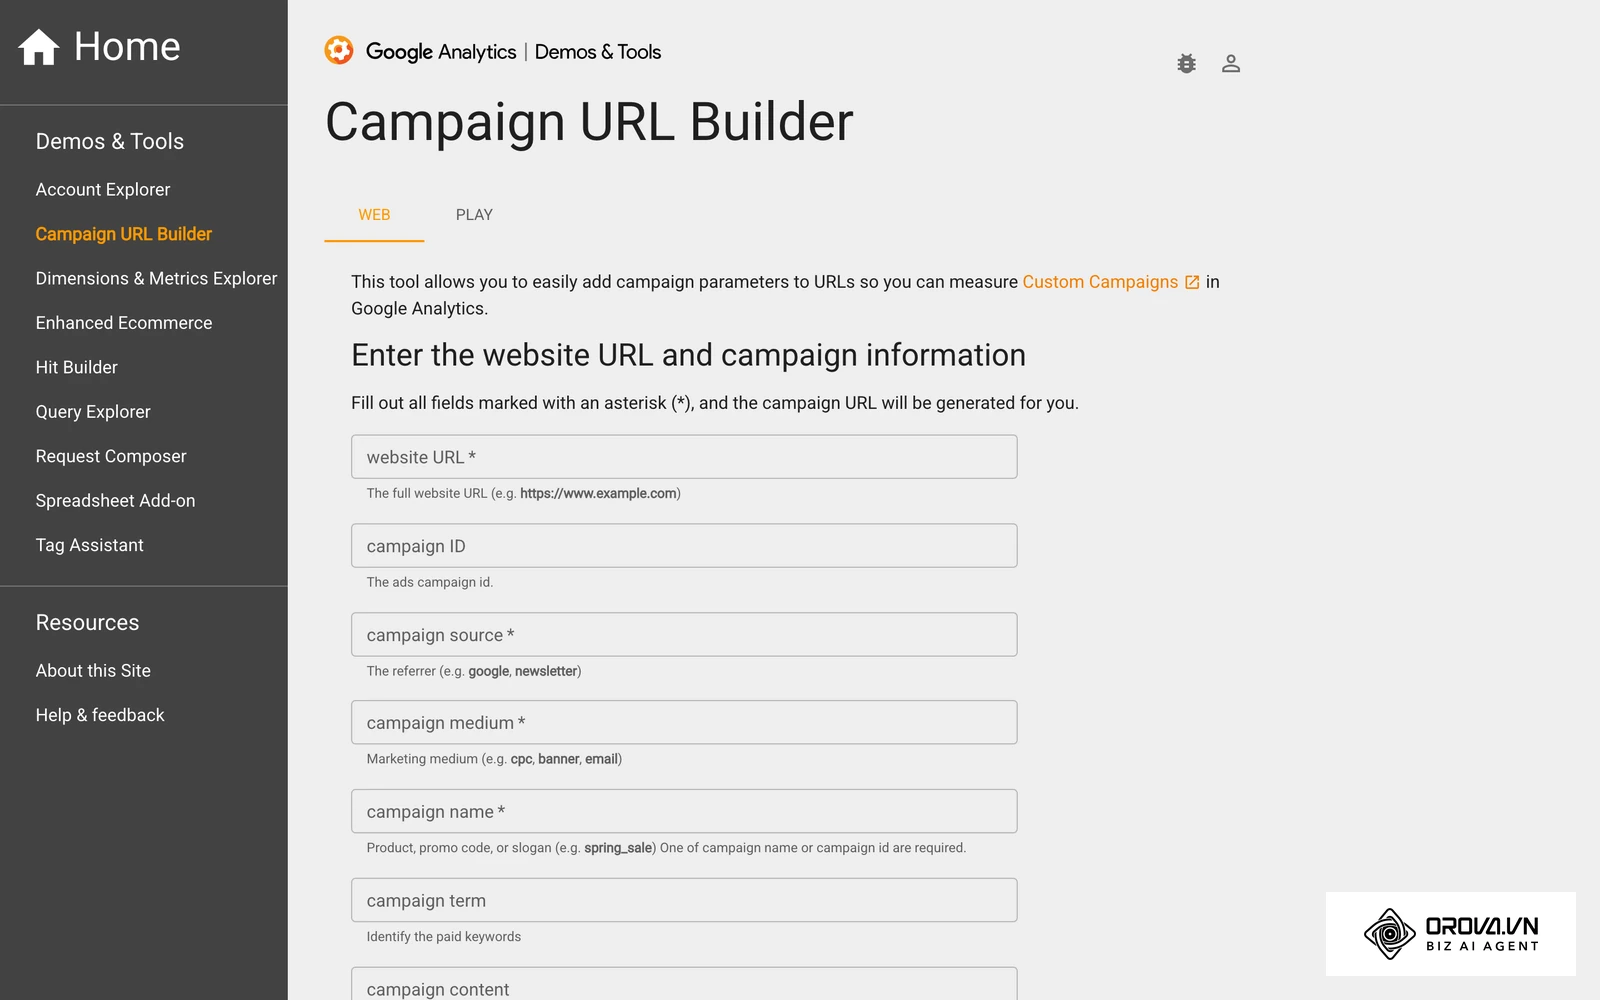
Give the boost at least 48 to 72 hours before major edits, because changing the goal, audience, or budget restarts the learning process. If you send people to your website, add UTM tags to the link (for example utm_source=facebook&utm_medium=boost&utm_campaign=spring_offer) so your web analytics can separate boosted visits from organic ones.
After the Boost Ends: Turn Viewers into a Warm Audience
A boost does not have to end when its budget runs out. The people who reacted, commented, messaged, or watched your post are now a warm group you can reach again.
To reuse them:
- Open Audiences in Meta Ads Manager on a computer.
- Create a custom audience based on Facebook Page engagement, for example everyone who engaged with your Page or posts in the last 30 days.
- Use that audience in your next boost (it appears under saved audiences) or in a campaign built in Ads Manager.
- Show this group a direct offer rather than general content: a first-visit discount, a free consultation, or a booking link.
Illustrative example: A small activewear shop boosts a short video of a new running jacket to people living in its city. A week later, it boosts a second post with a limited sizing offer only to people who engaged with the first one. The second boost reaches far fewer people, but nearly every message asks about sizes and delivery.
If you want to see how boosts fit into a wider campaign plan, this Facebook ads guide covers the full picture.
Want to scale your budget but afraid of breaking performance? 📉
Integrate OROVA ADS now - an AI Agent that automatically monitors and optimizes Google, Meta, TikTok ads 24/7. Now, expanding and replicating your Performance Ads team is just one click away.
🚀 Try it now at: orova.vn/ads
Common Mistakes When Boosting Facebook Page Content and How to Fix Them
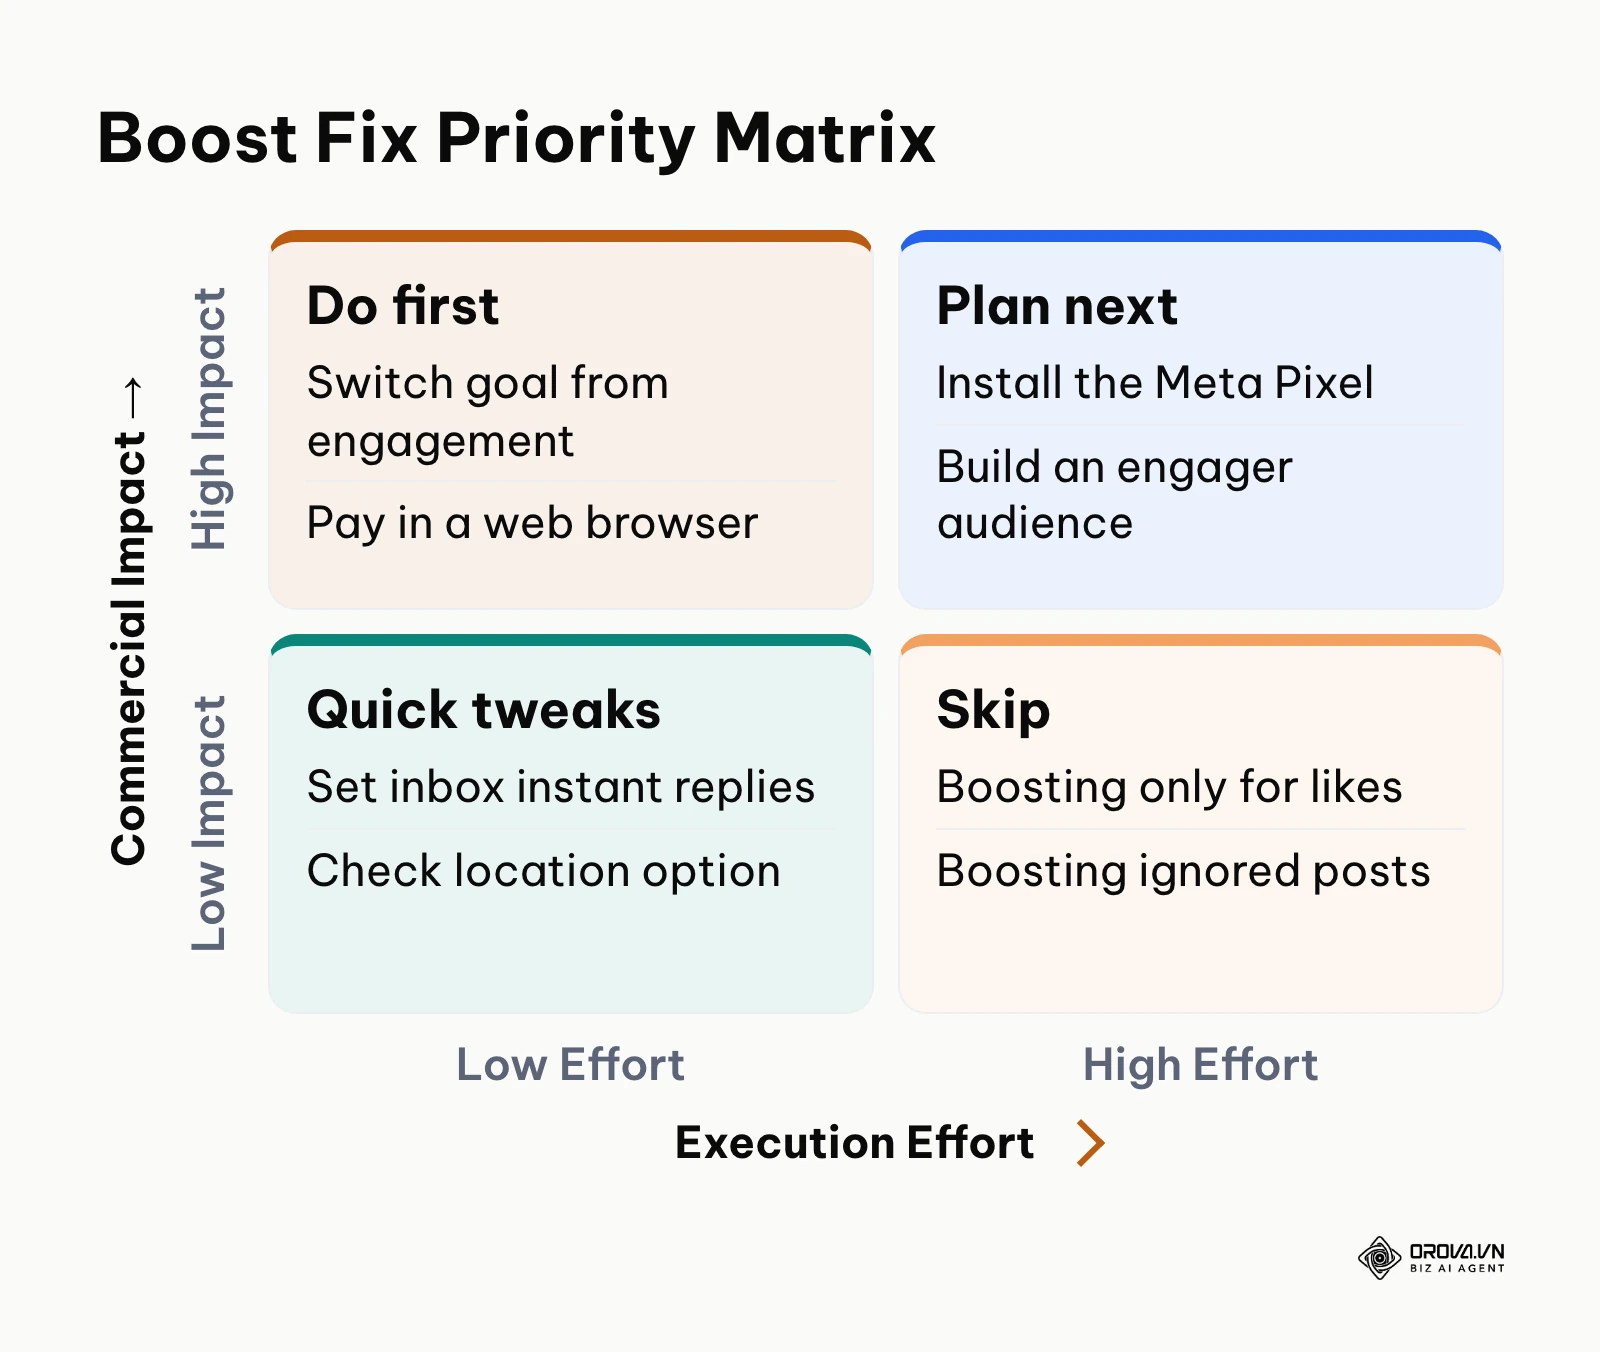
Most wasted boost budgets come from a handful of setup mistakes made in the Boost form itself. The diagram below sorts the fixes by effort and impact.
- Boosting a post nobody reacted to: if your followers ignored it, strangers usually will too. Run the 4-Hour Test first and boost only posts that beat your Page's average.
- Leaving the goal on engagement when you want sales: Meta will deliver likes, not customers. Pick Get more messages, website visitors, calls, or leads instead.
- Paying inside the iPhone or iPad app when an extra charge applies: create and pay for boosts in a web browser through Meta Business Suite.
- Choosing "people in this location" for a local offer without checking the option: pick people living in the area so travelers do not use up your budget.
- Starving the boost: a budget too small to produce a few results per day gives you nothing to learn from. Size the daily budget around three to five times your target cost per result.
- Editing too early: changing the boost after a few hours restarts learning. Wait 48 to 72 hours unless the post is drawing negative feedback.
- Boosting without a way to reply: a message goal with nobody answering the inbox wastes every conversation it starts. Set an instant reply and check the inbox daily while the boost runs.
Trends in Facebook Page Boosting Over the Next Few Years: Author's Perspective
The Boost form looks simple, but the system behind it keeps changing. These three views are my own reading of where page boosting is heading, not forecasts from Meta.
Automated Audiences Will Matter More Than Manual Interest Lists
Meta already makes Advantage+ audience the default in the Boost form, and its delivery system increasingly relies on what the post itself is about and who responds to it. In my view, manual interest targeting in the simple boost flow is likely to keep shrinking over the next few years, and the post's content will do more of the targeting work. The practical takeaway is to make the post itself say clearly who it is for, through the image, the first line, and the offer. This could move slower if privacy rules limit how platforms use behavioral data.
Boosting Will Increasingly Be Planned Alongside Other Channels
Small teams today often boost on Facebook, promote on Instagram, and run search ads in separate places with separate budgets. I think owners will increasingly plan a boost as one part of a cross-channel budget rather than a stand-alone purchase, judging it against what the same money does elsewhere. Preparing for that means using consistent UTM tags and comparing cost per result across channels in one report. Platform competition may keep the tools from connecting as smoothly as advertisers would like.
Server-Side Signals Will Carry More Weight in Measurement
Browser privacy changes already make the Meta Pixel miss some actions, which is why Meta encourages the Conversions API alongside it. My view is that boosts tied to verified events sent from your website or CRM will be easier to measure and optimize than boosts that rely on the browser alone. Owners who sell online can prepare by asking their developer or platform provider about Conversions API support. If browsers settle on simpler consent standards, the gap between the two methods may narrow.
Frequently Asked Questions About How to Boost Facebook Page Campaigns
Is boosting a Facebook post worth it for a small business?
It is worth it when you boost a post that already performs well organically and choose a goal tied to a business result, such as messages or website visits. Boosting a weak post with the engagement goal usually buys reactions rather than customers.
Should you use the Boost button to grow page likes?
Boosting only to collect likes rarely helps sales, because many of those new followers never engage again. If follower growth is your main goal, our guide on how to grow Facebook page followers covers organic methods.
Why does reach drop after a boost ends?
Reach usually falls back to your organic level because the paid impressions stop; it is not a penalty. Compare the post's organic reach before and after the boost rather than its total reach during the boost.
How much does it cost to boost a Facebook page post?
There is no fixed price. You set the daily or total budget yourself in your account currency, and Meta shows an estimated reach for that amount. A useful starting point is a daily budget of three to five times what one result, such as a message, is worth to you, for three to seven days.
Can I boost a post from my phone?
Yes, the Facebook app has a Boost button under each Page post. On iPhone and iPad, check whether the app shows an extra service charge before paying; if it does, finish the boost in a web browser through Meta Business Suite.
How do I separate sales from boosted posts and organic posts?
Add UTM tags to the link in the boosted post and turn on the Meta Pixel option in the Boost form. Your web analytics can then show which visits and purchases came from the boost.
Where Should You Start?
Your first move depends on where you are today. Pick the one that fits and do only that this week.
If you have never boosted a post, open Meta Business Suite on a computer, review your last ten posts in Insights, and pick the one with the highest engagement rate and the most buyer questions. Boost it with the Get more messages goal to people living near you, with a budget you are comfortable losing, for three days.
If you boost often but cannot tell what works, stop changing settings for a week. Run every candidate post through the 4-Hour Test and write down the goal, audience, budget, and cost per result for each boost in one simple sheet.
If you send boosted traffic to a website, install the Meta Pixel, turn on the Pixel option in the Boost form, and add UTM tags to every boosted link before your next boost goes live.
About the author

Builder of Orova
Nguyễn Đỗ Trọng Ân has 8 years of experience in marketing, including 6 years managing market development across Asia. He builds Orova, a Biz AI Agent that never sleeps: it plans, runs and optimizes work for businesses.
Run your business with AI Agents
Orova is the always-on Biz AI Agent — it plans, runs, and optimizes the work for you.
Save time, unlock productivity.