
Orova Social is where you write one post and publish it to several social networks at once. This guide is written for someone who has never opened Orova. Every section explains the new words first, then walks through what to press, what to type and what a correct result looks like.
The order of the sections is the order you will actually work in: set up a project and connect channels, fill in the Brand profile, write a post, schedule it and read the calendar, then build a Reel. The last section collects the errors people hit most.
Three things are true everywhere. Your password never reaches Orova. Every AI request costs quota, and the number is shown before you press. All dates and times follow the clock on your own device.
00 · Before you start
What Orova Social is and what to know first
This section explains the words you will meet throughout the guide, the four tabs on the menu bar, and the three rules that always hold while you use the module.
Orova Social
One place to write posts, let AI help with the words and the images, then publish to several social networks. Think of it as a shared desk for all of your pages.
Workspace
The shared space for you and your colleagues. The quota wallet, the channels and the posts all belong to the workspace, not to one person. If you go on leave, your colleagues keep publishing.
Quota
The number of AI requests you are allowed. Every time AI writes text, draws an image or builds a video, it costs quota. The amount is shown before you press; a run that fails costs nothing.
Open your workspace, then open Orova Social. The module menu bar has exactly four tabs. The table below says what each one is for.
| Button / field | What it does | Notes |
|---|---|---|
Projects | The list of projects. Each project keeps its own channels, Brand profile and posts. | This is where you connect channels. Open it first. |
Posts | The composer: write text, attach images, pick channels, publish or schedule. | The tab reads Posts and stays in English in every language. |
Reels | The builder for vertical video: TikTok, Instagram Reels, YouTube Shorts. | Pressing it opens the builder straight away — there is no list first. |
Calendar | See every scheduled post by day, week or month. | Drafts have no date and time yet, so they do not appear here. |
The list of all your posts lives in the Posts section, not on the tab bar. Do not mix the two: the composer tab is called Posts, and the list of posts is also called Posts.
Three rules that always hold
- Your password never reaches Orova. You sign in on Facebook's, Google's or TikTok's own page. Orova only receives a pass that lets it publish on your behalf.
- Every AI request costs quota. The amount is shown before you press. A run that fails costs nothing.
- Times follow the clock on your device. Whatever time you enter is the time the post goes out on your clock, not the server's.
Note
The quota banner at the top of the page
01 · Projects & channels
Set up a project and connect social channels
The first job is to create a project, then connect real social accounts to it. Only after this step can you publish anything.
Project
One brand or one client. Each project keeps its own channels, Brand profile and posts, so you can run several brands side by side without mixing them up.
Channel
A real account on a real platform: one Facebook Page, one Instagram account, one Telegram channel. Connecting a channel gives Orova permission to publish there for you.
Connecting by signing in on the platform
The safe way to connect. You sign in on the platform's own page, then press approve. Orova receives a pass with an expiry date so it can publish for you — it never receives your password.
Open the Projects tab. If the workspace has no project yet, you see the empty state No projects yet with a line telling you to create a project and connect its channels.
| Button / field | What it does | Notes |
|---|---|---|
New project | Creates a project called New project straight away and opens its Channels page. | There is no name field and no dialog. One press, one project. |
Search projects... | Filters the list by name, project ID or website. | Filters as you type. No match shows the empty state. |
The Project name column | Clicking anywhere in the cell opens that project's Channels page. | The line underneath shows how many channels are connected, or No channels connected yet. |
The PROJECT ID column | The unique ID the system gives each project. | Use it when you need to talk to support. |
The Created by, Created, Updated columns | Who set the project up and when, and when it was last changed. | Read-only, you cannot edit them. |
The pencil button Open project | Opens the project's Channels page. | Exactly the same as clicking the project name. |
The bin button Delete | Deletes the project, with a confirmation dialog first. | Channels and posts are not lost, they are simply detached from the project. |
Follow this order
- 1
Create your first project. On the
Projectstab, pressNew project. Orova immediately creates a project called New project and opens its Channels page, without asking anything else. Go back to theProjectstab and you will see the new project in the list with its project ID and the line No channels connected yet.
Each project is one row in the Projects list. - 2
Rename the project and set a logo. On the Channels page, the top row holds the project name and a small logo box. Click straight on the name and it turns into an editable field. Type the new name and press Enter to save, or Esc to cancel. Names are between 2 and 200 characters. Click the logo box to open the file picker; it accepts PNG, JPG or WEBP up to 4 MB, saves as soon as you pick, and confirms with a banner at the top of the page.
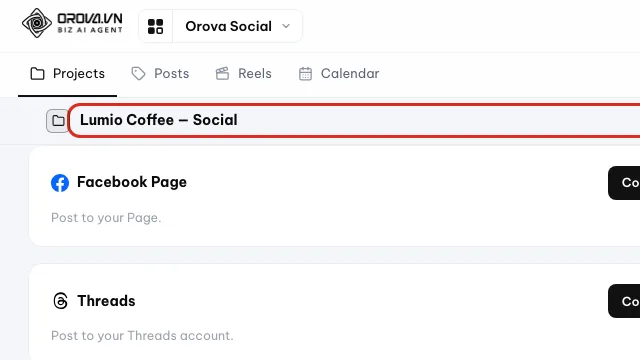
Click the project name to rename it. - 3
Look at the grid of eight platforms. The Channels page has two sub-tabs:
ChannelsandBrand. On theChannelstab you get a grid of eight cards, one per platform. Each card shows the platform name, a short description and its ownConnectbutton. A card that already has channels also shows the label {n} connected.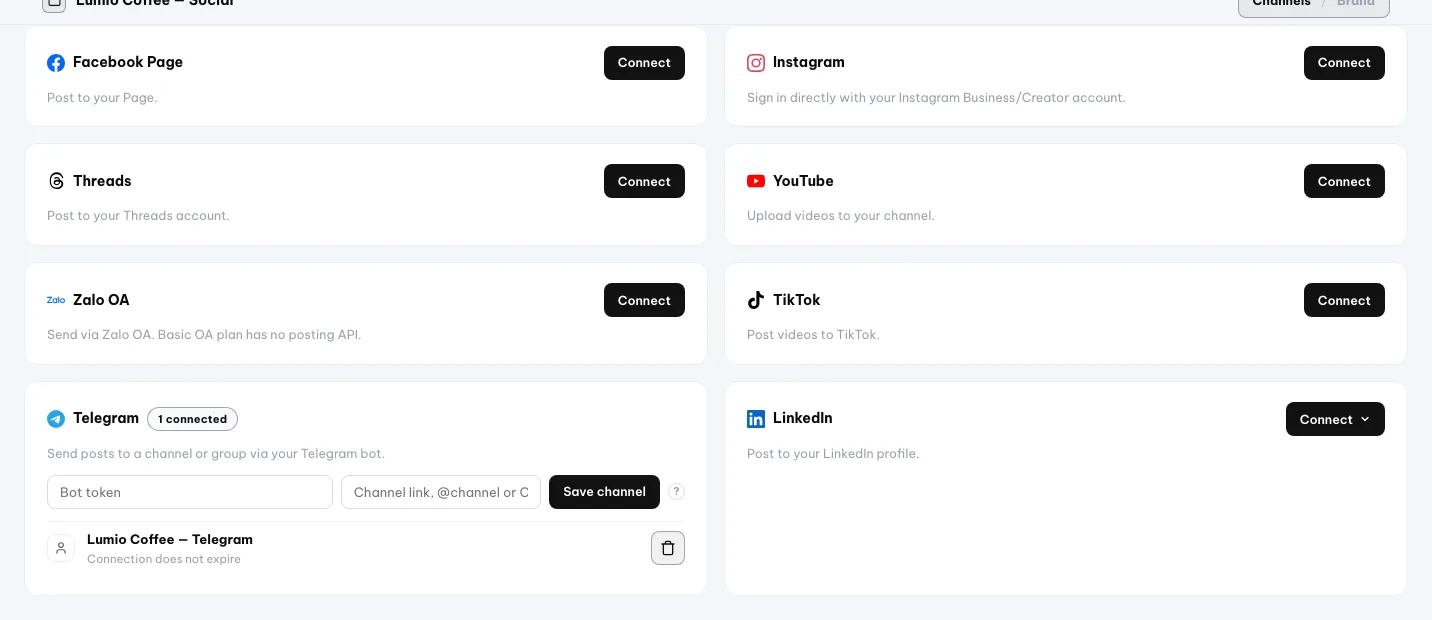
The eight platforms you can connect to one project. - 4
Connect Telegram with a form, no platform sign-in needed. This is the easiest one to try. In the
Telegramcard, theBot tokenfield takes the string you get from @BotFather on Telegram. TheChannel link, @channel or Chat IDfield accepts a web.telegram.org link, a t.me link, an @channel name or a Chat ID — Orova works out the rest. PressSave channel, the banner Channel saved appears at the top of the page and the channel shows up right under the card.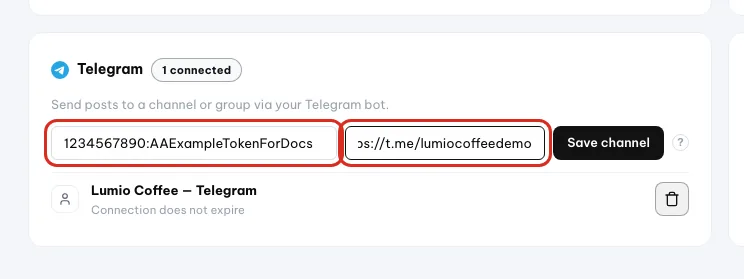
Fill in the bot token and the channel link, then Save channel. - 5
Check the Telegram channel you just connected. After saving, the
Telegramcard shows the label 1 connected and a channel row with a bin button. If Telegram later refuses to deliver a post, it is usually because the bot is not in the channel, or the bot has no administrator rights. Press the question mark next to the field to read the short instructions again. - 6
Connect the other platforms by signing in. Press
Connectin the platform card. A sign-in page from that platform opens. Sign in, then approve Orova to publish for you. The page comes back to Orova with the banner {n} channels connected. On a card that already has channels, the button readsConnect more— one project can hold as many Facebook Pages as you like, there is no limit.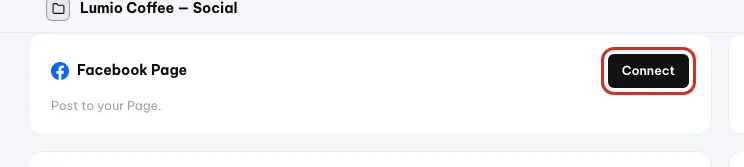
Other platforms connect by signing in through Connect. - 7
LinkedIn asks which page you mean. On the
LinkedIncard, the button opens a two-line menu.Connect LinkedInpublishes to your personal profile.Connect Pagepublishes to a company Page. Pick the line you need and carry on as with the other platforms.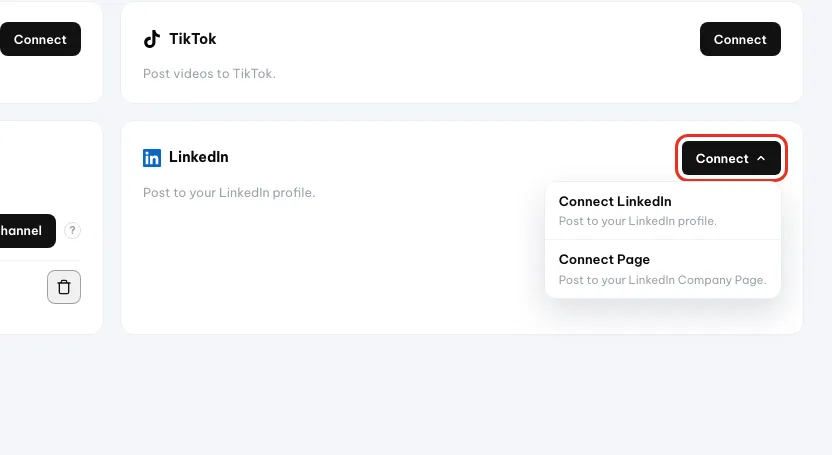
LinkedIn asks whether you connect a profile or a Page. - 8
When the Connect button is greyed out. A greyed-out button with the tooltip {platform} app not set up means the system administrator has not registered the application keys for that platform yet. Every platform requires the system owner to register its own set of keys. Keys are entered once under
Admin→Settings→API. Once they are in, the button lights up and you connect as usual. - 9
Read the connected channel rows. Under each card is the list of connected channels. Each row shows the channel name and Connection expires with a date, or Connection does not expire. The publishing pass has an expiry date, so a small label appears when you need to pay attention:
Expiring soon,Expired — reconnectorDisconnected. PressReconnectand Orova asks for a fresh pass for the same channel — no duplicate rows, no lost posts. - 10
Disconnect a channel. Press the bin button on the channel row. A dialog asks again: Disconnect «channel name»? Orova will stop publishing to this channel. Posts already published stay as they are. Confirm and the channel row is deleted from Orova; cancel and nothing changes.
Warning
Disconnecting cannot be undone
Per-platform limits, worth knowing in advance
- TikTok needs a verified domain and the video publishing permission.
- YouTube caps how many videos you can upload per day.
- Zalo OA on the Basic plan does not allow publishing through the API, so connecting it still will not let you publish.
- Instagram does not accept text-only posts. A post must carry at least one image or one video.
- Telegram needs the bot to still be in the channel with permission to post, otherwise Telegram refuses to deliver.
02 · Brand
Fill in the Brand profile before you write
The Brand profile is what the AI remembers about your brand. Set it up once and the text and images the AI produces come out consistent, so you edit far less by hand.
Brand profile
Your brand's tone of voice, colours, logo, fonts and no-gos. The AI follows this profile whenever it writes a post or draws an image.
No-gos
The list of words or claims you never want to see in a post. For example: never promise to cure an illness, never say cheapest on the market.
Content pillars
The topic groups you want to post regularly, with a percentage each. For example: Knowledge sharing 50%, Product 30%, Behind the scenes 20%.
Open a project, then press the Brand sub-tab in the top row, right next to the Channels tab. On a new project this page is empty and only offers the Add item button.
Fill in the profile
- 1
Add your first item. Press
Add item. A new row appears with aTypefield. Pick a type and the fields you need to fill in change to match it. Each item is its own row, and you can add as many rows as you like until you hit the cap.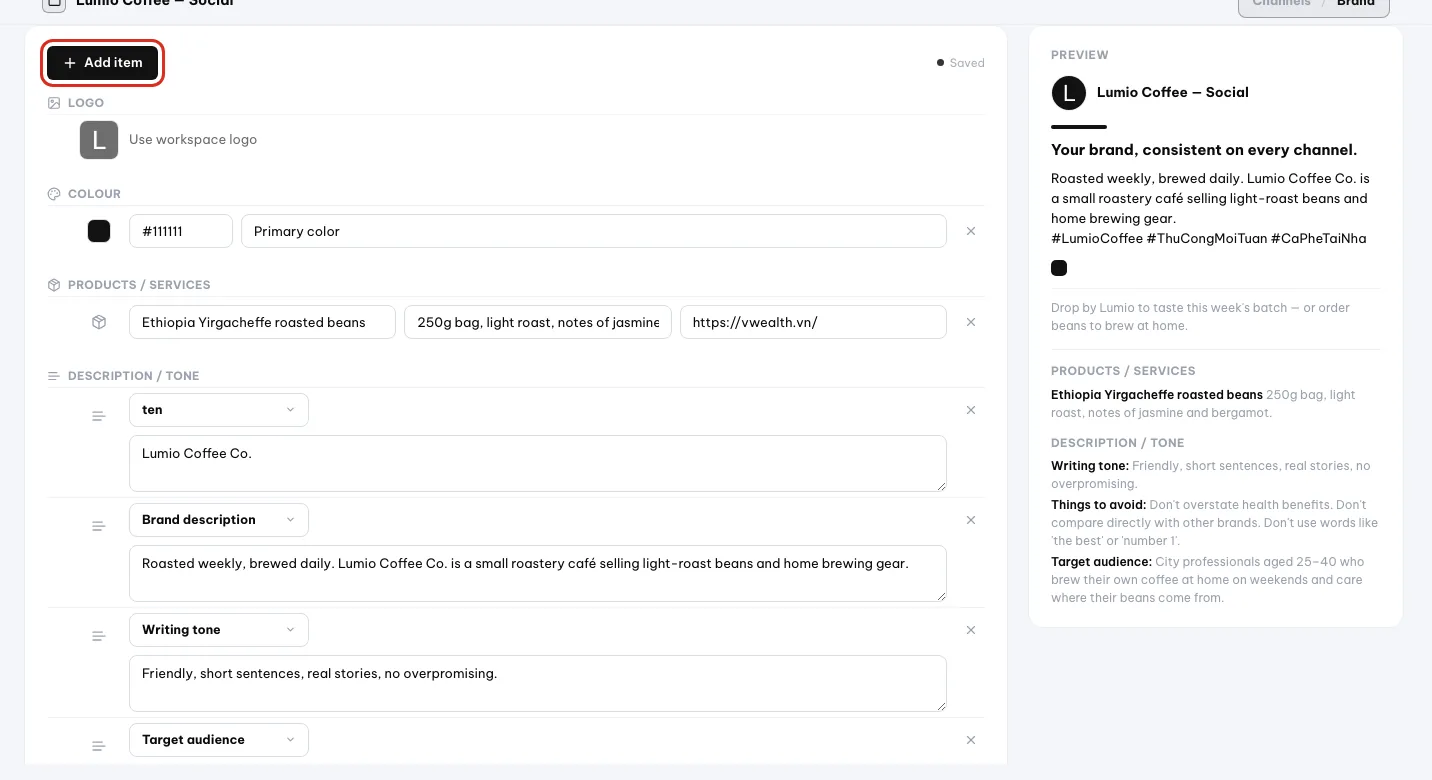
Start with Add item on the Brand profile page. - 2
Pick the right type. There are 11 types. The table below lists them all, with file specs and how to fill each one in. You do not have to complete everything at once; Logo, Colour and Description / tone are enough to get going.
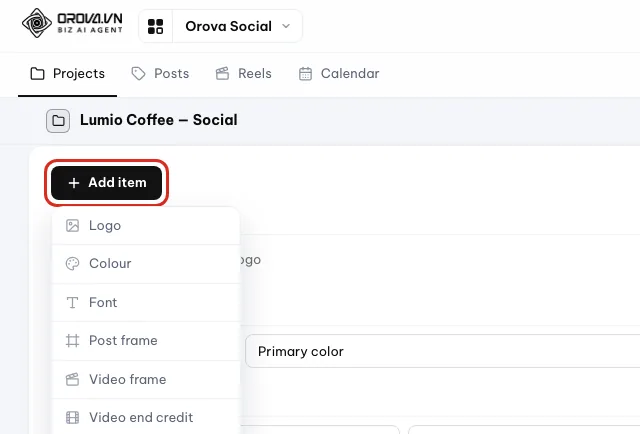
Pick the item type from the menu. - 3
Add default hashtags. Besides the list of items there is a
Default hashtagsfield. Type the hashtags separated by spaces, up to 200 characters. This set is suggested back to you while you write a post. - 4
Preview before you trust it. The
Previewblock builds a sample image with the line Your brand, consistent on every channel. That way you can see how the logo, colours and font look together before you use them for real. The preview costs no quota.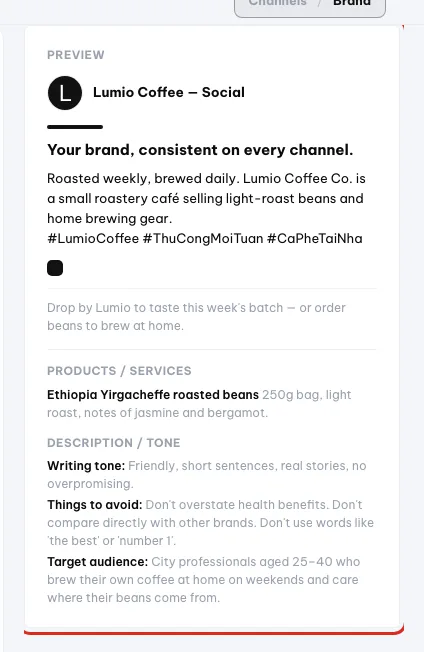
The preview shows how the brand items look in a post. - 5
Know which item pays off most. When you ask the AI to rewrite a post or write a new one, it reads the tone of voice, the target audience and the No-gos in the
Description / toneitem. Fill this one in carefully once and every later post needs less hand editing. This is the item worth the most of your time. - 6
Know where Post frame, Video frame and end credit are used.
Post frameis used when you create a branded frame image in the composer.Video frameandVideo end creditare used when you build a Reel. The frame must match the format of the image or video, otherwise it lines up wrong. - 7
An empty project falls back to the workspace. If a project has no profile of its own, Orova uses the workspace-wide logo and Brand profile. Any item you fill in for the project takes priority over the shared version.
| Button / field | What it does | Notes |
|---|---|---|
Logo | A transparent PNG or WEBP, 512×512, up to 8 MB. | Or tick Use workspace logo for speed. |
Colour | A primary and a secondary colour, written as #RRGGBB. | The wrong format gives That colour code is not valid — use #RRGGBB. |
Font | Pick a Google font, or upload a TTF, OTF or WOFF file. | Used for branded frame images and video subtitles. |
Post frame | A transparent PNG, matching the post image format. | Laid over the image when you create a branded frame image. |
Video frame | A transparent PNG, vertical format. | Reels take their frame from here. It must match the video format. |
Contact | Phone, email, address, website. | Printed on the image when you turn on Print contact line while creating images. |
Description / tone | Brand name, description, tone of voice, sign-off line, No-gos, target audience. | The most important item for the AI. Worth filling in carefully. |
Products / services | Product name, one-line description, link with UTM tags if you have them. | You can add several rows, one per product. |
Content pillars | Pillar name and percentage. | For example: Knowledge sharing 50%. |
Posting times | Your usual time slots, separated by commas. For example: 09:00, 12:30, 20:00. | Used as suggestions when you schedule. |
Video end credit | The line that runs at the end of a video, and how many seconds it shows. | Only used in Reels. |
Note
The page saves itself — there is no Save button
03 · Compose
Write a post, let AI draft the text and create images
This is where you write the post, attach images, get a hand from the AI, then pick channels to save a draft, schedule it or publish right away.
Draft
A post that is saved but not published and has no date or time yet. Drafts live in the Posts section and never show on the calendar. You can reopen and keep editing them whenever you like.
Writing assistant
The AI panel inside the composer. It does two jobs: rewrite the text you already typed, or write a whole new post from a topic you give it.
Post image
The Create image panel has just one form: you describe the image, the AI draws it, then lays the brand logo, colours, font and frame you picked on top. Every image made here is drawn by AI, so each image costs quota; there is no free preview step.
Press the Posts tab on the menu bar. The page Compose a post opens, split into two columns. The left column is where you write and choose. The right column is the Preview, which changes per channel so you can see how the post will look in each place.
| Button / field | What it does | Notes |
|---|---|---|
Title | The post's name, so you can find it again in the list. | It is not published to the channel. Leaving it blank gives Enter a title. |
Post content | The text that is actually published to the channel. | Empty gives You need to write the post content. Anything too long gets cut by the platform. |
Emoji | Insert a symbol into the content. | Costs no quota. |
Background | Turn the text background in the preview image on or off. | It only changes the preview image, not the text published to the channel. |
Images · Choose images | Attach JPG, PNG or WEBP images, up to 8 MB each. | Up to 10 images per post. Orova blocks the wrong file type straight away. |
Rewrite | Opens the Writing assistant panel. | Costs quota on every run. |
Create image | Opens the image panel for the post. | Costs quota for each image created. |
Channels to post to · Choose channels | Tick the connected channels that will receive this post. | With no channel connected you get No channel connected — post saved as draft. |
Schedule | Pick a date, hour and minute for the post. | In your device's time. Leave the date blank and the post is saved as a draft. |
Save draft | Saves the post without publishing. | Shows the banner Saved. |
Schedule | Moves the post into the Scheduled state. | You have to fill in the date and time first. |
Publish now | Publishes straight to the real channels, immediately. | Orova cannot take it back. There is a confirmation dialog. |
Recent drafts | The strip at the bottom of the page, listing the workspace's 10 newest drafts. | Click an entry to reopen that post. |
Write a post from scratch to published
- 1
Fill in the title and the content. Type a
Titleso you can find the post later; this title does not go to the channel. Type the real text into thePost contentfield — the placeholder asks what you want to tell your followers today. The right column updates with every character you type.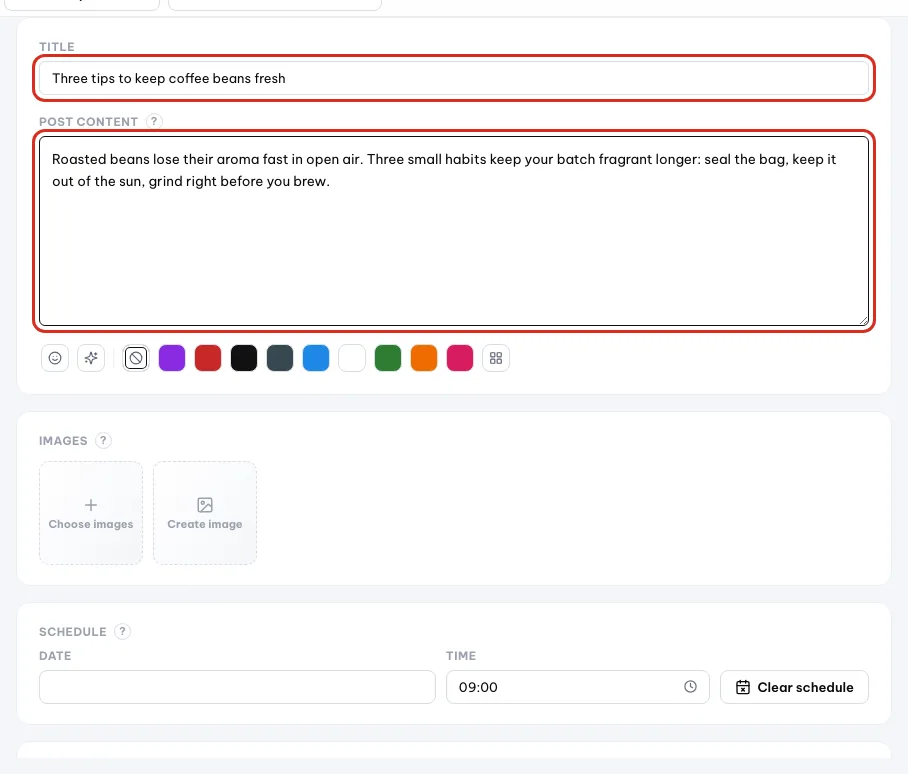
Type the title and the post content. - 2
Attach images to the post. Press
Choose imagesin theImagesblock. Pick up to 10 images, each up to 8 MB, in JPG, PNG or WEBP. The wrong format or too many files is blocked and reported straight away, so you do not find out at publishing time. The right column immediately rebuilds the preview with the images.
Click Choose images to attach pictures. - 3
Ask the AI to rewrite. Type a few lines of content first, then press
Rewrite. TheWriting assistantpanel opens. Pick aVoicefrom the 13 available, set theCharactersyou want, and type anExtra requestif you need one. TheBrand elementsblock lets you tick which brand items go into the post; only the ticked items are used. Press run, the screen shows Writing, one moment… and then the result appears.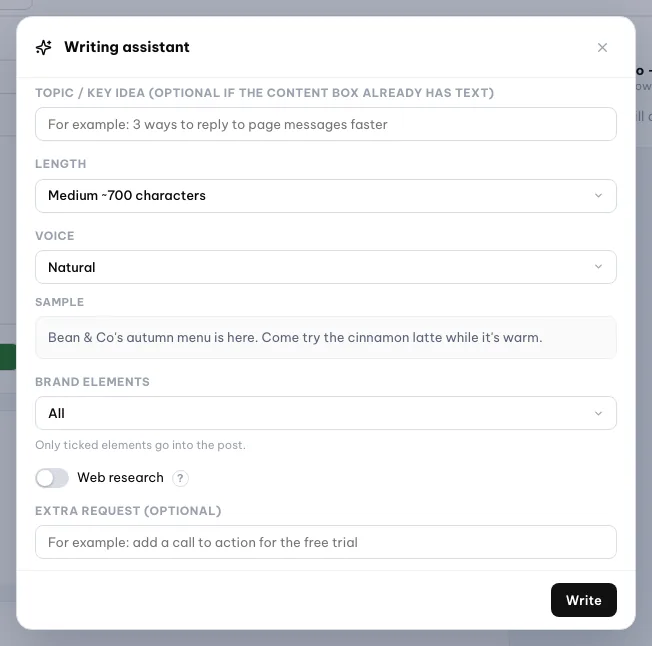
The Writing assistant opens; set the options before you click Write. - 4
Use the AI version. The result appears in the
AI versionblock, with suggested hashtags. PressUse this versionto replace the content currently in the composer; Orova warns you first because the old version is overwritten. If you are not happy, pressTry again. Every rerun costs one more quota charge. - 5
Write a new post from a topic. In the same panel, switch to the
Write from a topictab. Type the topic into the field, for example: 3 ways to answer customers faster on your Facebook Page. Pick aLengthand pressWrite. The result comes with aSuggested titleand anImage idea; the image idea is pre-filled into the image panel for you. - 6
Fill in the image form. Press
Create image. The Create an image panel opens with a single form. Type intoDescribe the image(required), for example: a bright desk with a coffee cup; if you just wrote a post from a topic, this field is already filled with the image idea. Pick aFormat: Square, Portrait or Landscape. Set theNumber of imagesfrom 1 to 10. OpenBrand elementsto choose Logo, Colours (up to two), Font and Frames; anything you have not set in the Brand profile reads Not set yet — add it in Brand.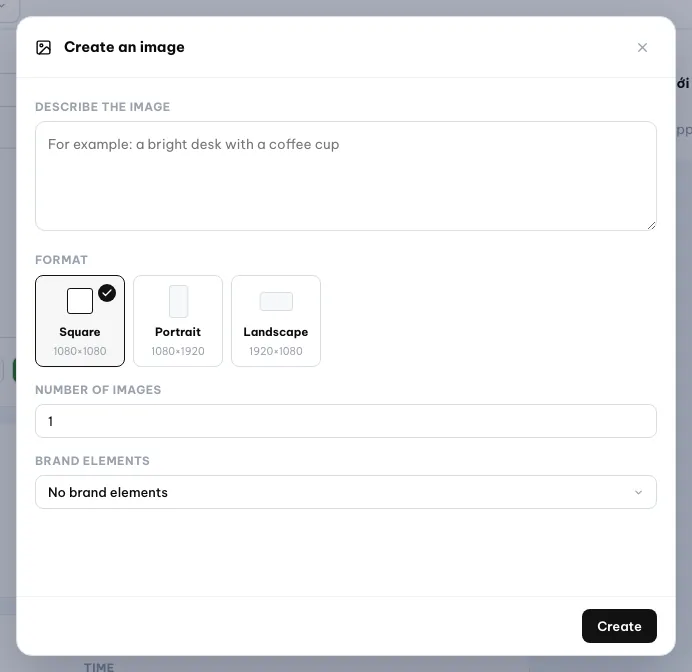
The image form opens; fill it before running. - 7
Run the image creation. Press
Create. IfDescribe the imageis empty, Orova shows Describe the image you want first. Orova checks quota for the whole batch before it starts; if there is not enough, it shows Not enough image credits for … images. and charges nothing. The AI draws from your description, then lays the logo, colours, font and frame you picked on top, charging quota once per image. Progress shows Creating image with a counter; pressStopto break off part-way. When it finishes, the banner Image added to the post. Remember to hit Save. appears. - 8
Edit an image with AI. Press the edit icon on an existing image. The
What do you want to change?field takes plain language, for example: change the background to light blue, move the logo to the top right. The screen shows Editing the image, about a minute… The new image is added next to the original, and the original is kept. Each edit counts as creating one image. - 9
Pick the channels. Open the
Channels to post toblock, pressChoose channelsand tick the channels you want. The number ticked shows on the {n} selected line. ThePreviewcolumn on the right changes with each channel you pick. If the project has no channel connected, Orova says No channel connected — post saved as draft.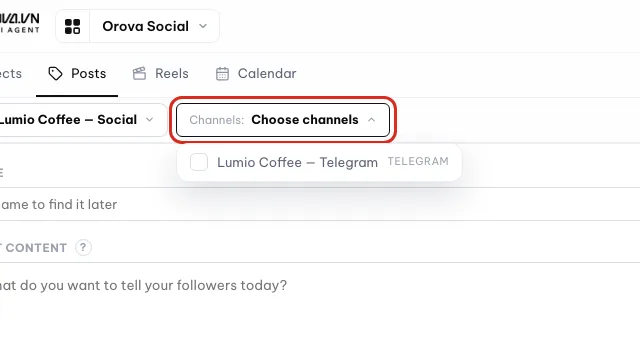
Open Channels to pick where the post goes. - 10
Save a draft or schedule it. Press
Save draftif you are not ready to publish. The banner Saved appears and the post sits in the Posts section as a Draft. To schedule it, fill in the date and time in theScheduleblock and pressSchedule. Scheduling and reading the calendar are covered in detail in the next section.
Leave Date empty to keep a draft, or fill it to schedule the post. - 11
Publish now. Press
Publish now. The dialog asks again: Publish straight to {n} real channels right now? Once it is published, Orova cannot take it back — you would have to delete it by hand on each platform. Confirm and the screen shows Publishing to your channels… A few seconds later Orova reports how many channels out of the total went through, with aSee it on the channellink.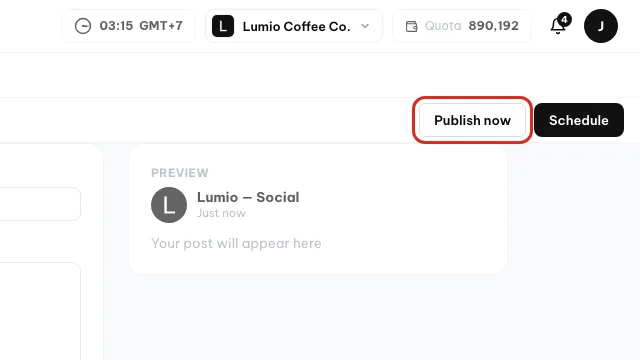
Publish now sends the post to the real channels at once. - 12
A published post is read-only. Reopen a published post and a banner at the top says This post is already published, so it is read-only. To change the wording you write a new post, and delete the old one on the platform yourself if you need to.
Warning
Publish now means publish for real
Publish now publishes straight to your real accounts, immediately. Orova cannot pull the post back. To remove it you have to delete it by hand on each platform. If you only want to try things out, press Save draft instead of Publish now.Tip
When to turn on Web research
Web research in the Writing assistant when the post needs fresh information, such as this week's news. The AI searches the internet before writing. It adds a per-run research fee and takes a few seconds longer, so leave it off for ordinary posts.Note
Common AI errors
Rewrite with nothing typed gives Write a few lines first — the AI needs something to work with. Out of quota gives You are out of quota. Top up on the Wallet page and try again. If the AI is busy or having trouble, wait a moment and run it again; those failed runs cost no quota.04 · Scheduling & Calendar
Schedule posts, track them and see the whole month
You set a date and time up front, then let Orova publish for you. The Posts list tells you where each post stands, and Calendar shows you a whole month in one go.
Scheduling a post
Setting a date and time for a post in advance. At that exact moment, Orova publishes it to the real channel without you sitting there watching. Like setting an alarm, except what goes off is your post.
Post status
Every post sits in one of five states: Draft, Scheduled, Publishing, Published, Failed. The status tells you whether the post has left Orova yet, and whether it got through.
Your device's time
Every date and time you type and see follows the clock on the machine you are sitting at. The server stores it in universal time and converts it back for display, so you can type times the way you say them.
You use this part when you want a post to go out at the hour your followers are online, instead of having to be at your desk at that exact moment. You also use it to check up on things: which posts are still drafts, which are about to go out, which ones failed.
Schedule a post
- 1
Open the Schedule block on the compose page. On the compose page, scroll down to the
Scheduleblock. It has three fields:Date,HourandMinute. Below the block is the reminder “Your device's time. No date keeps it a draft.”.
The Schedule block holds the date and time. - 2
Fill in the date and time, then click Schedule. Pick a day in
Date, then the hour and the minute in the other two fields. ClickSchedule. The post moves to Scheduled and disappears from the draft list. - 3
If you forget to pick a date. Clicking
Schedulewith no date and time shows “Pick a date and time before scheduling.”. Choose both, then click again. Leave the date empty and clickSave draftand the post simply stays a draft. - 4
To drop the schedule, click Clear schedule. The same schedule block has a
Clear schedulebutton. Click it and the date and time are removed, the post goes back to Draft and will no longer publish by itself.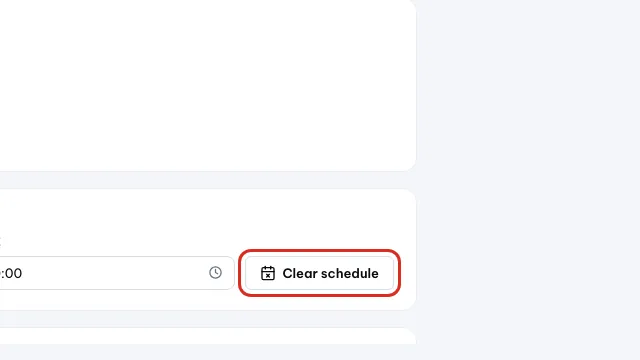
Clear schedule turns the post back into a draft. - 5
At the set time, the post goes out to the real channel. You do not need to have the page open. At the exact moment you set, Orova publishes the post to the channels you picked, down to the second — it does not wait for the next five-minute tick. Once it is out, the status turns to Published.
Warning
Scheduled posts publish for real
Track posts in the Posts list
- 1
Open the Posts list. The Posts list gathers every post you have published and every draft in one place. At the top is a row of filter tabs:
All,Draft,Scheduled,Publishing,Published,Failed. Click a tab and the list shows only posts in that state.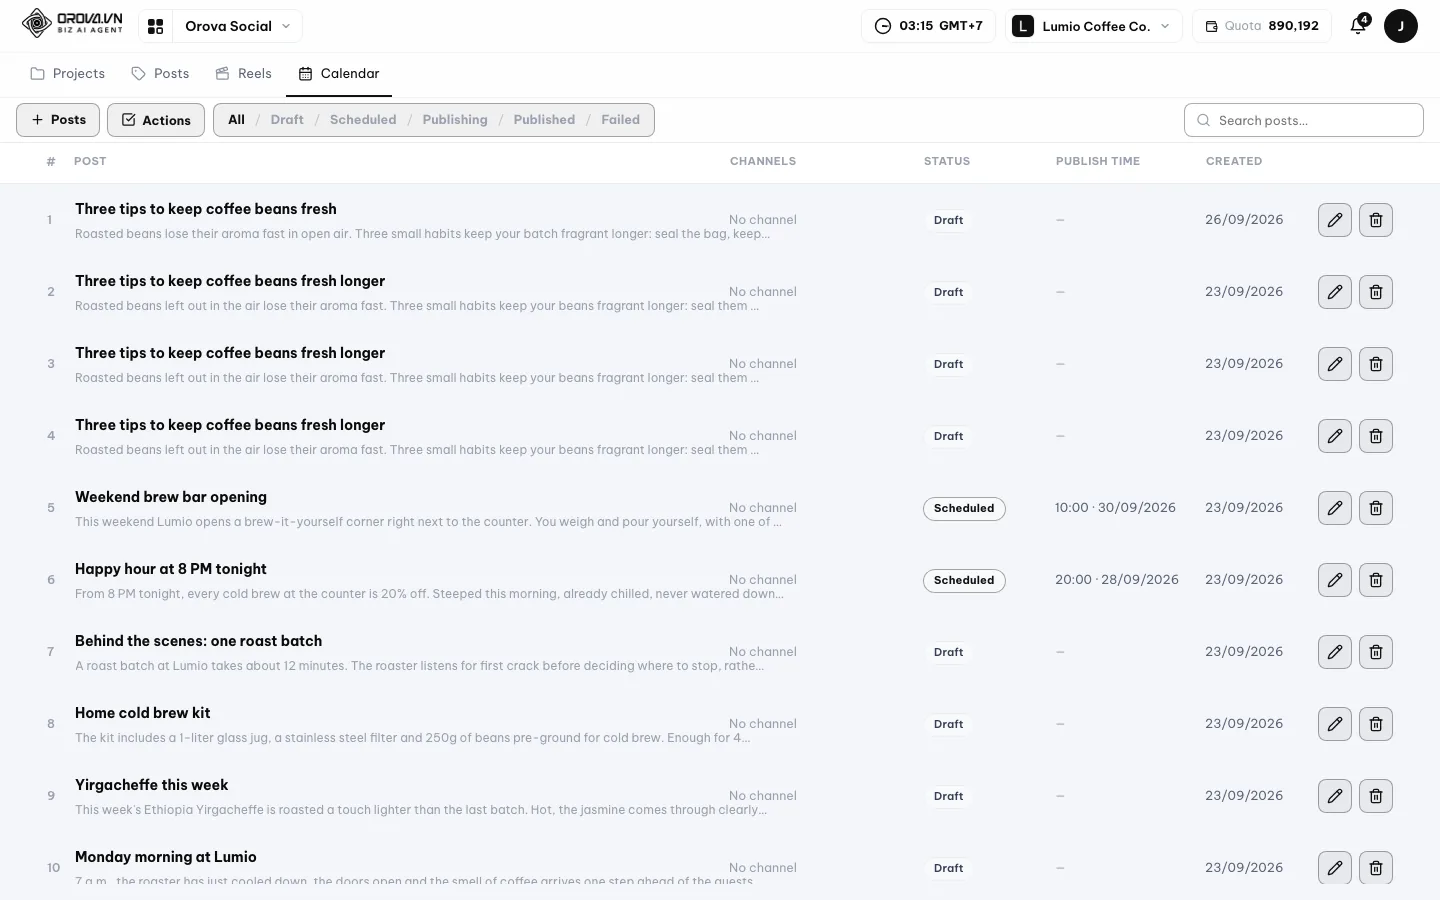
The Posts list gathers drafts and published posts. - 2
Read the five columns in the table. The table has the columns
Post,Channels,Status,Publish timeandCreated. A post with no channel picked yet shows “No channel” in the channel column. Click a row to reopen the post and edit it.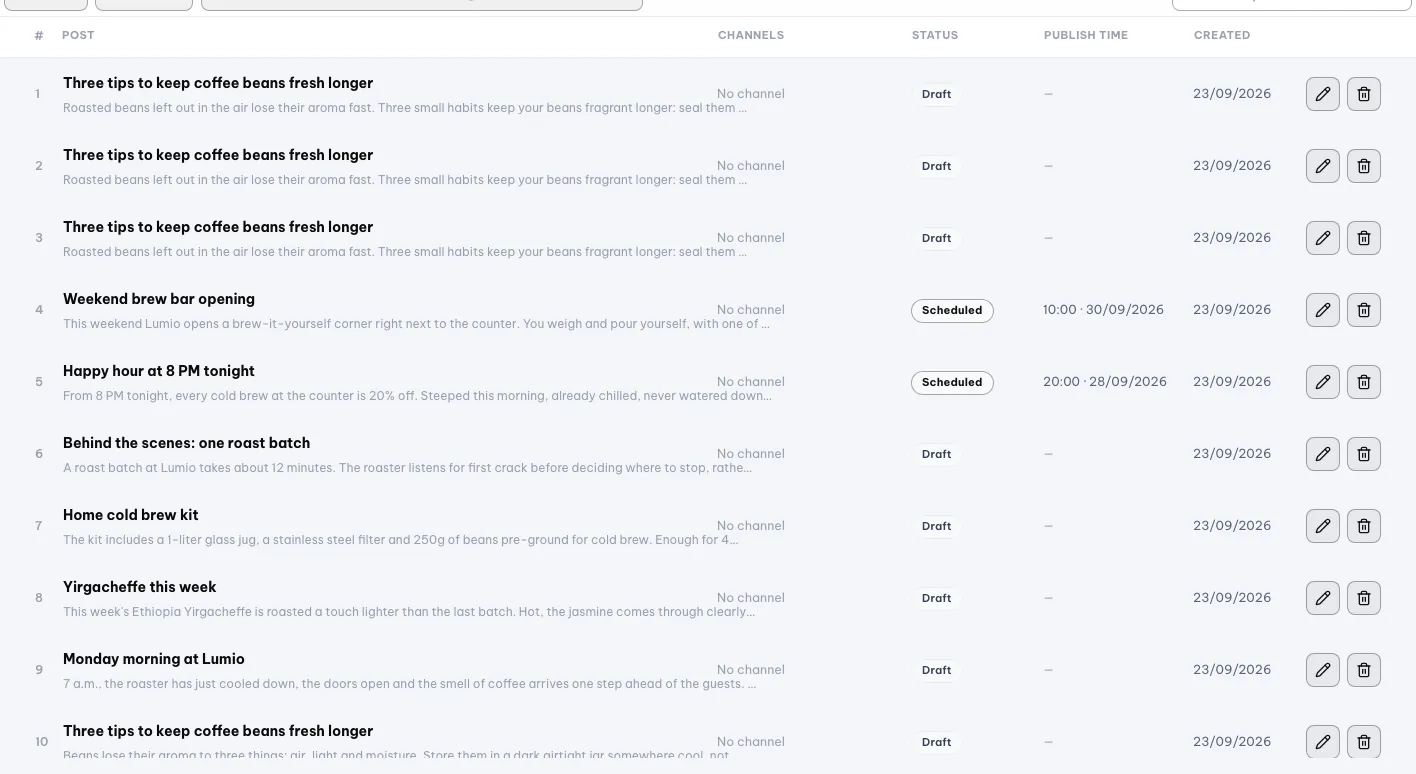
Read the columns to see where each post stands. - 3
Find a post quickly. Type a few characters into the
Search posts…box above the table. The list filters as you type. When nothing matches, the screen says “No matching posts.”. - 4
Select several posts to delete. Tick the checkbox at the start of each row. A bar appears at the bottom of the screen reading “{n} selected” with a
Deleteand aClearbutton. ClickDeleteand a popup asks you to confirm before anything is removed.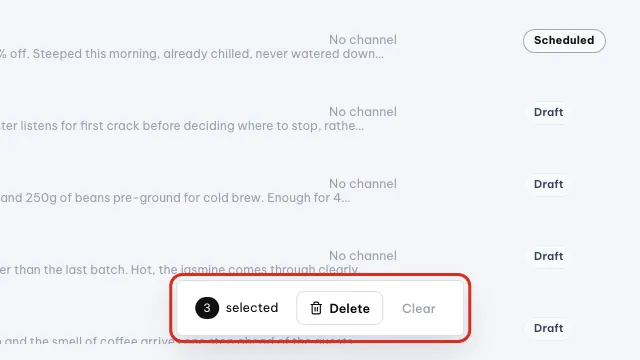
Tick posts and the bar shows how many are selected. - 5
Republish a post that got stuck. The
Actionsbutton on each post has aPublish nowitem. Use it when a post is stuck in Publishing or Failed, after you have fixed the cause.
Warning
Deleting a post is permanent
View and adjust the schedule in the Calendar tab
- 1
Open the Calendar tab. The calendar lays your scheduled posts out on a date grid. The three buttons
Day,WeekandMonthchange the view. TheToday,PreviousandNextrow moves you back and forth between periods.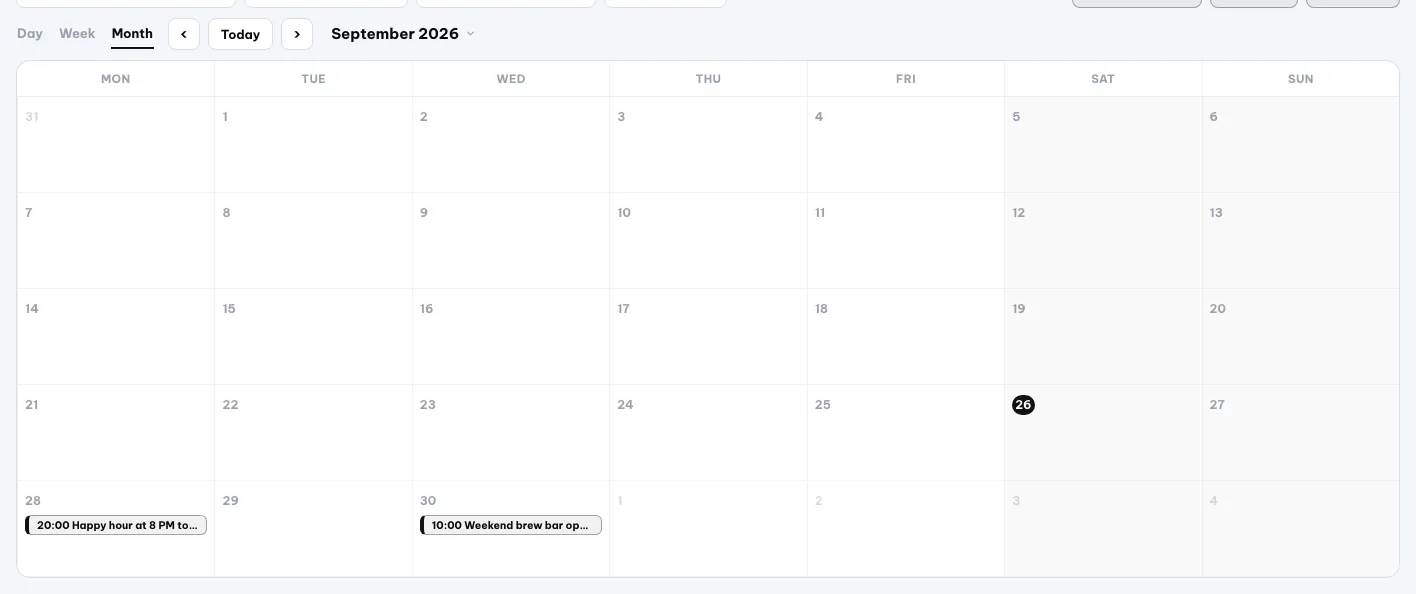
Month view shows every scheduled post on its day. - 2
Filter and change how the cards look. The
Platformfield filters to one social network; pickAll platformsto see everything. TheDisplaygroup togglesTimeandThumbnailon the cards. The three card stylesList,GridandIconschange how dense the calendar feels.
Filter by platform and change how cards look. - 3
Drag a card to another slot to change the time. Hold the mouse on a post card and drag it to another day or time slot. On drop, the screen says “Rescheduled to {time}”. Drag it to a moment that has already passed and you get “Cannot schedule a time in the past”.
- 4
Use the card menu to edit or unschedule. Click a card and the menu shows two items,
EditandUnschedule.Editreopens the composer.Unscheduleremoves the date and time, and the screen says “Unscheduled — moved back to drafts”.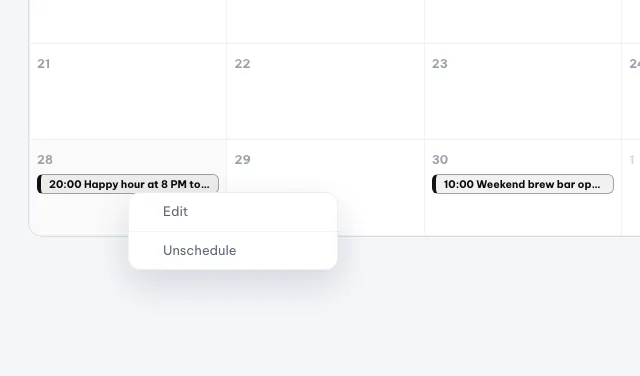
Click a card to Edit it or Unschedule it. - 5
Add a new post right on the calendar. Click an empty day cell and the composer opens straight on that day. The
+ Postand+ Reelsbuttons in the toolbar open the matching composer as well. - 6
Export the calendar to Excel. Click
Export Excelin the toolbar and your browser downloads a spreadsheet. The file has two sheets, Calendar and Per-channel results, with columns for publish date, hour, type, content, project, channel, status, published at and the link to the published post.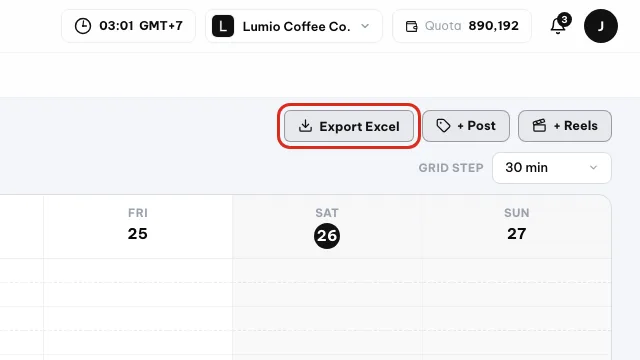
Export Excel downloads the calendar as a spreadsheet.
| Button / field | What it does | Notes |
|---|---|---|
Day / Week / Month | Change the calendar view | Month is the one for reviewing a whole content cycle |
Today · Previous · Next | Move back and forth between periods | The title shows the month and year you are looking at |
Grid step: 15 / 30 / 60 minutes | Drop slots snap to this step | A 60-minute step lands you on round hours |
Platform · All platforms | Filter the calendar to one social network | Pick All platforms to see everything |
Display · Time · Thumbnail | Toggle details on the post cards | Turn some off when a busy calendar gets noisy |
List / Grid / Icons | Three card styles | Icons is the most compact |
+ Post · + Reels | Open the post composer or the Reels builder | Opens on the day you are standing on |
Export Excel | Download the whole calendar as a spreadsheet | Two sheets: Calendar and Per-channel results |
Note
Drafts do not show on the calendar
Draft tab.Tip
A tidier way to set times
Grid step to 30 or 60 minutes before you drag cards around. Slots then snap to round marks and you never have to fix the minutes by hand.05 · Reels
Build vertical videos with voice-over and subtitles
Reels turns one long video into short vertical clips for TikTok, Instagram Reels or YouTube Shorts. The AI handles the voice-over, the subtitles and the cutting by meaning.
A Reel and the 9:16 shape
A Reel is a vertical video, taller than it is wide, matching the way you hold a phone. The standard ratio is called 9:16. TikTok, Instagram Reels and YouTube Shorts all take this shape.
Clip
A short piece cut out of your source video. One build can produce several clips. Each clip then becomes its own post, published on its own.
Background processing
Building a video takes time, so Orova does it on the server. You click the button and wait while the screen shows progress. This is AI work, so it draws on your workspace quota.
You use Reels when you already have a long video — a livestream, say, or a shoot at your shop — and want to pull a few short pieces out of it to publish over time. You do not need to know how to edit video.
Bring in a video and choose the framing
- 1
Open the Reels tab. Click the
Reelstab in the module menu. The page opens straight into the builder for a new Reel, with no list in between. The first block you see isSource video.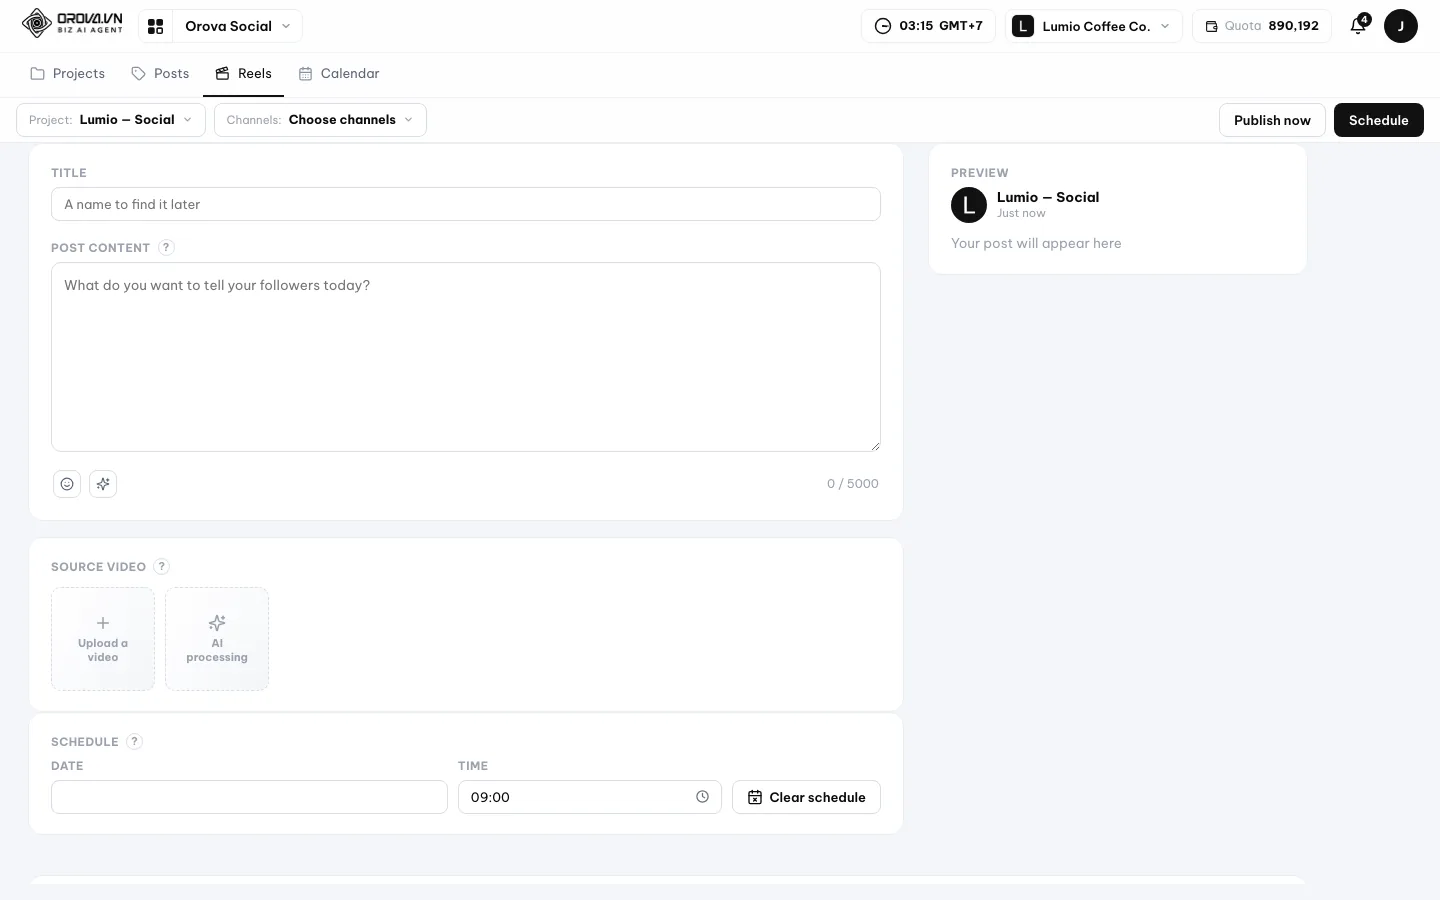
The Reels tab opens straight into a new Reel. - 2
Upload a video or pick one you already have. Click
Upload a videoto choose a file from your machine, orPick an uploaded videoto reuse an older one. MP4, MOV and WEBM are accepted. A video can be at most 60 minutes long; anything longer is refused.
Upload a video from your machine. - 3
Choose what happens when the video is the wrong shape. A landscape video does not fit a vertical frame, so the
When the video is the wrong shapeblock offers three ways:Zoom to fillcrops both sides,Fit with a blurred backgroundkeeps the whole picture and blurs the spare space,Fit with a solid colourfills it with one colour.
Let the AI handle the hard parts
- 1
Turn on Voice-over and pick a voice. In the
AI processingblock, turn onVoice-over. Pick a voice in theVoicefield and listen to it before you commit. Type your lines intoVoice-over script, or clickLet AI write from the videoto have the AI watch the video and write the lines itself.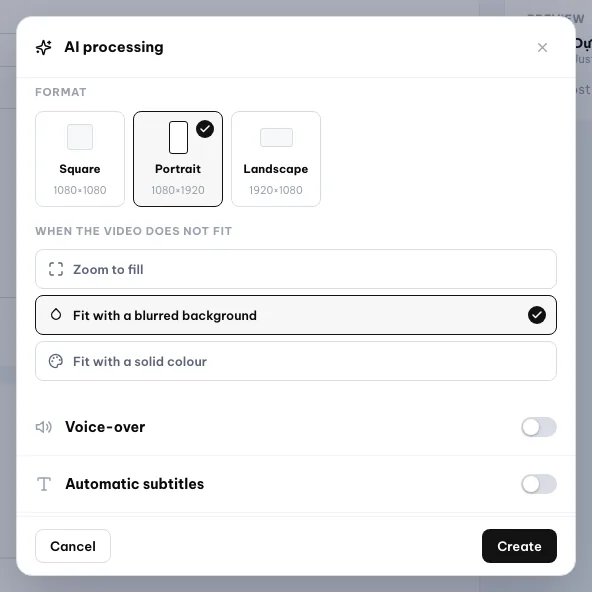
Turn on Voice-over and pick a voice. - 2
Turn on Automatic subtitles. With
Automatic subtitleson, the AI listens to the speech in the video and writes it out under the picture. You can set theFont(upload a .ttf or .otf file), bold, italic and underline,Text size(Small, Medium, Large),Text colour,Text backgroundandPosition(Bottom or Middle).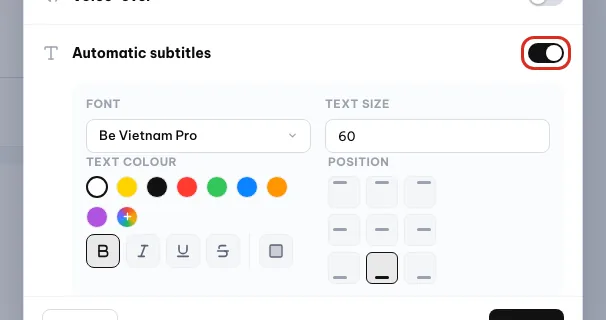
Turn on Automatic subtitles to add captions. - 3
Choose how the long video is cut into short clips. The
Auto-cut by meaningblock has three ways.By number of clips: you say how many clips you need.By length per clip: you say how long each clip should run.By notes: you type one idea per line and the AI finds the matching passages and stitches them together. - 4
Turn on Trim the dead scenes if the video has a lot of silence. With
Trim the dead sceneson, the AI drops long silences, filler words and repeated passages. Good for video shot in one take with no editing. - 5
Put your brand on the video. The
Brand on the videoblock hasFrame the video,Add the logoandAdd an end credit. These come from the project's Brand profile. Note that the frame has to be the same shape as the video to line up.
Note
The AI processing group draws quota
Build it, check the result, then publish
- 1
Click Create and wait for the server. Click
Create. The screen shows “Processing the video…” with the progress. The work runs on the server, so it takes a few minutes depending on how long the video is. Wait until the progress says it is done. - 2
Look at the clips it produced. When it finishes, the builder lists the clips. If there are several, the screen spells it out: publishing now only publishes the first clip, and the rest are split off as separate drafts for you to publish over time.

The finished clips appear next to the source video. - 3
Save the Reel, or schedule the clips. Click
Save the Reelto keep it. If you set a schedule while creating it, the screen pre-fills that date and time and asks you to clickScheduleto split it into child posts. It then reports “{n} posts scheduled”. - 4
Fill in the TikTok block if you publish to TikTok. Pick a TikTok channel and an extra, required block appears. You have to choose
Who can view this video, toggleAllow comments,DuetandStitch, and fill inDisclose video contentif the post promotes a brand or is sponsored. Leave it incomplete and you get “Pick who can view and accept TikTok's terms to continue”.
| Button / field | What it does | Notes |
|---|---|---|
Source video | Upload a video or pick one you already have | MP4, MOV, WEBM; at most 60 minutes long |
When the video is the wrong shape | How a landscape video is fitted into a vertical frame | Three ways: zoom to fill, blurred background, solid colour |
Voice-over · Voice | The AI reads the lines for you | Type a script, or click Let AI write from the video |
Automatic subtitles | The AI listens, then writes text under the picture | Set the font, size, colour, text background and position |
Auto-cut by meaning | Cut a long video into several clips | By number of clips, by length, or by notes |
Trim the dead scenes | Drop silences, filler words and repeats | Good for video shot in one take |
Brand on the video | Frame it, add the logo, add an end credit | Taken from the project's Brand profile |
Create · Save the Reel · Schedule | Run the build, keep it, or set a publish time | The build runs on the server, with progress shown |
Warning
Publish now only sends the first clip
Publish now only publishes the first one. The others sit as separate drafts. Orova does this so platforms do not read you as spam when a batch of near-identical videos goes out at once.Note
What Instagram Reels allows
06 · FAQ
Common questions and what to do when something fails
Most of the red messages you run into have a simple cause and a fix that takes a few steps. Here are the most common cases, matched to the exact wording on screen.
Failed
The status of a post that Orova sent out but the platform refused. The post is still in Orova; fix the cause and you can publish it again, no rewriting needed.
You check for failures in the Posts list, on the Failed tab. Open a post there and you see the reason the platform returned. Match it against the list below to know where to fix it.
A channel says “Expired — reconnect”. What do I do?
The pass the platform issued Orova to post on your behalf has expired. This is normal and happens on a schedule. Go to the project's Channels, click Reconnect on that channel's row and sign in again on the platform's own screen. Nothing you have already posted is lost.
The Connect button is greyed out, or it says the app is not set up.
That platform has no application keys entered by the system administrator, so Orova has no door to send you through. Ask your workspace administrator to enter the keys for that platform and the button lights up.
I signed in, but it says no channel could be connected.
You signed in correctly, but that account manages no eligible page, or you did not tick a page on the permissions screen. Click Connect again and be sure to tick the page you want, right on the platform's own screen.
Instagram says it cannot publish a text-only post.
Instagram requires every post to carry an image. Yours is text only, so it was refused. Reopen the post, attach at least one image or one video, then publish again.
Zalo OA will not publish my post.
The Zalo OA plan you are on does not allow posting through the API. That is a limit on Zalo's side. Upgrade your Zalo OA plan, or post that one by hand on Zalo and use Orova for the rest of the channels.
Telegram refuses to send the post.
Usually the bot has been pushed out of the channel, or it is still there but no longer allowed to post. Open your Telegram channel, check that the bot is still a member and can send posts, then click Publish now again.
LinkedIn refuses to publish.
Something is wrong with the LinkedIn connection. Go to Channels, disconnect the LinkedIn channel and connect it again from scratch. Then reopen the post and click Publish now.
It says “Publishing was interrupted midway (the server restarted)”.
The server reloaded while the post was going out, so some channels never finished. Open that post and click Publish now once more. Orova only publishes to the channels still missing; it does not double-post to the ones already done.
The platform refused without saying why.
The screen says “The platform refused the request — usually the content breaks a rule or the channel lacks posting rights.”. Reread the content for wording or images that get blocked easily, and check that the connected account is allowed to post on that page.
My draft is not showing on the calendar.
That is by design. A draft has no date or time, so the calendar does not know which cell to put it in. Open the Posts list and click the Draft tab to see them all. To get one onto the calendar, open the post, fill in a date and time, then click Schedule.
I cannot drag a post on the calendar.
The screen says “Only posts waiting to publish can be moved or unscheduled”. A post that is published or publishing can no longer be moved. If it says “Cannot schedule a time in the past”, you are dropping it on a slot that has already gone by.
I published by mistake. Where do I take the post down?
Orova cannot pull back a post that has gone out to a channel. You have to open that platform and delete the post by hand. Deleting the post inside Orova only removes the copy kept here, not the one on the channel.
If I disconnect a channel, do I lose the old posts?
Posts already published stay exactly where they are on the platform. But the channel row inside Orova is deleted outright, not just switched off, so any post scheduled for that channel can no longer go out. To use it again, connect the channel from scratch.
It says I am out of quota when I call the AI.
Your workspace quota wallet has run dry. The screen says “You are out of quota. Top up on the Wallet page and try again.”. Open the Wallet page in your workspace to top up, then run it again. The failed run is not charged.
How much quota does each action cost?
The amount for each action shows on screen before you click, so you always know in advance. AI images, rewrites, posts written from a topic and Reel builds all cost quota.
Why is my image or video blocked the moment I pick the file?
A post takes at most 10 images, each under 8 MB, and they must be JPG, PNG or WEBP. A Reels video has to be MP4, MOV or WEBM and under 60 minutes. Break one of those conditions and Orova blocks the file before it even uploads.
Tip
Try one channel first
/ Need help?
Can't find what you need? Open the Support section in your workspace, or send us a message.