
Orova Connect آپ کے Orova ورک اسپیس میں تین چیزیں یکجا کرتا ہے: کئی میل باکسز کے لیے ایک ان باکس، دعوت نامے بھیجنے والا میٹنگ کیلنڈر، اور Orova Meet، براؤزر میں چلنے والا میٹنگ روم۔ اس کا وعدہ مختصر ہے: نوٹس کے بغیر میٹنگز، لکھے بغیر ای میل۔
یہ رہنما پہلی بار module کھولنے والے کے لیے لکھا گیا ہے۔ ہر حصہ پہلے نئے الفاظ سمجھاتا ہے، پھر بتاتا ہے کہاں کلک کرنا ہے، کیا بھرنا ہے اور آپ کو کیا نظر آنا چاہیے۔ حصوں کو ترتیب سے پڑھیں: میل باکس جوڑیں، پڑھیں اور ترتیب دیں، لکھیں، رابطے رکھیں، پھر میٹنگز اور AI خلاصوں پر جائیں۔ آخری حصے میں سب سے عام سوالات اور غلطیاں جمع ہیں۔
دو باتیں پہلے جان لینا مفید ہے۔ Orova Connect میں تقریباً ہر چیز Quota سے آزاد ہے؛ صرف AI خصوصیات پر Quota لگتا ہے، اور بٹوے میں کمی ہو تو Orova پیسے کاٹنے سے پہلے رک جاتا ہے۔ اس رہنما میں بٹنوں کے نام انٹرفیس سے لفظ بہ لفظ ملتے ہیں، تاکہ آپ انہیں اسکرین پر ڈھونڈ سکیں۔
00 · شروع کرنے سے پہلے
Orova Connect کیا ہے اور پہلے کیا جاننا ضروری ہے
یہ حصہ module کے تین حصے، رہنما بھر میں آنے والے چند الفاظ، اور ٹھیک کہاں Quota خرچ ہوتا ہے، سمجھاتا ہے۔
Orova Connect
ای میل اور میٹنگز کے لیے Orova module۔ نعرہ: نوٹس کے بغیر میٹنگز، لکھے بغیر ای میل۔ مشکل اور بار بار کا کام — میٹنگ کا خلاصہ لکھنا، ای میل کو بہتر الفاظ میں ڈھالنا — AI کو جاتا ہے۔ باقی سب آپ آزادی سے استعمال کرتے ہیں۔
ورک اسپیس
آپ اور آپ کے ساتھیوں کی مشترکہ جگہ۔ میل باکسز، رابطے، ٹیمپلیٹس، میٹنگز اور Quota بٹوہ سب ورک اسپیس کے ہیں۔ ہر میل باکس کو کون دیکھ یا استعمال کر سکتا ہے، یہ آپ ہر میل باکس کے لیے الگ طے کرتے ہیں۔
میل باکس
Orova سے جڑا ایک ای میل پتہ، مثلاً Gmail اکاؤنٹ یا آپ کا کمپنی کا پتہ۔ ایک ورک اسپیس کئی میل باکس جوڑ سکتا ہے۔ بائیں کالم میں آپ تمام میل باکسز ایک ساتھ دیکھ سکتے ہیں یا ایک وقت میں ایک میل باکس کھول سکتے ہیں۔
Quota
آپ کے ورک اسپیس بٹوے میں AI استعمال کی گنجائش۔ Orova کوئی AI کام چلنے سے پہلے لاگت کا اندازہ لگاتا ہے اور بٹوے میں کمی ہو تو پہلے ہی روک دیتا ہے، تاکہ کام کبھی بیچ میں نہ رکے۔ بیلنس اور ہر کٹوتی ورک اسپیس کے بٹوہ صفحے پر دیکھ سکتے ہیں۔
تین حصے
| حصہ | وہاں آپ کیا کرتے ہیں | کہاں ملے گا |
|---|---|---|
| ان باکس | تمام جڑے میل باکسز میں ای میل پڑھیں، ترتیب دیں اور لکھیں۔ رابطے، ٹیمپلیٹس اور ترتیبات بھی یہیں ہیں۔ | module مینو میں ان باکس۔ ترتیبات میں 8 ٹیبز ہیں۔ |
| میٹنگ کیلنڈر | میٹنگز شیڈول کریں، ای میل سے لوگوں کو مدعو کریں، رومز، موضوعات اور ٹیگز سنبھالیں۔ | module مینو میں میٹنگ، جو کیلنڈر کھولتا ہے۔ |
| میٹنگ روم (Orova Meet) | براؤزر میں آن لائن میٹنگز کریں، اسکرین شیئر کریں، چیٹ کریں، AI خلاصہ چلائیں اور میٹنگ رپورٹ پڑھیں۔ | میٹنگ کی تفصیلات میں میٹنگ میں شامل ہوں، یا روم کا لنک۔ |
صرف یہ جگہیں Quota خرچ کرتی ہیں
- ای میل یا ٹیمپلیٹ کی AI سے دوبارہ تحریر۔ ہر دوبارہ تحریر اصل استعمال شدہ AI کے حساب سے چارج ہوتی ہے۔
- ریڈنگ پین میں ای میل کا AI ترجمہ۔ اصل استعمال شدہ AI کے حساب سے چارج ہوتا ہے؛ ایک ہی ای میل کا اسی زبان میں 7 دن کے اندر دوبارہ ترجمہ مفت ہے۔
- Orova Meet روم میں لائیو کیپشنز۔ نقل کی گئی گفتگو کے منٹوں کے حساب سے، اور ہر پڑھنے والے کی زبان میں ترجمے کے حساب سے چارج ہوتا ہے۔
- میٹنگ کی AI نقل اور خلاصہ — روم میں AI خلاصہ، بالمشافہ میٹنگ کے خلاصے کا صفحہ، یا میٹنگ رپورٹ میں اپ لوڈ کی گئی ریکارڈنگ۔ نقل آڈیو کی لمبائی کے حساب سے، خلاصہ متن کی مقدار کے حساب سے چارج ہوتا ہے۔ ہر
دوبارہ خلاصہ کریںایک نیا عمل شمار ہوتا ہے۔
باقی سب Quota سے آزاد ہے: میل باکس جوڑنا اور سنک کرنا، ای میل پڑھنا، بھیجنا اور شیڈول کرنا، دستخط، ٹیمپلیٹس، رابطے، فلٹرز، کیلنڈر، دعوت نامے، Orova Meet پر میٹنگز (لوگوں یا منٹوں کے حساب سے نہیں گنی جاتیں، جب تک لائیو کیپشنز آن نہ ہوں)، اسکرین شیئرنگ، چیٹ، پس منظر، اپنی ڈیوائس پر ریکارڈنگ، حاضری اور Excel ایکسپورٹ، اور خلاصہ ای میل کرنا۔ ہر پلان میں ہر خصوصیت ہے؛ پلانز میں صرف Quota کی مقدار کا فرق ہے۔
Note
انٹرفیس کی کئی زبانیں
01 · میل باکس جوڑیں
میل باکس جوڑیں اور طے کریں کون اسے استعمال کر سکتا ہے
ان باکس میں کچھ دکھنے سے پہلے آپ کو کم از کم ایک میل باکس چاہیے۔ یہ حصہ Gmail، IMAP/SMTP پر کمپنی ای میل، اور ہر میل باکس کی رسائی کی ترتیبات بیان کرتا ہے۔
ایپ پاس ورڈ
ایک الگ 16 حرفی پاس ورڈ جو Google (اور کئی دوسرے فراہم کنندگان) صرف میل ایپس کے لیے بناتے ہیں۔ یہ آپ کا عام سائن ان پاس ورڈ نہیں۔ Orova Connect اسے Gmail تک پہنچنے کے لیے استعمال کرتا ہے، کیونکہ Orova Connect میں Google اکاؤنٹ سے سائن ان دستیاب نہیں۔
IMAP اور SMTP
IMAP وہ سرور ہے جہاں سے Orova آپ کی میل پڑھتا ہے (آنے والی میل کا سرور (IMAP))۔ SMTP وہ سرور ہے جس سے یہ بھیجتا ہے (جانے والی میل کا سرور (SMTP))۔ آپ کا ای میل فراہم کنندہ یا IT ٹیم دونوں پتے، ان کے پورٹس اور سیکیورٹی کی قسم دیتی ہے۔
Gmail ایپ پاس ورڈ بنائیں (Google کی طرف)
- 1
2-Step Verification آن کریں. اپنا Google Account کھولیں، Security میں جائیں اور 2-Step Verification آن کریں۔ Google ایپ پاس ورڈز تبھی پیش کرتا ہے جب یہ آن ہو۔
- 2
ایپ پاس ورڈ بنائیں. Google Account میں ہی App passwords صفحہ کھولیں، ایسا نام لکھیں جسے آپ پہچان سکیں (مثلاً
Orova) اور بنائیں۔ Google ایک 16 حرفی پاس ورڈ دکھاتا ہے۔ - 3
اسے فوراً کاپی کریں. Google پاس ورڈ صرف ایک بار دکھاتا ہے۔ ابھی کاپی کر لیں؛ اگلے مراحل میں آپ اسے Orova میں چسپاں کریں گے۔ کھو جائے تو Google پر اسے حذف کر کے نیا بنائیں۔
Orova میں میل باکس شامل کریں
- 1
میل باکسز ٹیب کھولیں.
ترتیباتمیں جائیں اورمیل باکسزٹیب کھولیں، پھرمیل باکس شامل کریںپر کلک کریں۔ اگر ابھی کوئی میل باکس نہیں تو ان باکس میں بھیمیل باکس شامل کریںدکھتا ہے۔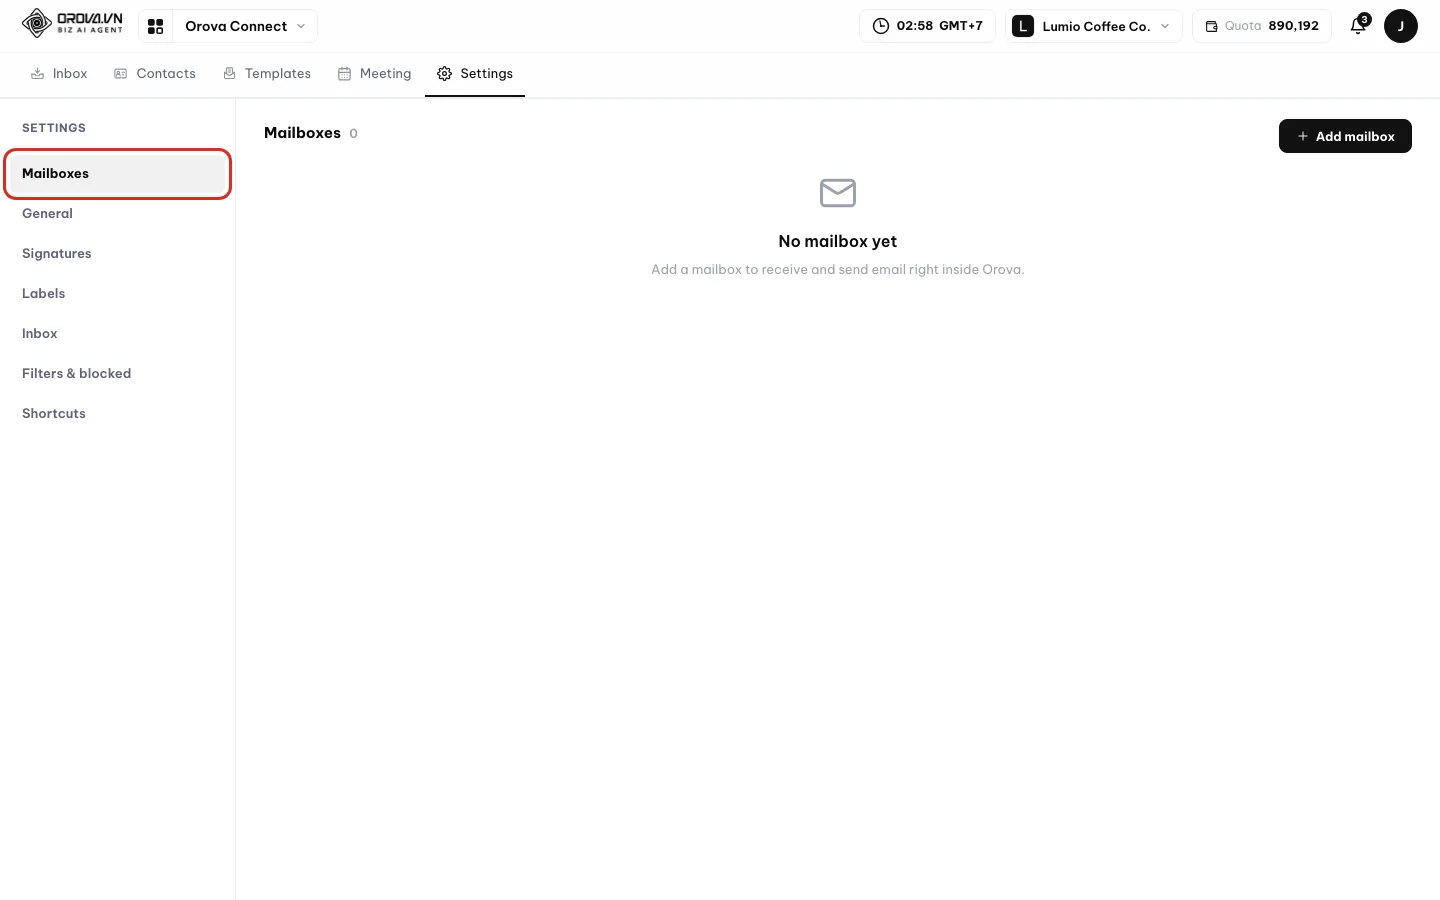
ترتیبات › میل باکسز: یہاں سے شروع کریں، پھر میل باکس شامل کریں پر کلک کریں۔ - 2
Gmail: Gmail جوڑیں استعمال کریں.
Gmail جوڑیںپر کلک کریں۔ Orova آپ کے لیے Gmail کے سرور بھر دیتا ہے اور Google کا ایپ پاس ورڈ صفحہ کھولتا ہے۔ای میل پتہمیں اپنا پتہ لکھیں، 16 حرفی کوڈایپ پاس ورڈمیں چسپاں کریں، اور چاہیں توبھیجنے والے کا ظاہری ناممقرر کریں۔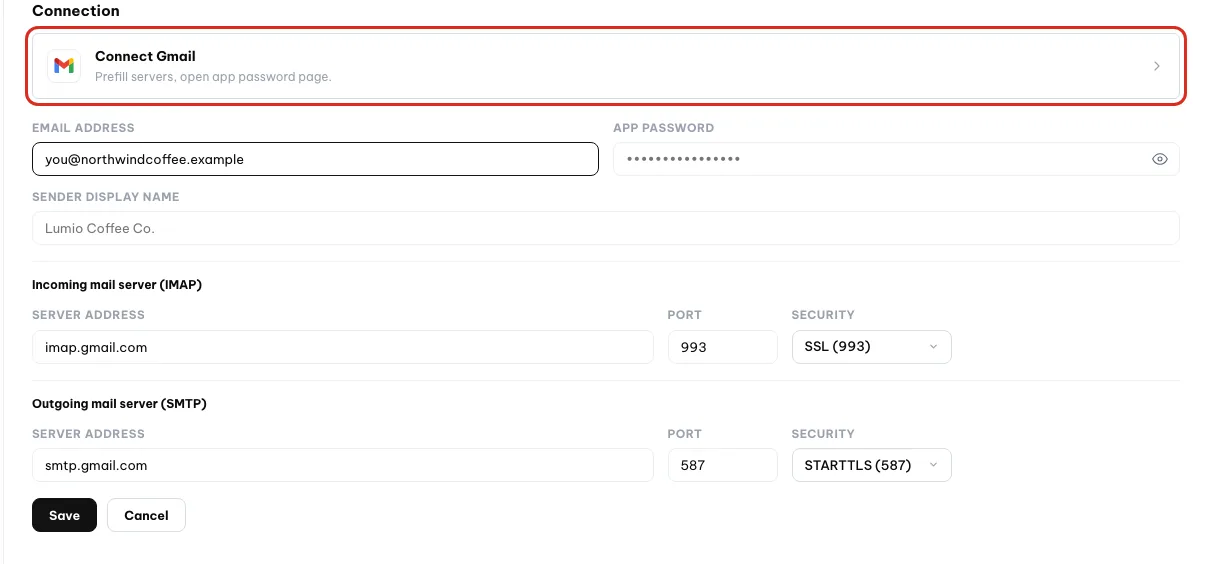
Gmail جوڑیں آپ کے لیے Gmail کے IMAP اور SMTP سرور بھر دیتا ہے۔ - 3
کمپنی ای میل: سرور بھریں. اپنا
ای میل پتہاور پاس ورڈ لکھیں، پھرآنے والی میل کا سرور (IMAP)اورجانے والی میل کا سرور (SMTP)گروپس بھریں:سرور کا پتہ،پورٹاورسیکیورٹی۔ یہ اپنے فراہم کنندہ سے ہو بہو نقل کریں۔
کمپنی ای میل: سرور کا پتہ، پورٹ اور سیکیورٹی اپنے فراہم کنندہ سے نقل کریں۔ - 4
محفوظ کریں پر کلک کریں.
محفوظ کریںایک براہ راست جانچ بھی ہے: Orova واقعی دونوں سرورز میں سائن ان کرنے کی کوشش کرتا ہے۔ آپ کوکنکشن جانچا جا رہا ہے…اور پھرکنکشن کام کر رہا ہے۔ میل باکس محفوظ ہو گیا۔دکھے گا۔ کچھ غلط ہو تو پیغام بتاتا ہے کہ کون سا سرور ناکام ہوا اور کیوں۔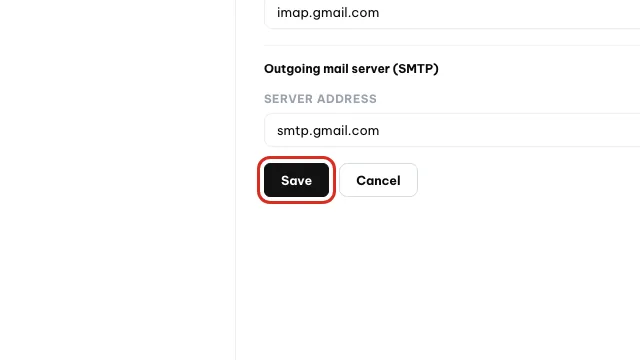
محفوظ کریں دونوں سرورز سے کنکشن بھی جانچتا ہے۔ - 5
پہلے سنک کا انتظار کریں. پہلی بار Orova پچھلے 90 دن کی میل لاتا ہے۔ اس کے بعد نئی میل تقریباً فوراً آتی ہے۔ آپ ان باکس میں کسی بھی وقت
سنکپر کلک کر سکتے ہیں۔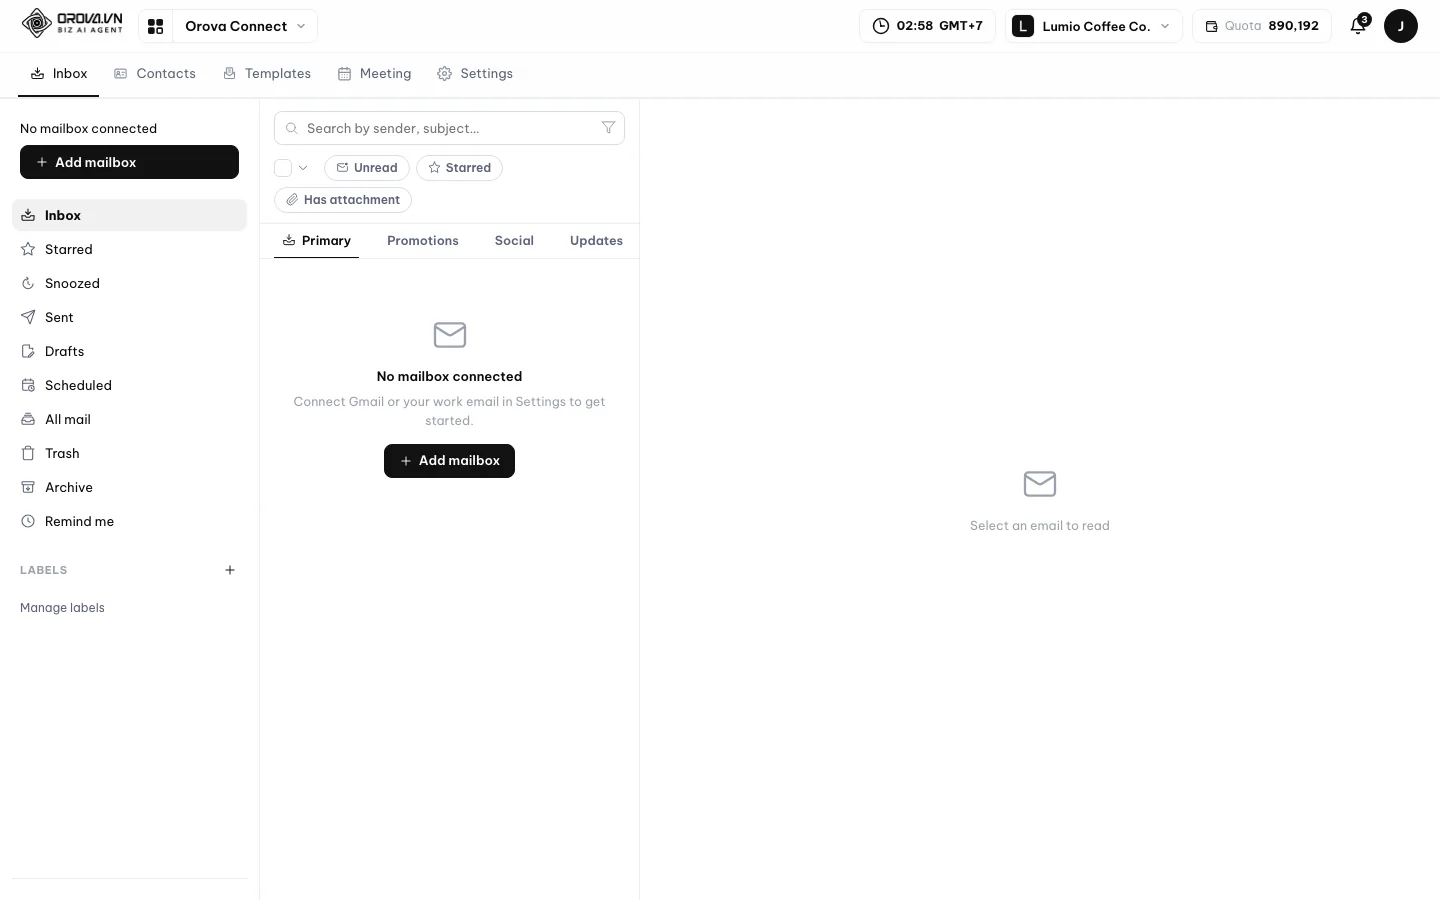
جب تک میل باکس جڑ کر سنک نہ ہو، ان باکس خالی رہتا ہے۔
ہر میل باکس کا انتظام
ڈیفالٹ بنائیںوہ میل باکس چنتا ہے جو نئی ای میل لکھتے وقت پہلے استعمال ہوتا ہے۔دوبارہ جانچیںکنکشن دوبارہ چیک کرتا ہے۔ حالت کا کالمجڑا ہوا،کنکشن کی خرابییاابھی جانچا نہیں گیادکھاتا ہے۔لوگو اپ لوڈ کریںمیل باکس کو اپنی تصویر دیتا ہے (PNG، JPG یا WEBP، زیادہ سے زیادہ 1 MB)۔ یہ میل باکس کی فہرست میں اور بھیجنے والا میل باکس چنتے وقت دکھتی ہے۔- ہر میل باکس میں زیادہ سے زیادہ 2 GB میل رہ سکتی ہے۔ بھر جانے پر Orova نئی میل کا متن ڈاؤن لوڈ کرتا رہتا ہے مگر اٹیچمنٹس چھوڑ دیتا ہے۔
حذف کریںمیل باکس کو اس کے تمام فولڈرز، پیغامات اور ڈاؤن لوڈ شدہ اٹیچمنٹس سمیت Orova سے ہٹا دیتا ہے۔ یہ آپ کے فراہم کنندہ کے سرور پر موجود میل کو نہیں چھیڑتا۔
میل باکس کون دیکھ اور استعمال کر سکتا ہے
| اختیار | اس کا مطلب |
|---|---|
صرف میں | یہ میل باکس صرف آپ کو دکھتا ہے۔ |
ورک اسپیس دیکھ سکتا ہے | ورک اسپیس میں ہر کوئی میل پڑھ سکتا ہے مگر اس سے بھیج نہیں سکتا۔ |
ورک اسپیس استعمال کر سکتا ہے | ورک اسپیس میں ہر کوئی اس سے پڑھ اور بھیج سکتا ہے۔ |
فی شخص: صرف دیکھیں · دیکھیں اور بھیجیں · رسائی نہیں | کسی ایک رکن کے لیے عمومی اصول بدلیں۔ ڈیفالٹ کا مطلب ہے وہ شخص ورک اسپیس کے اصول پر چلتا ہے۔ |
Warning
پاس ورڈ صرف جوڑنے والا شخص دیکھتا ہے
جوڑنے والا کے نیچے ہے۔ پرانے میل باکسز میں جہاں یہ معلوم نہیں، وہ ورک اسپیس کا مالک ہوتا ہے۔ رسائی رکھنے والے ساتھی پڑھ اور بھیج سکتے ہیں مگر یہ نہیں دیکھ سکتے کہ میل باکس کیسے جڑا ہے۔02 · پڑھیں اور ترتیب دیں
اپنی ای میل پڑھیں اور ترتیب دیں
ان باکس کافی حد تک Gmail کی طرح کام کرتا ہے۔ یہ حصہ زمرہ ٹیبز، گفتگو، روزمرہ کے کام، تلاش، فلٹرز اور بلاک کرنا، اور دفتر سے غیر حاضری کا خودکار جواب بیان کرتا ہے۔
زمرہ ٹیبز
ان باکس بنیادی، پروموشنز، سوشل اور اپ ڈیٹس میں بٹا ہے؛ آپ فورمز بھی آن کر سکتے ہیں۔ Orova میل کو خود ان میں ترتیب دیتا ہے۔ ستارے والی میل ہمیشہ بنیادی میں رہتی ہے۔ ترتیبات › ان باکس میں ٹیبز دکھا، چھپا اور ترتیب بدل سکتے ہیں، اور زمرہ شامل کریں سے 10 تک اپنے زمرے بنا سکتے ہیں۔
گفتگو
ایک ہی موضوع کی ای میلز ایک گفتگو میں جمع ہوتی ہیں، اور پرانے پیغامات کا اقتباس شدہ متن تہہ کر دیا جاتا ہے۔ اسے ترتیبات › عمومی میں گفتگو کا منظر سے بند کر سکتے ہیں۔
روزمرہ کے کام
| بٹن | یہ کیا کرتا ہے |
|---|---|
ستارہ · لیبل | اہم میل نشان زد کریں، یا کسی لیبل کے تحت رکھیں۔ لیبلز کے رنگ اور بنیادی لیبل ہو سکتے ہیں؛ انہیں ترتیبات › لیبلز میں سنبھالیں۔ |
آرکائیو · حذف کریں | میل کو ان باکس سے نکالیں، یا ردی میں بھیجیں۔ |
اسپام کی اطلاع دیں · بھیجنے والے کو بلاک کریں | میل کو اسپام میں بھیجیں، یا کوئی پتہ یا پورا ڈومین بلاک کریں تاکہ آئندہ میل اسپام میں جائے۔ |
ان سبسکرائب | نیوز لیٹر بھیجنے والے سے بھیجنا بند کرنے کو کہیں۔ |
اسنوز | پیغام کو آج بعد میں، کل، اس ہفتے کے آخر، اگلے ہفتے، یا وقت چنیں سے آپ کے منتخب وقت تک چھپائیں۔ |
مجھے یاد دلائیں | آپ کے مقرر کردہ وقت پر Orova اسی میل باکس میں یاددہانی کی ای میل بھیجتا ہے۔ |
پرنٹ کریں · .eml ڈاؤن لوڈ کریں | پیغام پرنٹ کریں یا اصل فائل محفوظ کریں۔ |
پیغام کے اعمالکھولنے کے لیے پیغام پر دایاں کلک کریں: اسے دوسرے ٹیب میں منتقل کریں،اس بھیجنے والے کی ای میلز تلاش کریں، جواب دیں، آگے بھیجیں اور مزید۔- Gmail طرز کے کی بورڈ شارٹ کٹس (j/k, c, r, a, f, e, #, s, /) پہلے سے بند ہیں۔
ترتیبات›عمومیمیںکی بورڈ شارٹ کٹسآن کریں؛ کوئی بھی کلیدشارٹ کٹسٹیب میں بدلیں۔ - بیرونی تصاویر پہلے سے دکھتی ہیں۔ اگر آپ انہیں صرف
تصاویر دکھائیںپر کلک کے بعد لوڈ کرنا چاہیں توبیرونی تصاویرکوپہلے پوچھیںپر رکھیں۔ - قابل اعتماد بھیجنے والوں کی تصاویر ہمیشہ دکھتی ہیں اور وہ کبھی اسپام میں نہیں جاتے۔ انہیں
ترتیبات›فلٹرز اور بلاک شدہمیں شامل کریں۔ - ریڈنگ پین کو کھینچ کر چوڑا یا تنگ کیا جا سکتا ہے۔
ریڈنگ پین میں ای میل کا ترجمہ کریں
- 1
ترجمہ پر کلک کریں. ای میل کھولیں۔ پیغام کے اوپر
ترجمہ کریںپر کلک کریں۔ ترجمہ کریں بطور مینو کھلتا ہے، جس میں زبان جلدی ڈھونڈنے کے لیے زبان تلاش کریں… خانہ ہے۔ - 2
زبان چنیں. جس زبان میں پڑھنا چاہتے ہیں اس پر کلک کریں۔ آپ کو ترجمہ ہو رہا ہے… دکھے گا، پھر ترجمہ ریڈنگ پین میں ہی Translation · Tiếng Việt جیسے لیبل کے ساتھ آ جاتا ہے۔ AI ای میل کی فارمیٹنگ، نام، رقمیں اور URLs جوں کے توں رکھتا ہے۔ Orova اگلی کھولی جانے والی ای میلز کے لیے زبان یاد رکھتا ہے۔
- 3
اصل پر واپس جائیں.
ترجمہ کریںپر کلک کر کےاصل دکھائیںچنیں۔ آپ کے میل باکس میں ای میل کبھی نہیں بدلتی۔
Note
تلاش
بھیجنے والے یا موضوع سے میل ڈھونڈنے کے لیے تلاش کے خانے میں لکھیں۔ جدید تلاش کھول کر از، بنام، موضوع، الفاظ شامل ہیں، شامل نہیں، سائز، تاریخ کی مدت، میں تلاش کریں والا فولڈر اور اٹیچمنٹ ہے ملا سکتے ہیں۔ اسی پینل سے فلٹر بنائیں آپ کی تلاش کو فلٹر میں بدل دیتا ہے۔
فلٹر
شرائط اور اعمال سے بنا ایک قاعدہ جو نئی آنے والی میل پر چلتا ہے۔ شرائط سب یا کوئی بھی سے جڑتی ہیں اور بھیجنے والا، وصول کنندہ، Cc، موضوع، متن، سائز (MB)، اٹیچمنٹس، میل باکس، لیبل، زمرہ اور وصولی کی تاریخ جانچ سکتی ہیں۔
فلٹر بنائیں
- 1
فلٹرز اور بلاک شدہ کھولیں.
ترتیبات›فلٹرز اور بلاک شدہمیں جائیں اورنیا فلٹرپر کلک کریں۔ اسے ایکنامدیں۔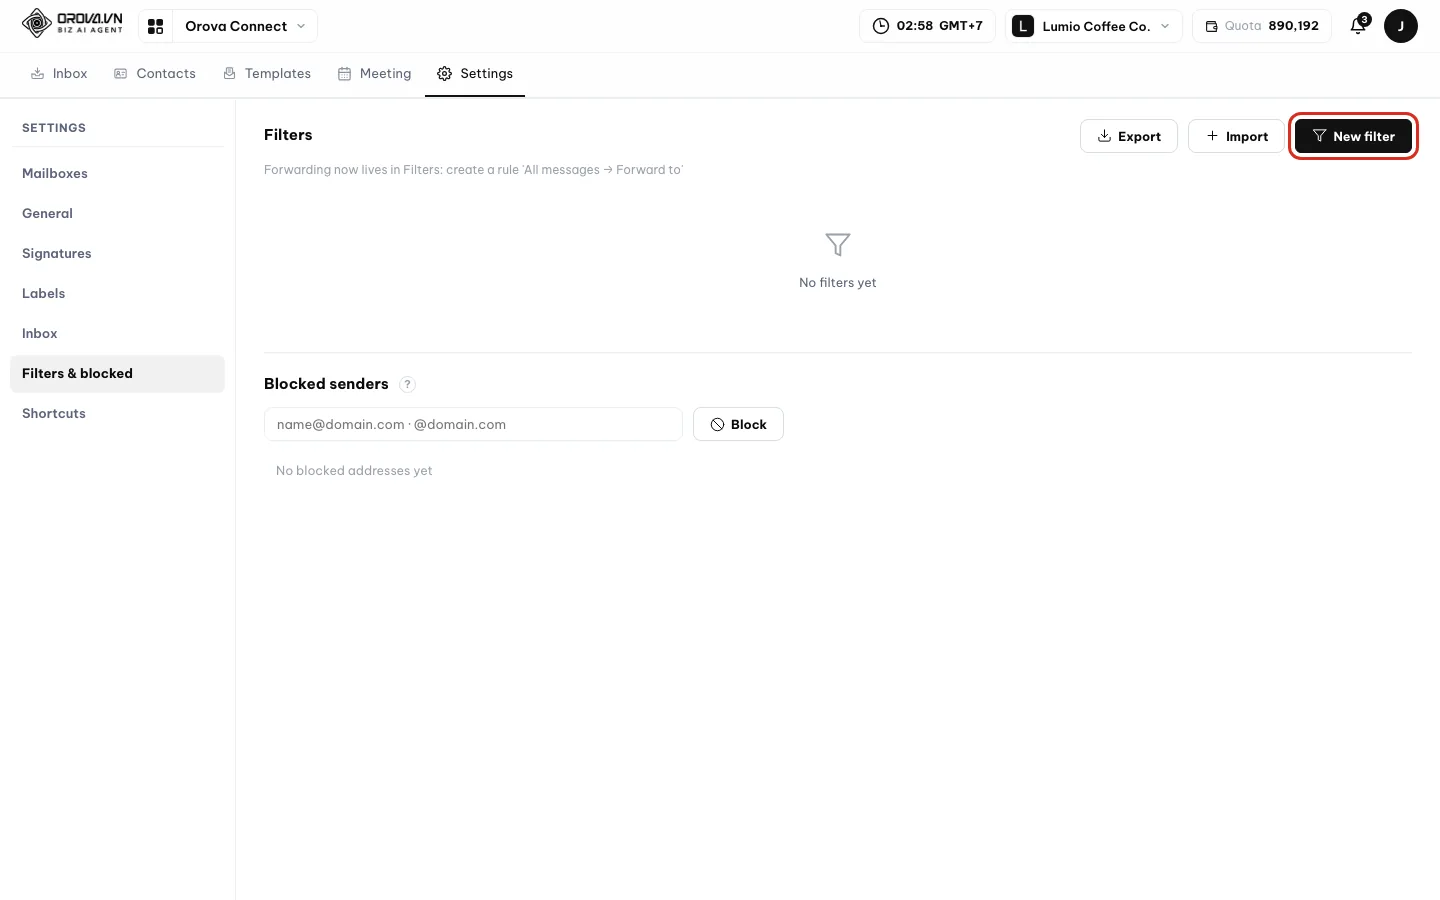
ترتیبات › فلٹرز اور بلاک شدہ: نیا فلٹر پر کلک کریں۔ - 2
شرائط مقرر کریں.
جب کوئی پیغامکے تحتسبیاکوئی بھیچنیں، پھر ہر جانچ کے لیےشرط شامل کریںاستعمال کریں — مثلاًازمیں کوئی ڈومینشامل ہو۔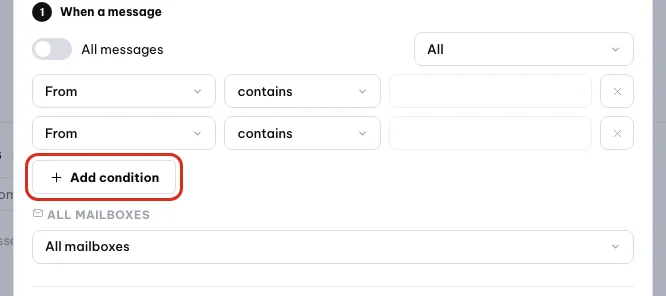
سب یا کوئی بھی چنیں، پھر ہر جانچ کے لیے ایک شرط شامل کریں۔ - 3
اعمال چنیں.
پھرکے تحت ایک یا زیادہ چنیں:آرکائیو،پڑھا ہوا نشان زد کریں،ستارہ،لیبل لگائیں،زمرہ بندی،حذف کریں،کبھی اسپام نہیں۔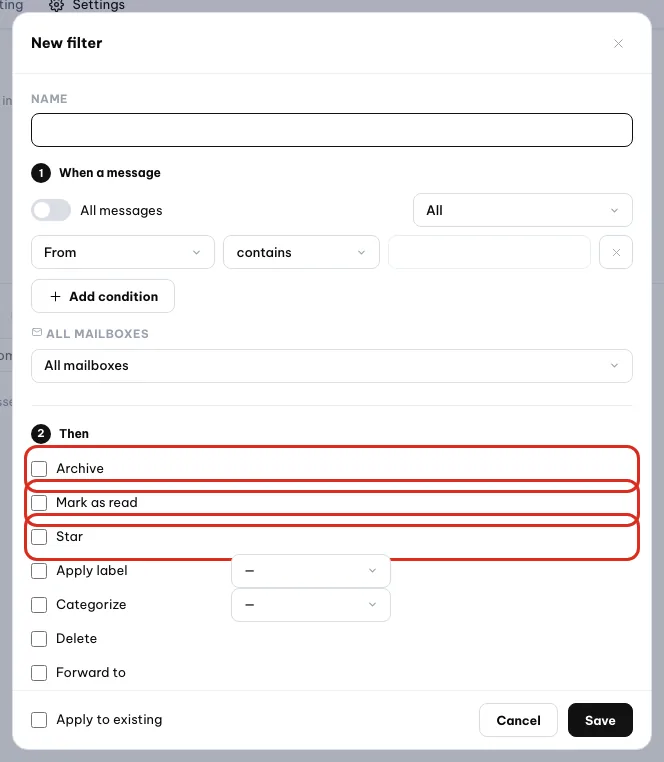
پھر کے تحت ایک یا زیادہ اعمال ٹک کریں۔ - 4
چاہیں تو پرانی میل پر لاگو کریں.
موجودہ پر لاگو کریںفلٹر کو آپ کی پہلے سے موجود میل پر چلاتا ہے۔ پرانی میل پر یہ صرف Orova کے اندر لیبلز، ستارے اور پڑھنے کی حالت بدلتا ہے۔
ایکسپورٹاورامپورٹآپ کے فلٹرز کو فائل کی صورت منتقل کرتے ہیں، مثلاً ورک اسپیسز کے درمیان۔بلاک شدہ بھیجنے والےہر بلاک شدہ پتہ یا ڈومین (name@domain.comیا@domain.com) دکھاتا ہے، ساتھ یہ کہ کس نے اور کب بلاک کیا۔ان بلاک کریںاسے واپس لیتا ہے۔
Warning
فلٹر میں آگے بھیجنا محفوظ ہوتا ہے، بھیجا نہیں جاتا
آگے بھیجیں بنام پتے ہو سکتے ہیں (اس پتے پر بھیجے گئے کوڈ سے تصدیق شدہ)۔ فی الحال Orova صرف یہ قاعدہ محفوظ کرتا ہے؛ ابھی آگے بھیجی جانے والی میل خود نہیں بھیجتا۔ اگر کوئی پیغام آگے بھیجنا ہو تو اسے کھول کر خود آگے بھیجیں پر کلک کریں۔غیر حاضری میں خودکار جواب
ترتیبات › عمومی میں مطلوبہ میل باکس کے لیے خودکار جواب کھولیں اور اسے آن کریں۔ جواب کا موڈ میں تاریخوں کے حساب سے (از–تک کی مدت)، کام کے شیڈول کے حساب سے (کام کے اوقات سے باہر، ہفتہ وار چھٹیوں پر اور آپ کے شامل کردہ تعطیلات اور حسب منشا چھٹیوں پر)، یا دونوں چنیں۔ موضوع اور پیغام لکھیں۔ صرف اپنے رابطوں کو جواب دینے کے لیے صرف رابطے ٹک کریں۔ ہر بھیجنے والے کو 4 دن میں زیادہ سے زیادہ ایک خودکار جواب ملتا ہے۔
03 · لکھیں اور AI
ای میل، دستخط، ٹیمپلیٹس اور AI سے دوبارہ تحریر
شروع کرنے کے لیے لکھیں پر کلک کریں۔ یہ حصہ ایڈیٹر، دستخط، وصول کنندگان، شیڈول شدہ بھیجنا، واپس لینا، AI سے دوبارہ تحریر اور ٹیمپلیٹس کے ساتھ کام بیان کرتا ہے۔
لکھنے کی ونڈو
- ایڈیٹر متن کی فارمیٹنگ، فہرستیں، جدولیں،
تصویر داخل کریںاورلنک داخل کریںسنبھالتا ہے۔ خام HTML چسپاں یا ترمیم کرنے کے لیےHTML موڈپر جائیں، اور واپسایڈیٹرپر۔ - ونڈو کو
چھوٹا کریں،پھیلائیںیاپوری اسکرینکیا جا سکتا ہے۔ - ڈیفالٹ فونٹ، سائز اور رنگ
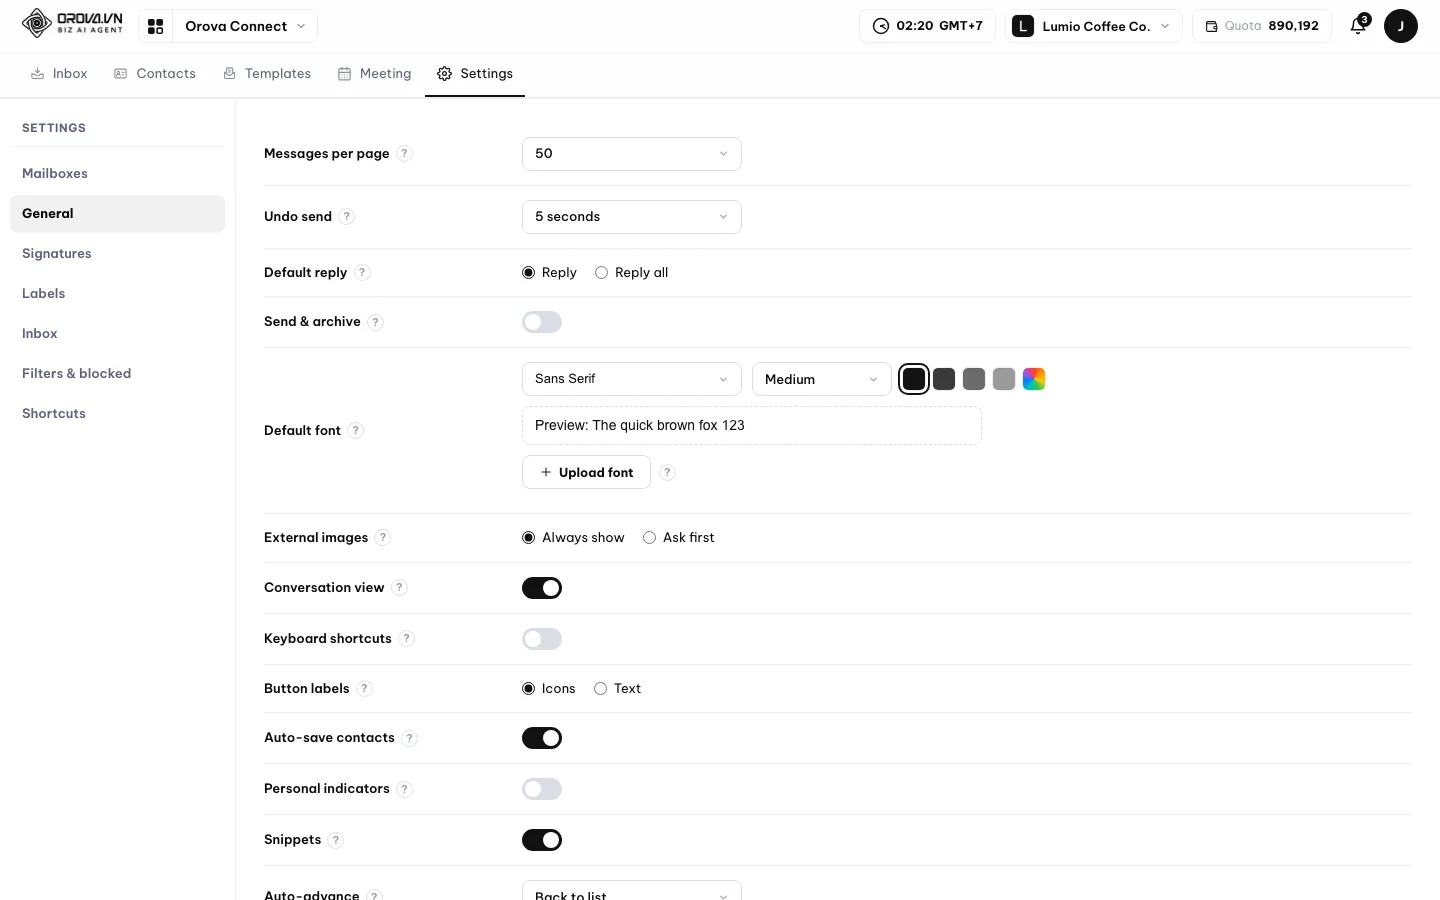
ترتیبات›عمومیمیںڈیفالٹ فونٹسے آتے ہیں۔فونٹ اپ لوڈ کریںآپ کی اپنی .woff2 یا .ttf فائل، زیادہ سے زیادہ 2 MB، شامل کرتا ہے۔ ازمیں بھیجنے والا میل باکس چنیں۔ اس کا دستخط خود شامل ہو جاتا ہے۔- وصول کنندگان
رابطےاورگروپسسے تجویز ہوتے ہیں۔ ایک ای میل To، Cc اور Bcc میں کل ملا کر زیادہ سے زیادہ 100 وصول کنندگان کو جا سکتی ہے، اور اٹیچمنٹس کل 25 MB تک۔ - جوابات اور آگے بھیجنا اسی پیغام کے نیچے کھلتے ہیں جو آپ پڑھ رہے ہیں۔ اصل پیغام اقتباس اور تہہ ہوتا ہے؛
اقتباس شدہ متن ہٹائیںاسے نکال دیتا ہے۔
دستخط
ہر میل باکس میں جتنے چاہیں دستخط ہو سکتے ہیں۔ ترتیبات › دستخط میں دستخط شامل کریں استعمال کریں، پھر چنیں کہ نئی میل اور جوابات کے لیے کون سا ڈیفالٹ ہو۔ لکھتے وقت آپ دستخط بدل سکتے ہیں یا کوئی دستخط نہیں چن سکتے ہیں۔
ابھی بھیجیں، بعد میں بھیجیں، یا واپس لیں
- 1
بھیجیں.
بھیجیںپر کلک کریں۔ ای میل چند سیکنڈ روکی جاتی ہے تاکہ آپ ظاہر ہونے والی پٹی میںواپس لیںپر کلک کر سکیں۔ - 2
واپس لینے کا وقفہ ترتیب دیں.
ترتیبات›عمومیمیںبھیجنا واپس لیںطے کرتا ہے کہ ای میل کتنی دیر روکی جائے: پہلے سے 5 سیکنڈ، 0 (بند) سے 60 سیکنڈ تک کچھ بھی۔
بھیجنا واپس لیں طے کرتا ہے کہ میل جانے سے پہلے کتنے سیکنڈ روکی جائے۔ - 3
اس کے بجائے شیڈول کریں.
بھیجنا شیڈول کریںکھولیں اورکل صبح 8:00،آج دوپہر 1:00،پیر صبح 8:00، یاتاریخ اور وقت چنیںچنیں۔ شیڈول شدہ میلشیڈول شدہفولڈر میں انتظار کرتی ہے۔
AI سے دوبارہ لکھیں
AI سے کسی حصے کو دوبارہ لکھوائیں
- 1
متن منتخب کریں. جس حصے کو دوبارہ لکھوانا ہے اسے نمایاں کریں۔ کچھ منتخب نہ ہو تو Orova کہتا ہے:
پہلے وہ متن منتخب کریں جو آپ AI سے دوبارہ لکھوانا چاہتے ہیں۔ - 2
AI خانہ کھولیں. ایڈیٹر کی ٹول بار میں
AIپر کلک کریں، یاiکلید دبائیں۔AI سے دوبارہ لکھیںخانہ کھلتا ہے۔ - 3
بتائیں کیا چاہیے. "مختصر اور زیادہ مہذب" جیسی ہدایت لکھیں۔ خالی چھوڑیں تو AI بس تحریر بہتر بنا دیتا ہے۔
چلائیںپر کلک کریں۔ - 4
نتیجہ جانچیں. AI اصل زبان، لنکس، تصاویر اور ٹیمپلیٹ کے متغیرات برقرار رکھتا ہے۔ دوبارہ تحریر کبھی آپ کے متن کا ترجمہ نہیں کرتی؛ کسی اور زبان میں ای میل پڑھنے کے لیے ریڈنگ پین میں الگ
ترجمہ کریںبٹن استعمال کریں (حصہ 02)۔
Note
ای میل میں صرف دوبارہ تحریر اور ترجمہ پر Quota لگتا ہے
Email — AI rewrite کے طور پر دکھتی ہے۔ بٹوے میں کمی ہو تو آپ کو AI Quota ختم ہو گیا۔ دکھتا ہے اور کچھ نہیں کٹتا۔ ترجمہ بھی اسی طرح چارج ہوتا ہے (حصہ 02)۔ ای میل لکھنے، بھیجنے اور شیڈول کرنے پر کبھی Quota نہیں لگتا۔ٹیمپلیٹس
module مینو میں ٹیمپلیٹس کھولیں۔ دو لائبریریاں ہیں۔ آپ کے ٹیمپلیٹس وہ ہیں جو آپ بناتے، ترمیم کرتے، ٹیگ کرتے، گروپ کرتے اور اجتماعی طور پر سنبھالتے ہیں (ٹیگ شامل کریں، گروپ میں منتقل کریں، ٹیمپلیٹس حذف کریں)۔ سسٹم ٹیمپلیٹس 35 صرف پڑھنے والے ٹیمپلیٹس ہیں — کوٹیشنز، انوائسز، ادائیگی کی درخواستیں، آرڈر کی تصدیق، شکریے کے پیغامات اور مزید۔ یہ آپ کی انٹرفیس زبان کے مطابق ہیں: انٹرفیس ویتنامی ہو تو ویتنامی، باقی تمام زبانوں میں انگریزی۔
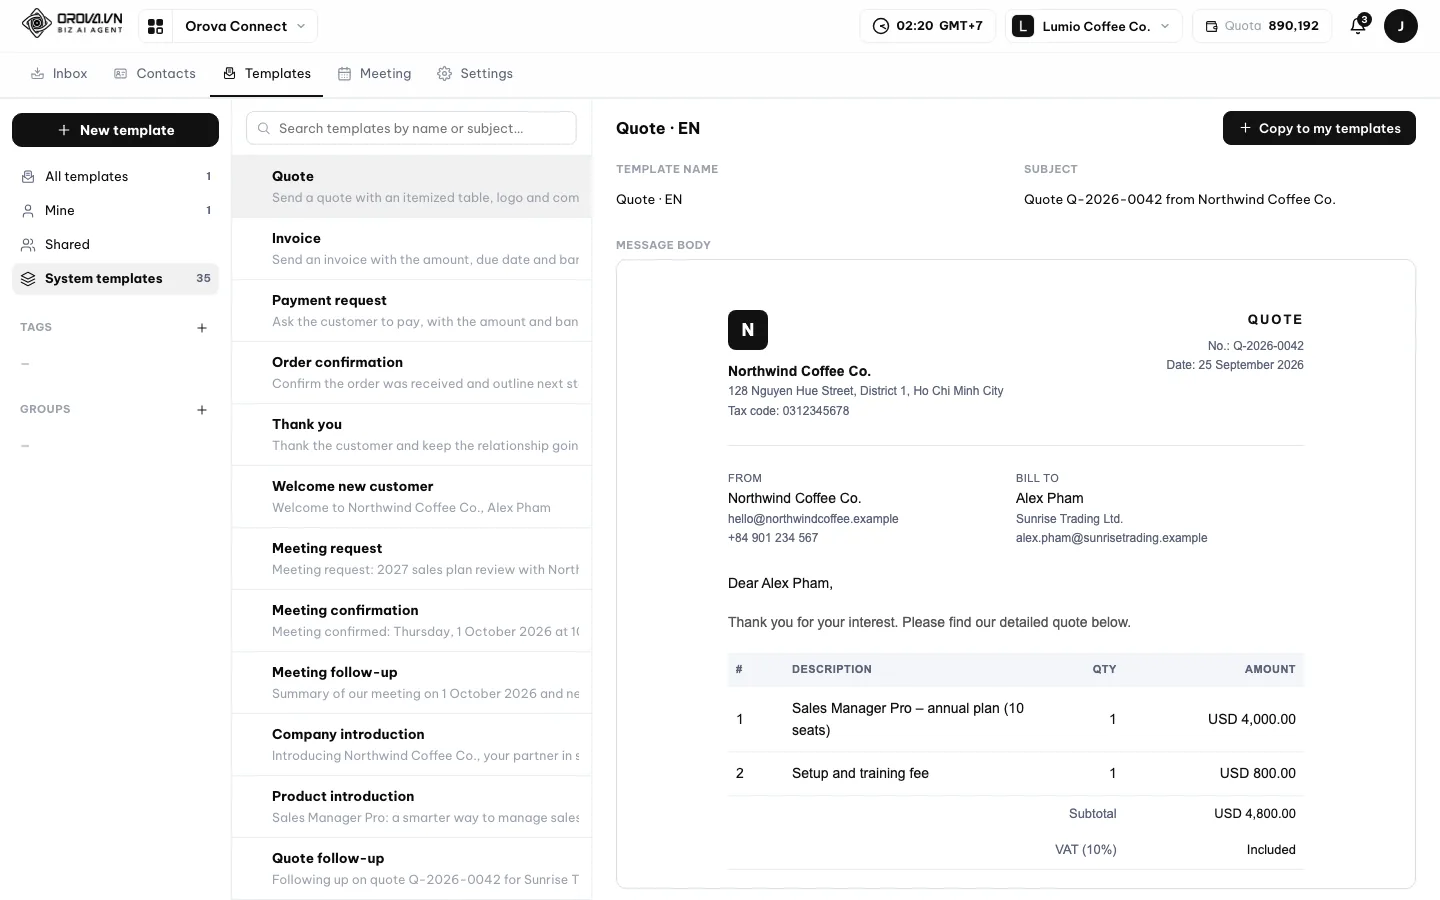
ٹیمپلیٹ بنائیں اور شیئر کریں
- 1
سسٹم ٹیمپلیٹ سے یا بالکل نئے سرے سے شروع کریں. سسٹم ٹیمپلیٹ پر
میرے ٹیمپلیٹس میں کاپی کریں(یابطور ٹیمپلیٹ استعمال کریں) پر کلک کریں تاکہ آپ کی اپنی قابل ترمیم نقل بن جائے۔ بالکل نئے سرے سے شروع کرنے کے لیےنیا ٹیمپلیٹپر کلک کریں۔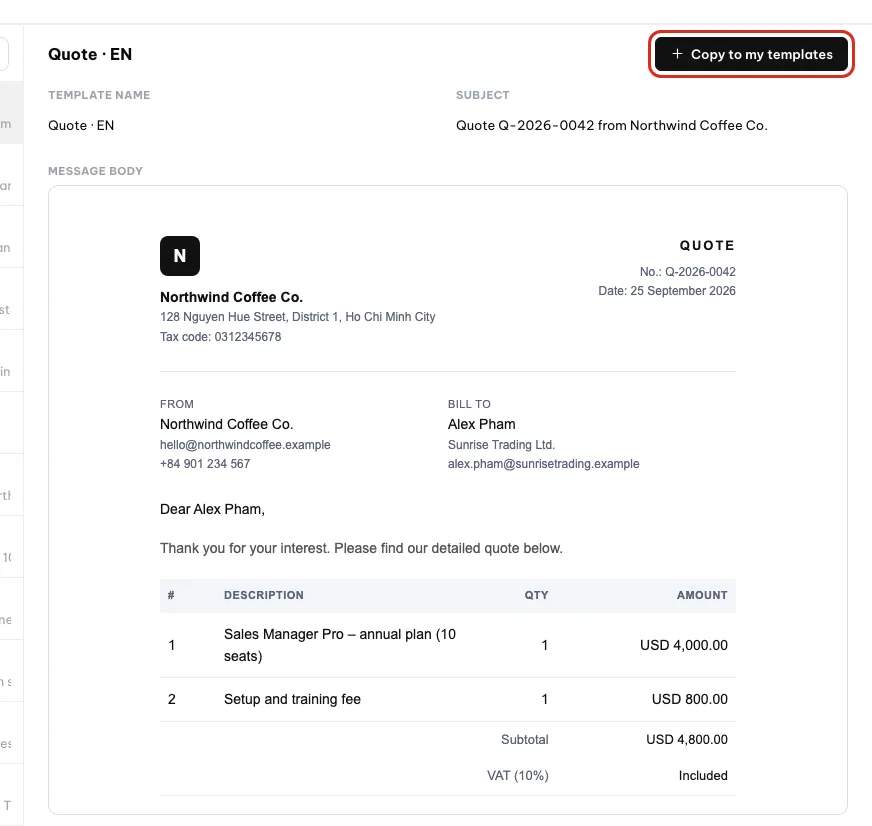
سسٹم ٹیمپلیٹس صرف دیکھنے کے لیے ہیں؛ ترمیم کے لیے ایک کاپی کریں۔ - 2
مواد لکھیں.
ایڈیٹریاHTMLٹیب استعمال کریں۔ ایڈیٹر میں تین ٹیبز ہیں:ایڈیٹر،HTMLاورپیش نظارہ۔ جدول والی ترتیب کے ٹیمپلیٹسHTMLمیں کھلتے ہیں تاکہ ترتیب برقرار رہے، کیونکہ انہیںایڈیٹرپر لے جانے سے ترتیب بگڑ سکتی ہے۔
ایڈیٹر یا HTML میں لکھیں؛ پیش نظارہ نتیجہ دکھاتا ہے۔ - 3
متغیرات داخل کریں اور پیش نظارہ دیکھیں.
متغیر داخل کریںگاہک، کمپنی یا بھیجنے والے کی تفصیلات جیسے خانے شامل کرتا ہے۔پیش نظارہپر کلک کریں: متغیرات آپ کے ورک اسپیس کے اصل ڈیٹا سے بھرتے ہیں، اور جن کا ڈیٹا نہیں وہ خالی رہتے ہیں۔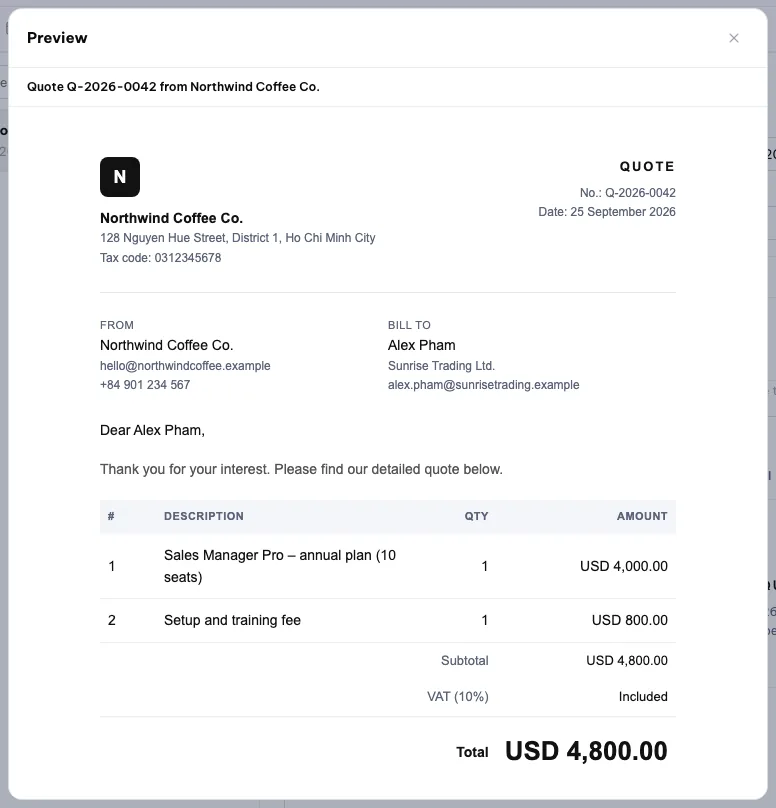
پیش نظارہ متغیرات کو آپ کے ورک اسپیس ڈیٹا سے بھرتا ہے۔ - 4
اسے شیئر کریں.
شیئر کریں…پر کلک کریں اورصرف میں،پورا ورک اسپیس، یاحسب منشاچنیں —شعبے(کوئی شعبہ ٹک کرنے سے اس کے ذیلی شعبے بھی شامل ہوتے ہیں) یا انفرادیاراکینچنیں، ہر ایک کواستعمال کر سکتا ہےیاترمیم کر سکتا ہےکے ساتھ۔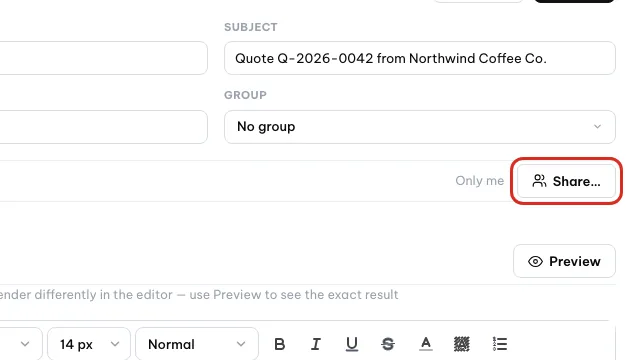
ٹیمپلیٹ کون استعمال یا ترمیم کر سکتا ہے، یہ چننے کے لیے شیئر کریں… پر کلک کریں۔ - 5
اسے ای میل میں استعمال کریں. لکھتے وقت
ٹیمپلیٹ داخل کریںپر کلک کریں۔ جو ای میل آپ لکھ رہے ہیں اسے ٹیمپلیٹ بنانے کے لیےبطور ٹیمپلیٹ محفوظ کریںپر کلک کریں۔
کسی ساتھی کا استعمال کر سکتا ہے کے ساتھ شیئر کیا گیا ٹیمپلیٹ صرف پڑھنے کے لیے کھلتا ہے: آپ اسے استعمال کر سکتے ہیں مگر بدل نہیں سکتے۔ ٹیمپلیٹ بنانا اور استعمال کرنا مفت ہے؛ ٹیمپلیٹ کے اندر AI سے دوبارہ تحریر پر بھی ای میل کی طرح Quota لگتا ہے۔
04 · رابطے
اپنے رابطے محفوظ رکھیں
رابطے ای میل کے لیے ورک اسپیس کی مشترکہ ایڈریس بک ہے۔ یہ لکھتے وقت وصول کنندگان کی تجاویز فراہم کرتی ہے، اور Orova CRM کے گاہکوں کے ریکارڈ سے الگ ہے۔
رابطہ
ایک شخص جس کا پہلا نام، آخری نام، ای میل، فون، کمپنی اور نوٹس ہوں۔ ہاتھ سے شامل کرنے کے لیے نیا رابطہ پر کلک کریں، یا کسی رابطے پر لکھیں دبا کر ایسی ای میل شروع کریں جس پر پہلے سے ان کا پتہ ہو۔
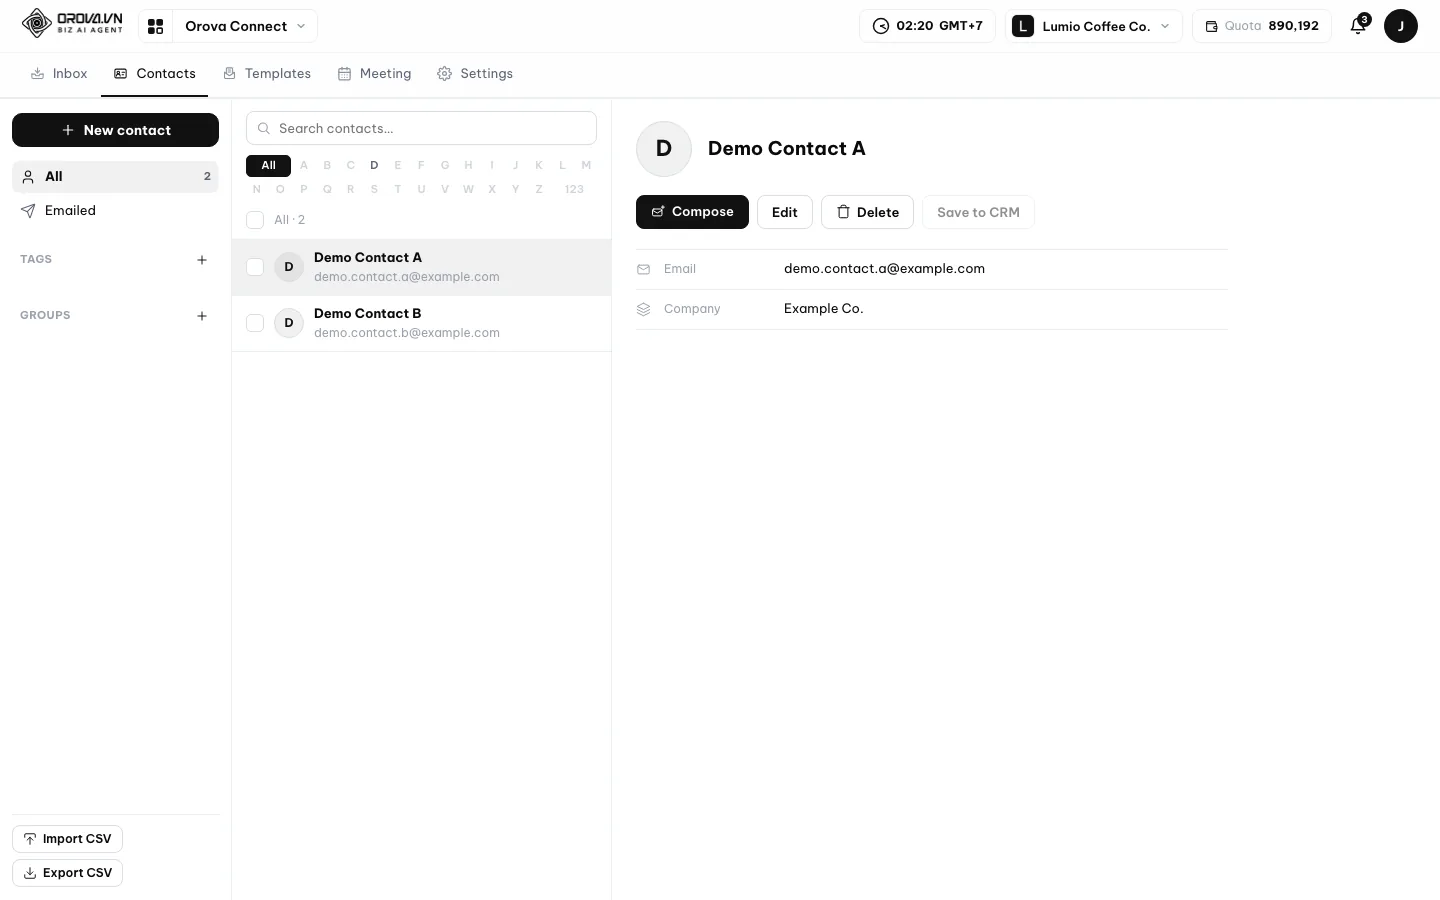
- تلاش اور فلٹر۔ تلاش کا خانہ، پہلے حرف کا فلٹر (ویتنامی اعراب والے نام بھی صحیح حرف کے تحت ترتیب پاتے ہیں، اس لیے "Đặng" D کے تحت آتا ہے)،
ٹیگزفلٹر یاای میل بھیجی گئیاستعمال کریں تاکہ وہ لوگ دیکھیں جنہیں آپ نے لکھا ہے۔ - ٹیگز۔ 24 رنگوں کی پیلیٹ سے چنیں۔ ایک شخص کے کئی ٹیگ ہو سکتے ہیں۔
نیا ٹیگسے بنائیں۔ - گروپس۔ گروپ پتوں کی ایک فہرست ہے جسے آپ ایک ساتھ To خانے میں ڈال سکتے ہیں۔
نیا گروپسے بنائیں۔ - کئی منتخب کریں۔ سطریں ٹک کریں تاکہ سب کو ایک ساتھ
ٹیگ کریں،ٹیگ ہٹائیں،گروپ میں شامل کریںیاحذف کریں۔ - رابطے خود محفوظ کریں (پہلے سے آن،
ترتیبات›عمومیمیں) ہر اس شخص کو رابطوں میں شامل کرتا ہے جسے آپ ای میل کرتے ہیں، تاکہ اگلی بار وہ تجویز ہو۔ - کالموں کو کھینچ کر چوڑا یا تنگ کیا جا سکتا ہے۔
CSV فائل سے رابطے امپورٹ کریں
- 1
فائل تیار کریں. UTF-8 CSV فائل محفوظ کریں جس کی پہلی سطر میں کالموں کے نام ہوں۔
emailکالم لازمی ہے؛ باقی خالی رہ سکتے ہیں۔tagsکالم میں کئی ٹیگ;سے الگ کر کے لکھیں۔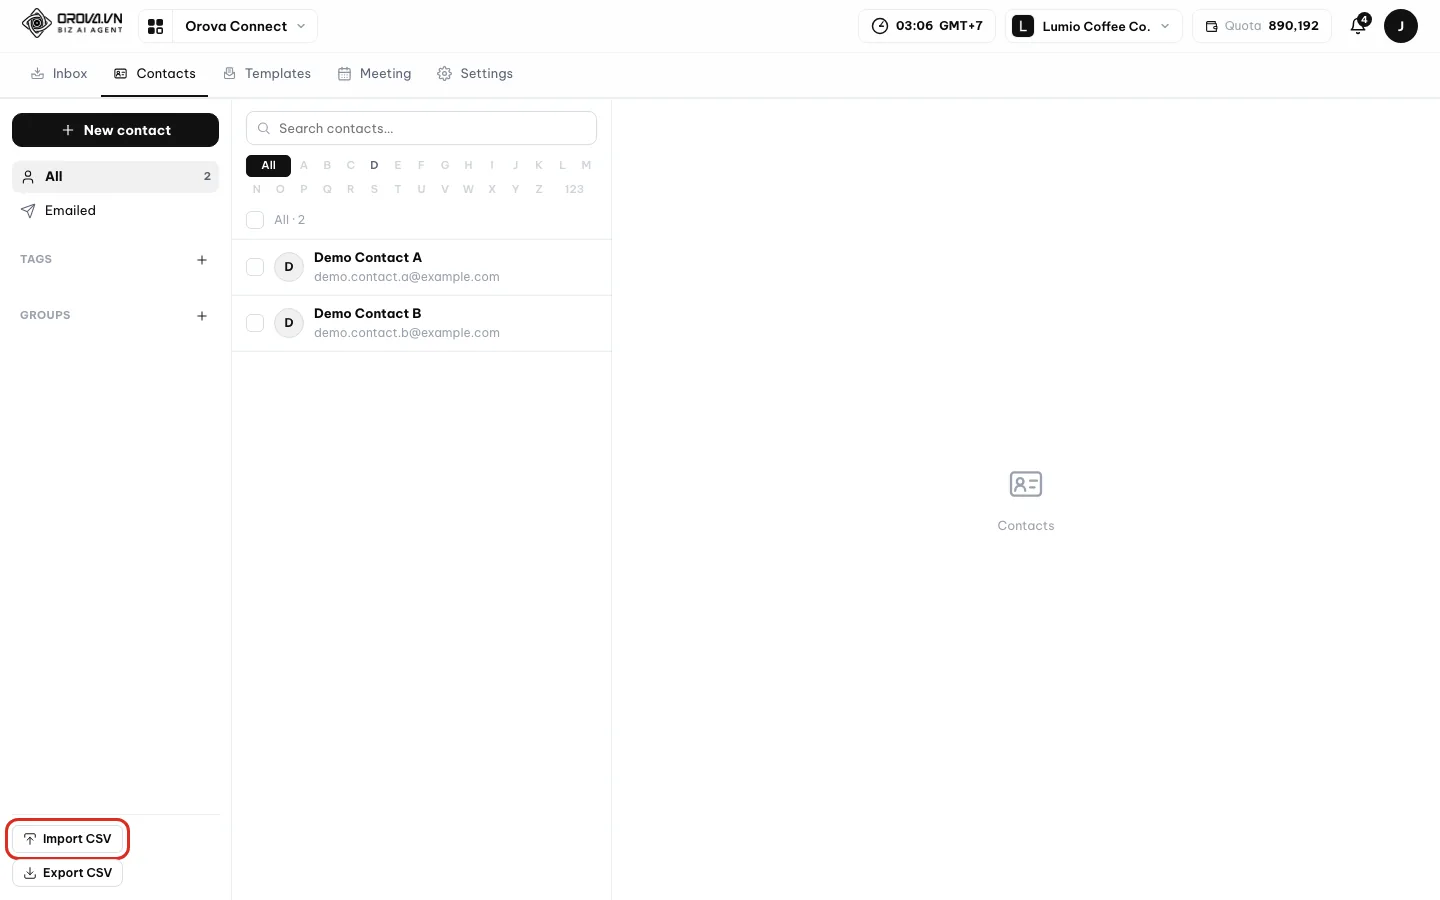
Import CSV رابطوں کے صفحے پر بائیں کالم کے نیچے ہے۔ - 2
حدیں چیک کریں. ہر امپورٹ میں زیادہ سے زیادہ 5,000 سطریں اور 2 MB۔ اگر بھرنے کے لیے تیار فائل چاہیے تو ڈائیلاگ میں
ٹیمپلیٹ ڈاؤن لوڈ کریںپر کلک کریں۔ - 3
امپورٹ کریں.
CSV امپورٹ کریںپر کلک کریں، پھرCSV فائل چنیں۔ پہلے سے موجود پتہ نقل ہونے کے بجائے اپ ڈیٹ ہوتا ہے، اور جو ٹیگ ابھی موجود نہیں وہ آپ کے لیے بن جاتے ہیں۔ مکمل ہونے پر Orova بتاتا ہے کہ کتنے رابطے امپورٹ ہوئے۔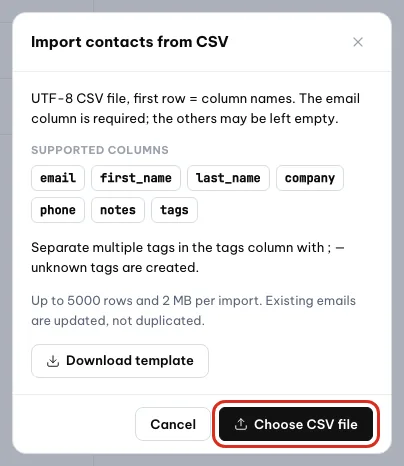
کالم اور حدیں چیک کریں، پھر CSV فائل چنیں پر کلک کریں۔
CSV ایکسپورٹ کریں پوری ایڈریس بک CSV فائل کی صورت ڈاؤن لوڈ کرتا ہے۔
Tip
رابطے آپ کا CRM نہیں
05 · کیلنڈر
میٹنگز شیڈول کریں اور دعوت نامے بھیجیں
میٹنگ کیلنڈر وہ جگہ ہے جہاں ہر میٹنگ شروع ہوتی ہے۔ آپ وقت اور لوگ طے کرتے ہیں، Orova روم بناتا ہے اور دعوت نامے ای میل کرتا ہے۔
آن لائن اور بالمشافہ
ہر میٹنگ کا ایک فارمیٹ ہوتا ہے۔ آن لائن میٹنگز ویب پر میٹنگ روم میں ہوتی ہیں — Orova Meet یا آپ کا چسپاں کیا گیا لنک۔ بالمشافہ میٹنگز اصل میز کے گرد ہوتی ہیں؛ ان کے لیے Orova روم کے بجائے بالمشافہ خلاصہ پیش کرتا ہے (حصہ 07 دیکھیں)۔
- منظر کو
دن،ہفتہاورمہینہکے درمیان بدلیں (ہفتہ پہلے سے طے ہے)۔آجموجودہ تاریخ پر واپس لے جاتا ہے۔ - وقت کی جالی پہلے سے 30 منٹ کے وقفوں میں چلتی ہے؛ آپ وقفہ بدل سکتے ہیں۔
میٹنگز تلاش کریں…سے عنوان، منتظم، روم یا ٹیگ کے حساب سے میٹنگز تلاش کریں، اورفلٹرزسے ٹیگ یا روم کے حساب سے کیلنڈر محدود کریں۔- میٹنگ کو نئی جگہ منتقل کرنے کے لیے کھینچیں۔ دہرائی جانے والی میٹنگ کے لیے اس کے بجائے ترمیمی فارم کھلتا ہے تاکہ آپ طے کریں کیا بدلنا ہے۔
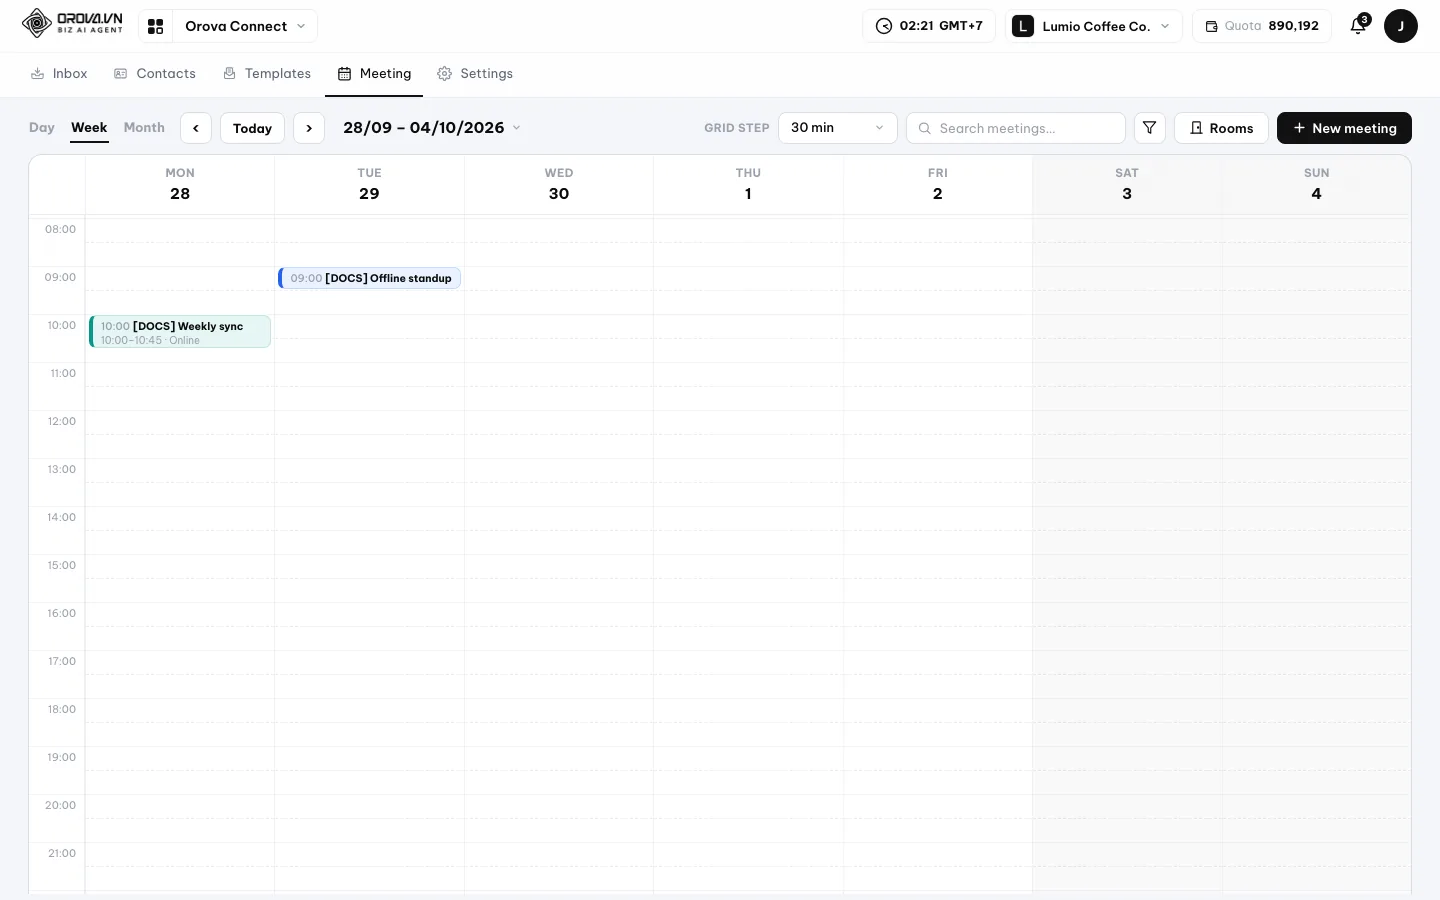
میٹنگ شیڈول کریں
- 1
فارم کھولیں. کیلنڈر میں کسی خالی خانے پر کلک کریں، یا
نئی میٹنگپر کلک کریں۔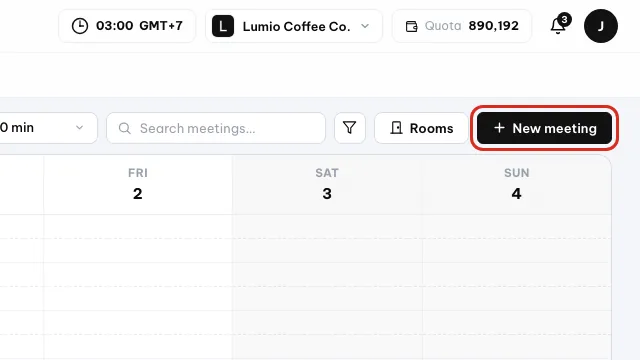
نئی میٹنگ پر، یا کیلنڈر کے کسی خالی خانے پر کلک کریں۔ - 2
بنیادی معلومات بھریں.
عنوانلکھیں،آن لائنیابالمشافہچنیں، پھرآغازاوراختتاممقرر کریں۔ اگر لوگوں کو پس منظر درکار ہو توتفصیلشامل کریں۔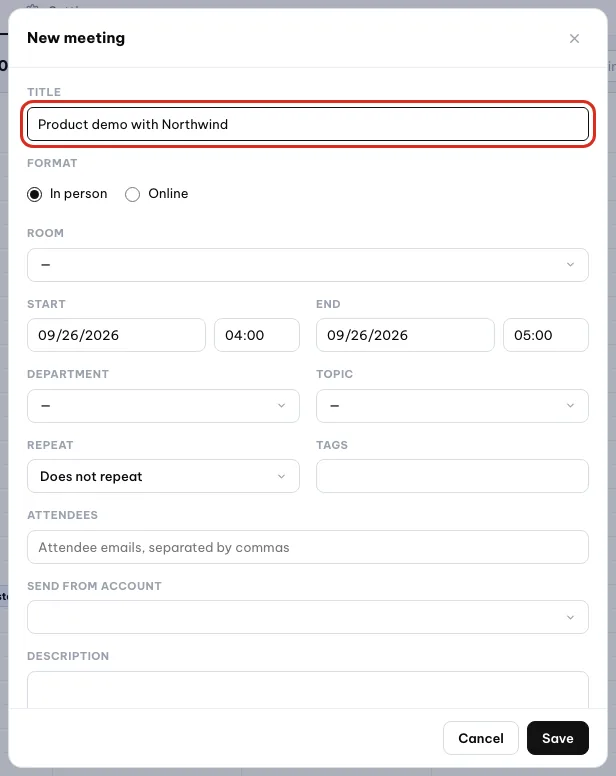
عنوان لکھیں اور بالمشافہ یا آن لائن چنیں۔ - 3
روم اور لنک (آن لائن).
میٹنگ لنکخالی چھوڑیں تو Orova آپ کے لیے Orova Meet روم بنا دیتا ہے۔ اگر آپ Zoom یا Google Meet پر ملتے ہیں تو اس کا لنک چسپاں کریں۔ پھرکون شامل ہو سکتا ہےچنیں (سیکشن 06 میں وضاحت)۔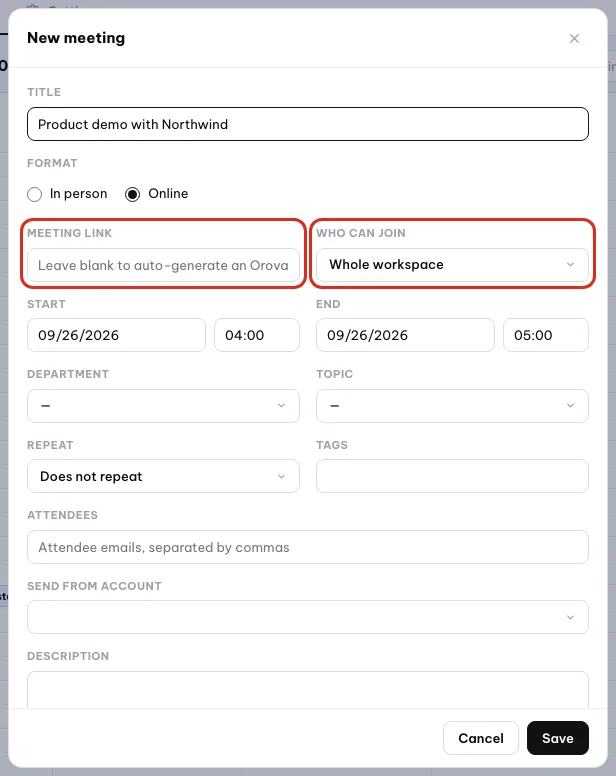
Orova Meet روم کے لیے لنک خالی چھوڑیں، پھر چنیں کہ کون شامل ہو سکتا ہے۔ - 4
درجہ بندی کریں. چاہیں تو ایک
روم، ایکشعبہ، ایکموضوعاور ایک یا زیادہٹیگزچنیں۔ ان سے کیلنڈر پڑھنا اور فلٹر کرنا آسان ہوتا ہے۔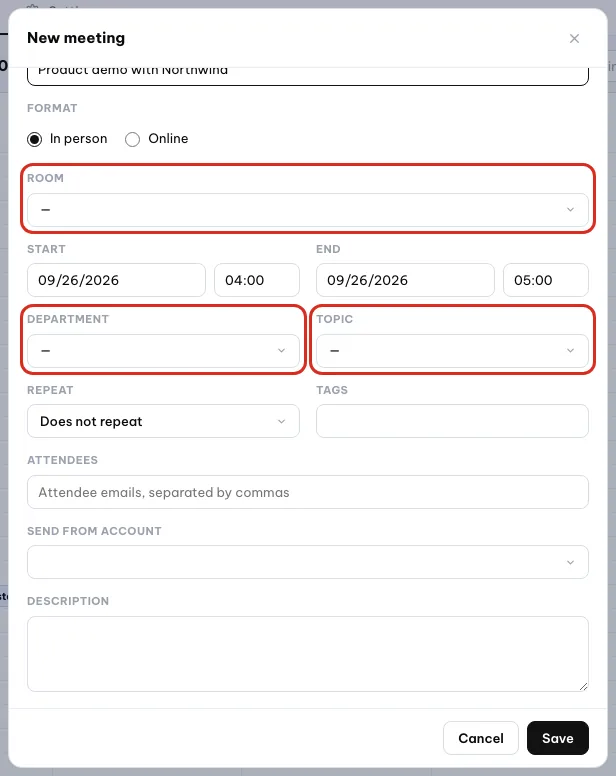
روم، شعبہ اور موضوع اختیاری لیبل ہیں۔ - 5
لوگوں کو مدعو کریں.
شرکاءکی ای میلز کوما سے الگ کر کے لکھیں، اوراس اکاؤنٹ سے بھیجیںمیں میل باکس چنیں۔ بھیجنے والے میل باکس کے بغیر کوئی دعوت نامہ نہیں جاتا۔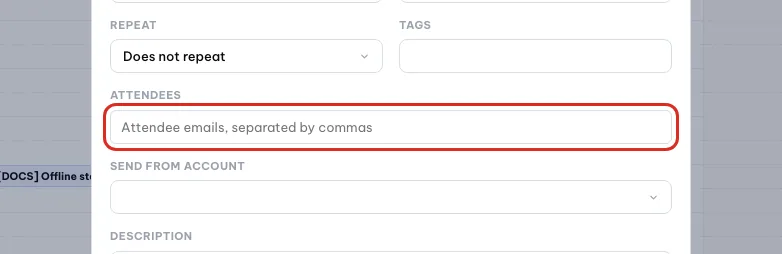
شرکاء کی ای میلز اور دعوت نامے بھیجنے والا میل باکس درج کریں۔ - 6
ضرورت ہو تو دہرائیں.
دہرائیںمیںروزانہ،ہفتہ واریاماہانہچنیں، پھراس تاریخ تک دہرائیںمقرر کریں یاکوئی آخری تاریخ نہیںچنیں۔ محفوظ کریں — آپ کومیٹنگ شیڈول ہو گئی اور دعوت نامے بھیج دیے گئے۔نظر آئے گا۔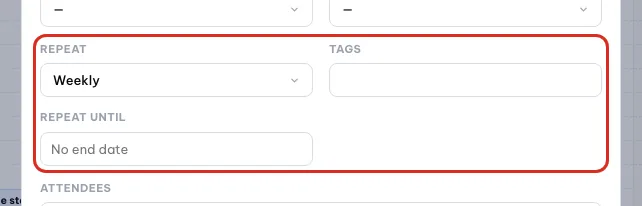
چنیں کہ کتنی بار اور کب تک دہرانا ہے۔
دعوت نامے اور جوابات
ہر مدعو شخص کو ایک ای میل ملتی ہے جس میں کیلنڈر فائل (.ics) اور دو بٹن، قبول کریں اور مسترد کریں، ہوتے ہیں۔ ان بٹنوں سے جواب دینے کے لیے Orova میں سائن ان ضروری ہے۔ جوابات میٹنگ پر قبول کر لیا، مسترد کر دیا یا زیر التوا کے طور پر دکھتے ہیں۔ میٹنگ منسوخ کریں پوچھتا ہے کہ کیا منسوخ کر کے شرکاء کو اطلاع دی جائے، پھر منسوخی کی ای میل بھیجتا ہے۔
روم، موضوعات اور ٹیگز
کیلنڈر پر روم پر کلک کریں تو تین ٹیبز والی ونڈو کھلتی ہے: روم، موضوع اور ٹیگز، ہر ایک کا نام اور رنگ ہوتا ہے۔ کسی فزیکل روم کے کھلنے کے اوقات ہو سکتے ہیں؛ Orova آپ کو اس وقت روم پہلے سے بُک ہے یا اس وقت روم بند ہے سے خبردار کرتا ہے۔ کیلنڈر پر ہر میٹنگ دو تہوں میں رنگی جاتی ہے: بائیں پٹی اس کے موضوع کے مطابق، پس منظر اس کے پہلے ٹیگ کے مطابق۔
Note
حدود
اختتام لازماً آغاز کے بعد ہو۔ کیلنڈر، روم اور دعوت نامے کوئی Quota نہیں لیتے۔06 · میٹنگ روم
Orova Meet روم اور میٹنگ کی میزبانی
Orova Meet، Orova کے اپنے سرورز پر چلتا ہے، Zoom یا Google کے ذریعے نہیں۔ کسی کو کچھ انسٹال نہیں کرنا: براؤزر میں لنک کھولیں اور آپ اندر ہیں۔ یہ سیکشن بتاتا ہے کہ کون شامل ہو سکتا ہے، روم میں آپ کیا کر سکتے ہیں، اور میزبان کے کنٹرولز۔
میزبان
روم چلانے والے لوگ: میٹنگ کا منتظم، ورک اسپیس کا مالک اور ایڈمنز، اور کوئی بھی شریک میزبان۔ میزبانوں کو روم کی ترتیبات اور ہر شریک پر کنٹرولز نظر آتے ہیں۔
کون شامل ہو سکتا ہے
| اختیار | کون داخل ہوتا ہے |
|---|---|
ورک اسپیس کے اراکین اور مدعوین (ڈیفالٹ) | ورک اسپیس کے اراکین کے علاوہ مدعو ای میلز۔ سب Orova میں سائن ان کرتے ہیں۔ |
صرف مدعوین | صرف منتظم اور مدعو ای میلز۔ کسی اور کو آپ دعوت کی فہرست میں نہیں ہیں نظر آتا ہے۔ |
لنک والا کوئی بھی (صرف نام) | مہمانوں کو Orova اکاؤنٹ کی ضرورت نہیں۔ وہ نام لکھ کر شامل ہو جاتے ہیں۔ |
پہلے رجسٹر کریں (نام، فون، ای میل) | مہمان شامل ہونے سے پہلے نام، فون اور ای میل بھرتے ہیں۔ Orova رجسٹریشنز کی فہرست محفوظ رکھتا ہے۔ |
اختیار بدلنے کے لیے میٹنگ میں ترمیم کریں؛ یہ اگلے شامل ہونے والے شخص سے لاگو ہوتا ہے۔ لنک میٹنگ کی تفصیلات یا لابی میں لنک کاپی کریں سے حاصل کریں۔ روم آغاز کے وقت سے 15 منٹ پہلے کھلتا ہے اور اس کے بعد 24 گھنٹے تک کھلا رہتا ہے۔ نام سے شامل ہونے والے مہمانوں پر اسپام سے بچاؤ کے لیے رفتار کی حد لگتی ہے۔
میٹنگ میں شامل ہوں
- 1
روم کھولیں. میٹنگ کی تفصیلات پر
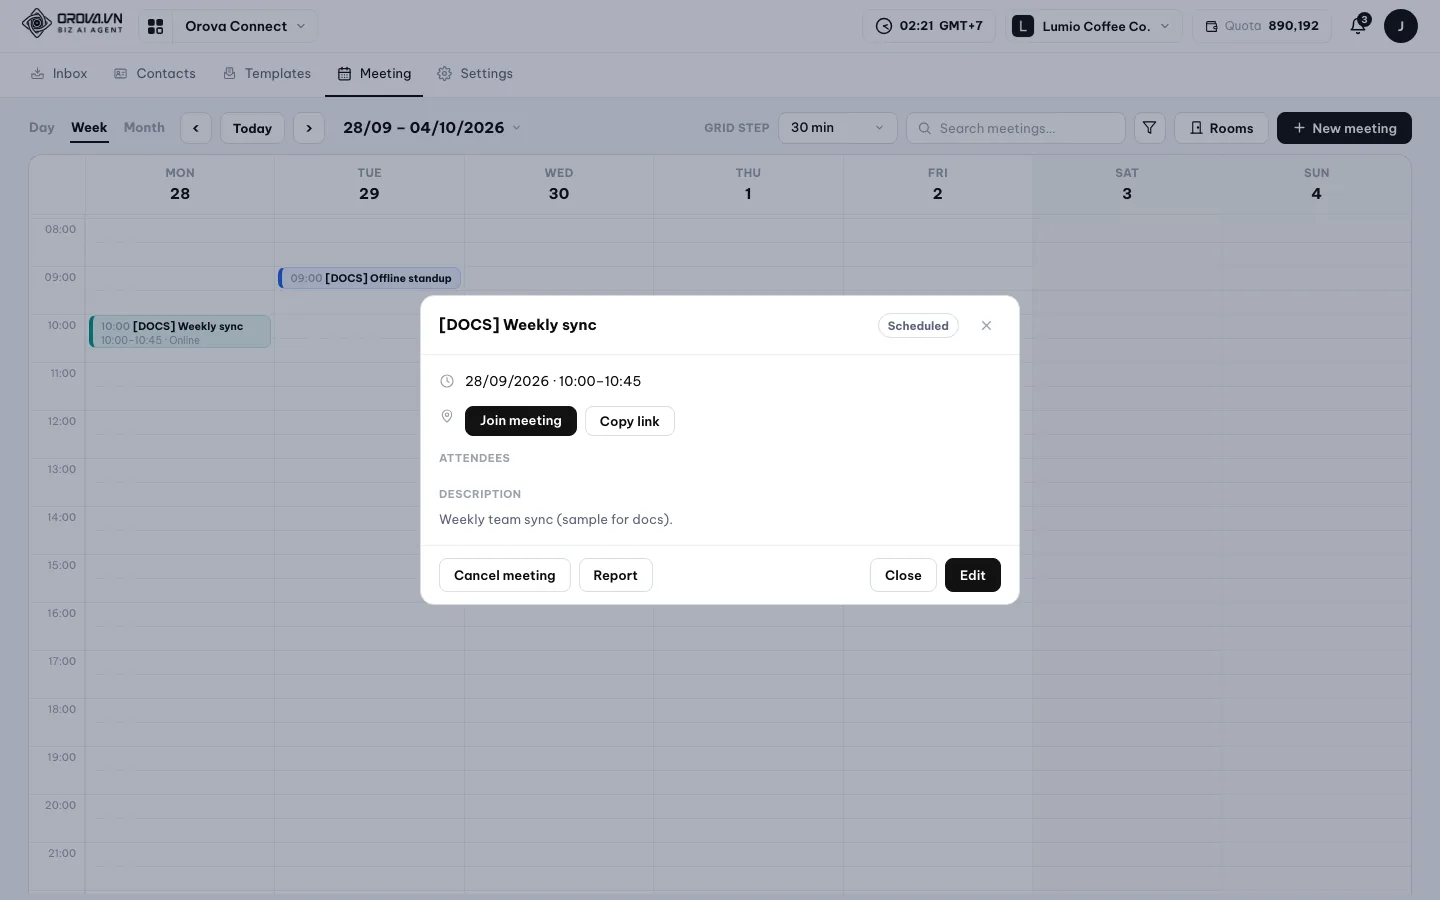
میٹنگ میں شامل ہوںپر کلک کریں (یہ نئی ٹیب میں کھلتا ہے)، یا روم کا لنک کھولیں۔ مہمانوں کوبطور مہمان شامل ہوںنظر آتا ہے اور وہآپ کا نامبھرتے ہیں (اگر رجسٹریشن لازمی ہو توفوناورای میلبھی)۔![[DOCS] Weekly sync کی میٹنگ تفصیلات، میٹنگ میں شامل ہوں پر دائرہ](/docs/orova-connect/en/s06-01-join-meeting.webp)
میٹنگ میں شامل ہوں روم کو نئی ٹیب میں کھولتا ہے۔ - 2
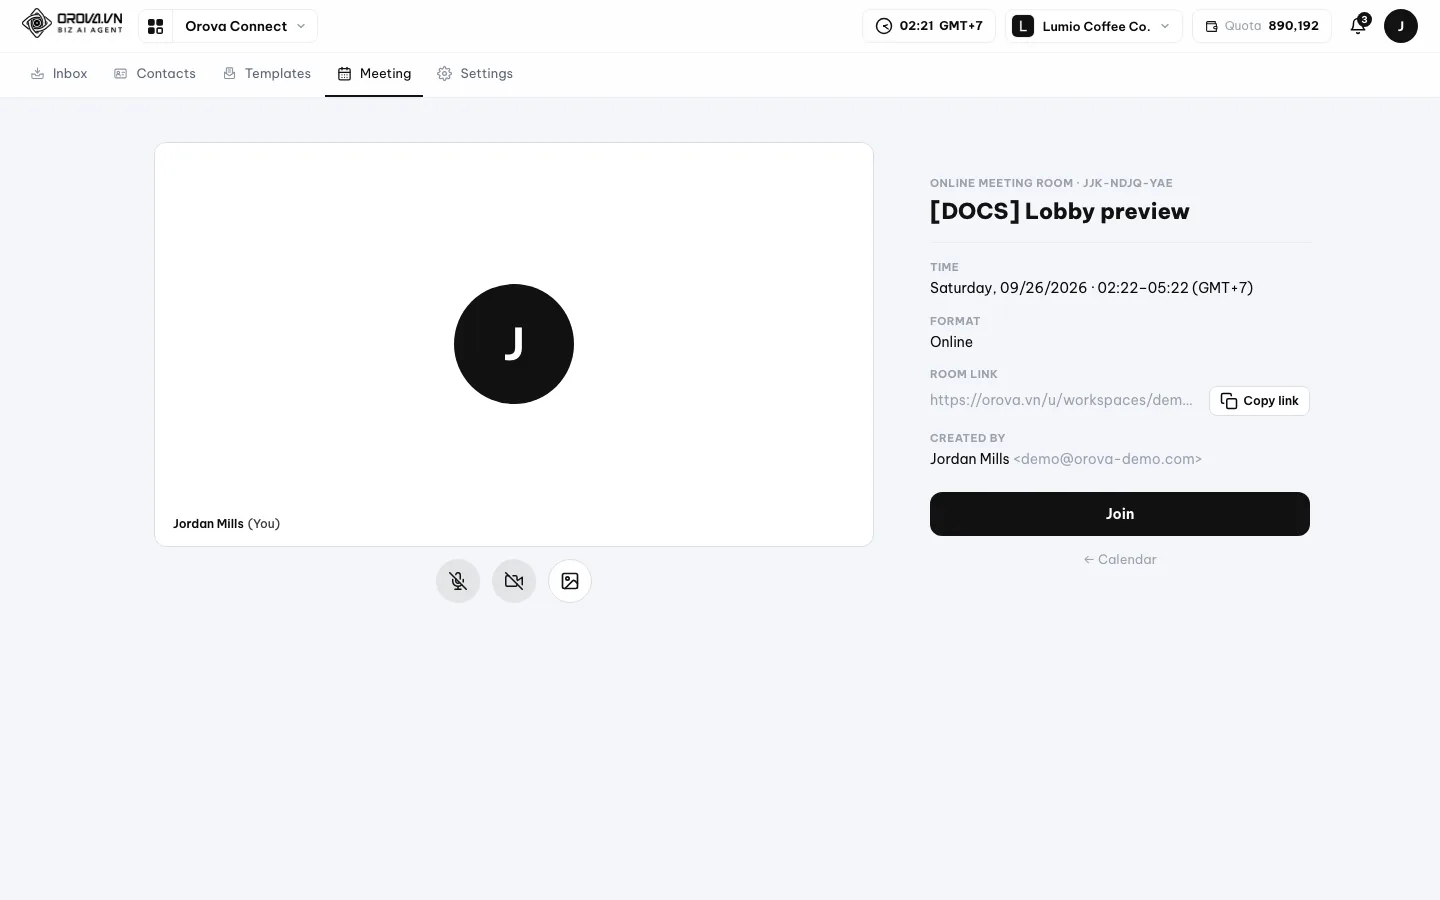
لابی میں تیاری کریں. مائیکروفون اور کیمرا ڈیفالٹ طور پر بند ہوتے ہیں۔ براؤزر اجازت تبھی مانگتا ہے جب آپ کوئی ایک آن کریں۔ اگر چاہیں تو یہیں
پس منظرچنیں۔ - 3
شامل ہوں.
شامل ہوںپر کلک کریں۔ اگر آپ جلدی آ گئے ہیں تو آپ کو نظر آئے گا کہ روم کب کھلے گا؛ اگر ابھی کوئی موجود نہیں تو آپ کودوسروں کے شامل ہونے کا انتظار…نظر آئے گا۔
روم میں
- معیار۔
خودکار1080p تک جاتا ہے اور جب آپ کا نیٹ ورک یا ڈیوائس مشکل میں ہو تو خود بخود 720p، 360p اور 180p پر آ جاتا ہے؛ آپمعیارمیں خود بھی چن سکتے ہیں۔ جب سرور پر گنجائش ہو تو ایک میٹنگ میں 50 لوگ تک آ سکتے ہیں۔ - ترتیب۔
خودکار،مقرر، 4، 9 یا 16 خانوں کا گرڈ، یاصرف اسکرین۔صرف اسکرینمیں شیئر کی گئی اسکرین پورا فریم بھرتی ہے اور لوگ ایک چھوٹے خانے میں ہوتے ہیں جسے آپ کہیں بھی گھسیٹ سکتے ہیں؛ ترتیبات کے بٹنوں کے ساتھ آنکھ والا بٹنلوگ چھپائیں/لوگ دکھائیںبدلتا ہے۔پوری اسکرینباقی سب کچھ چھپا دیتا ہے۔ - اسکرین شیئر۔ ایک ٹیب، ایک ونڈو یا اپنی پوری اسکرین چنیں۔ براؤزر کے ڈائیلاگ میں آڈیو شیئر کریں پر نشان لگائیں تاکہ سب آپ کے کمپیوٹر کی آواز بھی سنیں (صرف Chrome اور Edge)۔
شیئرنگ بند کریںاسے ختم کرتا ہے۔ میزبان طے کرتا ہے کہ کون شیئر کر سکتا ہے۔ - کیپشنز۔
CCبٹن لائیو کیپشنز کھولتا ہے — نیچے دیکھیں۔ - چیٹ۔ ایموجی کے ساتھ پیغامات اور 25 MB تک کی فائلیں۔
- ہاتھ اٹھائیں اور ردعمل سے آپ بولے بغیر اشارہ دے سکتے ہیں۔ کوئی شامل ہو تو سب کو بتایا جاتا ہے۔
- پس منظر۔
کوئی نہیں،دھندلا،زیادہ دھندلا، 10 تیار روم (شیشے کا دفتر، سادہ میٹنگ روم، گھر کا دفتر، اینٹوں والا لوفٹ، شہر کا نظارہ، لائبریری، سبز دفتر، ہوٹل لاؤنج، کوورکنگ اسپیس، Japandi روم)، یاتصویر اپ لوڈ کریں(8 MB سے کم)۔ اثر آپ کی اپنی ڈیوائس پر پروسیس ہوتا ہے، اور سست ڈیوائسز پر Orova اسے خود ہلکا کر دیتا ہے۔ - ریکارڈ۔ میٹنگ کو آپ کی ڈیوائس پر 2 فائلوں میں محفوظ کرتا ہے: ویڈیو اور الگ آڈیو۔ Orova اپنے سرورز پر کوئی کاپی نہیں رکھتا۔
لائیو کیپشنز، ہر سننے والے کے لیے ترجمہ شدہ
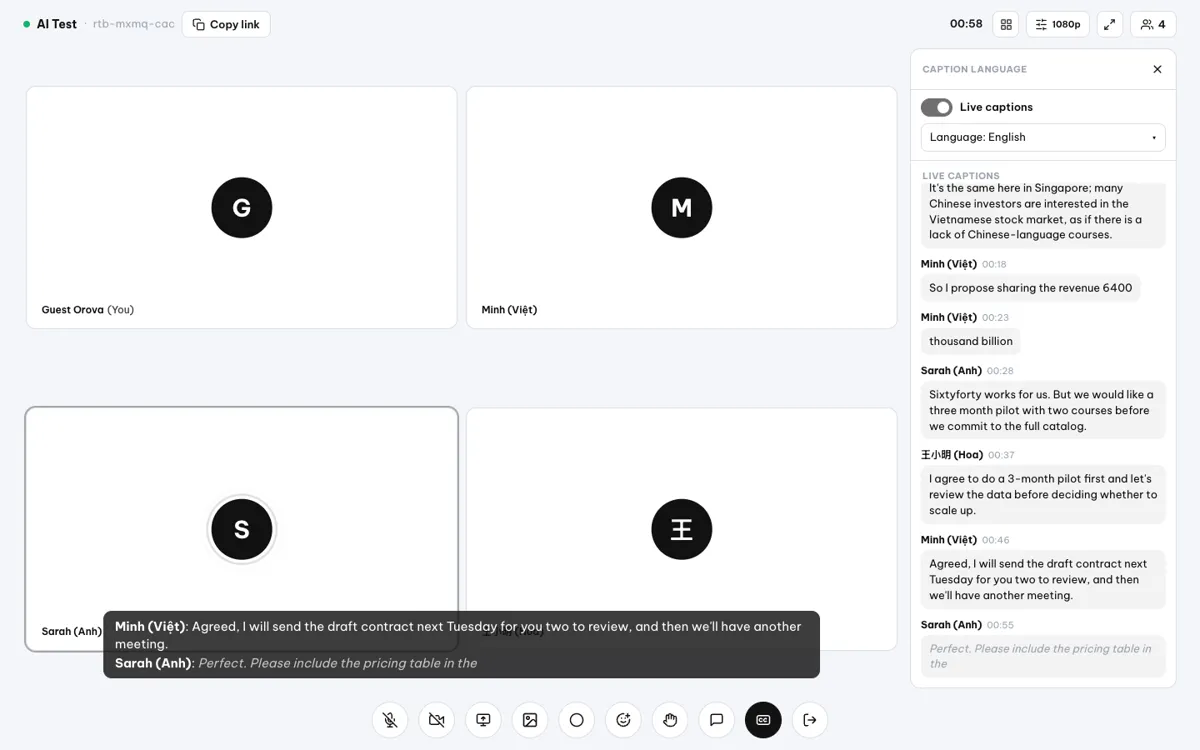
لائیو کیپشنز میٹنگ کے دوران ہر شخص کی بات کو متن میں بدلتے ہیں، پھر اسے اس زبان میں ترجمہ کرتے ہیں جو ہر پڑھنے والا چنے۔ Orova 30 سے زیادہ زبانوں میں گفتگو پہچانتا ہے، جن میں انگریزی، ویتنامی، چینی، جاپانی، فرانسیسی، ہسپانوی اور تھائی شامل ہیں۔ لاؤ اور خمیر ابھی گفتگو کے طور پر نہیں پہچانی جاتیں، لیکن آپ انہیں پڑھنے کے لیے پھر بھی چن سکتے ہیں۔ آپ کی بولنے کی زبان آپ کی اپنی Orova انٹرفیس زبان کے مطابق ہوتی ہے۔
لائیو کیپشنز استعمال کریں
- 1
کیپشنز آن کریں. بٹنوں کی نچلی قطار میں
CCپر کلک کریں۔ کیپشن کی زبان پینل کھلتا ہے؛ لائیو کیپشنز آن کریں۔ صرف میزبان انہیں آن کر سکتا ہے — باقی سب کوصرف میزبان کیپشنز آن کر سکتا ہےنظر آتا ہے۔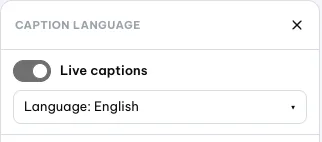
لائیو کیپشنز کا سوئچ اور پڑھنے کی زبان کا انتخاب - 2
اپنی پڑھنے کی زبان چنیں.
زبانکھولیں اور 50 زبانوں میں سے ایک چنیں، یا جو کہا گیا بالکل وہی پڑھنے کے لیےاصل (بغیر ترجمہ)۔ ہر شخص اپنی زبان خود چنتا ہے، اس لیے آپ انگریزی پڑھ سکتے ہیں جبکہ ساتھی ویتنامی پڑھے۔ - 3
کیپشنز کا تاریخچہ پڑھیں. پینل ہر مکمل سطر کو بولنے والے کے نام اور وقت کے ساتھ رکھتا ہے۔ یہ
چیٹسے الگ ہے۔ اپنی پڑھنے کی زبان بدلیں تو پورا تاریخچہ دوبارہ ترجمہ ہو جاتا ہے۔ پینل بند کریں تو کیپشنز اسکرین کے نیچے ایک پٹی کی صورت میں دکھتے ہیں، YouTube کی طرح۔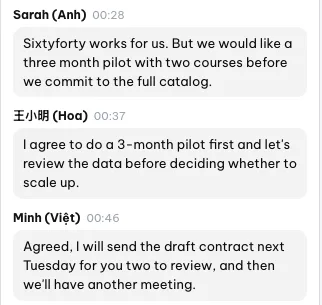
تاریخچہ پینل: انگریزی اور چینی سطریں آپ کی چنی ہوئی زبان میں ترجمہ شدہ - 4
کیپشنز بند کریں.
CCسے پینل دوبارہ کھولیں اور اسے بند کریں۔ صرف میزبان یا کیپشنز آن کرنے والا شخص انہیں بند کر سکتا ہے۔
Note
کیپشنز کا خرچ فی منٹ ہے
Quota ختم، کیپشنز رک گئے کے ساتھ خود رک جاتے ہیں؛ جو پہلے استعمال ہو چکا اس کا خرچ پھر بھی لگتا ہے۔میزبان کے کنٹرولز
روم کی ترتیبات:کون چیٹ کر سکتا ہے،کون آواز کھول سکتا ہے،کون کیمرا آن کر سکتا ہےاورکون اسکرین شیئر کر سکتا ہےکوسبیاصرف میزبانپر رکھیں۔ یہ فوراً لاگو ہوتا ہے؛ کسی کو دوبارہ شامل نہیں ہونا پڑتا۔شریک میزبان (ای میل): ای میل لکھیں یا شرکاء میں سے کسی کو چنیں، 20 شریک میزبان تک۔ نام سے شامل ہونے والے مہمان شریک میزبان نہیں بن سکتے۔- ہر شریک پر:
خاموش کریں،ویڈیو بند کریں،مائیک کی اجازت دیں،کیمرا کی اجازت دیں،چیٹ لاک کریں/چیٹ ان لاک کریں،شریک میزبان بنائیں/شریک میزبان ہٹائیں، اور روم سےہٹائیں۔ اٹھے ہوئے ہاتھکی پٹی صرف میزبانوں کو دکھتی ہے اور اس میںسب ہاتھ نیچے کریںبٹن ہے۔- AI خلاصہ صرف میزبان شروع کر سکتا ہے (سیکشن 07)۔ میٹنگز کوئی Quota نہیں لیتیں، چاہے کتنے ہی لوگ یا منٹ ہوں؛ صرف لائیو کیپشنز، جب آن ہوں، کا خرچ لگتا ہے۔
Warning
میٹنگ ختم کرنا
میٹنگ ختم کریں سب کے لیے روم بند کر دیتا ہے اور لنک کام کرنا چھوڑ دیتا ہے۔ اسے صرف منتظم یا ورک اسپیس کا مالک/ایڈمن دبا سکتا ہے — شریک میزبان نہیں۔ دہرائی جانے والی میٹنگ کے لیے لنک اگلی میٹنگ کے لیے، اس کے آغاز سے 15 منٹ پہلے، دوبارہ کھل جاتا ہے۔Note
متبادل موڈ
سرور مصروف، 8 لوگوں تک متبادل موڈ)۔ متبادل موڈ میں میزبان لوگوں کو ہٹا تو سکتے ہیں، لیکن دور سے مائیکروفون یا کیمرا بند نہیں کر سکتے۔07 · AI خلاصہ اور رپورٹ
AI خلاصہ، بالمشافہ خلاصہ اور میٹنگ رپورٹ
یہ "نوٹس لیے بغیر میٹنگز" والا حصہ ہے۔ AI سنتا ہے، ٹرانسکرپٹ لکھتا ہے اور اسے چار حصوں کے خلاصے میں بدلتا ہے — آن لائن میٹنگز، میز کے گرد میٹنگز، اور آپ کے پاس پہلے سے موجود ریکارڈنگز کے لیے۔
ٹرانسکرپٹ اور خلاصہ
ٹرانسکرپٹ وہ ہے جو کہا گیا، باری باری، اسی زبان میں جو ہر شخص نے بولی؛ ٹرانسکرپٹ خود ترجمہ نہیں ہوتا۔ میٹنگ کے دوران گفتگو اپنی زبان میں پڑھنے کے لیے لائیو کیپشنز آن کریں، جو ہر سننے والے کے لیے ترجمہ کرتے ہیں۔ خلاصے کے چار حصے ہیں: اہم نکات، فیصلے، کرنے کے کام (ذمہ دار – کام – آخری تاریخ) اور کھلے سوالات۔ یہ اس شخص کی انٹرفیس زبان میں لکھا جاتا ہے جس نے خلاصہ شروع کیا یا خلاصہ بنائیں دبایا، کئی زبانوں میں سے کسی میں بھی۔
آن لائن میٹنگ میں AI خلاصہ
- 1
شروع کریں (صرف میزبان). روم کے کنٹرولز میں
AI خلاصہپر کلک کریں۔ روم میں سب کو بتایا جاتا ہے کہ خلاصے کے لیے میٹنگ ریکارڈ ہو رہی ہے۔ ہر میٹنگ صرف ایک ڈیوائس ریکارڈ کرتی ہے؛ دوسری کوکوئی اور ڈیوائس پہلے سے یہ میٹنگ ریکارڈ کر رہی ہےنظر آتا ہے۔ - 2
بات جاری رکھیں. آپ کا براؤزر روم کی آڈیو ملا کر 15 سیکنڈ کے ٹکڑوں میں سرور کو بھیجتا ہے، ساتھ یہ بھی کہ کب کون بول رہا تھا۔ اگر آپ کا اپنا مائیک بند ہو تو Orova یاد دلاتا ہے کہ اسے آن کریں تاکہ آپ کی آواز بھی ریکارڈ ہو۔
- 3
روک دیں.
AI خلاصہ روکیںپر کلک کریں۔ آپ کوریکارڈنگ بھیج دی گئی، AI خلاصہ بنا رہا ہے — میٹنگ رپورٹ دیکھیںنظر آتا ہے۔ AI ہر بولنے والے کے اصل نام کے ساتھ ٹرانسکرپٹ بناتا ہے، ایک ہی شخص کی مسلسل باریوں کو ملاتا ہے، پھر خلاصہ لکھتا ہے۔ - 4
نتیجہ پڑھیں. میٹنگ رپورٹ کھولیں۔ AI پس منظر میں کام کرتا ہے، اس لیے آپ صفحہ چھوڑ کر واپس آ سکتے ہیں۔ AI خلاصہ آپ کی ڈیوائس پر
ریکارڈکے ساتھ بخوبی چلتا ہے۔
Tip
کیپشنز آن ہیں؟ خلاصہ پہلے سے تیار ہے
ختم کریں پر کلک کریں اور خلاصہ کیپشنز سے بن جاتا ہے — آڈیو یا ویڈیو ریکارڈنگ کی ضرورت نہیں۔ میٹنگ رپورٹ میں ٹرانسکرپٹ لائیو کیپشنز سے لیا گیا دکھتا ہے۔بالمشافہ میٹنگ کا خلاصہ
- 1
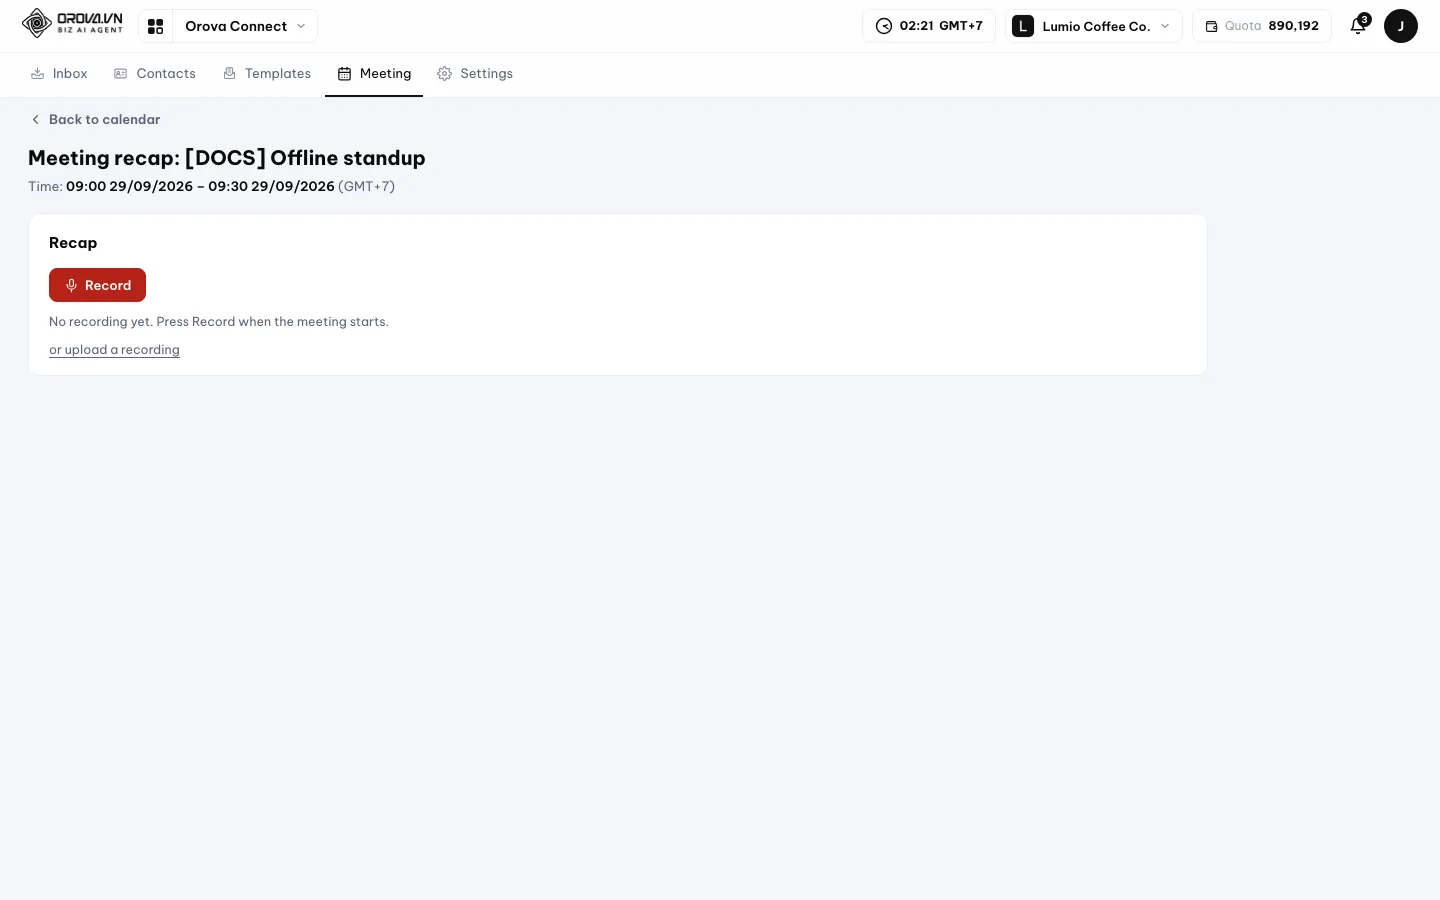
خلاصے کا صفحہ کھولیں. کیلنڈر پر بالمشافہ میٹنگ کھولیں؛ یہ آپ کو
میٹنگ کا خلاصہپر لے جاتی ہے۔ - 2
ریکارڈ کریں. میز کے بیچ میں لیپ ٹاپ یا فون رکھیں اور
ریکارڈپر کلک کریں۔ صفحہ اسی ڈیوائس کا مائیکروفون استعمال کرتا ہے اور 15 سیکنڈ کے ٹکڑوں میں اپ لوڈ کرتا ہے، اس لیے ٹیب کھلی رکھیں۔ اگر براؤزر نے مائیکروفون کی اجازت نہیں دی تو صفحہمائیکروفون تک رسائی مسترد کر دی گئیبتاتا ہے۔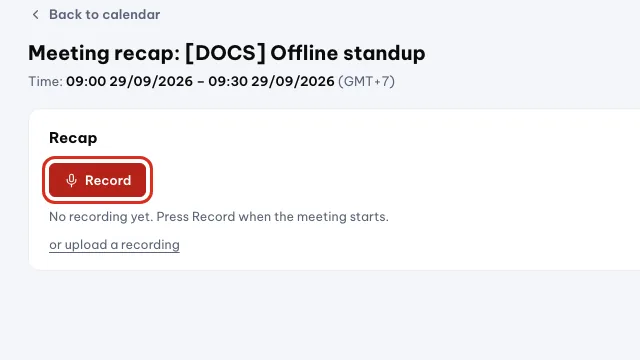
ڈیوائس میز کے بیچ رکھیں اور ریکارڈ پر کلک کریں۔ - 3
روکیں اور خلاصہ بنائیں.
روکیں اور خلاصہ بنائیںپر کلک کریں۔ AI آوازوں کو مقرر 1، مقرر 2 وغیرہ میں الگ کرتا ہے، بولنے والوں اور ہر ایک کے بولنے کا وقت گنتا ہے، پھر وہی چار حصوں کا خلاصہ لکھتا ہے۔ - 4
یا پہلے سے موجود فائل استعمال کریں. موجودہ آڈیو یا ویڈیو فائل بھیجنے کے لیے
یا ریکارڈنگ اپ لوڈ کریںچنیں۔ریکارڈنگ رد کریںریکارڈنگ حذف کر دیتا ہے۔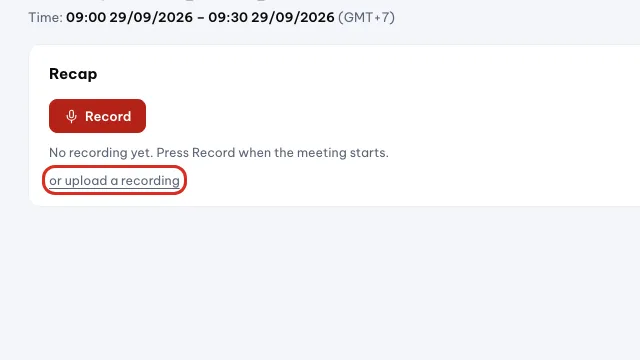
فائل پہلے سے ہے؟ ریکارڈ کرنے کی بجائے اسے اپ لوڈ کریں۔
Note
بالمشافہ خلاصوں میں مقرر 1، 2… کیوں دکھتا ہے
میٹنگ رپورٹ (آن لائن میٹنگز)
اسے میٹنگ کی تفصیلات سے یا روم میں رپورٹ سے کھولیں۔ بالمشافہ میٹنگز اس کی بجائے خلاصے کے صفحے پر جاتی ہیں۔ صفحے پر دو کارڈ ہیں: حاضری اور AI خلاصہ۔
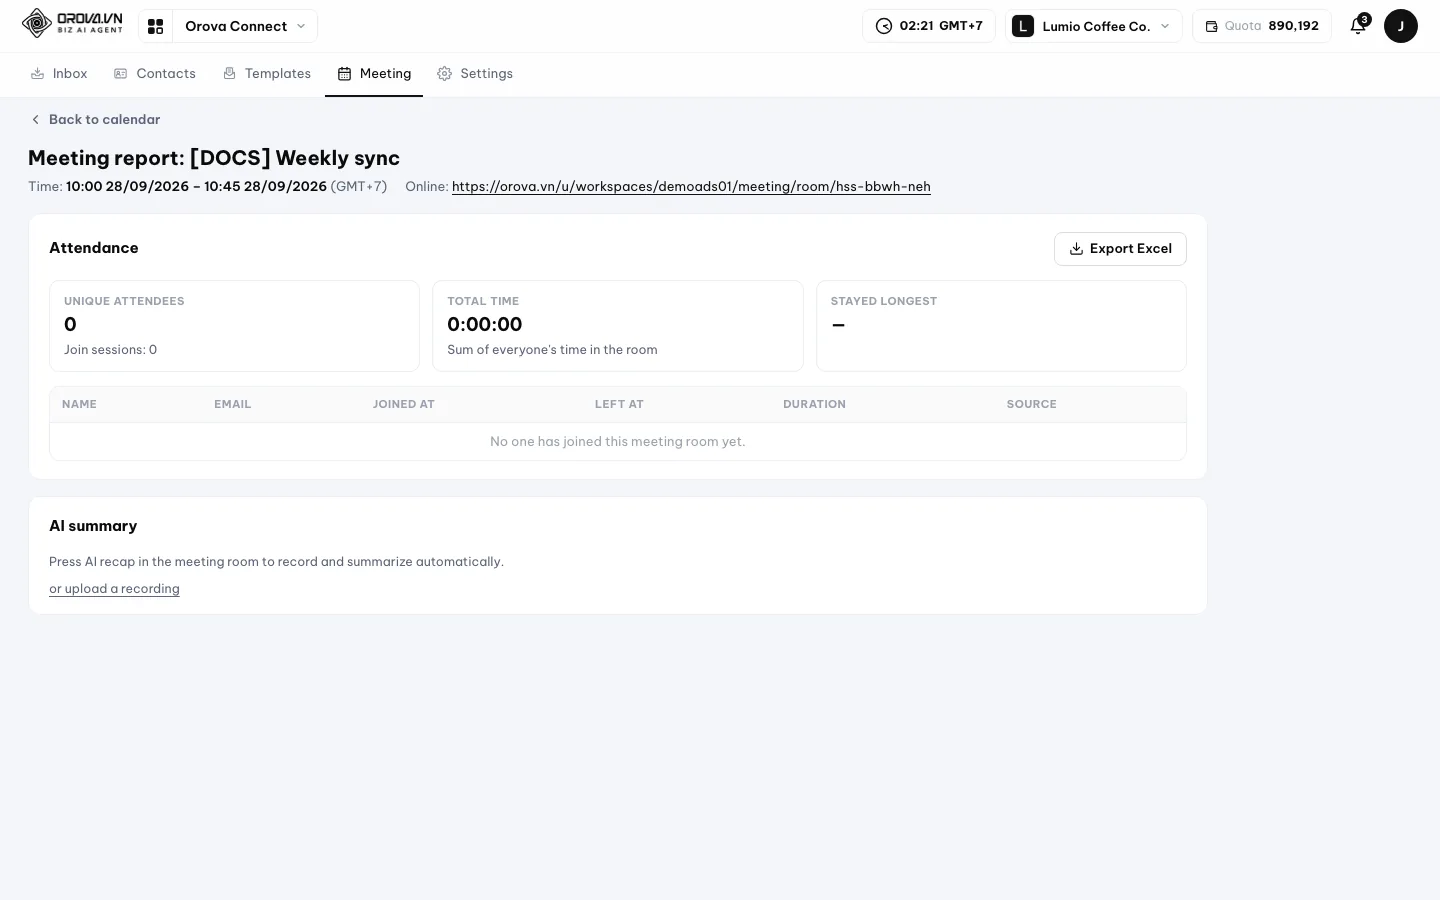
- حاضری میں درج ہوتا ہے کہ کون شامل ہوا،
شمولیت کا وقت،روانگی کا وقت،دورانیہاورسیشنزکی تعداد۔ مجموعے میںمنفرد شرکاء(دو ڈیوائسز پر ایک شخص دو بار نہیں گنا جاتا)،شمولیت کے سیشنز،کل وقتاورسب سے دیر تک رہادکھتے ہیں۔ جس سیشن کا روانگی کا وقت ریکارڈ نہ ہو اسے روم بند ہونے تک گنا جاتا ہے اوراندازاًکا نشان لگتا ہے۔ رجسٹر ہونے والے مہمان اپنی ای میل اور فون کے ساتھ دکھتے ہیں۔ Excel ایکسپورٹ کریں2 شیٹس والی فائل ڈاؤن لوڈ کرتا ہے: ہر سیشن کی ایک قطار، اور ہر شخص کا خلاصہ۔- AI خلاصہ AI خلاصے سے آتا ہے، یا آپ کی اپ لوڈ کردہ فائل سے:
فائل چنیں(webm، mp4، m4a یا mp3، 500 MB تک)، پھرAI سے خلاصہ بنائیں۔ ٹرانسکرپٹ میں بولنے والوں کی تعداد اور ہر ایک کے بولنے کا وقت دکھتا ہے۔ .md ڈاؤن لوڈ کریںخلاصے کو ٹیکسٹ فائل کے طور پر محفوظ کرتا ہے۔دوبارہ خلاصہ بنائیںاسے محفوظ ریکارڈنگ سے دوبارہ چلاتا ہے — مثلاً انٹرفیس زبان بدلنے کے بعد دوسری زبان میں خلاصہ لینے کے لیے۔شرکاء کو بھیجیںخلاصہ مدعوین اور منتظم کو، میٹنگ کےاس اکاؤنٹ سے بھیجیںسے، ای میل کرتا ہے۔ اگر میٹنگ میں بھیجنے والا میل باکس نہیں تو پہلے میٹنگ میں ترمیم کر کے ایک چنیں۔
خلاصوں کے لیے Quota
- ٹرانسکرپشن کا خرچ آڈیو کی لمبائی کے حساب سے، اور خلاصے کا متن کی مقدار کے حساب سے لگتا ہے۔ والیٹ میں یہ
میٹنگ — AI میٹنگ خلاصہکے طور پر دکھتا ہے۔ - Orova چلانے سے پہلے ریکارڈنگ کی لمبائی سے لاگت کا اندازہ لگاتا ہے۔ اگر والیٹ میں کمی ہو تو ریکارڈنگ محفوظ رہتی ہے: ری چارج کریں، پھر
دوبارہ خلاصہ بنائیںپر کلک کریں۔ - ہر
دوبارہ خلاصہ بنائیںنیا خرچ ہے۔ - خاموش ریکارڈنگ، یا صرف شور والی ریکارڈنگ پر
ریکارڈنگ میں کوئی گفتگو نہیں ملیدکھتا ہے — AI نہیں بلایا جاتا اور کوئی خرچ نہیں لگتا۔ - ایک ریکارڈنگ 600 MB تک ہو سکتی ہے۔
- حاضری، Excel ایکسپورٹ اور خلاصہ ای میل کرنا کوئی Quota نہیں لیتے۔
08 · FAQ
اکثر پوچھے جانے والے سوالات اور عام غلطیاں
لوگوں کے سب سے زیادہ پوچھے جانے والے سوالات، پھر سب سے عام غلطیاں اور ہر ایک کا حل۔
میں AI خلاصہ کیسے آن کروں؟
Orova Meet پر آن لائن میٹنگ میں میزبان روم کے کنٹرولز میں AI خلاصہ پر اور آخر میں AI خلاصہ روکیں پر کلک کرتا ہے۔ ٹرانسکرپٹ اور چار حصوں کا خلاصہ میٹنگ رپورٹ میں آ جاتے ہیں۔ اسے صرف میزبان شروع کر سکتے ہیں۔
میں Gmail کیسے جوڑوں؟
اپنے Google Account میں 2-Step Verification آن کریں اور 16 حروف کا ایپ پاس ورڈ بنائیں۔ Orova میں ترتیبات › میل باکسز پر جائیں، میل باکس شامل کریں، پھر Gmail جوڑیں پر کلک کریں، ایپ پاس ورڈ چسپاں کریں اور محفوظ کریں پر کلک کریں۔ Google اکاؤنٹ سے سائن ان دستیاب نہیں۔
میں روم کیسے بُک کروں اور لوگوں کو ای میل سے کیسے مدعو کروں؟
کیلنڈر پر نئی میٹنگ پر کلک کریں، ایک روم چنیں، شرکاء کی ای میلز کوما سے الگ کر کے لکھیں اور اس اکاؤنٹ سے بھیجیں چنیں۔ آن لائن میٹنگ کے لیے میٹنگ لنک خالی چھوڑیں اور Orova ایک Orova Meet روم بنا دیتا ہے۔ مدعوین کو .ics فائل اور قبول کریں / مسترد کریں بٹنوں کے ساتھ ای میل ملتی ہے۔
میں کیسے دیکھوں کہ کون حاضر ہوا؟
آن لائن میٹنگ کی میٹنگ رپورٹ کھولیں۔ حاضری کارڈ ہر شخص کو شمولیت کے وقت، روانگی کے وقت، دورانیے اور سیشنز کے ساتھ دکھاتا ہے۔ Excel ایکسپورٹ کریں اسے 2 شیٹس والی فائل کے طور پر ڈاؤن لوڈ کرتا ہے۔
میں بالمشافہ ہونے والی میٹنگ کو کیسے ریکارڈ کروں اور اس کا خلاصہ بناؤں؟
میٹنگ کا خلاصہ تک پہنچنے کے لیے کیلنڈر پر بالمشافہ میٹنگ کھولیں، میز کے بیچ لیپ ٹاپ یا فون رکھیں اور ریکارڈ پر کلک کریں۔ ختم ہونے پر روکیں اور خلاصہ بنائیں پر کلک کریں۔ آپ پہلے سے موجود ریکارڈنگ بھی اپ لوڈ کر سکتے ہیں۔
میں دستخط کیسے بناؤں اور ٹیمپلیٹس سے جلدی جواب کیسے دوں؟
ترتیبات › دستخط میں ہر میل باکس کے دستخط شامل کریں اور نئی میل اور جوابات کے لیے ڈیفالٹ چنیں۔ فوری جوابات کے لیے کسی ای میل کو ٹیمپلیٹ کے طور پر محفوظ کریں سے محفوظ کریں، پھر جواب دیتے وقت ٹیمپلیٹ داخل کریں استعمال کریں۔
میں میٹنگ میں اپنا پس منظر کیسے بدلوں؟
لابی میں یا روم میں پس منظر کھولیں۔ دھندلا، زیادہ دھندلا، 10 تیار روم میں سے ایک، یا تصویر اپ لوڈ کریں (8 MB سے کم) چنیں۔
کیا میٹنگ میں کیپشنز کا ترجمہ ہو سکتا ہے؟
جی ہاں۔ میزبان CC پر کلک کر کے لائیو کیپشنز آن کرتا ہے، پھر ہر شخص زبان کھول کر 50 زبانوں میں سے کسی میں بھی پڑھتا ہے۔ کیپشنز کا خرچ گفتگو کے منٹوں اور ترجمے کے حساب سے لگتا ہے۔ سیکشن 06 دیکھیں۔
کیا ای میل کا ترجمہ Quota لیتا ہے؟
جی ہاں، ہر ترجمے کا خرچ اصل میں استعمال ہونے والے AI کے حساب سے لگتا ہے۔ ایک ہی ای میل کا اسی زبان میں 7 دن کے اندر دوبارہ ترجمہ مفت ہے۔ اصل متن پر واپس جانے کے لیے اصل دکھائیں پر کلک کریں۔ سیکشن 02 دیکھیں۔
میرے میٹنگ روم میں کون شامل ہو سکتا ہے؟
یہ میٹنگ کے کون شامل ہو سکتا ہے پر منحصر ہے: ورک اسپیس کے اراکین اور مدعوین (ڈیفالٹ)، صرف مدعوین، لنک والا کوئی بھی (صرف نام) یا پہلے رجسٹر کریں (نام، فون، ای میل)۔ اسے بدلنے کے لیے میٹنگ میں ترمیم کریں۔
Gmail کہتا ہے کہ میری ای میل یا پاس ورڈ غلط ہے۔
غالباً آپ اپنا عام Google پاس ورڈ استعمال کر رہے ہیں۔ Gmail کو 16 حروف کا ایپ پاس ورڈ چاہیے، جو 2-Step Verification آن ہونے کے بعد بنتا ہے۔ اگر پیغام اس میل باکس کے لیے IMAP آن نہیں کہے تو اپنے میل فراہم کنندہ کی ترتیبات میں IMAP فعال کریں، پھر دوبارہ محفوظ کریں پر کلک کریں۔
نئی میل نہیں آ رہی۔
ان باکس میں سنک پر کلک کریں۔ اگر پھر بھی نہ آئے تو ترتیبات › میل باکسز کھولیں اور دوبارہ جانچیں پر کلک کریں۔ کنکشن کی خرابی کا عموماً مطلب ہے کہ پاس ورڈ بدل دیا گیا یا منسوخ ہو گیا — میل باکس میں ترمیم کریں اور نیا ایپ پاس ورڈ درج کریں۔
میرا میل باکس کہتا ہے کہ وہ بھر گیا ہے۔
ہر میل باکس میں 2 GB تک جگہ ہے۔ بھر جانے پر Orova نئی میل کا متن تو ڈاؤن لوڈ کرتا ہے لیکن اٹیچمنٹس چھوڑ دیتا ہے۔ جگہ بنانے کے لیے بڑی اٹیچمنٹس والی پرانی میل حذف کریں۔
AI کہتا ہے کہ میرا Quota ختم ہو گیا ہے۔
ورک اسپیس کے والیٹ میں اس کام کے لیے کافی رقم نہیں۔ والیٹ صفحے پر ری چارج کریں۔ AI ری رائٹ کے لیے اسے دوبارہ چلائیں؛ میٹنگ خلاصے کے لیے ریکارڈنگ محفوظ رہتی ہے، اس لیے بس دوبارہ خلاصہ بنائیں پر کلک کریں۔ روکی گئی کوشش کا کوئی خرچ نہیں لگا۔
میں میٹنگ روم میں داخل نہیں ہو پا رہا۔
پہلے وقت دیکھیں: روم آغاز سے 15 منٹ پہلے کھلتا ہے اور اس کے 24 گھنٹے بعد بند ہوتا ہے۔ آپ دعوت کی فہرست میں نہیں ہیں کا مطلب ہے کہ میٹنگ صرف مدعوین پر ہے — منتظم سے اپنی ای میل شامل کرنے کو کہیں۔ شامل ہونے کے لیے Orova میں سائن ان کریں کا مطلب ہے کہ روم مہمانوں کے لیے کھلا نہیں۔
کوئی میری آواز نہیں سن رہا۔
یقینی بنائیں کہ روم میں آپ کا مائیک آن ہے، اور براؤزر کو مائیکروفون استعمال کرنے کی اجازت ہے — ایڈریس بار کے ساتھ سائٹ کی اجازتیں دیکھیں۔ ہو سکتا ہے میزبان نے کون آواز کھول سکتا ہے کو صرف میزبان پر رکھا ہو۔
خلاصہ کہتا ہے کہ کوئی گفتگو نہیں ملی۔
ریکارڈنگ میں صرف خاموشی یا شور تھا، اس لیے AI نہیں بلایا گیا اور کوئی Quota استعمال نہیں ہوا۔ بالمشافہ خلاصے کے لیے ڈیوائس بولنے والوں کے قریب رکھیں؛ آن لائن میٹنگ میں دیکھیں کہ مائیکروفون آن تھے۔
میں کسی مہمان کو شریک میزبان نہیں بنا پا رہا۔
صرف نام سے شامل ہونے والے مہمانوں کا Orova اکاؤنٹ نہیں ہوتا، اس لیے وہ شریک میزبان نہیں بن سکتے۔ شریک میزبان لازماً سائن ان شدہ Orova صارفین ہوں۔
شریک میزبان میٹنگ ختم نہیں کر سکتا۔
یہ جان بوجھ کر ایسا ہے۔ میٹنگ ختم کریں منتظم اور ورک اسپیس کے مالکان/ایڈمنز کے لیے مخصوص ہے۔ شریک میزبان شرکاء کو سنبھال سکتے ہیں لیکن سب کے لیے روم بند نہیں کر سکتے۔
Tip
پہلے ایک مختصر میٹنگ سے آزمائیں
09 · Email campaigns
What an email campaign is and what you need first
Five terms you will meet throughout this chapter, the permissions you need, and what uses quota.
Campaign
One email sent to a whole list of people at once. It comes with sending rules (when, how fast) and its own report page. For example: an “October coffee offer” email sent to all your regulars.
Sending mailbox
A mailbox you have connected to Orova Connect. Campaign emails go out from it. You can pick several mailboxes at once; the emails are then shared out between them in turn.
Recipient
Each person on the sending list. Every recipient gets their own copy with their own tracking links. That is how Orova knows exactly who opened, who clicked and who replied.
Conversion
The action you want people to take after reading, such as placing an online order. Your website tells Orova each time it happens, and the report counts it for you.
Unsubscribe
When a recipient clicks the unsubscribe link in your email and confirms they no longer want your emails. That person is skipped automatically in later campaigns.
The sections follow the order you will work in: write the email, pick recipients, set the schedule, send a test, send for real, read the report, measure conversions, then add recipients to CRM.
Campaigns can only send from mailboxes you have connected and are allowed to send from. If you have not connected one yet, follow section 01 · Connect a mailbox at the top of this page first.
Open the Campaigns tab
- 1
Go to Orova Connect. In your workspace, pick
Orova Connectin the module switcher at the top left. A menu bar appears withInbox,Campaigns,Contacts,Templates,MeetingandSettings. - 2
Click
Campaignsin the menu bar. The page opens on theCampaignssub-tab. You see a search box, filters, eight stat cards and a table of every campaign in the workspace. The two tabs next to it,Follow-upsandSent log, have their own guides.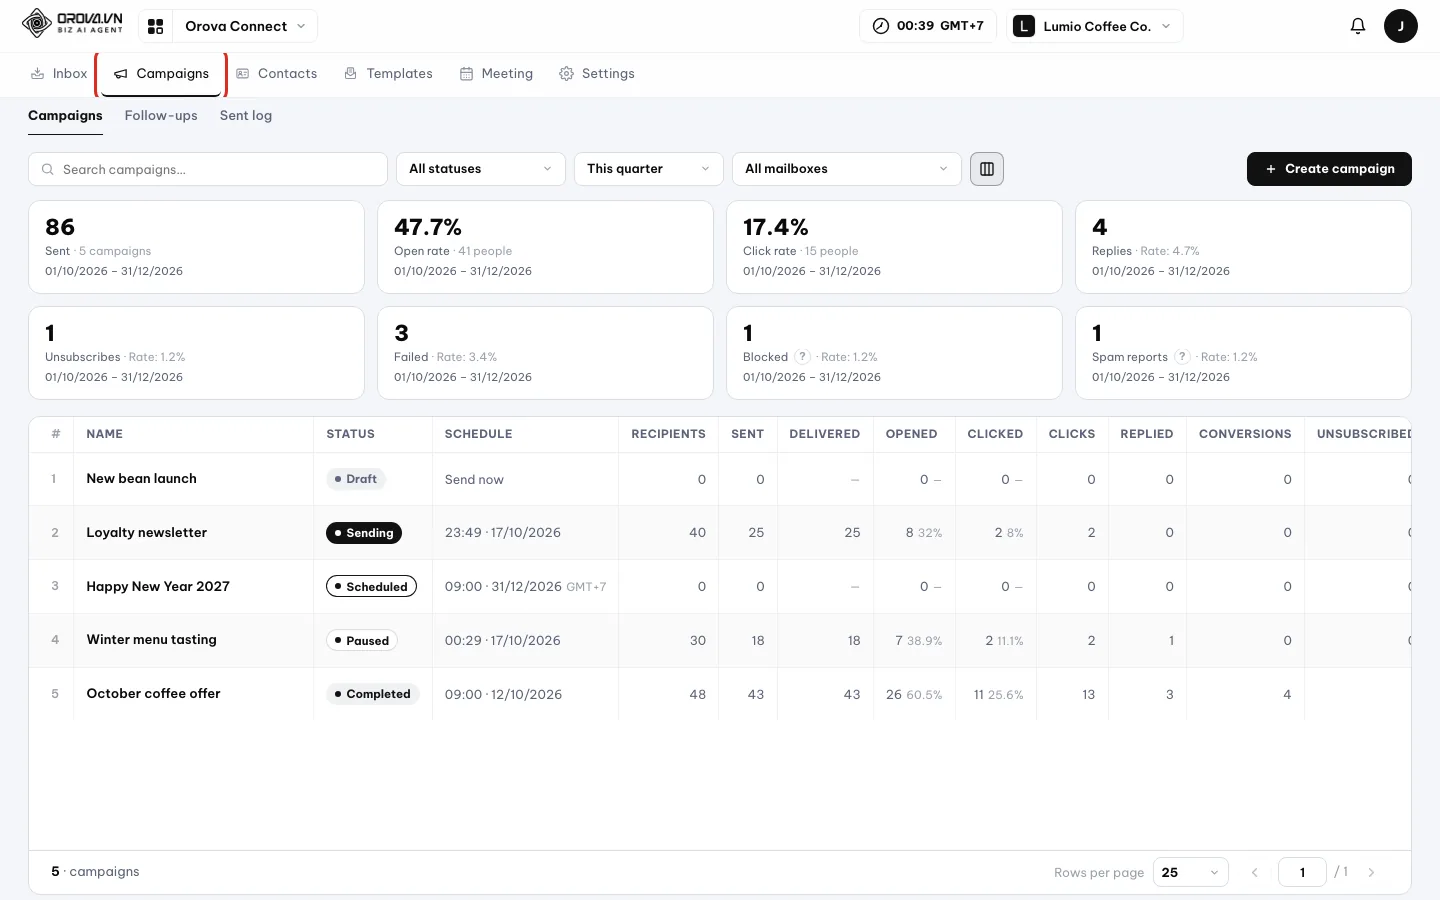
Campaigns in the Orova Connect menu bar (outlined in red). - 3
A new workspace starts with an empty table. With no campaigns yet, the table shows No campaigns yet and a
Create campaignbutton. Clicking it starts section 10.
| Task | Permission | Notes |
|---|---|---|
| View, create, edit drafts, preview recipients, send tests | View & create email campaigns | The basic permission to open the tab. |
| Send now, schedule, pause, resume, duplicate, delete | Schedule & send campaigns | Without it, the Send now button and the action icons are hidden. |
| Add recipients to CRM | Schedule & send campaigns + permission to write CRM customers | See section 16. |
| Pick a mailbox to send from | Edit permission on that mailbox | Mailboxes you can only view do not appear in the list. |
Take recipients from CRM customers | View CRM | You only get customers within the scope you can see. |
Take recipients from Bot leads | View Bot | Without permission to view all bots, you can only pick your own bots. |
| Create API keys | Workspace owner or admin | See section 15. |
| Task | How it is charged |
|---|---|
| Sending campaigns and test emails | At the current email price, per email. Before queuing, Orova estimates the whole send. If your wallet is short, you are told right away and no email goes out. |
| Adding recipients to CRM | Each new customer costs the same as adding a customer by hand in CRM. Updating existing customers is free. |
| AI rewrite button in the editor | Based on the AI actually used for each rewrite. |
| Recipient preview, reports, conversions, Conversion API, Excel export | No quota. |
Note
Every plan gets every feature
10 · Campaigns: Content
Create a campaign and write the email
One single screen with four cards. This section covers the Content card: sender, subject, body, variables, unsubscribe link and files.
Subject prefix
Text placed in front of every subject, such as a label you want recipients to see first. The box starts empty; fill it in only when you need it.
Preheader
The short line shown right after the subject in the recipient's inbox. It works like a teaser and helps people decide whether to open the email.
Sender rotation
When you pick several sending mailboxes, emails are shared out between them in turn. Each email carries the name and signature of the mailbox that sends it. Each mailbox sends fewer emails, so it is less likely to hit the email provider's limit.
Draft
A campaign that is saved but not sent. You can reopen and edit it as many times as you like; no email goes out.
The create page is one screen with four cards shown together: Content, Recipients, Schedule and Review & send. There is no Next step, so you can fill them in any order. Orova checks everything in one pass when you click send.
Open the create page
- 1
Click
Create campaign. The black button sits at the top right of theCampaignstab, in line with the filter bar. One click takes you to the create page.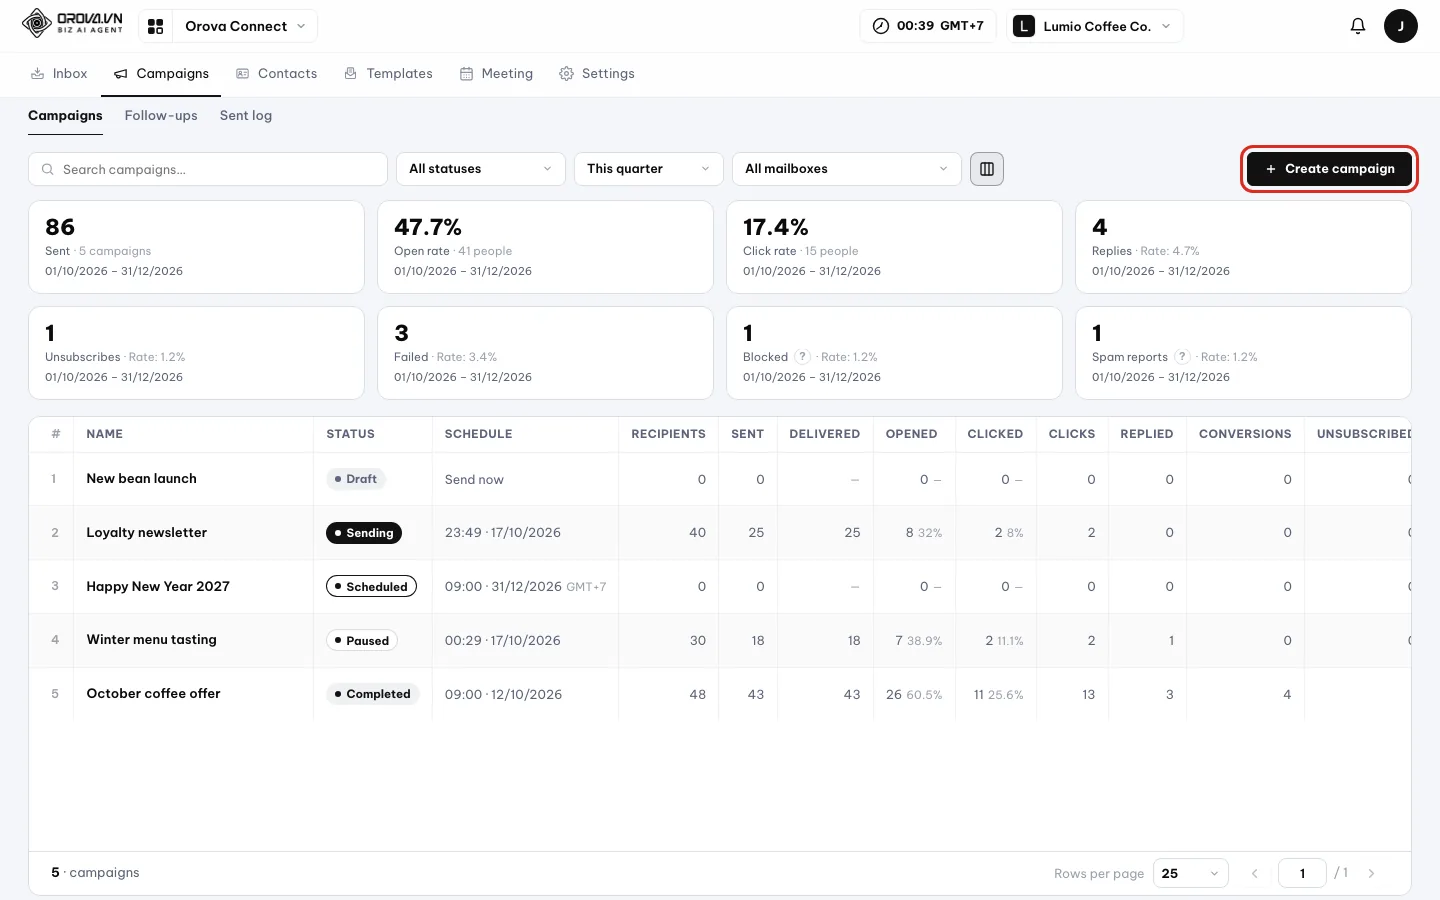
The Create campaign button at the top right. - 2
Look at the four-card layout. The left column holds the
Contentcard, thenRecipients. The right column holdsSchedule, thenReview & send. The footer always has two buttons:Save draftandSend now. When you reopen a draft, the page title changes to Edit campaign.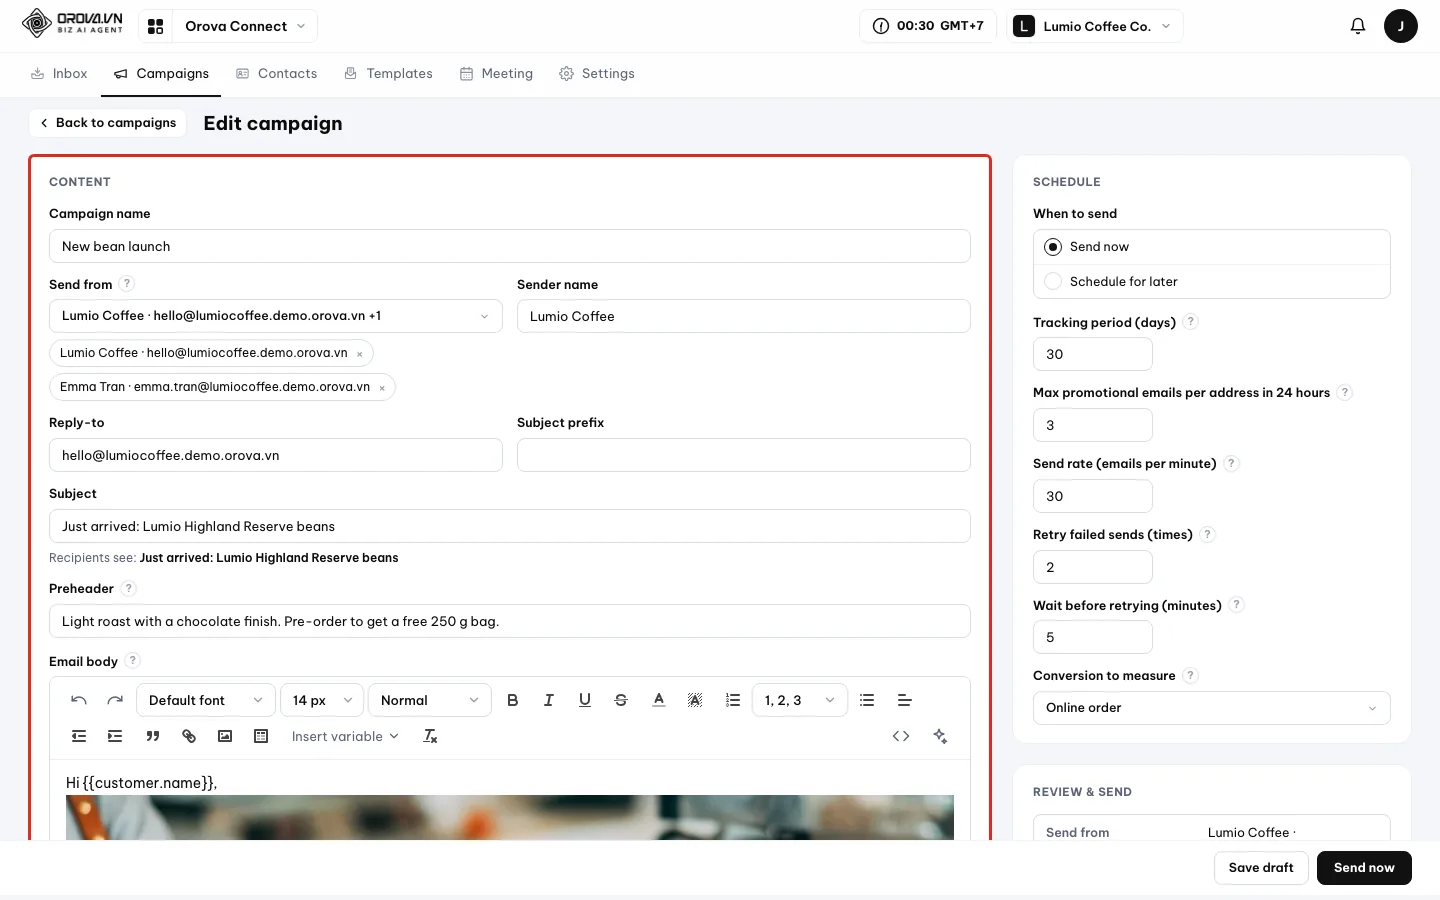
The Content card (outlined in red) is at the top of the left column. - 3
Save a draft at any time. Click
Save draftin the footer and you see Draft saved at …. If you clickBack to campaignswith unsaved changes, Orova asks before you leave the page.
Fill in the Content card
- 1
Type a
Campaign name. For example New bean launch. Only you and your teammates see the name; recipients do not. This field is required. - 2
Pick
Send from. Click theSend frombox and a small panel opens with aSearch mailboxesbox. Tick one or more mailboxes, for example the Lumio Coffee mailbox and the Emma Tran mailbox. Selected mailboxes show as chips under the box; click the x to remove one.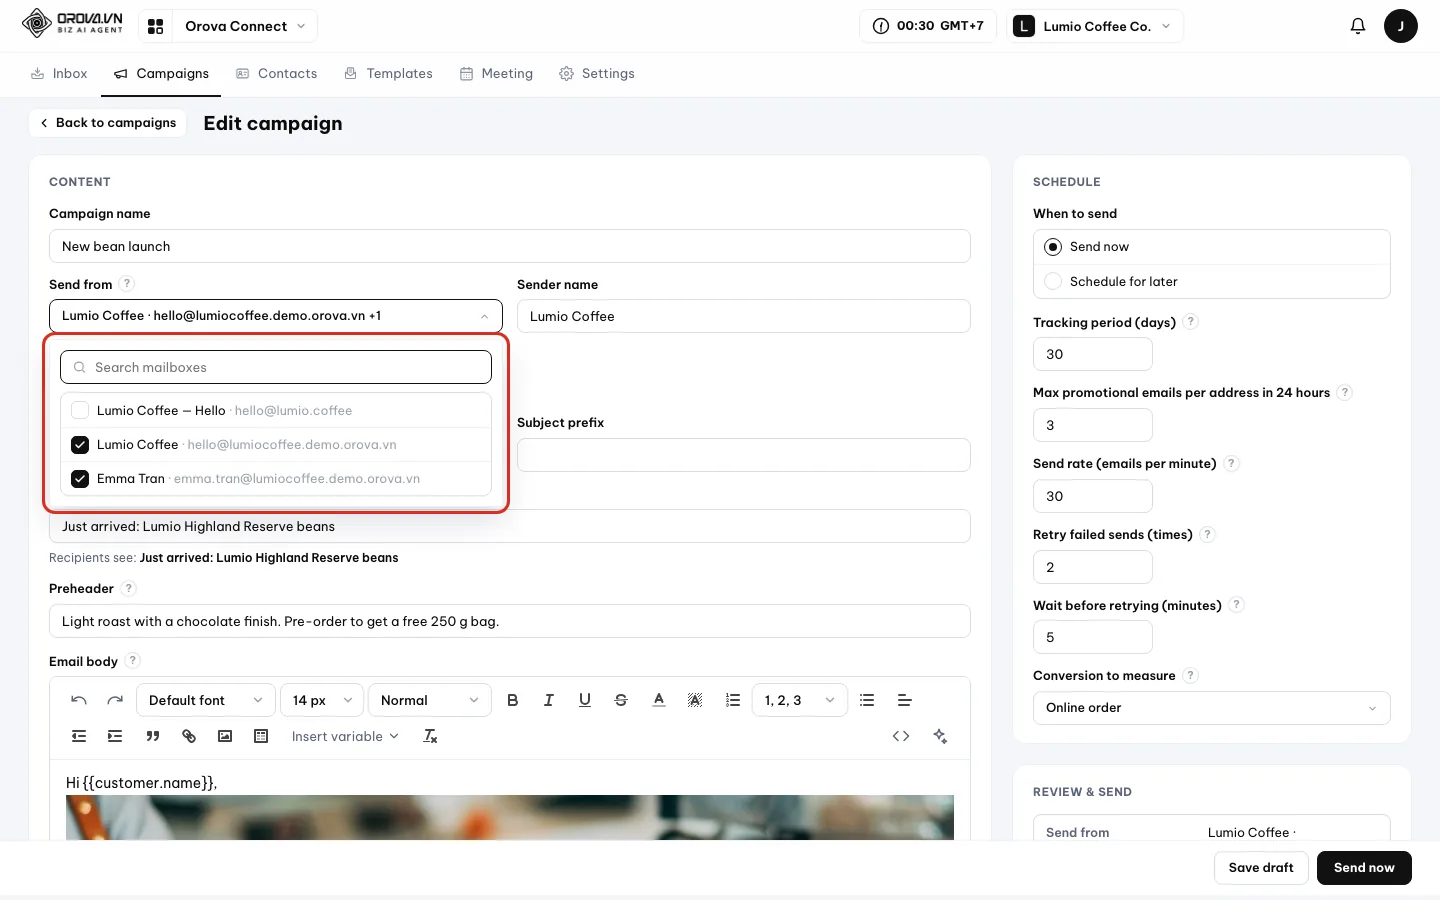
Tick several mailboxes to rotate senders. - 3
Fill in
Sender nameandReply-to.Sender nameis the name shown in the recipient's inbox, for example Lumio Coffee.Reply-tois the address that receives replies, for example hello@lumiocoffee.demo.orova.vn. - 4
Fill in the subject and preheader. Leave
Subject prefixempty if you don't need it. Type theSubject; the Recipients see: line right below shows you the full subject. Finally, type thePreheader.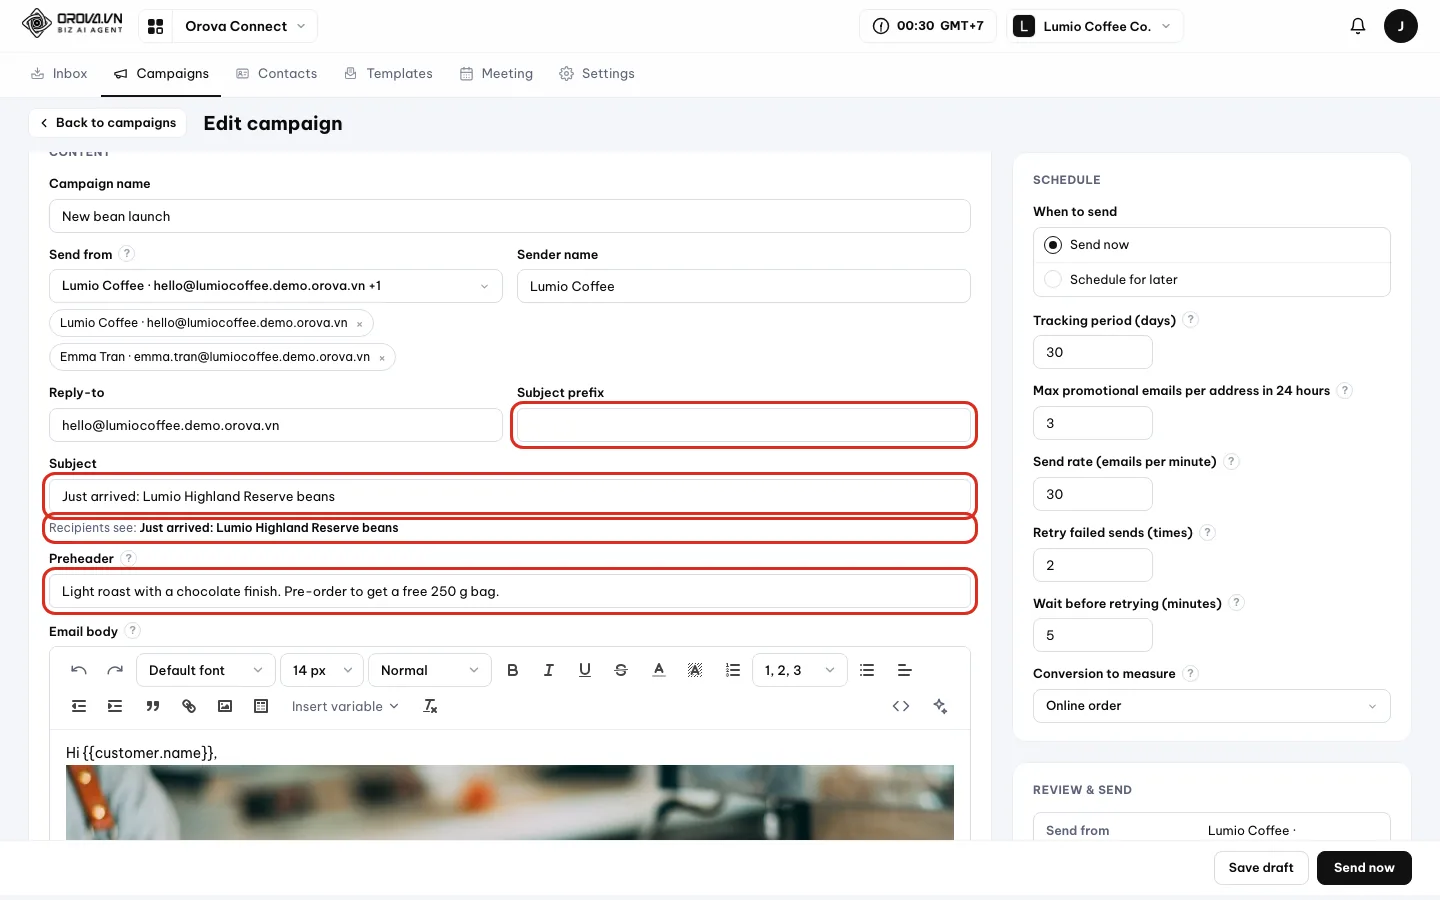
The Recipients see line shows the subject exactly as recipients will read it. - 5
Write the
Email body. The toolbar has font, font size, bold, italic, colour, lists, alignment, link, image, table,Insert variable, an HTML button and an AI button at the end. The body must contain some text.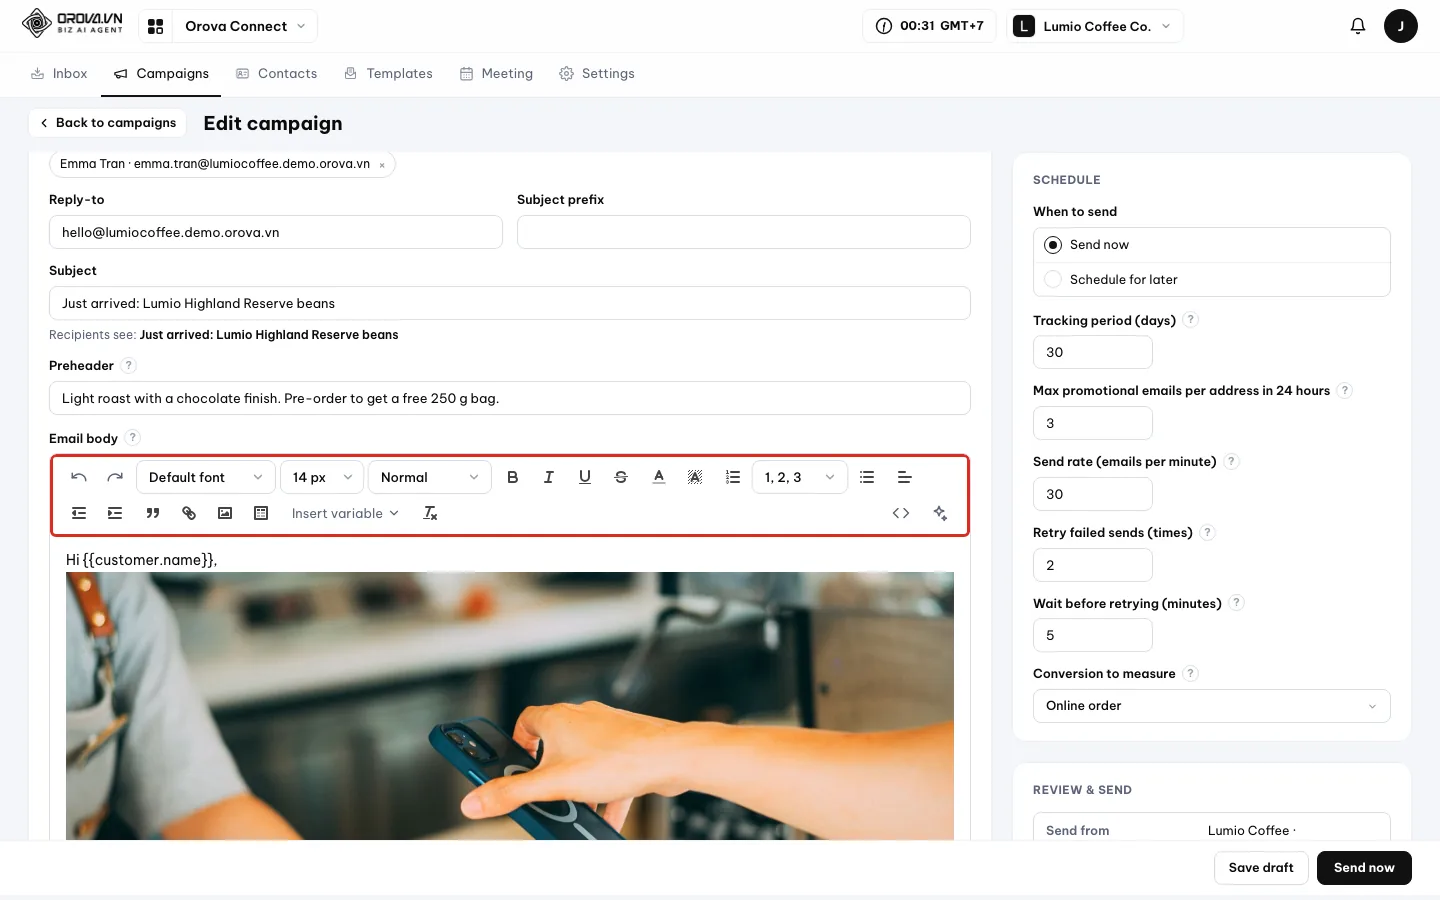
The email editor toolbar. - 6
Or load a saved template. In the icon row under the body, click the
Templateicon. The Insert template menu opens with a search box and a Your templates group. Click a template to load it into the email. TheSave as templateline at the bottom saves the email you are writing as a new template.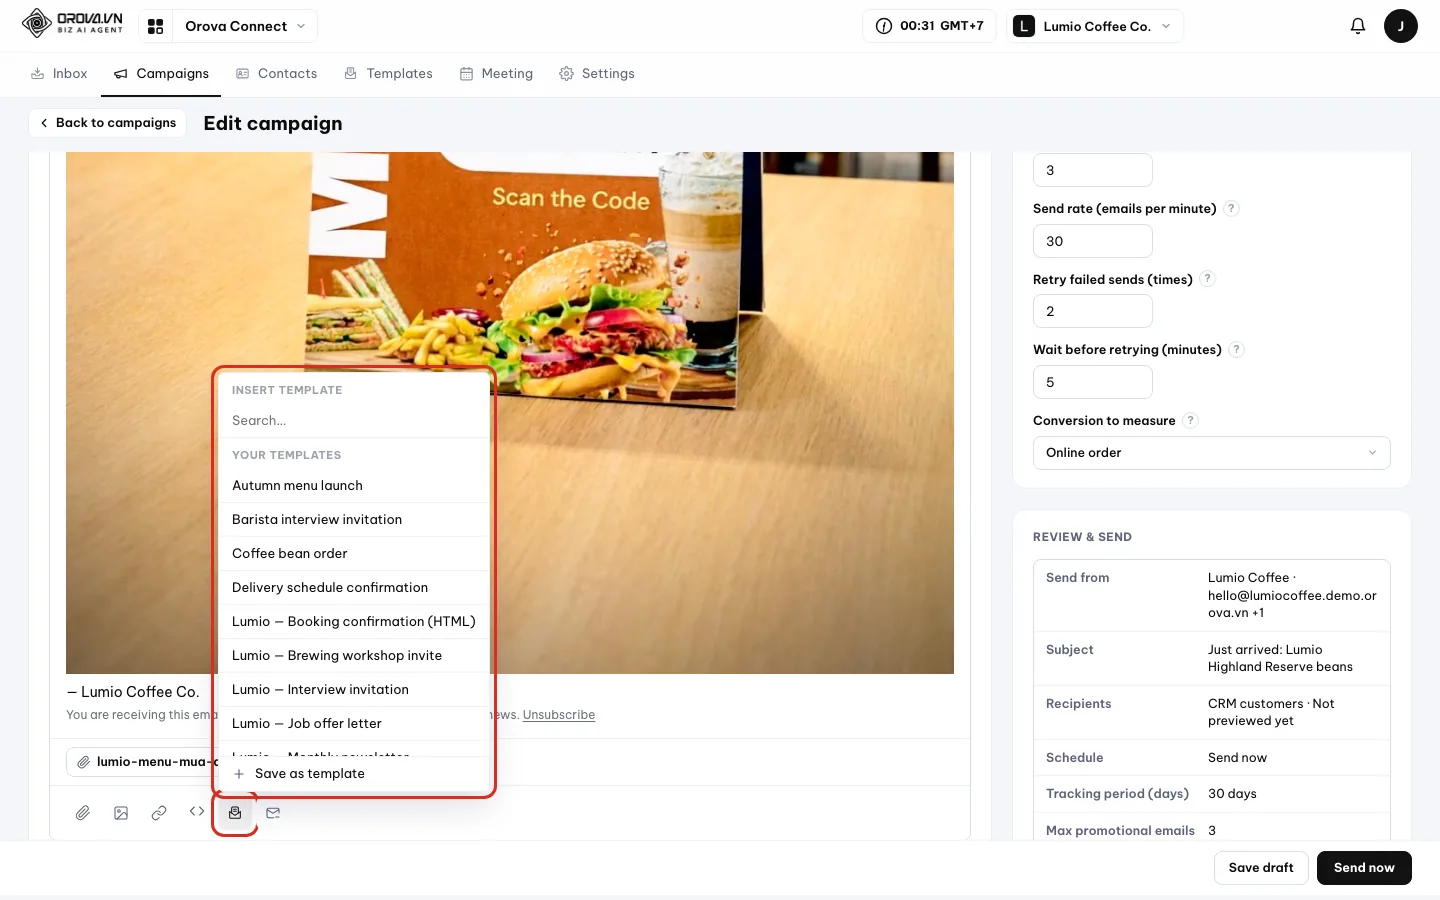
Pick a template, or save the current email as one.
| Button / field | What it does | Notes |
|---|---|---|
Campaign name | Internal name so you can find it later. | Required. |
Send from | Mailbox the campaign emails go out from; pick several to rotate senders. | Required. Hover the ? to read the explanation. |
Sender name | Name shown in the recipient's inbox. | — |
Reply-to | Address that receives replies. | — |
Subject prefix | Text placed in front of every subject. | Starts empty. |
Subject | The email subject. | Required. |
Preheader | Short text shown after the subject in the inbox. | — |
Email body | The body, written with the toolbar. | Required. |
Insert variable | Inserts a placeholder filled in separately for each person. | See Insert variables just below. |
| AI button (star, end of the toolbar) | Rewrites a passage of the email with AI. | Uses quota. |
| Icon row under the body | Attach, Insert image, Insert link, HTML mode, Template, Insert unsubscribe link. | You can also drag files into the body, up to 25 MB per file. |
Insert variables: a personal email for everyone
Variable
A placeholder Orova fills in separately for each recipient at send time. For example, you write “Hi {{customer.name}}” and Emma Tran receives “Hi Emma Tran”.
The Insert variable button on the toolbar opens a panel with a Search variables box and groups. Each variable shows its name, its code and a sample value in grey.
Insert a variable into the email
- 1
Place the cursor where the value should go. Click in the body exactly where you want the filled-in text to appear, for example after “Hi”.
- 2
Click
Insert variableand pick a group. The variable panel opens. Click a group in the top row:All,General,CRM,Connect… or type in theSearch variablesbox. TheConnectgroup hasUnsubscribe link,Campaign name,Sender nameandSender email.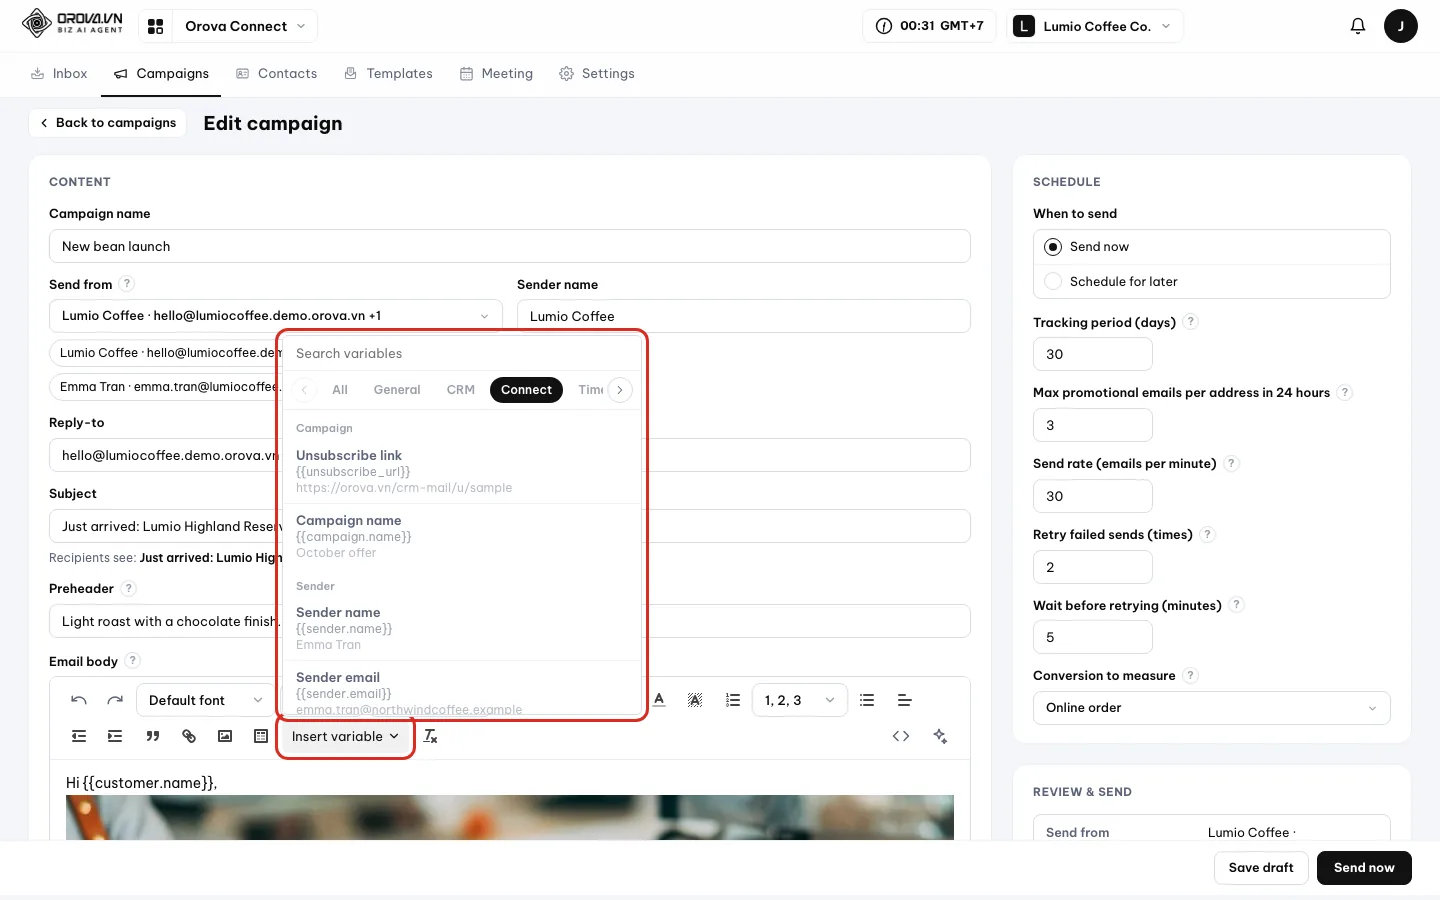
The Connect group in the Insert variable panel. - 3
Click the variable. The variable code, for example
{{campaign.name}}, is inserted right at the cursor. At send time, each recipient sees their own value.
| Group | What it contains |
|---|---|
General | Business, staff and system information. |
CRM | Customer fields exactly as set up in your workspace's CRM settings, including custom fields. |
Connect | Unsubscribe link {{unsubscribe_url}}, Campaign name {{campaign.name}}, Sender name {{sender.name}}, Sender email {{sender.email}}. |
Tip
Unsubscribe link: a personal link for everyone
Personal unsubscribe link
A link placed in the email footer so recipients can stop your emails themselves. Each person gets their own link, so Orova knows exactly who unsubscribed.
Add an unsubscribe link to the email
- 1
Select text in the footer (or not). Type a line in the footer, for example “You are receiving this email because you signed up for Lumio Coffee Co. news.” Select the words you want to turn into the link. You can also skip selecting.
- 2
Click the
Insert unsubscribe linkicon. It is the envelope icon at the end of the row under the body. If text is selected, that text becomes the link. If nothing is selected, Orova inserts the word Unsubscribe with the link already attached.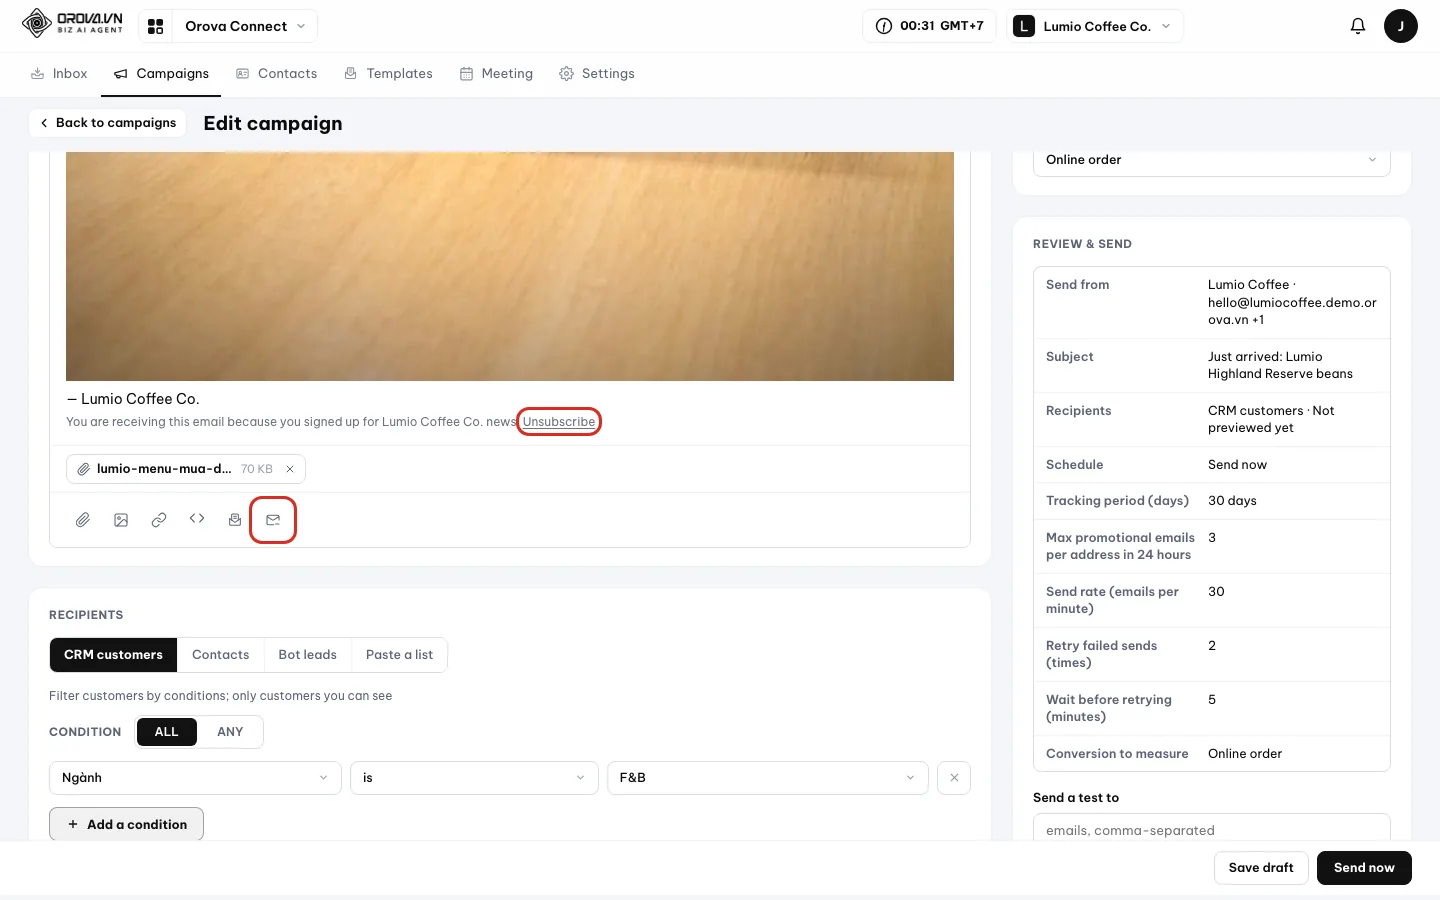
The envelope icon inserts the word Unsubscribe with a personal link. - 3
Recipients who click the link see a confirmation page. The page asks Stop receiving emails from Lumio Coffee Co.?, with a partly hidden email and an
Unsubscribebutton. The unsubscribe is only recorded when they click that button.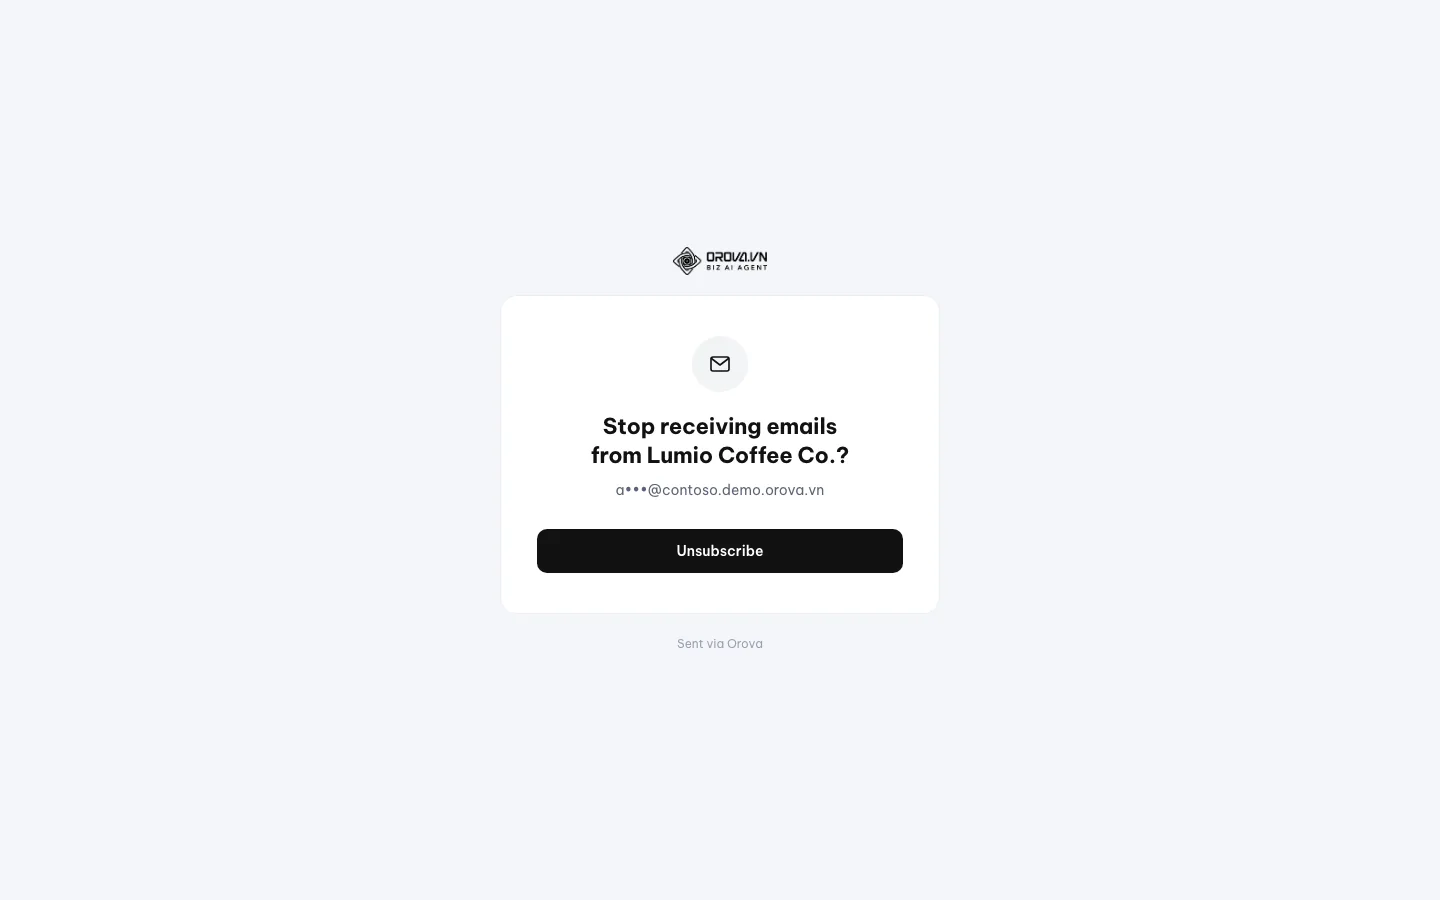
The page recipients see when they click the unsubscribe link. - 4
The result shows in the report. People who confirm are counted on the Unsubscribes card. From the next campaign on, Orova skips them automatically.
Warning
Emails do not get an unsubscribe footer by themselves
Unsubscribe link variable. The link stays valid for 60 days after sending.Attachments are tracked links
Tracked file
Files you attach are not embedded in the email like normal attachments. Recipients see a link to the file. Each time they view or download it, Orova counts it for you.
Attach a file
- 1
Click the
Attachicon or drag a file in. The paperclip icon is the first button in the row under the body. You can also drag a file straight into the editor, up to 25 MB. The file shows as a chip with its name and size; click x to remove it.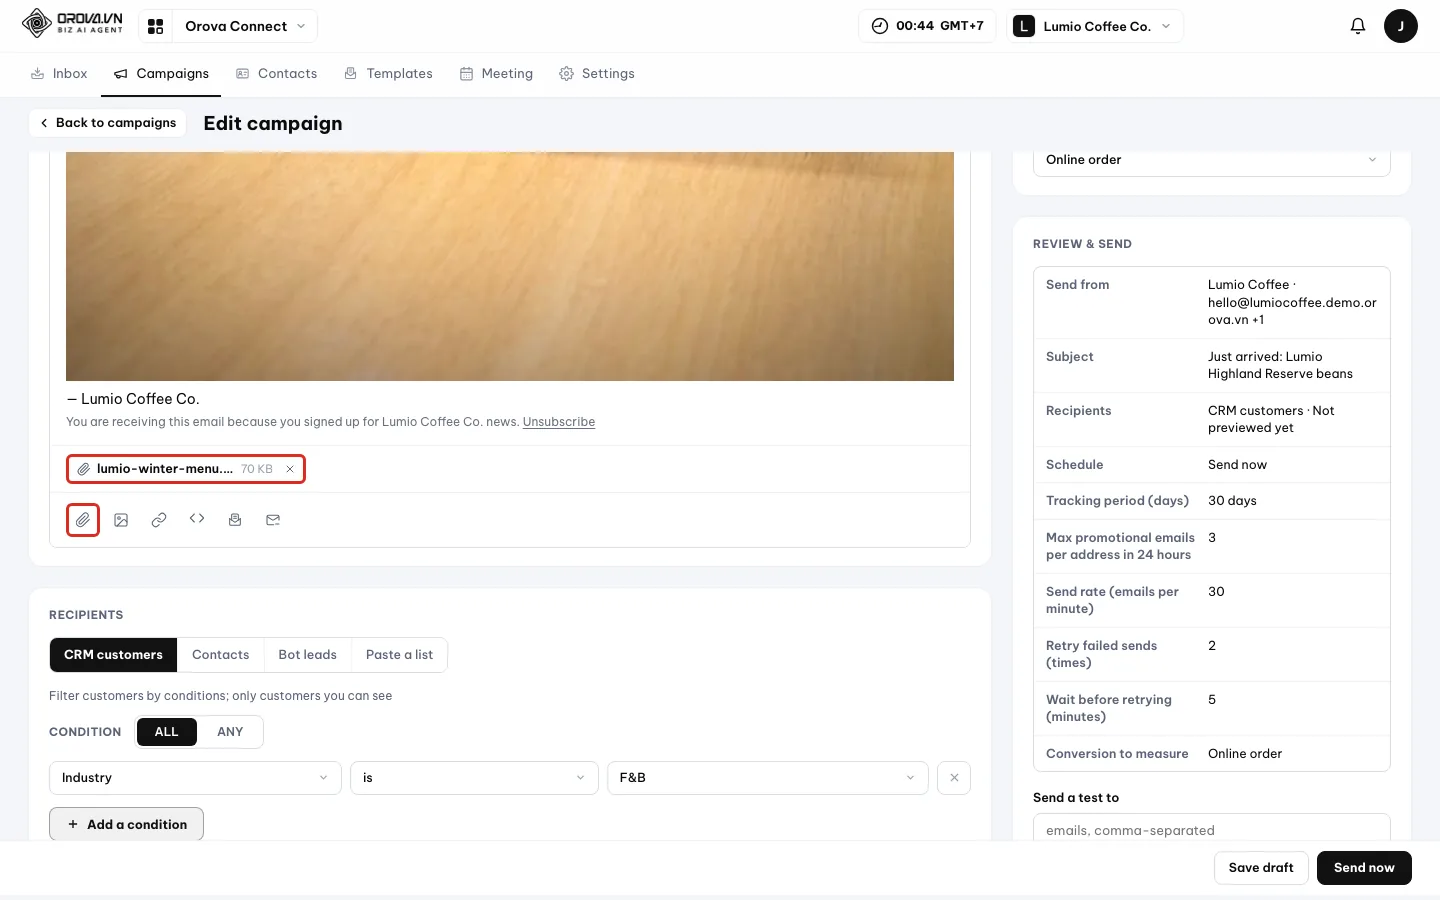
An attached file shows as a chip under the body. - 2
Recipients open the file page. When they click the file link in the email, recipients land on a separate page. It shows the file name, size, sender and a download button.
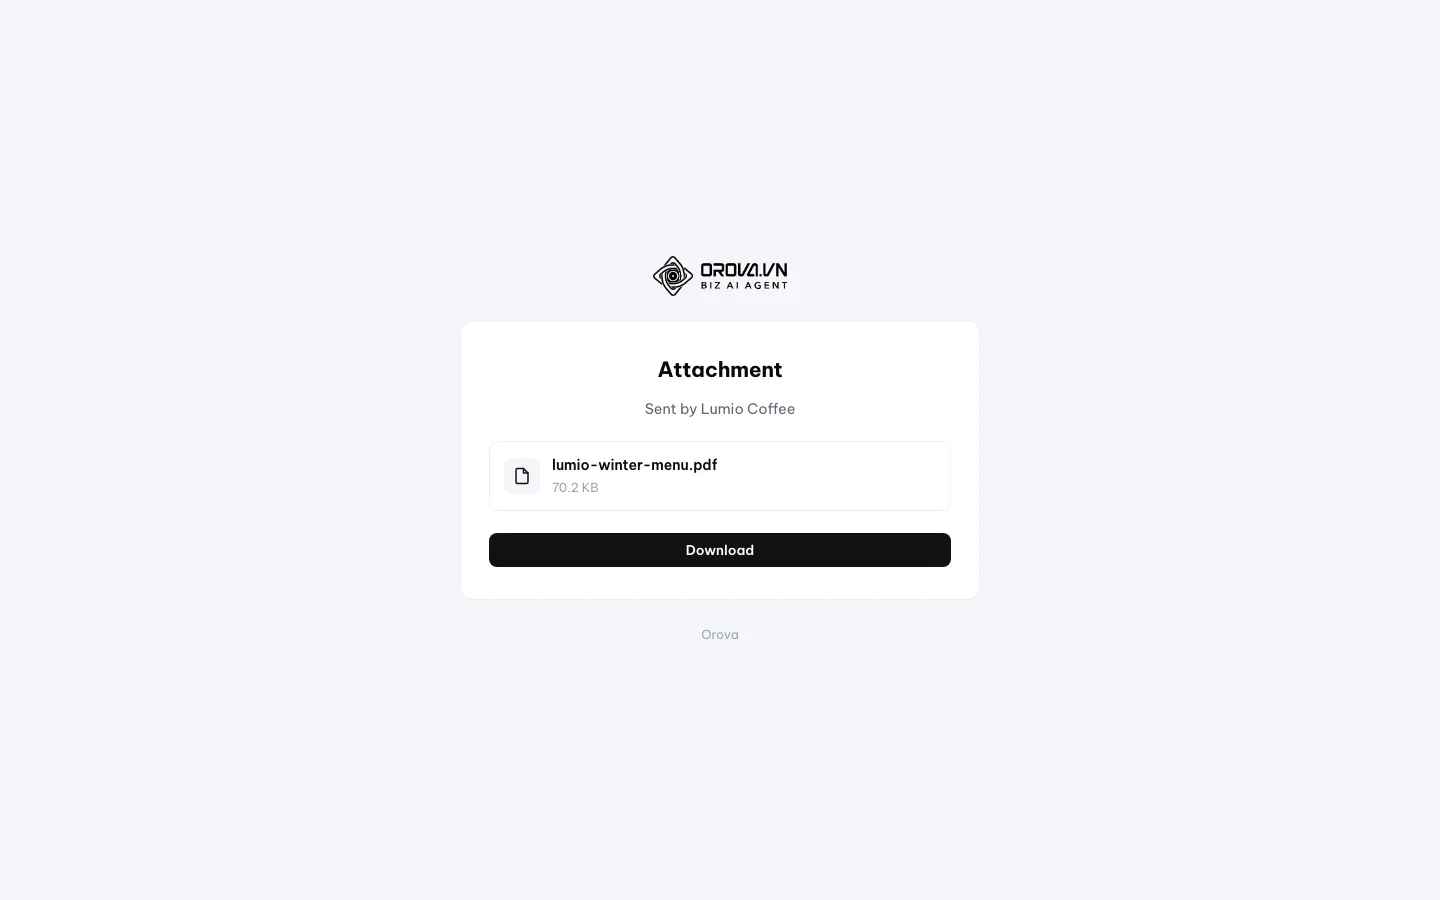
The file page recipients see. - 3
See who viewed and who downloaded. On the report page, the File views and File downloads numbers appear under the Funnel and in the Recipients table (section 14).
11 · Campaigns: Recipients
Pick recipients and preview them
Four recipient sources, and a Preview button that tells you exactly how many people will get the email.
Recipient source
Where Orova takes the sending list from: CRM customers, Connect contacts, leads collected by a bot, or a list you paste yourself. Each campaign uses one source.
Recipient preview
A test count on real data that sends nothing. You learn in advance how many people will receive the email, and how many are skipped and why.
The Recipients card sits below the Content card. Click one of the four source buttons and the area below changes to match that source.
Pick a recipient source
- 1
Click a source button. The four buttons sit side by side:
CRM customers,Contacts,Bot leadsandPaste a list. The selected one has a black background.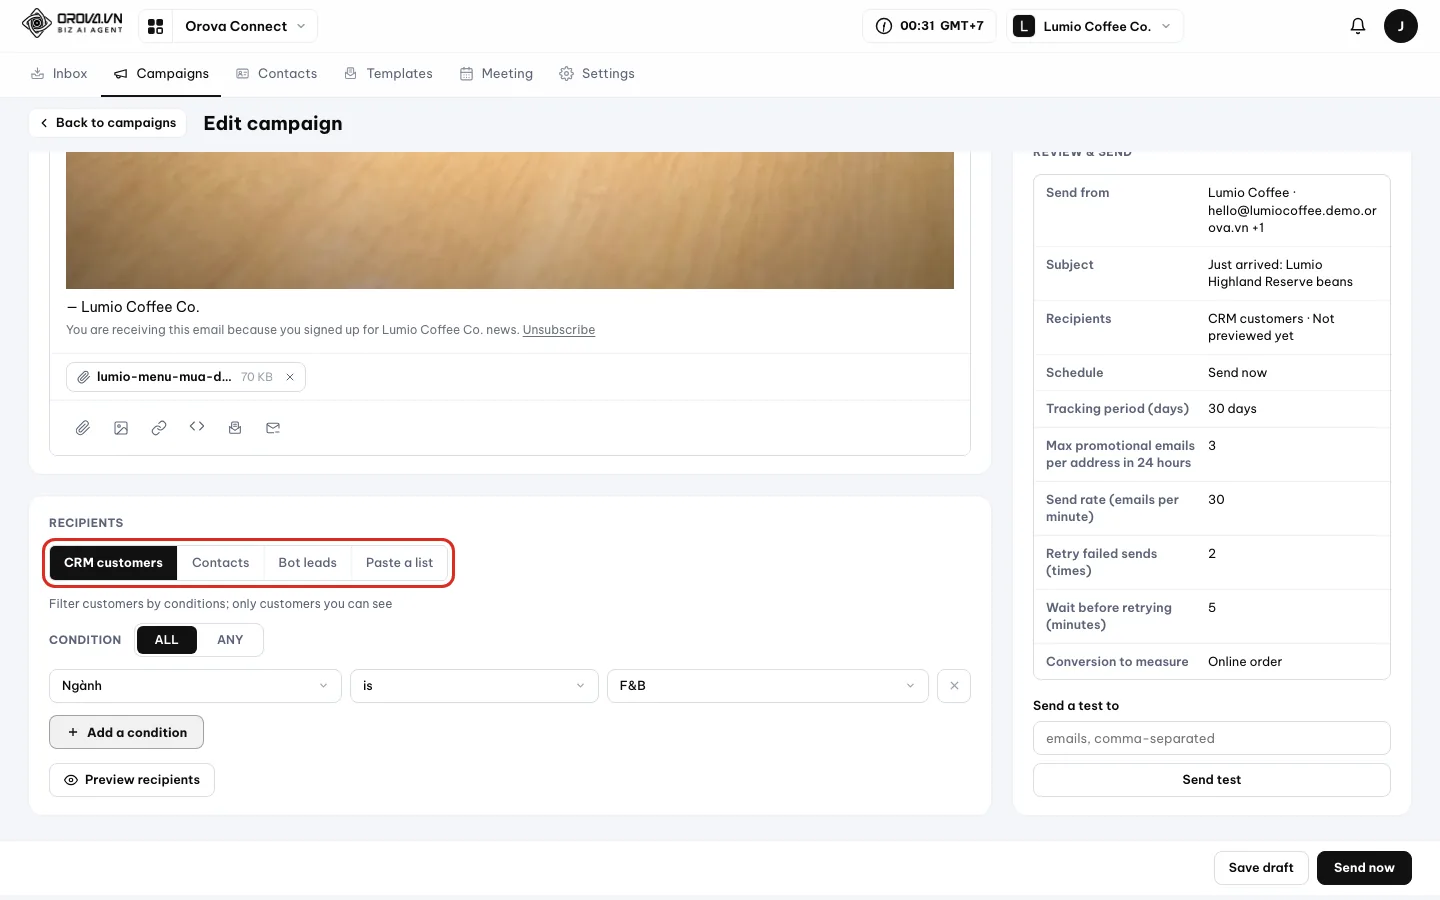
The four recipient sources. - 2
CRM customers: build filter conditions. Choose
ALL(match every condition) orANY(one match is enough). Each condition has a field, an operator and a value, for exampleIndustry·is·F&B. ClickAdd a conditionto add a row, or the x to remove one.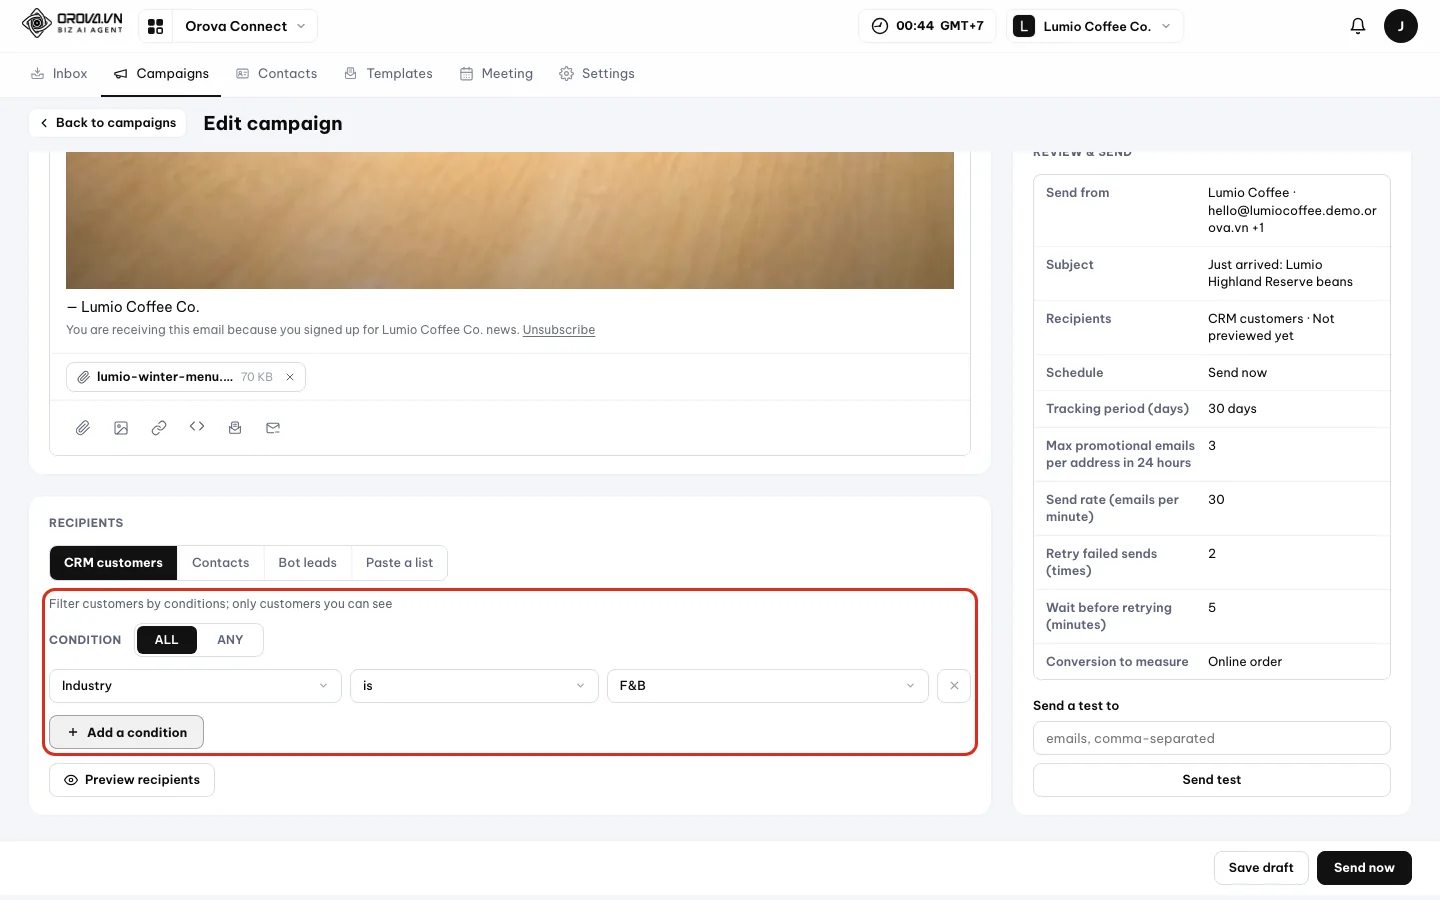
With no conditions, you get every customer you can see. - 3
Contacts: tick groups or tags. The left column is
Groups, the right column isTags, and the number on the right is the head count. For example, tick the Wholesale buyers group and the VIP tag.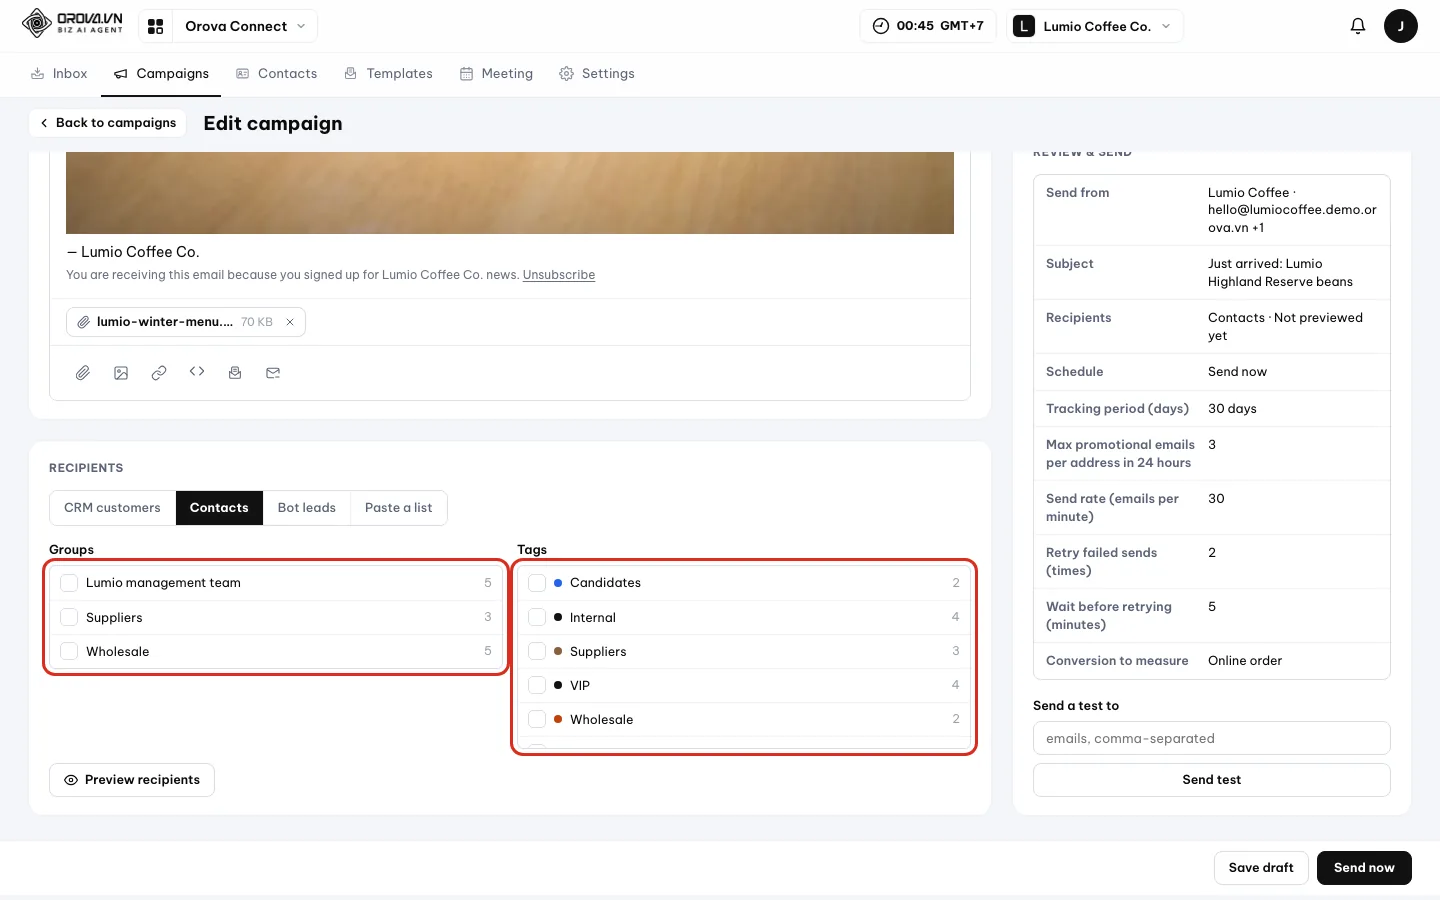
Tick Contacts groups or tags. - 4
Bot leads: pick a bot. Tick a bot under
Choose bots. TheOnly AI-qualified leadsbox is ticked by default; untick it to include leads that did not qualify. - 5
Paste a list: one email per line. Paste emails into the large box, one address per line. To include a name, use the format
Name <email>, for exampleMaya Lin <maya.lin@northwind.demo.orova.vn>.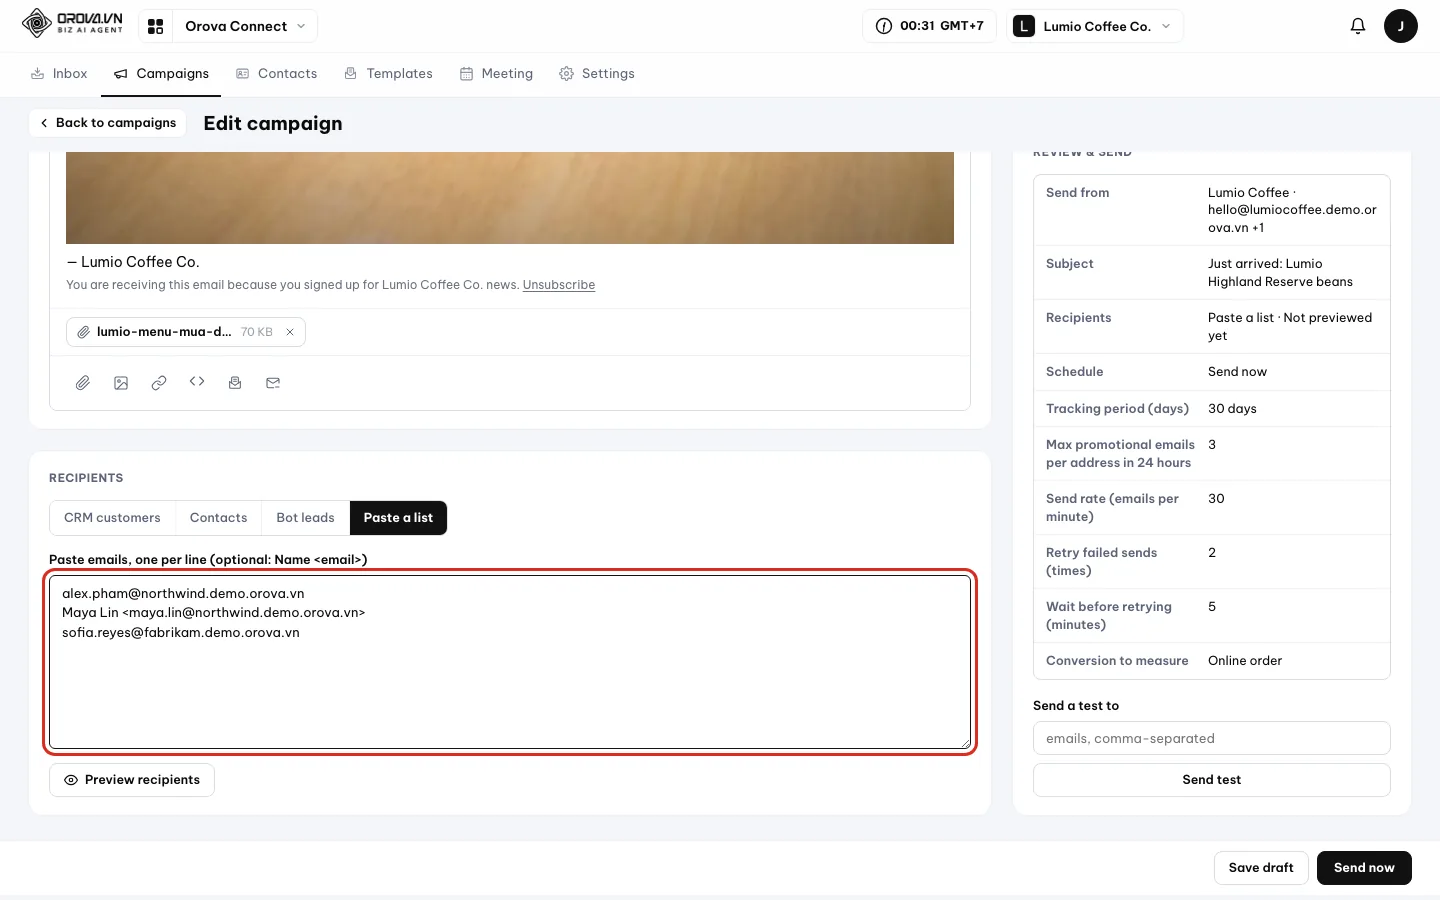
You can add a name with the format Name <email>.
| Button | Where recipients come from | Permission needed |
|---|---|---|
CRM customers | Customers matching the filter, within the scope you can see. | View CRM. Without it, this button does not appear. |
Contacts | People in the Groups and Tags you tick. | — |
Bot leads | Leads collected by the bots you pick. | View Bot. |
Paste a list | The emails you paste, one address per line. | — |
Preview recipients
- 1
Click
Preview recipients. The button with the eye icon sits at the bottom of the Recipients card. Orova saves the draft and then counts for real, which takes a few seconds. No email is sent.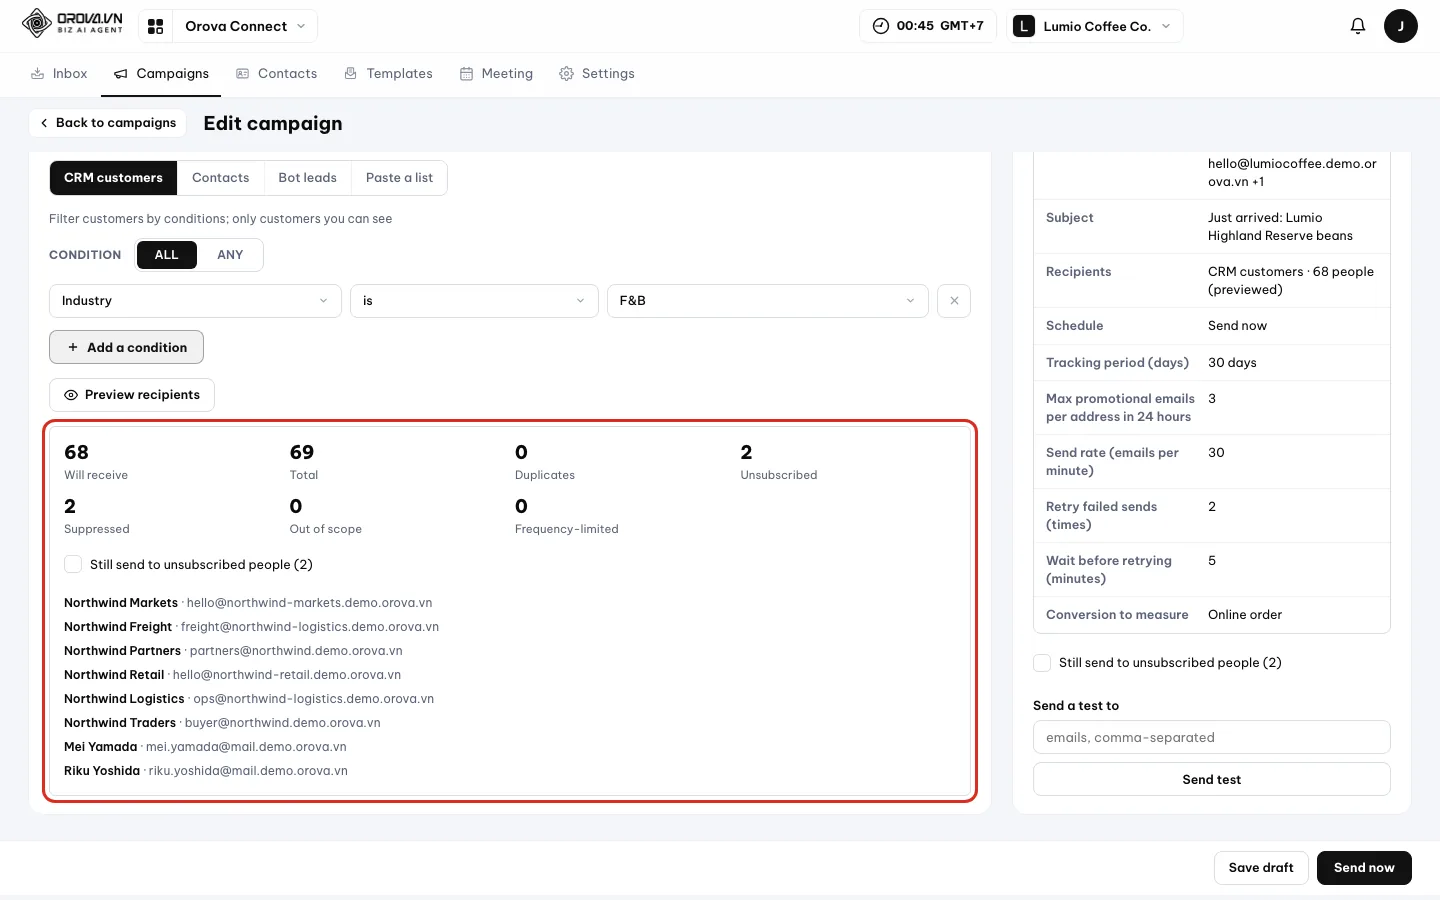
Will receive is the number of emails that will actually go out. - 2
Read the seven counts and the sample list. The table just below explains each count. The names and emails underneath help you check you have the right audience. The
Review & sendcard updates too, for example CRM customers · 68 people (previewed). - 3
Decide about people who unsubscribed. If anyone has unsubscribed, a Still send to unsubscribed people (2) box appears, unticked by default. If you tick it, Orova asks you to confirm once more.
| Count | Meaning |
|---|---|
| Will receive | How many people the email will actually reach. |
| Total | How many addresses the source returned. |
| Duplicates | Repeated addresses; each person gets only one email. |
| Unsubscribed | People who unsubscribed from your emails; skipped by default. |
| Suppressed | Addresses that bounced permanently or reported spam before; never sent to. |
| Out of scope | CRM customers you don't have permission to see. |
| Frequency-limited | People who already got the allowed number of promotional emails in 24 hours (set on the Schedule card). |
Warning
Sending to people who unsubscribed is risky
12 · Campaigns: Schedule & send
Set the schedule and rules, send a test, then send
The Schedule card decides when and how emails go out. The Review & send card sums everything up and lets you send a test first.
Tracking period
How many days after sending Orova keeps counting new opens and clicks. After that, the numbers are finalized.
24-hour limit
The maximum number of promotional emails one address can receive in 24 hours, counted across all campaigns and Follow-up sequences. It keeps customers from being flooded with email.
Send rate
How many emails Orova sends per minute. Sending slowly and evenly makes providers less likely to treat your mailbox as spam.
Retry on temporary errors
A temporary error clears up on its own after a while, for example a full inbox or a lost connection. Orova retries as many times as you set.
Set the schedule and sending rules
- 1
Choose
When to send. ChooseSend noworSchedule for later. For a scheduled send, fill inDate,Time(09:00 by default) andTime zone, for example (GMT+07:00) Asia/Ho Chi Minh. The black button in the footer changes toSchedule.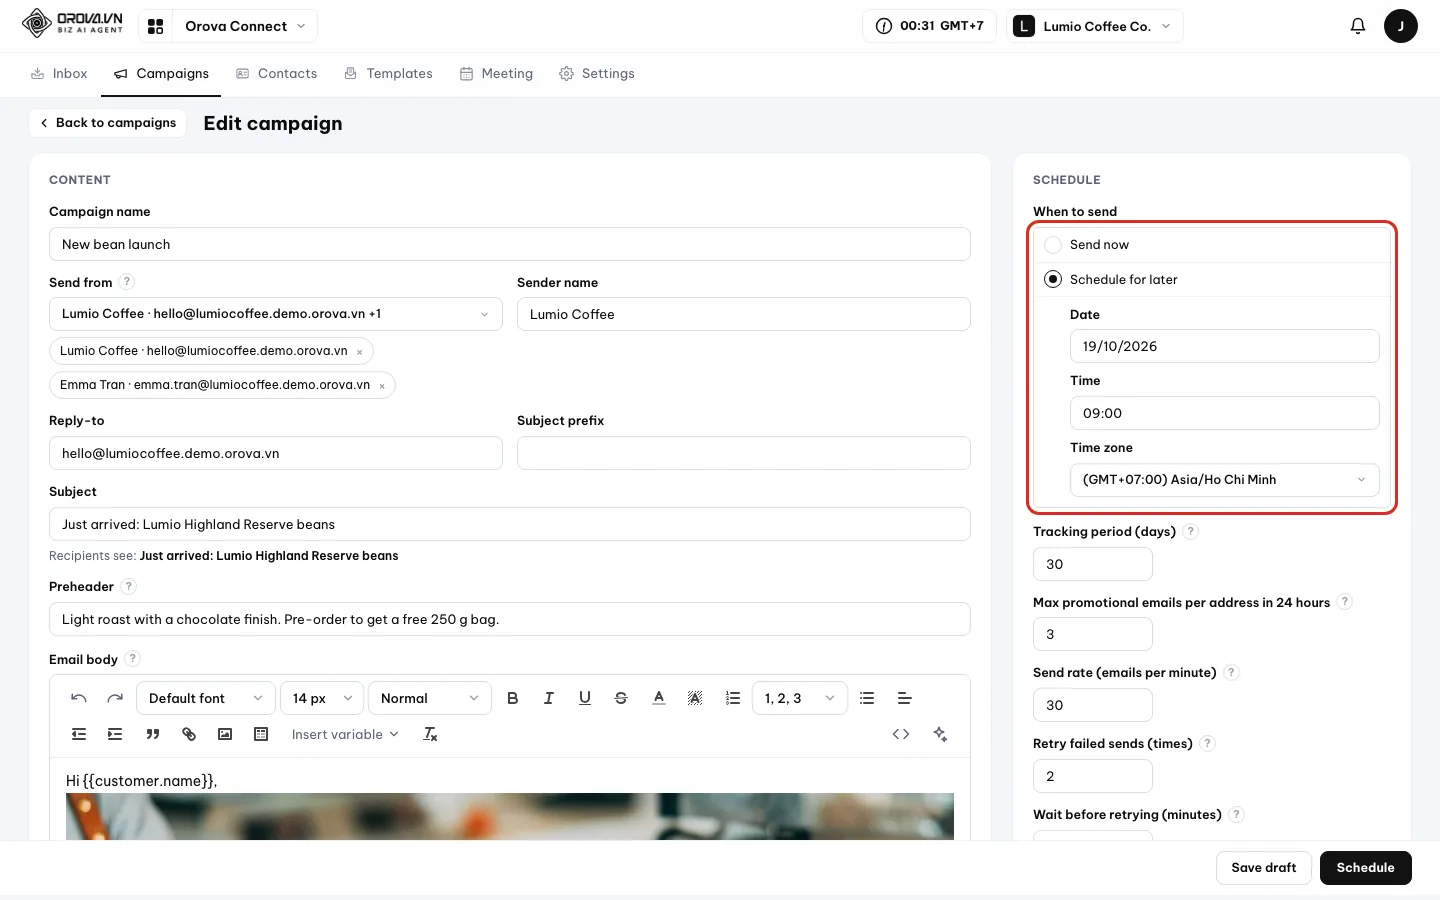
Schedule for later shows Date, Time and Time zone. - 2
Adjust the four sending-rule fields. Fill in
Tracking period (days),Max promotional emails per address in 24 hours,Send rate (emails per minute)andRetry failed sends (times). When retries are above 0,Wait before retrying (minutes)also appears.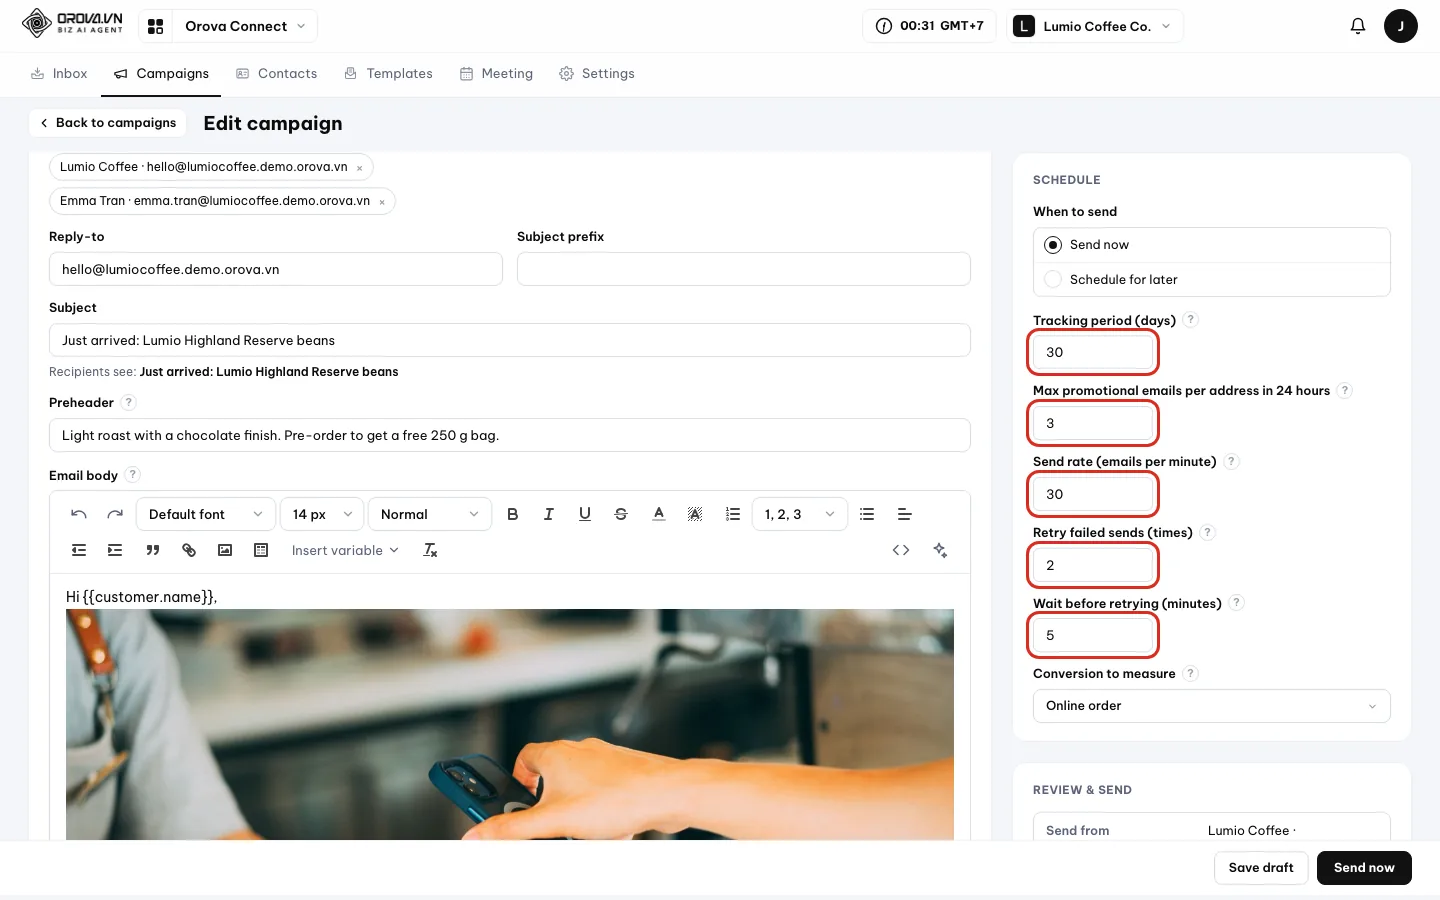
Hover the ? next to each field to read the explanation. - 3
Choose a
Conversion to measure. Click the last box on the Schedule card. The list hasNot measuredand the conversions you have created, for example Online order (keyonline_order). If you have none yet, see section 15.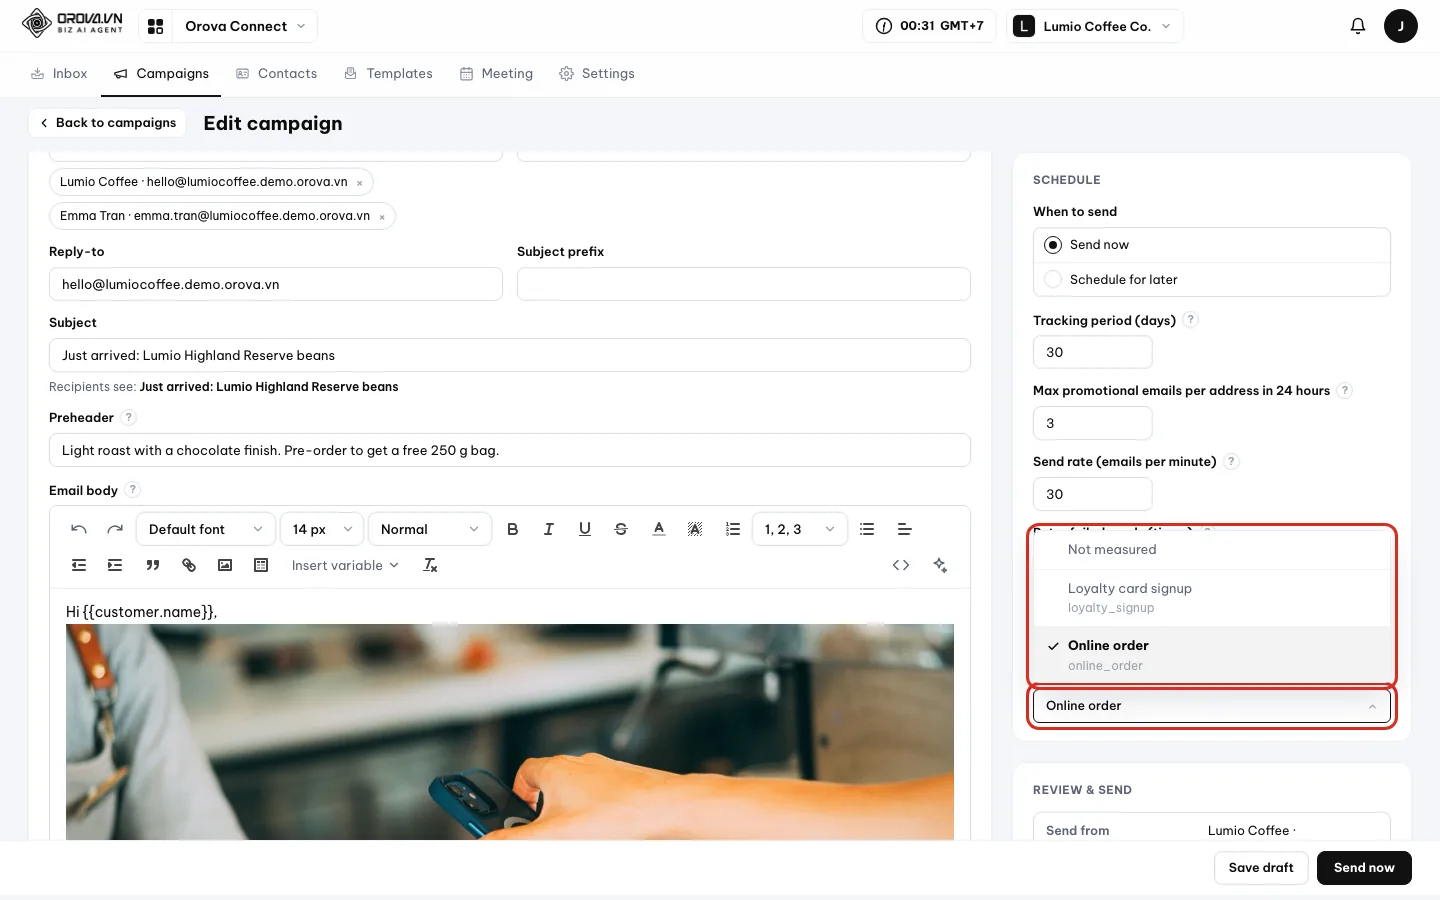
Pick a conversion before sending, or the report cannot count it.
| Field | What it does | Default |
|---|---|---|
When to send | Send now or Schedule for later with Date, Time, Time zone. | Send now; scheduled at 09:00 |
Tracking period (days) | How many days new opens and clicks are still counted. | 30 |
Max promotional emails per address in 24 hours | Anyone who already got this many emails in the last 24 hours is skipped. | 3 |
Send rate (emails per minute) | From 0 to 600; 0 means as fast as possible. | 30 |
Retry failed sends (times) | From 0 to 5; 0 means no retries. | 0 |
Wait before retrying (minutes) | From 1 to 1,440; each retry waits twice as long as the one before. | 5 |
Conversion to measure | The conversion the report will count. | Not measured |
Review, send a test, then send for real
- 1
Read the
Review & sendcard. The card sums up everything you filled in: sending mailbox, subject, recipients, schedule and sending rules. If you have not clicked Preview, the Recipients line says Not previewed yet. - 2
Send a test to yourself. Type one or more emails in
Send a test to, separated by commas, then clickSend test. The test email gets[TEST]added to the subject, its unsubscribe link is only a sample, and it does not count in the report.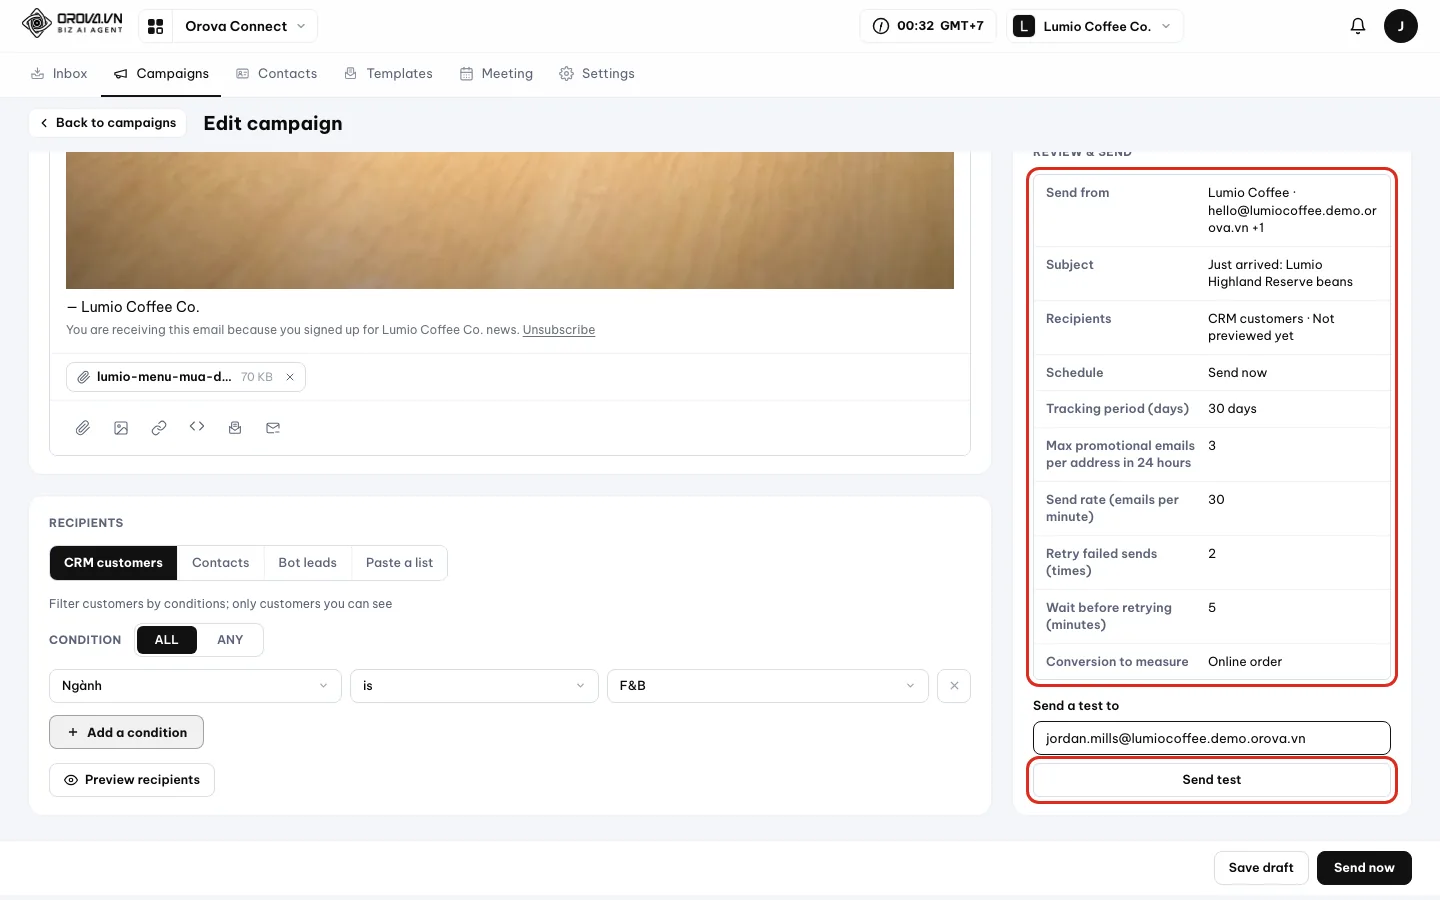
Send a test first to see the email exactly as recipients will. - 3
Click
Send noworSchedule. Both buttons are in the footer, next toSave draft. If a field is missing, Orova shows an error and scrolls to that field, for example Please choose recipients.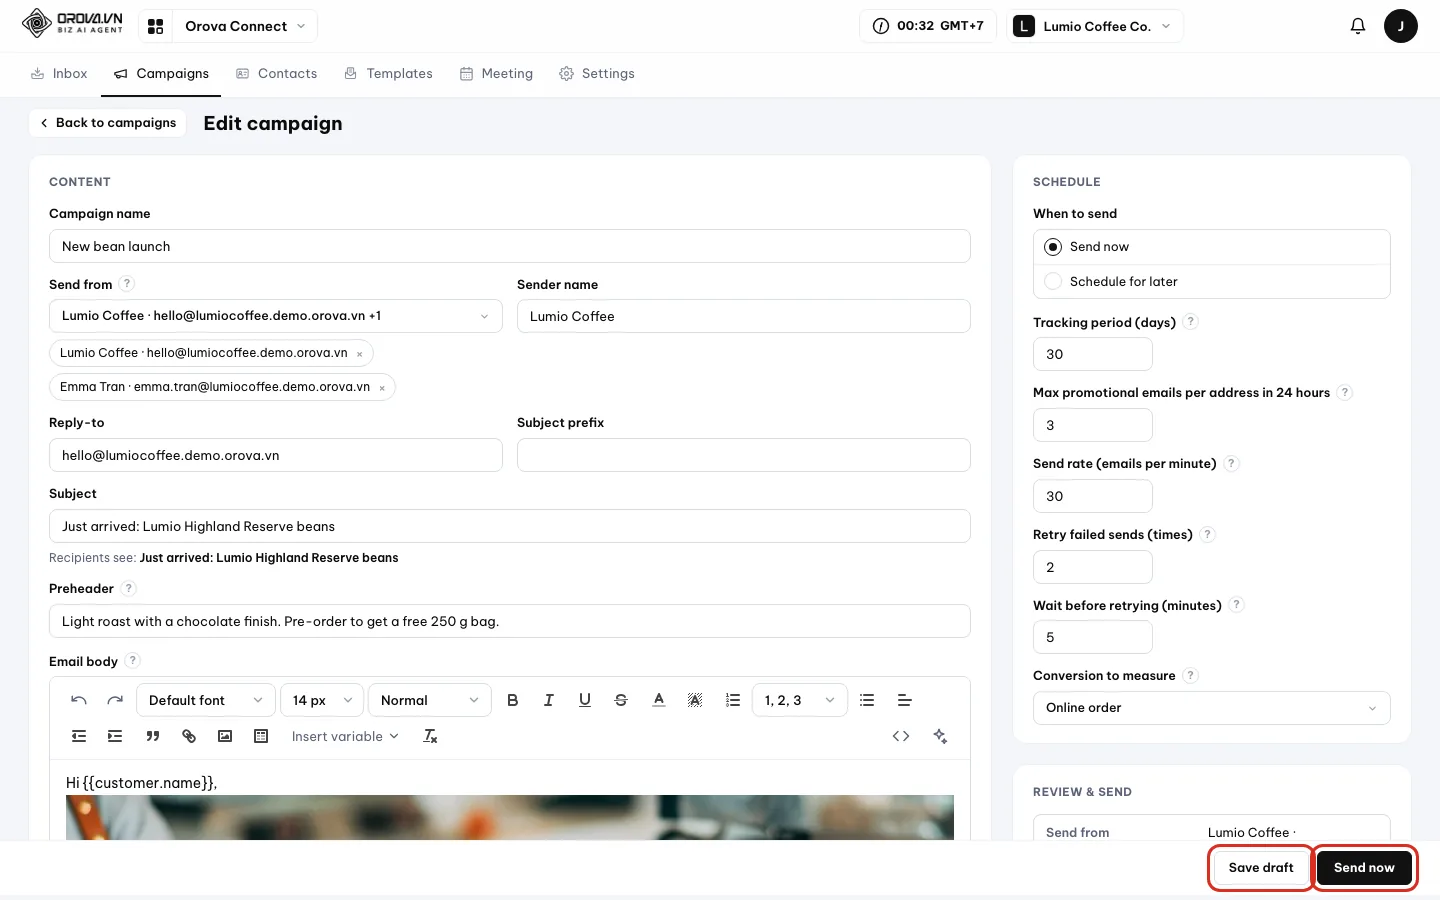
Save draft to send later, Send now to send right away. - 4
Confirm. With
Send now, Orova asks Send "campaign name" to N people now?. Confirm and the emails start going out. - 5
Go to the report page. Orova shows Campaign is sending (or Campaign scheduled) and opens the report page for you. The numbers update as emails go out.
Warning
Sent emails cannot be pulled back
Pause icon in the list or on the report page.Tip
Send now button? You are missing the Schedule & send campaigns permission. You can still save a draft and ask someone who has it to send it.13 · Campaigns: Manage
Campaign list: filter, pause, edit, duplicate, delete
The Campaigns tab shows every campaign with its numbers. Each row has a set of action icons.
Campaign status
A small label that tells you where a campaign stands: Draft, Scheduled, Sending, Paused, Completed, Cancelled or Failed. The status decides which icons appear on that row.
Open the Campaigns tab and you land on this page. Use it to find campaigns again, compare numbers between campaigns and take quick actions without opening each one.
Find and filter campaigns
- 1
Use the filter bar. Type a name in
Search campaigns…. Pick a status inAll statuses, a period (for exampleThis quarter) and a mailbox inAll mailboxes. TheCustomperiod opensFromandToboxes and anApplybutton.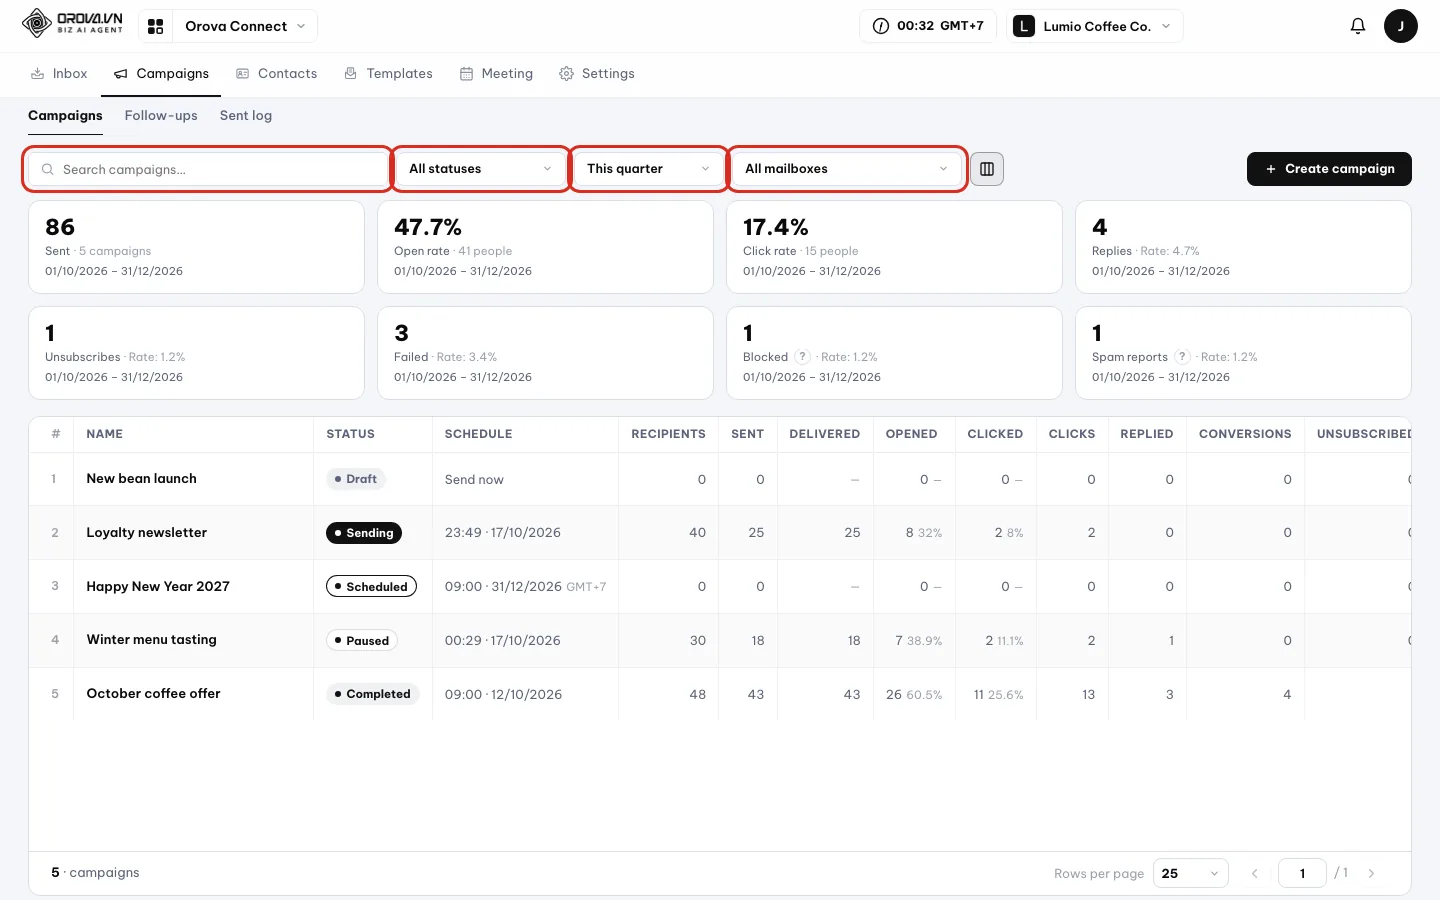
Four filters at the top of the list. - 2
Read the eight stat cards for the period. The cards add up every campaign in the period: Sent, Open rate, Click rate, Replies, Unsubscribes, Failed, Blocked and Spam reports. The small line under each number shows the date range being counted.
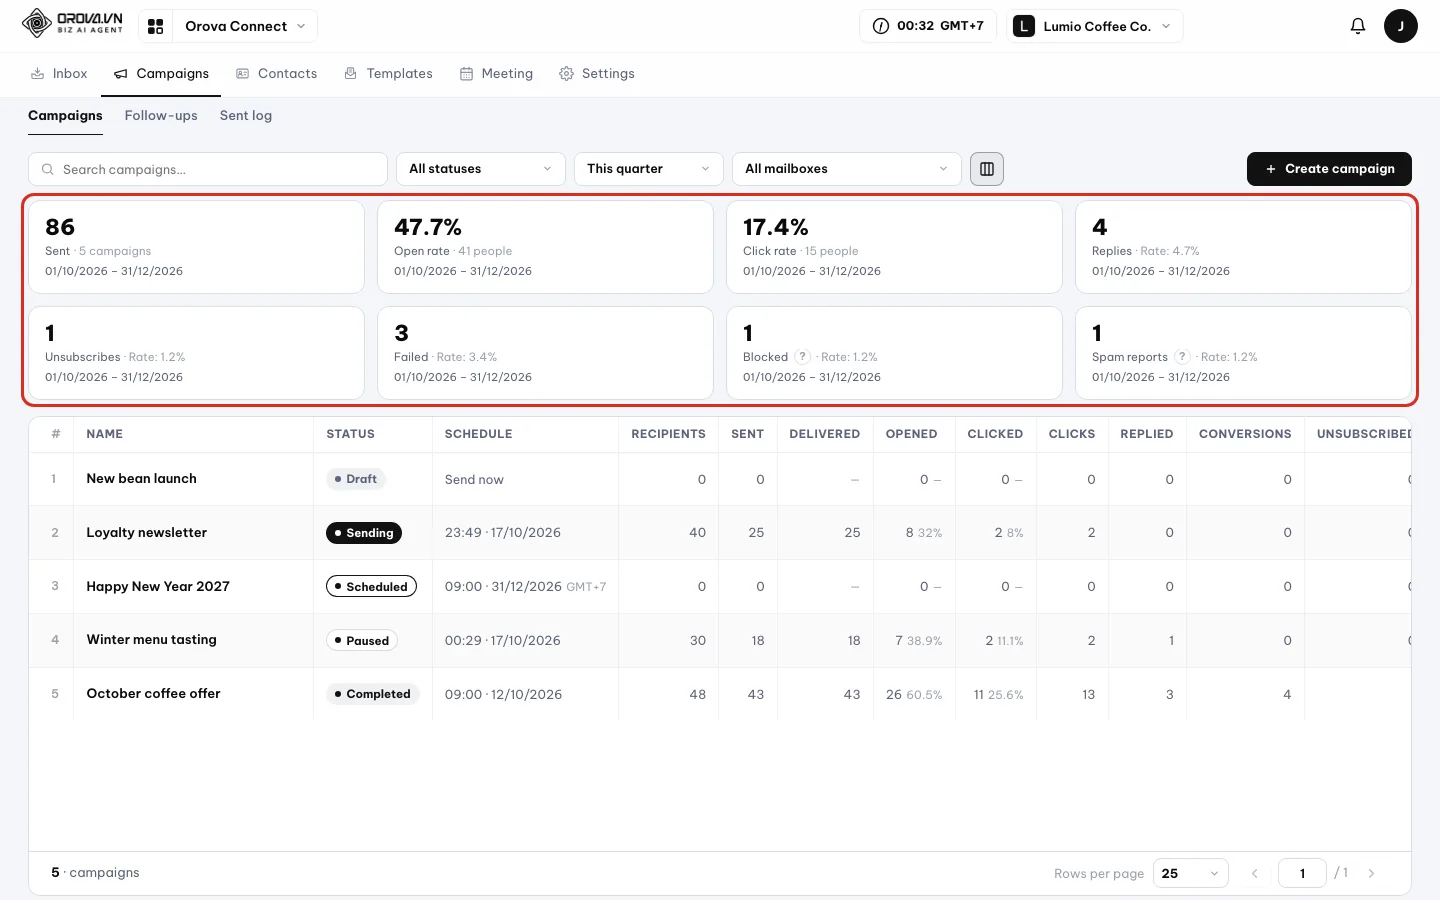
The eight cards change with the period you pick. - 3
Choose which columns to show. Click the columns icon next to
All mailboxes. The menu has aFind a columnbox and a list of columns with checkboxes. Untick a column to hide it.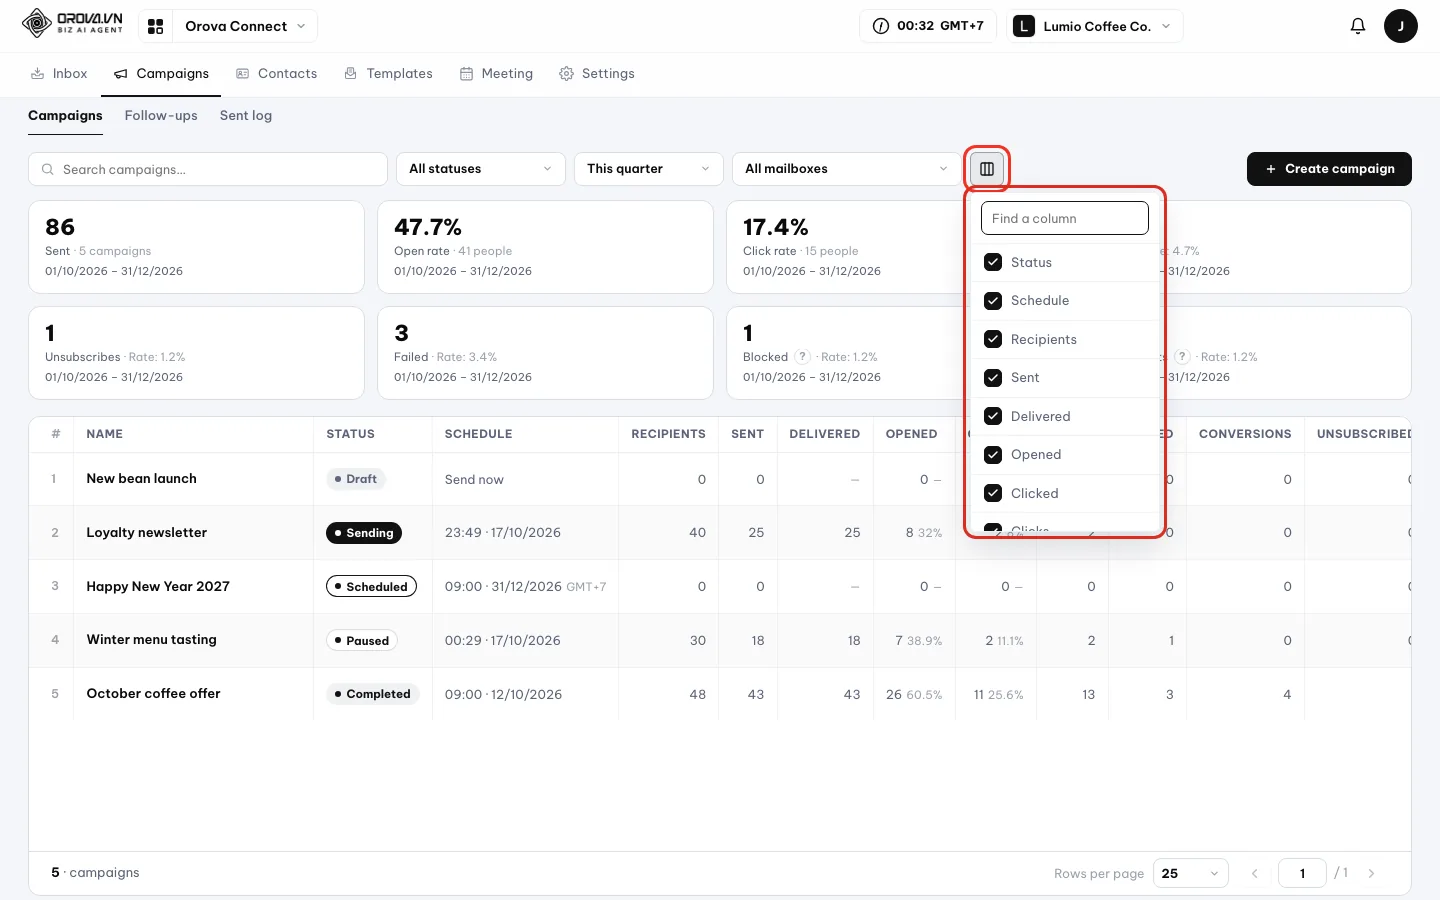
Hide some columns to keep the table tidy. - 4
Change pages. The table footer shows the total number of campaigns. Set
Rows per pageto 25, 50 or 100, then use the arrows to move between pages.
Act on a campaign
- 1
Read the status and the icons. The
Statuscolumn tells you where the campaign stands. TheActionscolumn holds the icons: eyeView, pencilEdit, two squaresDuplicate, two barsPause, triangleResumeand binDelete campaign.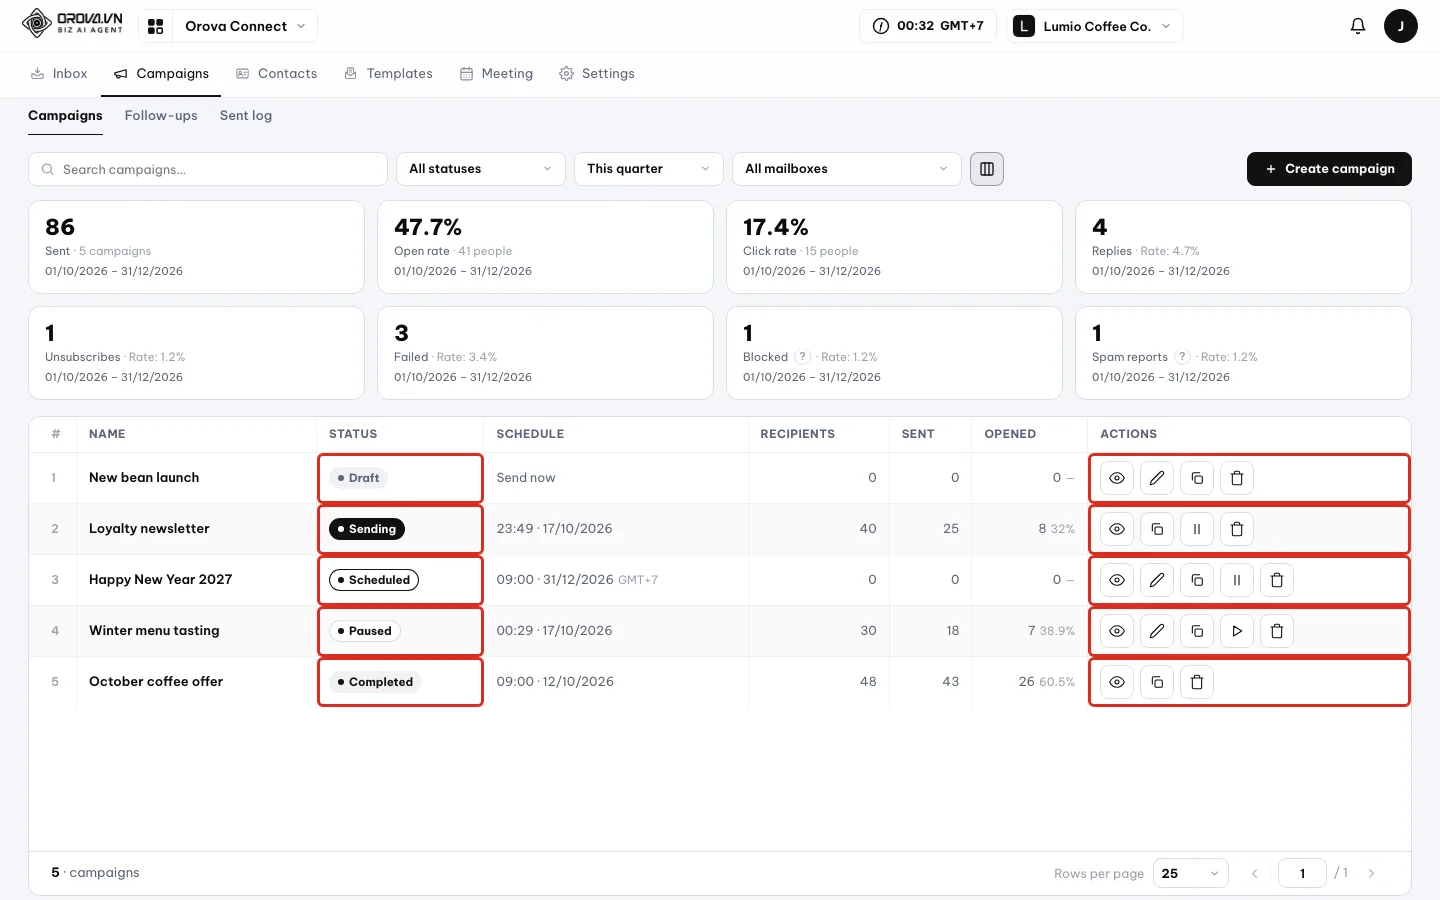
Each status shows a different set of icons. - 2
Rename right in the table. Hover a row and a
Renamepencil icon appears next to the name. Click it, edit the name and click outside; Orova shows Saved. - 3
Duplicate, pause or resume.
Duplicatecreates a new draft that is an exact copy.Pausestops sending the rest.Resumesends the rest; people who already got the email are not sent it again. - 4
Delete a campaign. Click the bin. The Delete campaign dialog asks again: “Unsent emails are cancelled; sent statistics will be lost and cannot be recovered.” Click
Deleteto delete orCancelto back out.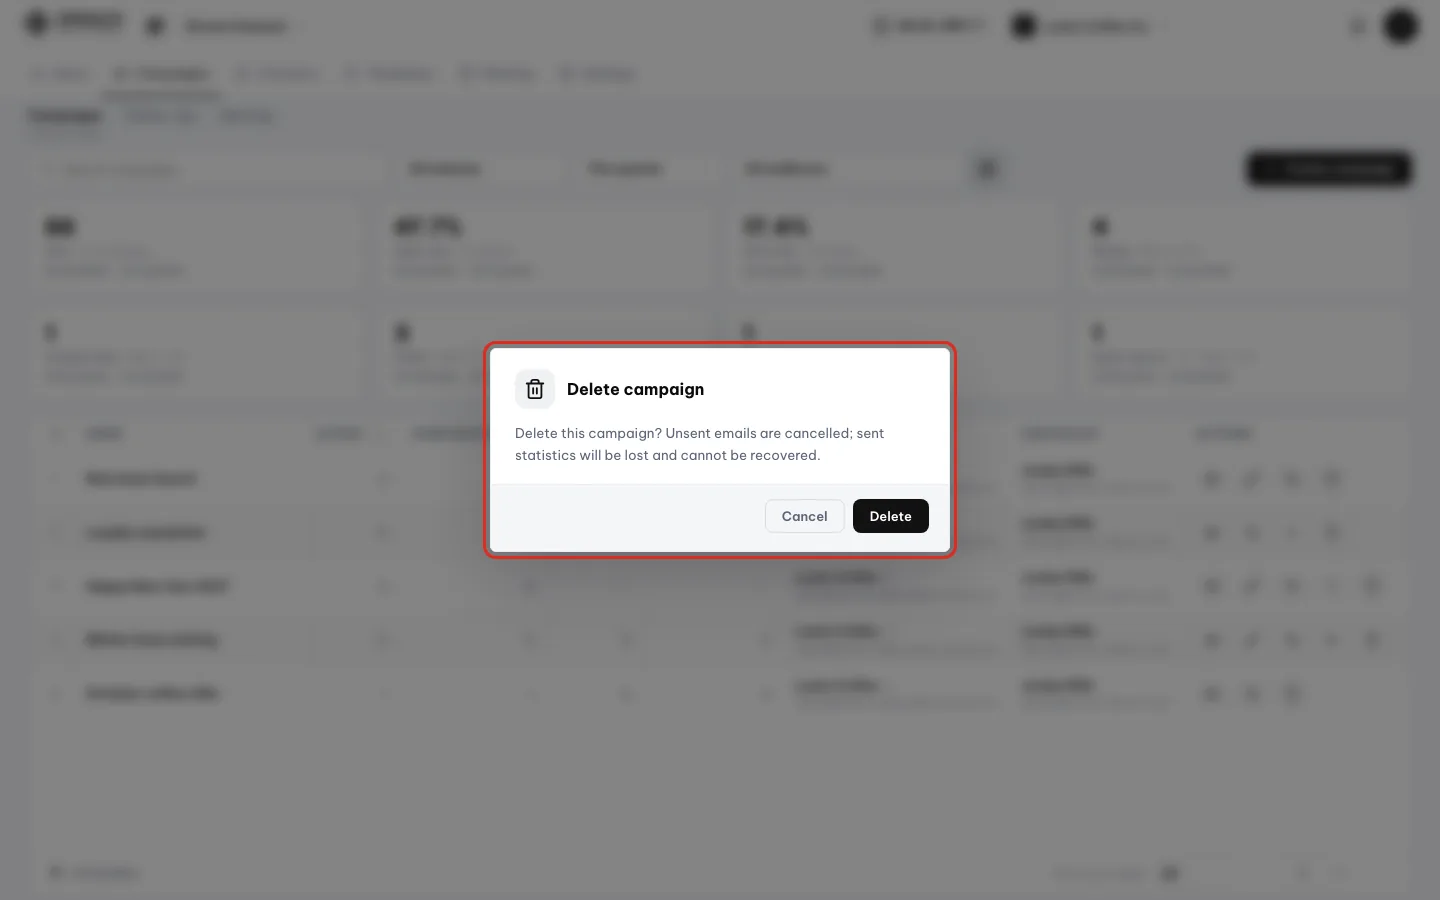
The confirmation dialog before deleting.
| Status | Icons shown |
|---|---|
| Draft | View · Edit · Duplicate · Delete |
| Scheduled | View · Edit · Duplicate · Pause · Delete |
| Sending | View · Duplicate · Pause · Delete |
| Paused | View · Edit · Duplicate · Resume · Delete |
| Completed | View · Duplicate · Delete |
Warning
Deleting is permanent
Pause instead.14 · Campaigns: Report
Read the campaign report
Click a campaign to open its report: 12 stat cards, a funnel, timing, charts, links and a recipients table.
Delivered
Emails sent minus emails that bounced. This is the number of emails that actually reached recipients' inboxes.
Real opens and machine opens
Some mailboxes load emails in advance to protect privacy, as if they had been opened. Orova separates those and counts only people who really opened. That keeps your open rate from being inflated.
Clicked and Clicks
Clicked counts people, one per person. Clicks counts every click, so one person clicking three times counts as three.
Bounced, Blocked, Spam reports
Bounced means the address could not receive the email, for example because it does not exist. Blocked means the recipient's server refused the email. A spam report means the recipient clicked the report-spam button themselves.
Open the report and read the header
- 1
Open a campaign. On the
Campaignstab, click the campaign name or the eyeViewicon. Orova also opens this page for you after you click Send now. - 2
Read the header. On the left are
Back to campaigns, the campaign name and its status label, for example October coffee offer · Completed. On the right are the period box (Whole campaignby default) and the action icons.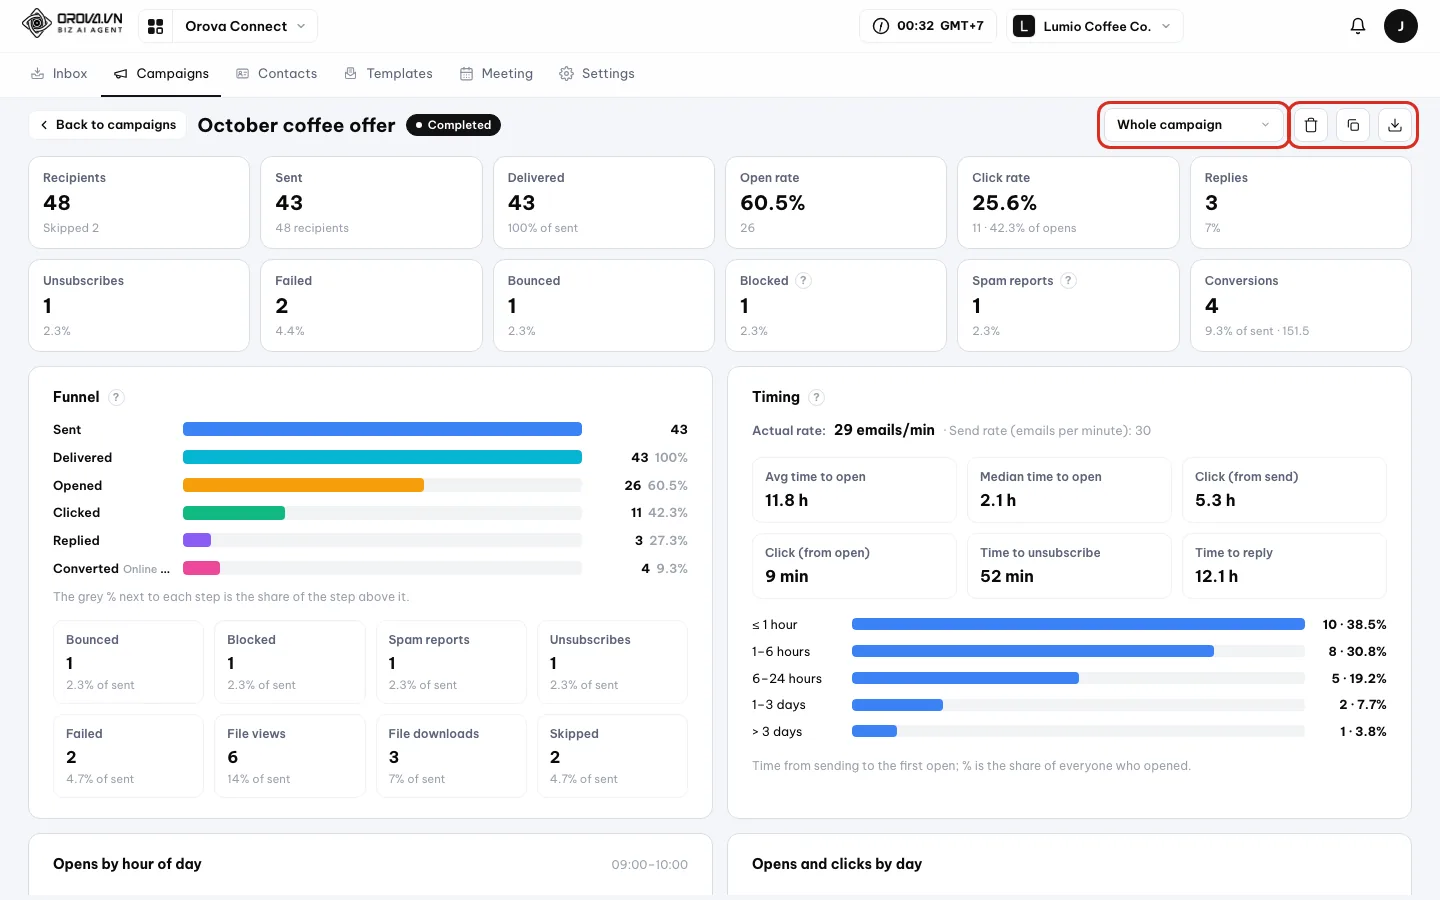
The period box and action icons at the top right. - 3
Read the 12 stat cards. Two rows of cards sum up the whole campaign. The grey line under each number shows a rate or a secondary number, for example Click rate 25.6% with “42.3% of opens”. The table below explains each card.
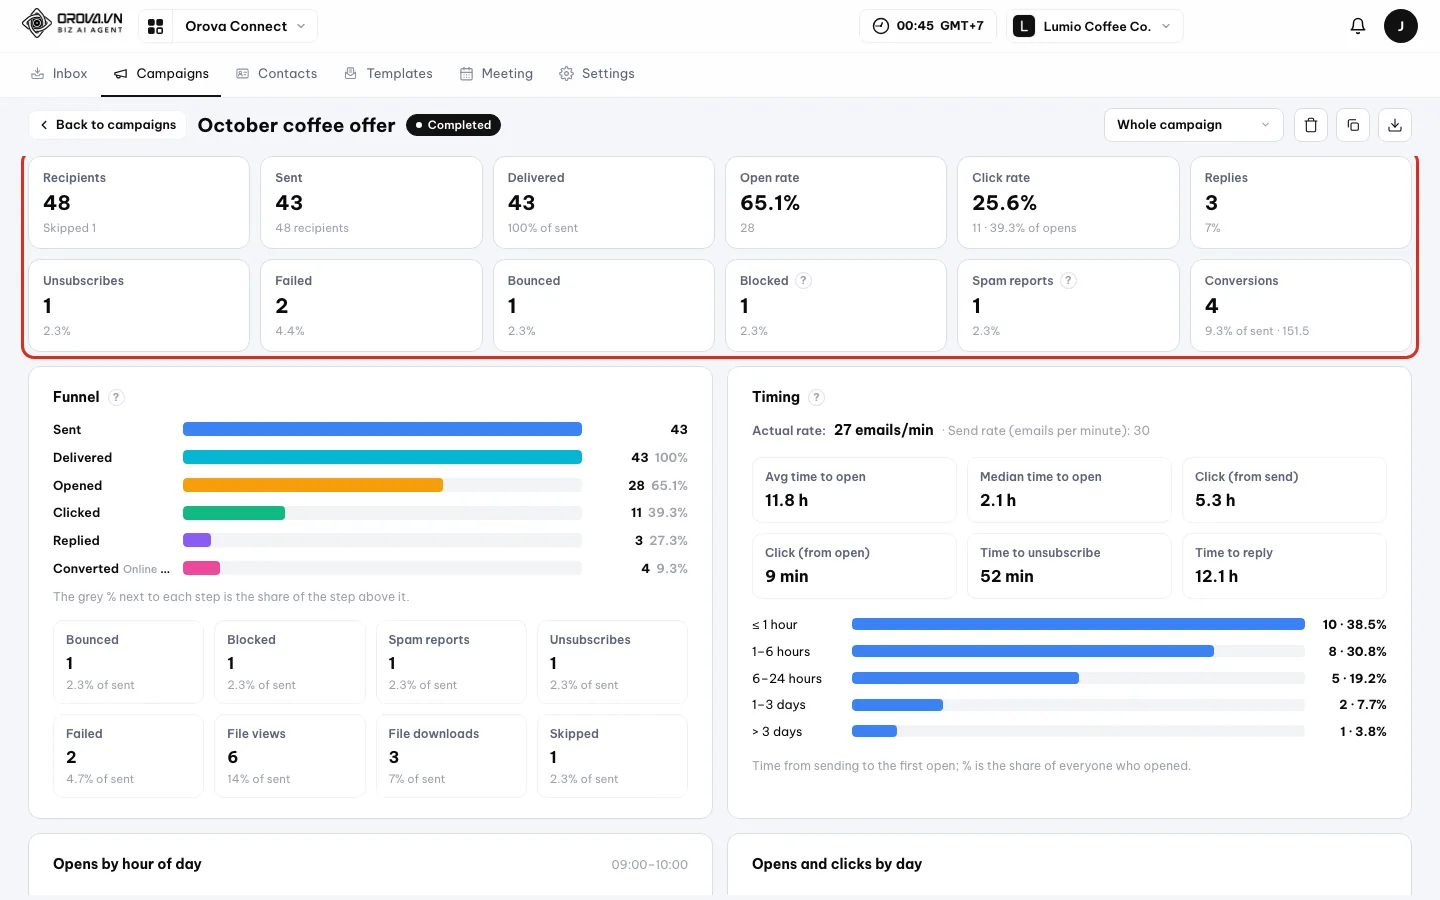
12 stat cards. Click a card to filter the recipients table.
| Button / field | What it does | When it appears |
|---|---|---|
Back to campaigns | Returns to the Campaigns tab. | Always |
| Campaign name | Edit it in place; it saves when you stop typing. | When you can edit |
| Period box | Whole campaign, Today, This week, This month, This quarter, Last 30 days, Custom. Every number on the page follows this period. | Always |
Pencil Edit campaign | Reopens the editor. | Draft, Scheduled, Paused |
Pause / Resume | Stops sending / sends the rest. | Sending, Scheduled / Paused |
Bin Delete campaign | Deletes it for good; cannot be recovered. | Every status |
Duplicate | Creates a new draft that is an exact copy. | Every status |
Download arrow Export Excel | Downloads the recipient list with each person's numbers. | Every status |
| Card | What it counts |
|---|---|
| Recipients | Everyone in the campaign; the secondary line shows how many were skipped. |
| Sent | Emails that left the sending mailbox; the secondary line shows how many are still queued, if any. |
| Delivered | Emails sent minus emails that bounced. |
| Open rate | People who really opened, out of emails delivered; machine opens are not counted. |
| Click rate | People who clicked at least one link, out of emails delivered; the secondary line also shows the rate out of people who opened. |
| Replies | How many people replied to the email. |
| Unsubscribes | People who clicked the unsubscribe link and confirmed. |
| Failed | Emails that could not be sent, after retrying by the rules you set. |
| Bounced | The recipient's server sent the email back. |
| Blocked | The recipient's server refused the email, usually as suspected spam. If you see a lot of these, check SPF, DKIM and DMARC for your sending domain. |
| Spam reports | People who reported spam. Only Outlook/Hotmail and Yahoo send these reports; Gmail does not report per person. |
| Conversions | People who converted, out of emails sent, plus the total value. For a campaign that does not measure conversions, the card shows — and Not measured. |
Click a stat card to filter recipients
Every stat card is also a filter button. Click one and the Recipients table below keeps only the people in that card.
Filter and clear the filter
- 1
Click a card, for example
Open rate. The Recipients table keeps only people who opened. A label with the card's name appears next to the search box, for example Open rate ×. The table footer shows how many people match, for example 26 · recipients.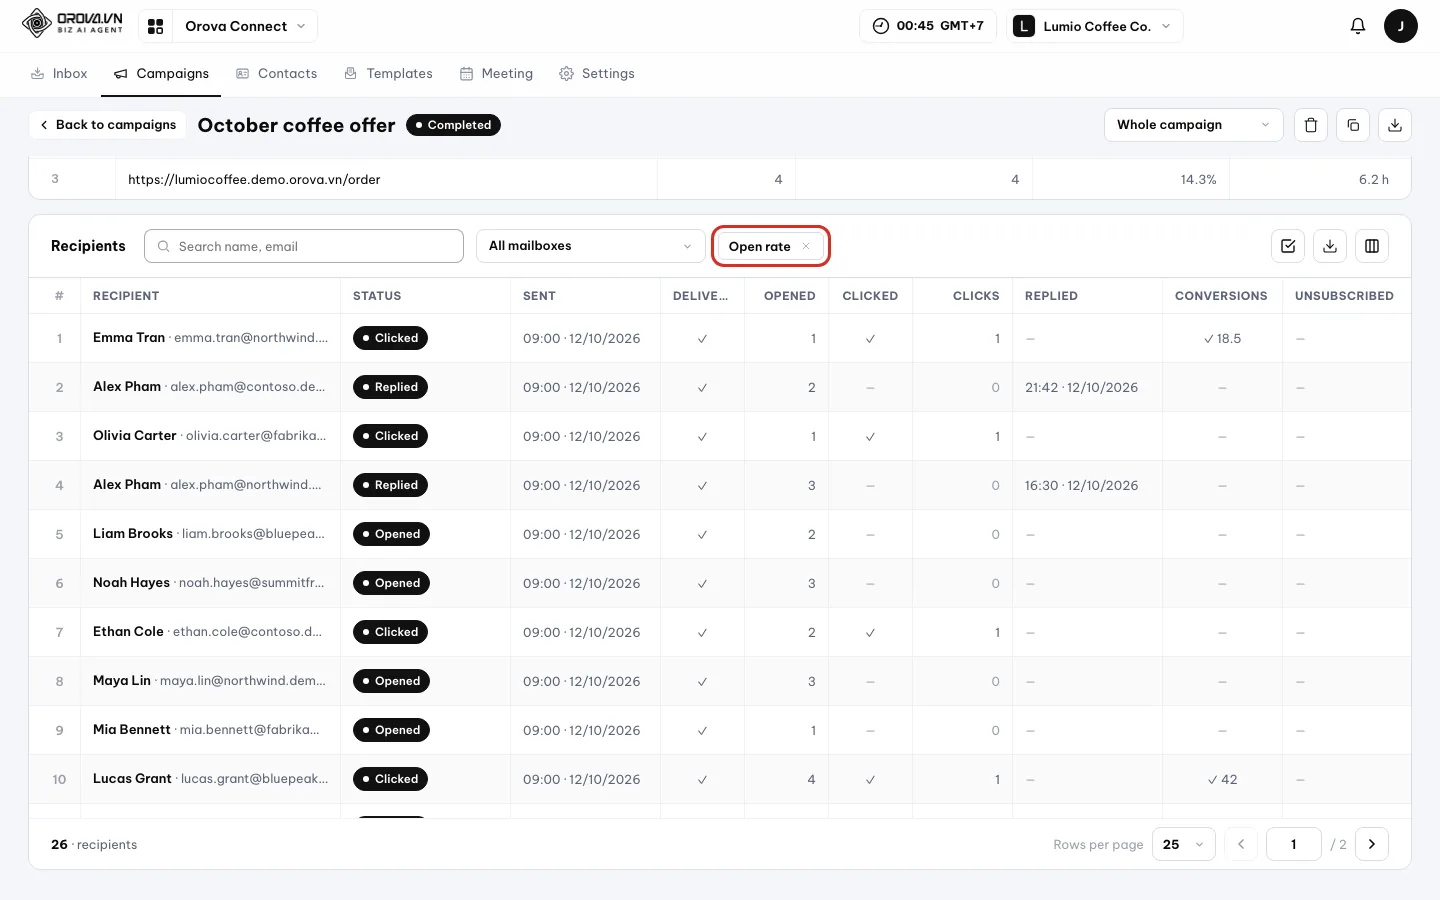
The filter label tells you which card the table is filtered by. - 2
Clear the filter. Click the × on the filter label, click the same card again, or click the Recipients card. Clicking the ? on a card only shows its explanation; it does not filter.
Funnel, timing, charts, links
- The six-step Funnel: Sent, Delivered, Opened, Clicked, Replied, Converted. The grey % next to each step is its share of the step just above.
- Below the funnel are secondary numbers: Bounced, Blocked, Spam reports, Unsubscribes, Failed, File views, File downloads, Skipped.
- Timing shows how quickly recipients reacted, with the Actual rate shown next to the send rate you set.
- The charts and Links show which hours people open most, and which links get clicked most.
Read the funnel, timing and charts
- 1
Read the
FunnelandTimingblocks. The funnel shows at which step emails drop off. The Timing block showsAvg time to open,Median time to open,Click (from send),Click (from open),Time to unsubscribeandTime to reply. The bars below group people who opened into ≤ 1 hour, 1–6 hours, 6–24 hours, 1–3 days and > 3 days.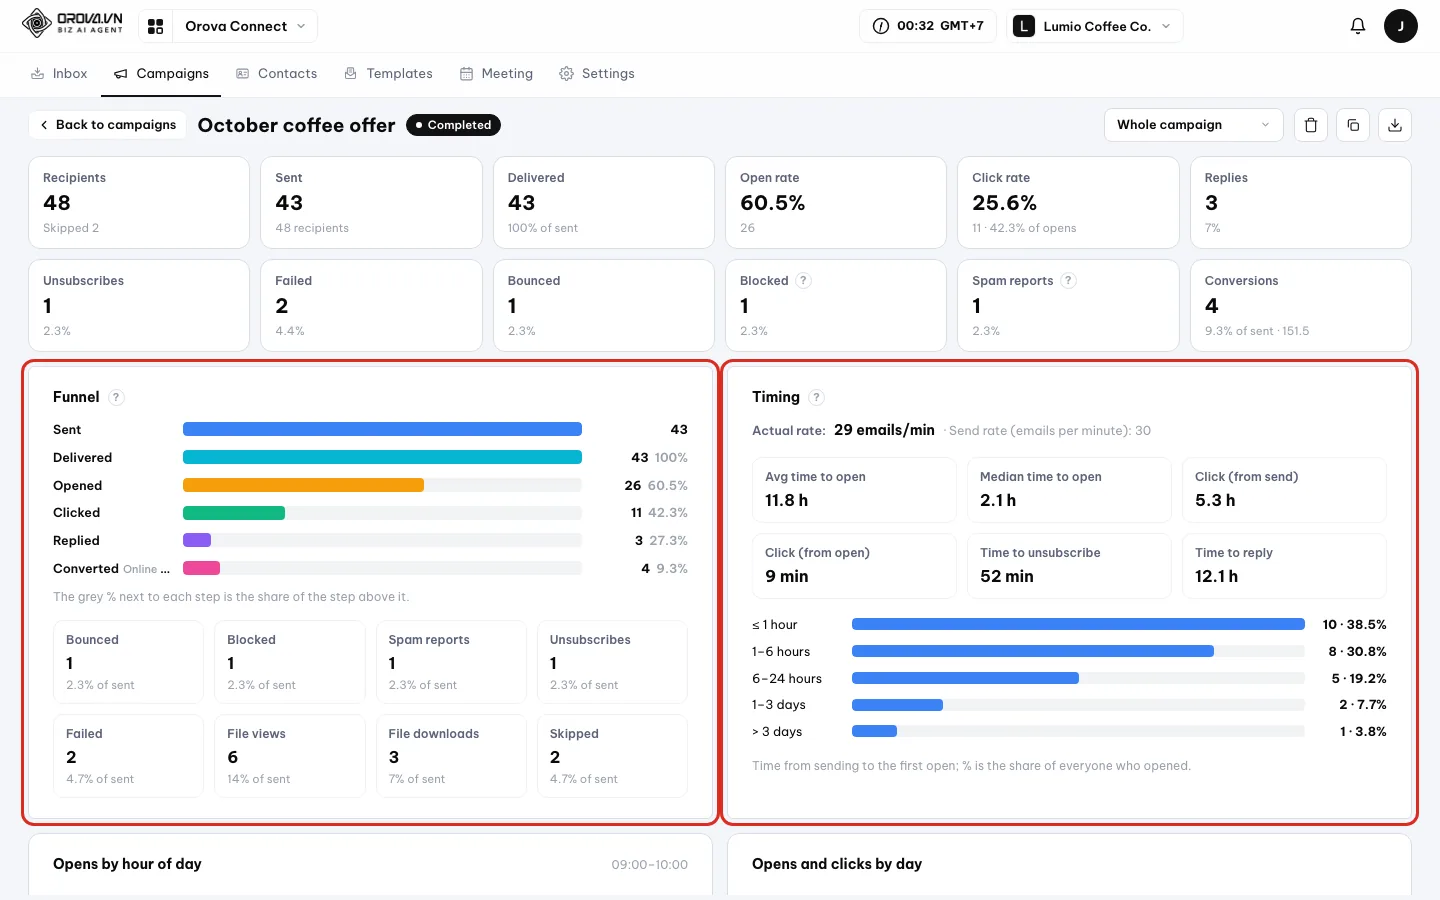
Funnel on the left, Timing on the right. - 2
Look at the two charts. Opens by hour of day shows the busiest opening hour, noted at the top right (for example 09:00–10:00). Opens and clicks by day draws two lines,
OpensandClicks. Use the busiest hour to schedule your next campaign.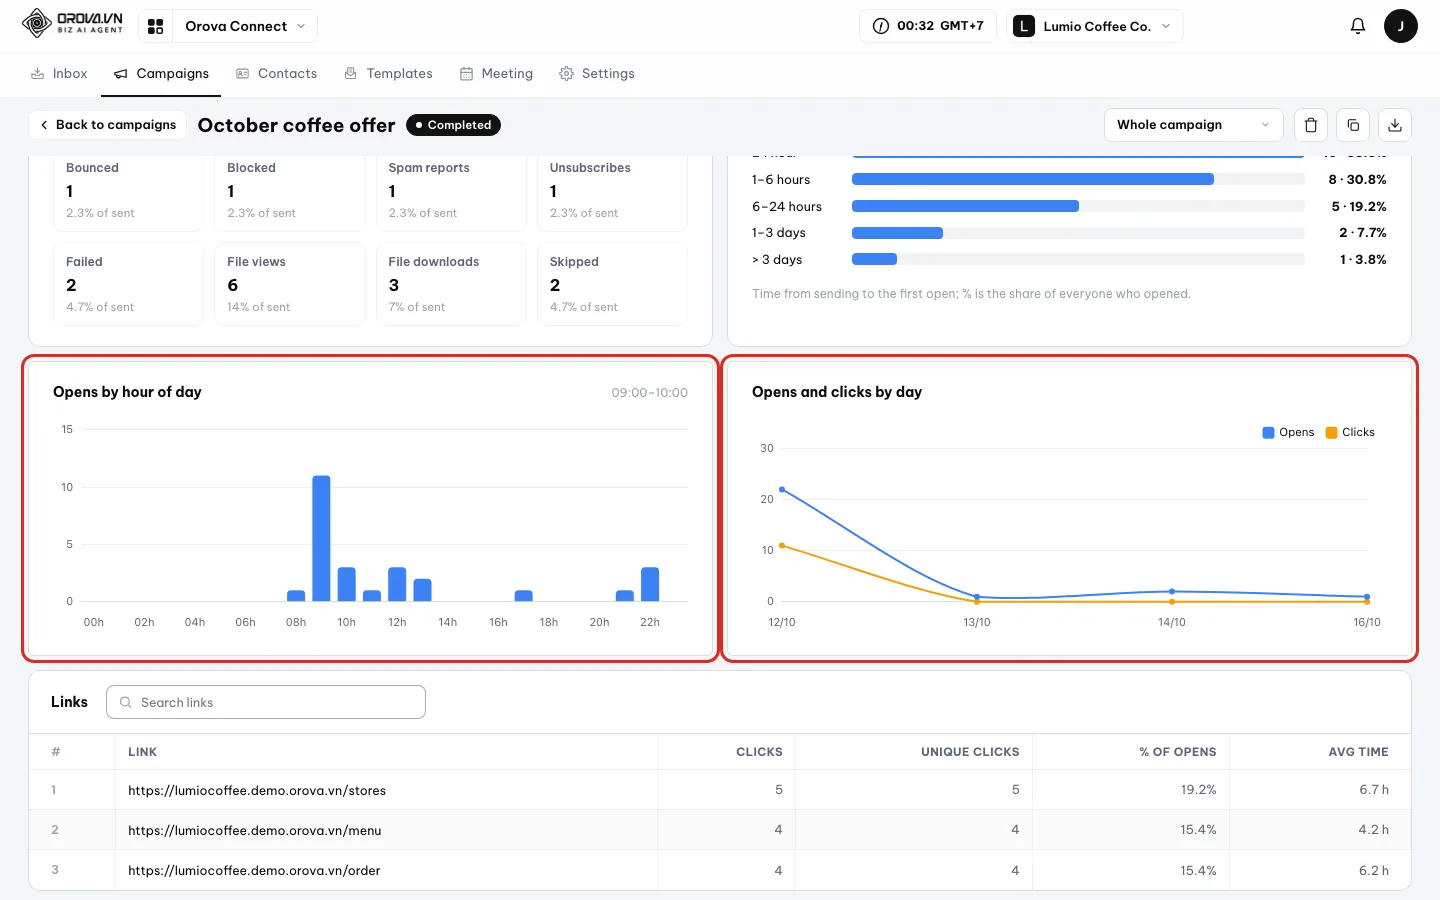
The busiest hour appears at the top right of the left chart. - 3
Read the
Linkstable. One row per link, withClicks,Unique clicks,% of opensandAvg time. Type inSearch linkswhen the email has many links.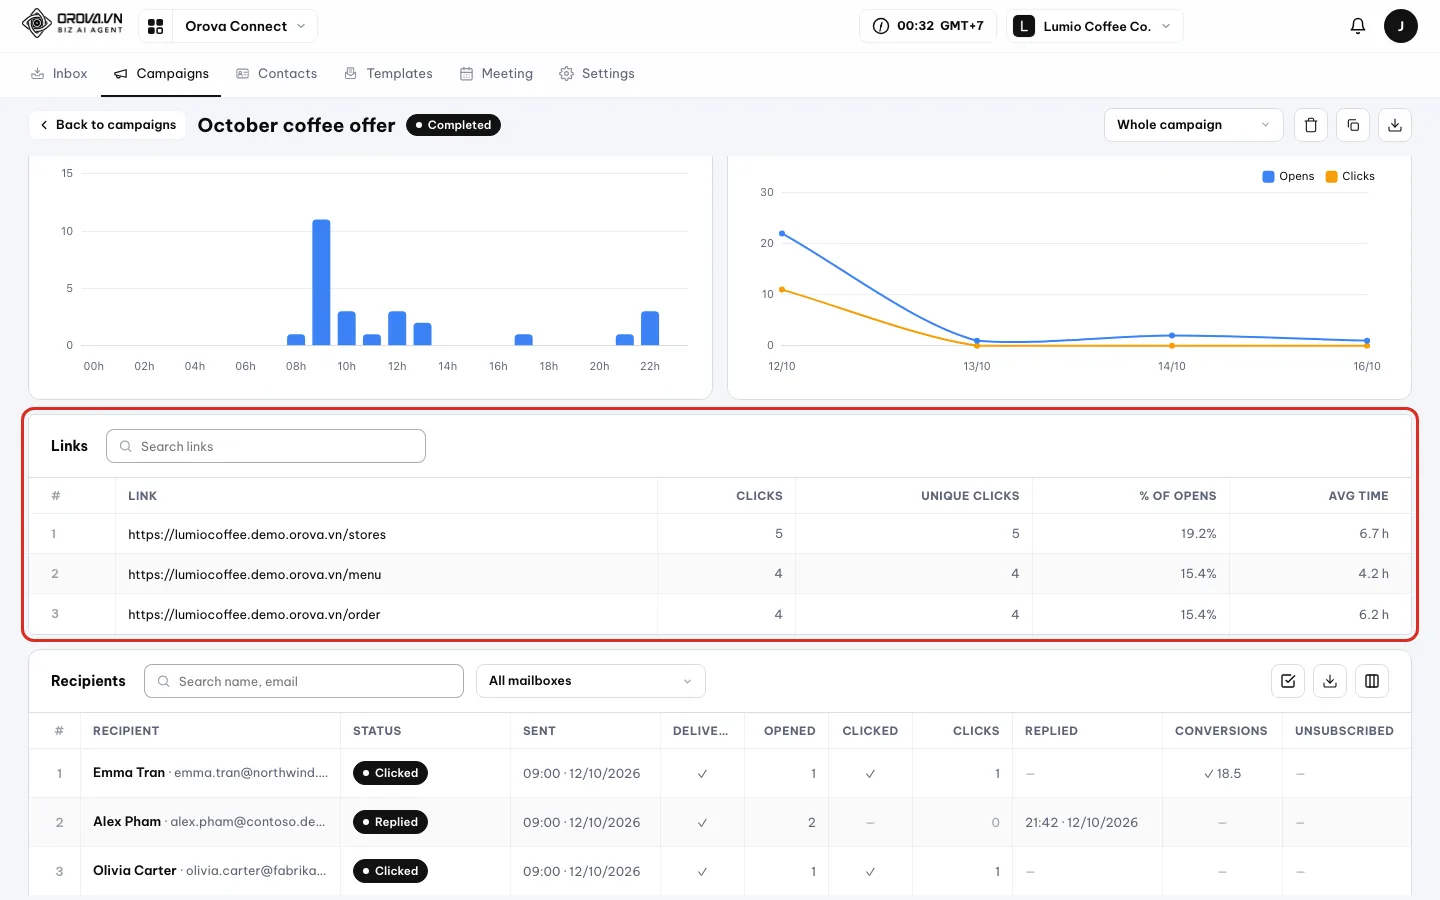
The most-clicked link is at the top.
Recipients table
The table at the bottom of the page lists each recipient with their own status and numbers: sent, opened, clicked, replied, converted, failed.
Find a person and see the details
- 1
Search, filter by mailbox, export to Excel, choose columns. Type in
Search name, email. If the campaign was sent from several mailboxes, filter withAll mailboxes. On the right areBulk select,Export Exceland the columns icon.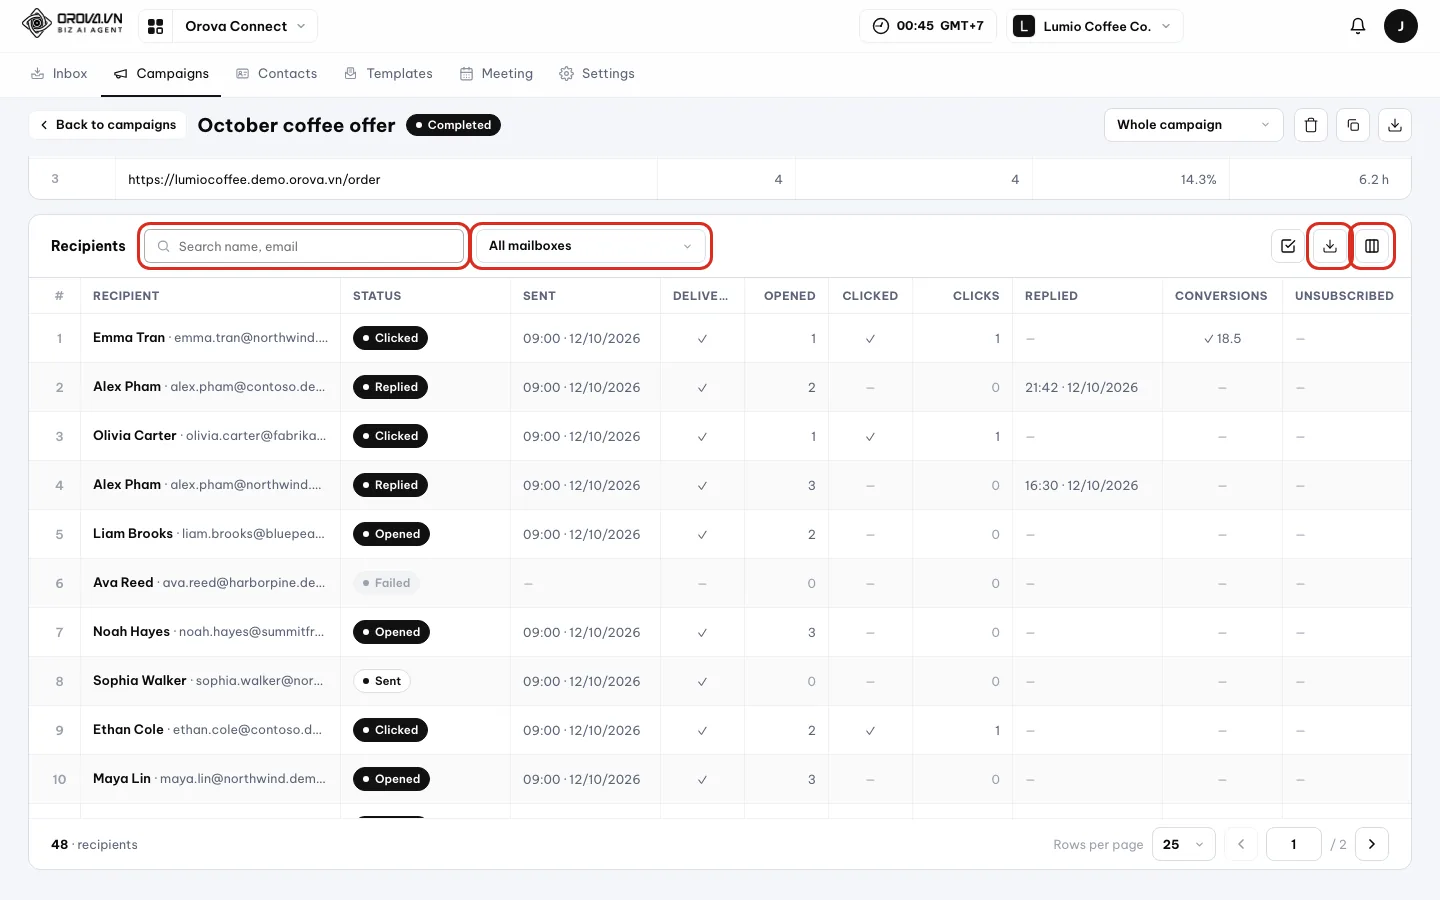
The Recipients table toolbar. - 2
Click a row to see the Timeline. A panel opens on the right listing each event for that person: Sent, First opened, Clicked link with the link they clicked. If the person has a CRM profile, there is an
Open customer profilebutton. Click × to close.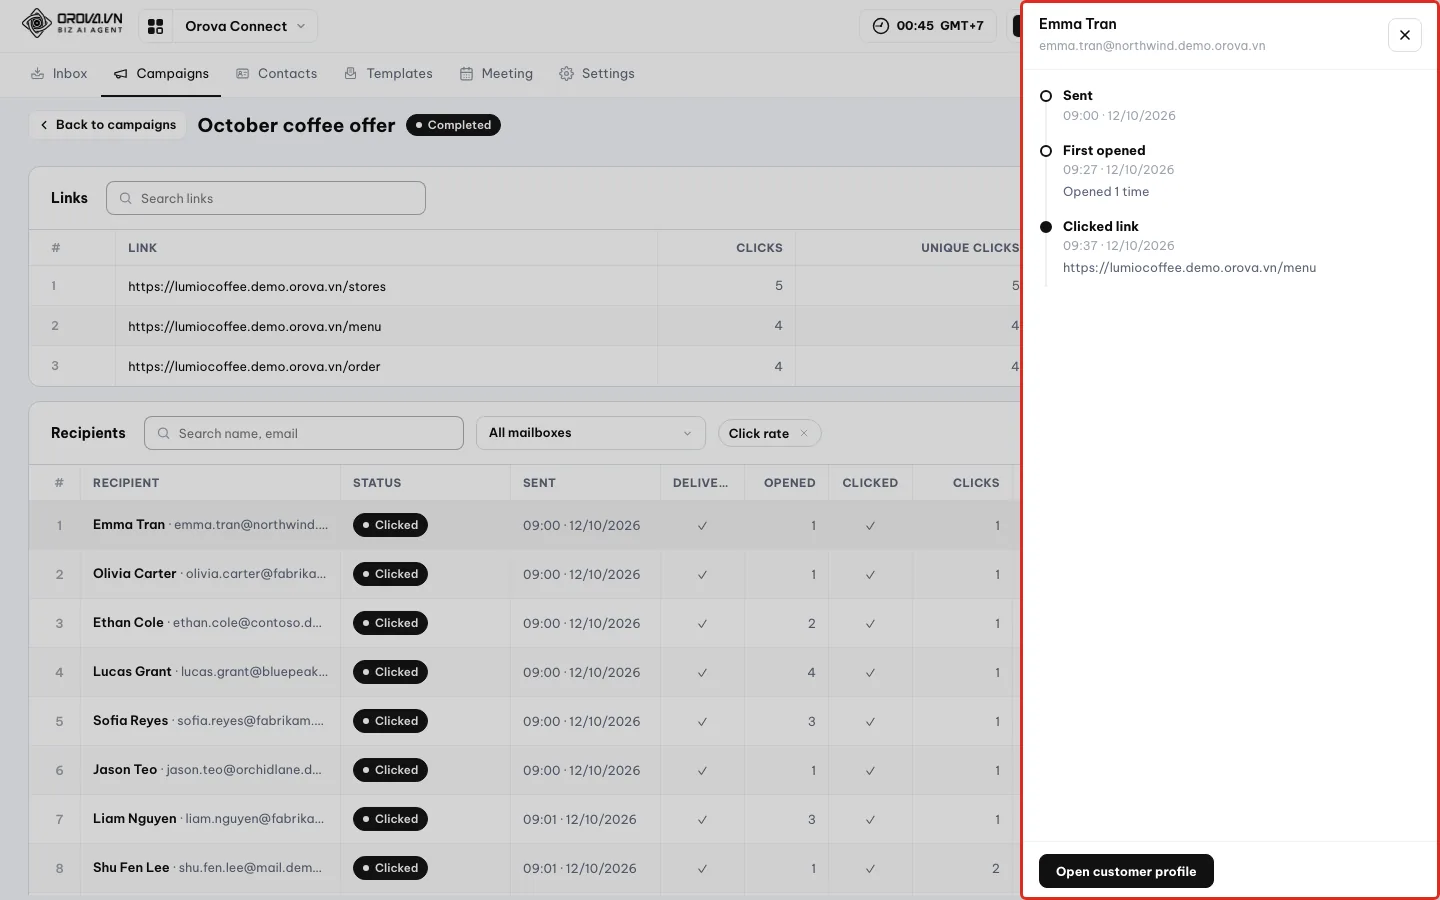
Each person's timeline, with a button to open their CRM profile. - 3
See why emails failed. Click the Failed card above to keep only failed emails. The
Failedcolumn shows the error code, for examplemailbox_not_found(the mailbox does not exist) ormailbox_full(the mailbox is full). Hover the ? to read the reason.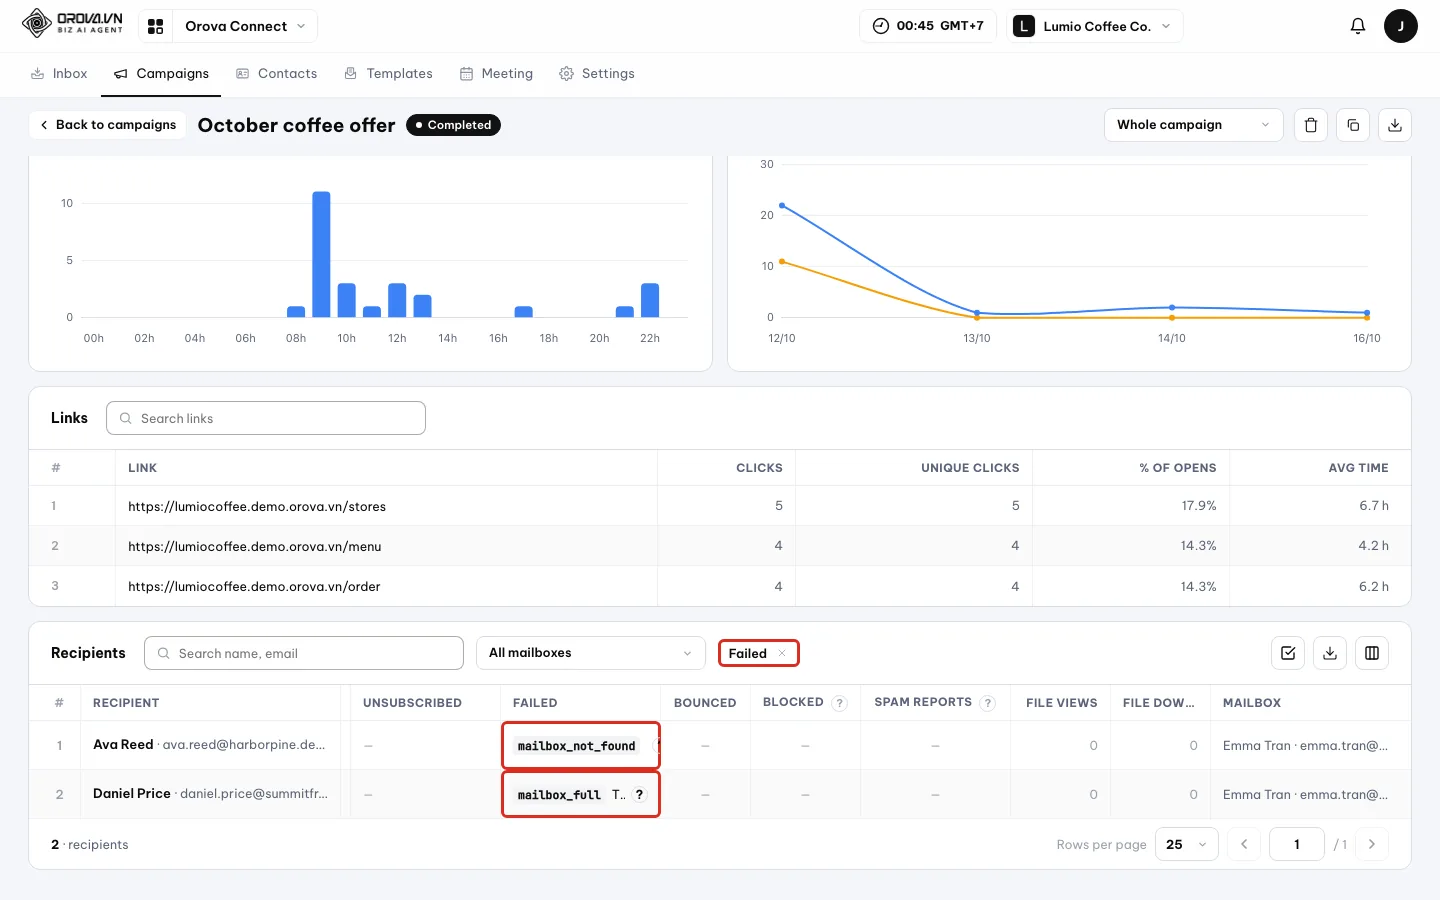
The Failed column tells you why an email did not arrive.
When a sending mailbox hits its email provider's limit
Provider limit
Gmail, Microsoft 365 and other providers only let a mailbox send a certain number of emails per day, depending on the plan you pay for. Once a mailbox reaches it, it has to wait for the limit to reset.
Handle a campaign that paused itself
- 1
Read the warning bar at the top of the report. The campaign switches to Paused on its own. The warning bar names the mailbox that hit its limit. The grey lines below show which mailboxes are resting and until what time.
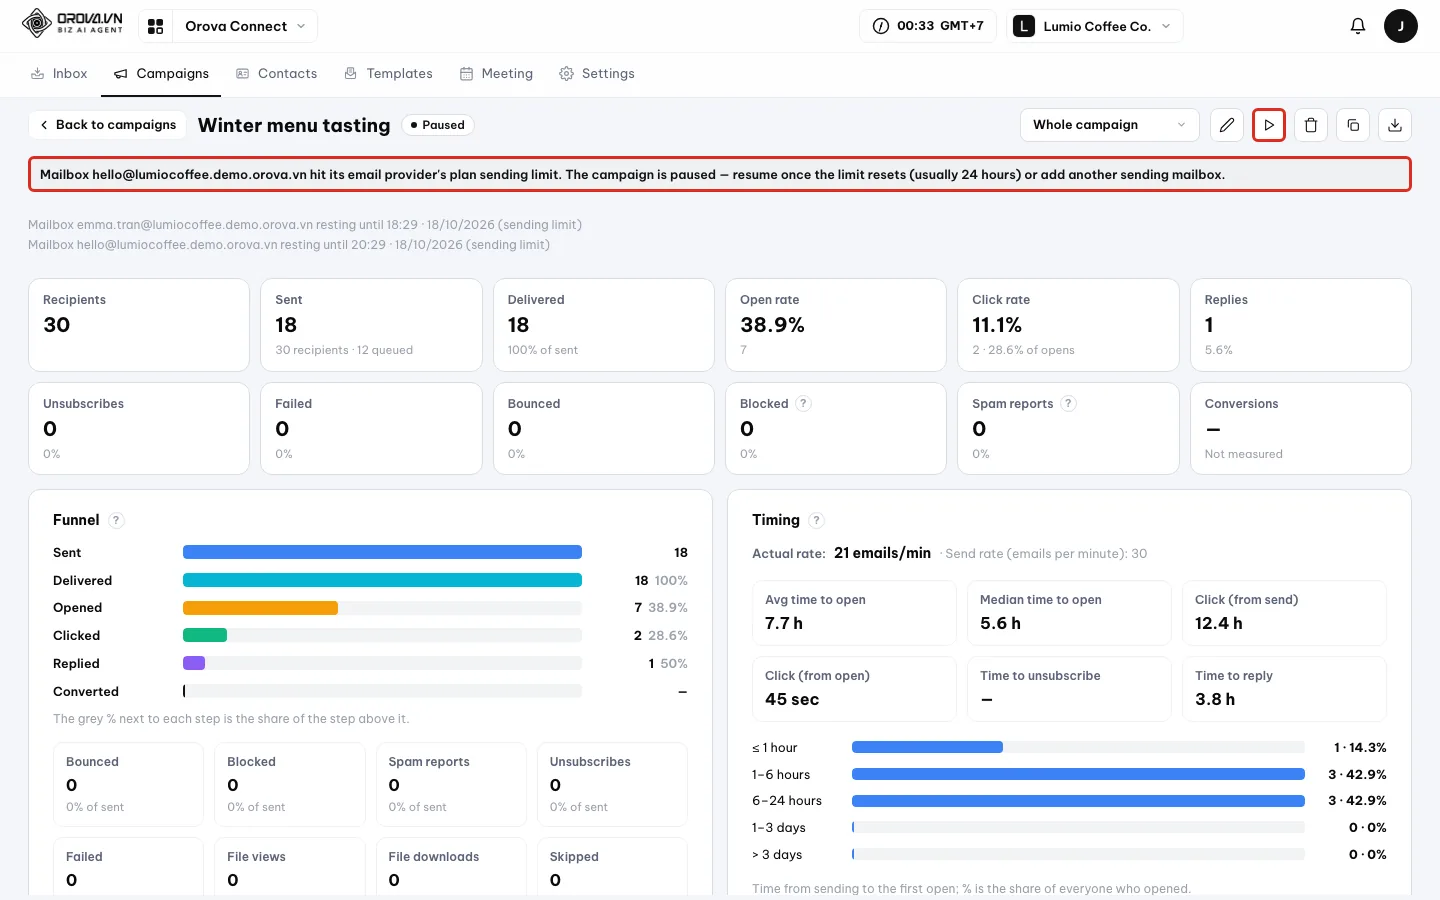
The warning bar and the Resume icon (triangle). - 2
Wait for the limit to reset or add a mailbox. Limits usually reset after 24 hours. To send sooner, click the
Edit campaignpencil and add another sending mailbox. - 3
Click
Resume. Orova sends the rest. People who already got the email are not sent it again.
| Situation | What Orova does | What you do |
|---|---|---|
| Only one sending mailbox, or every mailbox has hit its limit | Switches the campaign to Paused and shows a warning. | Click Resume once the limit resets, or add another sending mailbox. |
| Several mailboxes, and at least one can still send | The mailbox that hit its limit rests; emails move to the others. | Nothing. |
15 · Campaigns: Conversions
Measure conversions and send events with the Conversion API
Create a conversion, create an API key, have your website report events to Orova, then pick the conversion when you create a campaign.
Event key
The machine-readable name of a conversion, made only of lowercase letters, digits and underscores. For example online_order. Your website sends exactly this key to Orova.
Attribution window
How many days after the email is sent an event still counts toward the campaign, from 1 to 365. If a customer buys after the window, the event is still recorded but credited to no campaign.
API key
A secret string starting with crmk_, like a door key. Only a website holding this key can send events into your workspace.
Conversion API
The address your website's server uses to tell Orova: “the customer with this email just placed an order”. Orova credits the event to the right campaign on its own.
Everything in this section lives under Settings ▸ Conversions in Orova Connect. Set it up once and every later campaign can reuse it.
Create a conversion
- 1
Open
Settings▸Conversions. ClickSettingsin the Connect menu bar, thenConversionsin the left menu. The page has three blocks: Conversions, API keys and Send events from your website or app.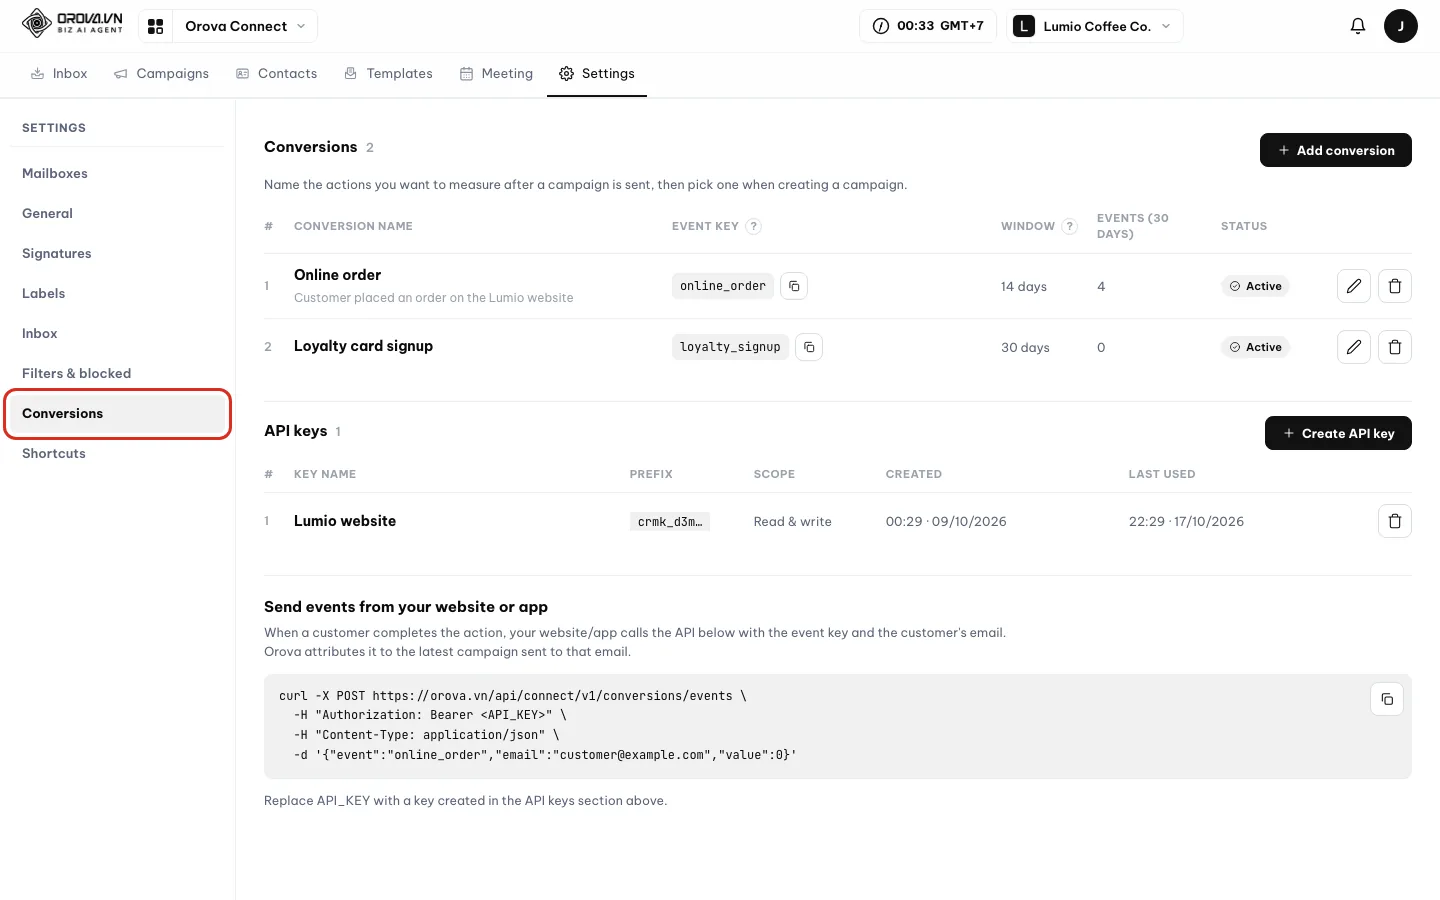
Conversions in Connect Settings. - 2
Click
Add conversionand fill it in. Type aConversion name, for example Webinar signup. LeaveEvent keyempty and Orova generates it from the name. Set theAttribution window (days), 30 by default. Add aDescriptionif you need one.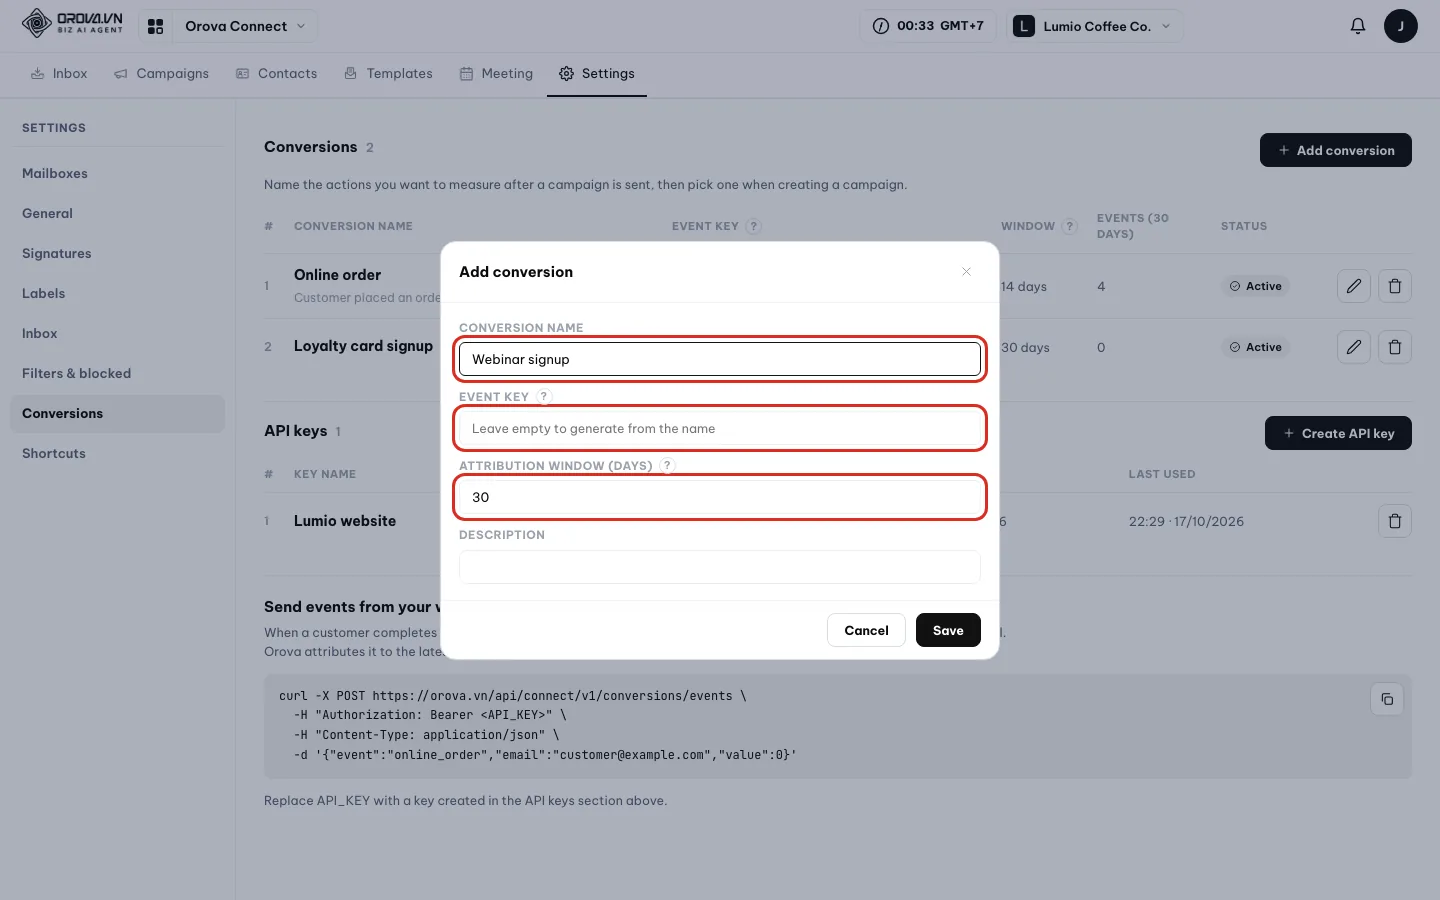
A name is all you need; Orova can generate the event key. - 3
Click
Save. The new conversion appears in the table with the status Active. Click the copy icon next to the event key to grab it for whoever builds your website. - 4
Edit or delete. Use the pencil and bin at the end of the row. A conversion that already has events is deactivated instead of deleted, to keep the history.
| Column | Meaning |
|---|---|
Conversion name | The name you set, with the description in grey below. |
Event key | The key your website sends; has a copy button. |
Window | Attribution window in days, for example 14 days. |
Events (30 days) | How many events arrived in the last 30 days. |
Status | Active or Inactive. An inactive conversion does not accept new events. |
Create an API key
- 1
Click
Create API key. The button is in the API keys block. Type aKey name, for example Lumio website. Pick aScope: Read & write (needed to send events) or Read only. ClickCreate API key.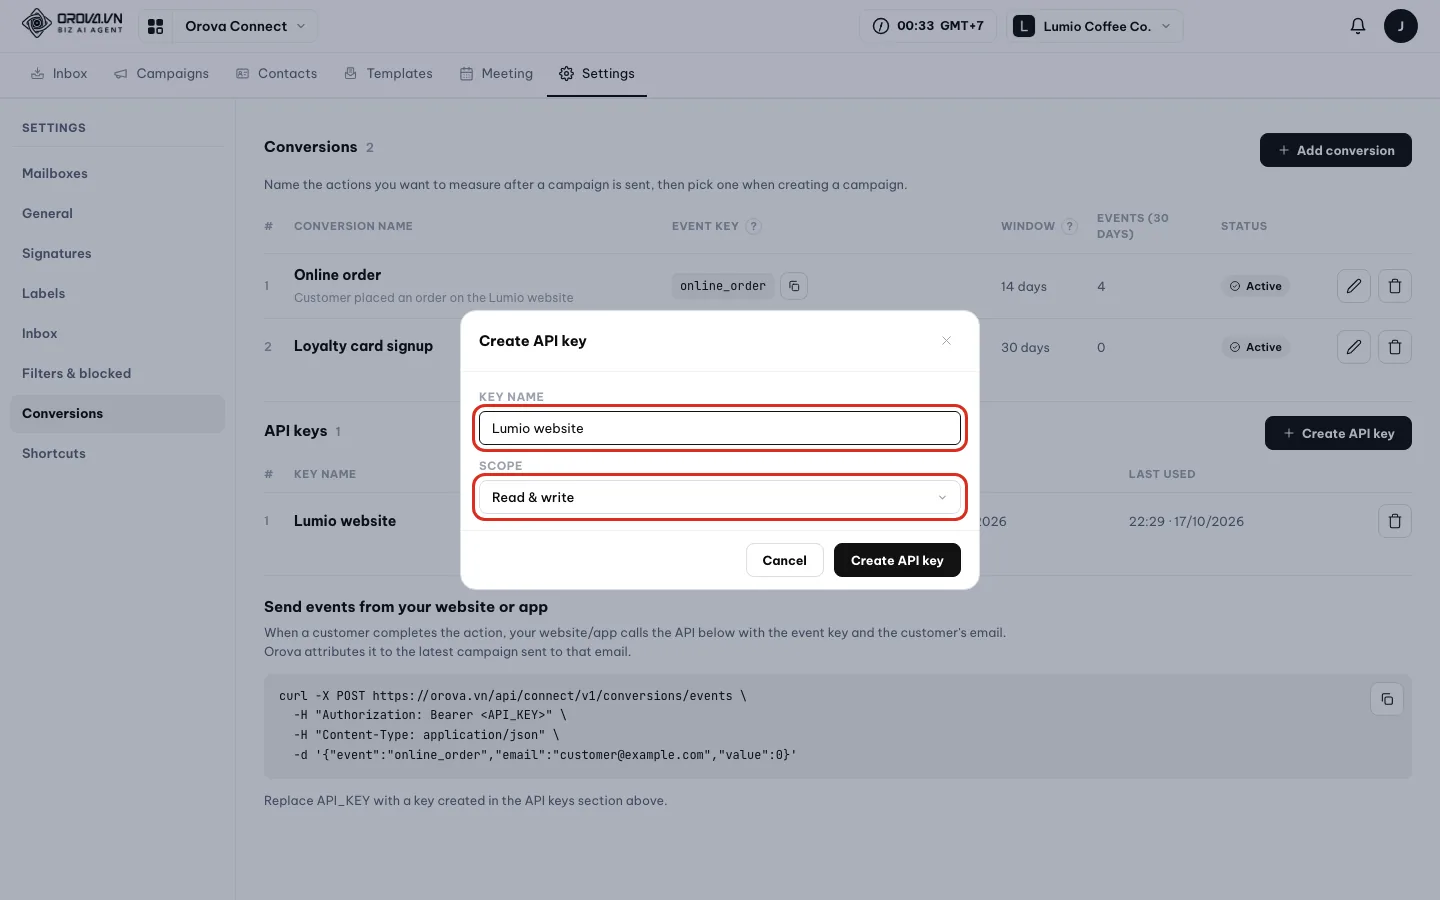
Name the key after the place you will use it. - 2
Copy the key right away. The key appears in a box with a copy button and the line Copy now — the key is shown only once. Click copy, paste it somewhere safe, then click
Done.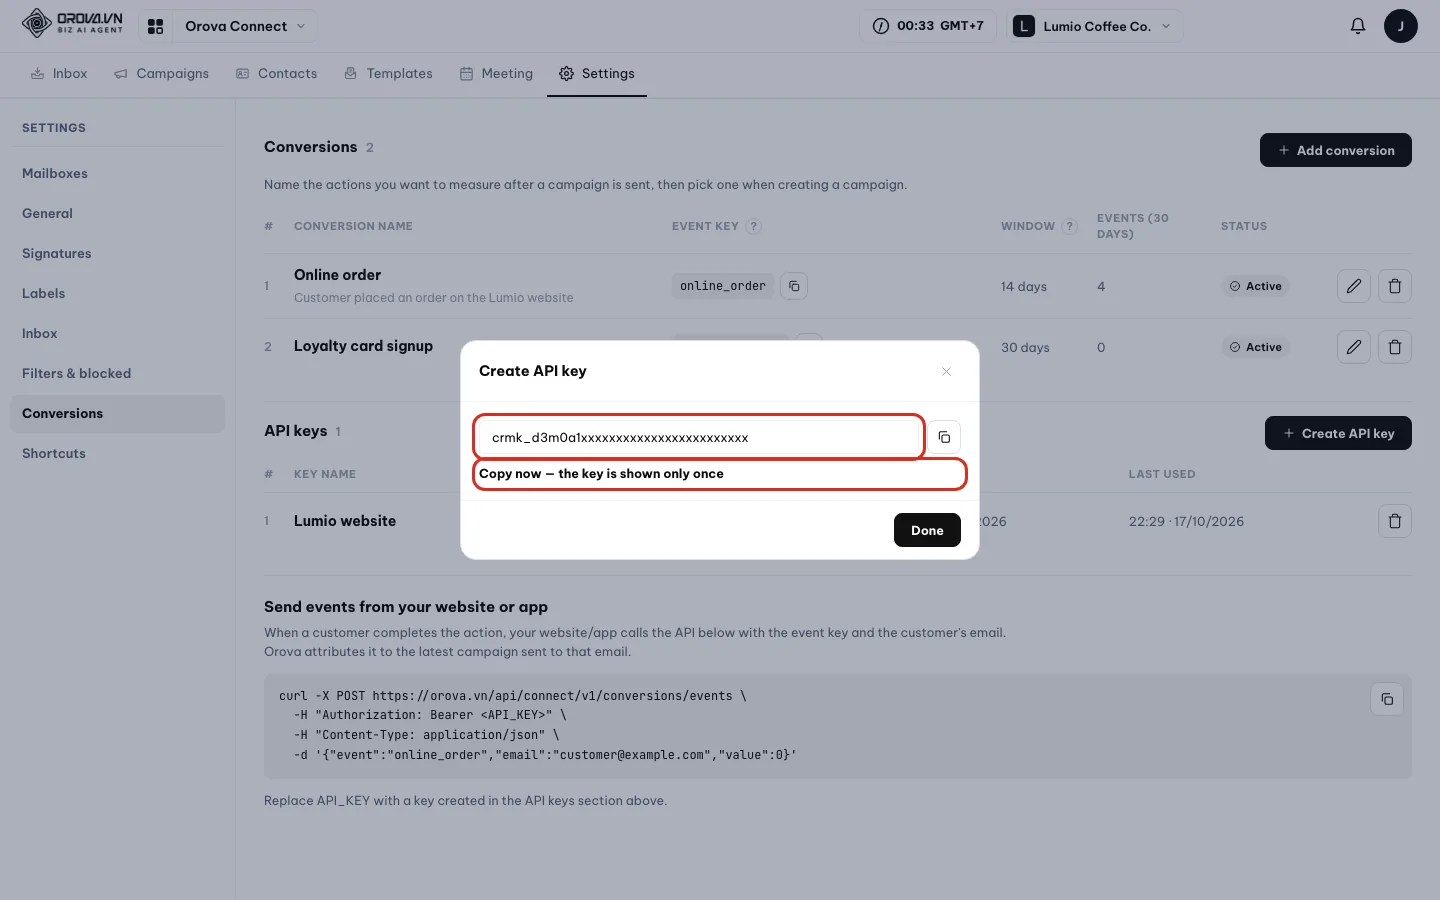
The key is shown exactly once. - 3
Revoke it when needed. Click the bin at the end of the key's row. Orova asks again, because any website using that key will be rejected immediately.
Warning
Treat the key like a password
Send events from your website or app
When a customer completes the action, your website's server calls the API with the event key and the customer's email. This part is for whoever builds your website.
Get the sample command
- 1
Copy the sample command. In the Send events from your website or app block, click the copy icon at the top right of the command box. The sample command already has your event key filled in, for example
online_order.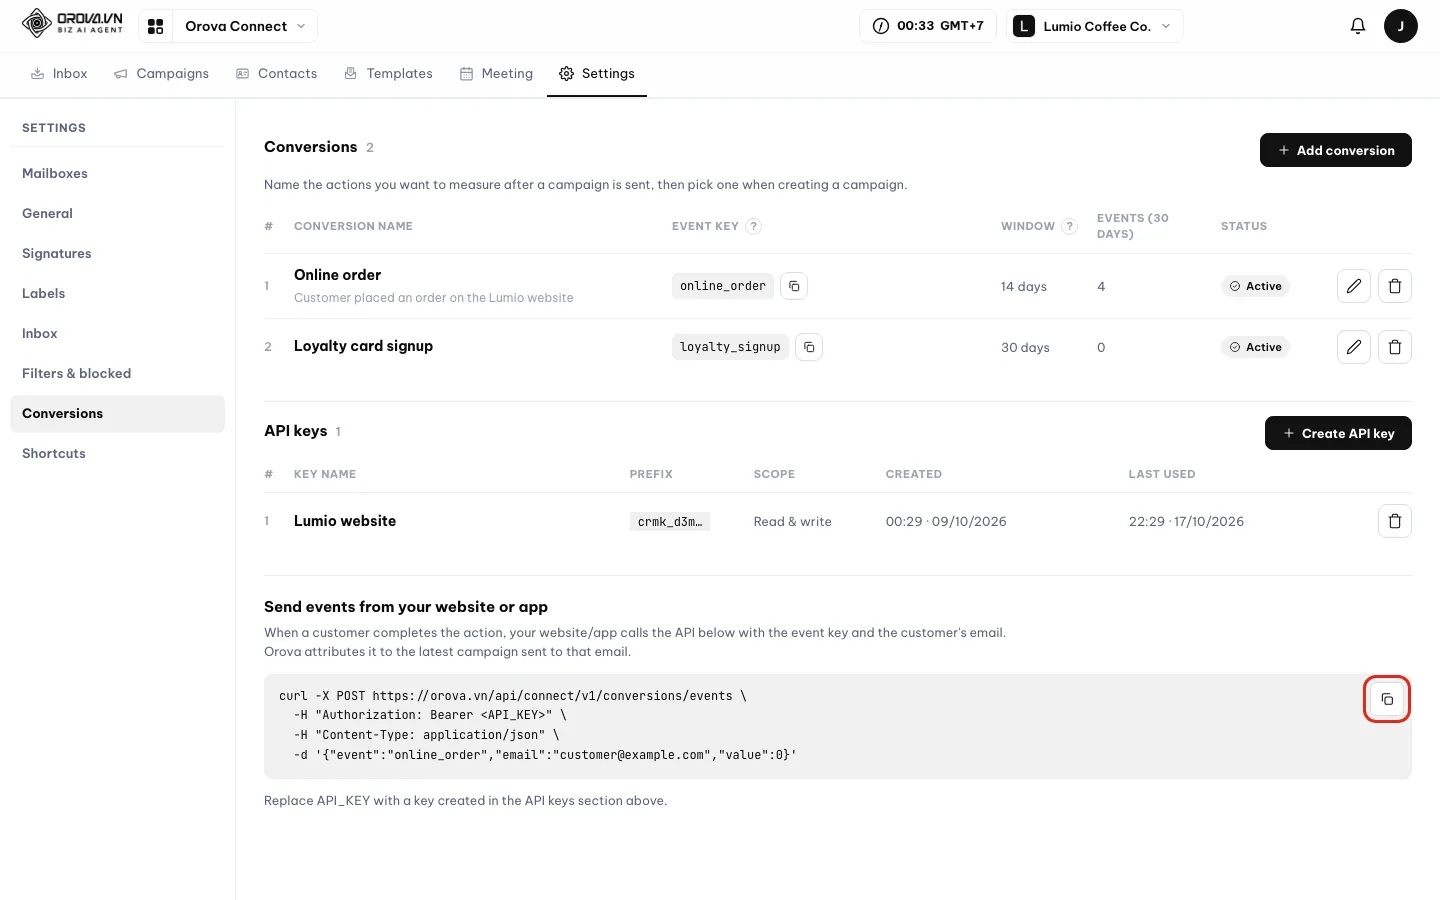
The copy button for the sample command. - 2
Swap in the key and hand it to your developer. Replace
API_KEYwith the key you just created. Your developer adds the command where a customer completes an order or submits a form.
curl -X POST https://orova.vn/api/connect/v1/conversions/events \
  -H "Authorization: Bearer API_KEY" \
  -H "Content-Type: application/json" \
  -d '{
    "event": "online_order",
    "email": "emma.tran@northwind.demo.orova.vn",
    "value": 18.5,
    "currency": "USD",
    "external_id": "order-1001"
}'| Field | Required | Meaning |
|---|---|---|
event | Yes | The event key of an active conversion. |
email | Yes | The customer's email; Orova matches it against recipient emails, ignoring upper and lower case. |
value | No | The value of the conversion, as a number, for example the order total. |
currency | No | Currency code, for example USD. |
occurred_at | No | When the event happened, in ISO 8601 format. Leave it out to use the time of the API call. |
external_id | No | Your own ID, up to 120 characters. Sending the same ID again does not count twice. |
meta | No | Any JSON object, up to 2 KB. |
To list your active conversions, call GET https://orova.vn/api/connect/v1/conversions with the same header.
| Code | Error | Meaning |
|---|---|---|
401 | invalid_key | Missing header, wrong key, or the key was revoked. |
403 | forbidden | A Read only key called the send-event endpoint. |
404 | unknown_event | No such event key, or the conversion is inactive. |
400 | invalid_email | The email is empty or badly formatted. |
400 | invalid_body | A field has the wrong type; the field value in the response tells you which one. |
413 | payload_too_large | The request body is too large. |
429 | rate_limited | Too many calls: each key allows up to 600 calls per 60 seconds. |
How Orova credits events to campaigns
- Only campaigns that picked that conversion in
Conversion to measureare considered. - The email in the event must match the email of one of the campaign's recipients.
- The event must happen after the email was sent and within the attribution window.
- If several campaigns match, Orova credits the one sent most recently.
- Sending the same
external_idagain does not count twice.
Measure conversions for a campaign
- 1
Pick the conversion before sending. On the create page, Schedule card, pick the conversion in
Conversion to measure(see section 12, step Choose a Conversion to measure). - 2
See the results in the report. Click the Conversions card on the report page. The Recipients table keeps only people who converted, and the
Conversionscolumn shows a ✓ with the value, for example Emma Tran ✓ 18.5.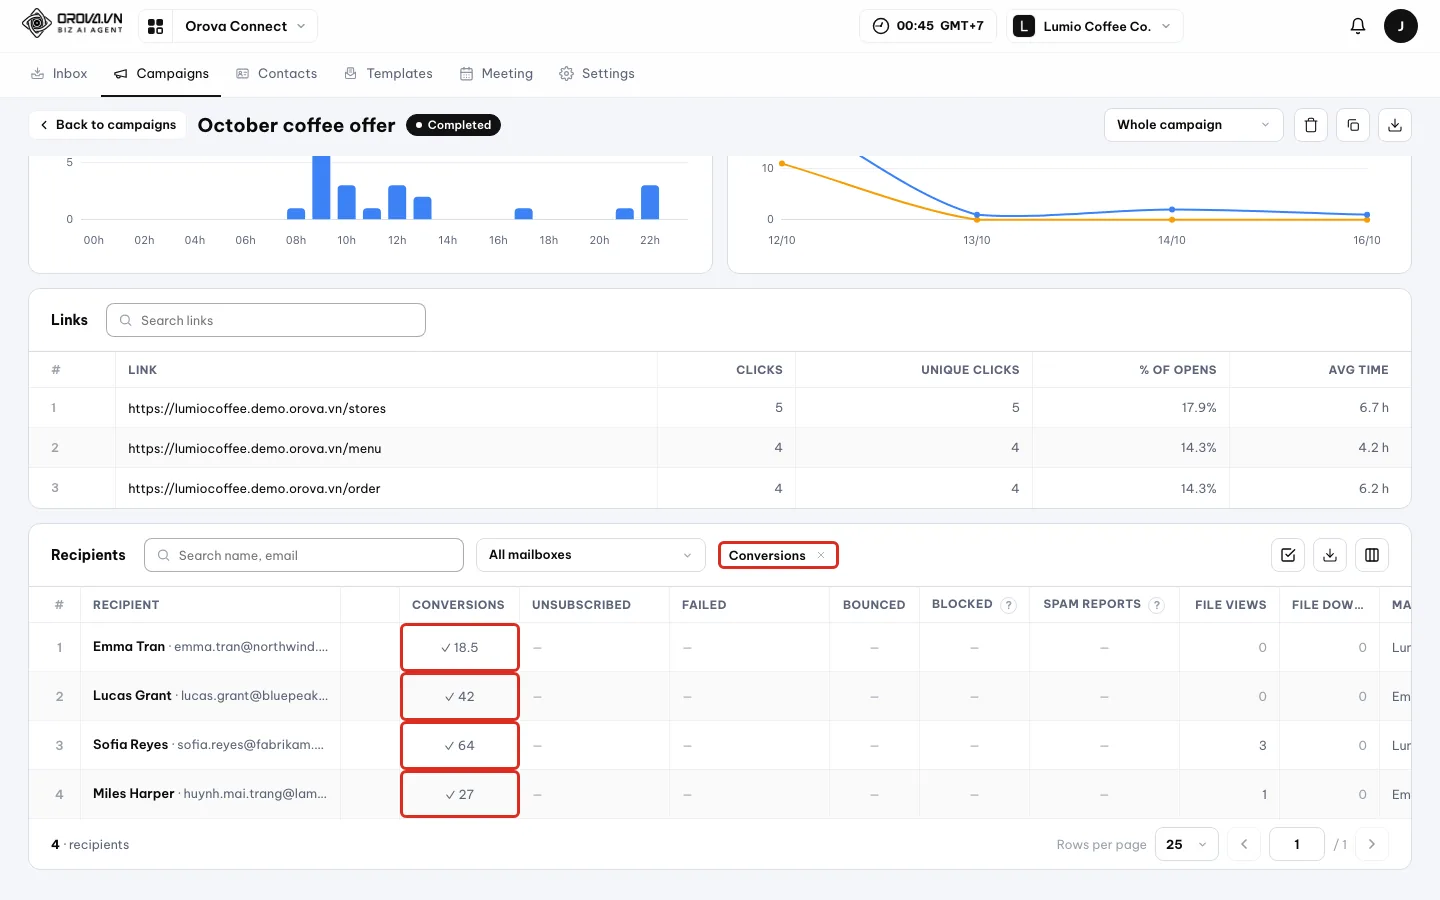
Who converted, and for how much.
Tip
Not measured, the Conversions card and column show —. Create a conversion and pick it before sending.16 · Campaigns: Add to CRM
Add recipients to CRM
Select recipients in the report table and fill in CRM fields; Orova creates new customers or updates existing ones.
Required CRM field
A field marked * in your workspace's CRM Settings ▸ Fields. A new customer can only be created when all of these fields are filled in.
Update vs create
If the email already exists in CRM, Orova only updates the fields you fill in. If it does not, Orova creates a new customer.
Use this to turn interested people into CRM customers. For example, add everyone who clicked a link to CRM so your sales team can call them back.
Add a group of recipients to CRM
- 1
Filter the group you want (optional). On the report page, click a stat card, for example Click rate, so the table keeps only people who clicked.
- 2
Click
Bulk selectand tick people. The checkbox icon is at the top right of the Recipients table. A checkbox column appears and you tick each person. The checkbox at the top of the column offersSelect this pageorSelect all N matching. The bar at the bottom shows 3 selected.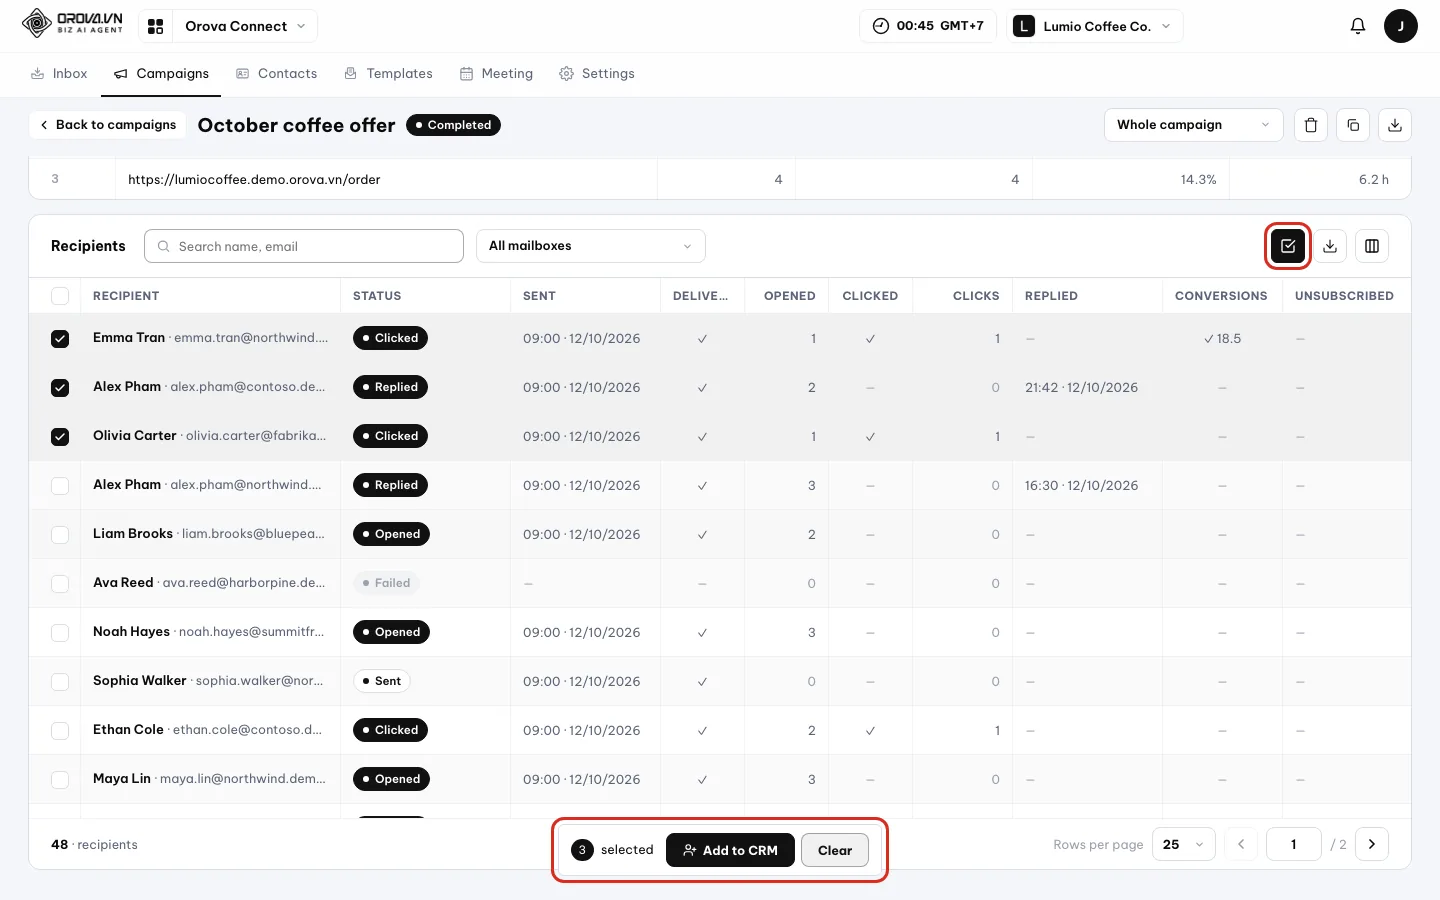
The selection bar appears at the bottom of the table when you tick recipients. - 3
Click
Add to CRM. The Add 3 people to CRM dialog opens. Name and email come straight from the recipient. The CRM field | Value table lets you fill in more, for examplePhone. Hover the ? to read the rules.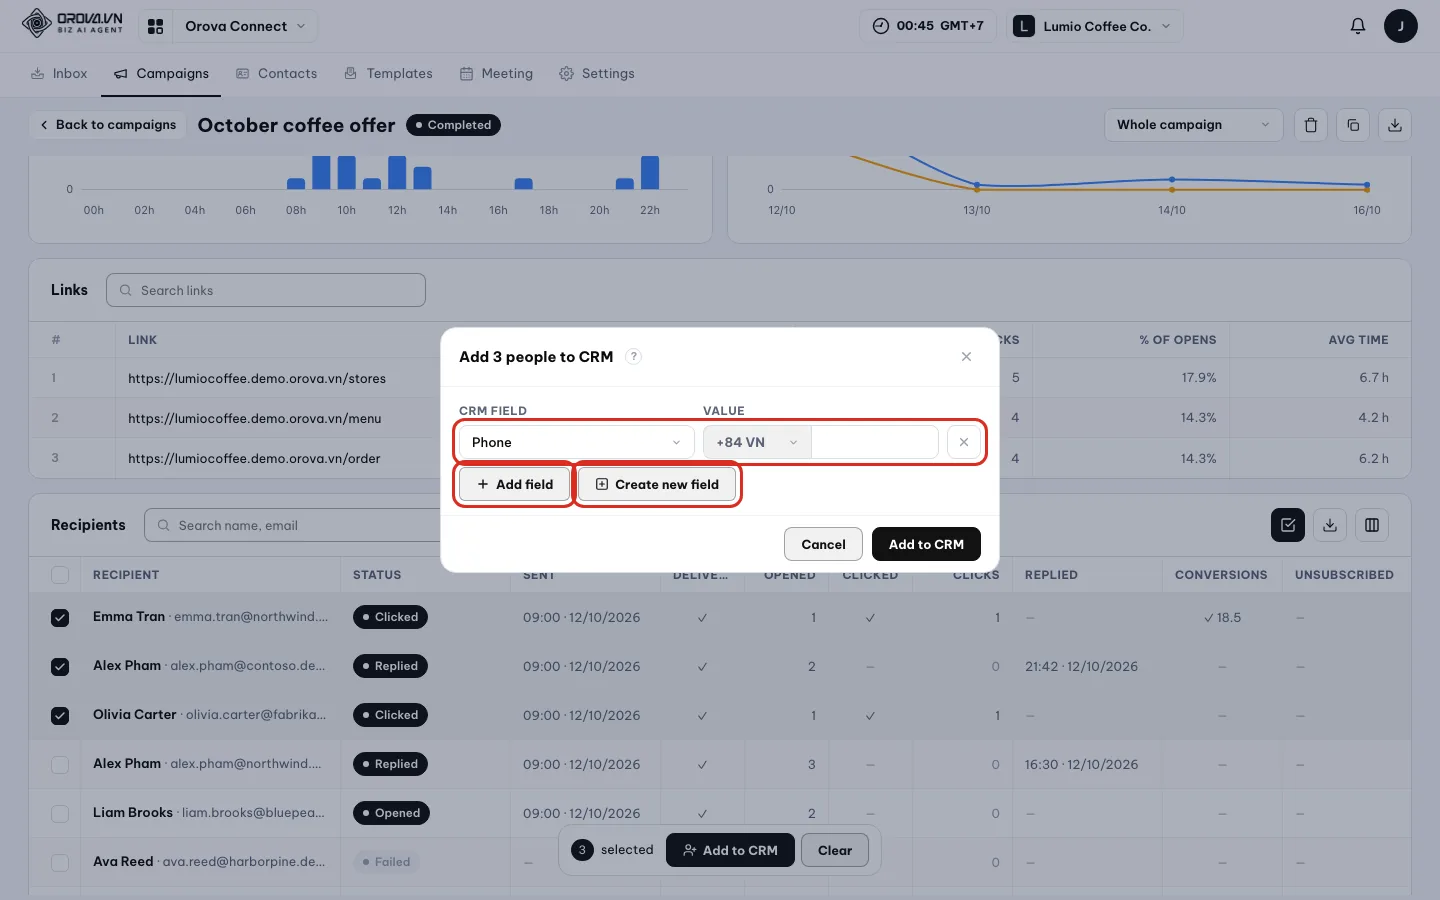
The values you fill in apply to the whole selected group. - 4
Add fields if needed. Click
Add fieldto add a row, pick a field and enter a value. The field list matches your workspace's CRM Settings exactly. If you need a field that does not exist yet, clickCreate new field. - 5
Click
Add to CRMand read the result. Orova reports Created …, updated …, skipped …. If anyone is missing a required field, the result says how many people are missing which field. ClickDoneto close. - 6
Large groups run in the background. For more than 200 people, Orova shows Processing … people in the background. You can carry on with other work.
| Situation | Result |
|---|---|
| Email matches an existing customer | Only the fields you fill in are updated. |
| No customer with that email yet | A new customer is created, but only when every required field (marked *) is filled in. |
| New customer missing a required field | That person is skipped; the result says which field is missing. |
| Email empty or badly formatted | Skipped. |
Note
17 · Campaigns: FAQ
Email campaign FAQ
Errors and questions newcomers often run into when sending their first campaign.
The Send from box says “No mailbox you can send from”?
You have not connected a mailbox yet, or you can only view that mailbox, not send from it. Connect one in Settings ▸ Mailboxes, or ask an admin for edit permission on the mailbox.
I click send and see “Please choose recipients”?
The Recipients card has no source, or the source is empty. Pick a source and click Preview recipients to make sure Will receive is above 0.
I can't see the Send now button?
You are missing the Schedule & send campaigns permission. Click Save draft and ask someone who has it to send it.
I click send and it says there is not enough quota?
The workspace wallet does not cover the emails you are about to send. Orova blocks it up front, so no email has gone out. Top up your quota and click send again.
My campaign switched to Paused by itself?
A sending mailbox hit its email provider's limit. Read the warning bar in the report, wait for the limit to reset (usually 24 hours) or add a sending mailbox, then click Resume.
Why is my open rate lower than in other tools?
Orova counts only people who really opened. Opens from machines that pre-load emails to protect privacy are not counted.
A Gmail user reported spam but Spam reports still shows 0?
Gmail does not send spam reports per person. Only Outlook/Hotmail and Yahoo send these reports.
What should I do about a lot of Blocked emails?
Recipients' servers suspect your emails are spam. Ask whoever manages your domain to check SPF, DKIM and DMARC, lower the Send rate, and use fewer links and images in the email.
The Conversions column only shows —?
The campaign is set to Not measured. The conversion has to be picked in Conversion to measure before sending. For a campaign already sent, duplicate it and pick a conversion for next time.
Events arrive but are not credited to the campaign?
Check three things: the campaign picked the right conversion, the customer's email matches the recipient's email, and the event happened within the attribution window after sending.
A recipient says the unsubscribe link has “expired”?
Unsubscribe links stay valid for 60 days after sending. That person can still unsubscribe through the link in a more recent email.
The test email has [TEST] in it and the unsubscribe link does nothing?
That is by design. Test emails are only for previewing; the unsubscribe link is a sample and does not count in the report.
I want to edit a Completed campaign?
Only Draft, Scheduled and Paused campaigns can be edited. For a finished campaign, click Duplicate to get a new draft, then edit that.
I want to edit a campaign while it is sending?
Click Pause first and the Edit icon comes back. When you are done editing, click Resume; people who already got the email are not sent it again.
/ مدد چاہیے؟
جو چاہیے وہ نہیں ملا؟ ورک اسپیس میں مدد کا حصہ کھولیں، یا ہمیں پیغام بھیجیں۔